waterpowered Hello Bidet User manual


2
XYK
WZ
General Diagram
A2
A1
B
C
D
F
E
G
Special Aerator Filter (A1, A2)
Addy (O) - Universal adapter
(Included only with“Travel” version)
(P1)
(P2)
O

3
Filter assemby to the faucet
1
4
5
2a
3a
2b
3b
XY
K
A1
A1
A2
A2
K
WZ

4
How to use
6a
Only for “Travel” version
6b
7
8
10
9
11
Maintenance
Only for “Travel” version
5
Only for “Travel” version

12
15
13
14
6
Addy Installaon
(For use of Hello Bidet with Addy, travel adapter.
To use Hello Bidet at home, see step 1-4).

7
18
20
19
16 17

8
EN USER MANUAL
PACKAGE CONTAINS::
•“Special Filter” bag (A1/A2) containing:
○Special lter holder with internal thread (X)
○Special lter holder with external thread (Y)
○ Aerator Filter (K)
○Seal (W - with rectangular secon) for lter holder
with internal thread
○Seal (Z - with “step-like” secon) for lter holder
with external thread
• Quick connector (B) with 3-meter spiral tube (C),
connector (D), handle/shower (E) with lever (F).
• Key for fastening/removing lter holders (G).
• Universal Addy adapter (O)*.
• Hello Bidet carrying case.
• Mul-language user manual.
Leers in parentheses refer to the main diagram.
*Included only with Hello Bidet Travel version.
WHAT IS HELLO BIDET
Hello Bidet is a handshower bidet that can be
conveniently and directly aached to your faucet
allowing you to enjoy the highest level of personal
hygiene while easily regulang water temperature
and pressure.
WHEN CAN IT BE USED?
Hello Bidet can be used instead of your normal bidet for
everyday cleansing and even when traveling.
SIDE EFFECTS
Hello Bidet will not cause any parcular side eects,
but with some cases of skin hypersensivity brought
on by irritaon, wounds, bruises, surgery and/or other
inammaons, the bidet use should be carried out with
cauon. With health condions that require special
aenon, please consult your physician before using
Hello Bidet.
WARNINGS
• For external use only: Hello Bidet should not be
used dierently than expressly indicated in the
manual.
• Contains small parts – keep out of the reach of
children!
• Before using Hello Bidet, check to make certain the
product and all parts are undamaged, and that it is
properly assembled;
• Be careful of the water temperature during use:
Hello Bidet can be used at any desired water
temperature by simply adjusng it directly
from the faucet. We recommend a warm water
temperature of 38° C / 100°F.
• Regulate the distance of the bidet handshower
from your inmate areas according to your skin
sensivity.
INSTALLATION
Installaon of Special Filter to faucet**
NOTE: The installaon of the lter holder to the
faucet should only be carried out when Hello Bidet
is connected. The special Hello Bidet aerator lter
should not be removed and reinstalled at every use
for it will not aect the normal funcons of the faucet
(Fig. 5), allowing airing, water savings and ltraon.
(The special Hello Bidet lter holder is adaptable to
all faucets of CEN - EN 226 norm). This standard is
commonly abided by all faucets with unscrewable
lter holders present on the market).
To connect the Hello Bidet lter (“special lter” bag)
to the faucet (sink, bidet, shower hose** or bathtub):
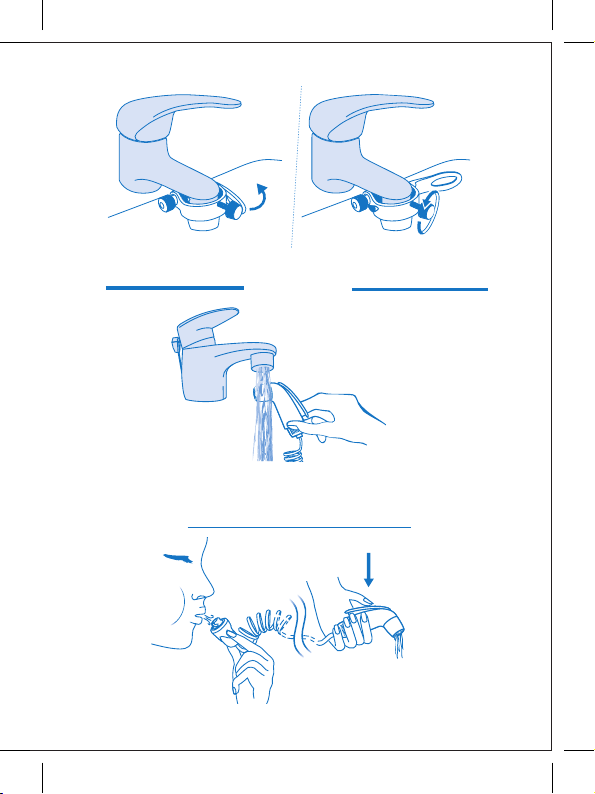
1 - Unscrew the lter holder from the faucet,
making certain the seal is also removed (g. 1). If
necessary, use the key (G).
2a - If the faucet has an internal thread (g. 2a), insert
the aerator lter (K) inside the special lter holder
with the external thread (Y) and place the seal with
the step-like secon (Z) on the aerator lter (g.
2a). Screw the lter holder to the faucet with the
just assembled (Fig. 3a) external thread (A1).
3a - If the faucet has an external thread (g. 2b),
insert the seal with the rectangular secon (W) and
the aerator lter (K) inside the special lter holder
with the internal thread (X)(g. 2b). Screw the lter
holder to the faucet with the just assembled (Fig.
3b) internal thread (A2).
4 - Completely screw on the assembled special
lter holder to the faucet with the quick
connector (B - g. 4) with dry hands and turning
counterclockwise.
** To connect Hello Bidet to the shower hose use the
mulfuncon connector (accessory sold separately -
see secon “Parts and Accessories”).
Hello Bidet can also be connected to the faucet via the
quick universal adapter “Addy” (O - included only with
the Hello Bidet Travel package and sold separately as an
accessory for the Basic version - see secon “Parts and
Accessories”) without unscrewing the lter holder from
the faucet. Perfect for travel.

9
HOW TO USE HELLO BIDET
1) Using dry hands for a beer grip, insert the quick
connector (B) to the special lter holder (A1 -A2)
or Addy (O) turning counterclockwise (g. 6a - 6b);
2) Turn on the faucet, press the lever (F) and adjust
the temperature of the water that comes out of
the handshower (E) by checking it with your hand
(g. 7). Regarding water temperature, keep in mind
that the skin sensivity of inmate areas is always
higher compared to the sensivity of hands; Never
use with water above 38°C/100°F.
3) Sit on the toilet, posion the handshower (E)
between your legs and press the lever (F) in order
to begin the cleansing of your inmate areas (g.
8); the lever (F) will allow you to interrupt the
water ow at any me by simply releasing the
lever.
4) When you are nished, release the lever (F) and
turn o the water from the faucet;
5) Unplug the quick connector (B) from the faucet
lter by turning clockwise;
6) At the end of each cleansing, aer having rinsed
out the bidet handshower (g. 10), blow air into
the aachment connector part (B) in order to get
rid of any remaining water le in the tube (g. 11)
and by simultaneously pressing the control (F) of
the bidet handshower (E).
FREQUENCY AND DURATION OF CLEANSINGS
• The cleansing of your inmate areas with Hello
Bidet can be performed as oen as you like, even
several mes a day;
• The total duraon of a cleansing is absolutely up to
your personal desires.
MAINTENANCE AND STORAGE
• Before use, connect Hello Bidet to the faucet and let
the water run for about 20-30 seconds unl it exits the
handshower;
• Between uses, we recommend keeping the product
thoroughly clean, dry and stored inside its carrying
case;
• When cleaning the product, do not use harsh
detergents so as to avoid damaging the rubber or
plasc parts.
UNIVERSAL ADAPTER ADDY
Included only with Hello Bidet “Travel” version. It can
be purchased separately as an accessory for the Hello
Bidet “Basic” version.
Thanks to the Addy adapter, you can connect Hello
Bidet to the faucet in a simple and fast manner,
without the need to mount the special lter holder .
Addy is ideal for use on the road, in a hotel or in case
of faucets with non-standard threads.
Addy can be connected to all faucets with circular
lter holder for water outlet with an outer diameter
from 16mm to 25mm and with a minimum height of
5mm (g.12).
WARNINGS AND RECOMMENDATIONS FOR THE USE
OF ADDY
• Gradually open the tap, not suddenly and not the
maximum water pressure;
• While the tap is open, do not try to reposion or
move Addy to avoid leaks;
• Inially, there may be some small leakage of water
from top of Addy for a few seconds, that are going
to disappear quickly. If the leakage were to be
prolonged or if it is excessive, you should repeat
the installaon procedure of Addy to the faucet;
• Make sure the lter holder is securely ghten to
the faucet to prevent leakage when the adapter
is mounted;
• The use of Addy in case of excessive pressure while
mounng, and repeated use on the same tap, may
cause light marks on the lter holder of the faucet
due to contact with the screws (for extended use
of Hello Bidet on the same faucet, we recommend
using the threaded special lters);
• It is not recommended to leave Addy mounted to
the faucet; if this happens, before each use check
that the hold is solid, making sure that the screw
(P1) is ghtened;
• When ghtening the screw (P1) be careful not to
deform the ring (Fig. 14);
• Should Addy come o the faucet, repeat the
procedure of assembly Addy to the faucet,
ghtening the screw P1 and the adjustment wheel
P2;
• Do not disassemble the components of Addy;
• Contains small parts - keep away from children.
ADDY - ASSEMBLY TO THE FAUCET
1. Place the lever in the open posion (Fig. 13) and
ghten the adjustment wheel (P2) unl the lever is
pulled, but without using excessive force;
2. Check that the ghtening screw is suciently
loosened to allow the inseron of Addy on the

10
IT
faucet’s lter holder and that the seal is properly
inserted in its housing with no visible deformaon
(Fig. 14);
3. Hold Addy (Fig. 15) pushing up against the faucet
unl the seal fully adheres to the lter holder on
the faucet, making sure that:
• The ghtening screw (P1) is on the front or side
of the faucet (never in the back);
• Addy follows the inclinaon of the lter holder,
to allow the seal to adhere completely and
ensure a ght hold (Fig. 16);
• Addy is placed as high as possible with respect to
the lter holder of the faucet (Fig. 17).
Parcular cases:
• Some lter holders have a slight indentaon:
make sure that the p of the screws do not lean
in the vicinity of the recess to prevent Addy from
coming o.
• In the case of taps that are slightly ared or
rounded (e.g. some types of kitchen taps),
mount the screws on the straight part of the
lter holder, never on the ared part to avoid
Addy from coming o the tap (Fig. 18).
4. While holding Addy against the tap, ghten the ing
screw (P1) unl it is aached to the tap (Fig. 19),
without pressing it too much;
5. Turn the lever bringing it to the closed posion
(Fig. 20);
Now you can connect your Hello Bidet (g. 6b);
6. When you are done, and aer disconnecng the
device, put the lever in the open posion (Fig. 9)
and, if necessary, loosen the ing screw;
7. Aer using Addy , allow it to dry and leave the
screw (P1) slightly ghtened checking, however,
that the p of the screws are above and don’t
deform the seal (Fig. 14).
SPARE PARTS AND ACCESSORIES
You can purchase the complete line of Hello Bidet
products on the site www.hellobidet.com or in a
pharmacy.
Handle/handshower: to allow mulple family
members to use the same Hello Bidet product by
simply replacing the shower handle.
“Duck” accessory set: extension that will allow you
to perform a deeper cleansing, with a water jet that
reaches closer to inmate parts.
Universal adapter Addy: allows the use of Hello Bidet
without removing the lter holder from the faucet.
Perfect for travel, hotels or with faucets with non-
standard threads.
Mulfuncon shower connector: for connecng
Hello Bidet to showers.
Extension: spiral hose for extending Hello Bidet; for
faucets that are more than 3 meters away.
Hello Bidet lter holder in metal: available with
standard internal and external threads.
Adapters: for faucets with non-standard threads.
The manufacturer, distributors and resellers will
not accept any responsibility for any damages that
may directly or indirectly be caused to persons or
property as a result of the failure to observe all the
requirements indicated in the present user manual as
well as the assembly, use, side eects, warnings, and
maintenance of the product.
For any claricaon or informaon please visit:
www.hellobidet.com or contact customer care by
email at: customer@waterpowered.eu
MANUALE D’USO
LA CONFEZIONE CONTIENE:
• Busta “Special Filter” contenente:
○Porta ltro speciale con leatura interna (X)
○ Porta ltro speciale con leatura esterna (Y)
○Filtro aeratore (K)
○Guarnizione (W - con sezione reangolare) per
porta ltro con leatura interna
○ Guarnizione (Z - con sezione a “scalino”) per
porta ltro con leatura esterna
• Innesto (B) con tubo a spirale da 3mt (C), raccordo
(D), impugnatura/doccea (E) con leva (F)
• Chiave per svitamento porta ltro (G)
• Adaatore universale Addy (O)*
• Astuccio porta Hello Bidet
• Manuale d’uso mullingue.
Le leere tra parentesi si riferiscono allo schema
generale.
* Inclusi solo nella confezione “Travel”.
CHE COS’È HELLO BIDET
Hello Bidet è una doccea bidet che si collega
direamente al rubineo e consente di avere il
massimo livello di igiene personale, permeendo
di regolare sia la temperatura dell’acqua che la
pressione.
QUANDO SI USA
Hello Bidet può essere ulizzato in sostuzione del
Table of contents
Other waterpowered Personal Care Product manuals


