manuals.online logo
Brands
  1. Home
  2. •
  3. Brands
  4. •
  5. Waterway
  6. •
  7. Water Filtration System
  8. •
  9. Waterway 640-134x V User manual

Waterway 640-134x V User manual

DIAMOND STRIP DRAIN OWNER’S MANUAL
USE ONLY GENUINE WATERWAY REPLACEMENT PARTS.
For Model Number: 640-134x V • 640-135x V • 640-136x V • 640-137x V
810-0230.0221
©2021 Waterway Plastics
2200 East Sturgis Road, Oxnard CA 93030 • Phone 805.981.0262 • Fax 805.981.9403
www.waterwayplastics.com • [email protected]
Designed,
Engineered &
Manufactured
in the USA.
Read and follow all instructions in this owner’s manual and on the equipment. Failure to follow instructions can cause
severe injury and/or death.
WARNING:
VGBA
2017
WHEN INSTALLING AND USING THIS EQUIPMENT, BASIC SAFETY
PRECAUTIONS SHALL ALWAYS BE FOLLOWED, INCLUDING THE FOLLOWING:
“IMPORTANT SAFETY INSTRUCTIONS”. READ, UNDERSTAND, AND FOLLOW
ALL WARNINGS AND INSTRUCTIONS.
SOFA INSTRUCTIONS
When installing and using this equipment, basic safety precautions shall always be followed, including the following: IMPORTANT
SAFETY INSTRUCTIONS. READ, FOLLOW, AND UNDERSTAND ALL INSTRUCTIONS AND WARNINGS.
Any modication that increases the ow rate of the circulation system shall require re-evaluation of the cover/grate and sump to
ensure that the ow rating of the Suction Outlet Fitting Assembly (SOFA) is not exceeded.
Missing, broken, or cracked cover/grates, sumps, mud-frames, or any other SOFA component shall be replaced before bathers are
allowed to use the pool.
Loose cover/grates shall be reattached before bathers are allowed to use the pool.
SAVE THESE INSTRUCTIONS.
Start installation of screws by hand to ensure proper thread engagement and prevent cross threading.
Replacement cover shall be only used on Waterway sump and mud-rings. All cracked or damaged mud-rings or sumps shall
be replaced.
Fasteners shall be replaced with identical ones.
Use either center port or two side ports, join the xture with approved PVC glue.
Winterization: plug the ports with applicable NPT plugs. Ensure rempval of plugs before operating and using the pool or spa.
IMPORTANT SAFETY INSTRUCTIONS
WARNING - SUCTION ENTRAPMENT HAZARD
Suction in suction outlets and/or suction outlet
covers which are damaged, broken, cracked,
missing, or unsecured can cause severe injury and/
or death due to the following entrapment hazards:
Hair Entrapment: Hair can become entangled in suction outlet cover.
Limb Entrapment: A limb inserted into an opening of a suction outlet
sump or suction outlet cover that is damaged, broken, cracked, missing,
or not securely attached can result in a mechanical bind or swelling of
the limb.
Body Suction Entrapment: A negative pressure applied to a large
portion of the body or limbs can result in an entrapment.
Evisceration / Disembowelment Entrapment: A negative pressure
applied directly to the intestines through an unprotected suction
outlet sump or suction outlet cover which is damaged, broken, cracked,
missing, or unsecured can result in evisceration / disembowelment
entrapment.
Mechanical Entrapment: There is potential for jewelry, swimsuit,
hair decorations, nger, toe, or knuckle to be caught in an opening of a
suction outlet cover resulting in mechanical entrapment.
• This is an “Unblockable” SOFA.
• Suction cover life is 7 years, the sump wall tting life is 15 years, the rest of the components have 25 year life, cover and all
SOFA components shall be replaced on or before the end of service life.
•The use of adhesives or other attachment methods that prevent access to suction piping or SOFA components is prohibited.
•Please refer to Head Loss Curve, suction head measured at the wall tting.
•This is an unblockable SOFA as marked on the suction cover.
•DO NOT USE POWER TOOLS TO INSTALL FASTENERS. Ensure proper thread engagement to prevent cross-threading.
•Ensure proper atness of installation surface.
• When mud-rings, sump and other components are held in place by the interior surface of the pool, the surface should be free
of deterioration or voids
•Damaged Fasteners shall be replaced with original parts, and must be passitive grade 316 stainless steel. The wall tting shall
be inspected for the presence of any CRACK or material loss. Cracked/damaged mud rings, sumps, or wall ttings shall
be replaced.
•No unauthorized eld modications.
•This product is intended for use on gunite, vinyl, berglass, and roto-molded pools, spas and hot tubs.
•No modication shall be made to SOFA structure or ow path unless the conguration has been certied as a new SOFA.
•Service life begins the month and year in which SOFA components are installed with or without water.
•For winterization remove the cover and plug the inlet.
•Observe cover/grate/fasteners for damage each operational day.
•During installation ensure components and fastener receptacles are clean, free of debris and obstructions.
•Hand-check cover/grate for snugness to the sump/frame/wall tting after installation.
•SOFA installation components with crack, chunks, or pieces broken o, stripped screw holes, brittleness, and/or unusual
discoloration should be replaced.
•The mounting surface or interior surface of the pool should be free of deterioration.
•Start installation of screws by hand to ensure proper thread engagement and to prevent cross-threading.
•Do not exceed the safe ow rating of SOFAs as listed.
•All SOFAs should be installed in accordance with Waterway installation instructions.
•No modication shall be made to SOFA structure or ow path unless new conguration has been certied as a new SOFA.
•SOFA specic ow ratings are not to be exceeded while the pool is open.
•The capacity of secondary circulation system (skimmer, cutters, etc) should not be included when evaluating an individual
suction system ow rating.
•For the ow rating for pools with multiple blockable SOFAs in one body of water without isolation valves: combine all
SOFAs, minus the ow rate of one, if all are not equal use the larger ow rate.
•“Blockable” SOFAs in new pools shall be installed in multiple-SOFA system ONLY.
•“Blockable” SOFAs in existing pools with single SOFA systems shall be installed with an additional anti-entrapment device
or system.
•This SOFA shall be used with Waterway sump or with Waterway mud-ring and eld built sump per attached instructions.
•Unauthorized eld modications will void certication.
•Cover/grate, including fasteners, shall be observed for damage or tampering each operational day.
•The ow rating for pools with single or multiple unblockable SOFAs shall be the combined ow rate of all SOFAs piped together
on one body of water.
•All SOFAs shall not be located on backrests or seats.
Required Tools: Philips screw driver bit and torque wrench. Hand tighten screws. DO NOT use power tools. Torque fasteners to a maximum
of 48 in-lb.
Failure to remove pressure test plugs and/or plugs used in winterization of the pool/spa from the suction
outlets can result in an increased potential for suction entrapment as described on the previous page.
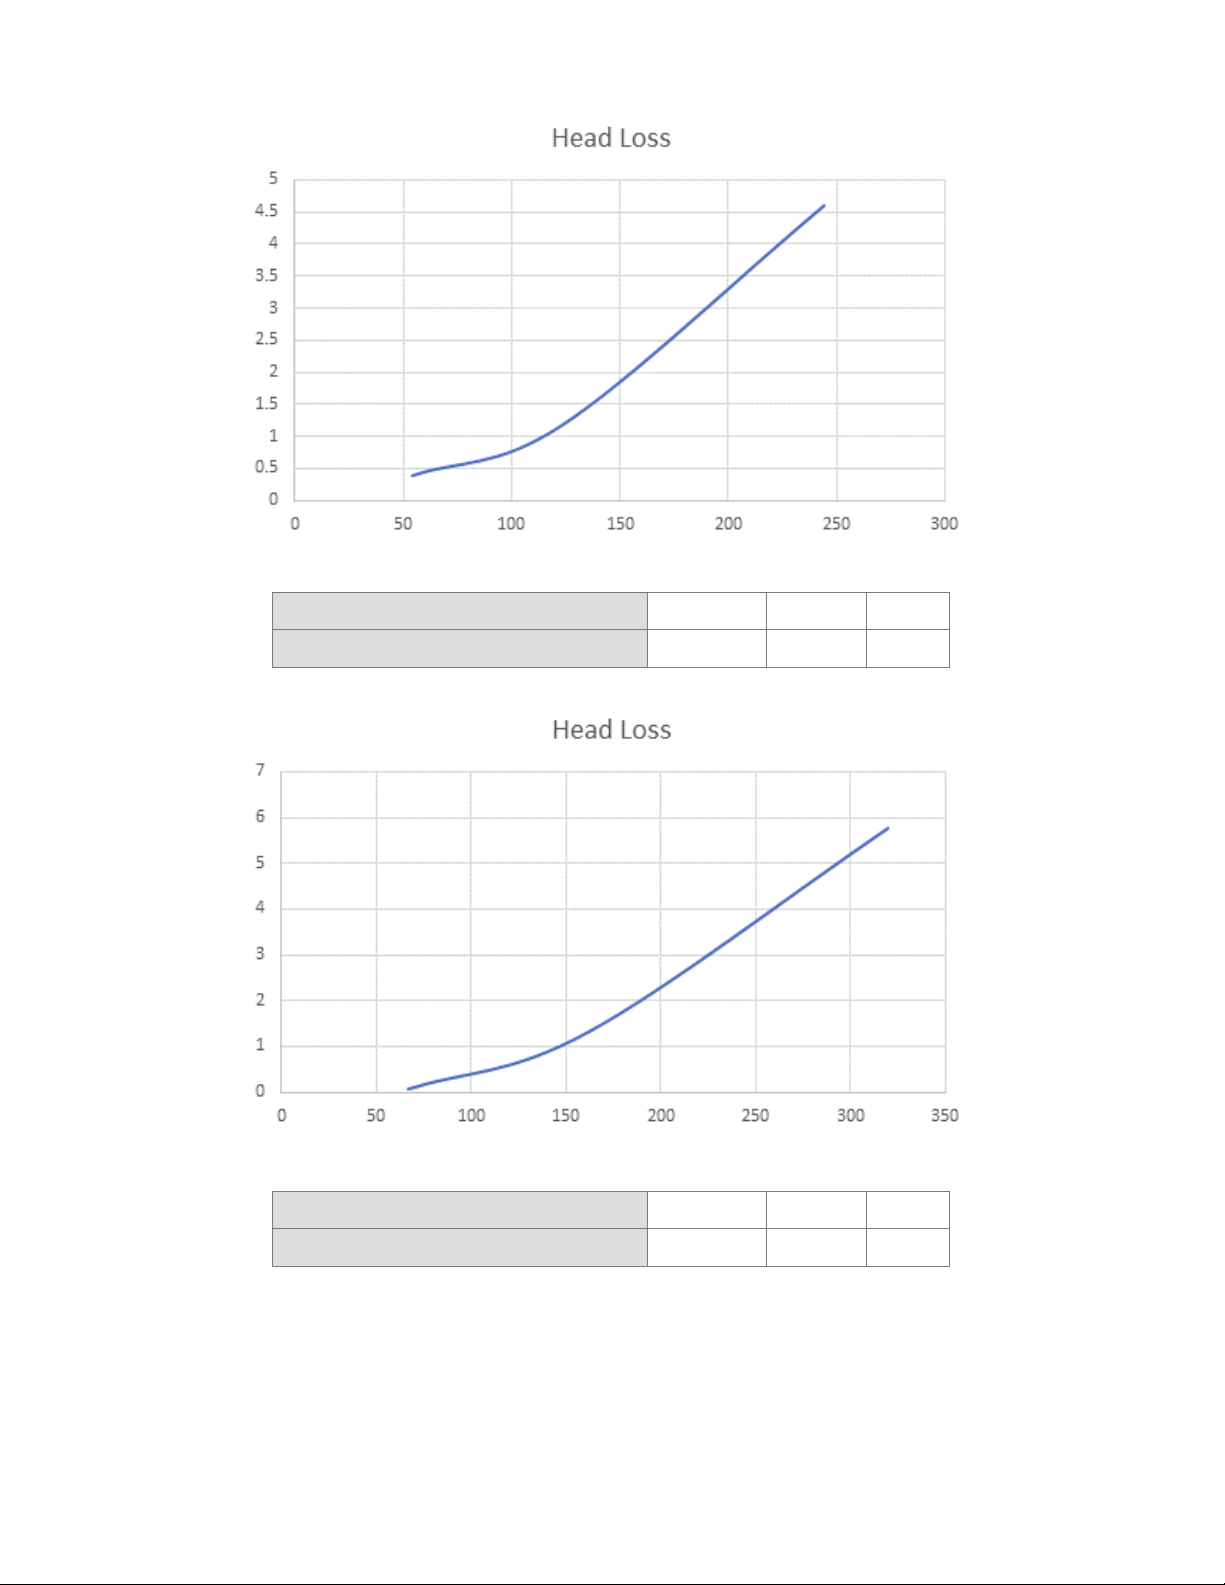
This tting is rated at 244 GPM when mounted on the oor and 216 GPM when mounted on the wall when
only one port on the center of the sump is used. This tting is rated at 320 GPM when mounted on the oor
and 240 GPM when mounted on the wall when two ports on the sump are used. If the tting is missing or
broken, replace with a tting of equivalent rating or higher. Use of a lower rated suction tting could result in
entrapment of the body which could result in serious injury including drowning.
Do not use or operate pool, spa, or hot tub if this suction tting is missing, broken or not secured per
instructions. The suction tting is intended to prevent entrapment of the body. Use of the spa hot tub with a
missing, broken or improperly secured suction grate may result in serious personal injury including drowning.
When the pool, spa or hot tub is in operation, suction is created at this tting. Users of the spa or hot tub must
be instructed not to come in contact with this tting in such a way as to block its orice. If a user of the spa or
hot tub blocks this tting with his/her body, serious personal injury or drowning may occur.
Failure to keep suction outlet components clear of debris, such as leaves, dirt, hair, paper and other material,
can result in an increased potential for suction entrapment as described on the previous page.
Suction outlet components have a nite life. The cover/grate should be inspected frequently and replaced at
least every seven years, or if found to be damaged, broken, cracked, missing, or not securely attached.
WARNING
Do not exceed the safe ow rate. Do not increase ow through system by increasing pump size or horsepower.
Do not allow children to sit, play or interact with main drains or suction outlet.
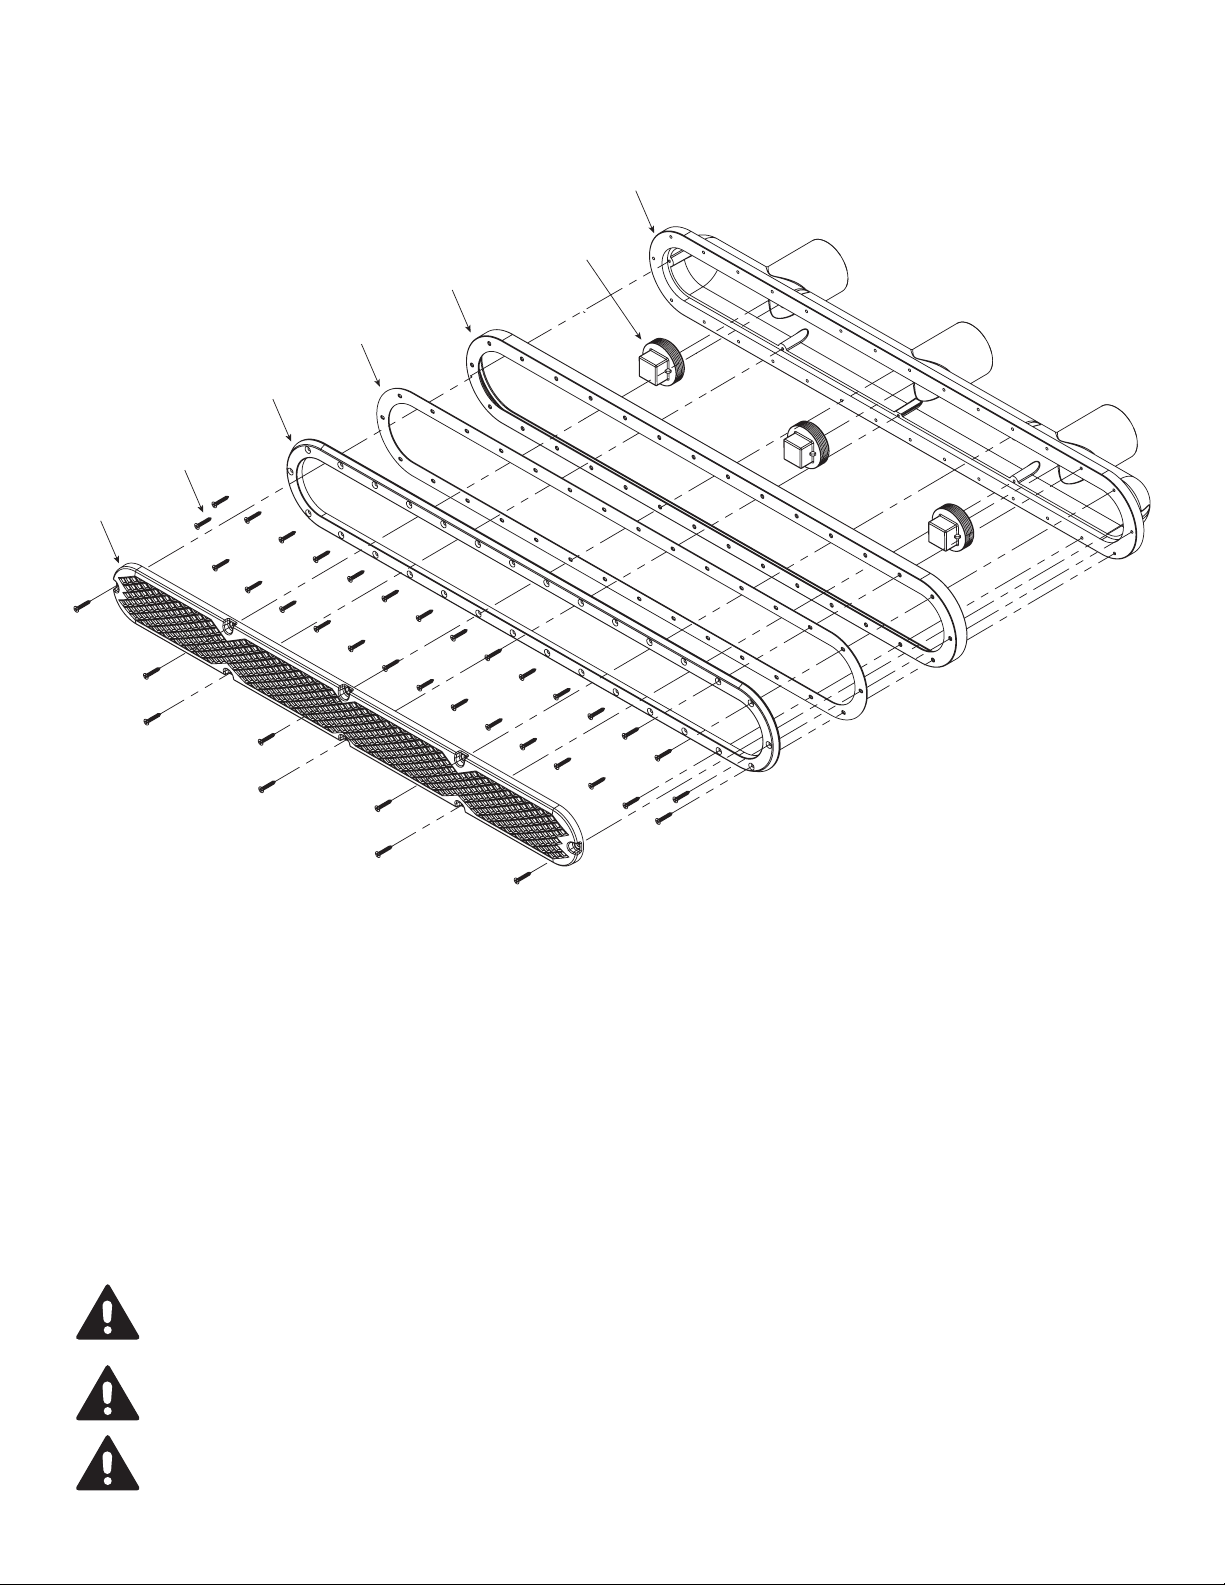
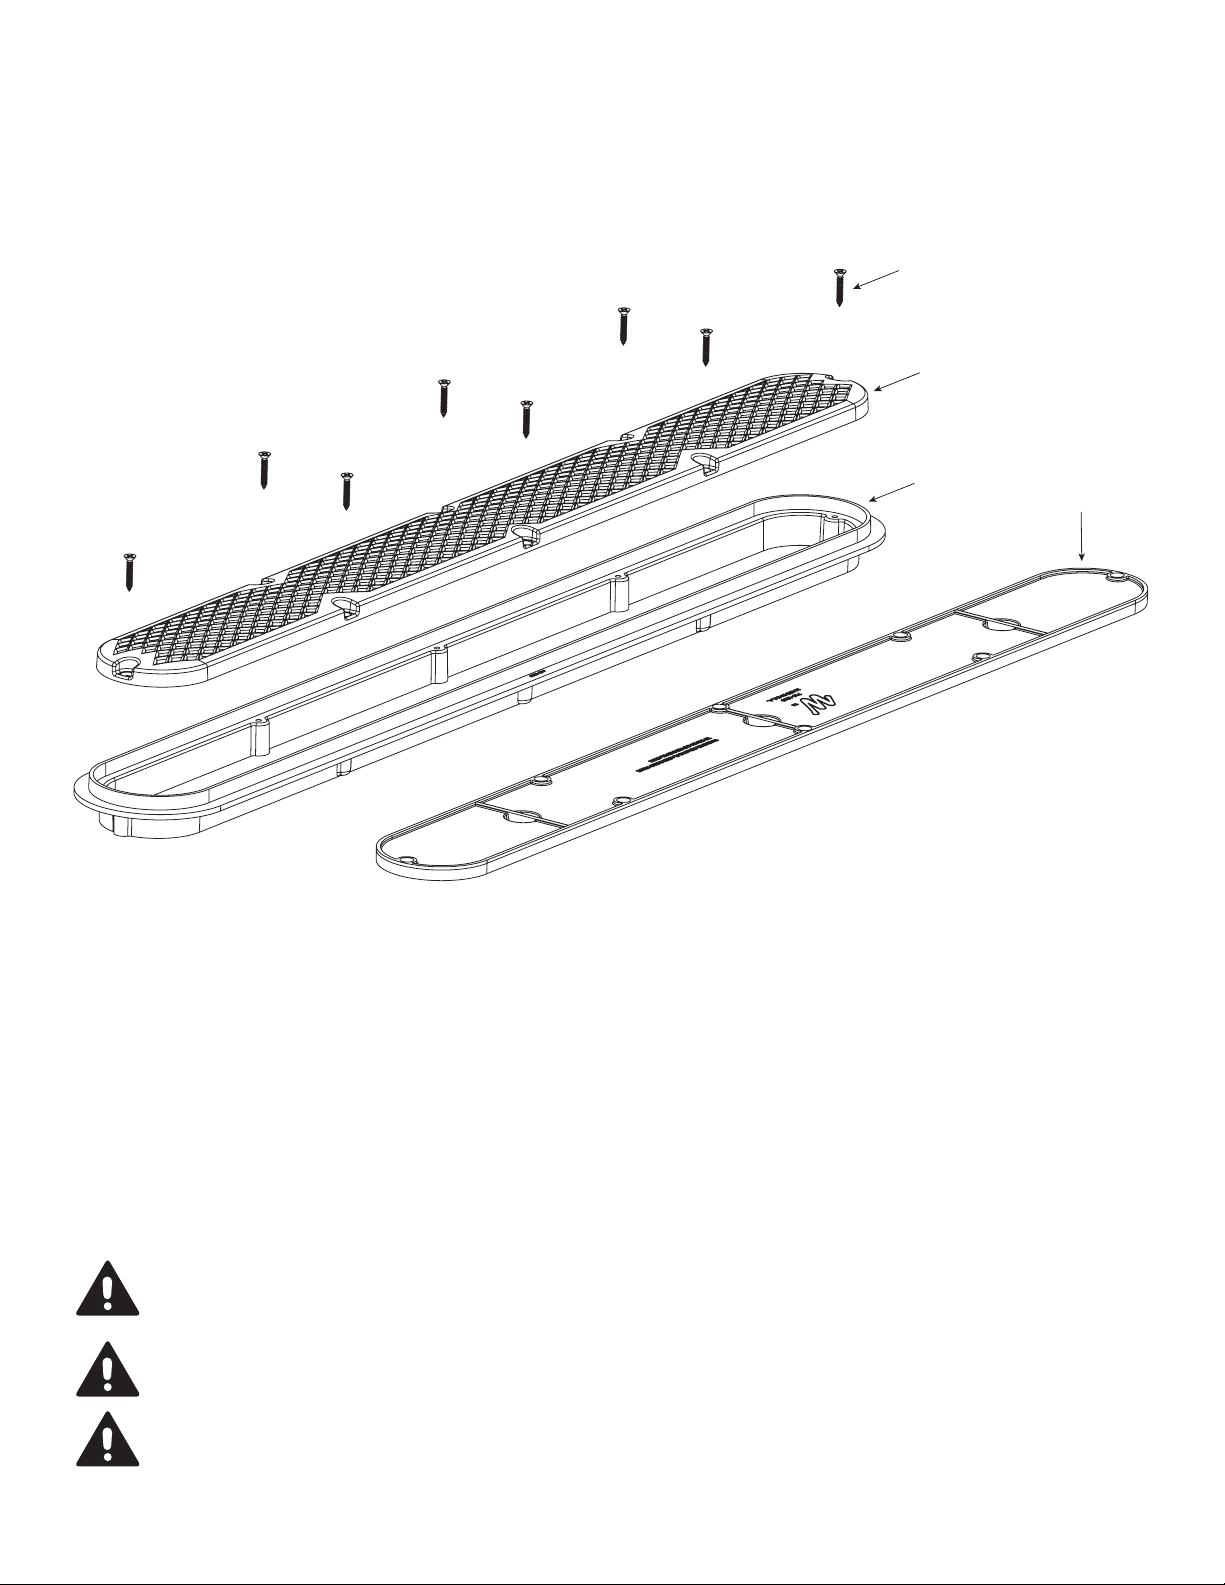
In order to remove the suction cover (for service or winterization), using a Phillips-head screw driver remove
the screws. Inspect both the suction cover and suction tting for any cracks or damages.
Any and all broken or missing parts must be replaced prior to starting spa or pool pump. Never operate spa or
pool without drain cover in place and properly axed, death or serious injury can result.
It is imperative to securely attach the suction cover to the wall ttings (use only the original supplied screws
or obtain original replacements). Do not over tighten the screws. Inspection of fasteners and observation for
damaged/tampered with suction ttings is required.
Use 2.5" schedule 40 PVC pipe.
810-0230.0221
©2021 Waterway Plastics
TO REDUCE THE RISK OF ENTRAPMENT HAZARDS:
SAVE THESE INSTRUCTIONS.
• Installation of a vacuum release system,
which relieves entrapping
suction, is recommended.
• SOFA(s) should be chosen so that the
individual suction system ow rate is >
pumping system’s MAX system ow rate.
• Never use a pool or spa if any suction outlet component is damaged,
broken, cracked, missing, or not securely attached.
• Replaced damaged, broken, cracked, missing, brittle, or not securely
attached suction outlet components immediately.
All other applicable National, State, and local codes and requirements shall be followed.
640-134x V DIAMOND STRIP DRAIN COMPONENTS - VINYL
Item Part No. Description Quantity
1 642-134x V 32" Diamond Pattern Grate 1
2 819-1031 #8 x 1" Screw 38
3 642-1350 Vinyl Liner Retainer Plate 1
4 711-4470 Vinyl Liner Mounting Plate Gasket 1
5 715-9910 2" Pipe Plug 3
6 642-1300 32" 3-Port Vinyl Liner Sump 1
7 715-1360 32" Plaster Cover/Plug 1
5
6
7
4
3
2
1
Hand tighten the screws using a Phillips screw driver. DO NOT use electrical or pneumatic tools for tightening
the screws.
Properly level the sump and avoid the contamination of screw pilot hole.
WARNING: The Plaster Cover/Plug shall be removed prior to assembly of the Grate.
810-0230.0221
©2021 Waterway Plastics
Install as illustrated.
640-135x V DIAMOND STRIP DRAIN COMPONENTS - FIBERGLASS
Item Part No. Description Quantity
1 642-134x V 32" Diamond Pattern Grate 1
2 819-1031 #8 x 1" Screw 38
3 642-1350 Retainer Plate 1
4 711-4470 Mounting Plate Gasket 1
5 711-4460 Body U-Gasket 1
6 715-9910 2" Pipe Plug 3
7 642-1300 32" 3-Port Vinyl Liner Sump 1
6
7
4
5
3
2
1
810-0230.0221
©2021 Waterway Plastics
Hand tighten the screws using a Phillips screw driver. DO NOT use electrical or pneumatic tools for tightening
the screws.
Properly level the sump and avoid the contamination of the jump screw pilot holes.
WARNING: The Plaster Cover/Plug shall be removed prior to assembly of the Grate.
Install as illustrated.
640-136x V DIAMOND STRIP DRAIN COMPONENTS - CONCRETE
Item Part No. Description Quantity
1 819-1031 #8 x 1" Screw 8
2 642-134x V 32" Diamond Pattern Grate 1
3 715-9910 2”Pipe Plug 3
4 642-1320 32" 3-Port Plaster Sump 1
5 715-1360 32" Plaster Cover/Plug 1
4
3
1
2
5
810-0230.0221
©2021 Waterway Plastics
Hand tighten the screws using a Phillips screw driver. DO NOT use electrical or pneumatic tools for tightening
the screws.
Properly level the sump and avoid the contamination of the fastener pilot holes.
WARNING: The Plaster Cover/Plug shall be removed prior to assembly of the Grate.
Install as illustrated.
640-137x V DIAMOND STRIP DRAIN COMPONENTS
FIELD BUILT SUMPS
Item Part No. Description Quantity
1 819-1031 #8 x 1" Screw 8
2 642-134x V 32" Diamond Pattern Grate 1
3 642-1360 32" Plaster Ring 1
4 715-1360 32" Plaster Cover/Plug 1
1
2
3
4
810-0230.0221
©2021 Waterway Plastics
Hand tighten the screws using a Phillips screw driver. DO NOT use electrical or pneumatic tools for tightening
the screws.
Properly level the mud-ring and avoid the contamination of the fastener pilot holes.
WARNING: The Plaster Cover/Plug shall be removed prior to assembly of the Grate.
Install as illustrated.
DIAMOND STRIP DRAIN HEAD LOSS CURVE
WARRANTY
For product registration visit: www.waterwayplastics.com.
For Warranty questions or claims please contact point of purchase.
810-0230.0221
©2021 Waterway Plastics
When one center port is used:
Pressure tap located 19.25in downstream of port in 2.5in DIA schedule 40 PVC pipe.
When two outside ports used:
Pressure tap located 29.5in downstream of port in 2.5in DIA schedule 40 PVC pipe.
Flow Rate (GPM) 54.1 123.0 244.0
NSF Measure Total Head Loss ("Hg) 0.39 1.17 4.59
Flow Rate (GPM) 66.7 161.5 320.0
NSF Measure Total Head Loss ("Hg) 0.07 1.31 5.77
When Center Port is used.
When 2 Outside Ports are used.
"Hg
"Hg
GPM
GPM
FINISH SURFACE
OF THE POOL
SUCTION
PIPE
OPENING
FINISH SURFACE
OF THE POOL
SUCTION
PIPE
OPENING
FINISH SURFACE
OF THE POOL
SUCTION
PIPE
OPENING
FINISH SURFACE
OF THE POOL
SUCTION
PIPE
OPENING
FLOW PATH ZONE:
NOTE: No reductions in plumbing size are permitted within 16" from the point of connection to the sump.
Flow Path 3"
Flow Path 3"
FIELD FABRICATED SUMP:
NOTE: No reductions in plumbing size are permitted within 16" from the point of connection to the sump.
Field fabricated sumps shall be made as shown below.
32” Min.
16”
2.38
FRAME
PLASTER
FINISH SURFACE
OF THE POOL
32” Min.
2.37
FRAME
PLASTER
FINISH SURFACE
OF THE POOL
5.8”
2" PIPE
FRAME
Part # 642-1360
PLASTER
FINISH SURFACE
OF THE POOL
2.7” Min.
3” Min.
Install as illustrated.
Properly level the mud-ring and avoid the contamination of fastener pilot holes.

This manual suits for next models

3

Other Waterway Water Filtration System manuals

Waterway 640-479X V User manual

Waterway

Waterway 640-479X V User manual

Waterway TWM User manual

Waterway

Waterway TWM User manual

Waterway 640-472x V User manual

Waterway

Waterway 640-472x V User manual

Waterway 640-476x User manual

Waterway

Waterway 640-476x User manual

Waterway 640-477XV User manual

Waterway

Waterway 640-477XV User manual

Waterway Crystal Water User manual

Waterway

Waterway Crystal Water User manual

Waterway Carefree FS016 User manual

Waterway

Waterway Carefree FS016 User manual

Waterway SVL56 User manual

Waterway

Waterway SVL56 User manual

Waterway 640-479X V User manual

Waterway

Waterway 640-479X V User manual

Waterway CLEARWATER II User manual

Waterway

Waterway CLEARWATER II User manual

Waterway proclean plus PCCF-075 User manual

Waterway

Waterway proclean plus PCCF-075 User manual

Waterway ClearWater Series User manual

Waterway

Waterway ClearWater Series User manual

Waterway Crystal Water User manual

Waterway

Waterway Crystal Water User manual

Waterway Clear Water II User manual

Waterway

Waterway Clear Water II User manual

Waterway pro clean plus User manual

Waterway

Waterway pro clean plus User manual

Waterway 640-475x V User manual

Waterway

Waterway 640-475x V User manual

Waterway clear water II User manual

Waterway

Waterway clear water II User manual

Waterway 640-477x V User manual

Waterway

Waterway 640-477x V User manual

Waterway 640-476x V User manual

Waterway

Waterway 640-476x V User manual

Waterway Clear Water II User manual

Waterway

Waterway Clear Water II User manual

Popular Water Filtration System manuals by other brands

Microline T.F.C.-4 Installation, operation & service manual

Microline

Microline T.F.C.-4 Installation, operation & service manual

Eden 501 user manual

Eden

Eden 501 user manual

Prozone Water Products CSS5 series Installation guide and operation manual

Prozone Water Products

Prozone Water Products CSS5 series Installation guide and operation manual

dafi Flow Comfort DC10 Lead manual

dafi

dafi Flow Comfort DC10 Lead manual

Clean Water Systems 5900-BT Greensand Filter Installation & maintenance guide

Clean Water Systems

Clean Water Systems 5900-BT Greensand Filter Installation & maintenance guide

Spear & Jackson BoilerMag Installation and servicing instruction

Spear & Jackson

Spear & Jackson BoilerMag Installation and servicing instruction

Nikken PIMAG AQUA POUR EXPRESS instruction manual

Nikken

Nikken PIMAG AQUA POUR EXPRESS instruction manual

Sterling OXY3-10 installation instructions

Sterling

Sterling OXY3-10 installation instructions

SMC Networks AFF30 Series Operation manual

SMC Networks

SMC Networks AFF30 Series Operation manual

Frizzlife SW10F owner's manual

Frizzlife

Frizzlife SW10F owner's manual

RACOR BVFS Series manual

RACOR

RACOR BVFS Series manual

Monarch Water WELLBEING CAPRICORN install guide

Monarch Water

Monarch Water WELLBEING CAPRICORN install guide

Ispring WF1024 Installation instructions & user manual

Ispring

Ispring WF1024 Installation instructions & user manual

RelaDyne ThermoJet G3500E Series Installation and operating manual

RelaDyne

RelaDyne ThermoJet G3500E Series Installation and operating manual

Philips IronCare GC024 manual

Philips

Philips IronCare GC024 manual

W&H multidem C27 Instructions for use

W&H

W&H multidem C27 Instructions for use

Garden ResQ Grey Water Operating guidelines

Garden ResQ

Garden ResQ Grey Water Operating guidelines

Baker Hydro HRF Series owner's manual

Baker Hydro

Baker Hydro HRF Series owner's manual

manuals.online logo
manuals.online logoBrands
  • About & Mission
  • Contact us
  • Privacy Policy
  • Terms and Conditions

Copyright 2025 Manuals.Online. All Rights Reserved.