We Care Solar Suitcase User manual

We Care Solar | Jan 2019
We Care Solar Suitcase®Installation Guide
www.wecaresolar.org
WCS-SC3

We Care Solar® promotes safe motherhood
and reduces maternal mortality in energy
poor regions by providing healthcare workers
with reliable lighting, mobile communication,
and medical devices using solar electricity.
The We Care Solar Suitcase® provides
highly efficient solar energy systems to
health facilities in areas without reliable
electricity. Our durable, easy-to-use
Solar Suitcases power medical lighting,
mobile communication, and essential
medical devices.

We Care Solar | Jan 2019
Installation Planning
Before Installation Day
• Ensure the in-charge and
midwives will be present
on installation day
• Check if the facility still
needs a Solar Suitcase; it
is possible the facility may
have recently received
alternate solar power or
been connected to the grid
• When possible, bring an
extra solar panel and Solar
Suitcase for backup and
teaching
• Bring food and water in
case there is little available
at the site
Identify installation team
2-3 technicians + 1 driver
Location planning
Call the clinic at least
one day in advance
Prepare and load tools
Review preparation checklist
Solar Suitcase + 1 extra for teaching healthcare facility staff and as a backup
1
2
3
4
5
Solar Panel(s) + 1 extra in case of breakage
Toolkit including drills and ladder
Make sure the drill batteries are charged and you bring the charger
Installation tracking sheet and other documents like baseline survey if applicable
Camera for taking photos at installation
04
Preparation Checklist

We Care Solar | Jan 2019
Installation Planning
After Installation
Installation Day
Leave early
Avoid working in the hot
afternoon sun. Leave time
for unexpected delays.
Teach healthcare workers
Train healthcare staff on
how to use and maintain
the Solar Suitcase
Complete paperwork
Please take the time to
complete the necessary
paperwork
Review nal
installation checklist
Checklists reduce
errors – use them!
Take photos
Take photos of installation.
Show us your good work!
Depart prior to dark
Re-organize tools
and load vehicle
Arrive and introduce
yourselves to the person
in charge of the clinic
Take a tour of the clinic
with the medical team
Plan the installation
Ask healthcare workers to
show you where they do
procedures to determine
the best place to install the
lights and Solar Suitcase
Organize team
Assign responsibilities
to roof lead, ground lead,
and teaching lead
Clean up the site
Take away debris
and re-organize any
furniture moved
Complete installation
Review installation
checklist for solar panel,
Solar Suitcase, lights,
and last steps
05

We Care Solar | Jan 2019
Installation Overview
06
The Lights must be placed where
they are most needed at the facility.
Talk with the midwife to determine
the best location for each light. Light
cables are 33 feet (10m) in length.
Primary locations:
• Delivery bed
• Resuscitation table
• Pre or post delivery room
Secondary locations:
• Entrance
• Waiting area
• Hallway
• Oce
The Solar Suitcase should be
mounted in a secure and dry area of
the facility and at a height where all
healthcare workers can easily turn
on lights and charge appliances
Light Expansion Box should be
mounted in a convenient location
such as the building entrance, hallway,
or delivery room. The Light Expansion
Box cable is 40 feet (12.2m) in length.
The Homerun Cable is 40 feet
(12.2 meters) and must reach from
the solar panel to the Solar Suitcase
The Solar Panel must be installed
where it will get sun all day long
A
A D
E
D
E
B
C
B
C

We Care Solar | Jan 2019
Solar Panel Installation
Parts & Tools Required
From the Solar Suitcase
From the Large Tool Bag
07
Homerun Cable
(4) L Brackets
Cordless Drill Driver Inclinometer
Zip Ties
1/4" Nuts
and Bolts
#12 x 3" Roof Screws
Silicone
1/4“ Standard Drill Bit
1/8” Standard Drill Bit
1/4" & 5/16” Nut Drivers
Safety Glasses Step Drill Bit
Wire Stripper
Slip Joint Plier WrenchHammer
Electrical
Tape
Cable Guard
Marker
#8 x 1-1/4"
Self-Tapping Screws
Actual size
Actual size
Actual size
Actual size
Actual size

We Care Solar | Jan 2019
Solar Panel Installation
Safety First
If roof is too steep or too weak for you to work on safely you can:
Mount the solar panel on the eave of the roof while
standing on the ladder. We do NOT want you to risk
getting hurt.
Mount the solar panel on a post or build a structure
near the clinic to mount the solar panel and then
route the homerun cable into the clinic
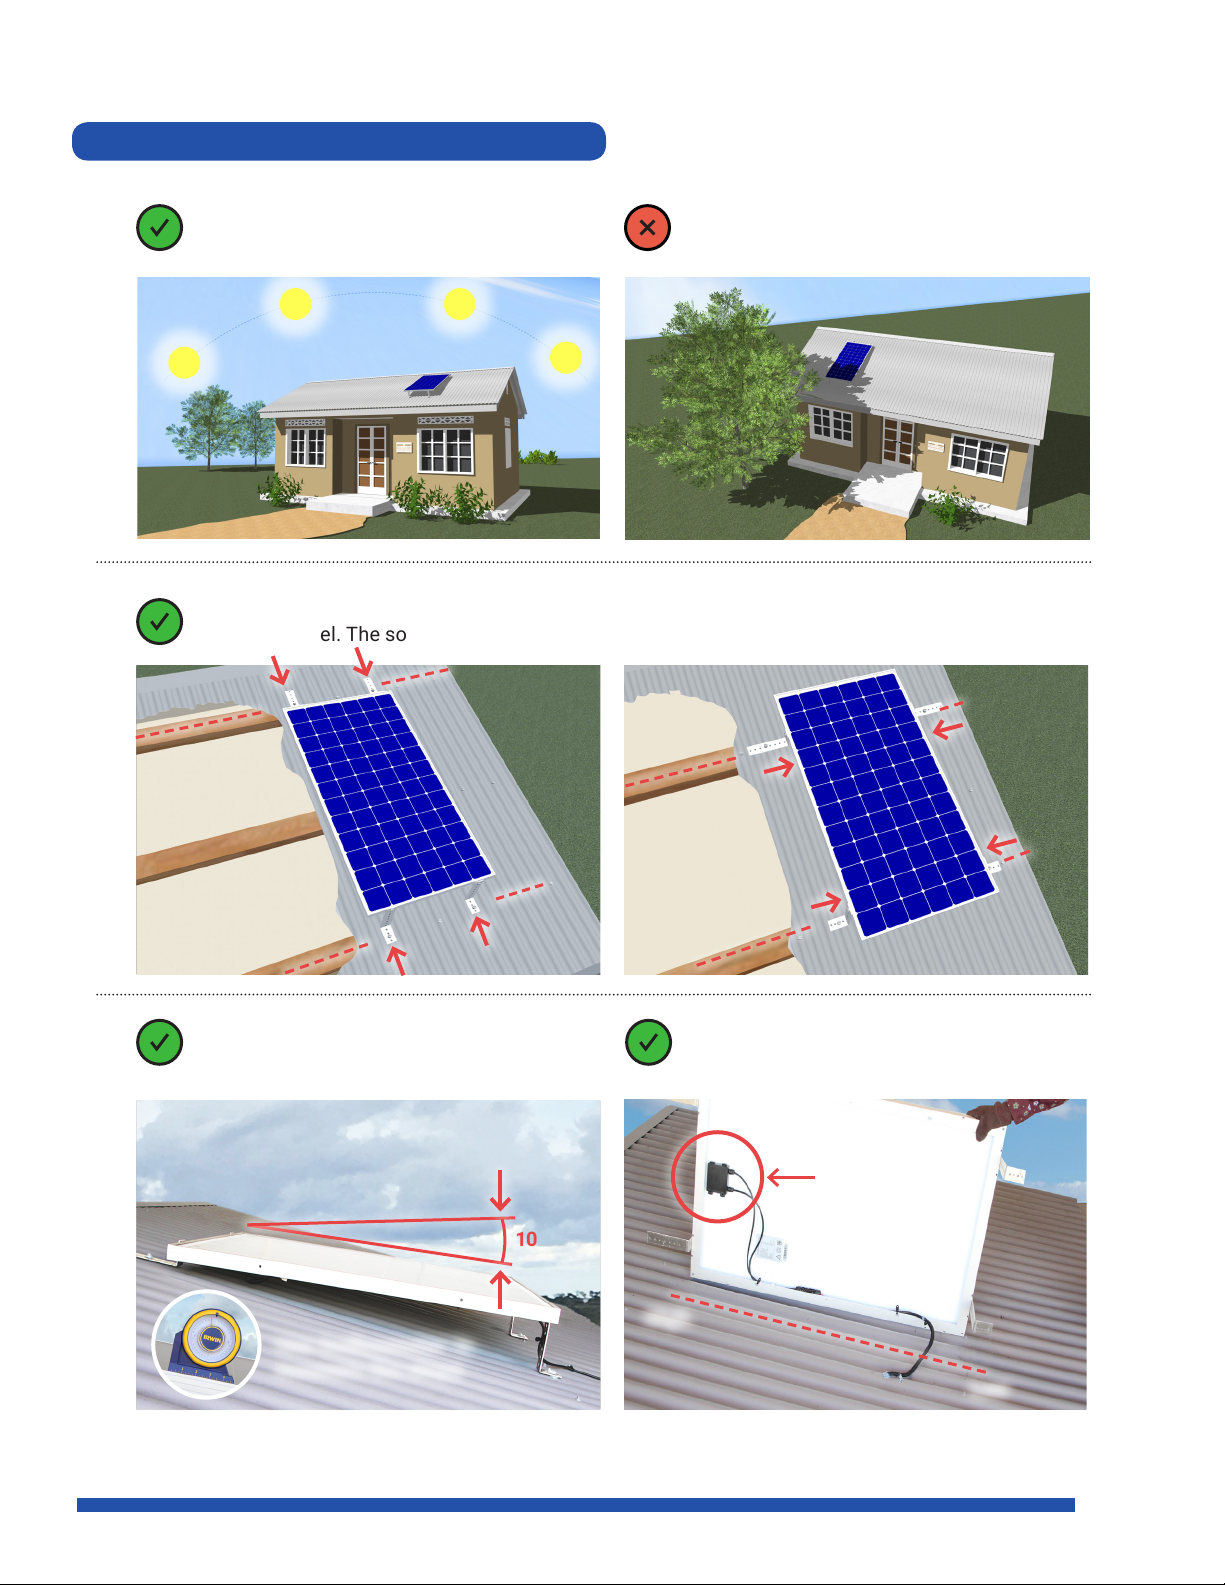
Look
Identify any potential dangers.
This includes power lines,
skylights, wasps, bats, holes in the
roof, or rusty spots on the roof.
Be Aware
Ladder Safety
Do not touch electricity lines
with your body or ladder
Do not walk near or over
skylights
Avoid wasp nests, attics with
bats or rodents. They may harm
you during installation and can
also eat through cables.
Plan
Work safely — make a plan
with your team on how to
work safely and communicate
with your team
08
• When you use a ladder, be careful and make sure it is
stable before you climb
• Only one person should be on the ladder at a time
• When standing at the base of the ladder, your outstretched
arms should be able to reach the ladder
• Climb with your eyes facing the ladder
• Have someone hold the ladder
• When getting off the ladder onto the roof, step around the
ladder and not over the top of the ladder

We Care Solar | Jan 2019
Solar Panel Installation
Using the Drill
Make sure to point
the drill straight
Unlock
Lock
09
Speed
Use speed #1 (slow) for attaching
screws and for drilling into concrete
Use speed #2 (fast) and light
pressure for drilling the solar panel
frames, walls and ceilings
Quick Mode
Adjustment
Torque Adjustment Ring
Use lower number settings for
attaching screws. Increase as
needed to drive the screw to
the correct depth.
Use higher number settings for
drilling holes on the frame of
the solar panel or drilling into
the wall or ceiling
Trigger
Rechargeable
Battery
Direction Mode
Forward/Lock /Reverse
Chuck
Adjustment
Wear safety glasses when you are drilling
!
:
:
:
Hammer mode for masonry
and concrete
Screw drive mode for
attaching screws
Drill mode for
drilling holes

We Care Solar | Jan 2019
Solar Panel Installation
Where to Place the Solar Panel
10
The solar panel must be placed where it
will receive the most direct sun all day long
The L feet can be attached to the top and bottom of the solar panel or the sides of
the solar panel. The solar panel must be mounted to the wood frame to the roof below.
The solar panel must be mounted on a
slope of 10 to 15 degrees from horizon
to allow for rain to run off
10-15˚
Use inclinometer to
measure the slope
Do not place the solar panel where it
will be shaded by a tree or another building
Install the junction box close to the
ridge/high part of the roof
High
Junction Box
Low

We Care Solar | Jan 2019
All penetrations must be sealed with silicone
Solar Panel Installation
11
All roof insertions must be done at the
top of the corrugated ridge. The solar
panel L feet must attach to the wood
frame of the roof.
Do not bend or crush the corrugated ridge
Do not make insertions at the bottom of
the corrugated ridge
The solar panel must be mounted
to the wood frame of the roof
The solar panel should not be stressed,
warped, or twisted when mounted to the roof

We Care Solar | Jan 2019
A
Option
B
Option
Under the ridge vent
Through the roof
Solar Panel Installation
How to Run the Homerun Cable
12
If needed, you can remove and reassemble the homerun cable connector to make it easier
to run through the roof and walls. See P.15 for instructions.
Always use the cable guard where the homerun cable goes through the roof or around the edge
of the roof. The cable guard should extend at least 6" inches (15cm) through the roof panel.
!
!
C
Option Through the eave
D
Option Over the edge
A
Option
B
Option C
Option
D
Option
6" (15cm)
Cable
Guard

We Care Solar | Jan 2019
Homerun Cable Options
Solar Panel Installation
13
A
Option
B
Option
Under the ridge vent
Through the roof
Cable Guard
Silicone
Zip Tie
Zip Tie
Zip Tie
Cable
Guard
Silicone

We Care Solar | Jan 2019
Solar Panel Installation
14
C
Option
D
Option
Through the eave
Over the edge
Drip Loop
Silicone &
Zip Tie
Cable
Guard
Cable
Guard
Zip Tie
Drip
Loop
Make a "Drip Loop" in the cable to allow water to drip off the cable,
preventing the water from entering the health facility and Solar Suitcase
!
Homerun Cable Options

We Care Solar | Jan 2019
Solar Panel Installation
15
This will make it easier to run the homerun cable through the roof and walls
Negative
wire black
Positive
wire red
1+
1-
How to Remove and Reassemble the Homerun Cable Connector
1
3
5 6
2
4
Twist blue shroud to disassemble
Leave screws attached to the connector
Twist the blue shroud rmly to
complete assembly
To rewire the connector, tighten screws rmly
onto wire. When nished, you should not be
able to pull the wires from the connector.
Loosen the terminals
To run the homerun cable through the
roof and walls, tape each wire individually
and then tape the two wires together
Insert
black negative
wire into 1-
Insert
red positive
wire into 1+

We Care Solar | Jan 2019
Solar Panel Installation
1
3
2
4
Mark on the solar panel where you will
attach the L brackets
Take the solar panel, installation hardware,
and tools up on the roof
Using speed #2, drill 1/4" holes in the frame
of the solar panel where the L brackets will
be attached
Attach all four L brackets to the solar panel
using 1/4" bolts and locking nuts
Use one of the L brackets to protect
the solar panel
16
Solar Panel Installation Steps
Walk where you see the rows of nails
1/4“ Standard Drill Bit
1/4" Bolt
and Locking Nut
Actual size
Actual size
!
!

We Care Solar | Jan 2019
5 6
Connect the homerun cable to the solar panel
and fasten the solar panel connectors and the
homerun cable to the frame with zip ties. This
is called stress relief and will prevent pull on the
delicate parts of the panel.
Using drill speed #1, use 12 X 3" screws with
rubber washer to mount the L brackets to the
roof and drill the screws down 50% of the way.
If necessary, use the 1/8" standard drill bit to
make a pilot hole before attaching roof screws.
Zip ties
Solar Panel Installation Steps
Solar Panel Installation
78Using speed #1, drill the screws down so
that the solar panel is rmly attached to
the roof but not so tight that it attens the
metal corrugations of the roof
Use silicone to seal the area below the
L brackets
17
#12 x 3" Roof Screws with Rubber Washer
1/8” Standard Drill Bit
Actual size
Actual size

We Care Solar | Jan 2019 18
Solar Panel Installation
9
11
10
12
Use silicone to seal the area on top of
the L brackets
Attach the cable guard where homerun
cable goes over the edge of the roof or
through the roof. Secure the cable guard
with zip ties & silicone.
Great job! Remember to do the Solar Panel
Installation Checklist.
Secure the homerun cable to one of the
L brackets and to the roof. Use silicone
to seal all holes.
See P.12 for details on securing
cable guard
Make a Drip Loop to prevent water from
entering into the Solar Suitcase
!
!
Solar Panel Installation Steps

We Care Solar | Jan 2019
Solar Panel Installation
19
Solar panels will not be shaded at any time of the day
1
2
3
4
5
6
7
8
Solar panels are rmly attached to roof beams at peak of the corrugation
Solar panels are installed at a 10 to 15° angle; they should not be at
Solar panel frame is straight, not warped, or twisted
Homerun cable is wrapped with cable guard for extra protection where it might
be damaged such as sharp edges and doorways
Homerun cable has a drip loop immediately before entering building or room
All roof holes are sealed with silicone
Cables on the back of the solar panel have stress relief
Solar Panel Installation Checklist

We Care Solar | Jan 2019
Solar Suitcase Installation
Where to Place the Solar Suitcase
20
Before you install the Solar Suitcase, you need to make sure you have a good location that
meets the needs of the healthcare staff. The Solar Suitcase powers the medical lights. The Solar
Suitcase has important appliances that should be easily accessed and also stored properly.
• Install the Solar Suitcase
where the lights can reach
the delivery room
• Consider how the homerun
cable from the solar panel
on the roof will reach the
Solar Suitcase
• Install in a room that is easy
to access and secure
The Solar Suitcase is designed to be attached to a strong wall. However, sometimes
another solution is needed: If the wall is too soft and the wall crumbles when drilling,
install the Solar Suitcase on a table to protect it from theft.
Do not place the Solar Suitcase
next to a cabinet
Do not place the Solar Suitcase
over a patient bed
Do not place the Solar Suitcase
over water
!
Clear space from
oor to ceiling.
Install where Solar
Suitcase can open
easily and is at a
good height for all
midwives to easily
reach the light
buttons.
A
B
C
C
A
B
36" inches (92cm)
48" inches (122cm)
67" inches (170cm)
Other manuals for Suitcase
1
Table of contents
Popular Controllers manuals by other brands

MicroTouch
MicroTouch Micro Touch Capacitive Controller MT3000 reference guide

Tresco
Tresco FREEDiM installation instructions

Johnson Controls
Johnson Controls FX30E Installation instructions manual

TEL
TEL AFA1000/BLD Installation & operating manual

Siemens
Siemens SINUMERIK 840D sl Diagnostic manual

Instrumentation Systems & Services
Instrumentation Systems & Services MicroSpeed 196 user manual