WeatherHawk WindMate 350 User manual

WindMate®350 Weather Monitor
User Manual (Version 11/09)
You now own a sophisticated, precise,
and comprehensive weather monitor. Please
study the manual to understand all of the unit’s
features and to maximize its benefits.
Getting Started
Open your WindMate®to 180° as
shown on the right. If using a tripod,
open it to a 90o angle as shown above
to access the tripod fitting at the bottom
of the unit.
Press and hold Mode Key to turn on.
Press and hold Mode for 3-4 secs. to
turn off. You can turn off the unit in any
function. If the unit is idle for 5 minutes,
it will auto shut down to preserve
battery life.►Your unit can be customized to:
deactivate auto shut down or any other functions
you do not need, choose memory settings or
adjust display contrast. See Customizing your
WindMate®350.
Operating the WindMate®350
When the unit is turned on for the first time, the
default mode is Time. Each time the unit is
reactivated, it returns to the last function used.
Press the Mode Key to move to other functions.
For Backlight, press SET/EL.
Mode Sequence
•Time
•Wind Speed
•Compass (reads vertically)
•Temperature
•Wind Chill
•Humidity
•Wet Bulb
•Dew point
•Comfort Index
•Delta Temperature
•Barometric
•Altitude
•Density Altitude
Choosing Measurement Units
Pressing and holding the Set/EL Key at any
mode, (except time, compass and humidity),
chooses your preferred measurement unit.
Press the View Key to select, then press Set/EL
to save and exit Units Setting. Below is the
sequence of measurement units for each mode.
Wind Speed
MPH---->KMPH---->MPS---->FPM---->KNT---->BF
Temp. / Wind Chill/ Wet Bulb/ Dew Point/ Comfort
Index/ Delta T
0F---->0C
Barometer mbar---->inHg
Altitude / Density Altitude ft---->m
Bar Graph Display
For best results with any bar graph display, set
the low and high limits of the instrument to
reflect the range of actual conditions the unit will
experience. In all modes except Time and
Compass, press and hold the Set/EL key until
the current unit of measure is flashing. Press
the Mode key to see the “Low Limit” of measure
the instrument will graph. Press the View key to
increase the value of the “Low Limit.” Holding
down the View key will cause the increase to
take place much faster. If you go past the value
you desire, continue to increase the value until it
scrolls around back to the number you need.
When you have reached the value you need,
press the Mode key and you will then be able to
set the “High Limit” that the instrument will graph
in exactly the same way. When you have
reached the value you need, press the Mode
key again and screen will go back to the current
unit of measure flashing. Press the Set/EL key
to save and exit. Changing the “Low Limit” and
“High Limit” values of the WM-350 only changes
the representation of the history graph. It does
not change any of the previously recorded data
or have any impact on the data yet to be
recorded.
History and Min/Max Feature
All modes, except Time and Compass, have a
Min-Max and a History display option. Your unit
is preset for 1-hr increments and 48-hr bar
graph. (See Customizing your WindMate®350
to change the storage interval.) To change the
display option from the normal view press the
View Key. The diagram below will show you the
sequence.
The current view shown in the History is the
recorded data of the previous hour. To view the
recorded data history previous 2 hours, 3 hours
and etc. press the Set/EL Key. The recorded
data will be displayed in numerical format and at
the same time will be indicated in the graph.
Wind Impeller
Wind Vane
VIEW
SET/ EL
MODE/On/Off
Tripod Fitting

Time
The Time mode will display the following
information: complete date, weekday and 12-24
HR format option.
To set the time, press and hold the Set/EL Key
for 3 sec. To adjust the current setting, press the
View Key. To go to the next option, press the
Mode Key. To exit and save the setting, press
the Set/EL Key.
Wind Speed
In the wind speed mode, you can take real time
wind speed measurements. Press View to
display Max-Avg, press View again to display
bar graph history. Press Set/EL to view each
increment. Press Mode to go to next function.
When taking wind measurements by hand, be
sure to keep the unit at an arm’s length from the
body with the display facing towards you, so the
wind enters the impeller through the rear. Use
the wind vane to orient the meter so you are on
the wind’s axis. This will give you the most
accurate measurement.
To get precise readings on a given vector, use
our optional wind tunnel with the unit mounted
on a tripod.
CAUTION: The WindMate®is very accurate at
low and mid-range air speeds. Consistent uses
at very high speeds, such as from a car, will
damage the impeller’s bearing and reduce
accuracy. See below for impeller replacement.
Compass (hold, read, set vertically)
The compass feature can compute the cross
and head wind. Align the unit to the course
direction, press and hold the View Key to mark
the course direction. Then point the unit directly
into the wind to mark wind direction, press and
hold the View key. The unit will display cross
wind. Press View to display head wind. The
head wind may indicate a minus(-) or plus(+).
Minus will indicate the wind is coming from the
back. Plus will indicate wind coming from the
front. Press Mode to return to compass.
Compass Calibration for Declination &
Deviation
Compass Declination
Declination/Variation is the difference
between magnetic N and true N.
Depending on where you are on the earth,
the angle of declination will be different—
in some locations, the geographic and
magnetic poles are aligned so declination
is minimal, but from other spots, the angle
between the two poles is large. To adjust
your compass,
get declination information from a GPS or
www.ngdc.noaa.gov/geomagmodels/struts/calc
Declination .
Go to compass mode and hold Set/EL Key till
display shows HOLD TO SET. Use the View
Key to choose E or W. Then press Mode and
degrees will blink. Use View to change the
degrees. Press Set/El to lock in values.
Compass Deviation (only necessary if the
compass is near ferrous metals)
In compass mode press and hold Set/EL until
you see HOLD TO SET. You will see the
declination setting. Press Mode twice. Screen
will say Calibrate Compass? YES. Press Mode.
(If you do not need to calibrate, press View for
NO. Press Set/EL.) Hold the unit and turn
around slowly twice, 15 sec per each ¼ turn.
When calibration is complete, you will see 11
dots at the top of the screen. Press Set/EL and
the display shows “END.” If the display shows
“ERR” redo the calibration.
Using
Temperature/Windchill
Humidity/WetBulb/Dewpoint/DeltaT**
Density Altitude***
Choose the function you wish. Press View to
display Min/Max. Press View to display history
bar graph. Press Set/EL to view each
increment. Press View to return to normal
function or press Mode to go to the next.
**DeltaT is the difference between wet & dry
bulb temperature, used in agricultural spraying.
***Density Altitude is pressure altitude adjusted
for air temp and humidity, used for aircraft,
formulating race car fuel mix, & very long-range
shooting.
Comfort Index
Accuweather.com®Comfort Index™ is the effect
of temp, wind speed, relative humidity & sun
intensity on the human body. You can adjust
the formula based on sun intensity. The solar
factor has range from 0 to 3.0. Full sun = 3.0.
Heavy clouds = 0. The unit is preset for 1.5,
medium sun intensity.
To change, press and hold the Set/EL Key and
press the Mode Key again to go into solar
factor. Press View to select the desired value,
then press the Set/EL Key to confirm and exit
the setting mode.
Barometer and Altimeter
Understanding Barometric Pressure
High or low air pressure caused by weather, and
air pressure caused by elevation affect the
barometer’s reading. No matter what the
weather is doing, air pressure decreases with
height. Actual or STATION pressure is the true

air pressure at a fixed point. However, the
weather service gives us the barometric
pressure reading, which adjusts for elevation.
Example: In Denver, an average barometer
reading will be 29.90, however, the STATION
(uncorrected) pressure might be 26.10 because
of Denver’s elevation. The barometric pressure
reading gives us a frame of reference within
parameters we understand.
Barometric Pressure
The barometric pressure should be calibrated for
first time use, after battery replacement, or if the
altitude of your position changes.
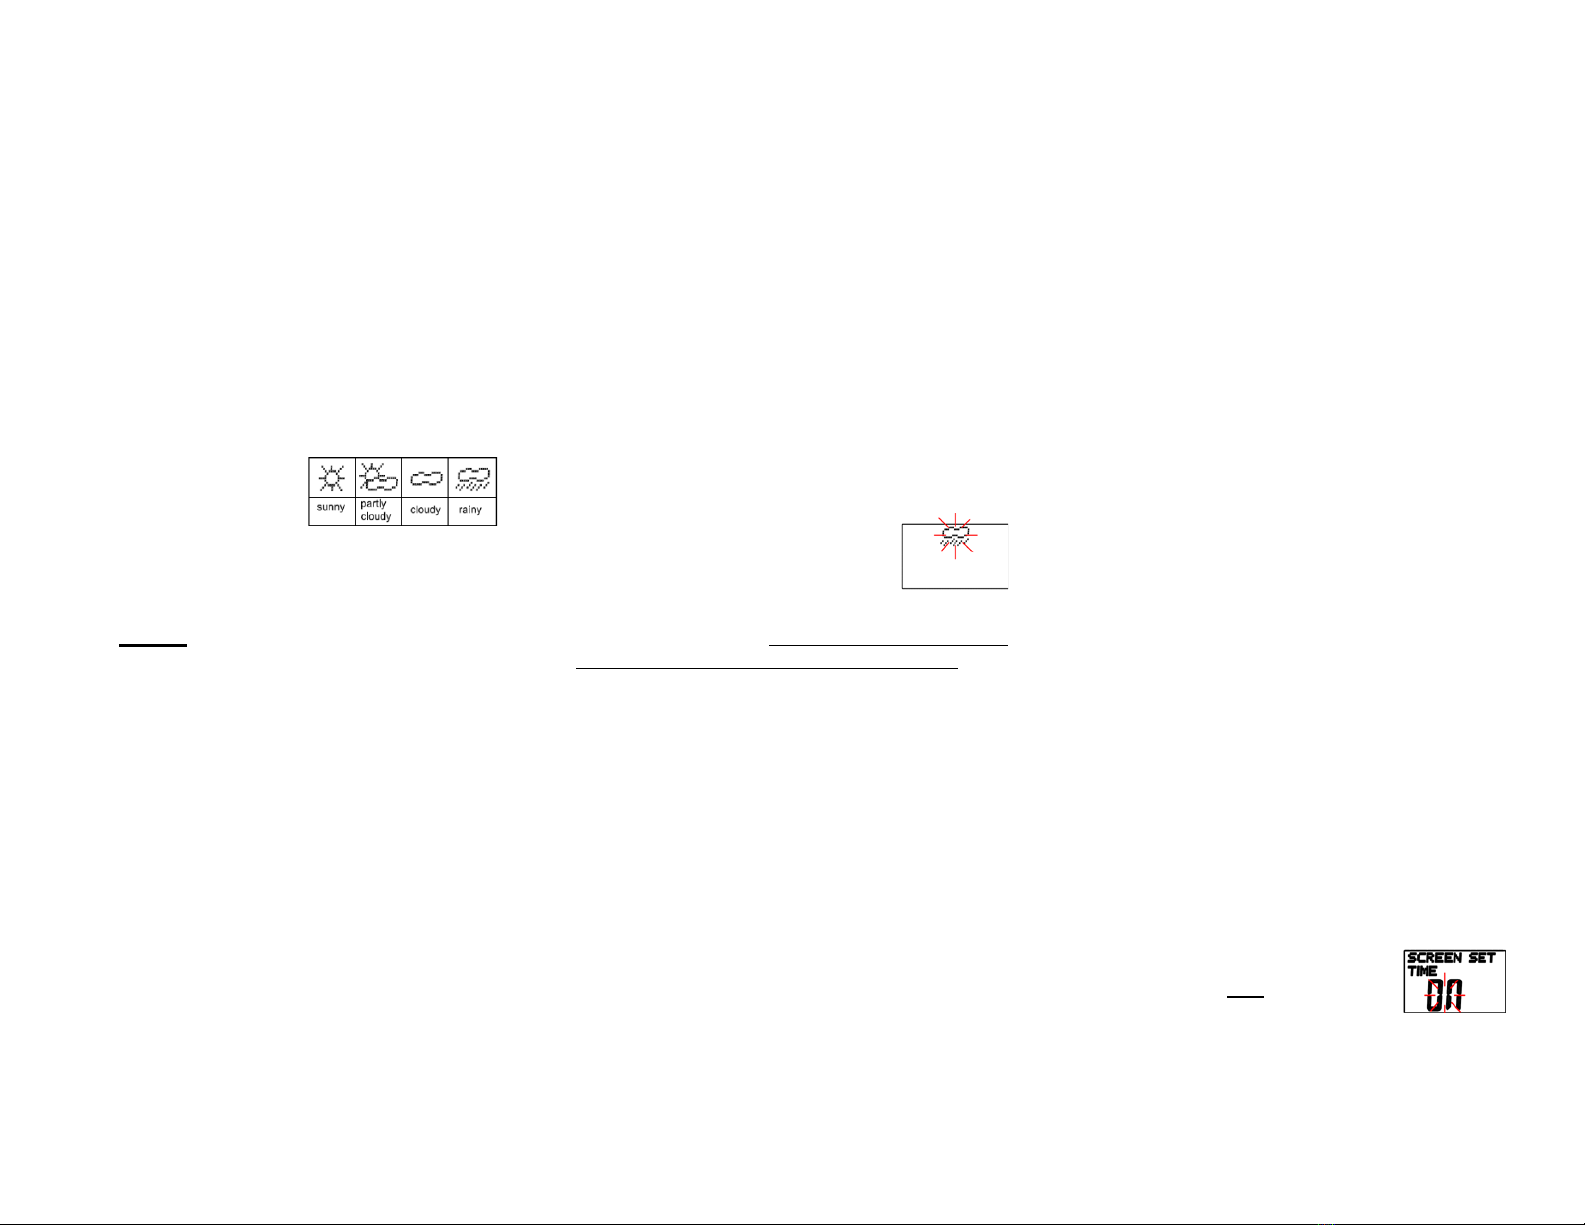
Calibrate the weather
forecast icon: press and
hold the Set/EL Key for
3 sec while in the
normal Barometer mode or Min-Max mode.
Select the preferred measurement unit by
pressing the View Key. Press ModeKey and
select the weather icon most appropriate for
your current weather condition, using the View
Key. Note: If you recalibrate because of an
altitude change, you don’t need to repeat this
part of the setup.
To calibrate the barometric pressure, you can
either: a) enter your correct altitude in the
Altitude function (See Altitude), or b) enter the
correct barometric pressure for your location, if
available.** In Barometer Mode, press and hold
Set/EL Key for 3 sec. Scroll till you see the
pressure displayed. Press Mode Key. Enter your
current barometric pressure by pressing the
View Key. Press Mode Key to go to the next
digit. Press the Set/EL Key to save and exit the
Calibration settings.
** You can use the barometer reading from your
local weather service. Weather cells can be
small and pressure different within a local area,
but for initial setup, the weather service pressure
figure should be fine.
The instrument will display air pressure either as
uncorrected STATION pressure or
BAROMETER for barometric pressure
(corrected for elevation). The BAROMETER
reading is what most of us are used to.
Using the Barometer
In Barometer mode, press View to display
Min/Max. Press View again to show pressure
and bar graph. If you want to review pressure
history, press Set/EL to review each past
increment. Press View again to see 6-12hr
weather forecast. Press View again to see the
current BAROMETER reading. Press Mode to
go to the next function.
Storm Warning Alarm
If there is a 6-millibar change in air
pressure over a 3-hr period, the
Storm Alarm will sound “BEEP
BEEP BEEP” every 15 minutes and an icon will
blink on the screen. This will also occur if you
experience dramatic changes in elevation. See
Customizing your WindMate®350 to
deactivate this feature.
Altitude (Altimeter)
The Altimeter must be calibrated for first time
use and after a battery replacement. If you stay
in one location, additional calibration is not
required. If you change locations (hiking,
climbing) and use the altimeter, you must re-
calibrate at known benchmarks to maintain
accuracy. The altimeter readings are also
affected by any weather-related air pressure
changes.**
To calibrate the Altimeter press and hold the
Set/EL Key for 3 sec while in normal Altimeter
mode or Min-Max mode. Select the preferred
unit of measurement by pressing the View Key
and then press the Mode Key to confirm. Enter
the current altitude by pressing the View Key
then press Mode Key to go to the next digit.
Press Set/EL to save and exit the Calibration
settings. This calibration requires you to enter a
known altitude for your location.
** Understanding the Altimeter
The WM-350 altimeter functions via barometric
pressure changes, unlike a GPS, which reads the
GEOMETRIC altitude, relative to a sea-level baseline
that is defined in the WGS84 coordinate system. GPS
altitude is unaffected by atmospheric conditions.
Airplane altimeters use the barometric measurement
system, but are constantly updated in flight. To
compensate for weather changes, your altimeter must
be calibrated using a known altitude. If you are
climbing and want accurate data, you may need to
re-calibrate frequently at known elevations.
Using the Altimeter
In Altimeter mode, press View to display
Min/Max. Press View again to show Altitude bar
graph. To review history, press Set/EL to
review each increment. Press View to return to
normal Altimeter mode or press Mode to go to
the next function.
Customizing your WindMate®350
You can customize your unit by turning off
unnecessary modes for your application,
choosing memory settings, adjusting display
contrast, etc.
Turn on the unit then press and
hold Mode key until you see this
screen flashing. (This will take
about 7-8 secs.) Release the Mode Key when
this is displayed.

Screen Set Menu
To navigate the Screen Set Menu press the
Set/EL Key to go to the next screen and set as
shown:
To turn on or off a mode, press the View Key.
To save and exit the screen set menu press the
Mode Key, this will take you to the Memory
Settings.
Memory Settings
In the Memory Settings, you can:
Set Storage Rate, which changes the intervals
for recording and saving data
Turn on or off the Memory Over-write option
Clear Memory and view the Memory Status
Deactivate Auto Shut-off &Storm Alarm
Change Display Contrast.
To navigate the Memory Setting press the
Set/EL Key.
Storage Rate has the following
fixed options: 5 min, 10 min, 20
min, 30 min, 1 hr, 2 hr, 6 hr, and
12 hr. The default setting is 1 hr.
To select Storage Rate press the View Key.
Note: The bar graph always shows 48
increments. Ex. If you keep the 1 hr increment,
the bar graph shows a 48-hr history. If you
change to a 2-hr increment, you will have a 96-
hr history; 12-hr increment will give you 2
measurements per day for 24 days.
Memory Overwrite option can be turned on or
off. If this option is turned on, the unit will
automatically over-write old data after the
memory is full. Press the View Key to turn on or
off this option.
Clear All Logs option allows you to clear and
erase all old data, so you have a new history. To
select yes or no, press the View Key. The
selected option will take effect after pressing
Mode Key. You can also reset the Min/Max/Avg
choices for each function.
Memory Status. The amount
of data saved and unused
memory is measured in hours.
The Memory Status shows
you the amount of saved data & unused memory
as shown on the right. Press Mode Key to save.
This will take you to Auto-Shutoff option.
Deactivate Auto Shut-Off
The Auto Shut-Off feature helps preserve the
battery. With Auto Shutoff deactivated, the unit
will work until the memory is full. This feature
can be switched on or off by pressing the View
Key. To save settings and go to the next option
press the Mode Key.
Deactivate Storm Warning Alarm
To turn off the alarm (or reactivate), press the
View Key. To save and go to the next option,
press the Mode Key.
Change Display Contrast
Display text contrast goes from light (0) to dark
(15). The unit is preset to 8. To darken or
lighten, press the View Key. To save and exit to
Time mode press the Mode Key.
Replacing the Battery
Because this unit has a capacitor, it will hold
your settings during a battery change, as long as
it is within several minutes. The unit uses a CR
2032 Lithium battery. Turn the unit to access the
battery cover. Turn it as indicated by the arrow
using a coin. Insert the battery into the unit. The
printed side faces you. Close the battery door
using the coin.
Replacing the Wind Impeller
Contact WeatherHawk or
your dealer for parts to
replace the impeller.
Impeller Replacement:
Turn the unit so the back
faces you. Remove the
screw cover plug & loosen
the screw. Turn the wind impeller clockwise and
pull it from the unit. Insert the new wind impeller.
Turn it in a counter-clockwise direction and
tighten the screw. Replace the screw cover
plug.
* * * * * * * * *
The WindMate®350 has a 2-year warranty.
Please keep your invoice or receipt.
Contact WeatherHawk for questions or service.
435-750-1840, M-F, 8:00 – 5:00, USA Mountain
Standard Time, www.weatherhawk.com
Additional manuals and instrument
specifications can be accessed from our website
at www.weatherhawk.com.
ACCURACY:
Wind speed +/- 3%
Compass +/- 2°
Wind Direction +/- 2°
Temperature +/- 1.8° F; 1° C
Relative Humidity +/- 3%
Wet Bulb & Dewpoint +/- 3.6° F; 2° C
Barometer +/- .05 inHg; 1.5 hPa
Altimeter +/- 50 Ft; 15 m
Density Altitude +/- 246 Ft; 75 m
Screw

Key Matrix
Mode
Key
Mode Set /EL View
Time
Change
mode
Hold to turn
on or off
Light
Hold to enter
Time Setting
Mode
----------
Wind Speed
Change
mode
Hold to turn
on or off
Hold to enter
unit settings Change view
Compass
Change
mode
Hold to turn
on or off
Hold to enter
Compass
Calibration
Hold to mark
direction
Crosswind
Change
mode
Hold to turn
on or off
Hold to enter
Compass
Calibration Headwind
Headwind
Change
mode
Hold to turn
on or off
Hold to enter
Compass
Calibration Crosswind
Compass
Calibration
Change
mode
Hold to turn
on or off
Exit compass
calibration ----------
Temperature
Change
mode
Hold to turn
on or off
Hold to enter
unit settings Change view
Wind Chill
Change
mode
Hold to turn
on or off
Hold to enter
unit settings Change view
Humidity
Change
mode
Hold to turn
on or off
View history Change view
Wet Bulb
Change
mode
Hold to turn
on or off
Hold to enter
unit settings Change view
Dew Point
Change
mode
Hold to turn
on or off
Hold to enter
unit settings Change view
Comfort
Index
Change
mode
Hold to turn
on or off
Hold to enter
Comfort
Index setting Change view
Comfort
Index Setting
----------
Enter Solar
Factor
Advance
Solar Factor
Change
mode
Hold to turn
on or off
Exit Solar
Factor Advance
Delta T
Change
mode
Hold to turn
on or off
Hold to enter
unit settings Change view
Barometer
Change
mode
Hold to turn
on or off
Hold to enter
settings Change view
Altitude
Change
mode
Hold to turn
on or off
Hold to enter
settings Change view
Density
Altitude
Change
mode
Hold to turn
on or off
Hold to enter
unit settings Change view
Unit Setting ----------
Exit Unit
Setting mode
Advance
Settings Next Exit Settings Advance
815 W 1800 N (435) 750-1840
Logan, UT 84321 USA www.weatherhawk.com
Other WeatherHawk Weather Station manuals
Popular Weather Station manuals by other brands

Ambient Weather
Ambient Weather WS-7078 user manual

La Crosse Technology
La Crosse Technology WS-9016TWC instruction manual

Vaisala
Vaisala BAROCAP PTB330 user guide

Frigidaire
Frigidaire 308-2414FR Instruction manua

La Crosse Technology
La Crosse Technology Wireless Weather Station instruction manual

Gira
Gira 1010 00 installation instructions