Weber WIDE PATH CAMPER User manual

Last update: February 24, 2021 1
Bicycle camper
user manual February 24, 2021
Last update: February 24, 2021 1
Bicycle camper
user manual February 24, 2021
Last update: February 24, 2021 1
Bicycle camper
user manual February 24, 2021

THOMAS MØLLER PEDERSEN APS . ELMEVEJ 18, GLYNGØRE
DK-7870 ROSLEV . TLF: (+45)9774 0733
E-MAIL: INFO@WIDEPATHCAMPER.COM . WWW.WIDEPATHCAMPER.COM
SCAN QR-CODE FOR
INSTRUCTION VIDEO
OR
WWW.WIDEPATHCAMPER.COM/
GETTING-STARTED
Unbox your new Bicycle Camper
IMPORTANT:
Tire pressure: The tire pressure should be 4.0-4.6 bar - control every week.
Wheel spoke maintenance: It is important that the wheel spoke tension is controlled regularly, especially after
the first trip with the camper.
Rear axle height should be adjusted, so the buttom of the camper is in horisontal position while driving.
Driving stability: To ensure continuous riding stability, please secure your luggage in a correct position to op-
tain optimal weight distribution and center of gravity.
Do so, by placing heavy items towards the front of the camper, at least in front of the wheel axles, and as low as
possible.
If your luggage and other items can be sliding or shifting position during transport, please secure with cargo
straps.
Target weight pressure on rear axle: The loading of the camper must be done, so the pressure on the rear axle
is 4-6 kg.

5
INSTALLATION INSTRUCTIONS AND SAFETY INFORMATION
DUK FNL ES
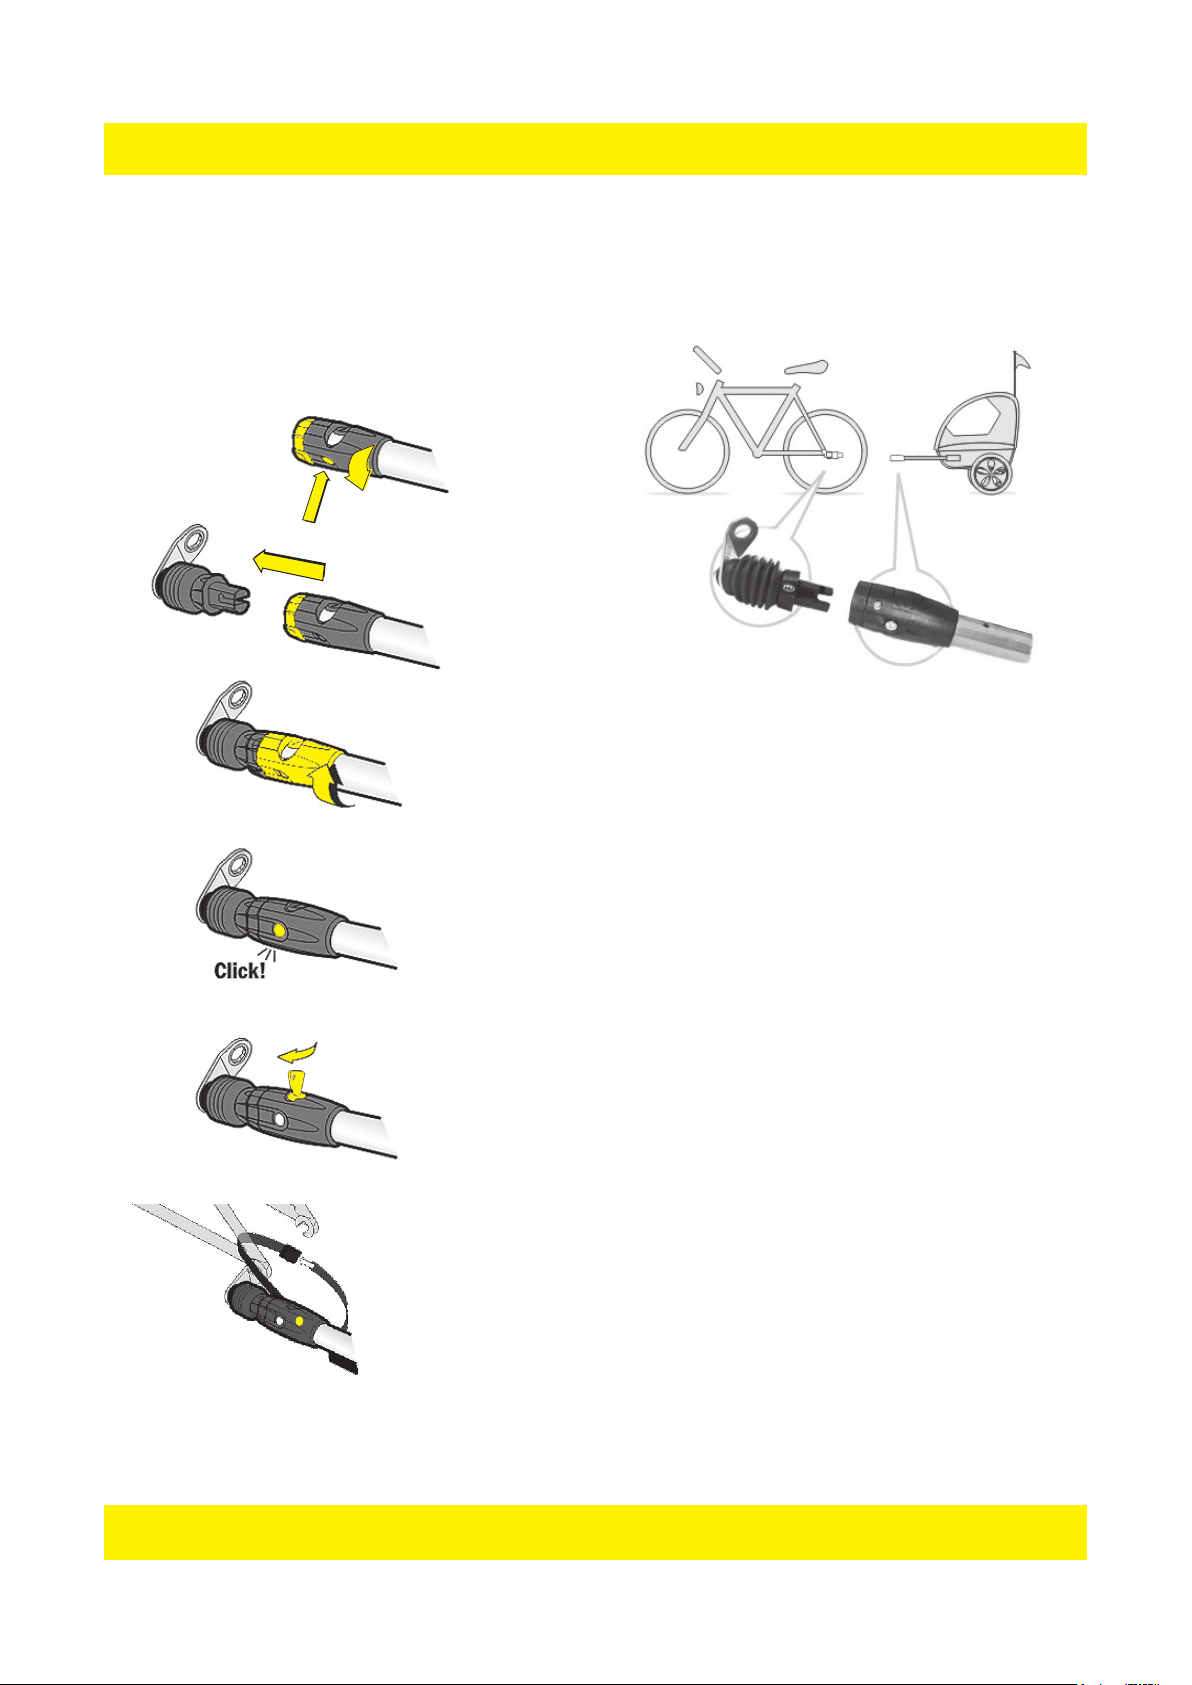
The E-clutch is xed to the axle on the left rear dropout.
Mounting the „E- EL- ES“ on the rear wheel axle
For solid axles, remove the left axle nut and possibly
the washer.
For quick-release axles, the quick-release skewers have
to be opened and pulled out of the axle.
1. Insert the clutch in the order sequence on the axle,
as shown in gure 1.
The safety lug of the polygon insert „A“ must engage
the open side of the dropout.
2. Put the base „B“ on the polygon insert. The hinge
piece must be horizontal and the bending edge of the
base plate vertical. (2)
3. Insert the washer
„C“ on the quick-re-
lease skewer and sli-
de the quick release
into the axle.
Tighten the adjusting
nut of the quick-re-
lease skewer until
the quick release
closes very rmly
(min. 8 turns).
The same sequen-
ce applies when
connecting to a solid
axle.
Tighten the axle nut
rmly with min. 8
turns!
The polygon is fully pressed into the base plate
of the clutch only by tightening the quick-relea-
se skewer or the axle nut!
A CB
1
Version E is one of the most sold bike clutches on the
market.
„ES“blue
„EL“ grey
„E“black
Base plate
Hinge piece
2
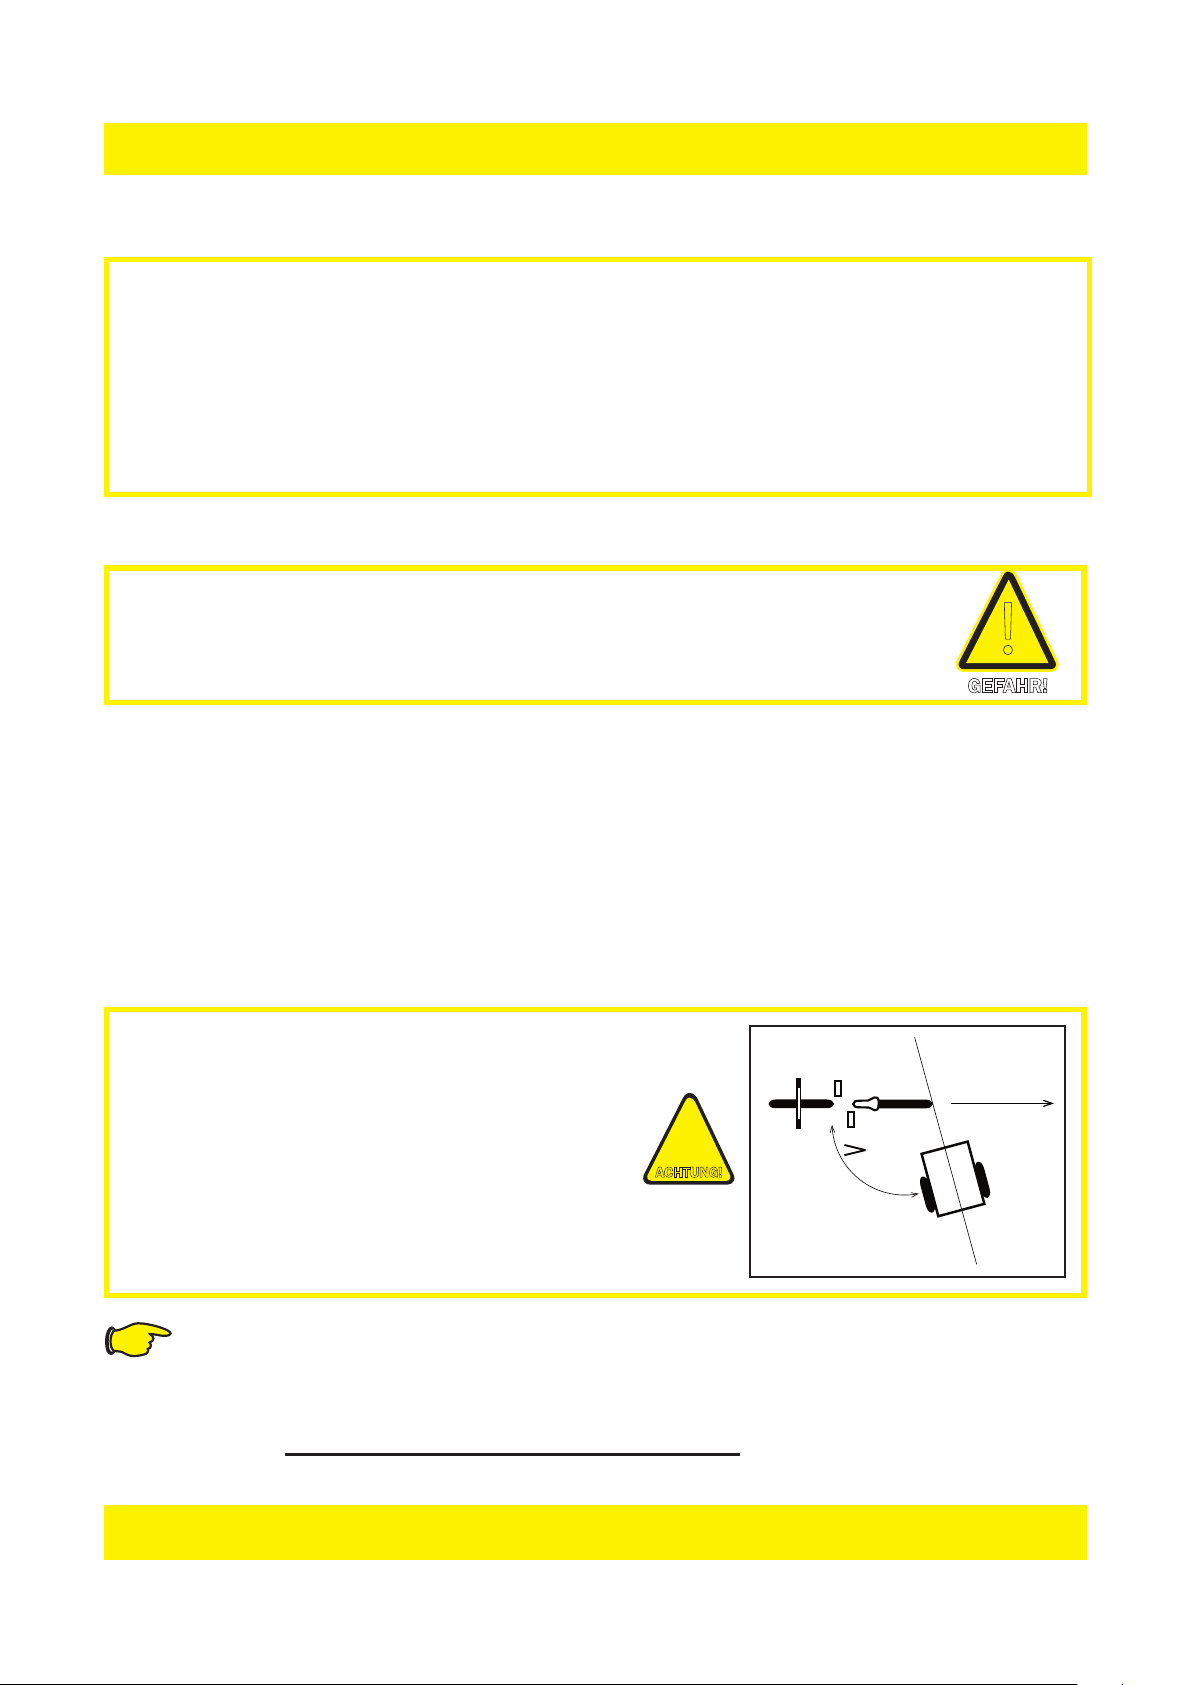
ATTENTION! It is not allowed to leave out the
washer „C“ so that there is adequate thread
length, or else the polygon inserts may slip
through.
In such a case, the clutch and its function will
not be covered by the guarantee and warranty!
ACHTUNG!
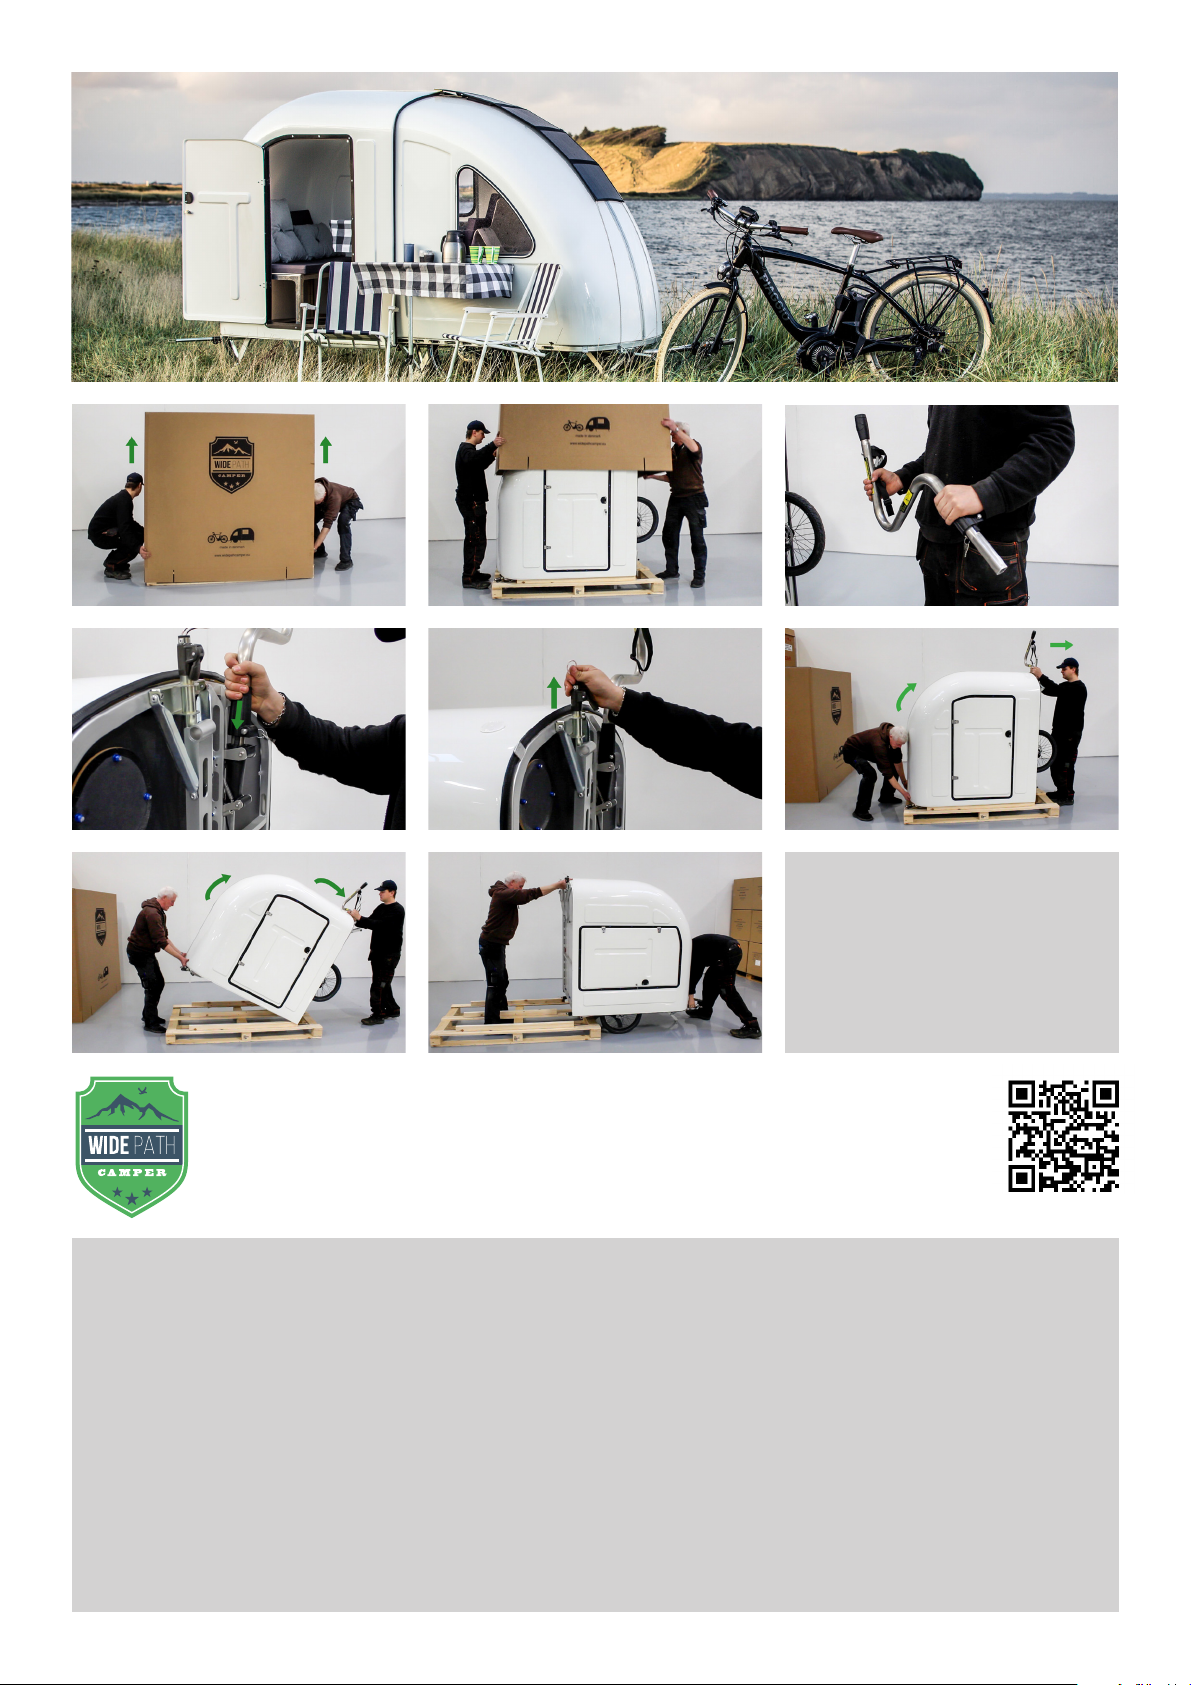
Bicycle trailers - CLUTCH E&EL&ES
Scope of delivery:
1x E-clutch incl. hinge piece, 1x washer
3x standard polygon inserts for quick release with
2.5mm and 5.5mm thickness and for solid axle
No polygon insert ts?
Call us or send us an email: info@weber-products.de
We have also developed some handmade special solu-
tions e.g. for Shimano, SRAM; Nexus hub gears and for
derailleurs in connection with special frame shapes.
Technical data:
E-clutch: Maximum weight allowed: 80kg
Max. support load: 6.5kg
EL-clutch: Maximum weight allowed: 80kg
Max. support load: 6.5kg,
Not for transporting children, only for transporting loads!
ES-clutch: Maximum weight allowed: 100kg
(only when mounted on a solid and thru axle!)
Max. support load: 6.5kg
Not for transporting children, only for transporting loads!
Note that the adjusting nut of the quick-re-
lease skewer must be screwed on with min.
8 turns or 8mm onto the quick release axle!
(Min. 8 turns also for solid axle)
Failure to comply carries the risk of tearing
out and thereby a loss of the rear wheel and
the trailer!
If a longer quick release skewer is required, it can be
immediately ordered from WEBER at: weber-products.de
Nr: KU.03.330.00
!
GEFAHR!
When using this E-clutch, a safety strap with a
metal clasp must be attached to the tow bar!
Accessories can also be ordered at:
weber-products.de /shop/de/
Nr: R2.12.400.00
!
GEFAHR!

6
www.weber-products.de
cons used within this document:
Caution!
Risk of the hitch being destroyed
or damaged
Note!
Additional information aside from
the operating manual
Danger!
Hazard that poses a risk
to life and limb
Icons in the
operating manual
ACHTUNG!
!
GEFAHR!
By purchasing this robust and sophisticated Hitch you have opted for a
high-quality German product that has been developed and manufactured
in Eggstätt/Bavaria. To ensure that your Hitch works for as long as pos-
sible, we have compiled several important pieces of information for you,
which you should read carefully before using the product for the rst time.
Please adhere to all safety instructions in order to enable smooth
operation and maximum safety.
Store the operating instructions in a safe place so that you can access
them at a later date if required. Non-observance of the instructions could
endanger your safety as well as the safety of your child and other road us-
ers. If you have any questions about the installation, maintenance or usage
of the product, please contact your Weber retailer or visit us online at:
www.weber-products.de
We hope you enjoy fun and safe journeys every time!
Warranty
Congratulations!
Safety in-
structions:
● Ensure the spring pin is fully locked into place on all rides!
● Ensure that the tow bar on the vehicle is correctly tted and secured.
Any incorrect installation can lead to the trailer detaching while riding and
serious consequences.
● Always fasten the safety strap around your bicycle frame’s rear
chainstay!
● Child bicycle trailers are not allowed on an EL-coupling or ES-coupling
append!
!
GEFAHR!
The WEBER hitch described overleaf comes with a two-year warranty from the date of purchase in line with the following
conditions:
• During the warranty period we shall rectify all damage reported to us at our own cost providing this has been demonstrably
caused by a manufacturing or material defect.
• Complaints shall only be dealt with if a copy of the receipt is provided with the item subject to the complaint.
• Production-induced deviations shall not be classed as damage.
• We shall full the warranty services by either repairing defective parts or replacing them with non-defective parts at our
discretion. Any parts replaced shall transfer to our ownership.
• When the product is sent to us, it must be packaged in such a manner that prevents damage. The sender must bear the
freight costs. Deliveries with postage unpaid shall not be accepted.
• We shall bear the cost of returning the replaced or repaired goods. The warranty shall not apply in the event of improper
handling.
• Warranty services shall neither extend the warranty period nor start a new one.
• The warranty period for replacement parts shall end on the same date as the warranty period for the entire product. Unless
required by law, we shall not assume any liability for claims, including those resulting from consequential damages.
If you have any questions, please contact your retailer or us directly! E-mail: info@weber-products.de
the poduct cannot be sold in the USA and Canada! (Product liability)

7
www.weber-products.de
• This Weber hitch has been designed to tow trailers with a permissible total weight of up to 80 kg.
(With the exception of the ES hitch = authorised for 100 kg).
• For safety reasons, we advise you to have your specialist retailer attach the hitches to your bicycle.
• Due to the many different bicycle dropout shapes and gear designs, our hitches do not generally t
all bicycles.
• Longer quick release axles or a replacement axle are often necessary. Extremely sporty mountain
bikes and modern internal gear hubs in particular require special polygons (special anti-rotation
discs for the bicycle hub), which you can purchase either from your specialist retailer or directly
from us.
Correct use of the hitch
Improper use of the hitch
−Cyclist -related information: children under the age of 16 are legally
prohibited from cycling while towing a trailer.
− Bike-related information: the bike must be in a technically sound condi-
tion and meet the latest technology standards.
Always consult your bike manufacturer in advance to nd out if your bike is
authorised for use with a trailer.
− Maintenance-related information: have specialists regularly service your
bike, the hitch and your trailer and inspect all connections.
Conditions of use for trailer hitches!
− Never turn on the spot with your bike and trailer combination.
− The angle between the bike and the trailer must always be great-
er than 90º, even when manoeuvring. If you ignore this
information, you will destroy the joint piece as it will bend
at smaller angles and can break.
– Always attach the tow bar’s tether strip to one of your
bike’s frame tubes. Tighten it so that it cannot interfere
with the spokes or get in the way when you are cycling.
− The maximum trailer load is 80 kg (ES 100 kg)
Manoeuvring with a trailer and hitch
90º
manouvering
backwards
correct
range angle
●Not suitable for use on S-Pedelecs or E-Bikes! (Not authorised for over 25 km/h)!
● Do not transport unsecured or oversized goods!
● Do not ride up/down steps or high kerbs!
● Do not breach the limits established by the technical specications
(operating instructions)!
!
GEFAHR!
Note the key number!
If you have purchased a connection piece with a lock, please store
one of the two keys provided separately and note the key number in case
of loss.
Key number:
ACHTUNG!

8
www.weber-products.de
How to use the Weber hitch
The parts are largely maintenance free but should still be regularly cleaned
to remove all dirt, salt and dust.
Never use oil to improve the function; if stiff, only ever apply a little silicon
or Teon spray.
Hitch maintenance:
Attachment:
1. Press the pin on the handle and twist the grip piece
anti-clockwise.
2. Push the grip piece and the hitch together. Ensure that the
smooth surfaces of the hitch and the connection piece are
aligned with one another.
3. Twist the grip piece clockwise until you hear a clear click.
Only then is the hitch securely locked into place.
4. In the case of connection pieces with a lock, lock the hitch
with the key provided.
5. Place the safety strap around the bike’s rear chainstay.
Thread the strap through the loop and lock it in place by push-
ing it together. The strap should have enough play to not impair
the trailers ability to change direction.
Removal:
1. Unfasten the safety strap on the bike frame
and unthread it.
2. Press the pin and twist to open.
3. Remove the tow bar from the hitch.
PUSH
TOGETHER...
TWIST CLOSED UNTIL
PIN LOCKS IN PLACE
PRESS THE PIN
TWIST OPEN...
LOCK!
ATTACH
SAFETY STRAP!
Table of contents
Other Weber Bicycle Accessories manuals
Popular Bicycle Accessories manuals by other brands

Busch+Müller
Busch+Müller Mu E 332ALK instruction manual

Chris King
Chris King R45 DISC user manual

SKS Germany
SKS Germany Mountain 11606 manual

Rose electronics
Rose electronics 2328852 owner's manual

Navibe
Navibe Mercury 100 operating instructions

Rose electronics
Rose electronics airik MT-CNC owner's manual