Weber HITCH EK Original instructions

MONTAGEANLEITUNG UND SICHERHEITSHINWEISE
DUK
Fahrrad-Anhänger - KUPPLUNG EK
Montage
Die Kupplung „EK“ ist eine Sondervariante der
bekannten WEBER E-Kupplung. Sie ist nur für
Räder mit sehr kurzem Ausfallende und 5mm
Schnellspanner bestimmt.
Achtung! Die Länge
des Ausfallendes
darf 10mm nicht
unterschreiten!!!
- Ist eine E-Kupplung (ab12mm)
verwendbar, ist diese der EK-Kupplung vorzuziehen, auf
Grund des Verdrehschutzes durch ein Polygon! Scope of delivery:
1x EK- Kupplung, 1x Fangband, 1 x Schraube M6x50,
1x Mutter M6 selbstsichernd, 2x Beilagscheibe Ø6,3
Fanggurt mit Metallschließe (neu)
Die EK- Kupplung ist nicht für elektrisch
betriebene Fahrräder zugelassen!
ACHTUNG!
Technische Daten:
EK-Kupplung:
Zulässiges Gesamtgewicht: 40kg
max. Stützlast: 6,5 kg
1. Schnellspanner öffnen und aus der Achse ziehen,
dabei auf die Feder achten!
2. Schnellspanner mit Kupplung in der Achse locker
befestigen (Bild 1)
3. Rad und Anhänger in einer Flucht aufstellen,
Kupplung und Deichsel verbinden, damit sich die
Kupplung streckt und ausrichtet. Erst dann den
Schnellspanner fest anziehen.
4. Tauschen Sie aus Sicherheitsgründen das vor-
handene Fangband durch das beiliegende (950mm
lang) Fangband und der M6 Schraube aus. Erwei-
tern Sie dafür das Schraubenloch mit einem Bohrer
auf Ø6,5mm und bohren Sie durch die gesamte
Deichsel durch. (Bild 2)
Die Schraube, den Deichselfuß und das Fangband
durchstecken und kontern.
Bild 1
Bild 2
Beachten Sie, dass die Einstellmutter des
Schnellspanners mit min. 8 Umdrehungen
oder 6mm auf die Schnellspannachse
aufgeschraubt ist, ansonsten besteht die Gefahr des
Ausreißens und somit der Verlust des Hinterrads!
ACHTUNG!
Es ist nicht zulässig, einen Hänger ohne
Deichsel- Fangband an der EK-Kupplung zu
befestigen. Dieses Fangband ist eine zu-
sätzliche Sicherheit für Sie und Ihre Kinder
gegen Unfälle oder Fehlbedienung.

2
www.weber-products.de
Benutzte Symbole innerhalb dieser Dokumentation:
Achtung!
Gefahr für Zerstörung oder Beschädigung
der Kupplung
Hinweis!
Zusätzliche Informationen außerhalb des
Betriebshandbuches.
Gefahr!
Gefahrenstelle für das Personal an
Leib und Leben.
Symbole in dem
Betriebshandbuch
ACHTUNG!
!
GEFAHR!
Mit dem Kauf dieser robusten und durchdachten Kupplung, haben Sie
sich für ein deutsches Qualitätsprodukt entschieden, das in Eggstätt/Lks.
Rosenheim entwickelt und gefertigt wurde. Damit Ihre Kupplung möglichst
lange seine Funktion erfüllen kann, haben wir einige wichtige Punkte für
Sie zusammengestellt, die Sie vor dem Erstgebrauch sorgfältig durchlesen
sollten. Bitte beachten Sie sämtliche Sicherheitshinweise für einen rei-
bungslosen Betrieb und ein Maximum an Sicherheit.
Bewahren Sie die Betriebsanleitung sorgfältig auf, um später bei Bedarf
darauf zurückgreifen zu können. Ihre Sicherheit, die Ihres Kindes und die
von Verkehrsteilnehmern könnte gefährdet sein, wenn Sie die Anweisungen
nicht befolgen. Wenn Sie Fragen zu Montage, Wartung oder Betrieb haben,
wenden Sie sich bitte an Ihren Weber- Fachhändler oder besuchen Sie uns
im Internet unter:
www.weber-products.de
Wir wünschen Ihnen allzeit Gute Fahrt!
Garantie
Herzlichen Glückwunsch!
Sicherheits-
hinweise:
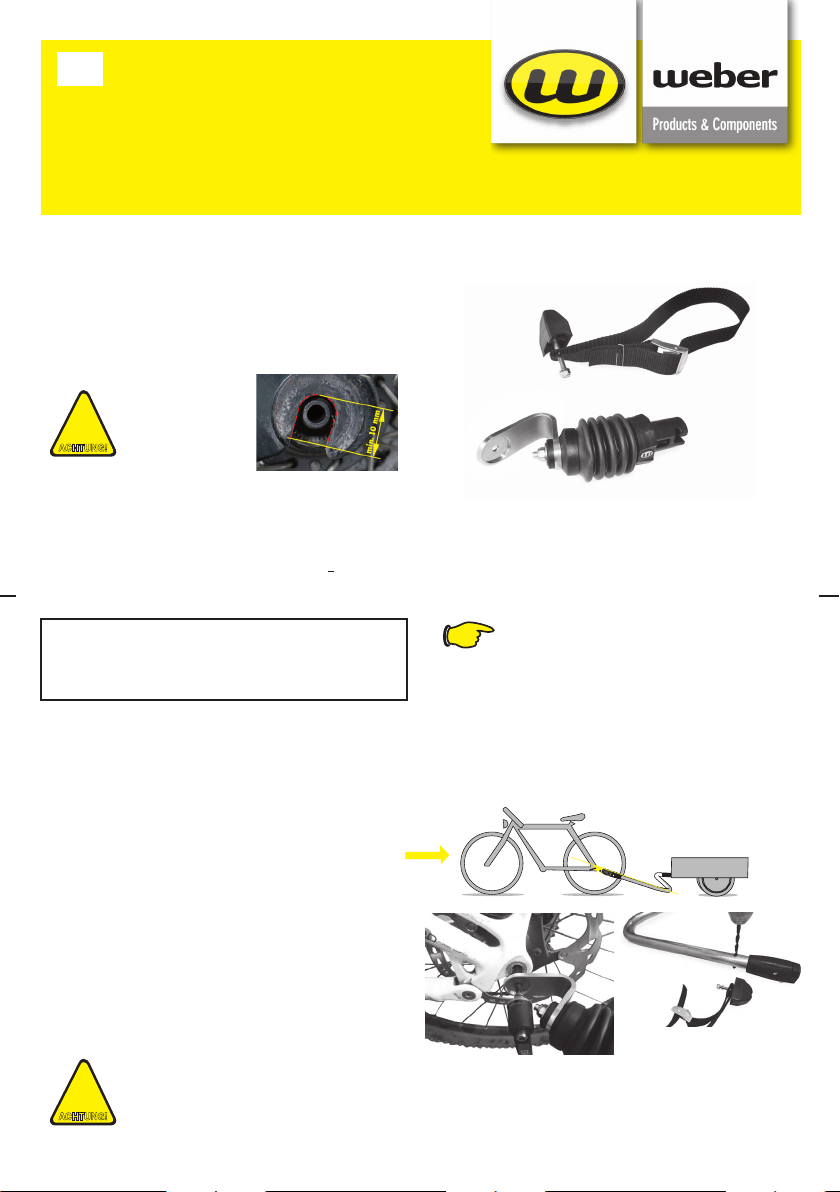
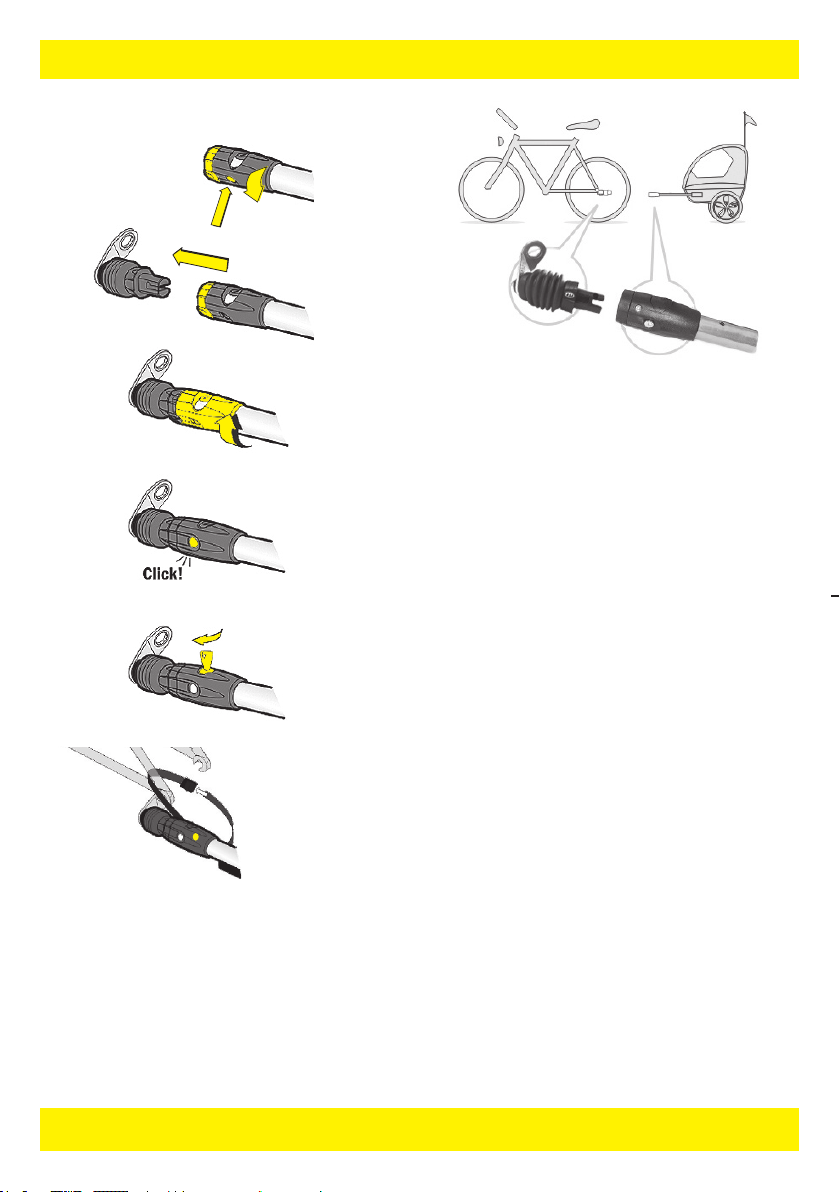
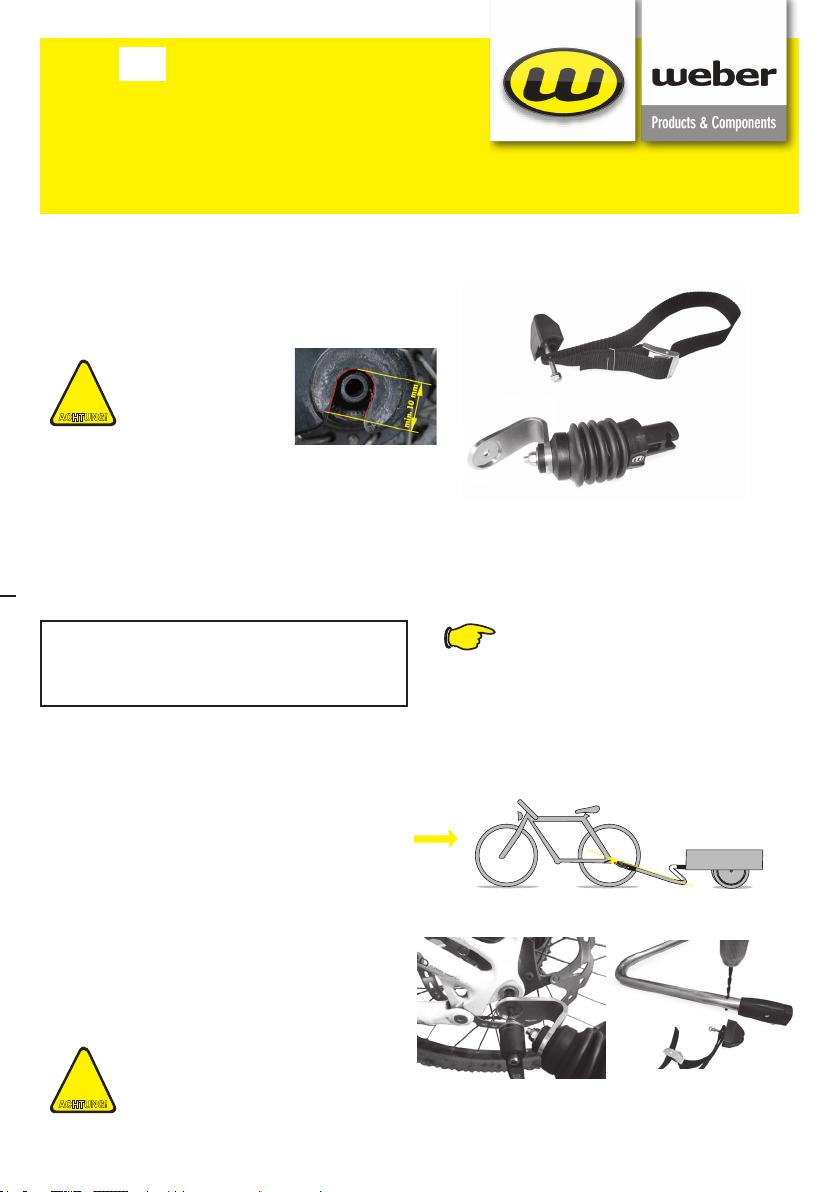
● Fahren Sie nur mit vollständig eingerastetem Federpin!
● Achten Sie darauf, dass die Deichsel am Fahrzeug korrekt montiert und
gesichert ist. Jede falsche Montage kann zum Verlust des Anhängers
während der Fahrt und zu schwerwiegenden Folgen führen.
● Legen Sie immer das Sicherheitsfangband um den Hinterbau Ihres
Fahrradrahmens!
● Kinderanhänger dürfen nicht an eine EL-Kupplung oder ES-Kupplung
angehängt werden!
!
GEFAHR!
Auf die umseitig bezeichnete WEBER Kupplung gewähren wir 2 Jahre Garantie ab dem Kaufdatum gemäß unseren folgenden
Bedingungen:
• Wir beheben innerhalb der Garantiezeit alle bei uns gemeldeten Schäden auf unsere Kosten, soweit die Schäden nachweislich
auf einen Herstellungs- oder Materialfehler zurückzuführen sind.
• Reklamationen werden nur bearbeitet, sofern der Reklamationsware eine Rechnungskopie beiliegt.
• Fertigungsbedingte Abweichungen gelten nicht als Schäden.
• Die Garantieleistung erfolgt in der Weise, dass alle mangelhaften Teile nach unserer Wahl unentgeltlich instand gesetzt oder
durch einwandfreie Teile ersetzt werden. Ausgetauschte Teile gehen in unser Eigentum über.
• Die Verpackung beim Einsenden der Ware muss so gestaltet sein, dass eine Beschädigung ausgeschlossen ist. Die Fracht
muss vom Versender getragen werden. Unfreie Sendungen werden nicht angenommen.
• Die Kosten für die Rücksendung der ersetzten oder reparierten Ware werden von uns getragen. Die Garantieleistung tritt nicht
in Kraft bei unsachgemäßer Behandlung.
• Garantieleistungen bewirken weder eine Verlängerung der Garantiefrist, noch setzen sie eine neue Garantiefrist in Lauf.
• Die Garantiefrist für Ersatzteile endet auch mit der Garantiefrist für das ganze Produkt. Soweit die Haftung nicht gesetzlich
vorgeschrieben ist, sind alle Ansprüche auch aus Folgeschäden, ausgeschlossen.
Sollten Sie noch Fragen haben, wenden Sie sich bitte an Ihren Fachhändler oder direkt an uns! E-mail: info@weber-products.de
Export in USA und Kanada nicht erlaubt! (Produkthaftung)

3
www.weber-products.de
• Diese Weber-Kupplung ist dazu bestimmt, Anhänger mit zulässigem Gesamtgewicht bis zu 80kg zu
ziehen. (mit Ausnahme ES-Kupplung = für 100kg zugelassen)
• Aus Sicherheitsgründen raten wir Ihnen grundsätzlich, die Kupplungen von Ihrem Fachhändler an
Ihr Fahrrad montieren zu lassen.
• Aufgrund der vielfältigen Formen von Fahrradausfallenden und Schaltungsausführungen passen
unsere Kupplungen nicht generell auf alle Fahrräder.
• Häug sind längere Schnellspannachsen oder eine Austauschachse nötig. Insbesondere sehr
sportliche Mountainbikes und moderne Nabenschaltungen verlangen Sonderpolygone (dies sind
spezielle Verdrehsicherungs-Scheiben für die Fahrradnabe), die Sie bei Ihrem Fachhändler oder
auch direkt bei uns erwerben können.
Bestimmungsgemäße Verwendung der Kupplung
Nicht bestimmungsgemäße Verwendung der Kupplung
−zum Fahrer: Kindern unter 16 Jahren ist es gesetzlich nicht erlaubt, mit
einem Anhänger zu fahren.
− zum Fahrrad: Das Fahrrad muss in einem technisch einwandfreien Zu-
stand sein und dem Stand der Technik entsprechen.
Fragen Sie immer zuerst Ihren Fahrradhersteller, ob Ihr Fahrrad für den
Anhängerbetrieb zugelassen ist.
− zur Wartung: Lassen Sie Ihr Fahrrad, die Kupplung und Ihren Anhänger
regelmäßig von Fachleuten warten und alle Verbindungen prüfen.
Einsatz - Voraussetzungenvon Anhänger - Kupplungen!
− Kehren Sie nie auf der Stelle mit Ihrem Fahrrad-Anhänger-Ge-
spann um.
− Der Winkel zwischen Fahrrad und Anhänger muss - auch beim
Rangieren - immer größer als 90º sein. Bei Nichtbeachtung
dieses Hinweises zerstören sie das Gelenkstück, da es bei
kleinen Winkeln verbogen wird und brechen kann.
− Befestigen Sie immer das Fangband der Deichsel an
einem Rahmenrohr Ihres Fahrrades. Spannen Sie es so,
dass es zum einen nicht in die Speichen gelangen kann,
zum anderen darf das Fangband das Fahrverhalten nicht negativ
beeinussen.
− Die Anhängelast beträgt max. 80kg (ES 100kg)
Rangieren mit Anhänger und Kupplung
90º
Rangieren
nach hinten
maximaler
Rangierwinkel
● nicht für S-Pedelecs oder E-Bikes! (keine Zulassung über 25km/h)!
● Kein Transport von ungesicherten oder übergroßen Waren!
● Kein Überfahren von Treppen und hohen Bordsteinen!
● Kein Betrieb außerhalb der zulässigen technischen Daten(Betriebsanleitung)!
!
GEFAHR!
Schlüsselnummer merken!
Falls Sie ein Anschlussstück mit Schloss erworben haben, bewah-
ren Sie bitte einen der beiden mitgelieferten Schlüssel gesondert auf und
notieren Sie sich die Schlüsselnummer für den Fall eines Verlustes.
Schlüsselnummer:
ACHTUNG!

4
www.weber-products.de
Und so benutzen Sie die Weber Kupplung
Grundsätzlich sind die Teile weitgehend wartungsfrei, sollten jedoch regel-
mäßig von Schmutz, Salz und Staub befreit werden.
Verwenden Sie niemals Öl für eine leichtere Bedienbarkeit, nur etwas
Silikon- oder Teonspray bei Schwergängigkeit.
Wartung der Kupplung:
Ankoppeln:
1. Pin am Griff drücken und Griffstück nach links
drehen.
2. Stecken Sie das Griffstück und die Kupplung zusammen.
Achten Sie darauf, dass die planen Flächen der Kupplung und
des Anschlussstückes zueinander ausgerichtet sind.
3. Drehen Sie das Griffstück nach rechts zu bis ein deutlicher
Klickton hörbar ist. Nur dann ist die Kupplung sicher verriegelt.
4. Bei Anschlusstücken mit Schloss schließen Sie mit dem
mitgelieferten Schlüssel die Kupplung ab.
5. Legen Sie das Sicherungsfangband um die Hinterbau-stre-
be des Fahrrades. Fädeln Sie das Sicherungsband durch die
Schließe und verschließen Sie diese durch Zudrücken. Dabei
sollte das Band genug Spiel haben, um das Lenkverhalten des
Anhängers nicht zu beeinussen.
Abkoppeln:
1. Fangband am Fahrradrahmen öffnen
und ausfädeln.
2. Pin drücken und aufdrehen.
3. Deichsel von Kupplung ziehen.
ZUSAMMEN
STECKEN..
ZUDREHEN BIS
PIN EINRASTET...
PIN DRÜCKEN-
AUFDREHEN..
ABSPERREN!
FANGBAND
ANLEGEN!
www.weber-products.de

5
INSTALLATION INSTRUCTIONS AND SAFETY INFORMATION
DUK
Bicycle trailer – HITCH EK
Installation
The “EK”hitch is a special version of the famous E hitch.
It is designed for wheels with very short dropout and
5mm quick release.
Caution! The length of
the dropout must not be
less than 10 mm! !!!
- If an E-coupling (minimum length of 12mm) can be used, this
is preferable to the EK coupling. The twist protection is better
given with a polygon.
Scope of delivery:
1x EK-hitch 1x tether, 1x screw M6x50,
1x nut M6 self-locking, 2x washer Ø6.3
Tether with metal clasp (new)
The EK-hitch is not approved for electrically
powered bicycles!
ACHTUNG!
Technical data:
EK-hitch:
allowabel total-weight: 40kg
maximum support load: 6,5 kg
1. Open the quick release and pull it off the axle.
Please attention to the Spring!
2. Fasten the quick release with clutch loosely in the
axle (Image 1)
3. Wheel and trailers to provide exactly one behind
the other. Coupling and drawbar connect, so that the
clutch stretches and aligns. Only then tighten the
quick release rmly.
4. For safety reasons, replace the existing safety
strap with the enclosed (950 mm long) safety strap
and the M6 screw. Extend the screwhole with a
Ø6.5mm bit and drill through the entire drawbar
(Image 2)
Push through and lock the screw and the tether.
Note that the adjustment nut of the quick
release with min. 8 turns or 6mm screwed
onto the quick-release axle.
Image 1 Image2
ACHTUNG!
It is not permissible to attach a trailer on
the EK hitch without a catch strap. This
catch strap is an extra security for you
and your children in case of accidents or
misuse.

6
www.weber-products.de
cons used within this document:
Caution!
Risk of the hitch being destroyed
or damaged
Note!
Additional information aside from
the operating manual
Danger!
Hazard that poses a risk
to life and limb
Icons in the
operating manual
ACHTUNG!
!
GEFAHR!
By purchasing this robust and sophisticated Hitch you have opted for a
high-quality German product that has been developed and manufactured
in Eggstätt/Bavaria. To ensure that your Hitch works for as long as pos-
sible, we have compiled several important pieces of information for you,
which you should read carefully before using the product for the rst time.
Please adhere to all safety instructions in order to enable smooth
operation and maximum safety.
Store the operating instructions in a safe place so that you can access
them at a later date if required. Non-observance of the instructions could
endanger your safety as well as the safety of your child and other road us-
ers. If you have any questions about the installation, maintenance or usage
of the product, please contact your Weber retailer or visit us online at:
www.weber-products.de
We hope you enjoy fun and safe journeys every time!
Warranty
Congratulations!
Safety in-
structions:
● Ensure the spring pin is fully locked into place on all rides!
● Ensure that the tow bar on the vehicle is correctly tted and secured.
Any incorrect installation can lead to the trailer detaching while riding and
serious consequences.
● Always fasten the safety strap around your bicycle frame’s rear
chainstay!
● Child bicycle trailers are not allowed on an EL-coupling or ES-coupling
append!
!
GEFAHR!
The WEBER hitch described overleaf comes with a two-year warranty from the date of purchase in line with the following
conditions:
• During the warranty period we shall rectify all damage reported to us at our own cost providing this has been demonstrably
caused by a manufacturing or material defect.
• Complaints shall only be dealt with if a copy of the receipt is provided with the item subject to the complaint.
• Production-induced deviations shall not be classed as damage.
• We shall full the warranty services by either repairing defective parts or replacing them with non-defective parts at our
discretion. Any parts replaced shall transfer to our ownership.
• When the product is sent to us, it must be packaged in such a manner that prevents damage. The sender must bear the
freight costs. Deliveries with postage unpaid shall not be accepted.
• We shall bear the cost of returning the replaced or repaired goods. The warranty shall not apply in the event of improper
handling.
• Warranty services shall neither extend the warranty period nor start a new one.
• The warranty period for replacement parts shall end on the same date as the warranty period for the entire product. Unless
required by law, we shall not assume any liability for claims, including those resulting from consequential damages.
If you have any questions, please contact your retailer or us directly! E-mail: info@weber-products.de
the poduct cannot be sold in the USA and Canada! (Product liability)

7
www.weber-products.de
• This Weber hitch has been designed to tow trailers with a permissible total weight of up to 80 kg.
(With the exception of the ES hitch = authorised for 100 kg).
• For safety reasons, we advise you to have your specialist retailer attach the hitches to your bicycle.
• Due to the many different bicycle dropout shapes and gear designs, our hitches do not generally t
all bicycles.
• Longer quick release axles or a replacement axle are often necessary. Extremely sporty mountain
bikes and modern internal gear hubs in particular require special polygons (special anti-rotation
discs for the bicycle hub), which you can purchase either from your specialist retailer or directly
from us.
Correct use of the hitch
Improper use of the hitch
−Cyclist -related information: children under the age of 16 are legally
prohibited from cycling while towing a trailer.
− Bike-related information: the bike must be in a technically sound condi-
tion and meet the latest technology standards.
Always consult your bike manufacturer in advance to nd out if your bike is
authorised for use with a trailer.
− Maintenance-related information: have specialists regularly service your
bike, the hitch and your trailer and inspect all connections.
Conditions of use for trailer hitches!
− Never turn on the spot with your bike and trailer combination.
− The angle between the bike and the trailer must always be great-
er than 90º, even when manoeuvring. If you ignore this
information, you will destroy the joint piece as it will bend
at smaller angles and can break.
– Always attach the tow bar’s tether strip to one of your
bike’s frame tubes. Tighten it so that it cannot interfere
with the spokes or get in the way when you are cycling.
− The maximum trailer load is 80 kg (ES 100 kg)
Manoeuvring with a trailer and hitch
90º
manouvering
backwards
correct
range angle
●Not suitable for use on S-Pedelecs or E-Bikes! (Not authorised for over 25 km/h)!
● Do not transport unsecured or oversized goods!
● Do not ride up/down steps or high kerbs!
● Do not breach the limits established by the technical specications
(operating instructions)!
!
GEFAHR!
Note the key number!
If you have purchased a connection piece with a lock, please store
one of the two keys provided separately and note the key number in case
of loss.
Key number:
ACHTUNG!

8
www.weber-products.de
How to use the Weber hitch
The parts are largely maintenance free but should still be regularly cleaned
to remove all dirt, salt and dust.
Never use oil to improve the function; if stiff, only ever apply a little silicon
or Teon spray.
Hitch maintenance:
Attachment:
1. Press the pin on the handle and twist the grip piece
anti-clockwise.
2. Push the grip piece and the hitch together. Ensure that the
smooth surfaces of the hitch and the connection piece are
aligned with one another.
3. Twist the grip piece clockwise until you hear a clear click.
Only then is the hitch securely locked into place.
4. In the case of connection pieces with a lock, lock the hitch
with the key provided.
5. Place the safety strap around the bike’s rear chainstay.
Thread the strap through the loop and lock it in place by push-
ing it together. The strap should have enough play to not impair
the trailers ability to change direction.
Removal:
1. Unfasten the safety strap on the bike frame
and unthread it.
2. Press the pin and twist to open.
3. Remove the tow bar from the hitch.
PUSH
TOGETHER...
TWIST CLOSED UNTIL
PIN LOCKS IN PLACE
PRESS THE PIN
TWIST OPEN...
LOCK!
ATTACH
SAFETY STRAP!
Table of contents
Languages:
Other Weber Bicycle Accessories manuals