Wegener Nielsen NAVE IIc User manual

www.wegwner.com 1 800026-02 Rev. A
NAVE IIc
Nielsen Audio Video Encoder
Compressed
Quick Start Guide
Welcome to your NAVE IIc Nielsen Compressed Audio Video Encoder! The
WEGENER NAVE IIc Nielsen encoder expands upon Nielsen’s audio-coding
capabilities by supporting the ability to code a pre-compressed MPEG-2
transport stream. The WEGENER NAVE IIc encoder will insert Nielsen data into
MPEG-2 Multi-Program Transport Streams compliant with the US ATSC
standards. This Quick Start Guide will help you quickly set up and start
operating your NAVE IIc using the Web Interface. For a full description of the
NAVE IIc's abilities and detailed installation and operation instructions, please
consult the NAVE IIc User's Reference Manual available on CD or on the
worldwide web at www.wegener.com.
For additional help, contact us by phone at (770) 814-4057, by fax at
For questions about SID support, please contact the Nielsen Encoder Support
1. Remove the NAVE IIc, ac power cord, and CD-ROM (Manual) from the
shipping carton. Call your shipping carrier immediately if any damage is
discovered.
2. Remove the clear plastic covering from around the bottom of the unit and
over the LCD window on the front panel.
3. Place the NAVE IIc indoors on a well-supported, flat table or desktop or
mount it in a standard equipment rack. If rack-mounting your NAVE IIc,
please consult the NAVE IIc User's Reference Manual for detailed
instructions and specific cautions.
4. Connect the following items: (Refer to Figure 1.)
a. The output from your DTV Encoder or Stream Splicer to the Receive
input female BNC connector (A).
b. The output from the NAVE IIc, Transmit out female BNC connector (B),
to your DTV transmitter or modulator.
c. Your LAN line to the NAVE IIc 's Network port (C), 10/100/1000baseT;
female RJ-45 connector. See step 8 for Network port configuration.
d. Your time reference source, of your chose, to one of the following
ports; NTP (C), SMPTE LTC (D) or GPS (E)
e. Connect the ac power cord to the NAVE IIc 's IEC receptacle (F) and
to a 100-to-120-Vac or 200-to-240-Vac source. We strongly
recommend that you connect the NAVE IIc unit to an un-interruptible
power supply.
Figure 1: NAVE IIc Rear-Panel Connectors

NAVE IIC QUICK START GUIDE
800026-02 Rev. A 2 www.wegener.com
f. The Alarm port (G, Figure 1) on the rear panel may be used to provide
a contact closure during alarm conditions or power failure. See the
NAVE IIc User’s Manual for complete connector and signal details.
CAUTION: Do not connect devices to the mouse, keyboard, or other
connectors not described here. They are for factory use only.
5. Next, start the NAVE IIc as follows:
a. Press and hold the ENTER/POWER button on the front panel for two
seconds. The NAVE IIc will power up and begin the boot process.
Six of the nine LED indicators flash on and off as the unit begins
initialization; Tx, Rx and System Bypass will not flash. The boot
process will take approximately 50 seconds to complete.
Note: To easily restart the NAVE IIc any time after a normal power down,
simply press the ENTER/POWER button on the NAVE IIc’s front panel.
(Refer to the User's Manual for details.) If power is lost to the NAVE IIc
because of an interruption of service, the NAVE IIc will automatically
power itself back on.
Figure 2: NAVE IIc Front-Panel Controls and Indicators
6. Get to know the NAVE IIc's front panel.
a. The Liquid Crystal Display (LCD) provides menu, data, and input
screens to the user. Menu screens are entry points to additional
screens. These may be data screens that display signal or unit status
information, or input screens where settings can be changed by the
user.
b. The NAVE IIc’s "Home" screen displays the unit's input/output stream
type (ASI or SMPTE310M), the TSID number (in hex) as read from the
input source, and a scrolling line that displays the current SID
configuration(s) (once the unit is configured). This "Home" screen may
be reached at any time by repeatedly pressing the ESC button.
7. Menu Navigation
a. Six pushbuttons allow you to move through the various screens, select
characters for input, and accept or reject changes. To move down or up
through the menu screens, use the ENTER/ POWER and ESC buttons.
b. To enter or change data in editable fields (indicated by <>), press the
ENTER/ POWER button and use the up Uand down Varrow buttons to
increment the underlined character or digit. Use the right Zand left Y
arrow buttons to move to adjacent digits and press ENTER/POWER
again to accept your input. Pressing ESC will cancel any changes.
c. Figure 3 is a summary of the top-level menus available through the
Front Panel Interface of the Encoder. See the NAVE IIc User’s Manual
for complete Front Panel menu description and operation.

NAVE IIC QUICK START GUIDE
www.wegener.com 3 800026-02 Rev. A
Figure 3: LCD Front Panel Menu Summary
d. Ten Front Panel light-emitting diodes (LEDs) illuminate to show unit
status at a glance. Table 1 gives the meaning of each LED indicator.
Please refer to Table 2 for the meaning of the rear panel Transport I/O
card LED indicators.
Table 1. Front Panel LED Indicator Descriptions
LED
Label LED
Color LED
STATE
Meaning
Constant The receiver is enabled and the unit is receiving a valid
transport stream.
Rx Green
Off Valid data has not been received for 0.1 seconds
Constant The transmitter is enabled and data is being transmitted.
Tx Green
Off Valid data has not been sent for 0.1 seconds
Constant The watermarking process has started, and no alarms are
present
System Green
Off The NAVE IIc Watermark function is shut down, but the
Encoder is monitoring the stream.
Constant The encoder has inserted at least one SID in the last second
or two
Encode Green
Off The NAVE IIc encoder is not watermarking the AC3 audio
frames
Constant The encoder is receiving PSIP packets, and the Program
information in the PSIP packet matches the PMT and PAT
PSIP Green
Off No PSIP information can be found in the stream, or the PSIP
information is incorrect
Constant The modem is on and in use
Modem Green
Off No modem activity is detected
Constant A warning has been issued recently. See error log for details.
Warning Yellow
Off No current Warning condition exists
Table 1. Front Panel LED Indicator Descriptions (Continued)
LED
Label LED
Color LED
STATE
Meaning
Constant An error has occurred. See error log for details.
Alarm Red
Off No current Alarm condition exists
Constant The encoder is in firmware-bypass mode.
System
Bypass Red
Off No critical error is occurring.
Constant The Forced Bypass switch will be illuminated Red when the
switch is pressed in (engaged). In this position all transport
stream processing and monitoring stops, until the switch is
disengaged.
Forced
Bypass
(Switch
CAP)
Red
Off The Forced Bypass switch is not engaged.
Table 2 Rear Panel Transport I/O Card LED Indicator Descriptions
LED
Label LED
Color LED
State
Meaning
Flashes The receiver is enabled and the unit is receiving a valid
transport stream.
Rx Red
Off Valid data has not been received for 0.1 seconds
Off No Carrier is detected on the Receive input
CD Red
Constant A carrier is detected on the receive BNC input.
Flashes The transmitter is enabled and data is being transmitted.
Tx Green
Off Valid data has not been sent for 0.1 seconds
Off Synchronization can not be detected on Receive BNC input
SYNC Green
Constant The received input stream is packet synchronized
e. The Web Interface for the NAVE IIc Encoder enables you to control and
view the state of the Encoder remotely via a web browser on a PC. It
mirrors the functionality of the Encoder's front panel interface.

NAVE IIC QUICK START GUIDE
800026-02 Rev. A 4 www.wegener.com
NOTE: The Encoder must be configured with an IP address before the Web
Interface can be used. See below for information on configuring the
NAVE IIc Encoder’s IP address, or see Appendix A for configuring the
PC network settings to work with the default NAVE IIc settings.
8. IP Configuration Setup for Web Browser Control
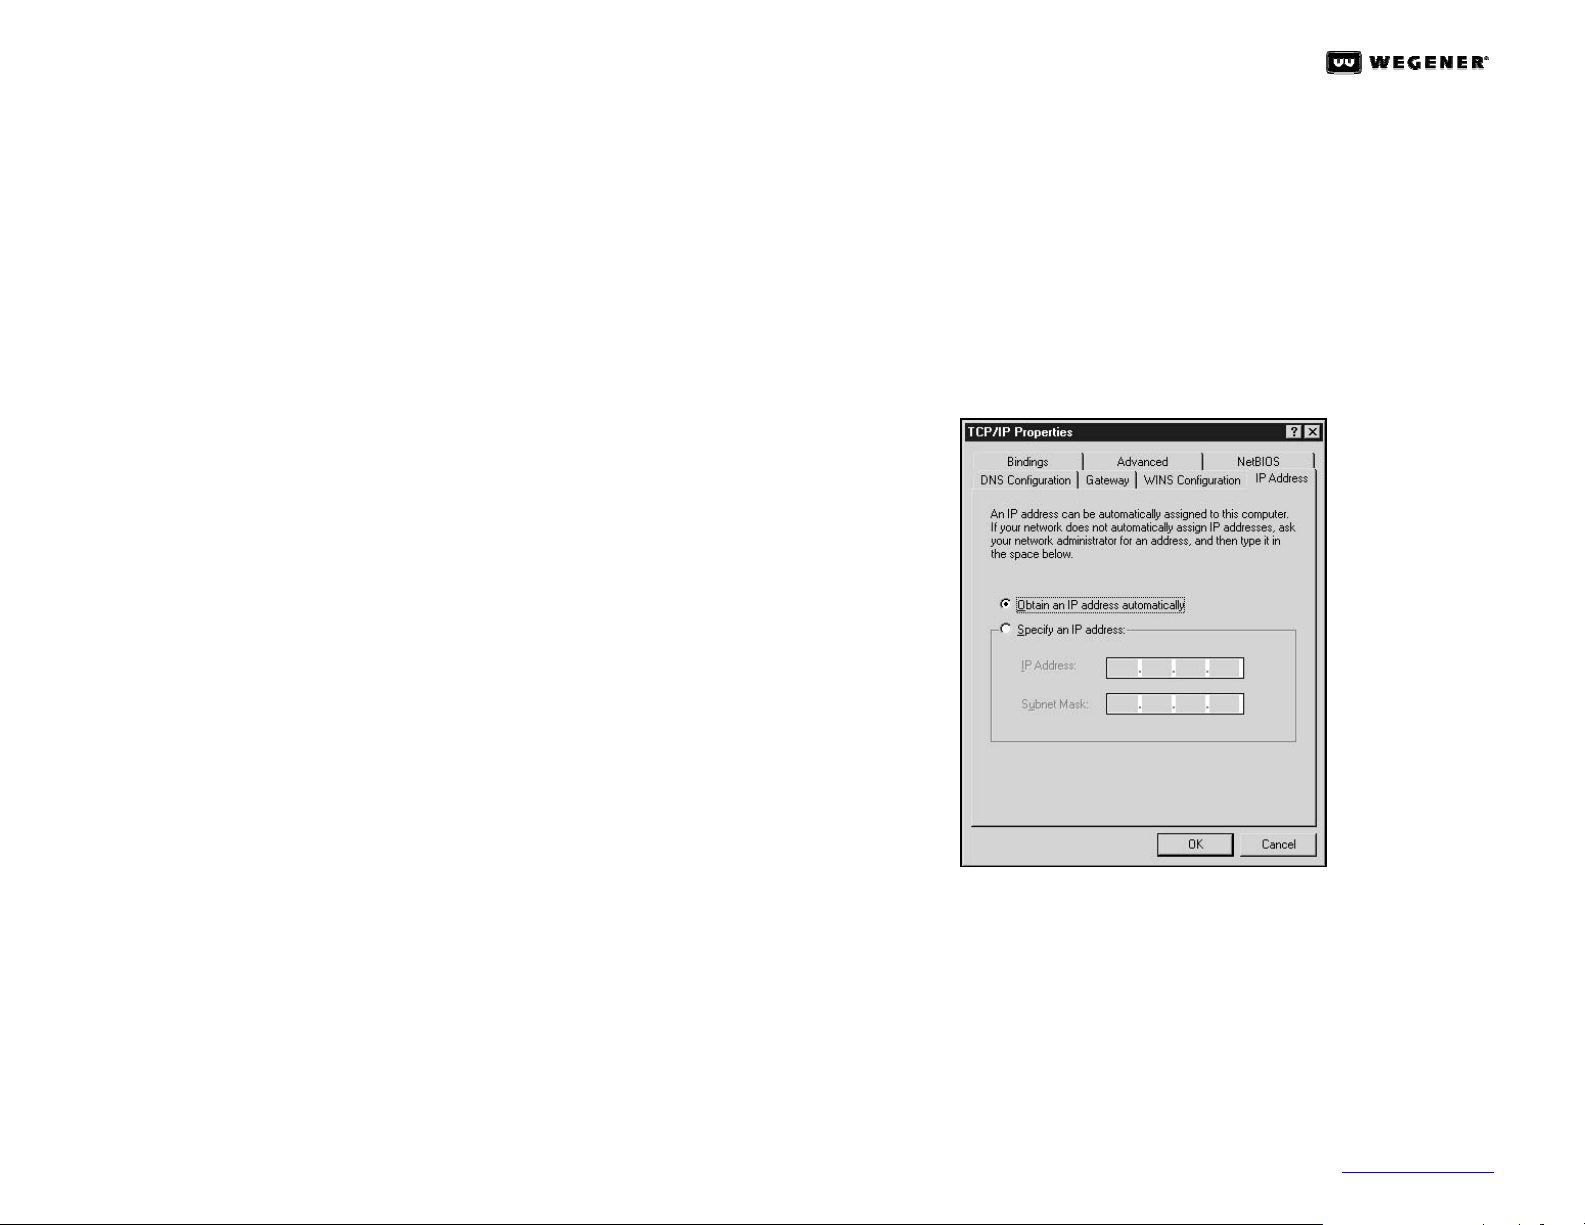
The default setting for the NAVE IIc Encoder’s Network port is Static Mode,
with an IP address of 10.61.62.63 and a Subnet mask of 255.255.255.0.
NOTE: Consult your Network Administrator to determine whether these
defaults can be used on the network where you will install the NAVE
IIc Encoder. You may need to configure it for DHCP Mode, to use a
different Static IP address, or to change the Subnet Mask or Gateway
Addresses (as described in the following steps).
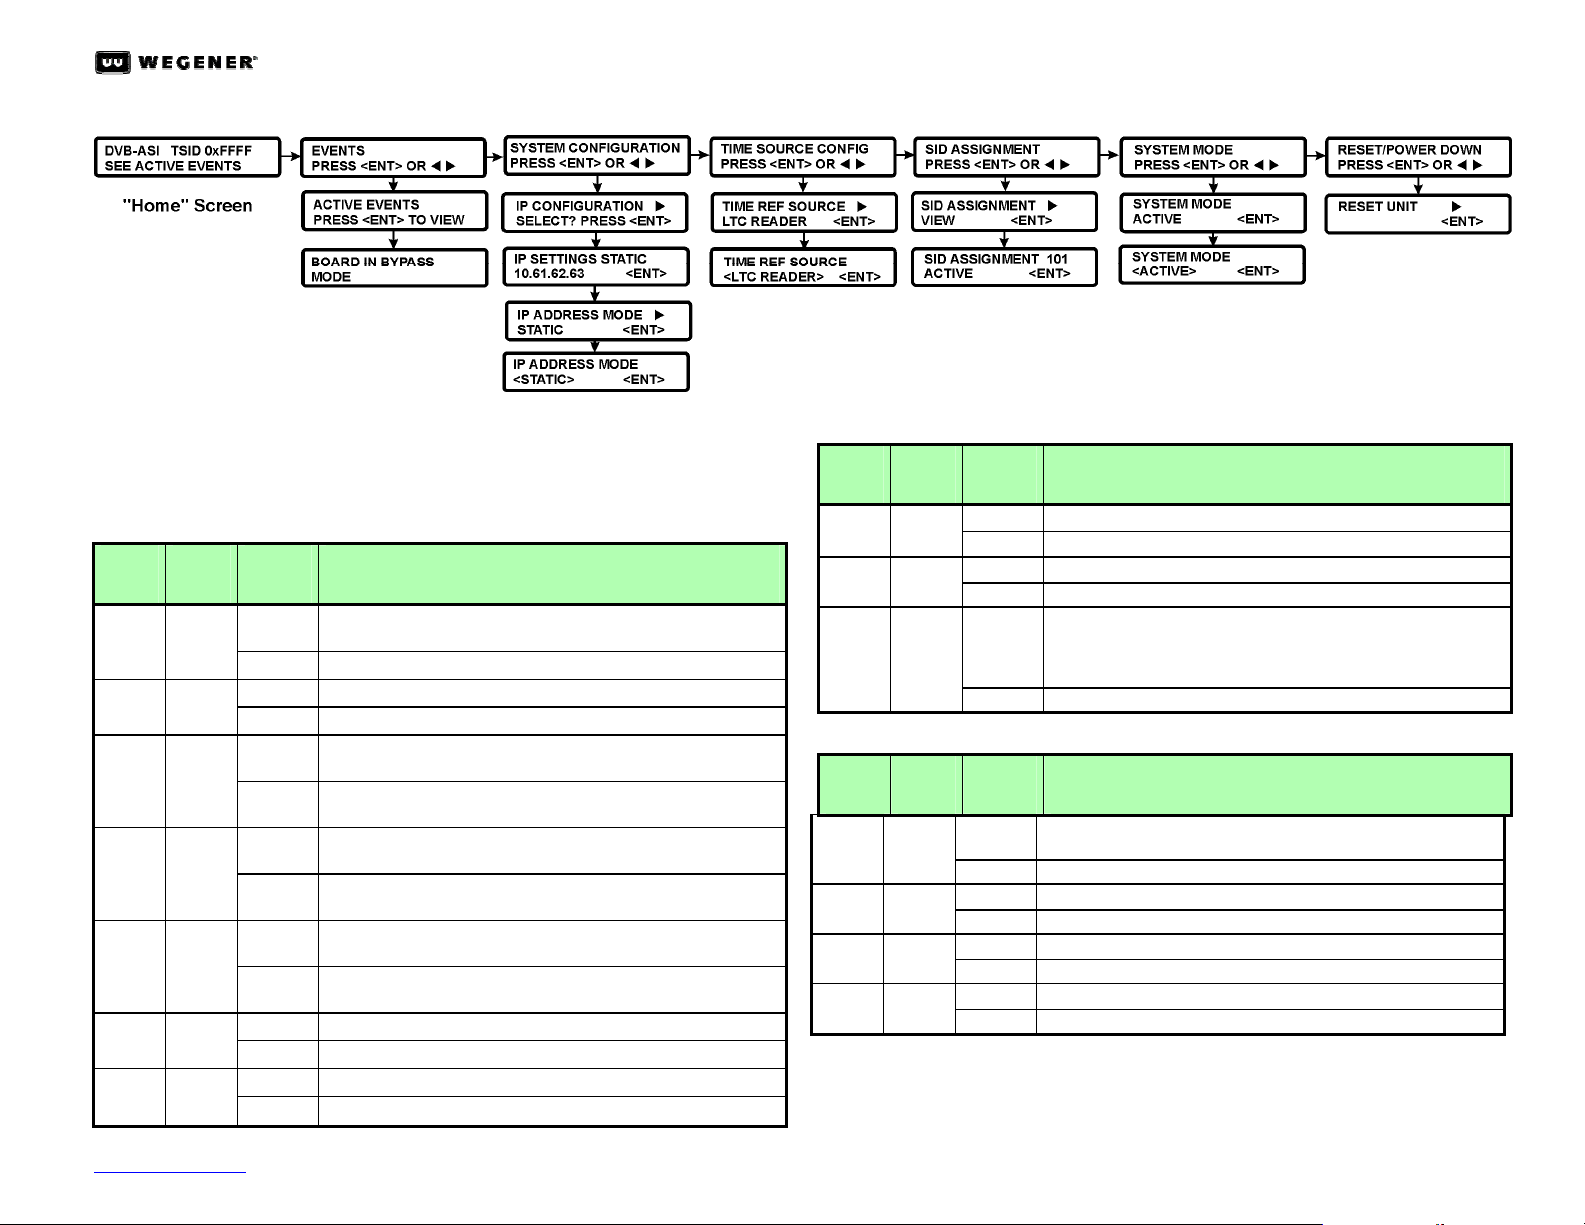
a. From the Home screen on the Front Panel LCD screen, press the right arrow
Zbutton until the LCD shows SYSTEM CONFIGURATION.
b. Press the ENTER/ POWER button to set the System Configuration. (Using the
Yand Zarrow buttons will move you to the other top-level menu screens.)
c. When the LCD screen shows IP CONFIGURATION SELECT? press ENTER/
POWER again.
d. The next LCD screen displays IP SETTINGS STATIC on the top line, while the
second line scrolls through the default IP configuration settings. Pressing
ENTER/ POWER at any time on this screen will drop you down into the IP
Setup menus.
e. The first IP Setup screen is IP ADDRESS MODE. Pressing the ENTER/
POWER button here allows you to select either STATIC or the DHCP IP
Address Mode.
f. If you select DHCP, the NAVE IIc Encoder will request an IP address from
your DHCP server. The LCD screen will display the message, APPLYING IP
SETTINGS PLEASE WAIT…, and then display the new DHCP-assigned IP
address.
g. If you need a Static IP address, but a different IP address or Subnet Mask
than the default settings, then use Zto move one screen to the right until you
see the screen with IP ADDRESS with the default address below it.
NOTE: For IP addresses that include subfields with leading zeros, you must
enter those zeros when entering the address in the NAVE IIc. For
example, IP address 128.92.56.4 would be entered as 128.092.056.004.
h. Press ENTER/ POWER to edit the default address. (See Menu Navigation
on page 2 to change editable data.) After entering the new IP address,
press the ENTER/POWER button.
i. The LCD screen will display the message, APPLYING IP SETTINGS
PLEASE WAIT.., and then display the SUBNET ADDRESS screen with the
default mask address.
j. Press ENTER/ POWER to modify the Subnet address (if needed). (and
then the Gateway address, if needed).
k. Record the new IP Address of the NAVE IIc unit displayed on the LCD
screen.
l. Using a computer on the network attached to the NAVE IIc, open your
web browser.
m.Type the IP Address noted from the IP Address screen in the browser's
address box. Leading zeros must be omitted when entering IP address
on Web browser.
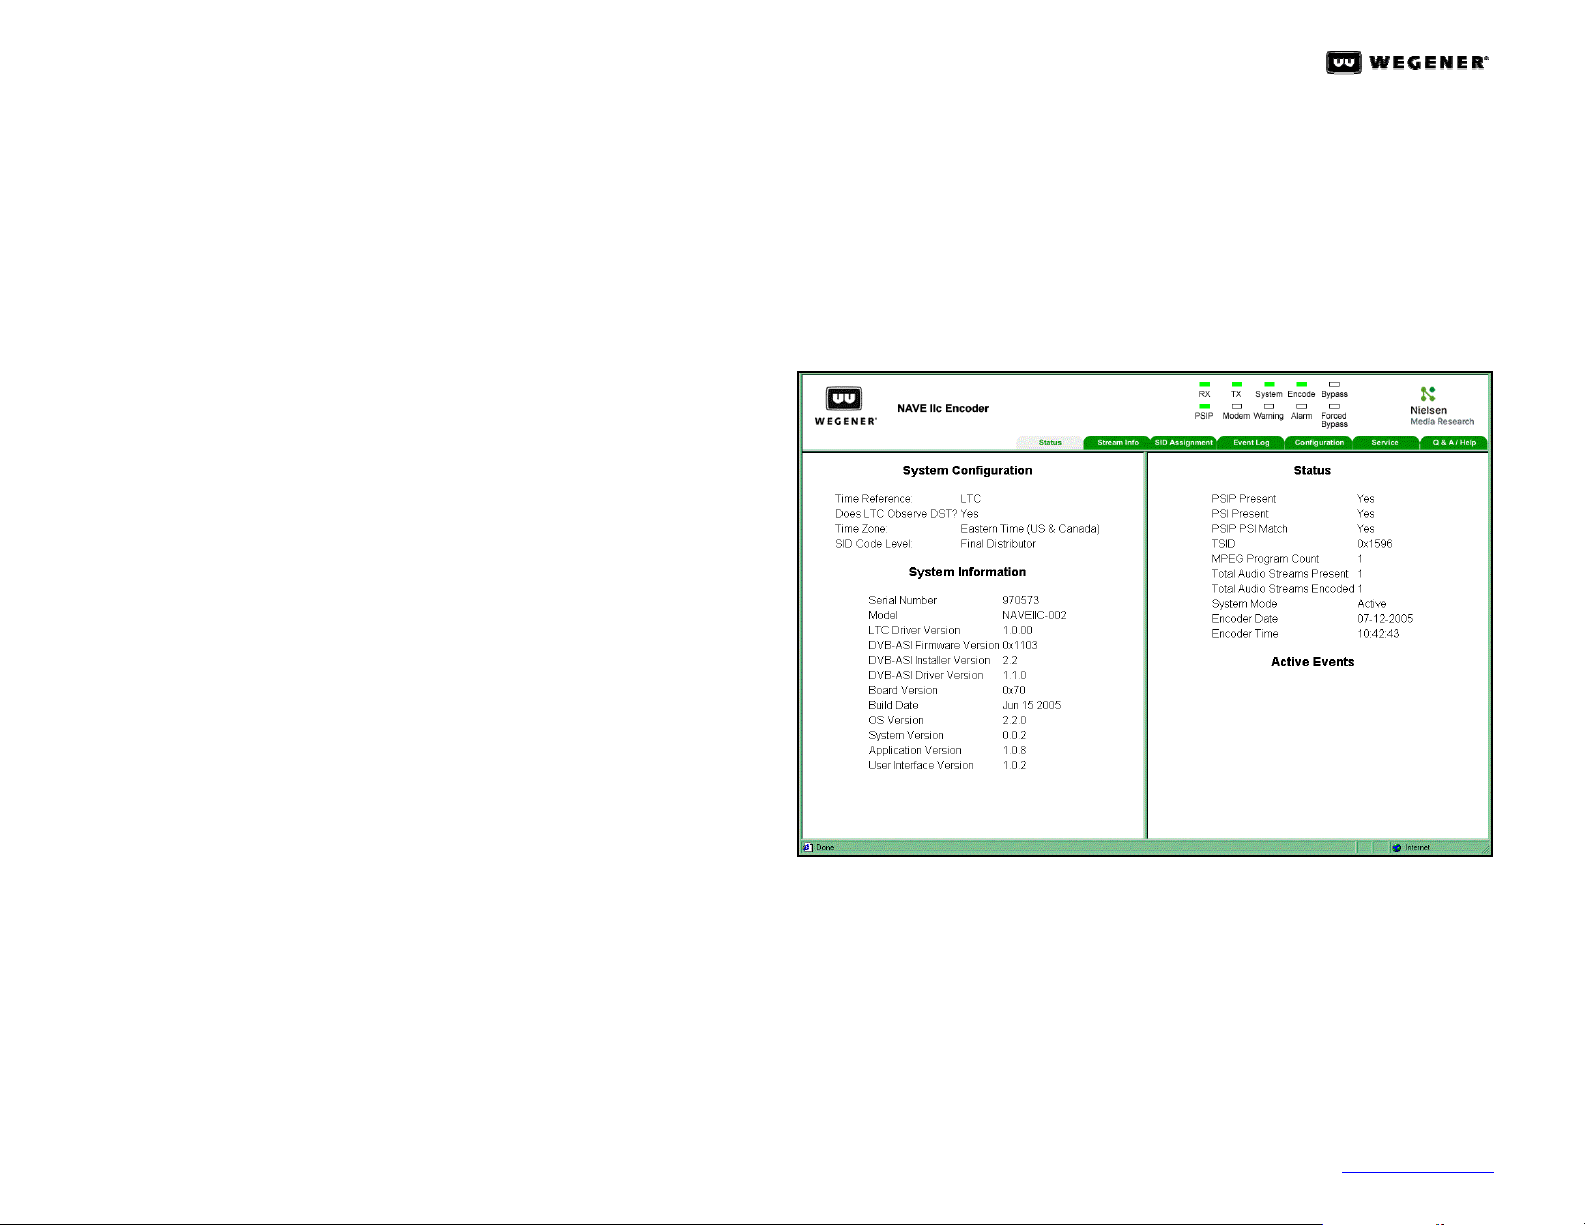
n. Press <Enter> (on the computer keyboard) and the NAVE IIc's Status
page will be displayed (Figure 4).
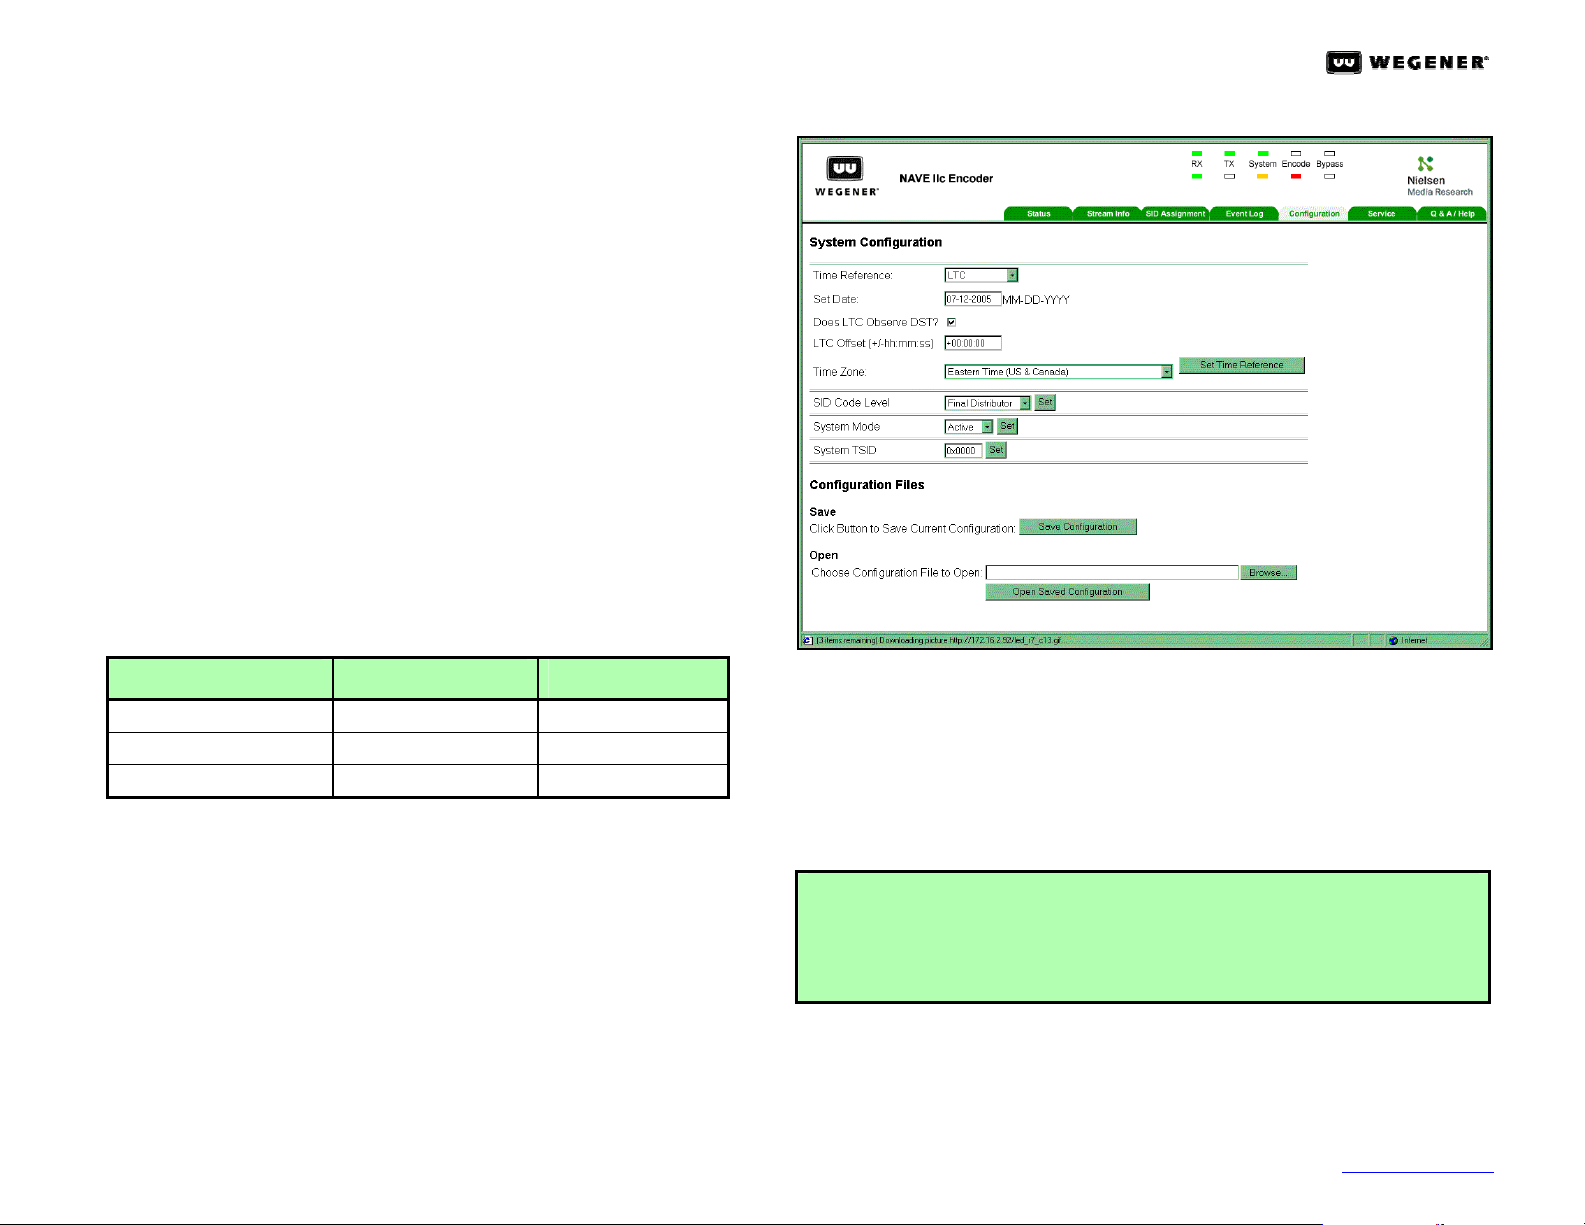
Figure 4: NAVE IIc Web Interface Status Page
o. To see detailed information about the transport stream, click the
Stream Info tab (Figure 5 on the next page). Information from this tab is
required to configure the SID Assignment tab.
NOTE: When the Front Panel Forced Bypass Switch is illuminated, no stream
information will be displayed on the Stream Info page.
9. Assigning Nielsen Source IDs (SIDs)
Each SID must be assigned to a Major/Minor Channel Number,a Program
Number, or to an Audio PID Number. Click the SID Assignment tab to begin
(Figure 6 on the next page).

NAVE IIC QUICK START GUIDE
www.wegener.com 5 800026-02 Rev. A
Figure 5: NAVE IIc Web Interface Stream Info Page
Figure 6: NAVE IIc Web Interface SID Assignment Page
NOTE: You must login to add the SID and Assignment choices. (See 10.
Password-Protected Web Pages for default Login User Names and
Passwords.)
Figure 7: NAVE IIc SID Assignment Page During Editing
a. Once you have logged in, first enter the SID and Check Digits
assigned to you by the Nielsen Encoder Support Group. The Check
Digits will be two letters following the SID Number. The Check Digits
must be entered as capital letters. If your transmission has more than
one program in it, you must assign the correct SID for the correct
program content.
NOTE: The Nielsen Encoder Support Group will supply this information to you.
b. Next, select how you want to assign the SID: you can choose Major/
Minor, Program Number, or Audio PID from a drop-down selection box.
c. Depending on the Selection Mode chosen in Step c, the appropriate
type of information box will display for you to enter the stream ID data.
d. Next, select the type of Insertion: Overwrite or Refrain (from overwriting
an existing SID) in the stream. (The Nielsen Encoder Support Group
can instruct you about the Insertion settings.) The preferred mode is
Overwrite.
e. Repeat Steps b- dfor each program in the stream.

NAVE IIC QUICK START GUIDE
800026-02 Rev. A 6 www.wegener.com
f. Click the Submit button on the left side of the page below the SID
Assignment rows to enter the data. When the information has been
accepted and matches the contents of the input stream, the PSIP Short
Name for each program will be displayed after the Selection Mode box.
g. You can also click the Validate button in the bottom left corner of the
page. Validation will check that information entered in the Selection
Mode data fields are valid, given the current state of the input stream,
that is, the Major and Minor Channel Numbers entered into the encoder
are valid for the input stream. The NAVE IIc Encoder will respond by
displaying valid SID number(s) at the top of the web page, followed by
Valid. If the information is not valid, the response will be Stream Does
Not Exist.
10. Password-Protected Web Pages
The SID Assignment, Configuration, and Service pages of the NAVE IIc’s
web interface are password-protected. To make configuration changes via
the web interface, users must be logged into the NAVE IIc with the
appropriate User Names and Passwords. The default User Name and
Password for each of these pages are given in Table 3:
For security reasons, all default passwords should be changed as soon as
the unit’s initial configuration is completed. This can be done on the
Service page.
Table 3. NAVE IIc Configuration Web Page User Names and Passwords
Page Name User Name Password
SID Assignment config config
Configuration config config
Service service service
The Service User Name and Password provide access to all password-
protected pages. Users with config privileges have access to the SID
Assignment and Configuration pages, which handle the normal unit and
data-stream-configuration processes.
11. Completing the NAVE IIc Encoder Configuration
a. Click on the Configuration Tab to open the Configuration Page (Figure 8).
b. Select a time reference source for the NAVE IIc Encoder on the
Configuration page. By default, the Encoder is set to an internal System
Clock time source. WEGENER recommends that you select a stable
external time source. The NAVE IIc supports three external sources:
NTP, LTC, or GPS. Please refer to the NAVE IIc User’s Manual for more
information on these.
Figure 8: NAVE IIc Web Interface Configuration Page
c. Next, select the SID Code Level that fits your transmission. Final
Distributor is the default and should be selected for ATSC broadcasts.
Program Content should be selected if the transmission content is
distributed to others.
This completes the setup for the NAVE IIc Encoder. You should not see
any Alarms or Warnings or at this time. If the Status page and front panel
LEDs do show one, please investigate the problem by reviewing the Event
Log web page or the Active Events screen on the Front Panel LCD menu.
CONTACT NIELSEN AFTER INSTALLATION
Upon completion of the NAVE IIc installation, you are required to
contact the Neilsen Encoder Support Group at 800-437-4872 for data
verification from the NG MMS reference site.

NAVE IIC QUICK START GUIDE
www.wegener.com 7 800026-02 Rev. A
12. Environmental Operating Conditions and Physical Specifications
Table 4. NAVE IIc Environmental Limits and Physical Specifications
Characteristic Specification
Use Indoor
Altitude Up to 2000 meters
Temperature Range +10 o C to +40 o C
Relative Humidity (max.) 80% for temperatures up to 31oC decreasing linearly to
50% relative humidity at 40oC.
Weight 24 pounds or 10.91kilograms
Dimensions (H x W x D) 3.5” x 19” x 20” or 88.9 mm x 483 mm x 508 mm
Input Power Rating 100-220Vac, 135 Watts, 50/60 Hz
13. NAVE IIc Encoder Interconnect Descriptions and Pin-Out Specifications
Table 5. NAVE IIc Encoder Interconnect Descriptions
Connector
Label Connector
Type Pin
No. Signal
Description
115/230 VAC
S
td. IEC Receptacle AC line in
ALARM – GP I/O
Note: GPI and User
Relay Inputs
not available
in Initial
Release.
2
5-pin D female jack 1
2
3
4
5
6
7
8
9
10
11
12
13
14-25
General purpose input # 1
General purpose input # 2
General purpose input # 3
General purpose input # 4
General purpose input # 5
General purpose input # 6
User Relay N.C. contact
User Relay COM contact
User Relay N.O. contact
GND
Alarm N.O. contact (OK - COM closes
here when unit OK)
Alarm COM contact
Alarm N.C. contact (Alarm –COM
closes here on alarm or if power is off)
GND
Table 5. NAVE IIc Encoder Interconnect Descriptions (Continued)
Connector
Label Connector
Type Pin
No. Signal
Description
GPS In
(RS-232 Levels) 9-pin D Male Plug 1
2
3
4
5
6
7
8
9
DCD
RXD
TXD
DTR
GND
DSR
RTS
CTS
RI
Ethernet (Network,
left connector),
10/100/1000 Base-T
RJ45 1
2
3
4
5
6
7
8
TXDO+
TXDO-
RXDI+
N/C
N/C
RXDI-
N/C
N/C
Modem RJ11 1
2
3
4
Tip 2 (N.C.)
Ring 1
Tip 1
Ring 2 (N.C.)
Receive (Rx, middle
slot)
BNC Jack SMPTE310 for Model # NAVEIIC-001
DVB-ASI for Model # NAVEIIC-002
19.393Mbps Transport Input Stream
Transmit (Tx,
middle slot) A.1. BNC Jack SMPTE310 for Model # NAVEIIC-001
DVB-ASI for Model # NAVEIIC-002
Nielsen-Encoded 19.393-Mbps
Transport Output Stream
Monitor (Middle
slot)
BNC Jack Buffered Output of the Transmit port.
NOTE: This port is not active when
the NAVE IIc is in Forced
Bypass mode.
LTC In (bottom slot) BNC Jack SMPTC LTC Time Reference,
Unbalanced Input

NAVE IIC QUICK START GUIDE
800026-02 Rev. A 8 www.wegener.com
Appendix A. CONFIGURING PC NETWORK TCP/IP SETTINGS TO WORK
WITH NAVE IIC DEFAULT SETTINGS
A.1. Network Checklist
The configuring PC must have an Ethernet network adapter card
installed, and must have the TCP/IP networking protocol installed and
configured.
The Encoder comes with a default Static IP Address of 10.61.62.63,
and a Subnet Mask of 255.255.255.0.
Your laptop or PC should have a static IP address of 10.61.62.62 and
a Subnet Mask of 255.255.255.0 to properly communicate with the
NAVE IIc Encoder.
Use the Network Control Panel to assign a static IP address to your PC or
laptop.
A.2. Configuring Windows 95 or Windows 98 for IP Networking
A.2.1. To configure TCP/IP for Windows 95or Windows 98:
a. Click Start from the Windowstoolbar.
b. Select Settings; then select Control Panel.
c. Double-click Network.
d. In the list of installed components, ensure that your Ethernet adapter,
TCP/IP Protocol, and Client for Microsoft Networks are listed.
NOTE: It is not necessary to remove any other network components shown in
the Network window in order to install the adapter, TCP/IP, or Client
for Microsoft Networks.
A.2.2. If you need the Ethernet Network Adapter:
a. Click Add.
b. Select Adapter; then click Add again.
c. Select the manufacturer and model of your Ethernet adapter, and
click OK.
A.2.3. If you need TCP/IP:
a. Click Add.
b. Select Protocol; then click Add again.
c. Select Microsoft.
d. Select TCP/IP and click OK.
A.2.4. If you need Client for Microsoft Networks:
a. Click Add.
b. Select Client; then click Add again.
A.3. Assigning the TCP/IP Address in Windows 95 or 98:
A.3.1. Accessing the TCP/IP Properties Setup Window:
a. Click Start from the Windowstoolbar.
b. Select Settings; then select Control Panel.
c. Double-click Network.
d. Select the Configuration tab.
e. From the list of network components, select TCP/IP.
f. If you have several TCP/IP entries in the network components list,
choose the one associated with the Ethernet adapter in your PC.
g. Click Properties. The TCP/IP Properties dialog window appears:
A.3.2 Setting the Encoder’s TCP/IP Address:
a. Select the IP Address tab.
b. Check the Specify an IP Address radio button.
c. In the IP Address fields, enter 10.61.62.62. In the Subnet Mask
fields, enter 255.255.255.0.
d. Click OK.
e. From your browser window, enter 10.61.62.63 in the address bar to
connect to the Encoder.

NAVE IIC QUICK START GUIDE
www.wegener.com 9 800026-02 Rev. A
A.4. Configuring Windows XP for IP Networking
A.4.1 Accessing the Windows XPLan Properties Setup Window:
a. Click Start from the Windowstoolbar.
b. Select Control Panel.
c. Double-click Network Connections.
d. Right-click on the connection you wish to configure. Select
Properties.
e. The LAN Properties dialog window appears:
A.4.2 Setting the Encoder’s TCP/IP Address:
a. Select Internet Protocol (TCP/IP).
b. Click Properties. The Internet Protocol Properties dialog window
appears:
c. Select the Use the following IP address radio button.
d. Enter the static IP address 10.61.62.62 in the first field.
e. Enter the Subnet Mask 255.255.255.0 in the second field.
f. Click OK.
g. From your browser window, enter 10.61.62.63 in the address bar to
connect to the Encoder.

NAVE IIC QUICK START GUIDE
800026-02 Rev. A 10 www.wegener.com
Data, drawings, and other material contained herein are proprietary to Wegener
Communications, Inc., and may not be reproduced or duplicated in any form without the prior
written permission of Wegener Communications, Inc.
The information contained herein is subject to change without notice. Revisions may be issued to
advise of such changes and/or additions.
WEGENERis a trademark of Wegener Communications, Inc. All other trademarks are the
property of their respective owners.
2005 Wegener Communications, Inc. All Rights Reserved.
The Wegener NAVE IIc is approved under FCC Part 15B Class A and UL 60950 3rd Edition.
Warranty: The following warranty applies to all WEGENER products:
All WEGENER products are warranted against defective materials and workman-ship for a
period of one year after shipment to customer. WEGENER’s obligation under this warranty is
limited to repairing or, at WEGENER’s option, replacing parts, subassemblies, or entire
assemblies. WEGENER shall not be liable for any special, indirect, or consequential damages.
This warranty does not cover parts or equipment, which have been subject to misuse,
negligence, or accident by the customer during use. All shipping costs for warranty repairs
shall be prepaid by the customer. There are no other warranties, expressed or implied, except
as stated herein.
Technical Support
This guide provides information for setup and initial operation of the NAVE IIc Encoder.
Additional information may be found in the User's Manual (p/n 800026-01) on the CD-ROM
packed with the unit, or on the www.wegener.com web site. (Click Support, then select
Manuals and Code Downloads, and search for the NAVE IIc in the Manuals product list.)
WEGENER
(Corporate Office)
11350 Technology Circle
Duluth, GA 30097
WEGENER
Customer Service
359 Curie Drive
Alpharetta, GA 30005
Table of contents
Other Wegener Media Converter manuals