WEIGHSOUTH WSI-602 User manual

WeighSouth
WSI-602

1. PRECATIONS.........................................................................pg 1
2. INTRODUCTION..................................................................pg 2
3. SPECIFICATIONS .................................................................pg 3
3.1 Specications ..................................................................pg 3
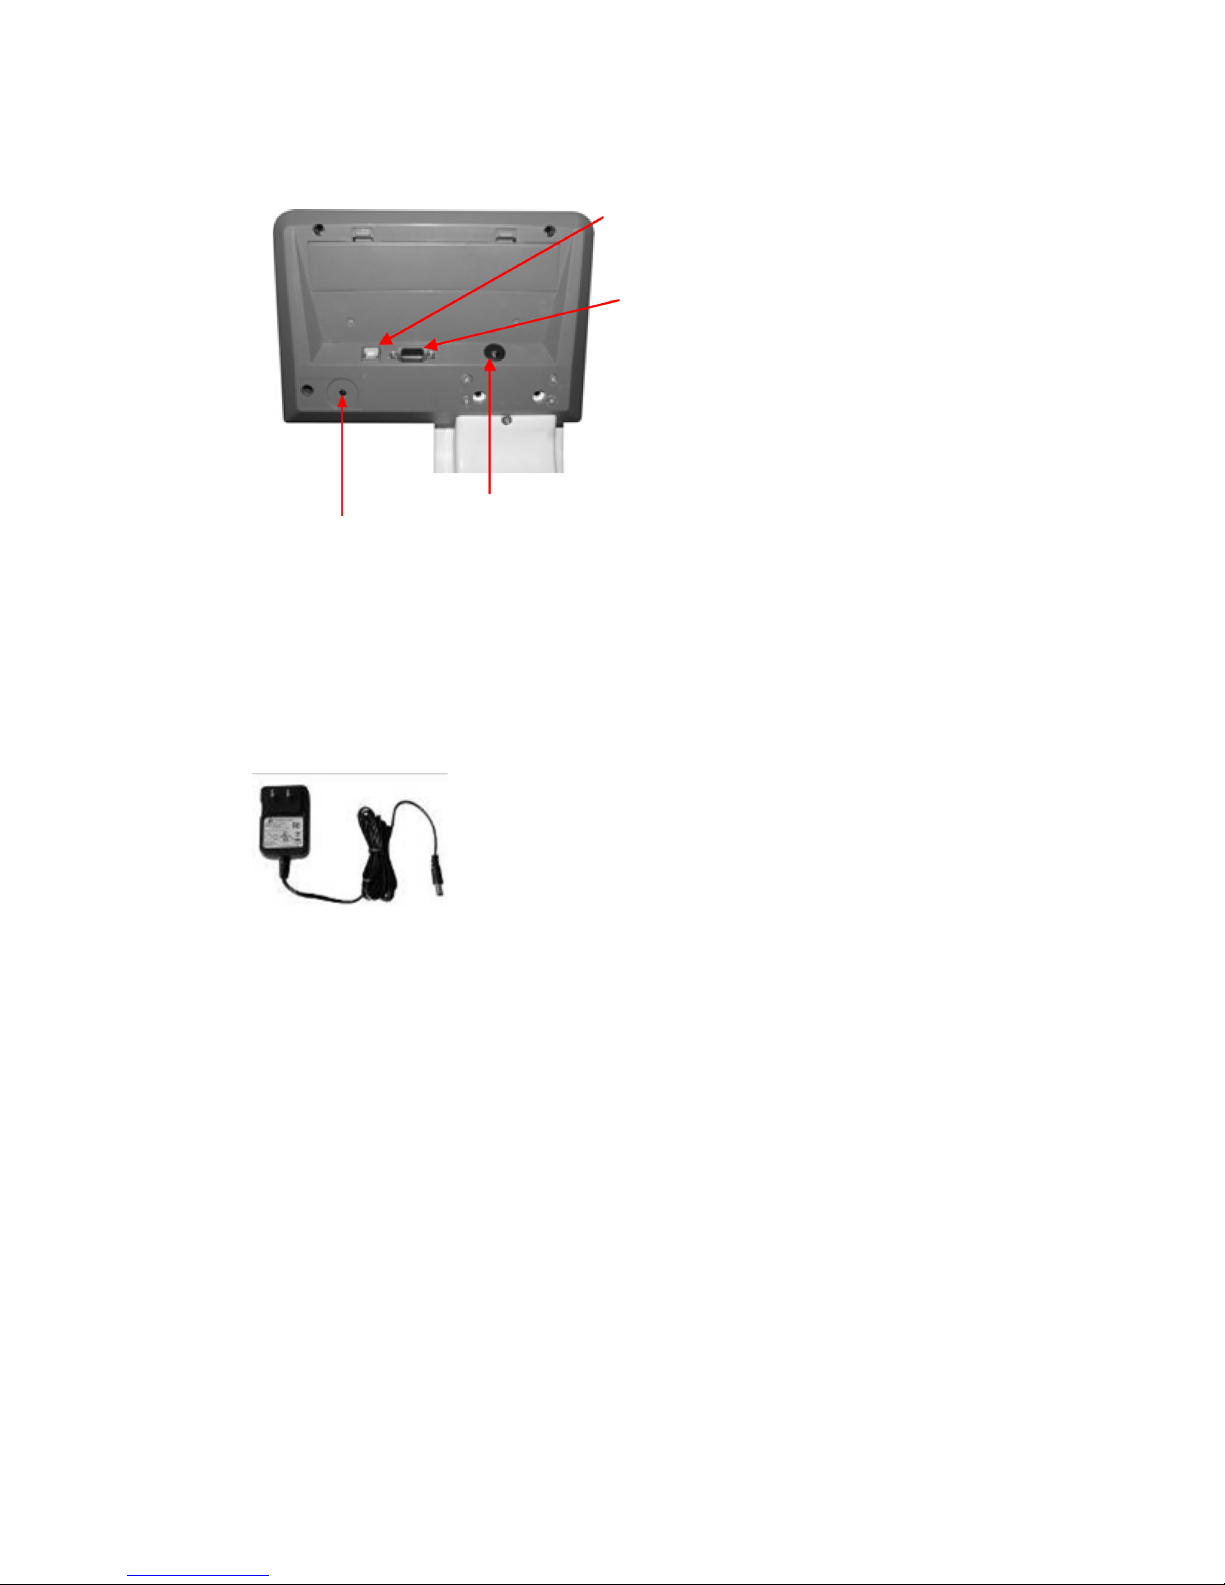
4. INSTALLATION ....................................................................pg 4
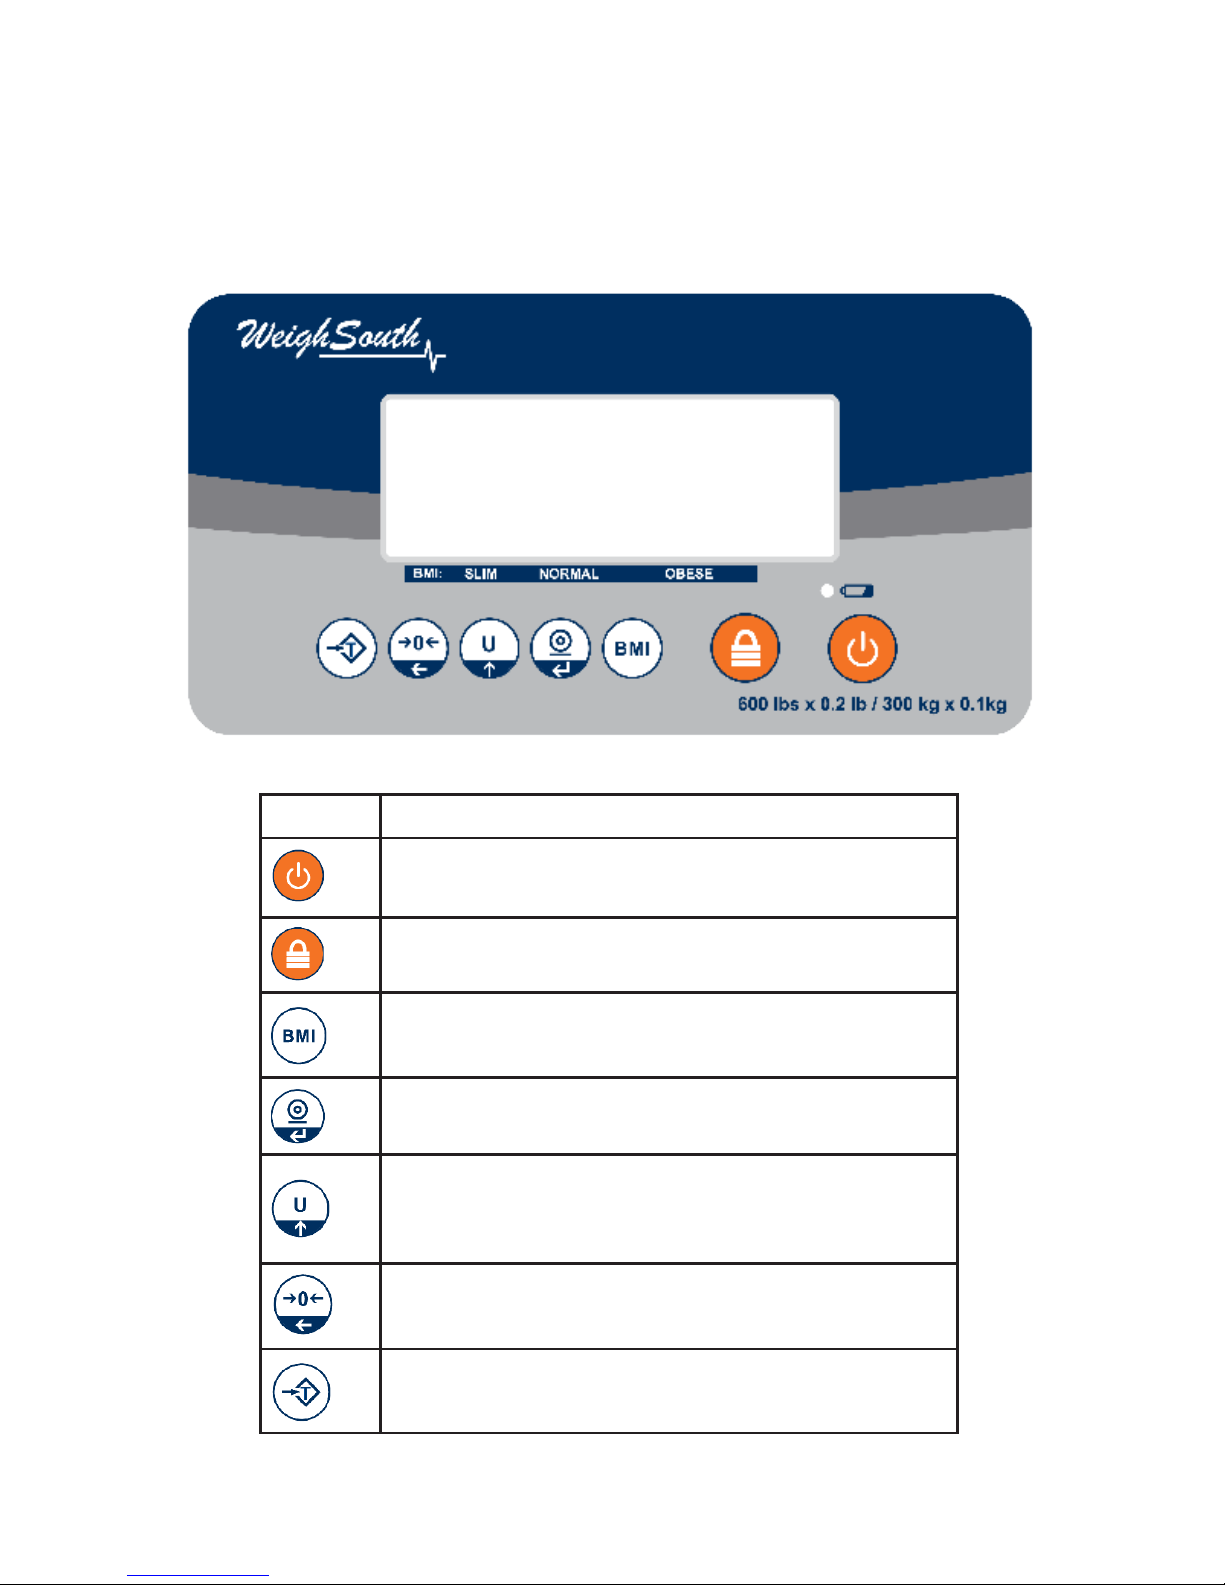
5. DESCRIPTION ......................................................................pg 6
6. OPERATION ..........................................................................pg 8
1. Power ON/OFF..................................................................pg 8
2. Zero .....................................................................................pg 8
3. Tare......................................................................................pg 8
4. Change unit........................................................................pg 8
5. Hold function.....................................................................pg 9
6. BMI function .....................................................................pg 9
7. Precision*10 .......................................................................pg 9
7. PARAMETER .......................................................................pg 10
8. CALIBRATION....................................................................pg 11
9. BATTERY OPERATION.....................................................pg 12
10. MAINTENANCE.................................................................pg 13
10.1 General ........................................................................pg 13
10.2 Error codes..................................................................pg 14
10.3 Determine the Problem.............................................pg 14
10.4 Trouble Shooting........................................................pg 15
11. WARRANTY ....................................................................pg 17M
CONTENTS

1. PRECAUTIONS
WARNING
DISCONNECT ALL POWER TO
THIS UNIT BEFORE INSTALLING,
CLEANING, OR SERVICING. FAILURE
TO DO SO COULD RESULT IN BODILY
HARM OR DAMAGE THE UNIT.
CAUTION
• Permit only qualied persons to service the instrument
• Before connecting or disconnecting any components,
remove the power.
• Failure to observe these precautions may cause bodily
harm or damage to or destruction of the equipment.
•Follow the instructions for use.
•Keeptheoperatinginstructionsandthedeclarationof
conformity in a safe place.
•Ensurethatthescaleisstandingrmlyonasmooth,level
surface.
•Donotdropthescaleorsubjectittoviolentshocks.
•Whenusingthescalewithamainunit,ensurethatthe
supply cable is routed in such a way as to exclude any type of
tripping hazard.
•Useonlythetypeofbatterystated.
•Havescaleservicedandre-calibratedonaregularbasis.
•Haverepairscarriedoutonlybyauthorizedpersons

• e WSI 602 series scales, amplies signals from a load
cell, converts it to digital data and displays it as a mass
value.
• It is accurate, fast and versatile series of general purpose
balances with % weighing functions and accumulation
• Mother and child weighing functions.
• BMI with bar graph.
• Wheels at bottom, easy to move.
• Rubber mat on the surface of the platform.
• 25mmLCDwithwhiteLEDbacklightdisplay
• 7 functions are light touch switches
• Battery provides up to 40 hours of continues use (with out
backlight)
• Capacityupto250kg/600lb
•
2. INTRODUCTION

Model WSI-602
Maximum Capacity 250kg/600lb
Readability 100g/0.2lb
Resolution 1/2,500
Tare Range Full
Minimum Capacity 200g
Linearity ± 20g
Common Specications
Interface RS-232 Output Optional
Stabilisation Time 2 Seconds typical
Operating Temperature 0°C - 40°C / 32°F - 104°F
Powersupply(external) 12V/500mA AC power adapter or
2000mAh Ni-MH batteries (optional, size
AA)
Calibration External
Calibration as per Directive
90/384/EEC Class III medical approval
Medical product as per
Directive 93/42/EEC Class I
ADC Σ-Δ
Display 25mmhigh6digitsLCDwithautoback-
light and loading bar graph
Housing Aluminium pan and pole, ABS plastic
indicator
Platform Size 355x360mm
3.1 Specications
3. SPECIFICATION

4. INSTALLATION
Unpacking
CarefullytaketheUnitoutofitspackage,makesureitsnotdamagedand
all accessories are included.
• Remove the weighing scale from the carton.
• Removetheprotectivecovering.Storethepackaging
if you need to transport the scale later.
• Inspectthescaleandterminalfordamage.Makesureallcom-
ponents are included.
Accessories,
1. Scale
2. Adaptor
3. Product manual
Place the scale on a rm surface.
Checkthewatermark.Ifbubbleisnotincen-
ter,adjustthelevelingfeetuntilthebubbleis
inthecentercircle.Checkthelevelwhenyou
change the location.
Level Adjusting
Charging Battery
• Tochargethebatteryinserttheadaptorpinintothejack,the
jackislocatedontherearsideofthescale.eadaptorsimply
plugs into a standard wall outlet. e scale doesn’ need to be
turned on.
• e battery should be charged for 12 hours for full capacity.
• e display has an indicator that shows the charging status of
the battery. When the scale is plugged into the main power the
internal battery will be recharged. If the indicator is o, the bat-
tery has a full charge. If it is on, the battery is nearly discharged
and if blue, the battery is being charged.
• Do not use any other type of power adaptor than the one sup-
plied with the scale.
• VerifythattheACpowersocketoutletisproperlyprotected.
Note: Please charge the battery before using the scale for the rst time

Installation
RS-232Connecter(selectable)
USBConnecter(selectable)
AdaptorJack
Calibration switch
• Place the scale on a table.
• Connecttheadaptorpinintothescaleadaptorjack.Adaptor
jackislocatedontherearsideofthescale.
• Adaptor connects into your AC power
socket.
• TurnontheOn/Okey.Ifyouwantto
turno,pressthekeyagain.
• Display will be show the version number
andwillbestartingselfchecking.
• Aerselfchecking,displaywillbecometonormalweighing
mode.
• Warm-up time of 15 minutes stabilizes the measured values
aer switching on.
• Calibrate with exact calibration weights, minimum 1/3 of
the scale capacity needed for calibration. For calibration see
details in parameter.
Scale is now ready for operation/ use.

5. DESCRIPTION
KEY DESCRIPTION
Turns the scale power On / O
Set to hold mode
Set to BMI mode
Set pre-tare
Enter into the menu of parameter
Changeunit:kg/lb
Sets display to Zero
Subtracts weight of container
Key Board

Display
DISPLAY
FUNCTION
STABLE Indicator for Display stability
ZERO Indicator for Zero display
TARE Indicator for Tare display
Indicator for weighing capacity graph
NET Indicator for Net weight
GROSS Indicator for Gross weight
Lb/kg Indicator for weight units
Indicator for Charging status of battery
Voltage has dropped
Low Voltage
Fully Charged

Initial Start-up
Warm-up time of 15 minutes stabilizes the measured values aer
switching on.
6. OPERATION
6.1 Power ON/OFF
6.2 Zero
6.3 Tare
Switch on the scale by pressing . e display is switched on and
the self test is started.
Ifyouwanttoswitchopressthekeyagain.
Environmental conditions can lead to the balance exactly zero in
spiteoftheplatformnottakinganystrain.However,youcansetthe
display of your balance to zero any time by pressing keyand
therefore ensure that the weighing starts at zero.
e weight of any container can be tared by pressing keyso
thatwithsubsequentweighingthenetweightoftheobjectbeing
weighed is always displayed
• Load weight on the pan.
• Press key.Zeroisdisplayed,andtareissubtracted.
• Remove weight from the platform. Tared weight is
displayed. It can set only one tare value. It can display
with a minus value.
• Press key.Zeroisdisplayed,tareweightiscleared.
6.4 Change unit
In weighing condition, you can press tochangetheunit:kg/
lb.

6.5 Hold function
Press before placing load on the platform, so
HOLD is active "Hold " and "-----" appear on the display.
Aer putting load on the platform no reading will be
available until a stable non-zero weight is detected. During this
period "----" is indicated. You will hear an acoustic beep, when
stable weight is detected.
Indication of calculated HOLD-value with small
"HOLD"indisplaytheunit“kg”isdisplayed.
Aer unloading the platform the value is indicated for
10 Seconds. Aer that normal weight display is resumed.
Pressing , while the HOLD-function is active, will
cancel it.
6.6 BMI function
Press keyontheweighingmode,displaywillshowthelast
height“xxxxxx”,use keytochangedigit,andpress keyto
increasethevalue,presskey conrm it, display will enter into
theBMImode,“BMI”indicatorwillbeshown,standonthe
platform, display will show the BMI value and the BMI bar,
Press keywillturnbacktoweighingmode
6.7 Precision*10
If you want to see more accurate weight value, press and
hold for 2 seconds, display will show one more decimal place,
thelastdigitwillblinkfor5seconds,thenitwillgobacktonormal
weighing mode.

7. PARAMETERS
Enter the Menu
• Press duringselfchecking(9--0),displaywillshow
Choose the Menu
• Press ,itcanchoosemenublockoroptionsoneby
one.
Enter the Selected Menu
• Press , it can conrm which will be displayed.
Escape from the Menu
• Press key,itcanescapefromthemenutoweighing
mode.
Menu Sub Menu Descripon
F1 o O 0/3/5/15/30 To set the auto close the scale me.
F4 bk
Bl on Set the backlight always on.
Bl o Set the backlight always o.
Bl au Set the backlight automac on.
F5 stu cm Select unit cm
inch Select unit inch
F6 unit Kg on/o Enable/ disable unit kg
Lb on/o Enable/ disable unit lb
tch pin Enter the password
P 1 spd Set A/D convert speed(7.5/15/30/60)
P 2 Cal
desc To set Decimal Points.
Opons: 0 , 0.0 , 0.00 , 0.000 , 0.0000
inc To set Increments.
Opons: 1 , 2 , 5 , 10 , 20 , 50
cap Set capacity
cal Enter into calibraon
P 3 pro
tri To modify the calibraon.
count To show the scale internal count
reset Reset the scale
setgra Set the gravity value
F1 off

8. CALIBRATION
Calibration Settings in the Parameter;
F1 off
tch
pin
P1 spd
P2 cal
desc
Cal
unload
pass
• Turn on the scale
• Press keyduringselfchecking,displaywill
show
• Presskeyuntilitdisplays
• Press keytoconrmdisplaywillshow
• Press and keys,displaywillshow
• Press keytoshowdisplay
• Press keytoentercalibration,
• Display will show
• Press keyuntildisplayshow
• Press keyintocalibration,displaywillshow
• When scale get stable, Press key,
• Display will be show
• Place the test weight on the platform.
• Aer stable, press keyconrm
• Display will be show
• en will start self-test and will come to normal display
Note:theunit(kg/lb)isthesameasthelastdisplayedone.
at is: before you restart the scale to do calibration, if
youseetheunitiskg,thenincalibration,theunitiskg;ifyou
wanttochangetolb,youneedtopressUkeytochangetheunit
before you restart it.
load

9. BATTERY OPERATION
e Medical Scale can be operated from the battery if desired. e
batterylifeis12hours(backlight)and22hours(withoutback-
light).
When the battery needs charging a symbol on the weight display
will turn on. e battery should be charged when the symbol is on.
e scale will still operate for about several minutes aer which it
will automatically switch o to protect the battery.
To charge the battery simply plug into the main power. e scale
does not need to be turned on.
e battery should be charged for 12 hours for full capacity.
Just under the quantity display is an LED to indicate the status of
battery charging. When the scale is plugged into the main power
the internal battery will charge. If the LED is green the battery has
a full charge. If it is Red the battery is nearly discharged and blue
indicates the battery is being charged.
As the battery is used it may fail to hold a full charge. If the battery
life becomes unacceptable then contact your distributor.
Note: useless battery should be recycled, not thrown away
in every day trash or go to landlls.

WARNING
DISCONNECT ALL POWER TO
THIS UNIT BEFORE INSTALLING,
CLEANING, OR SERVICING. FAILURE
TO DO SO COULD RESULT IN BODILY
HARM OR DAMAGE THE UNIT.
CAUTION
10. MAINTENENCE
10.1. General
If the scale does not operate properly, nd out the problem if possible.
Determine whether the problem is constant or alternating. Be aware that
problems can be caused by mechanical or electrical inuences.
Checkthefollowing.
• Water
• Corrosive materials
• Vibrations or temperature or wind
• Physical damage
Checkthescalecablesfordamage,andcheckallconnectionsand
connecters for any loose contact or incorrect connection
• Permit only qualied persons to service the instrument
• Before connecting or disconnecting any components,
remove the power.
• Failure to observe these precautions may cause bodily
harm or damage to or destruction of the equipment.

Cleaning
• Disconnect the power before cleaning.
• Use a cloth with mild suds and light cleaning agents.
• Makesurethatuidisnotabletogetintothescale.
• Use a clean and so cloth for rub o.
10.2. Error Codes
Error Code Description POSSIBLE CAUSES
Err 4 Zero range exceeded. • Goods on the platform
• Overload, when zeroing the
scale.
• Improper calibration
• Load cell problem
• PCB problem
Err 6 A/D Count out of the
range
• Platform not installed
• Load cell problem
• PCB problem
10.3. Determine the Problem
Determine whether the problem is in the PCB or the Load Cell
• Remove power from the system, and disconnect the load cell
connection from the PCB
• Connect the PCB to a load cell simulator
• Reapply power and test the PCB
• If problem goes away, its source is probably in the Load cell.
Checkthewiring,connecter,loadcellandmechanicalcom-
ponents of the load cell.
Ifproblempersists,itssourceisprobablyinthePCB.Checkthe
PCB voltages, connecters, cables and function programs

10.4 Trouble Shooting
Problem Possible cause Common Soluons
Display is blank.
No self test
Main power is turned o.
Power supply faulty or not
plugged. Internal baery is
not charged. On/O switch
problem
Check power is geng
inside the scale and on/
o switch is working.
Verify voltages, which is
on the power labels.
Blank display aer
self test
Plaorm not installed.
Unstable weight, load cell
damaged
Check that the plaorm
is installed correctly. Try
to turning on again.
OL or -------
Maximum capacity exceed-
ed. Load cell or mechanics
damaged. Power supply
faulty
Check the plaorm is
installed correctly. Try
to turn on the scale
again. Do the calibra-
on again
------- or NULL
displayed
Weight on the plaorm is
below permissible limit.
Plaorm not installed cor-
rectly. Power supply faulty.
Load cell or mechanism
faulty
Check the plaorm is
installed correctly. Try
to turn on the scale
again. Do the calibra-
on again.
Display is unstable
Debris is touching some-
where. Air variaon or any
vibraons. Temperature
changed . Load cell or con-
necons faulty. Power sup-
ply faulty
Check the scale is in
acceptable locaon.
Check the connectors
and load cell
Weight value
incorrect
Calibraon error. Plaorm
or load touching some-
where. Wrong weight unit.
Use accurate weight for
the calibraon. Check
the plaorm and load
cell is installed properly
and not touching. Check
the parameter sengs.
Check the load cell and
connectors.

Can not use full
capacity
Shipping screws are not
removed. Parameters are
set incorrectly. AD problem.
Load cell or mechanism
damaged.
Check the shipping
screws under the plat-
form. Check Weighing
unit and parameter
sengs. Check the load
cell
Plaorm Corner
Weight dierent
Shipping screws are not re-
moved. Load cell or mecha-
nism damaged.
Check the shipping
screws under the
plaorm. Use accurate
weight for calibraon.
Check the load cell
Baery not charg-
ing
Main voltage problem.
Charging circuit problem.
Baery problem.
Check the main power
and adaptor. Check
the baery. Check the
charging circuit.

WARRANTY
e Manufacturer warrants each product to be free from defects in
materialsandworkmanship,andtoconformtoitspublishedproduct
specic cautions under normal use and service for the period of one
year commencing from the date of purchase.
e foregoing warranty is extended only to the rst purchaser and
applies only to product failures due to defective materials and/or
workmanship.Withoutlimitingthegeneralityoftheforegoing,the
foregoing warranty will not apply if, upon inspection, it is found that
the product was: misused or abused; used for a purpose for which it
was not designed; mishandled; placed in an improper environment;
repaired by unauthorized personnel; or improperly installed or ad-
justed.
e sole and exclusive remedy in the event of any breach of the fore-
going warranty shall be for the original purchaser to return the prod-
uct to e Manufacturer, freight and insurance prepaid, for repair,
replacement or credit, at e Manufacturer option. Any product
repaired or replaced under the foregoing warranty shall be shipped
backtocustomerfreightandinsuranceprepaid.
IN NO EVENT SHALL THE MANUFACTURER BE LIABLE FOR
ANY LOSS, INCONVENIENCE, OR DAMAGE, INCLUDING
WITHOUT LIMITATION DIRECT, OR INDIRECT, SPECIAL,
INCIDENTAL OR CONSEQUENTIAL DAMAGES, RESULTING
FROM OR RELATED TO THE USE OR INABILITY TO USE A
PRODUCT, WHETHER RESULTING FROM BREACH OF WAR-
RANTY OR ANY OTHER LEGAL THEORY, EVEN IF THE MAN-
UFACTURER HAS BEEN ADVISED OF THE POSSIBILITY OF
SUCH INCONVENIENCE, DAMAGE OR LOSS.

Table of contents
Other WEIGHSOUTH Scale manuals