manuals.online logo
Brands
  1. Home
  2. •
  3. Brands
  4. •
  5. Weka
  6. •
  7. Drill
  8. •
  9. Weka DK08 User manual

Weka DK08 User manual

DK08, DK09, DK11, DK16, DK17, DK18
DK116, DK118, DK119
BETRIEBSANLEITUNG...............................................1
INSTRUCTIONSFORUSE............................................9
NOTICED'UTILISATION.............................................1 6
ISTRUZIONIDISERVIZIO............................................2 4
INSTRUCCIONESDESERVICIO......................................3 2
GEBRUIKSAANWIJZING.............................................4 0
DRIFTSVEJLEDNING. ..............................................4 8
BRUKSANVISNING.................................................5 5
BRUKSANVISNING.................................................6 2
KÄYTTÖOHJE.....................................................6 9
INSTRUKCJA OBS£UGI. ............................................7 6
Ñïðàâî÷íèê ïî ýêñïëóàòàöèè . .......................................8 4
WEKA Elektrowerkzeuge
Auf der Höhe 20, D 75387 Neubulach
Telephone: +49 7053 96816-0, Telefax: +49 7053 3138
Internet: www.weka-elektrowerkzeuge.de
Email: weka@weka-elektrowerkzeuge.de
9
GB INSTRUCTIONS FOR USE -
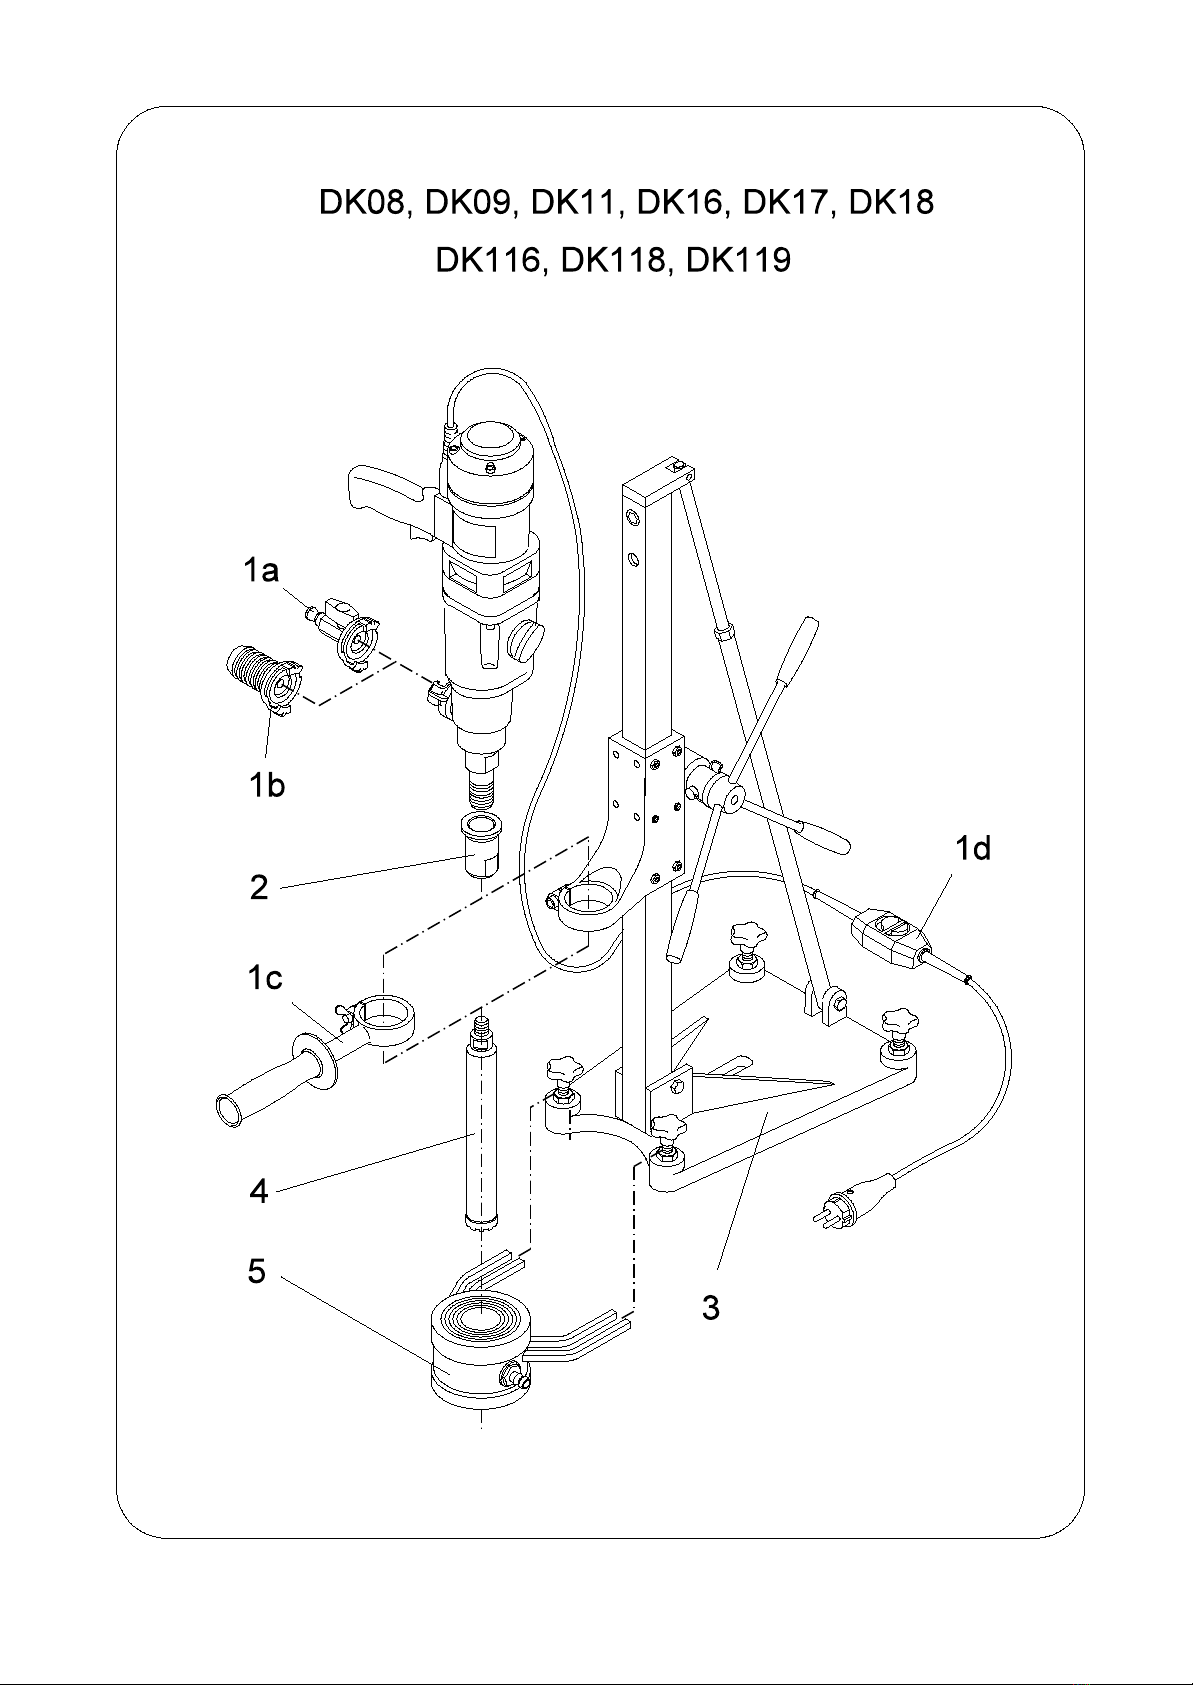
DIAMOND CORE DRILL DK08/09/11/16/17/18, DK116/118/119
Please read carefully before putting the machine into operation!
With the WEKA core drilling machine you own an excellent product of quality, with which you will certainly
be fully satisfied if you use it for its designed use.
1. G E N E R A L S A F E T Y P R E C A U T I O N S
WARNING! Read all safety precautions and instructions. Failures in the compliance with
these safety precautions and instructions can cause electric shock, fire and/or heavy injuries.
Please keep these safety precautions and instructions for the future.
The term “electric tool” used in the safety precautions corresponds to mains operated electric tools (with
mains cord) and to battery operated electric tools (without mains cord).
1) Security of employment
a ) Keep your working area clean and well illuminated. Disorder or unilluminated working
areas can cause accidents.
b ) Do not work in explosive ambiances with the electric tool, in which there are
flammable liquid, gases or dusts. Electric tools generate sparks which can inflame the
dust or vapors.
c ) Keep children and other persons away from the electric tool while using it. When
being distracted, you can lose the control on the device.
2) Electrical safety
a ) The mains plug of the electric tool must fit into the socket. The plug must not be
changed in any kind. Do not use adapter plugs together with earthed electric tools.
Unmodified plugs and fitting sockets reduce the risk of electric shock.
b ) Avoid body contact with earthed surfaces, like tubes, heatings, cookers and
fridges. There is a higher risk of electric shock when your body is earthed.
c ) Keep your electric tool away from rain or wetness. The infiltration of water into an
electric tool increases the risk of an electric shock.
d ) Do not divert the cord from its intended use from carrying or hanging up the
electric tool, or for pulling the plugs from the socket. Keep the cord away from heat,
oil, sharp edges or moving device parts. Damaged or tangled cords increase the risk
of an electric shock.
e ) If you work outside with your electric tool, only use extension cords that are
appropriate for outside use. The use of a extension cord which is appropriate for outside
use reduces the risk of an electric shock.
f ) If the use of the electric tool in humid areas is inevitable, use a ground fault circuit
interrupter (GFCI). The use of a GFCI reduces the risk of an electric shock.
3) Personal safety
a ) Be attentive, pay attention to what you do and go to work with the electric tool with
reason. Do not use an electric tool when you are tired or under the influence of
drugs, alcohol or pharmaceuticals. One moment of carelessness while using an electric
tool can cause serious injuries.
b ) Wear personal protective equipment and always goggles. The wearing of personal
protective equipment, like dust mask, skid-proof shoes, protection helmet or hearing
protection, depending on the kind and use of the electric tool reduces the risk of injuries.
c ) Avoid unintended start up. Make sure that the electric tool is switched off before
connecting it to the mains and/or the battery, picking it up or carrying it. When you
have your finger on the switch while carrying the electric tool or connect the device to the
mains when it is switched on, this can cause accidents.
d ) Remove adjusting tools or wrenches before switching on the electric tool. A tool or
wrench which is located on a turning device can cause injuries.
10
e ) Avoid abnormal posture. Care for safe standing and keep the balance anytime. Do
not work on a ladder. Thus you can control the electric tool better in unexpected
situations.
f ) Wear suitable clothing. Do not wear wide clothing or jewelry. Keep hair, clothing
and gloves away from moving parts. Wide clothing, jewelry or long hair can be caught
by moving parts.
g ) If there is the possibility to assemble a dust exhauster and collecting device, make
sure that these are connected and used correctly. The use of a dust exhauster can
reduce dangers by dust.
4) Use and handling of the electric tool
a ) Do not overload the device. Use the appropriate electric tool for your work. With the
appropriate electric tool you work better and saver in the declared range of performance.
b ) Do not use an electric tool whose switch is damaged. An electric tool which can not
be switched on and off is dangerous and has to be repaired.
c ) Unplug the plug from the socket and/or remove the battery before carrying out
instrument settings, exchanging accessories or put the device aside. This safety
measure avoids the unintended start of the electric tool.
d ) Keep unused electric tools out of reach of children. Do not allow persons to use the
device who are not familiar with it or have not read these instructions. Electric tools
are dangerous if they are used by inexperienced persons.
e ) Maintain electric tools with care. Check if movable parts function correctly and do
not jam, if parts are broken or damaged in that way, that the function of the electric
tool affected. Have damaged parts repaired before using the device. Many accidents
originate from bad maintained electric tools.
f ) Keep the cutting tool sharp and clean. Carefully maintained cutting tools with sharp
edges do jam less and are easier to guide.
g ) Use electric tool, accessory, operation tools, etc. according to these instructions.
Thereby consider the conditions of employment and the work to be done. The use
of electric tools for others than the intended task can result in dangerous situations.
5) Service
a ) Have your tool only repaired by qualified personnel and only with original spare
parts. Thus it is assured that the safety of the electric tool is being obtained.
6) Safety precautions for drilling machines
a ) Wear hearing protection while using drilling machines. The effect of noise can cause
hearing loss.
b ) Use the additional handles that are supplied with the device. The loss of control on
the machine can cause injuries.
c ) While drilling keep a sufficient big distance to the drill bit and do not touch rotating
parts. Protect the danger zone and keep children and other persons away from it.
Falling or catapulted parts can cause injuries.
2. S P E C I A L S A F E T Y P R E C A U T I O N S - P L E A S E N O T E !
This diamond core drill is assigned for commercial use only. It may only be used by trained people.
Proper use extends only to the drilling of rock, concrete and masonry..
Pay attention that water gets not into the machine, switch handle, terminal case and the electrical
connections.
For operation, the national regulations for working with this core drill must be observed.
Electric tools must regularly (approx. 6 months) be checked for safety by a specialist.
Pay attention drill vertically (overhead drilling) only with appropriate safety equipments (water-collecting
ring).
11
It is strictly to pay attention that water does not get into the motor.
After an interruption of work first see for yourself that the core bit turns loosely before you start the
machine again.
Wear ear protection when working with this machine.
3. T E C H N I C A L D E S C R I P T I O N
The DK 11 is a hand-held core drill with water supply, which is mainly used in the fixing technique for
drilling dowel and anchor holes.
The DK 116 and DK 118 are drills for dry drilling, they are without water supply and can therefore only
be used for drilling in masonry. The DK 116 is hereby a special machine for creating holes for installation
sockets in the electrical industry. The DK 118 has been developed for drilling big holes in masonry, e.g.
in chimney brick and the installed ceramic tubes. The DK 119 is especially for drilling big holes in
concrete, especially in sewer pipes.
The DK08/16 are universal core drills with water supply. They can be used manually as well as in a stand
(3) (drilling hand-held or by stand). They are suitable for drilling rock, concrete and masonry.
The DK09/17 is an universal core drill, which may be used wet (with water supply, adapter 1a) as well as
dry (with dust exhauster, adapter 1b). It is used especially as a hand-held machine, but it can also be
used in a drill stand (3).
The and DK18 are core drills with water supply. They can only be used when fixed to a drill stand (drilling
directed by stand).
The material that is loosened by drilling is washed away by water provided through the diamond core bits
(4). The supply of water can be controlled by the ball valve (1a). At the same time, the tool is cooled (wet
drilling).
The boring tool (4) consists of a tube with an appropriate tool adapter G ½" , or 1 1/4" UNC, and with
soldered-on or welded-on diamond segments.
In case of wet drilling it is possible to suck up the water again with a vacuum cleaner through a water-
collecting ring (5).
The machine may not be used for a different purpose or with a different tool.
ATTENTION: Avoid wet drilling upwards (overhead drilling). If it is indispensable use
absolutely a perfect, all right and functioning water-collecting ring.
Only for DK09/17: By exhausting the removed material through the drill bit and the hose coupling (1b)
with a vacuum cleaner, the tool is cooled, too (dry drilling only possible in masonry)
3.1 Technical Data
Type DK11 DK116 DK118 DK119 DK08/09 DK16/17/18
Rated Voltage V 110 110 110 110 110 110
Rated Current A 15 15 15 15 16,8 18,6
Power input W 1600 1600 1600 1600 1800 2000
Power output W 1080 1080 1080 1080 1200 1340
Frequency Hz 50-60 50-60 50-60 50-60 50-60 50 - 60
Rated Speeds (Rated
Load) 1/min 6500 1500 430 430 540
1700
540
1200
2520
Drilling idrill rig/
concrete mm 10-30 100-250 20 - 150 20 - 180
Drilling ihand-held/
concrete mm 10-30 100-250 20 - 80 20 - 100
Drilling ihand-held/
masonry mm 10-50 50-82 100-250 100-250 20 - 150 20 - 180
Weight kg 5,5 5 5,4 5,4 DK08: 4,9
DK09: 5,2 DK16/18: 5,9
DK17: 6,3
Tool fixture G ½", 1 1/4" UNC, 1 1/4" UNC + G ½" , M33/3, M16 (DK116)
12
Operating data
Gear 1/min 1 2 3
Release Torque/Safety Clutch Nm 58 25 12
Core bit Ø concrete (DK16/17/18)
Core bit Ø concrete (DK08/09) mm 70 - 140
80 - 150 32 - 65
25 - 60 15 - 30
Water volume DK08/09/16/17/18 approx. l/min 0,8 - 1,1 0,5 - 0,8 0,4 - 0,6
Water volume DK11 approx. l/min 0,3 - 0,5
Water volume DK119 approx. l/min 1 - 1,5
3.2 List of contents
DK11 - Diamond core drill (1), with water supply (1a), handle with clamp ring (1c), PRCD
inline protector (1d), carrying case and instructions manual.
Special accessories: start drilling aid with water collecting ring WR 10.
DK08/16 - Diamond core drill (1), with ball valve and connect-nipple (1a), handle with clamp
ring (1c), PRCD inline protector (1d), carrying case and instructions manual.
Special accessories: Start drilling aid with water-collecting ring.
DK09/17 - Diamond core drill (1), with ball valve and connect-nipple (1a), tail end (1b), handle
with clamp ring (1c), PRCD inline protector (1d), carrying case and instructions
manual.
Special accessories: Elastic bore piercer, start drilling aid with water collecting ring.
DK18 - Diamond core drill (1), with ball valve and connect-nipple (1a), PRCD inline
protector (1d) and instructions manual.
DK116/ - Diamond core drill (1) with adapter for dust exhausting, carrying case and
DK118 instructions manual.
DK119 - Diamond core drill (1) with ball valve and connect-nipple (1a), PRCD inline
protector (1d), carrying case and instructions manual.
3.3 Sound emission and vibration acceleration (EN 50144)
The typical A-weighted sound pressure level is 86 dB(A).
The typical A-weighted sound capacity level is 99 dB.
The typical weighted acceleration is <2,5 m/s .
2
4. P R E P A R A T I O N
Make sure that the machine did not get damaged by the transport. Check that the rated voltage indicated
on rating plate conforms with main voltage.
4.1 Connection to the power supply
According to the general safety precautions the electric connection of diamond core drills with water
supply is on principle to be done by a ground fault current interrupter (GFCI).
Likewise, those machines are only to be used at sockets with protective plug reception, earthed
according to the regulations.
According to those regulations WEKA core drills with water supply are provided with a PRCD inline
protector assembled between the cord.
The PRCD includes a ground fault current interrupter as well as an undervoltage breaker.
The PRCD is ready for service after connecting the electric main by pressing the ON button. If the
voltage is disconnected, the PRCD switches off and is, after the voltage returns, to start once more.
ATTENTION: Do not put the PRCD into water. It is regularly to be checked on perfect
functioning by pressing the TEST-key. Never use a core drill without a GFCI being directly
connected to the mains connection.
13
4.2 Water supply
Connect the machine with the water supply by using a GARDENA coupling to the Quick Connect Nipple.
ATTENTION: maximum water pressure 3 bar.
Use only clean water because the sealing wears more quickly with dirty water.
If water comes out of the indicator hole the rotary shaft seals are to be replaced immediately.
It is preferable to have this done in an authorized specialist´s workshop only.
4.3 Installation in the drill stand
In the drill stand, the machines are fastened by clamping the gearbox (Ø 60 mm). Put the machine into
a solidly designed drill stand that is equipped with a clamping ring that exactly fits the machine. Divided
clamping devices which do not tighten exactly in the middle of the gear's neck are unsuitable and
damage it.
Be careful that the machine's axis is absolutely parallel to the stand column. We recommend our drill rig
KS13.
4.4 Motor switch (1e) and overload protection
After having switched on the motor starts softly. If the machine is being overloaded, the motor electronic
switches over to the pulsating operation for showing the operator the overload. If the force is then not
reduced, the motor switches off after a few seconds. After switching the machine off and on again, the
motor start again softly.
The motor electronic can temporarily be used on 260 Volt (resp. 140 Volt on 110 Volt machines). Higher
voltages however can cause irreparable damages. Please note that when operating the machine via a
generator, this does not generate higher voltage peaks.
4.5 Gear changing
The DK16/17/18 is equipped with a 3-speed gear unit. The DK08/09 has a 2-speed gear. Please do
never change gears forcibly but only when the machine is just coming or has already come to a stop.
4.6 Safety clutch
The integrated safety clutch protects the operator, the machine and the tools against high mechanical
overstrain.
Please notice that the safety clutch is activated after only 2-3 seconds because otherwise the
wear and the development of heat increases greatly.
5. O P E R A T I N G I N S T R U C T I O N S
5.1 Diamond core bits
The tool fixture is prepared for standard drill bits with G ½", 1 1/4" UNC or the new M33/3 thread.
Additional description 03 (e.g. DK 1603) - combined spindle with female thread G ½" + male thread 1
1/4" UNC. So it is possible to fix tools with G ½" as well as 1 1/4" UNC thread.
Additional description 08 (e.g. DK 1108) - external thread M33/3.
The DK17 is provided with a 1 1/4" UNC spindle. By using the additional adapter (2) it is possible to fix
tools with G ½" female thread.
Only use appropriate diamond tools of high quality.
Especially when drilling manually use core bits that cut easily and have a low specific initial pressure.
Take care that the segments jut out sufficiently against the tube.
It is useful to apply some water resistant grease to the thread of your tool so it can be taken off again
more easily.
Take care that the radial run out at the diamond segments of the core bits is not more than
1 mm, on the DK 11 not more than 0,5mm.
Changing tools on the DK 1108: The DK 1108 is provided with a special spindle arrest, which makes
the changing of the tools easier. The drill bit on this new thread is normally not so tight, that tolls are
required for loosening. Press the locking knob, for arresting the spindle and loosen the drill bit.
Never press the locking knob on a running machine!
Only use suitable wrenches for changing the core bit. Thereby hold the drilling spindle with another
wrench.
Never use a hammer or something similar to open the core bit. If necessary elongate the
wrench.
14
5.2 Drilling - directed by a drill rig
Since the drill stand is not included in the delivery, we merely want to point out some important things you
should note when using the machine.
Please observe the special instructions for the drill rig.
Kinds for fixing the rig
Fixing the stand using dowels, by vacuum and by a brace.
The mainly applied method to fix the stand is given by using dowels. It is preferable to use metal dowels.
The diameter must be at least 10 mm.
When fixing the stand by vacuum, take care that the vacuum is sufficient high.
Make sure the seals are not worn out.
Please take care that the rig is really fixed solid and stable, if by the aid of the adjusting screws at the
base plate of the rig the vacuum seal is released.
5.3 Drilling - hand held
Open the ball valve and start the machine.
Hold the core drill as rigidly as possible.
Touch the surface you want to work on with the core bit in a slight angle (of about 30Eto the axe) or use
the start drilling aid (special accessories).
After the bit has worked its way into the object for about 1/8-1/4 of the circle's circumference, turn the
core drill up into a right-angled position, using sufficient initial pressure.
Formula: drilling diameter in mm x 4 = contact power in N.
Use especially for bigger core bits a drilling-start aid which helps to keep track for the first few
millimeters. This can simply be a wooden plate with a recess in it in the shape of a triangle in which the
core bit can be guided.
DK11 with water collecting ring: Adjust the position of the gas pressure spring for the water collecting
ring in the way that it juts out at least 2 cm over the segment edge. Adapt the hose nipple to a water
suction. Then put the tool into a right-angle position to the surface that you are working on and use
sufficient initial pressure to surmount the spring power of the gas pressure spring.
Take special care that the core bit is directed in a straight way in the drilled hole so it does not block.
ATTENTION: Please do consider that the machine has a very high torque, especially in the
first gear. Therefore, drill manually only extremely concentrated, especially when working
in the first gear and with diameters of more than 60 mm. In case of a sudden blocking of
the core bit the machine, despite the safety clutch, might get out of control and hurt you
considerably. Avoid working positions at face level.
5.4 Dry drilling
In case of dry drilling fix the exhaust hose on the tail end (DK09/17), resp. into the dust exhauster
(DK116/118) and start the dust exhauster.
For applying to drill exactly a bore piercer art.-no. AS13 is disposable for the DK09/17. It is to put into the
spindle and after a depth of bore hole of maximal 10 mm it is to be removed.
The DK08/09/16/17 can alternatively be fitted with a start drilling aid, which also includes a water
collecting ring.
Use by dry drilling absolutely a powerful dust exhauster which´s filter doesn´t obstruct.
Drilling dry is only possible if the masonry is absolutely dry - risk of obstruction.
Before working dry with the DK09/17 in order to avoid obstruction, take care that the inner side of the
spindle is absolutely dry.
For the rest proceed as explained in 5.3.
5.5 General directions for drilling
Adjust the quantity of water by using the ball valve to such an extent that the loose material gets
completely washed out of the drilled hole.
You do not wash out enough material if mud occurs around the drilled hole.
Use sufficient contact pressure. If it is too low the diamonds tend to polish. This means that the feed
speed becomes less until finally no material is cleared away any more.
In this case the segments are to "sharpen" again by means of a SiC-grindstone.
15
Take care that the core bit does not vibrate; otherwise the diamonds are detached by force.
By drilling of reinforcements you might have to use greater initial pressure and the next lower gear.
In case the machine gets stuck do not try to loosen it by switching it on and off. Immediately switch off
the machine and loosen the bit by turning an appropriate wrench to the left and right. At the same time,
pull the machine out of the drilled hole carefully.
Take care not to cut a water-pipe or even an electric mains. In case of doubt use a line detector
for searching the drilling area.
6. M A I N T E N A N C E
Always and on principle pull the mains plug before beginning with works of maintenance
or repairs.
Clean the machine after you have finished drilling. Do not forget to clean the core bit thread and grease
it.
Clean the machine with a dry or moist cleaning-rag and not with a jet of water. Keep the ventilation
apertures clean.
Damaged PRCDs, cords and plugs have to be repaired or exchanged exclusively in an authorized repair
station (www.weka-elektrowerkzeuge.de) . 
6.1 Oil-bath lubrication
After the first 100 hours of using the machine you should replace the gear system´s oil. Get this done in
a specialist´s workshop or demand on the appropriate technical documents for this work.
ATTENTION: If oil comes out of the machine, stop working with it immediately. Leakage of oil does
damage the gear system.
6.2 Carbon brushes
After you have used the machine for about 300 hours you should check the carbon brushes for wear and
replace them if necessary. Like any other work on the motor this must be done by an electrical specialist.
7. G U A R A N T E E
This product is covered by a guarantee for a period of 12 months from the date of purchase.
The guarantee covers all defects or damages of the product during the guarantee period evidently due
the defaults in workmanship or material and is limited to repair and/or adjustment. The guarantee is not
valid in case of normally wear and tear, if the product has been misused, used contrary to the instruction
manual, or by using extraneous parts.
8. D E C L A R A T I O N O F C O N F O R M I T Y
Description: Diamond core drill - for drilling holes in concrete, stone and masonry
Type: DK08, DK09, DK11, DK16, DK17, DK18, DK116, DK118, DK119 (and versions)
from serial no.: 0110001
We hereby declare under our sole responsibility that this product conforms with the following standards:
EN60745-1:2009/A11:2010, EN60745-2-1:2010, EN55014-1:2006 + A1:2009 + A2:2011, EN55014-
2:1997 + Corrigendum 1997 + A1:2001 + A2:2008, EN61000-3-2:2006 + A1:2009 + A2:2009, EN61000-
3-3:2008 in accordance to the regulations of directive 2006/42/EG, 2011/65/EU and 2004/108/EG.
WEKA Elektrowerkzeuge Neubulach, 29.12.2009
Auf der Höhe 20 Wilhelm Wurster, Owner
D 75387 Neubulach
9. R E C Y C L I N G
According to the European regulation 2002/96/EG we have to take back old machines for
departing them by substance and for recycling. Please make sure that the old tool does not
get into the unsorted municipal solid waste, but that it is given back to us, resp. abroad to our
distributors.
Übersetzung der Originalbetriebsanleitung - Subject to change without notice 0510

Other manuals for DK08

1

This manual suits for next models

9

Other Weka Drill manuals

Weka HD1603 Series User manual

Weka

Weka HD1603 Series User manual

Weka SR35 User manual

Weka

Weka SR35 User manual

Weka DK12 User manual

Weka

Weka DK12 User manual

Weka DK 42 B series User manual

Weka

Weka DK 42 B series User manual

Weka DK26 User manual

Weka

Weka DK26 User manual

Weka DK28 User manual

Weka

Weka DK28 User manual

Weka DK16 User manual

Weka

Weka DK16 User manual

Weka DK 22 User manual

Weka

Weka DK 22 User manual

Weka SR 25 User manual

Weka

Weka SR 25 User manual

Weka HD16 Series User manual

Weka

Weka HD16 Series User manual

Weka KS 18 User manual

Weka

Weka KS 18 User manual

Weka DK 42 User manual

Weka

Weka DK 42 User manual

Weka KS30 User manual

Weka

Weka KS30 User manual

Weka DK08 User manual

Weka

Weka DK08 User manual

Weka DKS15 User manual

Weka

Weka DKS15 User manual

Weka DK 62 User manual

Weka

Weka DK 62 User manual

Popular Drill manuals by other brands

Power Fist 9054685 manual

Power Fist

Power Fist 9054685 manual

VALERII S & M GROUP PREMIUM 0503GX-EID043 user manual

VALERII S & M GROUP

VALERII S & M GROUP PREMIUM 0503GX-EID043 user manual

Pro's Kit PT-1801A user manual

Pro's Kit

Pro's Kit PT-1801A user manual

NUTOOL NCD18C Original instructions

NUTOOL

NUTOOL NCD18C Original instructions

BLACK DECKER BDHD500 Original instructions

BLACK DECKER

BLACK DECKER BDHD500 Original instructions

MasterForce 241-0725 Operator's manual

MasterForce

MasterForce 241-0725 Operator's manual

Far Tools PP 850B Original manual translation

Far Tools

Far Tools PP 850B Original manual translation

Tack life PCD04C user manual

Tack life

Tack life PCD04C user manual

Powerplus POWDP1520 manual

Powerplus

Powerplus POWDP1520 manual

BLACK DECKER BL186 Original instructions

BLACK DECKER

BLACK DECKER BL186 Original instructions

Elite CID12 user manual

Elite

Elite CID12 user manual

Central Pneumatic 7528 Assembly and operating instructions

Central Pneumatic

Central Pneumatic 7528 Assembly and operating instructions

Delta 18-900L instruction manual

Delta

Delta 18-900L instruction manual

Worx Nitro WX130L.X manual

Worx Nitro

Worx Nitro WX130L.X manual

Wesco WS3145 manual

Wesco

Wesco WS3145 manual

Emax EATDR03S1P Operator's manual

Emax

Emax EATDR03S1P Operator's manual

BLACK DECKER BEH200 Original instructions

BLACK DECKER

BLACK DECKER BEH200 Original instructions

MasterForce 241-0412 Operator's manual

MasterForce

MasterForce 241-0412 Operator's manual

manuals.online logo
manuals.online logoBrands
  • About & Mission
  • Contact us
  • Privacy Policy
  • Terms and Conditions

Copyright 2025 Manuals.Online. All Rights Reserved.