Well Red Coronet Quick setup guide

Well Red Coronet –Safety, Assembly and Use
1
CONTENTS
A. Safety ..............................................................................................................................................2
B. Care.................................................................................................................................................2
C. UNPACKING.....................................................................................................................................3
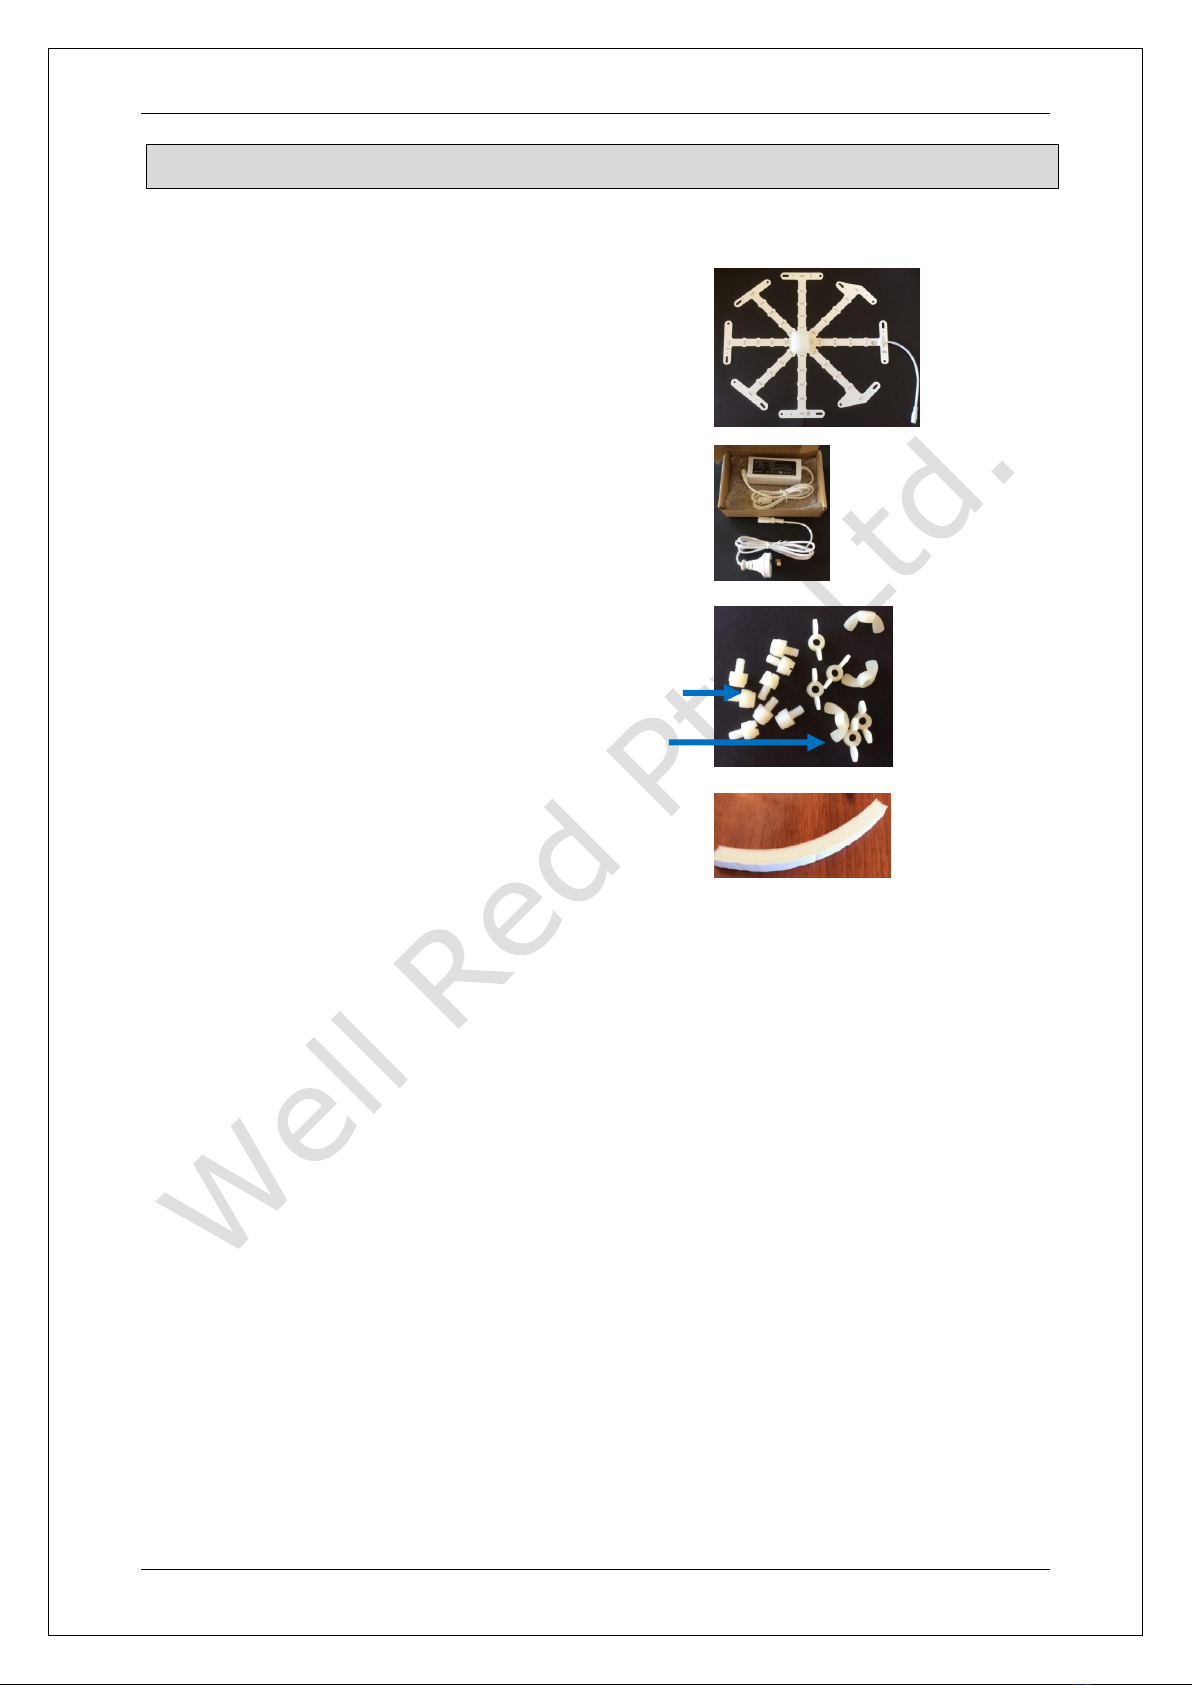
1. Your package has three items:....................................................................................................3
2. Before you start assembling: ......................................................................................................3
D. Your Coronet...................................................................................................................................4
E. Assembling your coronet ................................................................................................................4
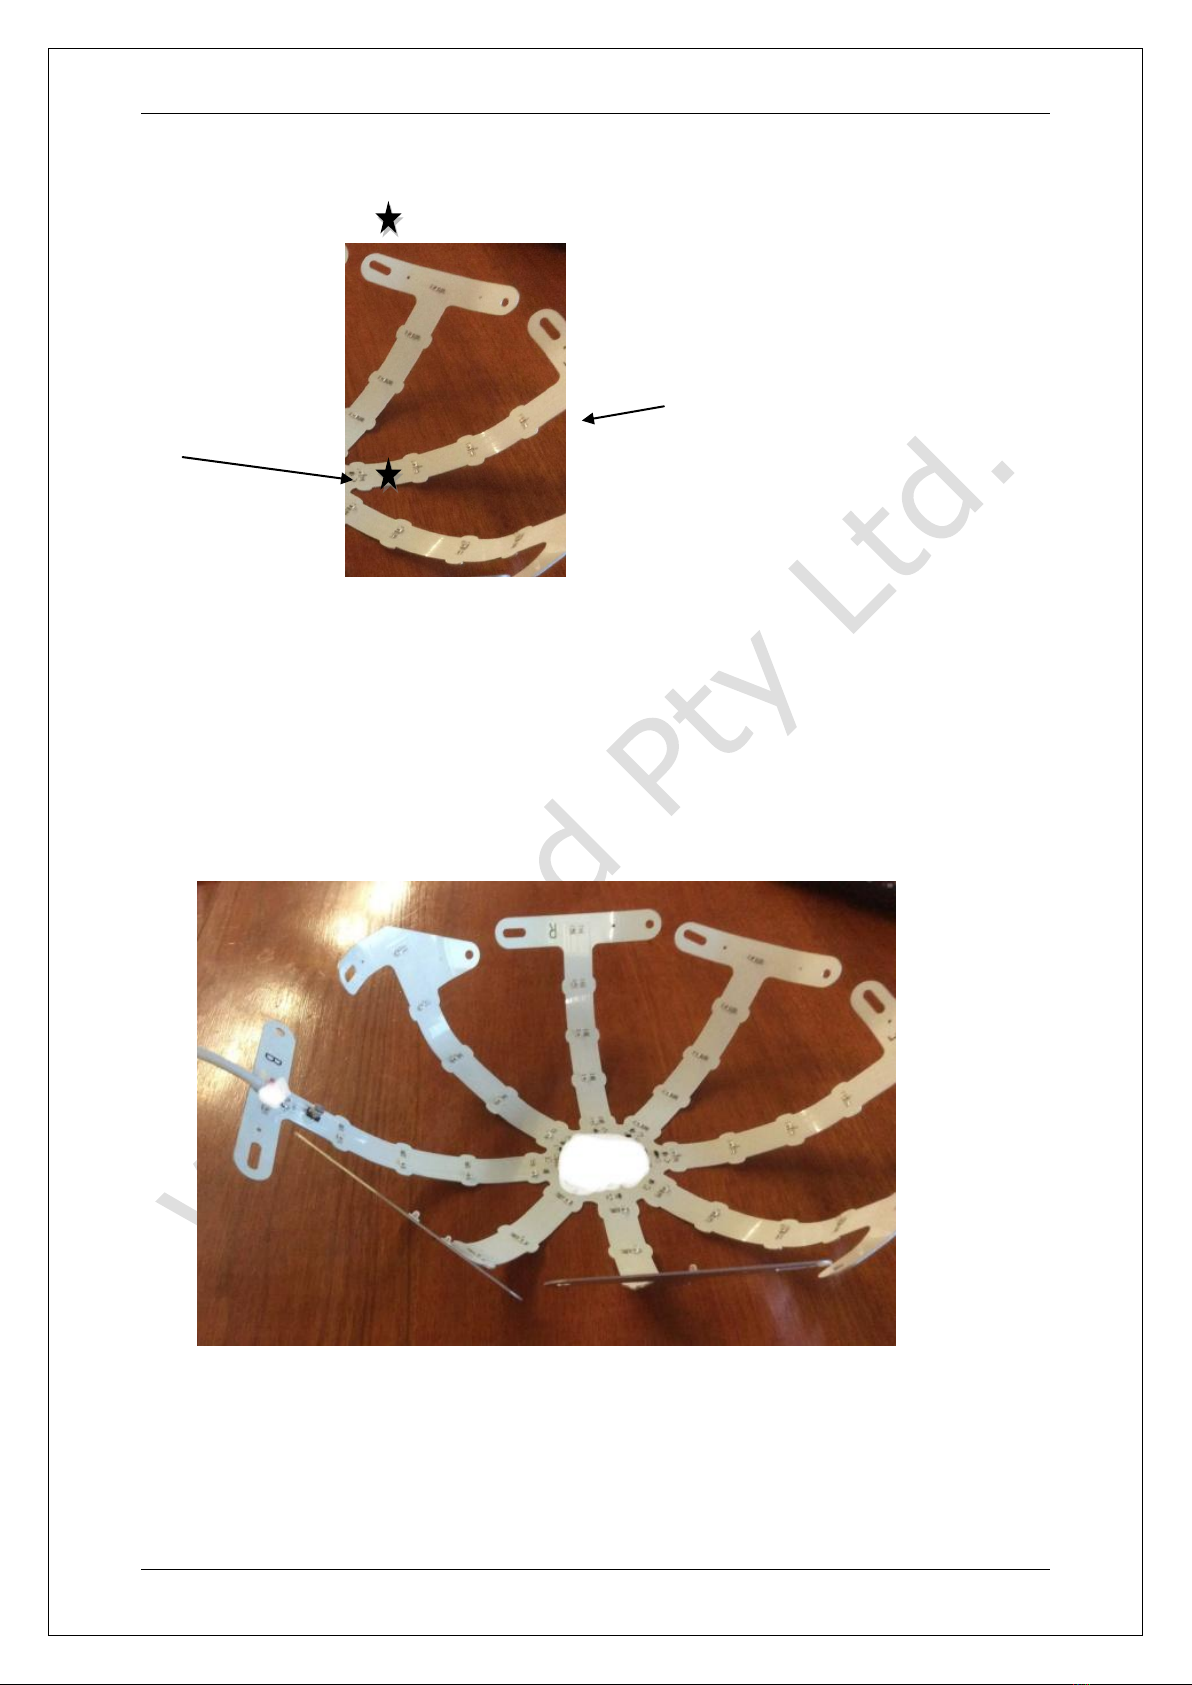
1. Curve the feet - gently ................................................................................................................4
2. Curve the end of each leg - gently..............................................................................................5
3. Curve the middle of each leg - gently .........................................................................................6
4. Curve the each leg a little more - gently.....................................................................................7
5. Keep curving those legs - gently. ................................................................................................7
6. Connect the feet .........................................................................................................................8
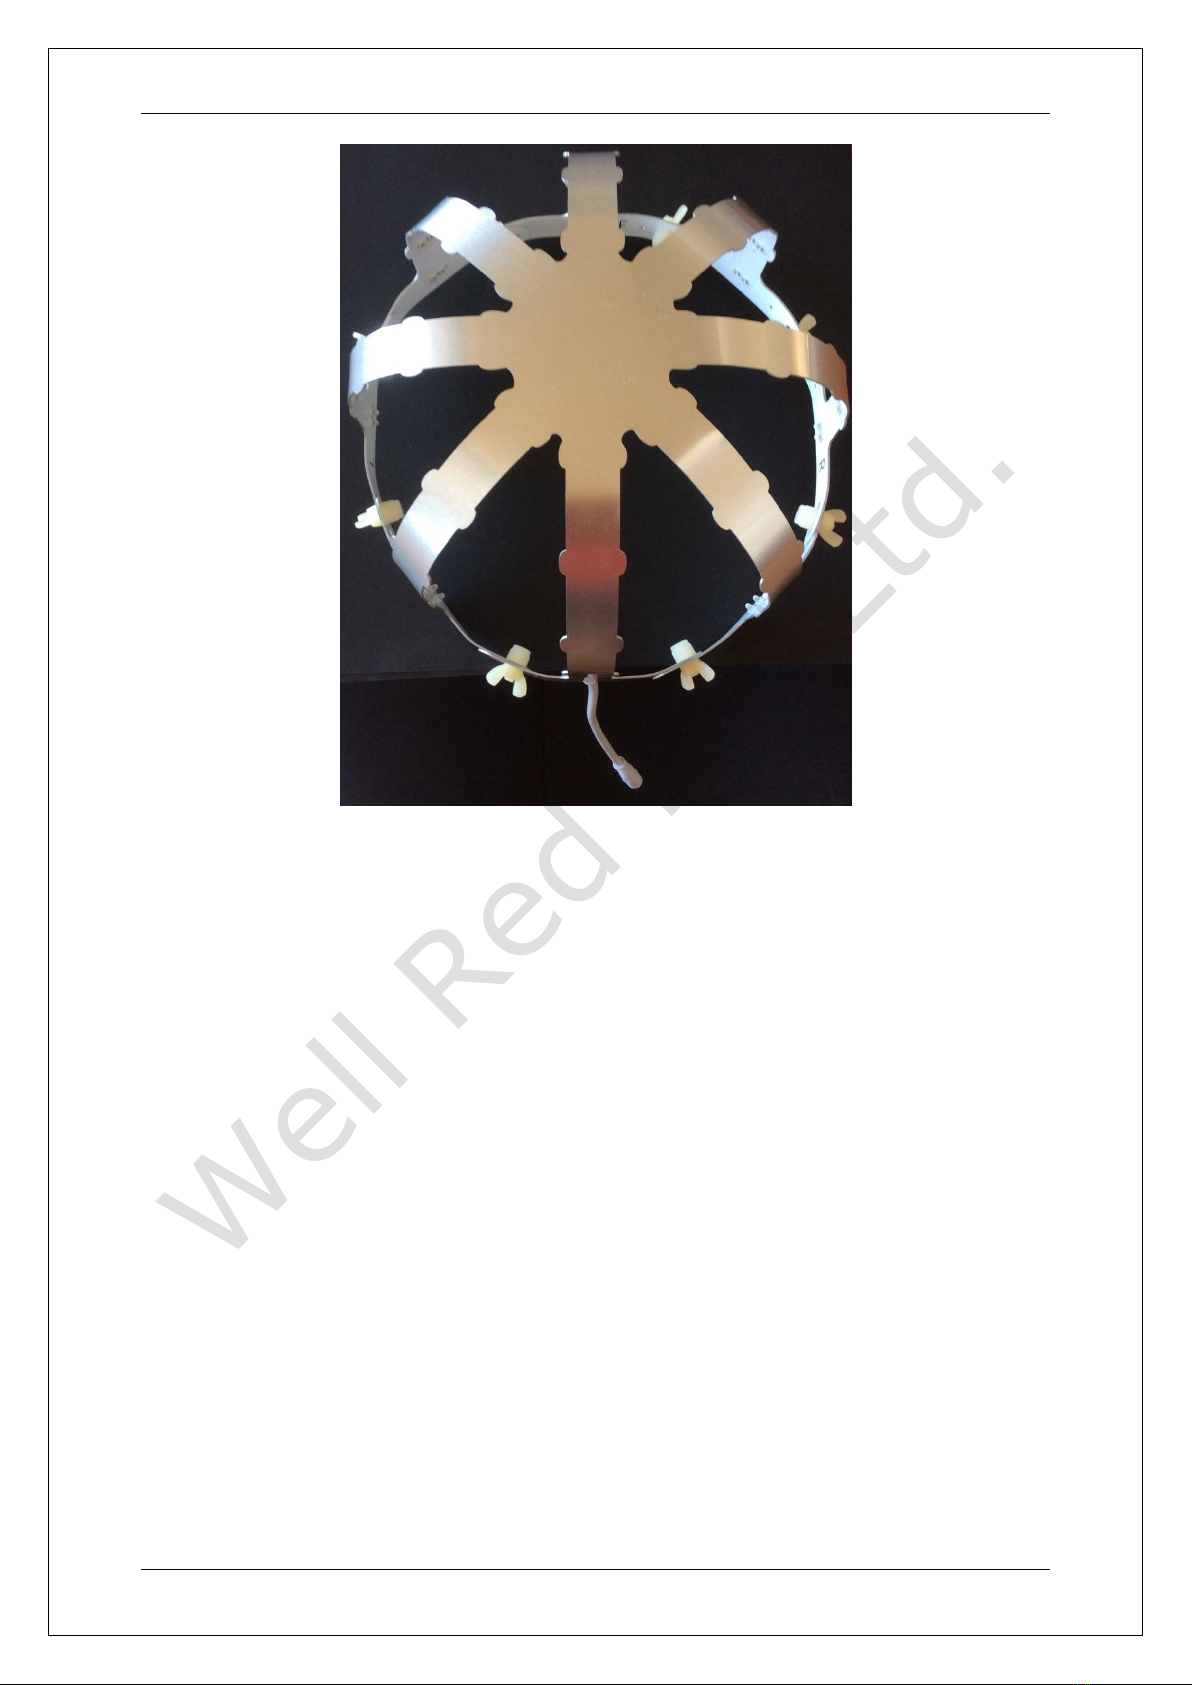
F. Fitting the coronet ........................................................................................................................10
1. To make it comfortable for your head, sit the coronet on your head with:.............................10
2. Adjust wing-nuts to fit the Coronet to your head: ...................................................................10
3. Aim for a fit that:.......................................................................................................................10
4. Be careful ..................................................................................................................................10
G. Using your coronet........................................................................................................................12
1. Coronets are pre-programmed.................................................................................................12
2. Mornings are the best...............................................................................................................12
3. Always be comfortable .............................................................................................................12
H. The Well Red App..........................................................................................................................13
1. Download the Well Red App.....................................................................................................13
2. Connect Coronet and your Android device using Bluetooth....................................................13
3. Connect the coronet to the App ...............................................................................................13
4. Well Red Control.......................................................................................................................14
5. Pause and Resume....................................................................................................................14
6. Settings......................................................................................................................................15
7. Tools –Tremor Tracker.............................................................................................................15
I. Troubleshooting............................................................................................................................15
J. About Well Red pty ltd..................................................................................................................16

Well Red Coronet –Safety, Assembly and Use
2
Thank you for purchasing a Well Red Coronet.
The Coronet light hat design is based on medical research which has shown that:
1. red and near infrared lights are safe to use on a daily basis for the recommended duration, which has
been programmed into this device, and
2. red and near infrared lights may improve symptoms of neurodegenerative diseases, sleep quality,
mood and energy levels.
While the research thus far is very encouraging, no guarantees can be given that there will be improvements
for any one individual.
It does seem that the longer a person has been living with a neurodegenerative disease, the more damage has
happened inside the brain. In this situation, red and near infrared lights may be less effective, compared with
someone who is at an early stage.
To complicate things further, the individual using the Coronet may not notice any changes at all, while at the
same time family members and friends do notice improvements.
Neurodegenerative disorders are subtle and complex beasts –for more about this read Catherine’s blog:
redlightsonthebrain.blog
A. Safety
Your coronet is a 12volt electrical device.
Do NOT use in or near water.
Do NOT use with wet hair.
Do NOT press or push the LED lights
B. Care
Your coronet is made with aluminium.
You can carefully and slowly bend the aluminium arms into shape.
Do NOT repeatedly bend the aluminium arms.
Use the instructions to fix it into shape for your head, then leave it in this shape.
Do NOT continue to reshape the coronet.
Do NOT press or push the LED lights

Well Red Coronet –Safety, Assembly and Use
3
C. UNPACKING
1. Four items:
Your coronet –in its flat mode
A rectangular box –this contains your
power supply
Nylon wing-nuts and bolts –to fit the
coronet to your head.
Bolts
Wing-nuts
Foam strip –for comfort
2. Before you start assembling:
Set yourself up
Use a comfortable table or bench, preferably near a power point.
Clear the area so that you have plenty of room to work.
Set up the Power Supply
Open the smaller rectangle box with the power supply and plug it in.
Discipline the Wing-nuts and bolts
Put all the wing-nuts and bolts into a container so that they don’t try to
run away.
Discipline yourself
Work slowly.
Don’t force or twist the aluminium. Yanking the aluminium can harm it.

Well Red Coronet –Safety, Assembly and Use
4
D. Your Coronet
Always keep the LEDS of your Coronet facing upwards.
Look carefully at the cover page showing your Coronet’s markings and
features
There are eight legs radiating from the centre
Each leg has LED lights spaced along it.
Each leg ends in a wide foot, with holes and slots.
E. Assembling your coronet
1. Curve the feet - gently
Place two fingers on either side of the foot near the hole and slot.
With your other hand, hold one side of one foot, and gently bend it
inwards. Bend slowly, aiming for a gentle curve. No right angles.
Repeat with the other side of the foot, then all the feet. Work slowly.
Press with two fingers of one hand.

Well Red Coronet –Safety, Assembly and Use
5
2. Curve the end of each leg - gently
Put two fingers of one hand on the clear parts between LEDs mid-way
along the leg.
With two fingers of the other hand placed under the foot, gently ease the
whole foot towards the centre. Gently.
Be gentle. You will be adjusting your coronet throughout the assembly.
Repeat with each leg. Work slowly and gently.
It should look something like this, once you have eased every leg.
Ease the whole foot towards the centre, with
two fingers placed under the foot.
Lift the whole foot with two
fingers of the other hand
placed under the foot. Gently.

Well Red Coronet –Safety, Assembly and Use
6
3. Curve the middle of each leg –gently
Put two fingers on the clear part between LEDs near the coronet centre.
Press down gently.
Put the other hand under the foot and the end of the leg
Gently lift the leg towards the centre, just a little.
Not too much.
You will be adjusting your coronet throughout the assembly.
Lift the whole foot with
the other hand placed
under the foot. Gently.
Not too much.

Well Red Coronet –Safety, Assembly and Use
7
4. Curve the each leg a little more - gently
Put one finger on the clear part between LEDs near the coronet centre.
Curve each leg section slowly inwards, aiming for a gentle curve.
Make sure that you don’t press on a LED light.
Repeat with each leg and foot section slowly. Work slowly and gently.
5. Keep curving those legs - gently.
You’ll see the holes in each side of the feet moving closer together.
Press with one finger of one hand
Use your other hand to gently ease
more curve into the coronet leg.

Well Red Coronet –Safety, Assembly and Use
8
6. Connect the feet
Put the wing-nuts and bolts close to you.
Gently pull two legs next to each other until the holes/slots just start to
overlap.
From the inside (LED-side) of the coronet, insert the bolt shaft so that it
connects the two feet.
Using a wing-nut, screw the shaft into place.
Bolts are inserted from the inside.
Wing-nuts are attached on the outside.
Don’t make the wing-nuts tight at this stage. There will be lots of
adjusting to do.
Work around the coronet, carefully and gently connecting the feet.
Watch out for the LED lights, as it is easy to press on them.
Bolts are inserted from the inside
Wing-nuts are screwed in from the outside.

Well Red Coronet –Safety, Assembly and Use
9
Eventually you should have all the feet connected creating your Coronet.
Now for the fitting.

Well Red Coronet –Safety, Assembly and Use
10
F. Fitting the coronet
To make it comfortable for your head, sit the coronet on your
head with:
Fat the front.
Band the cable at the back.
Place the Fso that it sits on your forehead, about a centimetre (just under
half an inch) above your eyebrows.
Adjust wing-nuts to fit the Coronet to your head:
It is best to have someone help with this bit, as it is a bit fiddly.
Keep checking that Fis sitting on your forehead just above your
eyebrows. Keep adjusting the wing-nuts.
The coronet can be adjusted to fit a very large head, or a very small head.
The LEDS can be close to the head as the coronet has a heat-limiting
sensor.
Don’t allow the LEDs to directly touch the head.
Aim for a fit that:
-feels stable and not too wobbly.
-is OK to have on your head for 20 - 24 minutes.
-allows you to read, use a computer or watch television.
Be careful
Adjust carefully and slowly.
There is no danger to the lights shining in your eyes, but your Coronet is
much more effective if positioned with Fon your forehead above your
eyebrows, and Bshining on the lowest part of the back of the head.
Make sure that the cable is at the back.

Well Red Coronet –Safety, Assembly and Use
11
Use pieces of sponge around the perimeter
Make sure that you don’t cover any LEDS.
If you find the pulsing is annoying, stick small pieces of foam outside the
front LEDs, so that you create a foam barrier.

Well Red Coronet –Safety, Assembly and Use
12
G. Using your coronet
Coronets are pre-programmed
Your coronet is pre-programmed with wavelength, power, pulsing and timing:
Wavelength
o670nm LEDs (Mono), or
o670nm and 810nm LEDs (Duo).
Timing
oMono –20 minutes
oDuo –24 minutes (12 minutes each wavelength)
Pulse-rate
o40 Hz is used for both Mono and Duo.
Mornings are the best
It seems likely that brain cells are more receptive to red and near infrared light
in the mornings.
use your Coronet in the mornings, preferably before noon.
use once a day.
use every day if you can.
don’t worry if you have the odd busy day when you haven’t time to use
your Coronet.
Always be comfortable
Set yourself up in a relaxed way so that you are not tense or in any pain or
discomfort.
You might consider a permanent location to set up your Coronet. You could have
it already plugged into a power-point and sitting next to a comfortable chair.
You can start your session in three ways:
by turning the Coronet on at the power-point
by plugging the short Coronet cable into the power plug just before you
put it on; or
by connecting through your Android device, and using the Pause and
Resume buttons.
If you are easily bored, make sure that you have something to do for the
duration, whether it is reading, watching TV or using a tablet device.

Well Red Coronet –Safety, Assembly and Use
13
H. The Well Red App
Well Red pty ltd offers an App for Android devices with Bluetooth. While the App
is not needed to use the Coronet, it might be helpful. It does not yet work on
iOS nor computers.
For the App to connect to the Coronet, the Coronet MUST be turned on.
1. Download the Well Red App
-contact enqui[email protected] for the link.
-download the Well Red app onto your Android device.
-when the download has finished, close the App on your Android device.
-the app should appear like a pink worm on a black background on your
screen –or wherever your device sends downloaded apps.
2. Connect Coronet and your Android device using Bluetooth
-Turn on your Coronet.
-Turn on Bluetooth on your Android device.
-Select scan so that your Android device scans for nearby Bluetooth
connections.
-WellRedCoronet will appear.
-Press WellRedCoronet.
-You will then get a screen asking if you want to pair your android
device with WellRedCoronet. It will look something like:
-Type in 1234
-Press OK
3. Connect the coronet to the App
-Open the WellRed app
-You will now see a screen with a black background, showing all the
various Bluetooth devices that your Android phone may have
previously paired with.
-You will see WellRedCoronet in white letters.

Well Red Coronet –Safety, Assembly and Use
14
Press on WellRedCoronet.
Your screen will tell you that you are connected –a nice green bar.
4. Well Red Control
Press Continue (on the right under the green banner telling that you are
Connected to WellRedCoronet)
The screen should now be a lovely red colour with a big Pause button
5. Pause and Resume
If you are using your Coronet and the doorbell rings, you can tap the
Pause button and your Coronet will turn off and wait until you return.
When you return, press Resume and your Coronet will continue from
where it left off.

Well Red Coronet –Safety, Assembly and Use
15
6. Settings
This area is only available to clinicians and researchers. It enables
changes to be made to the Coronet’s programming.
7. Tools –Tremor Tracker
Tremor Tracker can be used without connecting to your coronet.
When you first use the Tremor Tracker, the number will probably be zero.
Hold the Android device comfortably on the palm of one hand.
Make sure that
oyour upper arm is lightly touching your side and
oyour elbow is held at right angles out in front of you.
With your other hand, press Start.
Hold the Android device as still as you can for ten seconds.
The App will show Test finished! and the number you scored:
A smaller number is better than a larger number.
If you want to keep track, write down the number each day.
You might like to use it daily or weekly, with one hand or both.
It might be a useful way to track your progress over a long period of time.
Don’t worry about the number you achieve each time, as the important
thing is whether there is a trend over months and even years.
I. Troubleshooting
If the App doesn’t seem to connect properly, clear the App by
pressing the rectangle key at the bottom of the screen.
If the App shows in the displayed windows, close it, then re-open it.

Well Red Coronet –Safety, Assembly and Use
16
J. About Well Red Pty Ltd.
The Coronet red and near infrared device have been developed by Well Red Pty Ltd, a Tasmanian-based
company.
The directors of Well Red Pty Ltd are:
Dr Catherine Hamilton, a retired medical practitioner and author of the blog redlightsonthebrain.
Mr Ron Brown, an electrical engineer and designer of bespoke electronic products.
Ron and Catherine aim to:
1. Continue research into the effects of red and near infrared lights,
2. Continue to develop red and near infrared light devices that can be used at home and in research
environments, and
3. Continue to make coronet light hats available to individuals for as low a price as possible.
Thank you for purchasing a Well Red Coronet. Please don’t hesitate to contact us if you have any queries.
For more information:
Email: enq[email protected]
Other manuals for Coronet
1
Table of contents