Well Tempered Lab LTD User manual

INSTRUCTION MANUAL
LTD
Rev. September 15

Description
The Well Tempered Lab LTD Tonearm is a stand alone refined version of our Simplex and Amadeus
tonearms that are only available on Well Tempered Lab plinths. The Well Tempered Lab LTD has all the
attributes of our standard tonearms. It can with a modicum ingenuity be mounted on a variety of
turntable plinths and features variable damping. A hydraulic cueing device is also fitted.
Well Tempered Lab's policy is the continuous improvements of it's products. We therefore reserve the
right of departure from illustration or specification that this might occasion.
Note: A parts list is included a the rear of the manual.
Contents
Preliminary
Pg 3
Mounting the LTD Tonearm
Pg 3 - 5
Fitting the Cartridge and Tonearm adjustments
Pg 6
Specification and Dimensions
Pg 6
Troubleshooting
Pg 7
Head-shell Alignment Guide
Pg 8
LTD Tonearm Parts List
Pg 9
LTD Tonearm Diagram
Pg 10 - 11
Warranty and Service
Pg 12
European Waste and Electrical and Electronic Directive
Pg 12
Registration
Pg 13
2

Preliminary
On a dedicated Well Tempered Lab plinth, inserts are provided to attach the base plate (Part no. 1) to the plinth.
No hardware is provided for mounting the LTD tonearm to other manufacturer's turntables. Well Tempered Lab
advise that such a project should only be attempted by competent personnel. Well Tempered Lab bears no
responsibility for this process.
.
Note: For plinths not drilled for the LTD Tonearm, a 22mm hole in accordance with the turntable manufactures
specifications is required. The LTD protractor provided specifies the centre of this hole. No further adjustment is
provided or required.
Mounting the LTD Tonearm
1. Install base plate (Part no. 1) in correct position on plinth and tighten fixing screws. See Fig (1). Fixing
screws are normally retained in inserts on Verslaex plinth.
Note: The Amadeus GTA MK II / LTD combination does not require the base plate (Part no. 1). The LTD
tonearm fits directly into the GTA MK II plinth. All adjustments are the same.
2. Carefully remove bearing cup (Part no. 7) and tonearm carrier bracket (Part no. 8) from foam packaging.
Fig (1)
3. Insert complete bearing cup and tonearm carrier assembly into base plate and tighten set screws (Part no. 2)
with hex wrench (Part no. 25) supplied. See Fig (2).
Fig (2)
Note: Do not over tighten as some further adjustment maybe be necessary and the whole assembly will need
to be lowered in the base plate to achieve correct VTA.
3

4. Carefully position tonearm tube assembly (Part no. 14 - 19) in a convenient position to allow phono socket
bracket (Part no. 4) to insert into carrier bracket. Extreme care must be taken during the process to ensure no
strain is applied between tonearm and phono socket wiring. See Fig (3) and (4). Tighten set screws to secure
phono bracket.
Fig (3)
Fig (4)
Note: Well Tempered Lab accept no responsibility for any damage to the Tonearm wiring during this process.
5. Suspend arm by applying one and half turns on the mono-filament suspension around the azimuth collar
apply a complete anti-clockwise twist to the mono-filament suspension lower golf ball into bearing cup and slide
azimuth adjusting collar onto azimuth rod (the anti-clockwise twist effectively provides anti-skate). See Fig (5)
and Drawings (1) and (2).
Fig (5)
4

Drawing (1)
Drawing (2)
6. Fine adjustment and alignment can now be completed and all set screws gently but firmly tightened. Some
further adjustments to overall tonearm height, VTA and the armrest may well be required after the chosen
cartridge has been installed on the tonearm. The silicone damping fluid can be poured into the bearing cup
(Part no. 7) using the nozzle supplied. The tonearm can be raised or lowered within the fluid in the bearing cup
by raising or lowering the tonearm pillar (Part no. 10). Carefully adjust the set screw and tighten gently when
desired level is achieved, some alterations to overall height, the cueing device and arm rest may also be
required at this time. The golf ball can be easily moved to one side of the damping cup by moving the azimuth
adjustment collar gently in the required direction. The arm rest (Part no. 18) and cueing device (Part no. 16) can
also be adjusted to ensure the tonearm and cartridge are in the correct position to clear the record and allow for
correct cueing. We recommend that approximately one third of the golf ball is submerged in the silicone fluid.
Do not overfill the bearing cup. It is easy to add more fluid, but difficult to remove it.
Fig (6)
5

Fitting the Cartridge and Tonearm adjustements
1. We recommend fitting the cartridge with the tonearm in position. However it is possible to fit the cartridge
before suspending the tonearm. Great care needs to be taken when installing the cartridge as the Well
Tempered Lab bears no responsibility for cartridge damage.
2. Install the cartridge to the manufacturer's specifications. The LTD features a head shell that requires no
tracking alignment adjustment. We strongly recommend it remains firmly fixed in the correct position as
supplied.
3. The Well Tempered Lab LTD Tonearm has an effective length of 10.5î (267 mm). The head-shell is fixed ex-
factory in the optimum position. There is no provision for over-hang adjustment. Some alignment protractors
may well disagree. However, The Well Tempered Lab stands by their convictions.
Important: There is absolutely no reason to torque head-shell / cartridge mounting hardware to excess.
Cartridge mounting hardware only requires firm but gentle tightening. Heavy handed torquing of mounting
hardware can result in movement of the LTD head-shell (refer to www.welltemperedlab.net on tracking
geometry).
4. There is an optional finger lift provided which can be attached to the cartridge fixing screw, adjacent to the
right hand side of the plinth.
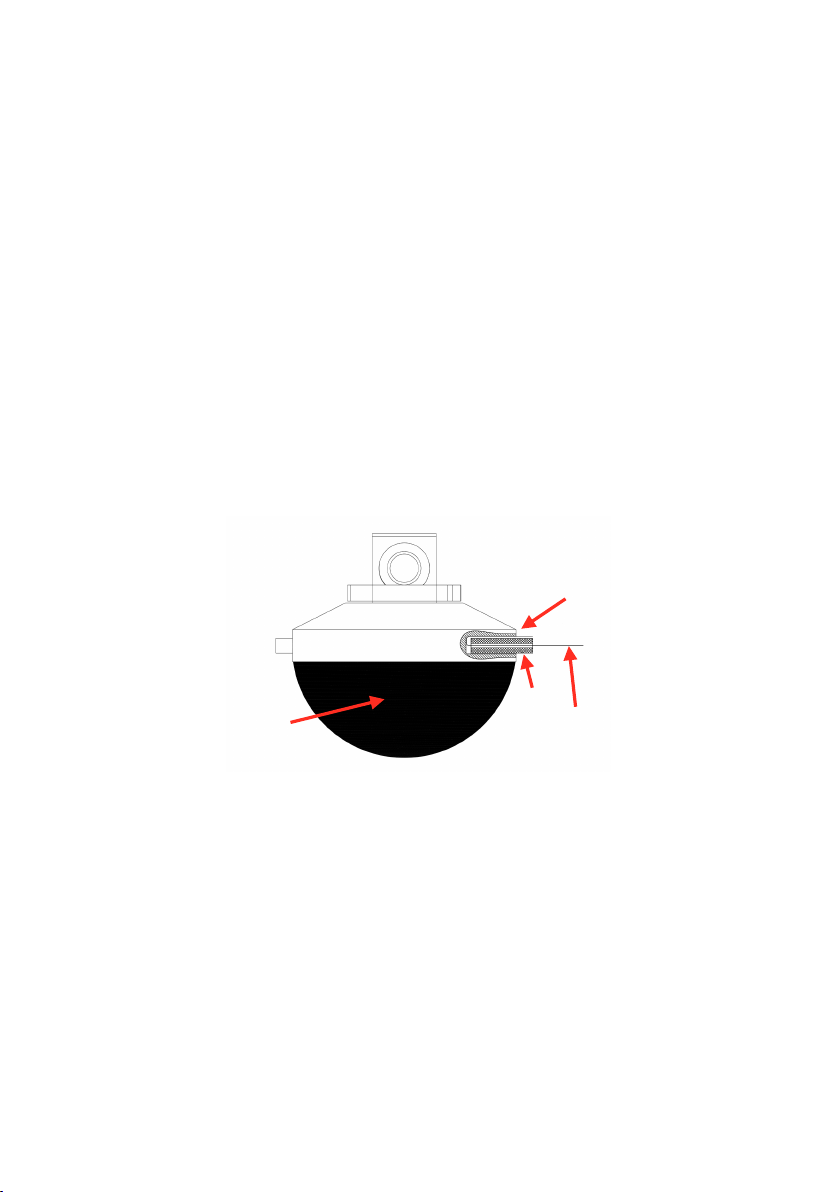
5. Apply enough damping fluid so as that no more than one third of the golf ball is submerged in fluid.
6. To set tracking force, two counterweights are supplied to enable correct tracking force to be applied to
cartridges of various weights. We recommend choice of counterweight (s) that allow correct tracking force to be
obtained with weight (s) as close to the tonearm lead out cable as practicable. This is not critical but care needs
to be taken as to not damage tone-arm lead out cable when attaching counterweights to tone-arm.
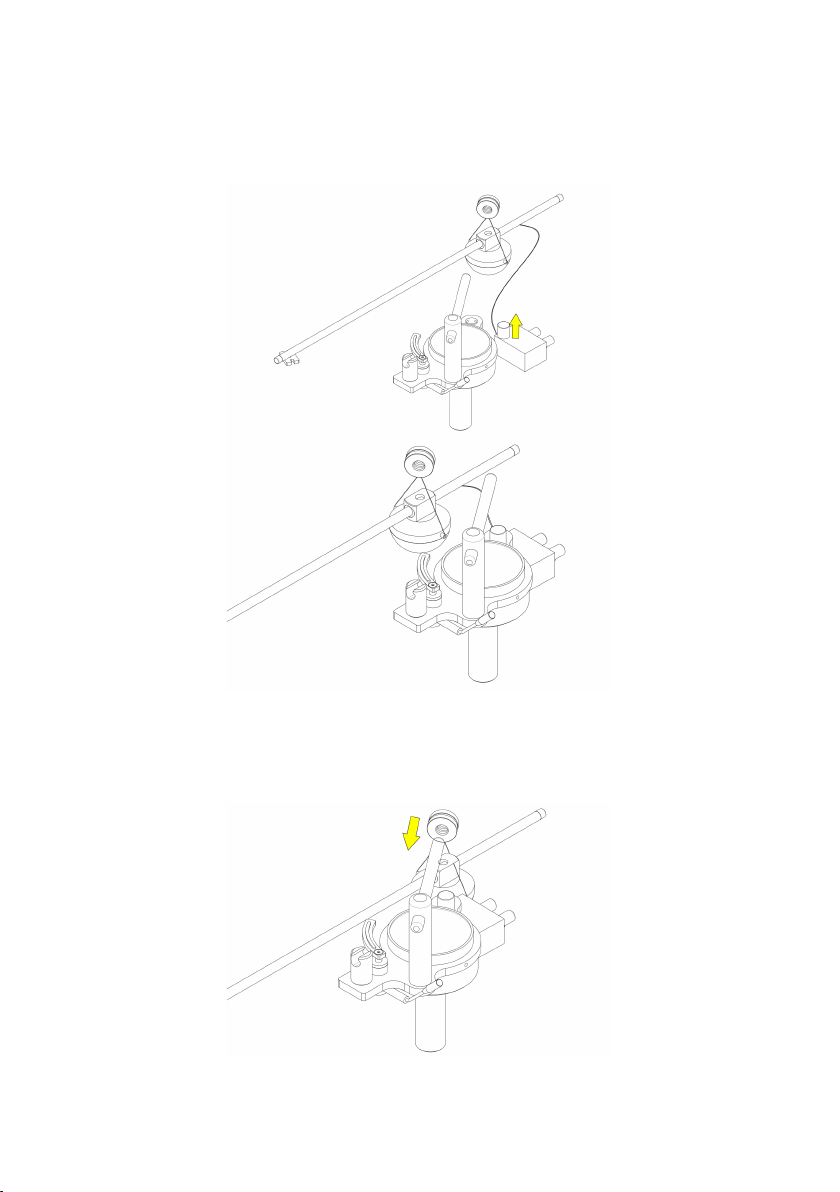
7. Adjust tonearm for correct VTA by raising or lowering bearing cup (Part no. 7) in base plate (Part no. 1) and
tightening set screws when correct VTA is obtained.
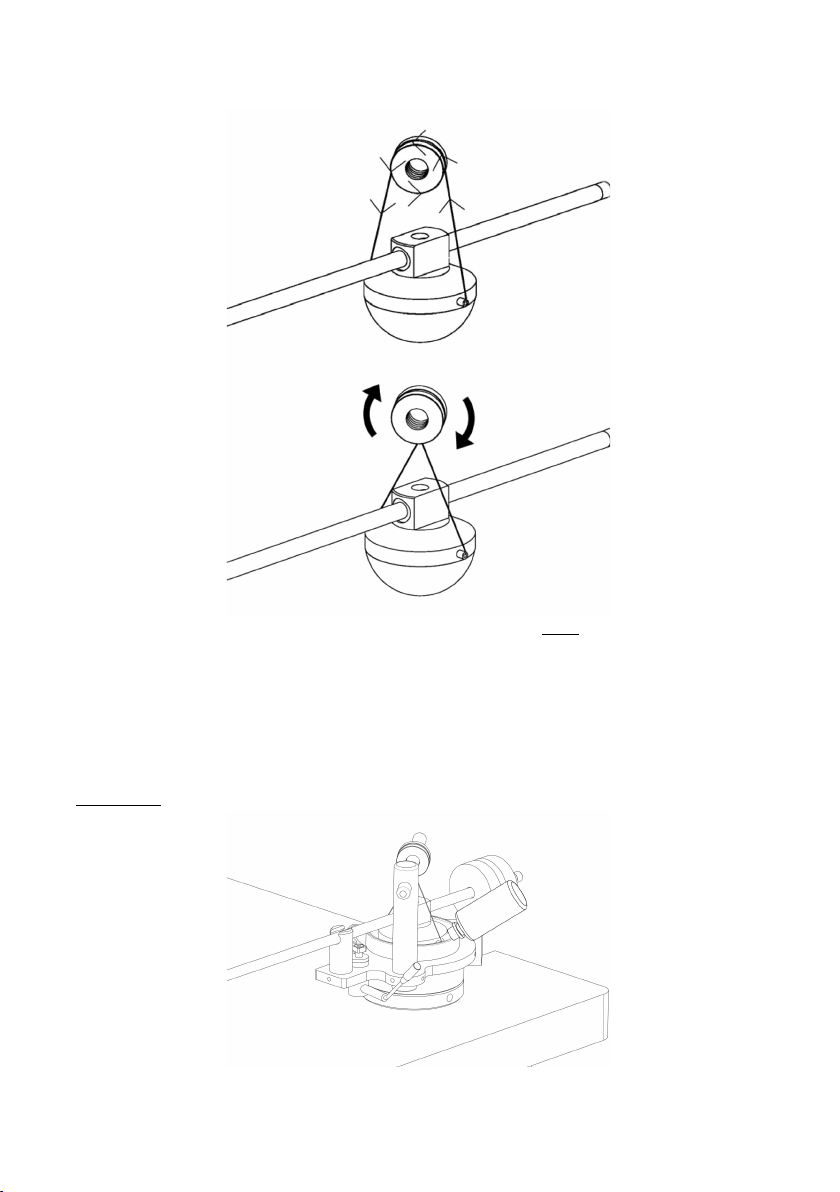
8. Correct Azimuth can be obtained by gently rotating the azimuth adjustment collar to allow the cartridge to
track parallel to the record surface. This can be achieved whilst the record is rotating and requires only minor
correction in both directions to achieve the correct result.
9. Due to the viscosity of the damping fluid adjustments in both tracking force and azimuth require the tonearm
to momentarily settle to affect the correct results.
Specification and Dimensions
Effective Mass: 10 g
Net Weight: 0.80 kg (800 g)
Cartridge fixing centres: 12.7 mm
Max Height above mounting surface: 140 mm
Max Depth below mounting surface: 45 mm
Max Radial clearance for Counterweights: 98 mm
Available in both:
Nominal: 9 inch (228.6 mm) version.
Nominal: 10 3/4 inch (273.05 mm) version.
6

Troubleshooting
1. In the unlikely event that you wish to remove the Symmetrex tonearm, the golf ball can be lifted clear of the
fluid, and left to drain. Surplus fluids may then be wiped from the golf ball with a paper towel.
2. Rubbing alcohol of 70% or above proof will remove all traces of fluid. All paper towels must be immediately
discarded in a suitable receptacle. We also have it on good authority that Vodka of the highest proof can be
pressed into service if rubbing alcohol is unavailable. Our chief designer also uses Ronsonol brand cigarette
lighter fluid with excellent results. This is also known in some countries as white spirits or white gas. We
suggest you first try cleaning fluid with caution and or the
underside of the plinth. The Well Tempered Lab can bear no responsibility for damage caused by cleaning fluid.
3. For cartridges without threaded fixing holes we find it most convenient to attach the cartridge to the head
shell in the slot closest to the platter. The other screw with the optional finger lift attached can then be passed
through the head shell and remaining cartridge hole. A small "popsicle" stick or similar with a piece of double
backed sticky tape on the end is invaluable. Just place the remaining cartridge nut on the tape at the end of the
stick under the protruding screw and tighten.
Note: Some cartridges may necessitate the shortening of the Nylon bridle that suspends the Golf Ball. This can
easily be achieved by the removal of one of the small plastic tubes that the Nylon passes through. Removal of
this tube will allow excess nylon to be pulled through the tube when the correct height is obtained the tube can
be re-inserted and the excess Nylon removed with a sharp craft knife. See Fig (7).
Fig (7)
1. Golf Ball
2. Tube
3. Nylon
4. Trim excess
4
2
3
1
7

20mm
Head-shell Alignment Guide for Well Tempered Lab Turntables
1. Cardboard
2. Centre of Tonearm tube
3. 19° Head-shell angle
150mm
Note: The Head-shell is factory fixed in position. Well Tempered Lab unequivocally reiterate that it should not be moved.
Heavy handed mounting of the cartridge may result in moving the head shell. In which case place the above guide with centre line parallel to tone
arm tube and align head shell to 19° angle.
It will be necessary to gently but firmly retighten the small screw fixing the head-shell to the tonearm. Do not over-tighten this screw.
1
2
3
19°
8

LTD Tonearm Parts List
Part Description (Part no.):
1. Base Plate
2. Set Screw (2)
3. Fluid Level Adjustment (Old model LTD only)
4. Phono Socket (RCA) bracket
5. Phono Socket Right (Red)
6. Phono Socket Right (White)
7. Bearing Cup and Shaft
8. Tonearm Carrier Bracket
9. Tonearm Carrier Bracket Set Screw (2)
10. Tonearm Pillar
11. Azimuth Adjustment Rod
12. Azimuth Adjustment Collar
13. Mono-filament Suspension
14. Golf ball
15. Cueing Lever
16. Damping Pot
17. Arm Lifter
18. Arm Rest
19. Tonearm Tube
20. Counter Weight Black
21. Counter Weight Silver
22. Head-shell
23. Cartridge Connections
24. Silicone Damping Fluid
25. Hex Wrench (4)
26. Finger lift
27. LTD Template
9

LTD Tonearm Diagram (Side View)
10

LTD Tonearm Diagram (Birdseye View)
11

Warranty & Service
Valid on completion of warranty card and confirmed date or purchase. Details can be registered at
www.welltemperedlab.net/welltemperedlab/contact/ or mailed to: Well Tempered Lab, P.O. Box 2650,
Christchurch, New Zealand.
This Well Tempered Lab product is warranted against defects in material and workmanship for one year from
date of purchase.
This warranty does not cover normal wear and tear and is void if the Well Tempered product has been subject
to mis-use, accident or negligence or if it has been tampered with or modified in anyway. Spillage of any fluids
supplied by the Well Tempered Lab is not covered within the scope of this warranty.
Warranty is restricted to the territory in which the product was purchased. Our distributors and dealers are
under contractual obligation to service under warranty products only sold through them. They are entitled to
make a non refundable charge for service to products purchased outside the territory if required.
Claims Under This Warranty
The product should be returned to the dealer or†nearest Well Tempered distributor, complete with warranty card
and confirmed date of purchase.
The European Waste Electrical and Electronic Directive
This product can be recycled. Products bearing this symbol must NOT be thrown away with normal household
waste. At the end of the product's life, take it to a collection point designated for recycling of electrical and
electronic devices. Find out more about return and collection points through your local authority.
The European Waste Electrical and Electronic (WEEE) Directive was implemented to dramatically reduce the
amount of waste going to landfills, there by reducing the environmental impact on the planet and on human
health. Please act responsibly by recycling used products. If this product is still useable, consider giving it away
or selling it.
12

Registration Card
Name
Address
City
State
Post Code (Zip)
Country
Phone
Email
Model
Serial No.
Dealer
Date of Purchase
13
Table of contents
Other Well Tempered Lab Turntable manuals

Well Tempered Lab
Well Tempered Lab Amadeus MK II User manual

Well Tempered Lab
Well Tempered Lab Amadeus User manual

Well Tempered Lab
Well Tempered Lab Royale 400 User manual

Well Tempered Lab
Well Tempered Lab Simplex MK II User manual

Well Tempered Lab
Well Tempered Lab Amadeus 254 User manual

Well Tempered Lab
Well Tempered Lab Amadeus GTA MK II User manual
Popular Turntable manuals by other brands

Audio Technica
Audio Technica AT-LP5 Installation and operation manual

Pro-Ject Audio Systems
Pro-Ject Audio Systems RPM 6.1 SB SuperPack Instructions for use

Megavoice
Megavoice Envoy Elite user guide

Omnitronic
Omnitronic DD-4220 user manual

Rotel
Rotel RP-510 owner's manual

Reloop
Reloop TURN3 instruction manual