Wersi Abacus User manual

Abacus / Verona / Vegas
User Manual
Edition: 18/02/2011 V.1
Gedownload bij www.wersi-fan.nl

Users Manual OAS Software Version 7
WERSI Direct www.wersidirect.com
We reserve the right to make technical modications to the hardware and software of the OAS instrument line without
prior notice. We disclaim any liability for differences between the features of a shipped OAS instrument and the fea-
tures described within this manual.
Legal Notes
Copyright Notice
Your WERSI keyboard / organ is an instrument belonging to the new WERSI OAS series. A PC running under the
operation system Windows XP & Windows 7 provides the central control of all its functions.
WERSI or third parties ship the instrument with various computer programs. You will receive these programs with the
right to run them on your instrument. Running these programs / software on any other computer, instrument or device
is a breach of the software agreement.
The End User Agreement for the operation system Windows is part of Microsoft’s original documentation that is
shipped with your instrument.
Copyrights on music
Please respect the copyright rules concerning the public reproduction of music. The applies to music that you play
yourself, as well as to music that is reproduced from Audio CD’s, from a Wave or MIDI le.
Warranty
In accordance to the applicable legal regulations, we guarantee the functionality of your instrument in the original
hardware and software conguration as shipped from our factory.
The main electronic unit used in the OAS instruments is a PC system that controls peripheral units like the touch
screen display, the hard drive, CD and other drives. The musical components, and the operation of your instrument
are supported by additional components like the DSP modules, the control panels with push buttons and the drawbars
etc.
The Operating System used in the OAS instruments runs within a special environment within a PC software. WERSI
uses Windows XP from Microsoft. You may be familiar with the software if you use a PC. Sometimes the media
publish that Windows isn’t a stable environment and that system crashes occur. In most cases, the problems are not
created by the Windows software, but by hardware and software components added later, specically so called ‘driv-
ers’ that are not compatible with with the current version of Windows, or are not written tot he specication / guidelines
outlined by Microsoft.
The Windows system on your instrument is congured in order to perfectly support the OAS software and the hard-
ware components of your instrument. We want to explicitly point out that our guarantee covers only instruments in
which the conguration of the instruments hardware and / or software components and the Windows operating system
was not changed from its original state at shipping.
Additional hardware or software, not provided by our factory or explicitly authorised by us may cause unpre-
dictable malfunctions, and even damage installed components or the whole system!
Please contact us before installing “Alien” hardware or software. It s also important not to change the le in the
‘WERSI’ folder or any sub-folder on the PC’s hard disk. This means you must neither delete les or folders nor move
them or create new folders / les.

As the structure of these folders and les is crucial for the functionality of the OAS software our warranty obligation
becomes void when you make changes here, except when being authorised by WERSI to do so. e.g. When installing
a new software update from WERSI.
Also, do not change folder ‘WINDOWS’ or any of its sub-folders. By doing so, you might cause a breakdown of the
operation system.
Please note that your instrument will come supplied with a genuine Windows XP installation disc, and the supporting
documentation. It is illegal to install this disc onto any other computer / machine other than your OAS instrument.
Also, a special image disc is available from WERSI with the complete OAS conguration ready to be installed onto
your hard disk. Please note that if such a re-installation is require, any personal data such as Total Presets, MIDI les
and Waves will all be lost. We recommend that users should backup their personal data to external media (CD / DVD
and USB memory sticks for example).
IMPORTANT: Microsoft’s end-user licensing agreement states that the original CD-Rom and the booklet only grant
you the right to use the Windows operating system on your OAS instrument. It is illegal to use this CD-Rom to install
Windows on one or more additional PC systems.

1. Getting Started
Connecting
The connections of your instrument are elegantly hidden behind the rear panel, so you won’t see the connections
even if you have cables plugged into them. Naturally, all connections will be in place. For the WERSI Verona, Vegas &
Abacus keyboard, connections for the Main Power, Lower Cabinet Speaker System (Left & Right Audio), Bass Pedals
& Volume / Expression Pedal Connector.
Further along to the left of the instrument audio / MIDI / in / out connections are further connection options for USB
(Motherboard USB ports), Video Out (For external monitors), Digital Audio in/out (Motherboard Connections).
Introduction
Congratulations on the purchase of your new WERSI OAS instrument. We can well understand that you, as the
proud owner of an instrument from our new family of WERSI OAS instruments (2011 Plus Range) do not want to
wade through the long, detailed information contained within the User Manual and Programmers Guide. However, we
recommend to read the introduction chapters of this user manual to quickly learn / familiarise yourself with the many
functions of your OAS instrument.
If you have the time and are curious enough to want to get to know your instrument in detail, we will happily guide you
through the many parts of your instrument via this user guide.
OAS stands for OpenArt-System. This means that this new generation of instruments is capable of almost unlimited
expansion. Although we here at WERSI have always been proud of the fact that our instruments are capable of ex-
pansion, we feel we have achieved special success in this respect with the OpenArt-System. A PC (Personal Com-
puter), which controls all functions of the central electronics is situated in the heart of OAS instruments. It is key to the
function of your instrument. However, a PC alone cannot provide the multiplicity of sound possibilities that the OAS
instrument range offers. For this purpose we have added additional high quality components. For example several
PCI cards with digital signal processors (DSP’s), an additional option module for vocal harmonizing effects, with which
layered voices are possible, and the proven / famous OX7 Tonewheel Sound Generator.
The digital signal processors produce, amongst other things the Longwave Sounds, the Reverb system, chorus and
delay effects, control the integrate digital mixer, play the Realdrums and control the signal routes of all sound sources.
The ‘bundle’ of high quality electronics built around a central PC offers ample reserves for expansion by activating
available software: soldering and DIY upgrades are things of the past, while the loading of software via CD/DVD/Blu-
Ray or USB is the way forward. Even though the OAS instrument range is built around a PC, you do not require any
PC / computer tech knowledge to operate your instrument. The PC interface remains hidden from the player. Windows
can be accessed, but it is not recommended to do so without professional knowledge or being competent at using the
Windows program.
PLEASE NOTE: The OpenArt-System continually records an ‘Error Log’ for WERSI service personnel to ac-
cess in case of malfunction. In the event of a customer using Windows and causing a malfunction, the Error
Log will show the action of the user. This may result in the warranty becoming void.

2. Safety Notes
General
• If possible, read the complete User’s Manual (or at least these safety notes) before powering up your instrument
for the rst time.
• Check the voltage setting of your instrument matches the voltage of your local power outlets (UK for example).
• Extreme changes in humidity and temperature may damage your instrument. Setup your instrument in a way to
guarantee proper ventilation.
• Don’t turn on the instrument immediately after you have taken it from a cold environment into a heated room.
Moisture may condense inside of the instrument which can cause electrical shortages. Wait until the instrument
has reached room temperature before turning the instrument on.
Electrical Safety
Due to the danger of electrical hazards, the instrument may only be opened by a qualied WERSI Service Technician.
IMPORTANT: If liquids are spilled over the instrument, or items have fallen inside, immediately disconnect
if from the power source. It is not enough to turn it off! Have your instrument checked by a qualied WERSI
Service Technician before you use it again.
In order to disconnect the instrument from the power-outlet, always pull out the power plug and never pull the power
cable from the instrument.
In order to avoid interference, do not connect the instrument to power-outlets (for example to multiple outlets) that sup-
ply other devices (like motors, dimmers, lighting etc) if there is another possibility.
When you use your instrument close to luminescent lamps, TV sets and computer monitors as noise signals may be
generated. This is standard advice for any electronic musical instrument.
PLEASE NOTE: Occasionally, some of the screens and buttons within the OpenArt-System contain German
words / names. WERSI Direct have provided notes within this manual to advise you of the correct English
translation for all German words. Do not worry, there are not many and you will soon become familiar with the
odd German words that are present!

3. Overview
Connecting
The connections of your instrument are elegantly hidden behind the rear panel, so you won’t see the connections
even if you have cables plugged into them. Naturally, all connections will be in place. For the WERSI Verona, connec-
tions for the Main Power, Lower Cabinet Speaker System (Left & Right Audio), Bass Pedals & Volume / Expression
Pedal.
For now, simply connect the Power Cable. To open the rear panel, push the clasps on the read panel toward the
middle and open the panel. There are openings for the cables to the left and right of the underside of the rear panel.
On the left side, you will see the power plug. Pass the power cable through the left opening, and connect it to a prop-
erly installed AC power outlet, and close the rear panel again.
You can obtain more information about the various connections that can be made to your instruments in the
‘Connections of the OAS Instrument’ chapter.
Power On
Locate the POWER ON/OFF on the far, lower right of the control panel. Press the button briey to switch on the instru-
ment. The button’s red LED should now be on.
Due to the new OpenArt-System, it takes longer to switch on than you be used to with other instruments. While start-
ing up the PC’s operating system (Windows XP / Windows 7 - Apollo / Pegasus Wing), the various sounds, effect
settings and much more is loaded.
Watch the colour TFT display in the middle of the control panel, and the LEDS in the various push buttons on the
control panel. If the Main Display is visible on the TFT screen and the LEDs in some of the push buttons light up, your
instrument is ready to go.
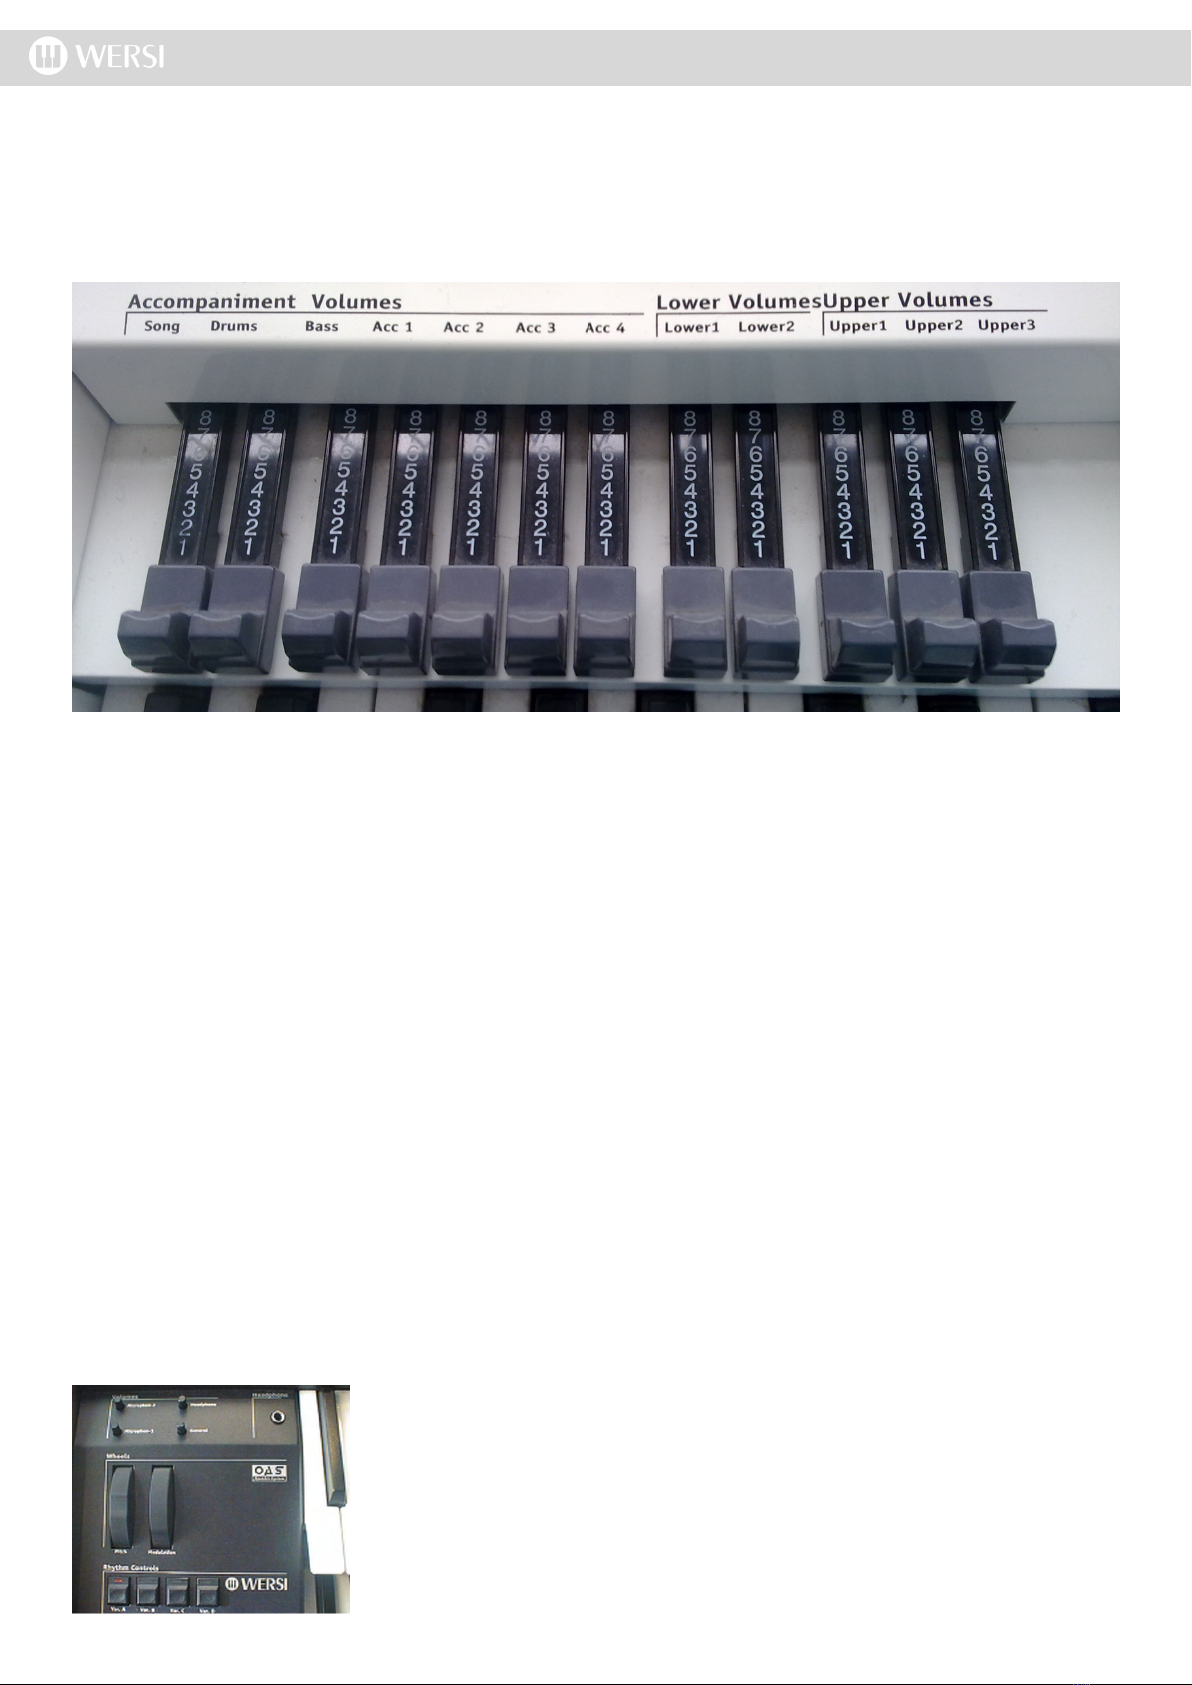
If you press some manual keys, you hear the sounds that have been automatically selected when you switch on. If this
is not the case, make sure that the grey volume drawbars are pulled out (on the left hand side of the main display).
IMPORTANT: If you have an expression pedal connected, you may have to slightly ‘accelerate’ in order to
reach an audible volume level.
ATTENTION! In the rst minute after starting, different program modules are still loading. During this time
different functions may proceed with delays. Please have some patience before beginning to perform. The
loading process is complete when the ‘Selectors’ & ‘Accompaniment’ tab buttons appear in the Blue Menu at
the top of the TFT display.
Power Off
If you are only running the instrument software (The OAS Program), as is the case when just starting your instrument
in the normal way, you may turn off your instrument simply by pressing the POWER ON/OFF button.
If you are a PC user, you know that a computer usually should perform a ‘shut down sequence’ before the
power is actually turned off. This allows programs still running to save any changes to hard disk. The OAS
software has been designed to save any pending changes before shutting down the system when you press
the POWER ON/OFF push button.
For your safety, the software will display a Blue message box asking you to conrm the shut down of your OAS instru-
ment. This ensures that you do not loose settings that you have not saved or shut down the instrument unintentionally
while performing should you hit the POWER OFF button unintentionally.

Overview
First Orientation
There are various devices available to operate your instrument and to display its current settings:
1. Push Buttons
2. Drawbars
3. Controls & Wheels (Pitch & Modulation Wheels)
4. The Data/Tempo Wheel (Top Right near the TFT Screen)
5. The TFT Display Screen
The rst four items correspond to buttons and controls that can be found on other instruments, they are useful for
quick changes or to adjust certain parameters while playing.
The TFT screen is combined with a ‘Touch Screen, i.e it does not only display information, but you may also ‘touch
buttons’ that are graphically displayed on the screen (similar to clicking a button with a mouse on a PC). Sometimes
‘virtual controls’ like sliders are displayed on the screen that you can move by touching the screen. Other such virtual
controls include ‘value boxes’ where you can touch them, and use either the DATA / TEMPO WHEEL or (The TRANS-
POSE Buttons) to change the values of the parameters.
NOTE: As your instrument contains a PC, it is actually possible to connect an external mouse in order to
control actions with ‘Mouse Clicks’, and ‘Mouse Drags’. You can also connect a normal PC keyboard to your
instrument too.
The push buttons are grouped on three panels according to their function: To the left of the TFT Display are the ‘Total
Preset’ push buttons, the ‘Sound Selector’ push buttons for the Upper, Lower & Pedal sections as well as the Style /
Rhythm section buttons for choosing accompaniment types. Below the Style / Rhythm panel on the left hand side, you
will also nd the instruments ‘Rhythm Control’ Push Buttons.
To the right of the main display you will nd the ‘Transposer’ push buttons and then nally the ‘Sound Groups’ push
buttons (and also on the far right, the ‘Power On / Off’ push button).
Each push button has an integrated LED. In order to turn on a specic function or choose a setting, hold down the cor-
responding push button for a moment. In most cases, when an LED is on, this indicates that the function associated
with the push button is active. By pressing the button again, the function is normally deactivated.

Overview
The Right Control Panel
The push buttons on the right control panel are assigned to the following groups: PERCUSSION, ENSEMBLE,
BRASS, TRADITIONAL, SYNTHESIZER and PEDAL. They are used to select sounds and are linked with ‘virtual but-
tons’ on the TFT display. Another group of push buttons allows the control of the Tonewheel sounds (ORGAN)
Data / Tempo Wheel
To the right of the TFT display, you will also nd the data wheel (Tempo / Data) for setting the
Rhythm tempo, and for changing various parameters described in the following sections of this
manual.
Drawbars (Tonewheel Upper / Lower)
Below the right control panel are the drawbars for setting the Tone Wheel sounds. The right group (Tonewheel Lower
Manual), determine the sound for the Lower Manual, whilst the left group (Tonewheel Upper Manual) determine the
sound for the Upper Manual.
Tonewheel Upper Manual Tonewheel Lower Manual

The Left Control Panel
To the immediate left of the TFT Display / Touch Screen is the group of push buttons for the
‘TOTAL PRESETS’. There are ten push buttons for the Total Presets, and two ‘Bank Up /
Down’ push buttons to cycle through the Total Preset banks, In total, there are more than
2000 Total Presets available at any one time!
The Sound Selector Controls
To the left of the Total Presets push buttons are the push button groups for Upper,
Lower & Pedals. Along the bottom row, each group has a button that corresponds to
each sound. (Selector 1, Selector 2, Selector 3 for example).
In the middle row of the Selector push buttons, special controls for turning on various
functions such as ‘Dynamics for Pedals, Chorus effect for Lower & Upper Selectors,
Turning Selector 2 on the Lower Manual ‘On’ and also Selectors 2 and 3 on the
Upper Manual ‘On’.
The top row of push buttons features the ‘Octave Shift’ push button. This function
can be used with every selector and allows the user to change the sound either two octaves up, or two octaves down.
Other functions for the Lower Manual include the ‘Hold Lower’ push button. This function allows the user the play a
chord or single note on the Lower Manual, and when the user lifts their hand away from the manual, the sound still
holds / plays.
Other functions for the Upper Manual include the ‘Dynamics’ push button. This actives the function sometimes re-
ferred to as ‘Touch Sensitivity’. Finally, for the Upper Manual, the push button to the far right on the top row is the push
button to activate the ‘WERSI-Chord’ function. WERSI-Chord is an auto harmony. There are 14 types to choose from
from Big Band harmonies to Hymn Harmonies. The WERSI-Chord auto harmony is activated when the push button is
activated and the Lower Manual is played at the same time as the Upper Manual.
The Rhythm / Accompaniment Group
This group contains the push buttons for selecting the Rhythm Styles. Each Push
Button contains nine Virtual Buttons that each display a rhythm style. Further more,
each button has ve levels. Each level can house up to 9 Rhythm Styles and
Accompaniments such as MP3, MIDI & WAV.
The SFX Push Button Group
All OAS instruments contain SFX (Sound Effects) buttons. The WERSI Abacus / Vegas and Verona feature
6 buttons for instant replay of an Audio SFX. SFX can be freely assigned to the push buttons.
See the ‘OAS Programmers Manual’ for information on how to assign SFX to the SFX buttons.

Overview
Volume Drawbars
The grey volume drawbars to the left of the TFT display (and directly under the Total Preset, Sound Selector push but-
ton groups) control the volumes of the various sections of your OAS instrument.
The Volume Drawbars starting from Left to Right:
Song Volume Drawbar (Controls the volume of Sequences and Overall volumes of all Accompaniment / Digital Input)
Drums Volume Drawbar (Controls the volume of the OAS Drums and Auto-Accompaniment Drum Tracks 1 and 2)
PLEASE NOTE: Controls Both Digital Sample Drums & Realdrums).
Bass Volume Drawbar (Controls the volume of both the BASS PEDALS & Auto-Accompaniment Auto-Bass)
Acc 1 Volume Drawbar (Controls the volume of Track 1 of the Auto-Accompaniment)
Acc 2 Volume Drawbar (Controls the volume of Track 2 of the Auto-Accompaniment)
Acc 3 Volume Drawbar (Controls the volume of Track 3 of the Auto-Accompaniment)
Acc 4 Volume Drawbar (Controls the volume of Tracks 4 and 5 of the Auto-Accompaniment)
Lower 1 Volume Drawbar (Controls the volume of Selector / Sound 1 of the Lower Manual)
Lower 2 Volume Drawbar (Controls the volume of Selector / Sound 2 of the Lower Manual)
Upper 1 Volume Drawbar (Controls the volume of Selector / Sound 1 of the Upper Manual)
Upper 2 Volume Drawbar (Controls the volume of Selector / Sound 2 of the Upper Manual)
Upper 3 Volume Drawbar (Controls the volume of Selector / Sound 3 of the Upper Manual)
Left Side Panel
Near the manual on the left are the ‘Volume Controls’. Here you can adjust the instrument’s overall volume (General
Volume) and the volumes for two connected Microphones (Volume Microphone 1, Volume Microphone 2 & Volume
Headphones). There is a Jack Input for connecting Headphones next to the Volume Controls.

Left Control Panel
On the left hand side of your instrument, you will nd the RHYTHM CONTROLS. These are frequently used when
playing. You can control the Rhythm Style, Start / Stop, select Fills / Breaks and more from this control panel.
As well as the Rhythm Controls, there are two controls for ‘Pitch & Modulation’.
These two controls are ‘Wheels’. The Pitch wheel can be used to ‘glide the pitch’
of the sound up and down. The Pitch Wheel automatically pitches back to it’s
original central position after you have nished using it.
Rhythm Controls
The Rhythm Controls are an important part of the OAS
control interface.
The top row of push buttons show the rhythm variations
A, B, C and D push buttons. All OAS Styles and Realdrums
each have four different variations. Simply pressing one of
these buttons will change between the different Rhythm
Style variations.
PLEASE NOTE: The A,B,C and D push buttons can
also be used to trigger lls for all OpenArt-Arranger
styles / Yamaha Tyros / PSR styles and all new WERSI
OpenArt-2011 Styles. Older styles from OAS 6, 5, 4 & 3 do
not contain the additional 4 lls, but instead have 2 lls per
style.
The middle row is home to the ‘Intro 1 and Intro 2’ push
buttons. The same buttons also trigger the ‘Ending 1 and
Ending 2’ controls when pushed (when a style is already
playing).
The last button to the right in the middle row of push buttons
is the ‘Rotor Slow / Fast’ push button. Although this is not a
‘Rhythm Control’, it has been placed here as users playing with the Drawbars / Tonewheel sounds will use this func-
tion to control the rotor, and this is the easiest place to locate this important feature for live playing.
Finally, the bottom row of push buttons control the ‘Fill 1 and Fill 2’ functions as well as the ‘Sync. Start’ and ‘Start /
Stop’ button.
PLEASE NOTE: The Fill 1 and Fill 2 buttons can also play ‘Rhythm Breaks’ for a fuller Drum Fill. See the Ac-
companiment Section chapter for details on how to change the function between Rhythm Fills & Rhythm
Breaks.
Also, the Synchron Start push button can be used as a ‘Tap Tempo’ function. Simply push the button four
times at the desired tempo and the Rhythm Style will automatically start at the tempo you have specied.
The Synchon Start push button can also be used to stop a style in a useful way for playing live. When the
Rhythm Style Accompaniment is playing, by pressing the Synchron Start push button it activates a feature
that stops the rhythm when you remove your hand from the Lower Manual. As soon as you play a chord or
note on the Lower Manual, the Rhythm Accompaniment resumes.

4. Selecting Sounds
Getting Started
To assign a specic sound to the Upper, Lower Manual or Pedals, you must rst push a ‘Select’ push button.
i.e rst you need to dene the ‘target’ for the sound as-
signment.
The Upper Manual can have three different sounds as-
signed to it and the Push Buttons ‘Select 1, Select 2 and
Select 3’ in the Upper group are used to select one of
these three ‘targets’. Alternatively you can choose the
‘target’ by touching one of the six selectors on the Main
Display via the TFT screen.
The Lower Manual can be the ‘target’ for two different
sounds that are selected with the ‘Select 1 and Select 2’
push buttons in the Lower group.
The Pedals can only accept one sound. Push the
‘Select’ push button in the Pedal group to select the
Pedal as the ‘sound target’.
The ‘Select 1 sounds assigned to both manuals and pedal are always active (always on), while the sounds assigned
with ‘Select 2 and ‘Select 3’ for the Upper Manual, and ‘Select 2’ for the Lower Manual will only be audible when the
push buttons ‘Upper 2 On’, ‘Upper 3 On’ and / or ‘Lower 2 On’ are active. If a sound is active, you will see small Piano
Manuals in the corresponding elds on the Main Display, indicating the playable manual section of this selector, while
these will be missing from the Main Display when the section is inactive.
After you have selected a ‘target’ for a sound-assignment, with one of the ‘SELECT’ push buttons, you should press
one of the ‘Sound Buttons’ in the right hand control panel (to the right of the TFT Display). i.e a push button in the OR-
GAN, PERCUSSION, ENSEMBLE, BRASS, TRADITIONAL, SYNTHESIZER or PEDAL groups.
Once you have pressed one of the Sound Groups,
on the Main Display will show the rst nine sounds
housed in the Sound Group button. In our example
we have pressed the ‘Strings 1’ push button in the
‘Ensemble’ sound group.
The rst sound is automatically selected for you.
To select any of the sounds located in this sound group, simply press one of the Yellow ‘Virtual Buttons’.the Button will
change colour to highlight the selected sound.
PLEASE NOTE: Sounds marked with an Asterisk (*) are called ‘Longwave Sounds’. The Instrument’s DSP
hardware generates these very high quality sounds.
Besides the sounds you can access by pressing the Sound Push Button (Strings 1 push button in our example), you
can use more sounds through changing the mapping level of your Sound-Button (if you press a Sound Button you
always access the rst level of the sound Mappings stored in your Total Preset).
You can see in the screen shot to the right that the
sound family displays nine sounds. Above the
Yellow buttons, there are several buttons called
‘Level 1, Level 2, Level 3 etc. Press the desired
Level button to access even more sounds.
TIP: To quickly access the other sound levels of a Sound Push button, you can simply press the Sound Push
button several times to access the different sound levels. For example: Press the Strings 1 just once to see
Level 1. Press the button Twice to access Level 2, Press the button Three times to access Level 3 and so on.

Example Of Selecting A Sound For The Upper Manual.
Let us go through an example of selecting sounds for the Upper Manual. The principle is the same for both Upper and
Lower Manuals and naturally the Pedals too.
1. Push the ‘Select 1 Button in the UPPER group to activate the rst sound ‘target’ for the Upper Manual.
2. Now Push the ‘Strings 1’ push button in the ENSEMBLE group. The Main Display now shows sounds
names like ‘Strings 1 Soft*, Strings Mantovani*, Strings Sustain* etc’. You may try the various String sounds
by touching the Virtual Buttons in the Main Display, and playing on the Upper Manual.
PLEASE NOTE: If you cannot hear the sounds, please check that the grey Upper 1 drawbar in the UPPER VOLUME
group is not in position 0. Other reasons for a mute instrument may be the General Volume control or the Expression
Pedal (Turn both up in this instance).
PLEASE NOTE: The current positions of the Volume Drawbars for the Three Sounds assigned to the Upper
Manual, the Two Sounds assigned to the Lower Manual, and the Sound Assigned to the Pedal is indicated by
Grey Bars at the bottoms of the associated Sound Display Fields in the Main Display. (See Hand Icons Below)
When you have a String sound you enjoy, let’s continue:
3. Now push the ‘Select 2’ button in the Upper group to select the second sound level for the Upper manual.
Touch the TRUMPET button in the Brass group, and select Trumpet* from the Main Display (or any other
sound you like). To hear the sound assigned to the second level, it is necessary to activate the ‘UPPER 2 ON’
push button in the Upper group. Use the grey Upper 2 volume drawbar in the Upper Volumes Drawbar group
(left of the TFT Screen). Adjust the volume of the sound. You will also see the grey bar associated with the
volume in the main display change too.
4. Next, push the ‘Select 3’ button in the Upper group to select the third level. Then select the ‘Acoustic Gui-
tar’ push button from the Percussion group, and guitar Nylon from the Main Display. Now you must activate
the ‘Upper 3 On’ push button to make the sound audible. Use the Upper 3 grey volume drawbar to adjust the
volume.
You now have assigned three different sounds to the three sound levels of the Upper Manual. When the push buttons
‘Upper 2 on’ and ‘Upper 3 On’ are active, you can hear all three sounds at the same time as you play on the upper
manual, and you may use the ‘Upper 1, Upper 2 and Upper 3 drawbars to adjust the volume levels.
Being able to turn sound levels 2 and 3 on or off, allows you to quickly change the sound while playing. Sound level 1
cannot be turned off - it is used as the ‘Basic Sound’. If necessary, you may move the Upper 1 volume drawbar to its
Zero Position in order to ‘turn that sound off’.

Selecting Sounds For The Lower Manual And The Pedals
Selecting sounds for these areas is similar to the methods described for the Upper Manual, with the exception that the
Lower Manual has two sound levels, and the pedals has just one sound level.
You will nd the Selector Push Buttons in the Lower and Pedal groups in the left control panel. The volumes for the
Lower Manual, and the Pedal are adjusted with the Lower 1 and Lower 2 grey volume drawbars in the Lower Volumes
group and with the Bass Drawbar in the Accompaniment Volumes group.
In theory you may assign any sound to any target. So it is possible to assign a sound from the Pedal group to the
Upper manual, or a trumpet sound to the pedal, although this may not always make sense from a musical viewpoint!
However, you might belong to the group of musicians who like play the ‘Tico Tico’ melody on the pedal (We know of at
least one artist who can do it to perfection!).
5. The Different Sound Generators - An Overview.
Longwave Sounds
Longwave sounds are high quality sample sounds generated by the DSP (SG-12) hardware of your WERSI OAS in-
strument. The Longwave sounds are as their name suggest, a ‘Long Wave’. In older instruments using digital samples,
they would use a sample that was perhaps only 1 second long and then digitally manipulated to make the sound. With
the WERSI OAS Longwaves, the sounds are real recordings in their entirety. For example the Grand Piano samples
last from between 3 seconds to 15 seconds per sample. Choir samples, string samples can last up to 30 seconds for
example. No digital manipulation is required to then synthesise a sound. Longwave sounds are pure samples con-
structed into a usable sound of the highest quality.
You can recognise a Longwave sound by the small Asterisk (*) next to its name. You can assign all Longwave sounds
to any Sound Selector. All Longwave Sounds can also be assigned to any track within any Style or MIDI accompani-
ment.
OX7 Sounds
To generate the famous Tonewheel sounds, your instrument is equipped with a separate
sound generating system based upon the WERSI OX7 Drawbar / Tonewheel system.
The Tonewheel / Zugriegel (German for Drawbars) and Presets push buttons are located
in the ORGAN group to the right of the TFT display screen. Besides other sounds, as
described earlier, you may also assign Tonewheel / Drawbar sounds to any of the avail
-able Selectors of a manual section.
Keep in mind though, that it does not make sense assigning Tonewheel / Drawbar sound
to more than one selector per manual section,as this causes a neutralizing effect which
may sound strange.
If you activate the Tonewheel / Zugriegel button when a selector is active for the Upper
Manual , the Drawbar sound is assigned to the selected sound level. You can vary this
sound with the Black, Brown and White Drawbars in the Tonewheel Upper Manual
group.
Mixing pure Sine Waves of different frequencies, where each of the sine drawbars,
generates the many different Tonewheel / Drawbar sounds.
The 8’ drawbar adjusts the volume of the base tone, and the White 4’, 2’ and 1’ drawbars adjust the volumes of the
Waves that are one, two or three octaves above the base tone.
The Black 2 2/3’ drawbar controls the volume of the fth above the rst octave, and the 1 3/5’ drawbar and the 1 1/3’
drawbars adjust the volumes of the hird or the fth respectively above the second octave.
The Brown 5 1/3 drawbar controls the volume of the and the 16’ drawbar changes the volume of the octave below the
base note. The colours and placement of the Drawbars correspond with the arrangement that can be found on the
classic Tonewheel organs (Hammond B3 Organs for example).

IMPORTANT: Moving the Tonewheel Drawbars while holding down the manual keys will immediately change
the Tonewheel / Drawbar sound. You may use this to create the ‘Wa-Wah’, and other effects. This is a new
feature that was not available with older WERSI instruments.
Additional Push Buttons in the Organ sound group allow for more changes of the Tonewheel / Drawbar sound (they
modify the sound of the manual section that is currently selected by the associated Selector push button).
• Percussion On - adds 2 2/3 ‘ Percussion
• Sustain On - adds a Sustain effect, i.e after releasing a manual key, the tone fades out softly (ala organ Maestro
Klaus Wunderlich Helios recordings).
• Rotor On - this activates the famous sound of rotating speakers. The Rotor Slow / Fast push button in the Rhythm
Controls group changes the speed of the ‘Rotation’ between the Slow and Fast. Please note the ‘Speed-up’ and
Speed-down’ effects when changing the speeds. We have placed the Rotor Slow / Fast push button on the left
control panel to allow you to quickly push it with your left hand while playing.
• Vibrato On - this push button activates the Scanner or Phase Vibrato, well known from classic Tonewheel organs
and also older WERSI instrument generations.
• Presets - this push button activates nine Tonewheel / Drawbar Sound Presets that can be selected by touching
one of the nine Yellow Virtual Sound buttons in the Main Display. You may then adjust the sounds using the Tone-
wheel Drawbars (except when the sound is marked with an Asterisk - because the sound is a Longwave sample
sound).
IMPORTANT: Please note that the Modulation wheel is used with OX7 sounds to produce the articial distor-
tion, such as you got from old tube ampliers. So if you hear a distorted Tonewheel sound, it does not mean
that your instrument is defective, simply that you have the Modulation wheel set to the maximum setting and
the Distortion effect is active. Simply roll the Modulation wheel back towards the Rhythm Controls to deacti-
vate the Distortion effect.
OAS X1 Drawbar Sounds
Typical of our nature at WERSI, why settle for one Drawbar Tone Generation when you can have more than one! OAS
makes this possible. The new OAS X-1 Drawbar is a new sound device within OAS and works in the same way as the
OX7 drawbars.
OAS X1 Drawbars (Listed in the Settings Screen as just OAS Drawbars) works on the same basis of mixing together
Sine waves / Vibrations of different frequency positions, whose volumes can be set individually with the Drawbars.
IMPORTANT: Please note that you can only change the sound with the Drawbars if the instrument was saved
with the parameters ‘Drawbars Free’ (See the OAS Drawbar Editor chapter in the Programmers Guide’.
PLEASE NOTE: You can Only assign the OAS-Drawbar Sounds to Selectors ‘Upper 1 & Lower 1). They will not
work on any other Selectors.
As with the OX7 sounds, you can use the Rotor Slow / Fast button in the Rhythm Controls section to switch the
‘Rotation Speed’ between Fast & Slow. However, the other buttons in the Organ group have no effect on the OAS X1
Drawbars. You can nd other settings for your OAS X1-Drawbar sounds in the appropriate section in the Programmers
Guide.
B4 Sounds (Optional) VST (Virtual Instrument)
Using the optional B4-software module provided by Native Instruments you can generate the very authentic sounds of
old Electro-mechanical organs. You control these sounds in the very same way as OAS X1 Drawbar Sounds.
VB3 Hammond Clone (Virtual Instrument
A VST (Virtual Instrument) for OAS. VB3 Drawbars are controlled inexactly the same way as the OAS X1 / B4 Draw-
bars.
PLEASE NOTE: VB3 Was only available for a very limited time during 2009. It is not possible to buy this acti-
vation at this time. The VB3 instructions are naturally included as many customers did purchase this limited edition
VST during the period it was available.

XG Sounds (Special Equipment)
Older OAS Instruments (Production Models During 2001-2004) were equipped with an XG-Soundcard, you can assign
these sounds as well as WERSI Longwave Sounds to any selector, you may also assign them to any track of a MIDI
le or Style accompaniment (Please note that any accompaniments modied with XG sounds can only be played back
on OAS instruments equipped with the XG-Sound Card).
IMPORTANT: All new OAS instruments and all OAS instruments manufactured post 2004 do not have an XG
Sound Card as the new OAS 7 Longwave & Advanced sound library is superior in sound quality and therefore
the XG sounds are redundant. We advise all customers who purchased their instruments post 2004 to disre-
gard any details relating to XG-Sounds. The information is only included to cover all details of the entire OAS
instrument range from the past ten years.
AKAI Sounds
The WERSI OAS instrument range is the only instrument sophisticated to allow users to load the AKAI Sound Sample
library. There are literally thousands of sample libraries available via third parties that will work with your OAS instru-
ment. At the turn of the Millennium it was estimated that AKAI had the largest sample library in the world!
PLEASE NOTE: OAS is compatible with all AKAI S-1000, S-2000 & S-3000 Sample Libraries.
Internal MIDI Sounds
Windows Sounds in the OAS system allow you to use internal programs that may be installed on your instrument.
These are not real sounds, but internal MIDI sounds. You can assign these sounds to the Selectors in the same way
that you would a normal sound.
External Sounds
MIDI Sounds are not real sounds, but rather MIDI-Information which can be interpreted by other programs that may
be installed on your instrument. You can connect your OAS instrument to external instruments, DAWs (Digital Audio
Workstations), MIDI expanders etc. You can assign the MIDI sounds to Selectors in the same way as a normal sound.
VST Sounds
The most modern musical instrument application is called VST (Virtual Instruments). WERSI OAS instruments allow
you to use up to four VST’s at any one time. Naturally you can have many different VST instruments installed and you
can combine the different VST instruments together.
The VST library is growing and Software developers such as Native Instruments for example have developed some
very exciting and sophisticated instruments. Virtual Real Steinway Pianos, Virtual Studio Drummers are just an ex-
ample of what can be achieved with VST.
PLEASE NOTE: If you wish to use VST instruments, please consult WERSI to ensure that they are a recom-
mended or certied VST that is safe to use with the OAS Operating System. Loading of any VST without
checking and affecting the OAS drivers or altering the OAS program architecture could void your warranty.
RAM REQUIREMENTS: We recommend for users wishing to use 4 VST instruments that they have the maxi-
mum RAM chips installed. All new OAS instruments come with 2GB of RAM as standard, older instruments
may need topping up.
WERSI DIRECT Recommend 4GB of RAM for optimum performance when using the powerful VST feature.

Dynamic Touch Push Button
One important characteristic of almost all musical instruments if the dynamic. A classical example is the Pianoforte (it
is named this way because you may play it soft, (piano), or loud, (forte). But almost all other instruments have some
kind of dynamic that is not only limited to different volumes.
When you softly press down a Piano key, the generated tone spectrum is very different from the spectrum you will
hear when you hit the key with power (or harder). The same is true for a trumpet when it is blown softly, or loudly and
for almost all other musical instruments.
The Dynamic push button in the Upper group is used to turn the Dynamic touch ON or OFF for the Upper section, and
the Dynamic push button in the Pedal group turns this effect ON or OFF for the Pedal sound of your instrument.
The Lower group does not have its own push button and can be controlled only in the Virtual ‘Selector Settings’.
If you hit the push button , the Dynamic is turned On or Off for the currently selected manual, if this manual is part of
the group where the push button is located.
Here is an example: You have selected the push button ‘Upper 2 Select’ and hit the button Dynamic in the Up-
per Selector group. The Dynamic for Upper 2 will be turned on, or off respectively (depending on its previous
state). The LED associated with the push button will light up or turn off.
When Dynamic touch is active, the volume and the tone spectrum of the generated sounds depend on how hard you
hit a manual or pedal key. Actually, the speed of the key movement is used to control the Dynamic, but this is almost
proportional to the strength of a key hit.
You can hear the dynamic effect very clearly with Piano sounds, but with other sounds such as Brass sounds for ex-
ample it may be more subtle or control different sound characteristics of the sound.
Tonewheel / Drawbar sounds use the Dynamic control in a different way. The ‘Dynamic’ controls the loudness of the
Percussion (Naturally the Drawbar Percussion must be turned on!)
Your OAS instrument has 14 different Dynamic types. You can assign each of these Dynamic types to each manual.
Please refer to the Advanced Selectors chapter.
Octave Offset Push Button
In the Selector Settings group is the Octave push button. Press an Octave push button once to increase the tuning
of the selected manual by one Octave. When you press the push button again, the tuning of that group is set another
octave up. The next push will set the tuning two octaves below normal, another touch will set the tuning one octave
below normal.
(So the order of the Octave offset cycle is +1, +2, -2, -1, 0).
When the LED in an octave push button is on, this indicate an active octave shift in the selected manual / selector.
The Chorus Effect Push Button
Also in the ‘Selector Settings’ group is the CHORUS button. If this button is active, a chorus effect is added to the
sounds of the selected manual. You may apply it to a piano sound in order to obtain a ‘Honky-Tonk’ type Piano for ex-
ample or to ‘Widen / Thicken’ sounds. The Chorus effect can also be set in the ‘Selector Settings’ on the Main Display.
LM Hold (Lower Selector Push Button)
When you activate the Hold Lower Push Button in the ‘Selector Settings’ group, all note that you play on the Lower
Manual are ‘Held’, even after you release the keys of the Lower Manual. Of course if you play another chord, or the
accompaniment stops, the ‘Held’ keys are released.

WERSI-Chord (Upper Manual Selector Controls)
If the function WERSI-Chord (push button in the Upper Selector group) is active, a single note played on the Upper
Manual will be harmonised depending on what chord you play on the Lower Manual.
Please note that the WERSI-Chord takes effect only for the Upper 3 Sound. Upper 1 & Upper 2 still function as
Solo Voices.
You can select the different type of WERSI-Chord Harmony Types from the ‘Selector Settings’ menu in the Main Dis-
play.
New with the OAS 7 Software are the WERSI-Chord types ‘Solo-Voice’ and ‘Fingered’. If you select the ‘Solo-Voice’
type and play chords in the Upper Manual, the Highest note is played as a Solo Voice using the instrument assigned
to Selector 3 of the Upper Manual.
The setting ‘Fingered’ will add notes played on the Lower Manual. Again, this uses the sound assigned to Selector 3 of
the Upper Manual.
6. Arabic Tuning
Another Function is the possibility of giving your instrument different tunings.
This will allow you to play, for example, Oriental Music. If you touch the
button ‘Arabic Tuning’ in the Main Display, a new virtual surface will open
where you can make these settings.
At the top of the ‘Arabic Tuning’ display there is a box with a
down-pointing arrow. This is a ‘Drop Down’ menu listing all of
the available preset tuning’s for your instrument.
Open the list by simply touching the down-pointing arrow and
select the desired tuning by gently touching the associated line.
The selected tuning is immediately activated. If ou choose any
other tuning than normal (0), the Arabic Tuning button the Main
Display will turn red in colour.
You can use the buttons ‘Presets to the right’ for switching quickly
between different tuning, which happens quite often in Oriental
music. (Please note, WERSI has already assigned a series of
different tuning presets to the presets. You can use the ‘Banc
(Bank) Down’ or ‘Banc (Bank) Up’ to navigate quickly through all of the ‘quick access presets’.
Using the 12 keys of the keyboard shown in the display, you can determine for which notes a detuning shall take effect
on. The option ‘Multi On’ in the lower right hand of the display determines if the tuning applies to just one or several
keys. The choice elds in the lower part of the Arabic Tuning display are for setting the current detune-value between
minus 50 and plus 50.
A value of -50 will tune the note down by a quarter note, the value of +50 is one quarter note up. Touch the choice eld
(the background will turn Red when selected) and set the desired value by turning the Tempo / Data wheel. Please
note that the tuning takes effect only if the corresponding button on the surface is pressed. You can reset all values to
0 by preset the button ‘Reset’.

Saving Arabic Tuning Presets
If you want to store your settings, press the ‘Save’ button. A new screen will be displayed with a Yellow background.
The Long Button (Top Centre) is for changing the name of the Preset. When
you press the Long Button, a Blue Virtual Keyboard will appear so that you
can name the Preset.
The list on the left hand side of the display serves for selecting a storage
location for your new Arabic Tuning Preset.
You may overwrite existing presets as well as add a new preset to the list.
After making these settings you can add your new tuning to the OAS data
-base by pressing the button ‘Save Preset’.
You can now recall the saved tuning at any time you wish. If you press the
‘Back’ button, you will exit the Arabic Tuning Save screen without storing the preset.
IMPORTANT: The Tuning only affects Longwave Sounds. You cannot give your drawbar sounds another tun-
ing.
PLEASE NOTE: You can also allocate other instrument tuning’s to your Total Presets in the Selector Settings
via the Main Display.
7. Hermode Tuning
Hermode Tuning is a professional Tuning Solution from the professional audio science
haus ‘Hermode’ in Germany. This function was only available between 2006 and 2009.
Hermode Tuning simply allows users to realistically tune the different sounds as an
Orchestra, Classical section or Pop band would. The changes can only be heard by the
most trained ear, or players with perfect pitch who prefer the purest tuning and characteristics and timbres that play
between different instruments.
The OAS 7 tuning feature built into the Advanced Selector Settings means that the same effect can be achieved with
the native OAS system.
The different Hermode Tunings are:
1. Temperiete Stimmung (Natrual tuning)
2. Referenzstimmung (Note Reference tunning)
3. Pop / Jazz - (Popular Music / Jazz Style tuning)
4. Klassik Alt - (An old Classical Music tunning)
5. Klassik - (Tuning for Classical Music)
6. Referenzstimmung Sest - (Large Reference /
tuning - for a large band for example)
7. Pop / Jazz Fest - (Large Popular Music / Jazz
Style tuning - for many musicians / sounds etc)
8. Barock - (A historical ‘European’ music period tuning)

8. Accompaniments
Accompaniment Types
To enable you to add versatile accompaniments to your music, your instrument offers various accompaniment meth-
ods: Styles, Realdrums, MIDI Sequences (General MIDI), Wave & MP3 les. You can now also play back multimedia
video les on your instruments.
• Standard OAS Styles - Styles are Rhythm with an automatic accompaniment. Each Style consists of four Varia-
tions, has two Intro / Endings, and two Fill patterns. (Older Styles from OAS 3,4,5 & 6)
• OAA Styles - The new standard for OAS Styles is the OAA (OpenArt-Arranger) styles. All new WERSI OAS
instruments come with the OpenArt-Arranger as standard. OAA Styles are rhythms with an automatic accompani-
ment. Each Style consists of four Variations, has three Intro / Endings, four Fill patterns and two Break patterns.
• Realdrums are high quality enhancements of Styles. WERSI has developed a new technology that allows a ‘Real
Drummer’ to play-in the rhythms with real percussive instruments. Realdrum rhythms sound much more lifelike
because you are listening to a recording or a real drummer, without any modication by a computer system. As
with regular styles, Realdrums have four Variations, two Fill patterns and two Intro / Ending Patterns. Naturally
an automatic accompaniment is standard with Realdrums. (Please note that some specialist Realdrums do not
contain an auto-accompaniment - Drum Solo for example).
• MIDI Files - For your accompaniment you can also use sequences saved as les that comply with the General
MIDI standard. These les usually contain complete, played-in pieces. Depending on the piece, you either play
some of the voices yourself while the MIDI sequence is played back, or you use your instrument as a ‘Duke Box’
and let the instrument play on its own. You can start the MIDI les with the Start/Stop push button in the Rhythm
Controls (left hand side panel). You can control the volume of the MIDI le with the grey volume Drawbar called
‘Song’. The Sequencer also features a special function that allows you to use the Volume Drawbars to control the
16 MIDI Sequence Track Volumes. See the Sequencer chapter in the programmers guide for more information.
• Waves - These add a new dimension to the kind of accompaniment sequence that you have been used to so far.
Waves may store any kind of sound events that you can imagine, even acoustic instruments or vocals, similar to a
normal audio CD. Use the Start / Stop push button to control the playback, and the Song Volume Drawbar to con-
trol the volume of the Wave. You can record your own Waves using the ‘Digi Record’ function on the Main Display
or load them from CD / USB. Please note that the tempo of a Wave accompaniment cannot be changed.
• MP3 - are compressed Wave Files. The compression is mainly accomplished by cutting the barely audible very
high and very low frequencies. Consequently, MP3 les need less than a tenth of the memory a regular Wave
le would use. Music you nd on the Internet is mainly MP3 format. Use the Start / Stop button to control the
playback, and the Song Volume Drawbar to adjust the volume. Please note that the tempo of an MP3 cannot be
changed.
• Multimedia - Multimedia les are audio and video les in various formats. Basically, you can use all types of
multimedia les, that will payback on a standard PC (e.g WMV, MPG, Divx, etc). Use the Start / Stop push but-
ton to start or stop the playback of the Video and the Song Volume Drawbar to adjust the volume. The tempo of a
multimedia accompaniment cannot be changed. Please note that large video les need a lot of storage space and
therefore take some time to load.
This manual suits for next models
2
Table of contents
Other Wersi Musical Instrument manuals

Wersi
Wersi GALAXY User manual

Wersi
Wersi SONIC OAX500LS User manual

Wersi
Wersi PEGASUS WING User manual

Wersi
Wersi ORION W1S User manual

Wersi
Wersi Pegasus Wing duo Plus User manual

Wersi
Wersi SONIC OAX1 User manual

Wersi
Wersi DX 400 User manual

Wersi
Wersi CLASSICA W3SK User manual

Wersi
Wersi CD 600 User manual
Popular Musical Instrument manuals by other brands

Voodoo Lab
Voodoo Lab GROUND CONTROL owner's manual

ADDAC
ADDAC ADDAC112 user guide

Accordions International
Accordions International Concerto DA300 user manual

Hohner
Hohner Symphonic 410 L General servicing instructions

Kawai
Kawai Concert Performer CP205 owner's manual

EnSoul
EnSoul Roosebeck BGSPR owner's guide