manuals.online logo
Brands
  1. Home
  2. •
  3. Brands
  4. •
  5. Wesco
  6. •
  7. Lifting System
  8. •
  9. Wesco POWER-LIFT STACKER Service manual

Wesco POWER-LIFT STACKER Service manual

159149H
© Copyright 2018 WESCO Industrial Products, LLC. Specifications subject to change. Not responsible for errors or omissions.
1500 Lb. POWER-LIFT STACKER
Operating Instructions and Parts Manual
ATTENTION: To insure proper use of your WESCO Power-Lift Stacker, read these instructions thoroughly
before using. It is important that all personnel, involved with the installation, maintenance or operation of the
stacker, read this manual.


Specifications
See nameplate on unit for capacity, load center,
model number and truck serial number.
This product is manufactured by:
WESCO Industrial Products, LLC
1250 Welsh Road
North Wales, PA 19454
Tel: 215-699-7031 FAX: 215-699-3836
Contact the factory if you have start-up problems
after reading these instructions, or for parts infor-
mation and parts ordering. Visit us on the web at
www.wescomfg.com
Unpacking
When unpacking your unit, check carefully for ship-
ping damage. If damage has occurred, file a claim
with the delivering carrier within 24 hours and notify
the dealer from whom the unit was purchased.
Start-up
With the lift in the lowest position, check following:
1) Remove plastic cover by removing the four
hex bolts, two on the top and one on each side
(Fig.1). Then disconnect the switch and gage
at the plastic connector (Fig. 2).
2) Check for signs of damage, especially to the
back cabinet that houses the battery, electrical
/ hydraulic power pack.
3) Remove plastic pipe plug from oil reservoir,
screw in breather cap.
4) Connect negative (black) wire to negative
battery terminal and tighten.
5) Check all electrical connections for tightness.
6) Run unit up and down and check for any
hydraulic oil leaks.
7) Do not use the lift if there appears to be
any damage.
8) Reinstall plastic cover.
General Safety Information
WARNING: WESCO Power-Lift Stackers are intended for
a wide range of uses. To insure proper use, the following
instructions must be adhered to:
1) Load Rating: The capacity of your unit is shown on a
metal tag attached to the truck. It is based on the load
center also shown on tag.
2) Do not use your unit for loads exceeding the size of
the platform or forks.
3) Never move unit unless the load is in the fully lowered
position.
4) Wesco power-lift stackers are intended for movement
of loads and lifting of loads to work position, not for
moving of loads in a raised position.
5) The floor lock is designed for minimizing movement of
unit during loading and unloading of items from the
units themselves. It is not to be used to control truck
speed when being moved. Be sure that lock is fully
engaged before loading and unloading.
6) Do not perform any repair work on lift if there is a load
on the forks or platform or if the forks or platform is in
the raised position.
7) All personnel must stand clear of the lift while lifting or
lowering platform or forks.
8) Do not stand, sit or climb on lift or use unit to lift
personnel.
9) Do not put hands or feet or stand underneath the forks
or platform when raised.
10)Do not use lift on uneven or unstable surfaces.
11)Custom alterations of units for specific functions not
made at the factory void all warranties without
exceptions. User made alterations may result in
unsafe conditions during use of unit.
WARNING:
The battery in this product can
expose you to chemicals including lead, which is
known to the State of California to cause cancer and birth
defects or other reproductive harm. For more information
go to www.P65Warnings.ca.gov.

Figure 1 Figure 2
159149H
© Copyright 2018 WESCO Industrial Products, LLC. Specifications subject to change. Not responsible for errors or omissions.

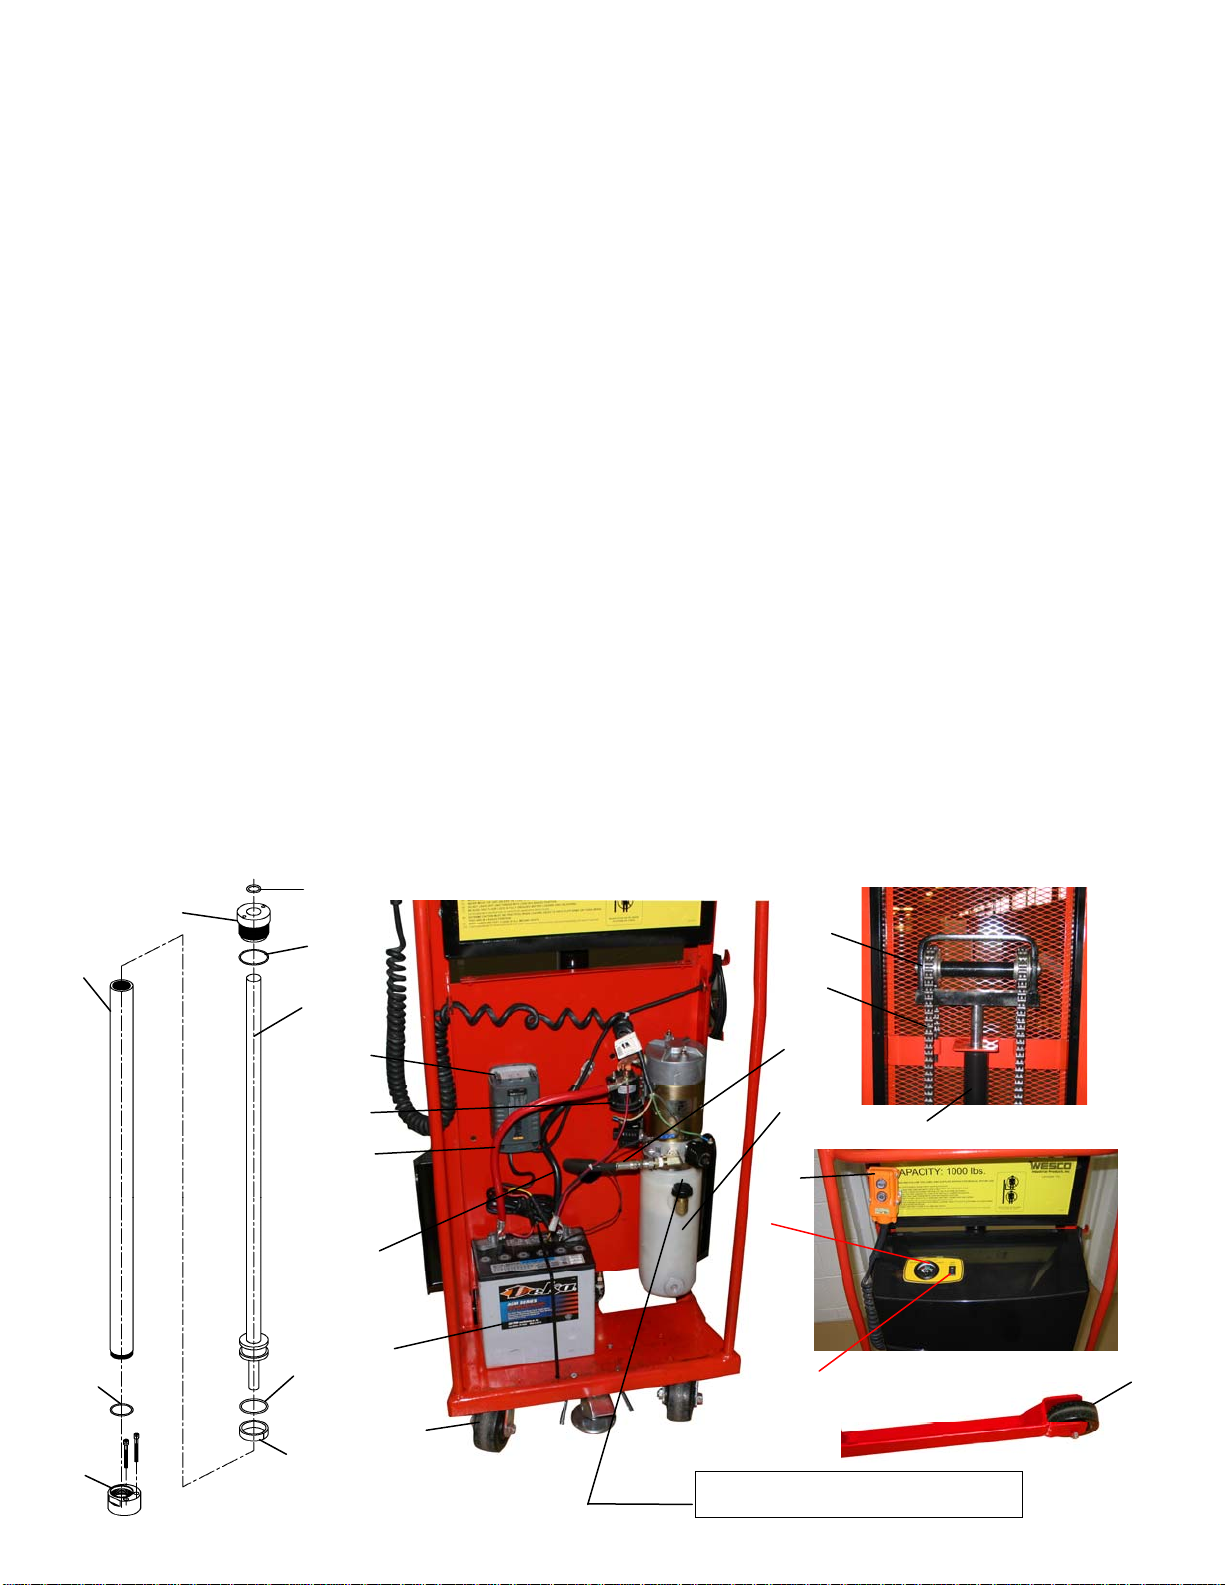
A) Operating Instructions:
1) Place power switch to "ON" position.
2) To raise lift, push "Up" button on hand
control pendant.
3) To lower lift, push "Down" button.
4) Whenever the control button is released, the
lift will stop.
5) Authorized operators should read and
understand all instructions, precautions and
warnings. Improper use of this lift truck
could result in injury and/or damage to load
and equipment.
Use lift on hard level surfaces only.
Make sure load is evenly distributed, not loose
or unstable, and as far back on platform or forks
as possible. Do not pick up loads on tips of
forks or edge of platform
For fork models, adjust forks to the maximum
practical width. Use two forks to pick up loads.
Make sure travel, work area & overhead are
clear of obstructions before lifting or moving
loads.
Make sure floor lock pad is in firm contact with
floor before lifting or lowering load or using as a
workstation.
6) Turn unit "OFF" when not in use, to prolong
battery life.
B) Daily Maintenance Checks:
WARNING: battery should be recharged on a
regular basis. Repeated total discharge of battery
can result in battery failure.
1) Battery
a. Check charge level. Warning: do not let
battery completely discharge.
b. Check for corroded and loose terminals.
c. Visually inspect for any cracks or
damage to battery casing.
d. Check for loose battery tie-downs.
2) Charger
a. Inspect wire connections.
b. Check power cord for nicks/damage.
3) Hydraulic System
a. Inspect pump and cylinder for oil leaks.
b. Check fluid level. Reservoir should be a
minimum of one half full with a good
grade of hydraulic oil (Premco #32
recommended). DO NOT use hydraulic
brake fluid.
c. Check hydraulic fittings and hoses.
d. Check piston rod for nicks/damage.
B) Daily Maintenance Checks (Continued):
4) Frame Assembly
a. Check floor lock.
b. Check safety screen & guards.
c. Check chain/roller assembly
connections.
d. Check for any worn or damaged
parts.
C) Monthly Maintenance Checks:
1) Battery
a. Clean battery compartment area.
b. Clean terminals.
2) Hydraulic System
a. Clean & inspect hydraulic cylinder.
b. Lubricate chain with a rust inhibitive
"Chain Lube".
c. Check chain tension with lift at its
lowest height, chain should be tight
enough so that it does not come off
roller assembly.
3) Frame Assembly
a. Clean and lubricate all roller bearings
and cam followers.
b. Clean and inspect all welds.
c. Check wheels for wear and damage.
D) Battery Charging
1) Plug charging cord into a nominal 120 volt
(220 volt for P/N 109158) grounded circuit
outlet, charging will begin.
2) Battery will be fully charged when voltmeter
indicates 12.0 - 13.4 volts, less than 12.0
volts battery is not fully charged.
3) When battery is fully charged unplug
charger cord from electrical outlet. Do not
attempt to move stacker when charging
battery!
4) The battery charger cord can be left plugged
in for an indefinite period of time. The
charger may be used any time to extend the
operating time of your battery. You do not
have to wait until the battery is run down.
5) The voltmeter will indicate battery condition
even when the charger cord is not plugged
in.
159149H
© Copyright 2018 WESCO Industrial Products, LLC. Specifications subject to change. Not responsible for errors or omissions.
Warranty Repairs
If unit does not work properly, contact your dealer or the factory (215-699-7031), within one year of purchase date.
Non-Warranty Service
For units older than one year, repairs can be made easily on site with factory supplied parts, or repairs can be made at the
factory. NOTE: Do not send units to the factory for service without obtaining a “returned materials authorization"
(RMA) number from the service department. We will not be responsible for goods returned without proper
authorization. To Purchase Parts
A complete parts list with drawings appears in this manual. To order parts contact the factory at the phone or fax numbers
WARNING: CHARGER (P/N 056762) IS SPECIALLY DESIGNED FOR USE WITH WESCO BATTERY (P/N 109102), USE
OF BATTERIES OTHER THAN WESCO'S MAY RESULT IN DAMAGE TO CHARGER, AND WILL VOID ALL
WARRANTIES. TROUBLESHOOTING
Problem Check Service Required
Stacker Does Not
Operate.
(Pump Does Not Run)
Power Switch Is In "OFF" Position. - Place in "ON" position
Battery Charger Indicator Lights.
Voltmeter Indicates 12 Volts - Charge battery until yellow or green light is lit
Battery Terminals And Cables - Clean if corroded (white powder).
- Tighten terminal bolts.
Hydraulic Oil Level - Fill oil reservoir to proper level.
Stacker Does Not Lift To
Full Height.
(Pump Runs)
Oil Leaks - Tighten fittings.
- Replace hydraulic hose if required.
Stacker Creeps Down
Under Load
Dirt In Oil Holding Valve Open
- Raise stacker to full height then lower in stages,
6" to 12" at a time to its lowest point.
- Repeat this cycle several times until dirt is
cleared and unit operates properly.
Oil Leaks
- Replace oil with clean hydraulic oil if
contaminated.
- Tighten fittings.
- Replace hydraulic hose if required.
- Replace "O" rings.
Pump Runs Continuously Malfunctioning solenoid - Replace pump-motor solenoid.
LIMITED WARRANTY
Wesco Industrial Products, LLC (WESCO) warrants to the purchaser of this product for a period of one year from the date of
purchase that this product shall be free of defects in material and/or workmanship, as follows:
1. WESCO will supply, at no charge, new or rebuilt replacements for any part that fails through a defect in material and/or
workmanship during the warranty period. To obtain warranty service, you must deliver the product prepaid, to the WESCO factory.
2. This warranty does not cover any product or product part which has been subject to accident, misuse, abuse or negligence.
WESCO shall only be liable under this warranty if the product is used in the manner intended by the manufacturer as specified in
the written instructions furnished with this product.
REPAIR OR REPLACEMENT AS PROVIDED UNDER THIS WARRANTY IS THE EXCLUSIVE REMEDY OF THE PURCHASER.
ANY EXPRESS WARRANTY NOT PROVIDED IN THIS WARRANTY DOCUMENT AND ANY REMEDY FOR BREACH OF
CONTRACT THAT, BUT FOR THIS PROVISION, MIGHT ARISE BY IMPLICATION OR OPERATION OF LAW, IS HEREBY
EXCLUDED AND DISCLAIMED. UNDER NO CIRCUMSTANCES SHALL WESCO BE LIABLE TO PURCHASER OR ANY OTHER
PERSON FOR ANY INCIDENTAL OR CONSEQUENTIAL DAMAGES, WHETHER ARISING OUT OF BREACH OF WARRANTY,
EXPRESS OR IMPLIED, A BREACH OF CONTRACT OR OTHERWISE. EXCEPT TO THE EXTENT PROHIBITED BY
APPLICABLE LAW, ANY IMPLIED WARRANTY OF MERCHANTABILITY AND FITNESS FOR ANY PARTICULAR PURPOSE
ARE EXPRESSLY LIMITED IN DURATION TO THE DURATION OF THIS LIMITED WARRANTY.
Some states do not allow the exclusion or limitation of incidental or consequential damages, or allow limitations on how long any
implied warranty lasts, so the above limitations may not apply to you. This warranty gives you specific legal rights, and you may
also have other rights which vary from state to state. 
159149H
© Copyright 2018 WESCO Industrial Products, LLC. Specifications subject to change. Not responsible for errors or omissions.


POWER-LIFT STACKER REPLACEMENT PARTS LIST
Item Qty Description 56”/60” Lift 64”/68” Lift 76”/80” Lift 86/09” Lift
1 1 Hydraulic Cylinder 051179 051180 051158 051181
2 1 Power Unit 109101 109101 109101 109101
3 1 Battery 109102 109102 109102 109102
4 1 Voltmeter 109104 109104 109104 109104
5 1 Battery Cable 12 “(Neg.) 052779 052779 052779 052779
6 1 Battery Cable (Pos.) 052780 052780 052780 052780
7 1 Solenoid 109117 109117 109117 109117
8 1 Battery Charger (110 V) 109150 109150 109150 109150
1 Battery Charger (220 V) 109158 109158 109158 109158
9 1 Hydraulic Hose 125824 125824 125824 125824
10 1 Remote Control Assembly 052726 052726 052726 052726
11 1 Switch 109325 109325 109325 109325
12 2 Lift Chain Assembly 050781 050782 050783 050784
13 2 Roller Carrier Assembly 050776 050776 050776 050776
14 1 Floor Lock 052010 052010 052010 052010
15 2 Wheel 053769 053769 053769 053769
16 2
Caster (21” OD Base Legs) 054267 054267 054267 054267
Caster (All Other OD Base Legs ) 150024 150024 150024 150024
HYDRAULIC CYLINDER PARTS LIST
17 1 Cylinder 051074 051073 051072 051105
18 1 Piston 051197 051196 051195 051138
19 1 Cylinder Cap 051198 051198 051198 050006
20 1 Seal Kit 220170 220170 220170 220171
*20A “O” Ring ---------- ---------- ---------- ----------
*20B “O” Ring ---------- ---------- ---------- ----------
*20C “O” Ring ---------- ---------- ---------- ----------
*20D “O” Ring ---------- ---------- ---------- ----------
*20E Piston Guide Ring ---------- ---------- ---------- ----------
21 Base 051052 051052 051052 051052
PARTS SHOWN WITH (*) COMPRISE “SEAL KIT” P/N 220170





19
17
*20A
*20B
18
*20C
*20E
*20D
21
12
13
1
Remove plastic pipe plug and replace
with breather cap prior to operation

8
7
6
9
5
3
16
2
10
4
11 15

Other Wesco Lifting System manuals

Wesco 272467 User manual

Wesco

Wesco 272467 User manual

Wesco DJ-55 Service manual

Wesco

Wesco DJ-55 Service manual

Wesco 273203 User manual

Wesco

Wesco 273203 User manual

Wesco Gator Grip Drum EGG-1 Operating instructions

Wesco

Wesco Gator Grip Drum EGG-1 Operating instructions

Wesco DM-800-MDT Service manual

Wesco

Wesco DM-800-MDT Service manual

Wesco 272460 User manual

Wesco

Wesco 272460 User manual

Wesco HWLFX-4 User manual

Wesco

Wesco HWLFX-4 User manual

Wesco EVM 206-90 Operation instructions

Wesco

Wesco EVM 206-90 Operation instructions

Wesco 272468 User manual

Wesco

Wesco 272468 User manual

Popular Lifting System manuals by other brands

morse 82A-120 Operator's manual

morse

morse 82A-120 Operator's manual

Genie GTH-844 Service and repair manual

Genie

Genie GTH-844 Service and repair manual

BGS technic 9239 manual

BGS technic

BGS technic 9239 manual

morse MORStak 289F Operator's manual

morse

morse MORStak 289F Operator's manual

morse 520-120 Operator's manual

morse

morse 520-120 Operator's manual

Joerns Oxford Journey User instruction manual

Joerns

Joerns Oxford Journey User instruction manual

Haulotte OPTIMUM 8 Training manual

Haulotte

Haulotte OPTIMUM 8 Training manual

VMB TL-054 Operating instructions & user manual

VMB

VMB TL-054 Operating instructions & user manual

Liko Likorall 200 Instructions for use

Liko

Liko Likorall 200 Instructions for use

SVERO 7112A manual

SVERO

SVERO 7112A manual

KSF GL-500DC Instruction book

KSF

KSF GL-500DC Instruction book

GraviTrax ELEMENT ZIPLINE instructions

GraviTrax

GraviTrax ELEMENT ZIPLINE instructions

Noblelift ETF-30 operating instructions

Noblelift

Noblelift ETF-30 operating instructions

Hisun Strike 250 installation instructions

Hisun

Hisun Strike 250 installation instructions

Dhollandia DH-P1 user manual

Dhollandia

Dhollandia DH-P1 user manual

IDEAL MSC-18K-B manual

IDEAL

IDEAL MSC-18K-B manual

Corti Zootecnici LH-PA-200G instruction manual

Corti Zootecnici

Corti Zootecnici LH-PA-200G instruction manual

Huchez CT3 instruction manual

Huchez

Huchez CT3 instruction manual

manuals.online logo
manuals.online logoBrands
  • About & Mission
  • Contact us
  • Privacy Policy
  • Terms and Conditions

Copyright 2025 Manuals.Online. All Rights Reserved.