West Bend Chris Freytag Pressure Cooker User manual

2011 West Bend®, a Brand of Focus Electrics, LLC.
www.westbend.com
Register this and other Focus Electrics products through our website:
www.registerfocus.com
Important Safeguards............................................................................................... 2
Before Using for the First Time ................................................................................ 3
Using Your Electric Pressure Cooker....................................................................... 4
Cooking Times ......................................................................................................... 6
Helpful Hints............................................................................................................. 8
Cleaning Your Electric pressure Cooker .................................................................. 9
Troubleshooting ..................................................................................................... 10
Recipes .................................................................................................................. 11
Warranty................................................................................................................. 13
SAVE THIS INSTRUCTION MANUAL FOR FUTURE REFERENCE

English - 2
IMPORTANT SAFEGUARDS
To prevent personal injury or property damage, read and follow all instructions
and warnings.
When using electrical appliances, basic safety precautions should always be
followed including:
•Read all instructions.
•Do not touch hot surfaces. Use handles or knobs.
•To protect against fire, electric shock, and injury to persons do not immerse
cord, plugs, or other electric parts in water or other liquids.
•Close supervision is necessary when this appliance is used by or near children.
•Always unplug from outlet when not in use and before cleaning. Allow to cool
before putting on or taking off parts and before cleaning.
•Do not operate any appliance with a damaged cord or plug, after the appliance
malfunctions, or has been damaged in any manner. For service information see
warranty page.
•The use of accessory attachments not recommended by Focus Electrics may
cause fire, electric shock, or injury.
•Do not use this appliance outdoors.
•Do not let cord hang over the edge of the table or counter, or touch hot surfaces.
•Do not place on or near a hot gas or electric burner, or in a heated oven.
•Attach plug to appliance first, then plug cord into wall outlet. To disconnect, turn
any control to “OFF,” then remove plug from wall outlet.
•Do not use appliance for other than intended use.
•Extreme caution must be used when moving an appliance containing hot liquids.
•Do not attempt to repair this appliance yourself.
•A short power-supply cord is provided to reduce risks resulting from becoming
entangled in or tripping over a longer cord.
•Longer extension cords are available, but care must be exercised in their use.
While use of an extension cord is not recommended, if you must use one,
ensure that the marked electrical rating of the extension cord is equal to or
greater than that of the appliance. If the plug is of the grounded type, the
extension cord must be a grounding-type 3-wire cord. To avoid pulling, tripping
or entanglement, position the extension cord so that it does not hang over the
edge of the counter, table or other area where it can be pulled on by children or
tripped over.
•Do not use an outlet or extension cord if the plug fits loosely or if the outlet or
extension cord feels hot.
•This appliance cooks under pressure. Improper use may result in scalding
injury. Make certain appliance is properly closed before operating. See “Using
your Electric Pressure Cooker” section of this manual.

English - 3
•Do not fill the appliance over full. When cooking foods that expand during
cooking, such as rice or dried vegetables, do not fill the appliance over ½ full.
Overfilling may cause a risk of clogging the vent and developing excess
pressure. See “Using your Electric Pressure Cooker” section of this manual.
•Be aware that certain foods, such as applesauce, cranberries, pearl barley,
oatmeal or other cereals, split peas, noodles, macaroni, rhubarb, or spaghetti
can foam, froth, and sputter, and clog the pressure release device (steam vent).
These foods should not be cooked in a pressure cooker.
•Always check pressure release devices for clogging before use.
•Do not open the pressure cooker until the unit has cooled and all internal
pressure has been released. If the lid is difficult to turn, this indicates that the
appliance is still pressurized. Do not force it open. Any pressure in the cooker
can be hazardous. See “Using your Electric Pressure Cooker” section of this
manual.
•Do not use this appliance for pressure frying with oil.
•For household use only.
SAVE THESE INSTRUCTIONS
B
EFORE
U
SING FOR THE
F
IRST
T
IME
Please check all packaging material carefully before discarding. Many
accessory parts are contained within the packaging material.
See “Cleaning your Electric Pressure Cooker” section of this manual. Clean pressure
cooker thoroughly and assemble the black spoon holder and clear drip catcher to the
exterior of the pressure cooker. Clear drip catcher attaches below the floating valve
at the back of the pressure cooker; place the flat side of drip catcher against
pressure cooker and press up until it “locks” into place. Place flat side of spoon
holder against the pressure cooker, over the small bracket by the right hand side of
the base of the cooker. Align the tab of the spoon holder into the opening of the
bracket, press down until the spoon holder is fully seated.
Cooking Vessel
Heating Plate
Pressure Limiting
Valve/Knob
Cover
Drip Catcher
(behind)
Spoon
Spoon Holder
Measuring Cup

English - 4
We recommend thoroughly reading the “Using Your Electric Pressure Cooker”
and “Helpful Hints” before using for the first time.
U
SING
Y
OUR
E
LECTRIC
P
RESSURE
C
OOKER
1. Before every use of your electric pressure cooker, always check that your
rubber lid seal ring gasket is securely attached under the rail in the lid. If it
has become loose, press it back into place using gentle pressure. If the
rubber lid seal ring gasket is damaged, DO NOT USE the pressure cooker.
Contact Customer Service to replace. Check that there is no debris on the
heating plate in the cooker. Do not place below hanging cabinets, as
damage to the cabinets from steam will occur.
2. Place food to be cooked in the cooking vessel. Do not overfill cooking
vessel. Place cooking vessel into the pressure cooker.
3. Plug cord into the heating base, then plug pressure cooker into 120 volt, AC
outlet ONLY.
4. Close and lock the lid, if required. The lid can be locked by turning the
handle clockwise. The pressure limiting valve will be loose and easily
turned until cooking cycle begins.
5. Choose the correct cook setting:
Timer: The timer is used for delayed cooking only. Press “Timer” to
increase the delay time. Pressing “Timer” will increase the delay time by
½ hour. The maximum delay time is 24 hours.
•Close and lock cover, set pressure limiting valve to “Airtight”, if
using “High Pressure” or “Low Pressure” or “Rice”. If cooking with
“Steam” or “Slow Cook”, set the pressure limiting valve to
“Exhaust”.
•Press “Timer” to set delay time. Example, if you wish the pressure
cooker to begin in 3 hours, press “Timer” until the red display
reads “30 00”.
•Select cooking function. Set cooking time by repeatedly pressing
the function button until desired cook time is reached. Press
“Start/Cancel” to begin delay time countdown. The timer counts
down in half hour increments. When the delay time has elapsed,

English - 5
the selected cooking function will begin. Note: Do NOT cook
perishable foods on a delayed setting. This setting is best used
with grains, beans, rice, or other foods that will not spoil.
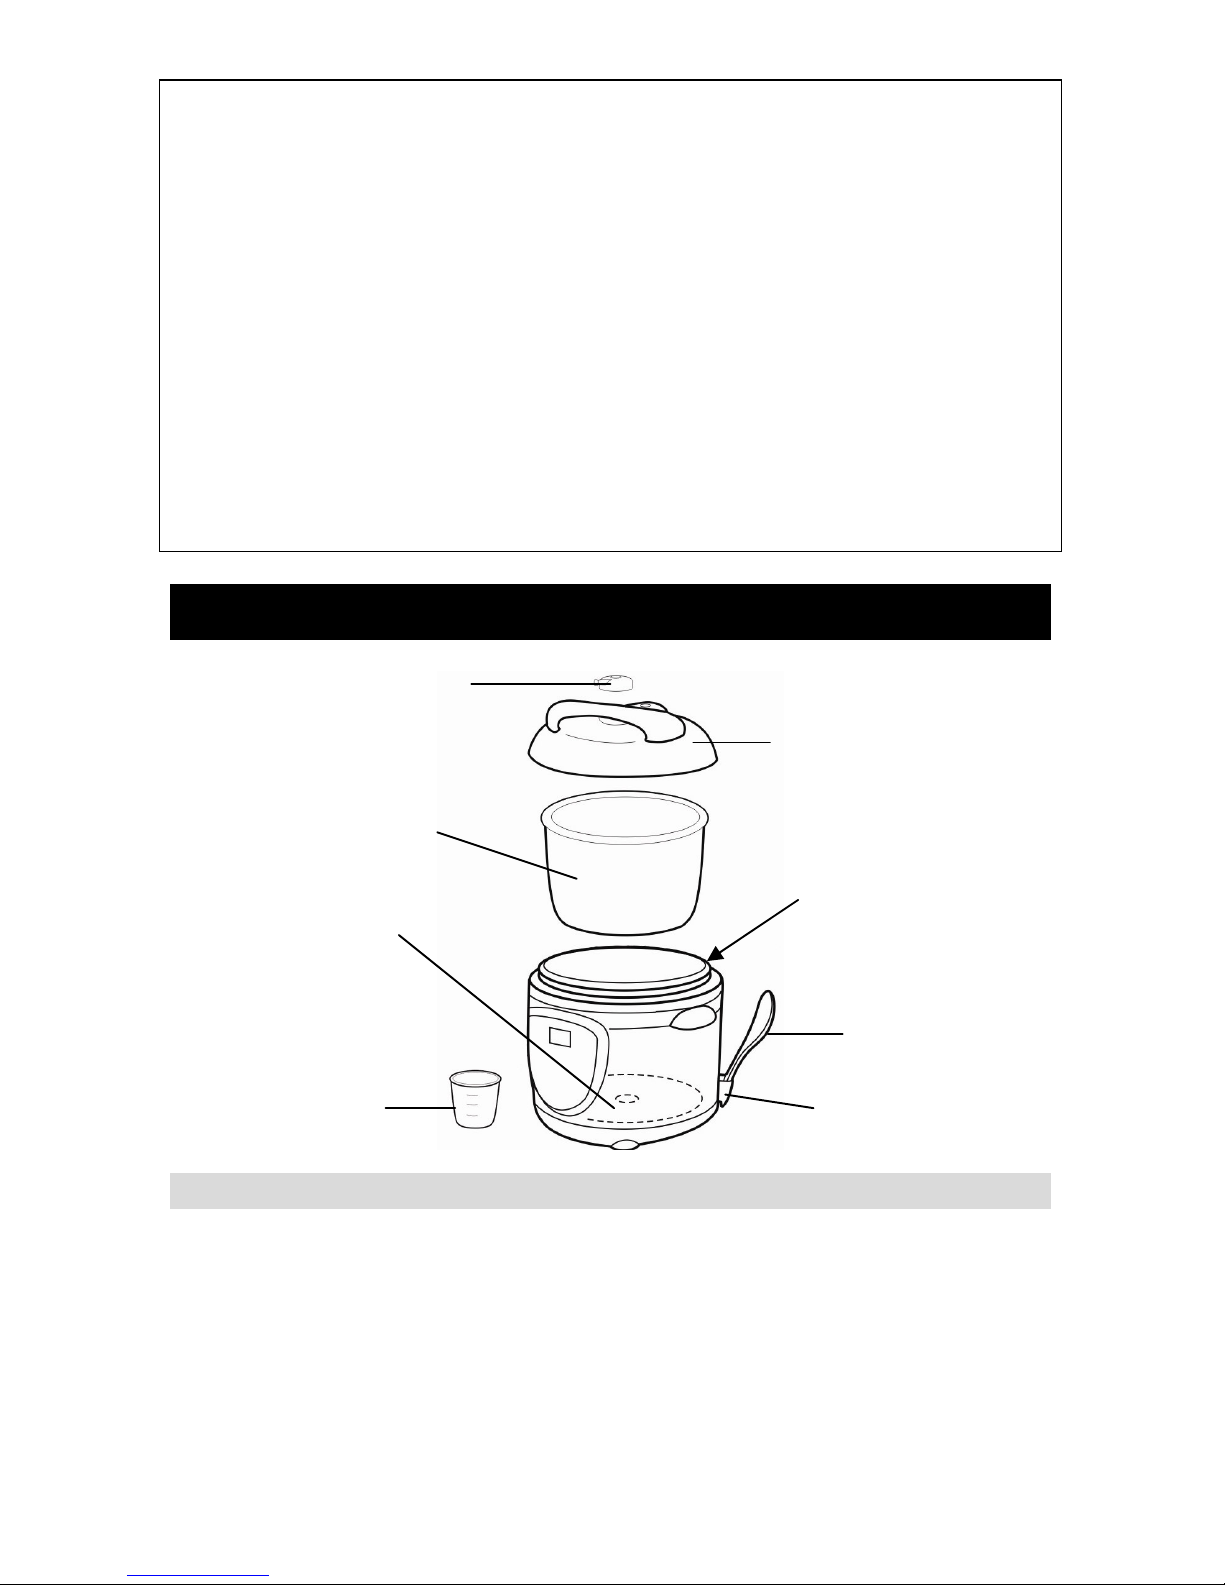
Rice: Set pressure limiting valve to “Airtight”. Press the “Rice” button, the
display will read “00 12”, then press “Start/Cancel”. Pressure will build,
and once pressure is reached, display will read “PO” and the timer will
count down. It will automatically cook rice, then will enter the “Warm”
setting when cooking is completed. Always use the included measuring
cup to measure rice and do not attempt to cook more than 8 measures of
rice at one time. Note: Though the timer reads 12 minutes, the time taken
to reach pressure will vary based on how much rice is being cooked. The
timer will not count down until pressure has been reached.
Steam: Set the pressure limiting valve to “Exhaust”. Press “Steam”
button, indicator light will blink. Continue to press “Steam” until desired
steaming time, 01-99 minutes, has been reached. Press “Start/Cancel” to
start cooking cycle. Indicator will stop blinking once the steam cycle has
begun.
Slow Cook: Set the pressure limiting valve to “Exhaust”. Press “Slow
Cook” button, the indicator light will begin to flash and the display will
show “0.5”. This indicates 30 minutes of cooking time. Continue to press
“Slow Cook” to increase cooking time in 30 minute increments, to a
maximum of 9.5 hours. Once a time has been selected, press the
“Start/Cancel” button to begin the cooking process. When the cooking
time is completed, the pressure cooker will automatically enter the Warm
setting.
•Slow cook can be used with the lid in the open or closed position. If
the lid is closed, be sure that the pressure limiting valve is set to
“Exhaust”.
Brown: No pressure is used for the “Brown” setting. Press “Brown”; the
indicator light will begin to flash and the display will read “00 00”. Be sure
to keep the lid in the open position. To begin heating, press the
“Start/Cancel” button. The indicator light will stop flashing. Press
“Start/Cancel” when food is browned.
Pressure Cook: Set the pressure limiting valve to “Airtight”. Press “High
Pressure” (8.7-11.6 psi) or “Low Pressure” (5.8-8.7 psi) setting. The
indicator light will begin to flash and the display will show cooking time in
minutes. Press the pressure button to desired cooking time, 01 - 99
minutes. Press “Start/Cancel” to begin cooking process. The pressure
cooker will pressurize, and once full pressure has been reached, the
display will read “PO” and the timer will begin to count down. It could take
up to 20 minutes to pressurize, depending on how much liquid is being
used and how much food is being cooked. When cook time is complete,
the pressure cooker will beep 3 times, depressurize itself, then go into the
Warm setting.
Warm: Set the pressure limiting valve to “Exhaust”. Press “Warm”, the
indicator light will begin to flash and the display will read “00 00”. Press
“Start/Cancel” to begin warming cycle, indicator light will stop flashing.
The “Warm” setting does not operate on a timer. When warming is
complete, press “Start/Cancel” to cancel warming.
6. When cooking is complete, press “Start/Cancel” to end the Warm function.
Determine if you wish to quickly release or naturally release the pressure.
If you are cooking foods that are likely to overcook, use a quick release. If

English - 6
you are cooking foods that are unlikely to overcook, use the natural release
method.
•To use the quick release method, stand back from the pressure
cooker. Use long tongs to turn the pressure limiting valve to the
“Exhaust” position. This will quickly release the steam. KEEP
HANDS AND FACE AWAY FROM PRESSURE LIMITING
VALVE WHEN RELEASING STEAM. When the floating valve at
the back of the lid lowers, pressure has been released. Note: if
cooking a soup or other liquid food, DO NOT turn the pressure
limiting valve to “Exhaust”. Instead, wait for cooker to cool and
floating valve to sink before opening.
•To use the natural release method, wait until the floating valve at
the back of the lid lowers.
Note: For any time setting, you can also press and hold the desired
setting to quickly advance the timer count.
7. Open the lid carefully; hold the handle and turn counter clockwise to unlock,
then lift to open. If the lid does not freely open, the pressure is not
completely released. Let cooker cool for a few more minutes, then try again.
When cooking is complete, unplug the cooker from the outlet.
•A small amount of smoke and/or odor may occur upon initial heating due to the
release of manufacturing oils – this isnormal.
•Some minor expansion/contractionsounds may occur during heating and cooling –
this is normal.
We recommend reviewing the “Helpful Hints” section of this manual before using.
C
OOKING
T
IMES
Here are some basic cooking time guidelines for use with your pressure cooker.
Times may need to be adjusted based on personal preference. When using pressure
cooking, it is better to undercook foods and then add time rather than overcooking. If
additional cooking time is needed, follow cooking directions for setting chosen.
Always use at least 1 cup of liquid when pressure cooking.
Beans, 1 cup
Cooking Time,
Soaked
Overnight
Cooking Time,
Unsoaked
Pressure
Release
Method
Black 20 - 25 min. 25 - 35 min. Natural Release
Cannellini 18 - 25 min. 30 - 40 min. Natural Release
Chickpeas/Garbanzo 35 - 40 min. 50 - 60 min. Natural Release
Great Northern 25 - 30 min. 30 - 35 min. Natural Release
Lentils No soak 8 - 10 min. Natural Release
Pinto 20 - 25 min. 30 - 35 min. Natural Release
Navy 20 - 25 min. 30 - 35 min. Natural Release
Red 20 - 25 min. 30 - 35 min. Natural Release
Soy 25 - 35 min. 30 - 40 min. Natural Release
When cooking beans, do not fill the cooking vessel higher than the 6 cup
mark. Always cook beans at “High Pressure”.

English - 7
Meat Cooking Time Pressure Release Method
Beef
Pot Roast, Bottom Round, 3 lbs. 99 min. Natural Release
Brisket 55 min. Natural Release
Corned Beef 24 min. per lb. Natural Release
Short Ribs, 2 - 3" thick 50 min. Natural Release
Stew meat, 1 ½" cubes 10 min. Natural Release
Chicken
Whole, up to 3 lbs. 18 - 23 min. Quick Release
Bone-in Breast, up to 3 lbs. 9 - 10 min. Quick Release
Boneless Breast, up to 3 lbs. 5 - 6 min. Quick Release
Bone-in Thighs/Legs 9 - 12 min. Quick Release
Boneless Thighs/Legs 8 - 10 min. Quick Release
Lamb
Shanks; 4, 12 oz. ea. 24 min. Natural Release
Chops, ½ - 1" thick 6 - 12 min. Quick Release
Stew meat, 1 ½" cubes 22 - 25 min. Natural Release
Pork
Bone-in Chops or Loin, ¾ - 1"
thick Brown meat, then
9 - 11 min. Quick Release
Boneless Roast, up to 3 lbs. 50 - 55 min. Natural Release
Spareribs, 2 - 3" pieces 22 - 28 min. Quick Release
Veal
Boneless Shoulder Roast 10 min. per lb. Natural Release
Chops, - 1" thick 6 - 12 min Quick Release
Stew meat, 1 ½" cubes 9 - 10 min. Natural Release
Fish
Steaks and Fillets 1" 4 - 5 min. Quick Release
Steaks and Fillets 1" 6 - 7 min. Quick Release
When cooking meats, do not fill the cooking vessel higher than the 8 cup
mark.
Vegetable Cooking Time Pressure Release Method
Artichokes, Med. to Lg. 8 - 10 min. Quick Release
Green, Yellow, or Wax Beans 2 - 3 min. Quick Release
Beets 12 - 16 min. Quick Release
Broccoli, florets 1 - 3 min. Quick Release
Cauliflower, florets 1 - 4 min. Quick Release
Carrots
baby cut 3 - 5 min. Quick Release
" slices 2 - 5 min. Quick Release
Collard Greens 3 - 4 min. Quick Release

English - 8
Vegetable Cooking Time Pressure Release Method
Corn on the cob 3 - 5 min. Quick Release
Eggplant 2 - 3 min. Quick Release
Kale 1 - 2 min. Quick Release
Parsnips
peeled and cubed 3 - 4 min. Quick Release
" slices 1 - 2 min. Quick Release
Peas 1 - 2 min. Quick Release
Peppers 1 - 3 min. Quick Release
Potatoes, Sweet, sliced ½ - 1"
thick 4 - 8 min. Quick Release
Potatoes, White
Whole, 1½ - 2½" thick 10 - 15 min. Quick Release
Sliced, ½ - " thick 3 - 5 min. Quick Release
Rutabaga, cubed or sliced 3 - 5 min. Quick Release
Spinach 1 min. Quick Release
Squash, Acorn Halved & Seeded 7 - 12 min. Quick Release
Squash, Butternut Peeled &
Cubed 6 - 10 min. Quick Release
Squash, Spaghetti Quartered 10 - 12 min. Quick Release
Squash, Zucchini or Yellow 1 - 3 min. Quick Release
Turnips, Sliced or Cubed 3 - 5 min. Quick Release
When cooking vegetables, do not fill the cooking vessel higher than the 8 cup
mark.
Grains Cooking Time Pressure Release Method
Brown, Red,
Wehani, or Black
Japonica Rice High Pressure, 10 min. Natural release 10 min, then
quick release.
Kamut High Pressure, 20 min. Natural release 10 min, then
quick release.
Quinoa High Pressure, 2 min. Natural release 10 min, then
quick release.
Wild Rice High Pressure, 25 min. Natural release 10 min, then
quick release.
Wheat Berries High Pressure, 30 min. Natural release 10 min, then
quick release.
When cooking grains, do not fill the cooking vessel higher than the 6 cup
mark.
H
ELPFUL
H
INTS
•To adapt conventional recipes to a pressure cooker, reduce the cooking time by
. Pressure cooking generally cooks 3 times faster than conventional methods.
Many pressure cooker recipes are available online.
•Pressure cooking is ideally suited to tougher, less expensive cuts of meat.
•When cooking frozen foods, add about 8 - 10 minutes to the cooking time.

English - 9
•Always use at least 1 cup of liquid to build up enough pressure to cook. If
cooking for 45 minutes or longer, use at least 1½ cups of liquid. Less liquid is
needed for pressure cooking than traditional cooking.
•When cooking foods that expand, never fill the cooking vessel more than half
full. If cooking liquids, or foods that won’t sputter or expand, do not fill more than
full.
•For beans, pastas, or foods likely to sputter, add one to two tbsp. cooking oil to
the water in the pressure cooker. This will help reduce sputtering.
•When pressure cooker is heating up, and periodically through the cooking cycle,
it is normal for some pressure to be vented from the floating valve.
•When using a pressured setting, the timer will not count down until pressure has
been reached. When pressure has been reached, the display will read “PO”.
•If you find that your food does not cook in the time set, your cooking cycle can
be extended by resetting the cycle or using the “Steam” setting for an additional
time.
•When slow cooking, the timer counts down by the half hour, not by minute.
•If there is a brief power interruption of less than five minutes, the program
position is stored in memory and the machine will resume when the power is
restored.
•For recipes that may call for a rack, trivet, oven-safe dishes, or bakeware, you
can use any that will fit inside your pressure cooker, as long as there is at least
a half inch gap around the dish and at least 2 inches between the top of the
bowl and the top of the cooking vessel. If you do not have a trivet or riser, 3-4
mason jar lids can be used in place.
C
LEANING
Y
OUR
E
LECTRIC
P
RESSURE
C
OOKER
1. Unplug pressure cooker and allow to cool completely. Do not clean
pressure cooker until it has cooled.
2. Wash the cooking vessel using warm, soapy water. Rinse thoroughly and
dry. Washing in a dishwasher is not recommended.
3. Remove drip catcher, wash in warm, soapy water, rinse and dry thoroughly,
then replace.
4. Wipe under and around the rubber lid seal ring gasket (A). If seal ring
becomes loose, secure it back under the rail along the lid.
5. Remove the splash filter (B) from the underside of
the lid, remove the floating valve (C) and gasket
and wash thoroughly. Use a bottle brush or pipe
cleaner to clean all openings. Wash floating valve
and splash filter, dry thoroughly, then replace on
the lid; place floating valve in the opening and fit
the gasket over the ridge at the bottom. Replace splash filter by pressing
back onto the prongs on the underside of the lid.
6. To remove lid completely, open lid about 2 inches, then slide left along the
rail until the lid is clear. To replace, hold the lid at the same angle, and slide
right onto the metal rail.
7. Wipe surfaces of the pressure cooker with a damp cloth and dry thoroughly.
This appliance has no user serviceable parts.
A
B
C

English - 10
T
ROUBLESHOOTING
The pressure limiting valve seems loose. Is that a problem?
•When you are not cooking, the pressure limiting valve will remain loose. Once
you actually start cooking and have the pressure limiting valve set to “Airtight”, it
will no longer be loose or freely turn. Occasionally while cooking, steam may
escape from the pressure limiting valve. This happens if it is not properly set to
“Airtight”. If this is the case, use tongs to gently adjust the pressure limiting valve
to the “Airtight” position.
When I choose a menu function, nothing is happening. Why?
•Always check that the pressure limiting valve is set to “Airtight” when using a
pressured setting. When cooking at a pressure setting, it takes time to build
pressure up in the appliance. The display will not change while pressure is
building, which can take up to 20 minutes.
I set the pressure cooker to “High Pressure” or “Low Pressure” or “Rice” and
it starts to build pressure, but then it beeps 3 times and goes into “Warm” and
my food isn’t cooked. What is happening?
•First, check to be sure that you set the cook time. If you have, then the pressure
cooker is sensing that there is a leak somewhere and that it hasn’t been sealed
properly. Carefully check the gasket on the floating valve and the rubber lid seal
ring gasket for any cracks or gaps. If there is a damaged gasket, do not use the
appliance and contact customer service. If the gaskets are in position and show
no damage, make sure that the lid is closed securely. Unplug the cooker, wait
15 seconds, plug in, then reprogram. It is also possible that you may not be
using enough water for what you’re trying to cook. Increase the amount of water
you’re using by at least half a cup, and reprogram.
Steam is being released around the rim of the lid while the pressure cooker is
pressurizing. How do I fix this?
•This happens when the rubber lid seal ring gasket has not formed a proper seal.
Press “Start/Cancel” to cancel all functions, then set the pressure limiting valve
to “Exhaust”. Once all steam has dissipated, open the lid. Run a damp cloth
around the rubber lid seal ring gasket to clean any debris that may be there.
Check that it is completely under the rail with no tears or gaps. Close and lock
the lid, then reprogram the cooker.
Steam is escaping from the floating valve during the pressurization sequence,
why?
•It is normal for small amounts of steam to be released during the pressure cycle.
However, if you are noticing a steady stream of steam escaping from the floating
valve, use tongs or a similar instrument and an oven mitt to adjust the floating
valve’s position. Steam will then cause the floating valve to lift and create a seal.
Steam is escaping from the pressure limiting valve during the pressurization
sequence, why?
•Always check that the pressure limiting valve is set to “Airtight” when using a
pressured setting. If it is not seated correctly, use tongs to gently adjust the
pressure limiting valve to the “Airtight” position. If steam continues to escape,
cancel all functions, set pressure limiting valve to “Exhaust” and exhaust all
steam in the cooker. When steam is released, gently pull up on the pressure
limiting valve to remove it from the lid. Check the wires on the underside, if they

English - 11
are bent, loose, or damaged, contact customer service for replacement. Make
sure there is no food or debris in the valve. Replace the pressure limiting valve.
If there are still problems after checking these, contact customer service for
assistance.
My food is done, the cooker has beeped, and I released the pressure but my lid
won’t open. Why?
•Check the floating valve at the back of the lid. If it is still in the up position, it may
be stuck. Gently tap on the cooker to dislodge it. Check that all steam has been
vented, then turn the lid to open.
R
ECIPES
Beef Stew
1½ lbs. Beef Stew Meat, cubed
1 med. Onion, Chopped
4 med. Carrots, Sliced ½”
2 Ribs Celery, Sliced ½”
4 med. Potatoes, Sliced ½”
1 - 28oz. can Diced Tomatoes
1 - 10.5 oz. Beef Broth
1 tbsp. Worcestershire Sauce
2 tbsp. Dried Parsley Flakes
1 Bay Leaf
1 tsp. Salt
¼ tsp. Pepper
2 tbsp. Quick Cooking Tapioca
1. Add all ingredients to cooking vessel. Stir to combine.
2. Securely close lid to locked position, set pressure limiting valve to “Airtight”.
3. Follow basic directions for pressure cooking, and cook at high pressure for
30 minutes, or slow cook for 5 hours
Barbecued Ribs
cup All-purpose Flour
¼ tsp. Garlic Powder
¼ tsp. Salt
tsp. Pepper
1½ lbs. Boneless Country-style Ribs,
cut into 2” pieces
1 tbsp. Vegetable Oil
1 cup Water, hot
½ cup Ketchup
¼ tsp. Chili Powder
tsp. Hot Pepper Sauce
1 small Onion, sliced
1. In a large, resealable plastic bag, combine the flour, salt, pepper, and garlic
powder. Add rib pieces, seal the bag, then shake to coat the ribs.
2. Add the oil to the cooking vessel, then use the “Brown” setting to brown the
meat on all sides. Drain grease when meat is browned.
3. Combine the ketchup, hot pepper sauce, water, and chili powder then pour
over the ribs.
4. Follow basic directions for pressure cooking, and cook at high pressure for
35 minutes.

English - 12
Chicken Piccata
6 Chicken Breast Halves
½ cup All-purpose Flour
¼ cup Olive Oil
4 Shallots
3 cloves Garlic, crushed
¾ cup Chicken Broth
1/3 cup Lemon Juice
1 tbsp. Sherry Wine
2 tsp. Salt
¼ tsp. White Pepper
1 tsp. Dried Basil
1 cup Pimento Stuffed Olives, minced
¼ cup Sour Cream
1 tbsp. Potato Starch or 1 tbsp. Flour
¼ cup Parmesan or Fontinella
Cheese, grated
1 Lemon, thinly sliced
1. Place flour in a large, resealable plastic bag. Place chicken in bag and
cover with flour.
2. Heat oil on “Brown” setting in the pressure cooker. Brown chicken, 2 pieces
at a time, until all have been browned. Set chicken aside.
3. Add shallots and garlic to the oil and sauté. Use a wooden spoon to stir and
dislodge anything stuck to the bottom of the cooking vessel. Add the broth,
lemon juice, salt, pepper, sherry, basil, and olives, then mix well.
4. Add chicken pieces to the cooker, skin side down. Lock the cover into
cooking position and follow directions for cooking. Cook at “High Pressure”
for 15 minutes.
5. When cooking is complete, remove chicken from the cooking vessel. In a
separate bowl, whisk together the sour cream and starch together.
Combine with leftover cooking liquid and heat mixture on “Brown” for one
minute, stirring constantly. Cancel cook setting and spoon the gravy over
the chicken. Top with cheese and lemon slices.
Creamy Cheesecake with Fruit Glaze
1 tbsp. Butter
4 tbsp. Bread or Cookie Crumbs
2- 8oz. pkg. Cream Cheese
¾ cup Sugar
¼ cup Heavy Cream
2 tsp. Vanilla
2 tsp. Lemon Zest, grated
2 tbsp. All-purpose Flour
6 tbsp. Sour Cream
2 Eggs
2 Egg Yolks
2 cups Water
1. Butter a 7 inch springform pan, then sprinkle with bread or cookie crumbs.
Set aside.
2. Blend cream cheese, sugar, cream, vanilla, lemon zest, flour, and sour
cream. Beat in the egg yolks and eggs, then pour mixture into the prepared
springform pan.
3. Unroll about 2 feet of aluminum foil and center the springform pan onto it.
Unroll another piece of foil, cover the pan, then crimp around the edges to
seal. Use excess length of foil to create a handle to assist removal from the
pressure cooker.
4. Place a trivet or mason jar lids in the bottom of the cooking vessel, pour the
2 cups of water into cooking vessel, then place covered springform pan on
top of trivet.
5. Follow directions to cook at “High Pressure” for 40 minutes. When done,
allow natural release.
6. Remove from cooking vessel, loosen the foil and cool. Then chill for 4 hours
or overnight. Before serving, cover with your favorite fruits or fruit
preserves. Remove from springform pan and serve.

English - 13
L5852 11/11 West Bend
®
, a Brand of Focus Electrics, LLC. Printed in China
P
RODUCT
W
ARRANTY
Appliance 1 Year Limited Warranty
Focus Electrics, LLC (“Focus Electrics”) warrants this appliance from failures in the material
and workmanship for one (1) year from the date of original purchase with proof of purchase,
provided the appliance is operated and maintained in conformity with the provided Instruction
Manual. Any failed part of the appliance will be repaired or replaced without charge at Focus
Electrics’ discretion. This warranty applies to indoor household use only.
This warranty does not cover any damage, including discoloration, to any non-stick surface of
the appliance. This warranty is null and void, as determined solely by Focus Electrics if the
appliance is damaged through accident, misuse, abuse, negligence, scratching, or if the
appliance is altered in any way.
THIS WARRANTY IS IN LIEU OF ALL IMPLIED WARRANTIES, INCLUDING WARRANTIES
OF MERCHANTABILITY, FITNESS FOR A PARTICULAR PURPOSE, PERFORMANCE, OR
OTHERWISE, WHICH ARE HEREBY EXCLUDED. IN NO EVENT SHALL FOCUS
ELECTRICS BE LIABLE FOR ANY DAMAGES, WHETHER DIRECT, INDIRECT,
INCIDENTAL, FORSEEABLE, CONSEQUENTIAL, OR SPECIAL, ARISING OUT OF OR IN
CONNECTION WITH THIS APPLIANCE.
If you think the appliance has failed or requires service within its warranty period, please
contact the Focus Electrics Customer Service Department at (866) 290-1851, or e-mail us at
service@focuselectrics.com. A receipt proving the original purchase date will be required for all
warranty claims, hand written receipts are not accepted. You may also be required to return
the appliance for inspection and evaluation. Return shipping costs are not refundable. Focus
Electrics is not responsible for returns lost in transit.
Valid only in USA and Canada
R
EPLACEMENT PARTS
Replacement parts, if available, may be ordered directly from Focus Electrics, LLC several
ways. Order online at www.focuselectrics.com, e-mail service@focuselectrics.com, over the
phone by calling (866)290-1851, or by writing to:
Focus Electrics, LLC
Attn: Customer Service
P. O. Box 2780
West Bend, WI 53095
To order with a check or money order, please first contact Customer Service for an order total.
Mail your payment along with a letter stating the model or catalog number of your appliance,
which can be found on the bottom or back of the unit, a description of the part or parts you are
ordering, and the quantity you would like. Your check should be made payable to Focus
Electrics, LLC.
Your state/province’s sales tax and a shipping fee will be added to your total charge. Please
allow two weeks for processing and delivery.
This manual contains important and helpful information regarding the safe use and care of your
new Focus Electrics product. For future reference, attach dated sales receipt for warranty proof
of purchase and record the following information:
Date purchased or received as gift: _______________________________________________
Where purchased and price, if known: _____________________________________________
Item number and Date Code (shown bottom/back of product):___________________________

N
OTES

2011 West Bend®, une Marque de Focus Electrics, LLC.
www.westbend.com
Enregistrez ce produit et les autres produits Focus Electrics sur notre site Internet:
www.registerfocus.com
Précautions Importantes .......................................................................................... 2
Avant la Première Utilisation .................................................................................... 3
Utilisation de votre Autocuiseur Électrique............................................................... 4
Temps de Cuisson ................................................................................................... 7
Astuces .................................................................................................................... 9
Nettoyage de votre Autocuiseur Électrique ............................................................ 10
Dépannage............................................................................................................. 11
Recettes................................................................................................................. 12
Garantie ................................................................................................................. 14
CONSERVEZ CE MANUEL D’INSTRUCTIONS POUR RÉFÉRENCE FUTURE

Française - 2
PRECAUTIONS IMPORTANTES
Afin de prévenir toute blessure ou tout dégât matériel, veuillez lire et suivre la
totalité des instructions et des mises en garde.
Lorsque vous utilisez des appareils électriques, les précautions de sécurité élémentaires
devraient toujours être suivies, notamment:
•Lisez la totalité des instructions.
•Ne touchez pas les surfaces à haute température. Utilisez les poignées carrées ou rondes.
•Afin de vous protéger contre le risque d’incendie, d’électrocution et de blessure,
veuillez ne pas plonger le cordon, les fiches ni toutes autres pièces électriques dans
de l’eau ni dans tout autre liquide.
•Une surveillance étroite est nécessaire lorsque cet appareil est utilisé par des
enfants ou à proximité d’enfants.
•Débranchez toujours l’appareil de la prise secteur lorsque vous ne l’utilisez pas et
avant le nettoyage. Laissez l’appareil refroidir avant de mettre en place ou de retirer
des pièces et avant le nettoyage.
•N’utilisez pas un appareil avec un cordon ou une fiche détériorés, après un
dysfonctionnement de l’appareil, ou si l’appareil a été détérioré de quelque manière
que ce soit. Pour des informations concernant les réparations, voir la page de
garantie.
•L’utilisation d’accessoires non recommandés par Focus Electrics risque de
provoquer un incendie, une électrocution ou des blessures.
•N’utilisez pas cet appareil à l’extérieur.
•Ne laissez pas le cordon d’alimentation pendre depuis l’extrémité de la table ou du
plan de travail, ou entrer en contact avec des surfaces à haute température.
•Ne placez pas l’appareil sur ou à proximité d’une gazinière à haute température ou
d’un brûleur électrique, ou dans un four chaud.
•Fixez d’abord la fiche à l’appareil, puis branchez le cordon d’alimentation sur la prise
secteur. Pour débrancher, positionnez toutes les commandes sur « OFF » (arrêt)
puis retirez la fiche de la prise secteur.
•N’utilisez pas cet appareil pour un usage autre que celui pour lequel il a été conçu.
•Il convient de faire preuve d’une extrême prudence lorsque vous déplacez un
appareil qui contient des liquides à haute température.
•Ne tentez pas de réparer cet appareil vous-même.
•Un cordon d’alimentation électrique court est fourni afin de réduire les risques qui
surviennent si quelqu’un s’emmêle les pieds ou trébuche sur un cordon électrique plus long.
•Des cordons de rallonge électrique plus longs sont disponibles, mais convient de
faire preuve de prudence dans leur utilisation. Bien que l’utilisation d’un cordon de
rallonge ne soit pas recommandée, si vous devez en utiliser un, assurez-vous que la
puissance nominale indiquée sur le cordon de rallonge est supérieure ou égale à
celle de l’appareil. Si la fiche est raccordée à la terre, le cordon de rallonge doit être
un cordon à 3 brins raccordé à al terre. Afin d’éviter que quelqu’un ne tire sur le
cordon, ne trébuche dessus ou s’y emmêle les pieds, positionnez le cordon de
rallonge de sorte que celui-ci ne soit pas suspendu depuis l’extrémité du plan de
travail, de la table ou de toute autre zone d’où il pourrait être tiré par des enfants ou
faire trébucher quelqu’un.

Française - 3
•N’utilisez pas une prise secteur ou un cordon de rallonge si la fiche s’adapte avec un
jeu ou si la prise secteur ou le cordon de rallonge vous semblent chauds.
•Cet appareil cuit sous pression. Une utilisation incorrecte risque de provoquer une
blessure par brûlure. Assurez-vous que l’appareil est correctement fermé avant de
l’utiliser. Voir la section « Utilisation de votre Autocuiseur Électrique
» de ce manuel.
•Ne remplissez pas l’appareil à plus de . Lorsque vous cuisez des aliments dont le
volume augmente pendant la cuisson, comme du riz ou des légumes secs, ne
remplissez pas l’appareil à plus de ½. Le fait de trop remplir peut entraîner un risque
d’encrassement de l’aération et le développement d’une pression excessive. Voir la
section « Utilisation de votre Autocuiseur Électrique
» de ce manuel.
•Soyez conscient que certains aliments, comme la sauce à la pomme, les
canneberges, l'orge perlé, l'avoine ou les autres céréales, les pois cassés, les
nouilles asiatiques, les macaroni, la rhubarbe, ou les spaghetti peuvent créer de la
mousse et des projections, et boucher le dispositif d'évacuation de la pression
(aération pour la pression). Ces aliments ne devraient pas être cuits dans un
autocuiseur.
•Vérifiez toujours si les dispositifs d’évacuation de la pression sont bouchés avant
utilisation.
•N’ouvrez pas l’autocuiseur tant que l’appareil n’a pas refroidi et que la totalité de la
pression interne n’a pas été évacuée. Si le couvercle est difficile à tourner, cela
indique que l’appareil est toujours sous pression. Ne l’ouvrez pas de force. Toute
pression à l’intérieur de l’autocuiseur représente un danger. Voir la section
“Utilisation de votre autocuiseur électrique” de ce manuel.
•N’utilisez pas cet appareil pour réaliser une cuisson de friture à l’huile sous pression.
•Pour une utilisation domestique uniquement.
CONSERVEZ CES CONSIGNES
A
VANT LA
P
REMIÈRE
U
TILISATION
Veuillez vérifier la totalité de l’emballage avec soin avant de le jeter. Le matériau
d’emballage contient un grand nombre d’accessoires.
Récipient de Cuisson
Plaque Chauffante
Couvercle
Egouttoir
(derrière)
Cuiller
Support pour la
C
uiller
Tasse de Mesure
Valve/bouton de
Limitation de la Pression

Française - 4
Voir la section « Nettoyage de votre Autocuiseur Électrique » de ce manuel. Nettoyez
l’autocuiseur de manière approfondie puis assemblez le support pour cuiller noir et
l’égouttoir translucide sur l’extérieur de l’autocuiseur. L’égouttoir translucide se fixe au-
dessous de la valve flottante à l’arrière de l’autocuiseur; placez le côté plat de l’égouttoir
contre l’autocuiseur et appuyez vers le haut jusqu’à ce qu’il se « verrouille » en place.
Placez le côté plat du support pour cuiller contre l’autocuiseur, sur le petit support du côté
droit du socle de l’autocuiseur. Alignez la languette du support pour cuiller à l’intérieur de
l’ouverture dans l’autre support, enfoncez jusqu’à ce que le support pour cuiller soit
complètement installé.
Nous recommandons de lire attentivement les sections intitulées « Utilisation de
votre autocuiseur électrique » et « Astuces » avant la première utilisation.
U
TILISATION DE VOTRE
A
UTOCUISEUR
É
LECTRIQUE
1. Avant chaque utilisation de votre autocuiseur électrique, vérifiez toujours que
votre joint étanche de caoutchouc du couvercle est bien fixé sous le rail dans le
couvercle. S’il s’est détendu enfoncez-le à nouveau en place en appuyant
doucement. Si le joint étanche de caoutchouc du couvercle est détérioré,
veuillez NE PAS UTILISER l’autocuiseur. Veuillez contacter le Service clientèle.
Vérifiez qu’il n’y a aucun résidu sur la plaque chauffante à l’intérieur de
l’autocuiseur. Ne le placez pas sous des placards suspendus, car ceux-ci
risquent d’être détériorés par la vapeur.
2. Placez les aliments à cuire dans le récipient de cuisson. Ne remplissez pas trop
le récipient de cuisson. Placez le récipient de cuisson à l’intérieur de
l’autocuiseur.
3. Branchez le cordon sur le socle chauffant, puis branchez l’autocuiseur sur une
prose secteur AC de 120 volts, UNIQUEMENT.
4. Fermez et verrouillez le couvercle, si nécessaire. Le couvercle peut être
verrouillé en tournant la poignée dans le sens des aiguilles d’une montre. La
valve de limitation de la pression sera détendue et facile à tourner jusqu’à ce
que le cycle de cuisson commence.
5. Choisissez le réglage de cuisson correct:
Minuteur: Le minuteur est utilisé pour la cuisson retardée uniquement.
Appuyez sur « Timer » (Minuteur) pour augmenter la durée de retard. Le fait
d’appuyer sur « Timer » (Minuteur) va augmenter la durée de retard de ½
heure. La durée de retard maximale est de 24 heures.

Française - 5
•Fermez et verrouillez le couvercle, réglez la valve de limitation de la
pression sur « Airtight » (Hermétique), si vous utilisez le réglage
« High Pressure » (Haute Pression) ou « Low Pressure » (Basse
Pression) ou « Rice » (Riz). Si vous cuisez avec le réglage « Steam »
(Vapeur) ou « Slow Cook » (Cuisson Lente), réglez la valve de
limitation de la pression sur « Exhaust » (Évacuation).
•Appuyez sur « Timer » (Minuteur) pour paramétrer le temps de retard.
Par exemple, si vous souhaitez que l’autocuiseur se mette ne marche
dans 3 heures, appuyez sur « Timer » (Minuteur) jusqu’à ce que
l’écran rouge affiche « 30 00 ».
•Sélectionnez la fonction de cuisson. Réglez la durée de cuisson en
appuyant de manière répétée sur le bouton de fonction jusqu’à ce que
la durée de cuisson souhaitée soit atteinte. Appuyez sur
“Démarrer/Annuler” pour commencer le décompte du temps de retard.
Le minuteur décompte le temps par incrémentations d’une demi-
heure. Lorsque le temps de retard est écoulé, la fonction de cuisson
sélectionnée commence. Remarque: Veuillez NE PAS cuire des
aliments périssables avec un réglage de cuisson retardée. Ce réglage
convient mieux pour une utilisation avec des grains, des fèves, du riz
ou d’autres aliments qui se conservent bien.
Riz: Réglez la valve de limitation de la pression sur « Airtight » (Hermétique).
Appuyez sur la touche « Rice » (Riz), l’écran affiche « 00 12 », ensuite
appuyez sur « Start/Cancel » (Démarrer/Annuler). La pression s’accumule, et
une fois que la pression est atteinte, l’écran affiche « PO » et le minuteur
commence le décompte. L’appareil va automatiquement cuire le riz, ensuite il
va entrer dans le réglage “Maintien au chaud” une fois la cuisson terminée.
Utilisez toujours la tasse de mesure fournie pour mesurer le riz et ne tentez
pas de cuire plus de 8 mesures de riz à la fois. Remarque: Bien que le
minuteur indique 12 minutes, le temps nécessaire pour atteindre une mise
sous pression varie en fonction de la quantité de riz cuisinée. Le minuteur ne
commence pas le décompte tant que l’autocuiseur n’est pas sous pression.
Vapeur: Réglez la valve de limitation de la cuisson sur « Exhaust »
(Évacuation). Appuyez sur le bouton « Steam » (Vapeur), le voyant indicateur
clignote. Continuez à appuyer sur « Steam » (Vapeur) jusqu’à ce que la
durée de cuisson à la vapeur souhaitée, entre 01 et 99 minutes, ait été
atteinte. Appuyez sur « Start/Cancel » (Démarrer/Annuler) pour commencer
le cycle de cuisson. L’indicateur cesse de fonctionner une fois que le cycle de
cuisson à la vapeur a commencé.
Cuisson Lente: Réglez la valve de limitation de la pression sur « Exhaust »
(Évacuation). Appuyez sur le bouton « Slow Cook » (Cuisson Lente), le
voyant indicateur commence à clignoter et l’écran affiche « 0.5 ». Ceci
correspond à 30 minutes de temps de cuisson. Continuez à appuyer sur
« Slow Cook » (Cuisson Lente) pour augmenter le temps de cuisson par
incrémentations de 30 minutes, jusqu’à un maximum de 9.5 heures. Une fois
qu’une durée a été sélectionnée, appuyez sur le bouton « Start/Cancel »
(Démarrer/Annuler) pour commencer le processus de cuisson. Une fois le
temps de cuisson écoulé, l’autocuiseur entre automatiquement dans le mode
de maintien au chaud.
•La cuisson lente peut être utilisée avec le couvercle en position ouverte
ou fermée. Si le couvercle est fermé, assurez-vous que la valve de
limitation de la pression est réglée sur « Exhaust » (Évacuation).
Doré: Aucune pression n’est utilisée pour le réglage « Brown » (Doré).
Appuyez sur « Brown » (Doré); le voyant indicateur commence à clignoter et
l’écran affiche « 00 00 ». Assurez-vous de conserver le couvercle en position
ouverte. Pour commencer à chauffer, appuyez sur le bouton « Start/Cancel »

Française - 6
(Démarrer/Annuler). Le voyant indicateur cesse de clignoter. Appuyez sur
« Start/Cancel » (Démarrer/Annuler) une fois que les aliments sont dorés.
Autocuiseur: Réglez la valve de limitation de la pression sur « Airtight »
(Hermétique). Appuyez sur le réglage « High Pressure » (Haute Pression)
(8.7 - 11.6 psi) ou sur « Low Pressure » (Basse Pression) (5.8 – 8.7 psi). Le
voyant indicateur commence à clignoter et l’écran affiche le temps de cuisson
en minutes. Appuyez sur le bouton de pression jusqu’au temps de cuisson
souhaité, entre 01 et 99 minutes. Appuyez sur « Start/Cancel »
(Démarrer/Annuler) pour commencer la cuisson. L’autocuiseur va monter en
pression, et une fois que la pleine pression aura été atteinte, l’écran va
afficher « PO » et le minuteur va commencer le décompte. Cela peut prendre
jusqu’à 20 minutes pour que l’autocuiseur soit sous pression, en fonction de
la quantité de liquide utilisée et de la quantité d’aliments cuits. Une fois le
temps de cuisson écoulé, l’autocuiseur émet 3 bips, il se dépressurise, puis
passe dans le mode de maintien au chaud.
Maintien au Chaud: Réglez la valve de limitation de la pression sur
« Exhaust » (Évacuation). Appuyez sur « Warm » (Maintien au Chaud), le
voyant indicateur commence à clignoter et l’écran affiche « 00 00 ». Appuyez
sur « Start/Cancel » (Démarrer/Annuler) pour commencer le cycle de
maintien au chaud, le voyant indicateur cesse de clignoter. Le réglage
« Warm » (Maintien au Chaud) ne fonctionne pas sur minuteur. Une fois le
maintien au chaud terminé, appuyez sur « Start/Cancel » (Démarrer/Annuler)
pour annuler le maintien au chaud.
6. Une fois la cuisson terminée, appuyez sur « Start/Cancel » (Démarrer/Annuler)
pour arrêter la fonction de maintien au chaud. Déterminez si vous souhaitez
évacuer la pression rapidement ou évacuer la pression naturellement. Si
vous cuisez des aliments qui sont susceptibles d’être trop cuits, utilisez
l’évacuation rapide. Si vous cuisez des aliments qui sont peu susceptibles d’être
trop cuits, utilisez la méthode d’évacuation naturelle.
•Pour utiliser la méthode d’évacuation rapide, éloignez-vous de
l’autocuiseur. Utilisez de longues pinces pour tourner la valve de
limitation de la pression vers la position « Exhaust » (Évacuation).
Ceci permet une évacuation rapide de la vapeur. MAINTENEZ LES
MAINS ET LA VISAGE A L’ECART DE LA VALVE DE LIMITATION
DE LA PRESSION LORSQUE VOUS EVACUEZ LA VAPEUR.
Lorsque la valve flottante à l’arrière du couvercle s’abaisse, cela
signifie que la pression a été évacuée. Remarque: Si vous cuisez une
soupe ou un autre aliment liquide, veuillez NE PAS tournez la valve de
limitation de la pression vers « Exhaust » (Évacuation). Au lieu de
cela, attendez que l’autocuiseur refroidisse et qua la valve flottante
descende avant d’ouvrir.
•Pour utiliser la méthode d’évacuation naturelle, patientez jusqu’à ce
que la valve flottante à l’arrière du couvercle s’abaisse.
Remarque: quel que soit le réglage de durée, vous pouvez également
maintenir enfoncé le réglage souhaité pour faire avancer le minuteur
rapidement.
7. Ouvrez le couvercle avec prudence; tenez la poignée et tournez dans le sens
inverse des aiguilles d’une montre pour déverrouiller, puis soulevez pour ouvrir.
Si le couvercle ne s’ouvre pas librement, cela signifie que la pression n’a pas
été complètement évacuée. Laissez l’autocuiseur refroidir pendant quelques
minutes supplémentaires, puis essayez à nouveau. Une fois la cuisson
terminée, débranchez l’autocuiseur de la prise secteur.
•Une petite quantité de fumée et/ou d’odeur peut être produite lors de la chauffe
initiale enraison de la diffusion des huiles de fabrication – c’est tout à fait normal.
Table of contents
Languages:
Other West Bend Electric Pressure Cooker manuals
Popular Electric Pressure Cooker manuals by other brands

Springlane
Springlane 944169 instruction manual

Hamilton Beach
Hamilton Beach PC03 Operation Manual - Original Instructions

Fagor
Fagor Fagor Rapida Pressure Cooker user manual

Ninja
Ninja FOODI OS300 Series owner's guide

Ninja
Ninja FOODI TENDERCRISP OP300ANZ Series instructions

MegaChef
MegaChef MCPR120A owner's manual