West Industries LaserLine User manual

STATEMENT OF LIABILITY
LASERLINE IS MANUFACTURED BY
WEST INDUSTRIES INC. LASERLINE IS
PATENTED AND TRADEMARKED.
This device is not toy. Misuse m y c use
serious injury. The user nd ny person within
r nge must we r eye protection t ll times.
He ring protection is strongly recommended.
This tool is to be used by dults only. Obey ll
loc l, st te, nd feder l l ws. Re d ll
instructions c refully before use.

Oper tion Procedure
Please read and understand all material in this
manual before operating this device.
Included in your LaserLine Kit:
1) LaserLine Gun
2) (2) CO2 12- gram cartridges
3) (2) Spools of pull line
4) (2) LaserLine Darts
5) Laser sight Batteries and Allen tool
6) Instruction manual
Import nt note: (Kits sold outside the Continental United
States or Air shipped, the CO will be excluded.)
Pull Line Darts
CO2 Cartridge
Instruction
Manual
12 gram CO2
adapter
Line Canister
Laser Sight

Fig. A
Lo ding the CO2 c rtridge
The LaserLine comes with a 12-gram CO2 adapter.
Your LaserLine will also accept larger CO2 tanks.
The 12-gram cartridges are good for approximately
6 -12 full power shots. Depending on your velocity’s
adjustment setting the higher your velocity the fewer shots
per cartridge. To load a 12- gram cartridge into the gun
simply insert the large end of the CO2 cartridge into the hole
at the top of the CO2 adapter. Then quickly screw the
adapter onto the threads protruding from the bottom of the
gun until you hear the CO2 cartridge seat. When removing a
CO2 cartridge be sure the piercing pin O-Ring stays in
place.
See Figure A below.
Inst lling the line spool
Unscrew the canister end cap. Place the spool into the canister
and replace the end cap. Pull a few feet of line from the center
of the spool. You are now ready to attach the line to the dart.
See Figure B below.
Note: When spool becomes low, the spool may collapse
causing the line to not release properly. When this happens,
replace with a new spool
Canister
Fig. B
Canister Cap

D rt Components
NOTE: line must be tt ched to the D rt for proper
flight st biliz tion. Therefore, you will need to use the
line every time you l unch the pull line D rt. Even
when sighting in your L ser.
Att ching the Line to the D rt
STEP 1:
1) Holding the Dart in one hand and the tag end of the
Pull Line in the other hand as shown above.
Foam Tail
Piece Dart Shaft
Foam Dart Tip
Line Slot
Notch
Line Centering
Hook
Pull Line Tag
End

STEP 2:
2) Slide the tag end of the pull line between the hard
plastic end cap and the foam tail piece as shown
above. Wrap tag end around Dart (1) time. Line is
between foam and plastic Dart end cap. See details
STEP 3:
3) Pull on the line (as shown above) to shorten the tag
end to approximately 3/8 to 1/2”. This is important
Pull Line Tag End
Line up with
notch

Notch at front of
foam tail piece
to ensure the least amount of drag from the extra tag
end in the barrel when launching the Dart.
STEP 4:
4) Pull the line end forward over the foam tail piece and
through the notch in the ring at the front of the tail
piece. See photo above.
STEP 5:
`
5) Holding the line spin the Dart shaft between finger
tips (2) times around so the line wraps around the
shaft (2) times in the provided line slot.

Line Centering
Hook
STEP 6:
6) Pull the line back over the foam tail piece through the
same notch.
STEP 7:
.
7) Pull the line through the notch in the plastic end cap
and through the line centering hook at the top of the
plastic end cap as shown above.

STEP 8:
8) Before you insert the Dart into the LaserLine barrel
you will need to pull the line back through the notch
at the top of the Darts foam tail piece and down
through the notch at the base of the Darts foam tail
piece. This will secure the line and keep it from
dragging in the barrel when launching the pull line
Dart.

Lo ding the D rt
Insert the Dart (tail end first) into the barrel of the LaserLine
until the Dart comes to a stop. (Do not try to force it and be
sure to keep the line snug while loading the Dart) Before
cocking the LaserLine be sure the trigger safety is in the ON
position (safety button protruding from right side of the gun)
See Figure C below.
Once the Dart has been loaded into the barrel and you are
ready to install your pull line (be sure safety is in the ON
position) Pull back on the cocking knob until it locks into
place you are now ready to launce your Dart and install your
pull line.
See Figure D below.
Be sure you keep the trigger safety in the ON position until
you are ready to launch the Pull Line Dart. Before launching
the Dart be sure the area is clear. It is recommended that
everyone in the work area wear safety glasses. F ilure to
we r eye protection within the work re - could result in
injury. Proper hearing protection is also recommended. Turn
Safety Button In ON
Position
Fig. C
Fig. D Cocking knob
Insert Dart here
(Tail end first)

on the laser sight by pressing the button on the back of the
laser then sight in your proposed path. Release the trigger
Safety and pull the trigger. Your pull line is now installed and
you are ready to pull your cable. It is recommended to turn the
safety back on after each Dart launch.
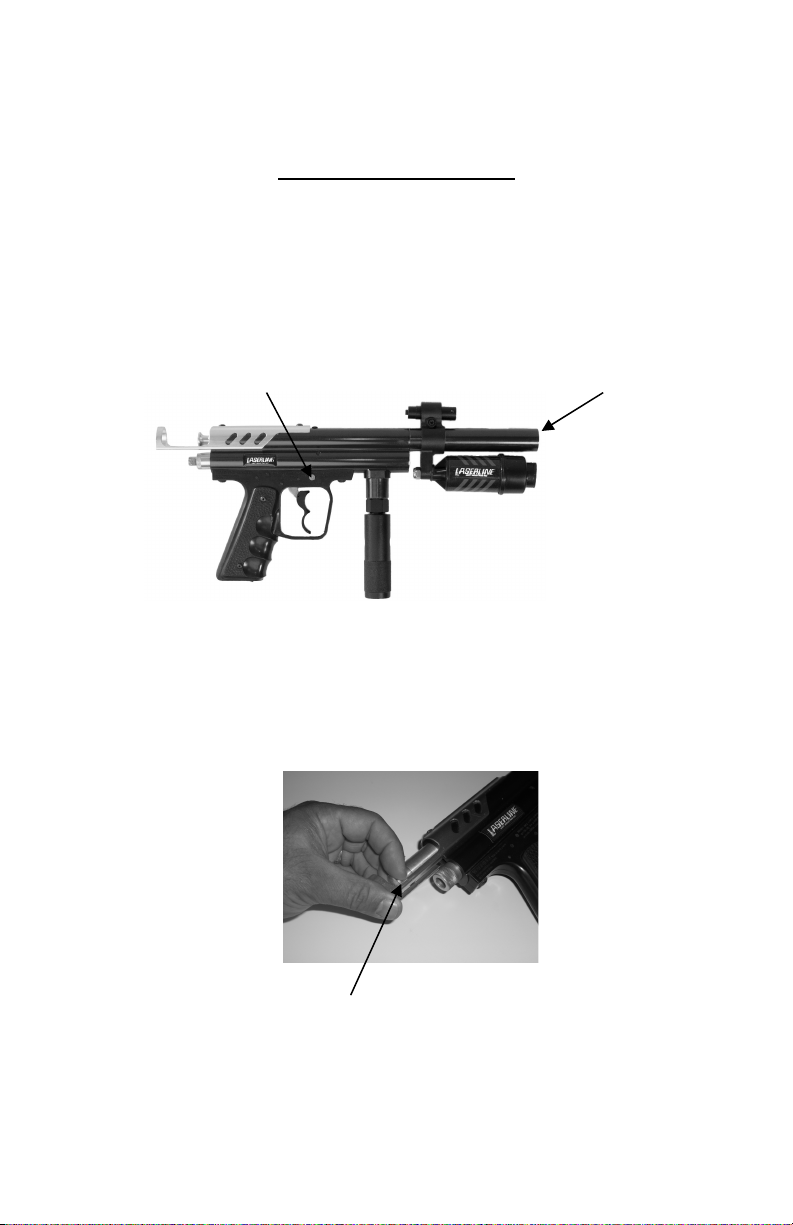
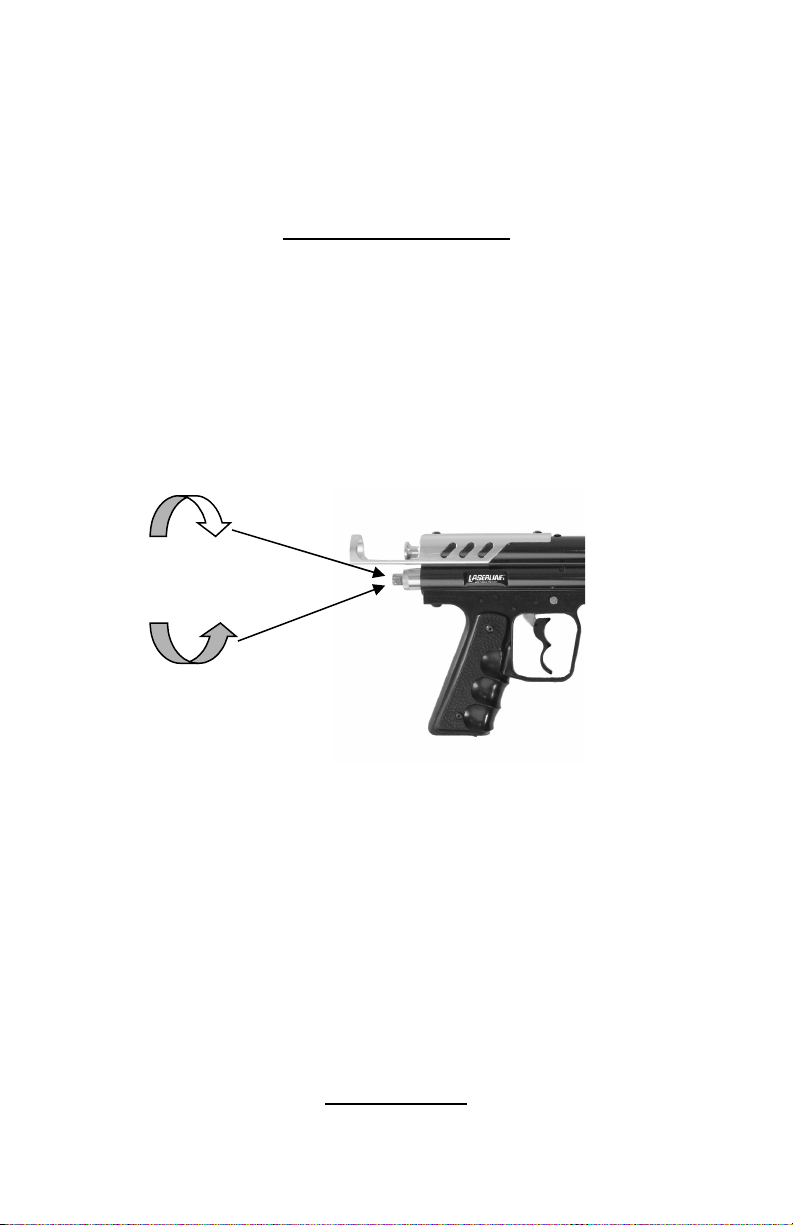
Velocity Control
The LaserLine is equipped with a velocity adjustment knob
that will allow you to slightly increase or decrease the darts
velocity. Located below the cocking knob is a knurled
adjustment knob. Turning the adjustment knob clockwise will
increase the dart velocity. Turning the adjustment knob
counter-clockwise will decrease the dart velocity.
See Figure E below.
Fig. E
NOTE: When lo ding the CO2, m ke sure the velocity
djustment knob is not set to the m ximum velocity
setting.
Before lo ding the CO2, turn the velocity knob ll the w y
to the right until it stops, then b ck it off pproxim tely 2
full turns. This will prevent the CO2 from le king nd lso
llow the v lve to se t nd se l correctly. Once the CO2
c rtridge is inst lled, you c n turn the velocity djustment
to the preferred velocity position.
WARNING
Increase
Velocity (clock wise)
Decrease
Velocity (counter clock wise)

Before removing CO2 C rtridge from d pter,
be sure to expel ll rem ining CO2 or d m ge
to the O-Ring m y result.
(To expel CO2 dry fire until remaining CO2 is expelled)
Troubleshooting
CO2 Le k Rel ted Problems:
1. If you can her CO2 leaking once the CO2 has been
installed you may need to pull slightly back on the
cocking knob or remove the CO2 then turn the
velocity control knob to the low velocity position and
then repeat the CO2 loading process.
2. Check to make sure the O-Ring did not fall out from
the CO2 adapters Piercing pin.
D rt doesn’t fly properly:
1) Dart may be bent or damaged. (Replace Dart)
2) If the Darts foam tip or foam tail piece becomes lose
re glue with Cyanoacrylate. (super glue)
3) CO2 may be low.
4) Pull Line MUST be attached to the Dart for proper
flight stabilization.
5) Pull line may be low and catching due to collapsed
spool.
For ny other issues ple se cont ct m nuf cture,
servicing m y be required.

Limited w rr nty
West Industries Inc. warrants the replacement of any original
part due to defect in materials and /of workmanship of this
device. This warranty will be in effect for twelve (12) months
for parts and twelve (12) months for labor following the
original date of purchase for the original purchaser. Such
warranty service will be provided with proof of purchase
within the above guidelines. All other repairs or services will
be duly charged for and returned via UPS C.O.D.
West Industries Inc. will replace without charge any original
part that is determined by West Industries inc. to be defective
under the terms of this warranty. However shipping charges
are not covered hereunder. Failure due to an accident abuse
neglect modification normal wear operator error and
maintenance by anyone other than West Industries Inc. or
qualified service center will result in voiding the warranty.
Any use of the parts inconsistent with the intended use is also
not covered by this warranty.
For W rr nty, p rts or service cont ct:
West Industries Inc.
P.O. Box 25793
Woodbury MN 55125
(Office) 651-458-1500
(Fax) 651-458-0521
E-mail: [email protected]
Website: www.thelaserline.com
Rep ir shipping ddress:
West Industries Inc. (Service)
8114 Ingberg Trail
Cottage Grove MN 55016

Elevation
(Adjustment screw)
Windage
Table of contents
Popular Power Tools manuals by other brands

Parkside
Parkside PDSP 1000 A1 SANDBLASTER GUN Operation and safety notes

Dolmar
Dolmar PT-2000 Assembly instructions

Sunex HD
Sunex HD 5740 manual

Limitless Innovations
Limitless Innovations JUMPSMART 10-IN-1 user manual

Sparky Group
Sparky Group HEAVYDUTY MKL 755CE Original instructions

Craftsman
Craftsman 320.28084 product manual