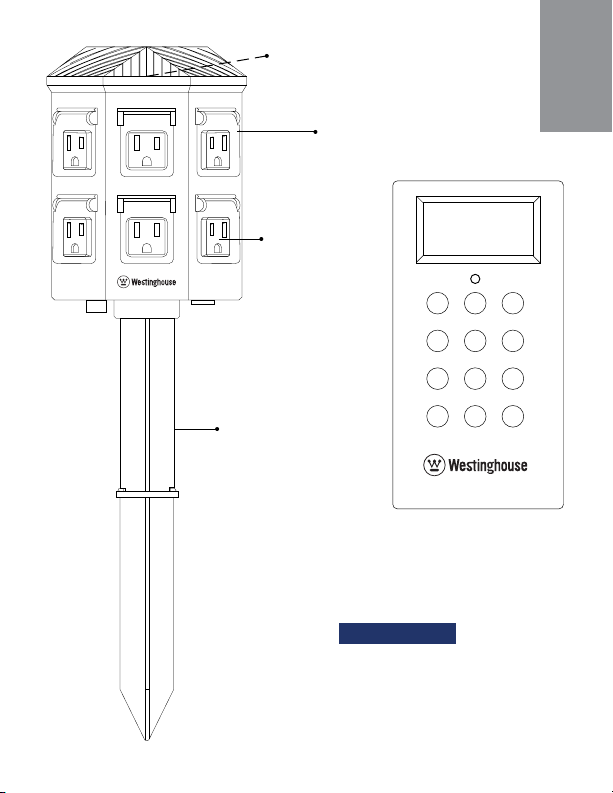
Westinghouse MH-28012 User manual

BLUETOOTH POWER REMOTE STATION
STATION D’ALIMENTATION
À DISTANCE BLUETOOTH
Model/Modèle #MH-28012

Photocell Countdown
Photocell
Timer Repeat
Manual ON/OFF
override button and
timer mode LED
indicator

Time
Day Hour Min
Photo
Set
Next
Program
Set
Time
ON OFF One Click Sync
Mode Photocell
6 Grounded
outlets
Rated:
125VAC/60Hz
15A/1875W Resistive
15A/1875W Tungsten
Remote uses:
2 x AAA (Not included)
Individual outlet covers
with spring-loaded hinges
Photocell (not shown)
12” ground stake

1. Download the HYBLU app from the Google play or Apple App store.
2. Plug your socket in
3. Open the HYBLU App.
4. The HYBLU App will automatically discover new sockets
5. To change the name of your socket, tap on the default name created
by the App.
6. Tap on modify device name
7. Name your new socket and press done. (Sometimes pressing back
button or return key on the keyboard is necessary to reveal “Done”
located at the bottom right corner of the screen.
SETUP INSTRUCTIONS
Each Bluetooth socket is paired with a default password (123456).
To prevent anyone on the outside from connecting to your sockets
follow the steps below.
1. Tap on the name of socket
2. Tap on modify password
3. Input the new password and conrm password.
Passwords must match.
4. Tap on “done” at down right side to submit the new password.
5. If the password of your Bluetooth socket does not match the
app, the home screen indicates a small red icon at top right side
of the sockets on/off icon.
6. Tap on the red icon
7. Input the correct password and submit
8. The red icon will disappear if the password is correct
9. If you forget the password. Located the Manual on/off override
button on the Bluetooth socket. Press and hold the button for 8
seconds. The socket will reset to default password.
CHANGE PASSWORD OF CONNECTED

TIMER FEATURES
WEEKLY TIMER
The HYBLU app features a built-in timer function to schedule all your
Bluetooth devices around the home. Follow the steps below for timer
programming.
1. Open the HYBLU app.
2. On the home screen, depending on what type of socket you have (indoor/
outdoor), a timer icon will appear to the right of the socket name.
3. Tap on the small icon.
4. Tap on the timer icon located on the lower right corner of the app’s screen.
5. The app gives you the option of setting a weekly, countdown or
vacation timer.
You can set 16 separate on/off programs with the HYBLU app. (The current
time and day is automatically set your phone.)
In the program eld start with Program 1.
1. Set the “ON” time in the SET ON TIME eld. Tapping on this eld will bring
up a scrolling menu to select the day or days of the week. If you set a
program with multiple days, the OFF time eld will be set automatically.
2. Set the “OFF” time in the SET OFF TIME eld.
3. Repeat steps above for programs 2-16.
1. Tap the Countdown Timer tab to reveal the countdown setting options.
The current time is set automatically by the app. The countdown timer will
begin counting down from the current time.
2. Preset countdown options are 1 HOUR, 2 HOURS, 3 HOURS, 4 HOURS, 5
HOURS, 6 HOURS, 7 HOURS, 8 HOURS. These presets were made to allow
you to set your timer quickly.
If none of the presets are what you require, a manual hour/minute eld is
located under the preset countdown timers; enter the number of hours/
minutes you would like the device to shut down in.
COUNTDOWN TIMER

ALL ON/OFF
REMOVING UNPLUGGED/UNUSED SOCKETS
1. Place your nger on the right side of the on/off button (Device home page)
for the device you would like to remove.
2. Press and hold until a red minus sign appears. Tap on the red minus sign
and press ok to conrm.
3. The device is now removed until it is plugged in again.
To turn all the sockets on your home page ON or OFF, press the ALL ON or
ALL OFF buttons located at the bottom of the home page.
VACATION MODE
1. To review your timer settings press the timer icon located to
the right of the socket name (On your home screen).
2. A list of timer settings for that device will appear.
3. To delete this setting tap the delete button located to the right of the
timer setting
4. Vacation timer will not have a delete button but rather an exit button.
Press the Exit button to turn off the vacation mode setting
TO REVIEW/DELETE TIMER SETTINGS
Vacation mode is an additional daily timer that will give your home an
appearance that someone is home.
1. Tap on the “Set On Time” to set. A scrolling window will appear to set.
2. Tap on the “Set Off Time” to set. A scrolling window will appear to set.
PHOTOCELL TIMER FEATURES FOR OUTDOOR SOCKETS AND
GROUND STAKES
Outdoor sockets and groundstakes have an added photocell feature.
At the bottom of the screen you will notice a green slider. In the photocell
position, the socket will automatically turn on at dusk and off at dawn. If
you press and hold the photocell icon you have the option of changing
from dusk to dawn or ON at dusk and OFF after X hours/minutes.

LCD REMOTE PAIRING
To set up the LCD remote for the rst time, plug in the ground stake,
push the “power” button for 3 seconds. Then red LED indicator will
ash. Push “ON” button of the remote. The remote is now paired with
the receiver.
BLUETOOTH OUTDOOR DIGITAL POWER CENTER
REMOTE INSTRUCTIONS
SAFETY INFORMATION
WARNING
DISREGARDING CAUTIONS COULD CAUSE DAMAGE, FIRE, OR FATAL SHOCK.
CAUTION
CAUTION – RISK OF FIRE. NOT FOR PERMANENT INSTALLATION. USE ONLY WITH A
TOTAL OF 15 AMPERE MAXIMUM
CHRISTMAS-TREE OR OTHER SEASONAL LIGHTING PRODUCTS. DO NOT INSTALL OR
USE THIS PRODUCT FOR MORE THAN A 90-DAY PERIOD.
IF USING FOR CHRISTMAS TREES OR DECORATIVE-LIGHTING PRODUCTS THAT ARE
NOT MARKED WITH AN AMPERE RATING, DO NOT CONNECT NO MORE THAN 140
SCREW-BASE LAMPS (C7 OR C9) OR 12 STRINGS WITH LAMPS TO THIS GROUND
STAKE.
OUTDOOR CORD SETS SHOULD ALWAYS BE PLUGGED INTO A GFCI-PROTECTED
RECEPTACLE.
IF USING AN OUTDOOR CORD SET FOR AN EXTENDED PERIOD OF TIME (GREATER
THAN 90 DAYS) PLEASE CONSIDER HARD WIRING A PERMANENT OUTDOOR-USE
RECEPTACLE RATED FOR YEAR-ROUND USE IN THE AREA THAT POWER IS NEEDED.
PLEASE CONTACT A LICENSED ELECTRICIAN FOR PROPER INSTALLATION OF
PERMANENT WIRING.
AFTER COMPLETION OF INSTALLATION, THE CONNECTOR SHALL BE MAINTAINED A
MINIMUM OF 6 INCHES ABOVE GROUND.
FOR TEMPORARY OUTDOOR INSTALLATION AND USE – NOT TO EXCEED 90 DAYS.
THIS ITEM IS A PHOTOELECTRIC DEVICE AND CONTAINS A LIGHT SENSITIVE
PHOTOCELL TO TURN ON AND OFF AUTOMATICALLY. IN ORDER TO OPERATE
PROPERLY, BE SURE TO FACE THE PHOTOCELL SENSOR ON THIS DEVICE AWAY
FROM ALL NEARBY LIGHT SOURCES.

Push the “Time” button
To Set Current Time While time appears in the LCD.
1. Push the “Set Time” button once. The time will be ashing.
2. Push the “Day” button until current day appears on top.
3. Push the “Hour” button until current hour appears (make sure to cycle
through hours until AM or PM appears to the right of the time).
4. Push the “Min” button until current minute appears. (Holding “Min” button
down for more than 3 seconds will make hour advance rapidly.)
5. Push the “Set Time” button to complete the program.
TO SET DIGITAL TIMER
TO SET
TO USE PHOTOCELL TIMER
1. Push the “Time” button.
2. Push the “Mode” button. The words “LD” will appear. The words
“ERR” will appear if load failed. The words “Program 1 ON” will appear
when load nished.
3. Push the “Set Time” button once. The time and day will ash in the
LCD display.
4. Push the “Day” button until the desired day of your program appears.
5. Push the “Hour” button until the desired “ON” hour appears. Make
sure that AM or PM appears as desired.
6. Push the “Min” button until the desired “ON’ minute appears.
7. Push the “Next Program” button to complete the program. The words
“Program 1 OFF” will appear. Repeat steps 2 to 5 to set the time for
the timer to power “OFF”
8. Repeat b, c, d, and eabove to set the additional ON/OFF times as
desired.
9. Push the “Set Time” button to return to the current time.
10.Push “One Click Sync” button. The programs that are set in the
transmitter will upload to the receiver. The words “ERR” will appear if
upload failed.
1. Push the “Photocell” button
2. Push the “Mode” button. The remote will load the program from the
receiver. The words “LD” will appear in the display. The words “ERR” will
appear if load failed.

TO DOWNLOAD YOUR SETTINGS FROM
THE RECEIVER TO THE REMOTE
TO CLEAR ALL
PROGRAMS FROM
THE REMOTE
NOTES
3. Push the “Photo set” button once. You will see the words: On at Dusk, Off
Hour after Dusk. (This means the plugged-in device will be powered ON
when it gets dark, and will shut OFF after set hours.)
4. Push the “Photo Set” button repeatedly to cycle through the number of
hours after Dusk that your timer will stay on. 00:00 hour means ON at dust
OFF at dawn.
5. Push the “One Click Sync” button. The programs that are set in the
transmitter will upload to the receiver. The words “ERR” will appear if
upload failed.
Push the “Time” button then Push the “Mode” button. The remote will load
the program from the receiver. The words “LD” will appear. The words “ERR”
will appear if the load failed. You need to make sure the remote is paired with
the receiver. The words “Program 1 ON” will appear when load nished.
Push the “ON” and “OFF”
button together and hold for
6 seconds. All programs in the
remote will be cleared.
- You can program the Photo Cell timer
to turn OFF at Dawn, or from 1 to 12
hours after Dusk.
- Be sure to place any lights at least 6ft
(1.8m) away from the timer, so that the
bulb does not affect the light sensor.

Photocell Countdown
Photocell
Timer Repeat
Bouton ON/OFF
(Marche/arrêt) manuel
de surpassement et
indicateur à DEL du
mode minuterie

Time
Day Hour Min
Photo
Set
Next
Program
Set
Time
ON OFF One Click Sync
Mode Photocell
Capacité Nominale de:
125VAC/60Hz
15A/1875W Resistive
15A/1875W Tungsten
Télécommande utilise :
2 x AAA pile (non inclus)
Cellule
photoélectrique
(non
Pieu de 30,5 cm
à enfoncer dans
le sol
Couvercles de prises individuels
avec charnières à ressorts
6 Prises
misé à la
terre

1. Téléchargez l’application HYBLU sur Google Play ou sur l’App Store
d’Apple.
2. Branchez la prise.
3. Ouvrez l’application HYBLU.
4. Celle-ci détectera automatiquement les nouvelles prises.
5. Pour modier le nom de votre prise, appuyez sur le nom créé par
défaut par l’application.
6. Appuyez sur « Modify device name » (Modier le nom du
périphérique).
7. Nommez votre nouvelle prise, puis appuyez sur « Done » (Terminé). (Il
peut être nécessaire dans certains cas d’appuyer sur le bouton « Back
» [Retour] ou sur la touche de retour du clavier pour révéler le bouton
« Done » [Terminé], situé dans le coin inférieur droit de l’écran.)
INSTRUCTIONS
Chaque prise Bluetooth est jumelée à l’aide d’un mot de passe par
défaut (123456).
Pour empêcher un tiers externe de se connecter à vos prises,
suivez les étapes ci-dessous.
1. Appuyez sur le nom de la prise.
2. Appuyez sur « Modify password » (Modier le mot de passe).
3. Entrez le nouveau mot de passe, puis conrmez ce dernier. Les
mots de passe saisis doivent concorder.
4. Appuyez sur « Done » (Terminé) en bas à droite de l’écran pour
dénir le nouveau mot de passe.
5. Si le mot de passe de votre prise Bluetooth ne correspond pas
à celui de l’application, l’écran d’accueil afche une petite icône
rouge au coin supérieur droit de l’icône On/Off (Marche/arrêt)
des prises.
6. Appuyez sur l’icône rouge.
7. Entrez maintenant le bon mot de passe et soumettez-le.
8. L’icône rouge disparaîtra si le mot de passe est le bon.
9. Si vous avez oublié le mot de passe, trouvez le bouton On/Off
(Marche/arrêt) manuel de surpassement sur la prise Bluetooth,
puis tenez le bouton enfoncé pendant huit secondes. La prise est
maintenant réinitialisée au mot de passe par défaut.
CHANGER LE MOT DE PASSE DE LA PRISE CONNECTÉE

CARACTÉRISTIQUES DE LA MINUTERIE
L’application HYBLU dispose d’une fonction de minuterie intégrée pour
programmer tous vos périphériques Bluetooth de la maison. Suivez les étapes
ci-dessous pour programmer la minuterie.
1. Ouvrez l’application HYBLU.
2. Sur l’écran d’accueil, selon le type de prise que vous avez (intérieure/
extérieure), une icône de minuterie s’afche à droite du nom de la prise.
3. Appuyez sur la petite icône.
4. Appuyez sur l’icône de la minuterie située dans le coin inférieur droit de
l’écran.
5. L’application vous donne la possibilité de régler une minuterie
hebdomadaire, un compte à rebours ou une minuterie pour les vacances.
MINUTERIE HEBDOMADAIRE
Vous pouvez dénir 16 programmes On/Off (Marche/arrêt) distincts avec
l’application HYBLU. (L’heure et le jour actuels sont dénis automatiquement à
partir des réglages de votre téléphone.)
Dans le champ de programmation, commencez par le programme 1 (Program
1).
1. Réglez l’heure de début dans le champ « SET ON TIME ». Appuyez sur
ce champ pour afcher un menu déroulant dans lequel vous pouvez
sélectionner le ou les jours de la semaine. Si vous dénissez un programme
sur plusieurs jours, le champ de l’heure d’arrêt de la minuterie sera déni
automatiquement.
2. Réglez l’heure de n dans le champ « SET OFF TIME ».
3. Répétez les étapes ci-dessus pour congurer les programmes 2 à 16.

1. Appuyez sur l’onglet Countdown Timer (Minuterie du compte à rebours)
pour faire apparaître les options de réglage du compte à rebours.
L’heure actuelle est dénie automatiquement par l’application. La minuterie
du compte à rebours commencera le compte à rebours à partir de l’heure
actuelle.
2. Les options préréglées du compte à rebours sont les suivantes : 1 HOUR
(1 heure), 2 HOURS (2 heures), 3 HOURS (3 heures), 4 HOURS (4 heures),
5 HOURS (5 heures), 6 HOURS (6 heures), 7 HOURS (7 heures), 8 HOURS
(8 heures). Ces préréglages vous permettent de régler votre minuterie
rapidement.
Si aucun des préréglages ne correspond à vos besoins, vous trouverez
un champ de réglage manuel de l’heure/des minutes sous les valeurs
préréglées du compte à rebours; entrez le nombre d’heures/minutes
souhaitées avant l’arrêt de l’appareil.
MODE VACANCES
1. Pour passer en revue les réglages de la minuterie, appuyez sur
l’icône de la minuterie située à droite du nom de la prise (sur
l’écran d’accueil).
2. La liste des réglages de la minuterie s’afche pour cette prise.
3. Pour supprimer les réglages, appuyez sur le bouton « Delete »
(Supprimer) situé à droite du réglage de la minuterie.
4. La minuterie du mode vacances n’est pas munie d’un bouton de
suppression, mais simplement d’un bouton « Exit » (Quitter). Appuyez
sur le bouton « Exit » (Quitter) pour désactiver le réglage du mode
vacances.
POUR PASSER EN REVUE/SUPPRIMER
LES RÉGLAGES DE LA MINUTERIE
Le mode vacances est une minuterie quotidienne supplémentaire qui fait
croire que quelqu’un se trouve dans votre maison lors de votre absence.
1. Appuyez sur Set On Time (Dénir l’heure de début). Une fenêtre déroulante
apparaît et vous permet de dénir l’heure de début.
2. Appuyez sur Set Off Time (Dénir l’heure de n). Une fenêtre déroulante
apparaît et vous permet de dénir l’heure de n.
MINUTERIE COMPTE À

RETRAIT DES PRISES DÉBRANCHÉES/INUTILISÉES DE
1. Mettez le doigt sur le côté droit du bouton On/Off (Marche/arrêt) (page
d’accueil de l’appareil) de la prise que vous souhaitez retirer de l’application.
2. Maintenez le bouton enfoncé jusqu’à ce qu’apparaisse un signe « - » rouge.
Appuyez sur le signe « - » rouge et appuyez sur OK pour conrmer.
3. La prise est maintenant retirée de l’application jusqu’à sa prochaine
utilisation.
TOUT ALLUMER/
Pour allumer/éteindre toutes les prises afchées sur votre page d’accueil,
appuyez sur les boutons « ALL ON » (Tout allumer) ou « ALL OFF » (Tout
éteindre) situés en bas de la page d’accueil.
MINUTERIE À CELLULE PHOTOÉLECTRIQUE POUR PRISES
EXTÉRIEURES ET PIQUETS DE TERRE
Les prises extérieures et les piquets de terre sont dotés d’une fonction à
cellule photoélectrique.
Au bas de l’écran, vous remarquerez un curseur vert. En position «
Photocell » (Cellule photoélectrique), la prise s’allume au crépuscule
et s’éteint à l’aube automatiquement. Maintenez l’icône de la cellule
photoélectrique enfoncée pour changer le mode d’allumage du
crépuscule jusqu’à l’aube et choisir d’allumer la prise au crépuscule et de
l’éteindre après X heures/minutes.

JUMELAGE D’UN ÉMETTEUR À ÉCRAN ACL
Pour congurer l’émetteur à écran ACL pour la première fois, branchez
le piquet de terre, puis enfoncez le bouton d’alimentation « Power »
pendant trois secondes. L’indicateur à DEL rouge se met à clignoter.
Appuyez sur le bouton « ON » (Marche) de l’émetteur. L’émetteur est
maintenant jumelé avec le récepteur.
STATION D’ALIMENTATION À DISTANCE BLUETOOTH
INSTRUCTIONS À DISTANCE
RENSEIGNEMENTS SUR LA SÉCURITÉ
AVERTISSEMENT
LE FAIT D’IGNORER LES MISES EN GARDE POURRAIT CAUSER DES DOMMAGES, UN
INCENDIE OU UN RISQUE D’ÉLECTROCUTION MORTELLE.
MISE EN GARDE
ATTENTION : RISQUE D’INCENDIE. NON CONÇU POUR UNE INSTALLATION
PERMANENTE. N’UTILISEZ CE PRODUIT QU’AVEC UN TOTAL DE 15 AMPÈRES AU
MAXIMUM.
POUR LES SAPINS DE NOËL OU POUR LES PRODUITS D’ÉCLAIRAGE SAISONNIERS.
N’INSTALLEZ PAS ET N’UTILISEZ PAS CE PRODUIT POUR UNE PÉRIODE EXCÉDANT 90
JOURS.
SI VOUS UTILISEZ DES PRODUITS D’ÉCLAIRAGE DÉCORATIFS OU UN SAPIN DE NOËL
QUI NE PRÉSENTENT AUCUNE INDICATION D’INTENSITÉ NOMINALE, NE BRANCHEZ
PAS PLUS DE 140 LAMPES À CULOT À VIS (C7 OU C9) OU PAS PLUS DE 12 GUIRLANDES
DE LUMIÈRE À CE PIQUET DE TERRE.
LES CORDONS D’ALIMENTATION CONÇUS POUR L’EXTÉRIEUR DOIVENT TOUJOURS
ÊTRE BRANCHÉS DANS UNE PRISE PROTÉGÉE PAR UN DISJONCTEUR DE FUITE À LA
TERRE.
SI VOUS UTILISEZ UN CORDON D’ALIMENTATION EXTÉRIEUR PENDANT UNE PÉRIODE
PROLONGÉE (SUPÉRIEURE À 90 JOURS), IL SERAIT PRÉFÉRABLE DE FAIRE INSTALLER
À L’ENDROIT DÉSIRÉ UNE PRISE EXTÉRIEURE PERMANENTE CONÇUE POUR ÊTRE
UTILISÉE TOUTE L’ANNÉE. VEUILLEZ COMMUNIQUER AVEC UN ÉLECTRICIEN AGRÉÉ
POUR EFFECTUER UNE TELLE INSTALLATION.
UNE FOIS L’INSTALLATION DU PIQUET DE TERRE EFFECTUÉE, LE CONNECTEUR DOIT
ÊTRE MAINTENU AU MINIMUM À 15,2 CM (6 PO) AU-DESSUS DU SOL.
POUR UNE INSTALLATION ET UNE UTILISATION TEMPORAIRE À L’EXTÉRIEUR,
N’UTILISEZ PAS LE PRODUIT AU-DELÀ DE 90 JOURS.
CET ARTICLE EST UN DISPOSITIF PHOTOÉLECTRIQUE QUI CONTIENT UNE CELLULE
PHOTOÉLECTRIQUE PHOTOSENSIBLE CONÇUE POUR S’ALLUMER ET S’ÉTEINDRE
AUTOMATIQUEMENT. AFIN DE FONCTIONNER CORRECTEMENT, ASSUREZ-VOUS QUE
LA CELLULE PHOTOÉLECTRIQUE PHOTOSENSIBLE DE CET APPAREIL NE FAIT FACE À
AUCUNE SOURCE DE LUMIÈRE ENVIRONNANTE.

Enfoncez le bouton « Time » (Minuterie).
Pour régler l’heure actuelle Lorsque l’heure s’afche sur l’écran ACL.
1. Enfoncez une fois le bouton « Set Time » (Régler l’heure). L’heure se met à
clignoter.
2. Enfoncez le bouton « Day » (Jour) jusqu’à ce que le jour actuel apparaisse
dans le haut.
3. Enfoncez le bouton « Hour » (Heure) jusqu’à ce que l’heure actuelle
apparaisse (faites déler les heures jusqu’à ce que le symbole AM ou PM
apparaisse à droite de l’heure).
4. Enfoncez le bouton « Min » (Minutes) jusqu’à ce que les minutes actuelles
apparaissent. (Tenez enfoncé le bouton « Min » pendant plus de trois
secondes pour faire déler l’heure plus rapidement.)
5. Enfoncez le bouton « Set Time » (Régler l’heure) pour terminer le réglage.
POUR RÉGLER LA MINUTERIE NUMÉRIQUE
POUR DÉFINIR LA PROGRAMMATION
1. Appuyez sur le bouton « Time ».
2. Appuyez sur le bouton « Mode ». Les mots “LD” apparaîtront. Les mots
“ERR” apparaîtront si le chargement a échoué. Les mots “Program 1 ON”
s’afchent lorsque la charge est terminée.
3. Enfoncez une fois le bouton « Set Time » (Régler l’heure). L’heure et le jour
se mettront à clignoter sur l’écran ACL.
4. Enfoncez le bouton « Day » (Jour) jusqu’à ce qu’apparaisse le jour désiré
pour la programmation.
5. Enfoncez le bouton « Hour » (Heure) jusqu’à ce qu’apparaisse l’heure de
début désirée. Assurez-vous que le symbole AM ou PM s’afche selon
l’heure désirée.
6. Enfoncez le bouton « Min » (Minutes) jusqu’à ce qu’apparaissent les
minutes de début désirées.
7. Enfoncez le bouton « Next Program » (Programme suivant) pour terminer
le réglage. L’écran afche maintenant « Program 1 OFF » (Programme 1,
Arrêt). Répétez les étapes 2 à 5 pour dénir l’heure d’arrêt de la minuterie.
8. Répétez les étapes b, c, d, et eci-dessus pour régler d’autres programmes
de minuterie.

POUR UTILISER LA MINUTERIE À CELLULE PHOTOÉLECTRIQUE
1. Enfoncez le bouton « Photocell » (Cellule photoélectrique).
2. Enfoncez le bouton « Mode » (Charger). L’émetteur charge le programme
du récepteur. L’écran afche alors « LD » (Chargement). L’écran afche «
ERR » (Erreur) si le téléchargement des données a échoué.
3. Enfoncez une fois le bouton « Photo set » (Régler la cellule
photoélectrique). L’écran afche ceci : On at Dusk, Off Hour after Dusk
(Mise en marche au crépuscule, arrêt x heures après le crépuscule).
(Cela signie que l’appareil branché sera allumé dès qu’il fait nuit et qu’il
s’éteindra après le nombre d’heures déni.)
4. Enfoncez le bouton « Photo Set » (Réglage de la cellule photoélectrique) à
plusieurs reprises pour faire déler le nombre d’heures pendant lesquelles
l’appareil restera allumé après le crépuscule. Le réglage « 00:00 Hour »
signie que l’appareil s’allume au crépuscule et s’éteint à l’aube.
5. Enfoncez le bouton « One Clic Sync » (Synchro en un clic). Les
programmes dénis dans l’émetteur seront transmis au récepteur. L’écran
afche « ERR » (Erreur) si le téléchargement des données a échoué.
POUR TÉLÉCHARGER VOS RÉGLAGES
DU RÉCEPTEUR À L’ÉMETTEUR
Enfoncez le bouton « Timer » (Minuterie) puis enfoncez le bouton « Mode »
(Charger). L’émetteur charge le programme du récepteur. L’écran afche «
LD » (Chargement). L’écran afche « ERR » (Erreur) si le téléchargement des
données a échoué. Vous devez vous assurer que l’émetteur est jumelé avec le
récepteur. L’écran afche « Program 1 ON » (Programme 1, Marche) une fois le
chargement terminé.
9. Enfoncez le bouton « Set Time » (Régler l’heure) pour afcher
l’heure actuelle.
10.Enfoncez le bouton « One Clic Sync » (Synchro en un clic). Les
programmes dénis dans l’émetteur seront transmis au récepteur.
L’écran afche « ERR » (Erreur) si le téléchargement des données
a échoué.

POUR EFFACER TOUS
LES PROGRAMMES DE
L’ÉMET TEU R
REMARQUES
Enfoncez les boutons «
ON » (Marche) et « OFF »
(Arrêt) ensemble pendant
6 secondes. Tous les
programmes de l’émetteur
sont maintenant effacés.
- Vous pouvez programmer la minuterie
de la cellule photoélectrique pour qu’elle
s’éteigne à l’aube, ou de 1 à 12 heures
après le crépuscule.
- N’oubliez pas de placer les lumières à
une distance minimale de 1,8 m (6 pi) de
la minuterie an que l’éclairage n’affecte
pas le capteur de lumière.

Item/Article #27118
, WESTINGHOUSE, and INNOVATION YOU CAN
BE SURE OF are trademarks of Westinghouse Electric
Corporation. Used under license by The NCC. All rights
reserved.
Les termes et WESTINGHOUSE et INNOVATION
YOU CAN BE SURE OF sont des marques de
commerce de la société Westinghouse Electric. Utilisés
sous licence par la société The NCC. Tous droits
Manufactured and distributed by /
Manufacturé et distribué par:
The NCC, Brooklyn, NY 11223
1.855.350.6868 • www.thencc.com
©2017 The NCC
MADE IN CHINA /
FABRIQUÉ EN CHINE
Customer Service:
1-855-350-6868
Hours of Operation:
Monday - Friday
10AM - 6PM, EST
Service à la Clientèle:
1-855-350-6868
Heures ouvrables:
Du lundi au vendredi
10AM - 6PM, EST
Table of contents
Languages:
Popular Power Distribution Unit manuals by other brands

StarTech.com
StarTech.com ECUSB3S11 instruction manual

Bals
Bals VARIABOX Installation and operating manual

PS Audio
PS Audio Juice Bar II Owner's reference

Hornbach
Hornbach STROHM SMCUB-027W-3M Usage and maintenance manual

Kramer
Kramer TS-PEU installation instructions

PSC
PSC Power Star Smart Traveler Operation manual