Westward 22XP38 Service manual

Please read and save these instructions. Read through this owner’s manual carefully before
using product. Protect yourself and others by observing all safety information, warnings, and
cautions. Failure to comply with instructions could result in personal injury and/or damage to
product or property. Please retain instructions for future reference.
Operating Instructions and Parts Manual 22XP38, 22XP39
Drain Cleaning Machine
ManufacturedforGraingerInternational,Inc.
PrintedinChina
11/2013
Description
22XP38and22XP39DrainCleaningMachinesarepowertools
designedforcleaningdrainageandheatinglinescommonlyused
forrestaurants,hotels,manufacturingfacilities,largebusinesses,
ships,andbuildings.Themachineispoweredbyamotor,which
drivesadrumbybelt.Thedrumholdsandspinsacable,which
comesoutofthedrumthroughaholeinthefrontcenter.
Thecableismanuallyfedinandoutofdrain.Optionalcable
feederandcableguidecanbeinstalledinfrontofthedrum.The
CableFeederdrivesthecableforwardingorretractingat20feet
perminute.ThecableguideisusedwithCableFeedertoprotect
fixturesandavoidcabletangling.
Unpacking
Theboxshouldbeopenedfromthetop.Afterunpackingthe
unit,pleaseinspectcarefullyforanydamagesthatmay
haveoccurredwhileintransit.Checkforloose,missing,
ordamagedparts.Note:Shippingdamageclaimmust
befiledwithcarrier.
Thehandleofthemachineisboundtotheframe.The
unitshouldincludethefollowingpartsthatarenot
assembledtothemachine:
1. Handle(boundtotheframe);
2. Wheel×2,8”(Dia.)X1.75”(W);
3. Axleforthewheels;
4. Toolbox;
5. Setofthreecuttersandakey(intoolbox);
6. NutsX2,M10mmandwashersX2Φ10mm(intoolbox);
7. Pairofgloves(intoolbox).
Optionally,theunitcanbeorderedwitha
CableFeederandCableGuideset.The
packageshallinclude
1. CableFeeder(22XP41);
2. CableGuide(49U742).

2
Westward Operating Instructions and Parts Manual 22XP38, 22XP39
Drain Cleaning Machine
Specifications
Item22XP39 22XP38
Motor120V~/60Hz/5.3A(Running), 1/3HP/1716RPM
PowerCordLength6’ long with GFCI
DrumDimension
Φ
13”×6.3”
DrumCapacity1/2”Dia.×75’Long
3/8”Dia.×100’Long
CableType3/8”Dia.×75’Long 1/2”Dia.×75’Long
DrainPipeCapacity11/2”to3”(38mmto76mm) 3”to4”(76mmto101mm)
Dimensions22.0” ×14.6”×23.6”(55.9 cm×37.1cm×59.9cm)
WeightMachineOnly:57.7lbs (26.2kg)
WithCable:73.6lbs(33.4kg)
MachineOnly:57.7lbs (26.2kg)
WithCable:93.2lbs(42.3kg)
WiringDiagram
GeneralSafetyRules
SafetySymbols
Pleaserefertothefollowingsymbolsforthelevelofdangers.Operatorsshouldbeawareofthe
degreeofdangerswhenmachineismisused.
Warnsabouthazardsthatwillcauseseriouspersonalinjury,death,ormajor
propertydamageifignored.
Warnsabouthazardsthatcouldcauseseverepersonalinjury,death,ormajor
propertydamageifignored.
Warnsabouthazardsthatmaycauseminorpersonalinjuryorproperty
damageifignored.

3
Westward Operating Instructions and Parts Manual 22XP38, 22XP39
Drain Cleaning Machine
Indicatesfactorsconcernedwithassembly,installation,operation,ormaintenance,
whichcouldresultindamagetothemachineorequipmentifignored.
Pleasereadthisoperator’smanualcarefully.Ignoringthismanualmayresult
inelectricshock,fireand/orseriouspersonalinjury.
ImportantSafetyInstructions
Whenusingelectricappliances,basicprecautionsshouldalwaysbefollowed,
includingthefollowing:
1. Readalltheinstructionsbeforeusingtheappliance.
2. Toreducetheriskofinjury,closesupervisionisnecessarywhenanapplianceisusednear
children.
3. Donotcontactmovingparts.
4. Onlyuseattachmentsrecommendedorsoldbythemanufacturer.
5. Donotuseoutdoors.
6. Foracord‐connectedappliance,performthefollowingsteps:
-Todisconnect,turnallcontrolstotheoff(“O”)position,thenremoveplugfromoutlet.
-Donotunplugbypullingoncord.Tounplug,grasptheplug,notthecord.
-Unplugfromoutletwhennotinuseandbeforeservicingorcleaning.
-Donotoperateanyappliancewithadamagedcordorplug,oraftertheappliance
malfunctionsorisdroppedordamagedinanymanner.Returnappliancetothe
nearestAuthorizedServiceCenterforexamination,repair,orelectricalormechanical
adjustment.
7. Foraportableappliance–Toreducetheriskofelectricalshock,donotplacethemotorin
waterorotherliquids.Donotplaceorstoreappliancewhereitcanfallorbepulledintoa
tuborsink.
8. Foragroundedappliance–Connecttoaproperlygroundedoutletonly.SeeGrounding
Instructions.
GroundingInstructions
Thisappliancemustbegrounded.Intheeventofmalfunctionorbreakdown,groundingprovides
apathofleastresistanceforelectriccurrenttoreducetheriskofelectricshock.Thisapplianceis
equippedwithacordhavinganequipment‐groundingconductorandagroundingplug.Theplug
mustbepluggedintoanappropriateoutletthatisproperlyinstalledandgroundedinaccordance
withalllocalcodesandordinances.
Improperconnectionoftheequipment‐groundingconductorcanresultinarisk
ofelectricshock.Theconductorwithinsulationhavinganoutersurfacethatisgreenwithor
withoutyellowstripesistheequipment‐groundingconductor.Ifrepairorreplacementofthe
cordorplugisnecessary,donotconnecttheequipment‐groundingconductortoaliveterminal.
Checkwithaqualifiedelectricianorservicemanifthegroundinginstructionsarenotcompletely
understood,orifindoubtastowhethertheapplianceisproperlygrounded.Donotmodifythe
plugprovidedwiththeappliance–ifitwillnotfittheoutlet,haveaproperoutletinstalledbya
qualifiedelectrician.
Thisapplianceisforuseonanominal120Vcircuit,andhas
agroundingplugthatlooksliketheplugillustratedinthe
figure.Thetemporaryadaptorshouldbeusedonlyuntila
properlygroundedoutletcanbeinstalledbyaqualified
electrician.Thegreencoloredrigidear,lug,andthelike,
extendingfromtheadaptormustbeconnectedtoa

4
Westward Operating Instructions and Parts Manual 22XP38, 22XP39
Drain Cleaning Machine
permanentgroundsuchasaproperlygroundedoutletboxcover.Whenevertheadaptorisused,
itmustbeheldinplacebythemetalscrew.
WorkingAreaandSafety
1. Donotletwatergetintothepowertools.Ifthemachineiswet,donotoperateituntilitis
dry.Donotoperatemachinewhenitisstandinginwater.Thiswillincreaseriskofelectrical
shock.
2. Wearsafetyequipment(glovesandrubbersoled,non‐slipshoes)andapplysafety
procedureswhenworkingareaiswet.Placethemachineonadrysurface.
3. Neveroperatemachinesinexplosiveenvironments,includingareaswithflammableliquids,
gasesordust.Powertoolscreatesparkswhichmayignitethedustorfumes.
4. Becautiouswhencleaningdrainswithcleaningchemicalsbeingapplied.Donotletthe
chemicalsdirectlycontactskin,eyesand/orthecable.Thesechemicalscancauseserious
burnstotheskinandeyesaswellasdamagingthecable.
5. Haveasecondpersonsupervisewhenworkinginanarrowspaceorspecialenvironment,
suchasinaboilerroom,insideapipeoronawetsurface.Failuretodosomaycause
seriousinjuryordeath.
6. Keepbystanders,children,andvisitorsawaywhileoperatingthepowermachine.
Distractionsbyothersmayleadtolosingcontrol.
7. Keepworkingareawelllit,neatandclean.Darkzonesandclutteredmessescause
unpredictableaccidents.
ElectricSafety
1.ThemachineisequippedwithaGroundFaultCircuit
Interrupter(GFCI),whichprotectsyouagainstshockifshort
circuitshouldoccur.Checkthatthereceptacleisproperly
grounded.TesttheGFCIbeforeeachuse.Thetestingprocedure
isgivenbelow:
a) Plugmachineintoareceptaclewiththemachine‐specified
voltage.
b) Pushthetestbutton.Indicatorlightwillgooutandpower
tomachinewillcutoff.
Iflightdoesnotgooutwhenthetest
buttonispushed,equipmentshouldnotbeuseduntil
properrepairsorreplacementtotheGFCIaremade.
c) Torestorepoweraftertest,pushresetbutton.
Withtheresetbuttonuntouched,ifthemachinedoesnotstart,or
stopswhilerunning,orifyouexperienceamildshock,donotusethemachine!Have
itrepairedorreplacedbyalicensedtechnician.
Whenusinganextensioncord,theGFCIonthedraincleanerdoesnot
protecttheextensioncord.IftheoutletisnotGFCIprotected,itisadvisabletousea
plugintypeGFCIbetweentheoutletandtheextensioncordtoreducetheriskof
shockifthereisafaultintheextensioncord.
2.Whenworkingwiththemachineoutside,useaspeciallydesignedoutdoorextensioncord.
Thiskindofcordreducestheriskofelectricshock.Useonlythree‐wireextensioncords
whichhavethree‐prongedgroundingplugsandthree‐polereceptacleswhichacceptthe
tool’splug.Useofotherextensioncordswillnotgroundthetoolandincreasetheriskof
electricshock.Insufficientconductorsizewillcauseexcessivevoltagedropandlossof
power.Whenusingextensioncords,aGFCImustbeusedincircuitboxesoroutlet
receptacles.ExtensioncordswithoutaGFCIcanalsocauseelectricshock.

5
Westward Operating Instructions and Parts Manual 22XP38, 22XP39
Drain Cleaning Machine
3.Groundedtoolsmustbepluggedintoaproperlyinstalledandgroundedoutlet,whichisin
accordancewithallsafetycodesandordinances.Nevermodifythepluginanymanner.Do
notremovethegroundingpin.Neveruseanyadapterplugs.ChecktheplugswithUL
approvedtestersorconsultwithacertifiedelectricianifyouarenotsurewhetherthe
powersourceisproperlygrounded.Shouldtheelectricaltoolmalfunctionorstopworking,
groundinggivesasafewaytokeeptheoperatorfromelectricalshock.
4.Useastraightelectricplug,sothattheoperatorcancutthepoweroffimmediatelyby
pullingtheplugofftheseatonthewall.Inaddition,checktheshockprotectortomake
sureitworksproperly.Failuretofollowinstructionsmayresultinseriousinjuryordeath.
5.Neverleavethepowermachineinrainorinwetconditions.Wetmachinesoftencause
electricshock.
6.Donotallowyourbodytocontactanygroundedsurfacessuchasradiators,rangespipes,
andrefrigerators.Itisverydangeroustobeelectricallyshockedwhenyourbodyis
grounded.
7.Neverabusetheelectricalcord.Donotusethecordtopulltheplugfromanoutletanddo
notusethecordtocarrythemachine.Keepthecordawayfromheat,oil,sharpedges
and/ormovingparts.Replacedamagedcordsimmediately.Damagedcordsincreasetherisk
ofelectricshock.
8.Nevertouchplugsortoolswithwethands.Keepallelectricalconnectorsdryandoffthe
groundtoreducetheriskofelectricshock.
9.Usemachine’sratepowertospecifyfusesonyourpowersupply.Neveruseothermetal
wirestoreplacethespecifiedfuses.Failuretofollowthisrulemaycauseseriousinjuryor
evendeath.
PersonalSafety
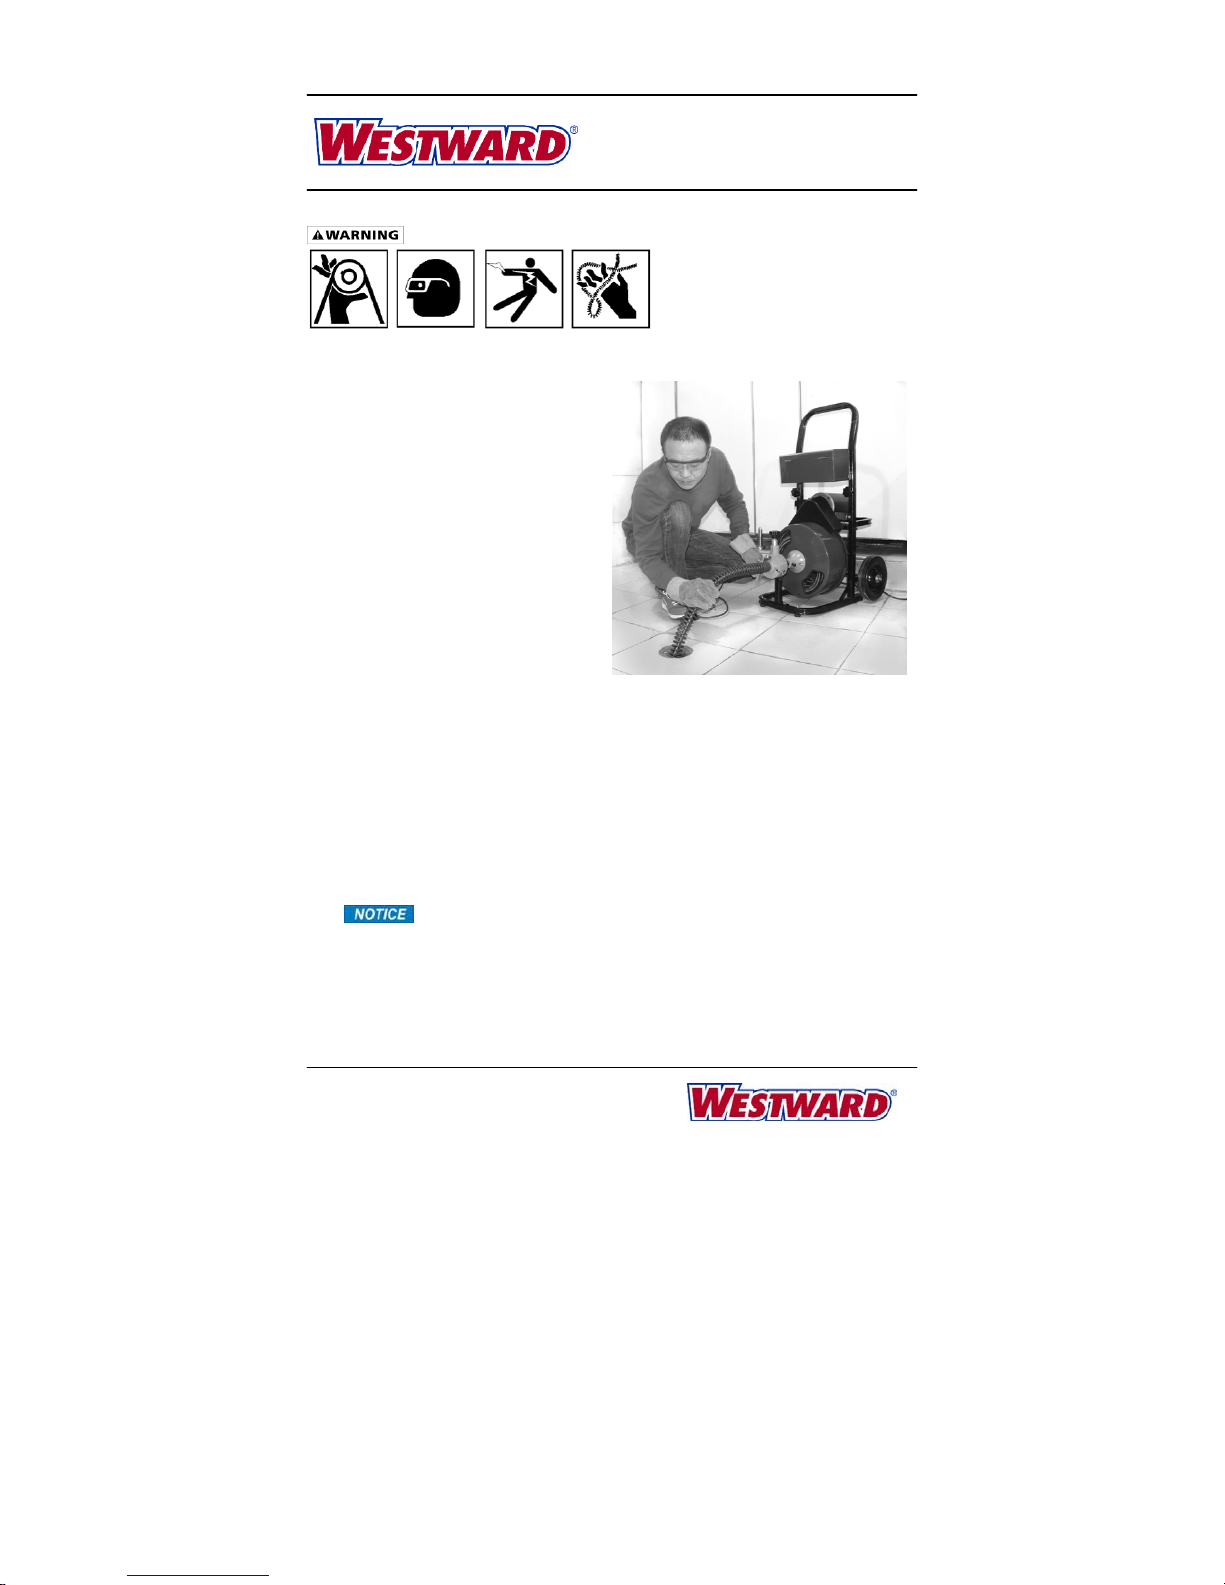
1. Wearproperworkingattire,rubber‐solednon‐slipshoes,safetyglasses,dustmask,hard
hat,hearingprotectionandleathergloveswhenoperatingthemachine.Failuretofollow
thisrulemaycauseseriousinjuryorevendeath.
Nevergrasparotatingcablewitharagorclothglove.Graspingthe
rotationalcablemaycausehandorfingerstobecaughtonthecableandleadtopersonal
injury.
2. Neveroperatemachinewithbeltguardremoved.Keephandsawayfrompulleyandbelts.
Fingerscangetcaughtbetweenbeltandpulley.
3. Keephandsawayfromtherotatingdrumanddistributingcone.Donotreachintothedrum
unlessthemachineisunplugged.Handmaybecaughtinthemovingpartsresultingin
seriousinjury.
4. Bealertatalltimes.Keepgoodjudgmentwhenoperatingamachine.Neveroperate
machineunderinfluenceoffatigue,drugs,alcoholormedications.Asinglesecondof
inattentioncanleadtoalifetimeofregret.
5. Dressneatly.Donotwearlooseclothingorjewelry.Keephairtiedand/ortuckedaway.
Keeplonghair,clothes,andglovesawayfrommovingparts.Sucharticlesmayresultin
seriousinjuryordeathwhencaughtinthemachine.
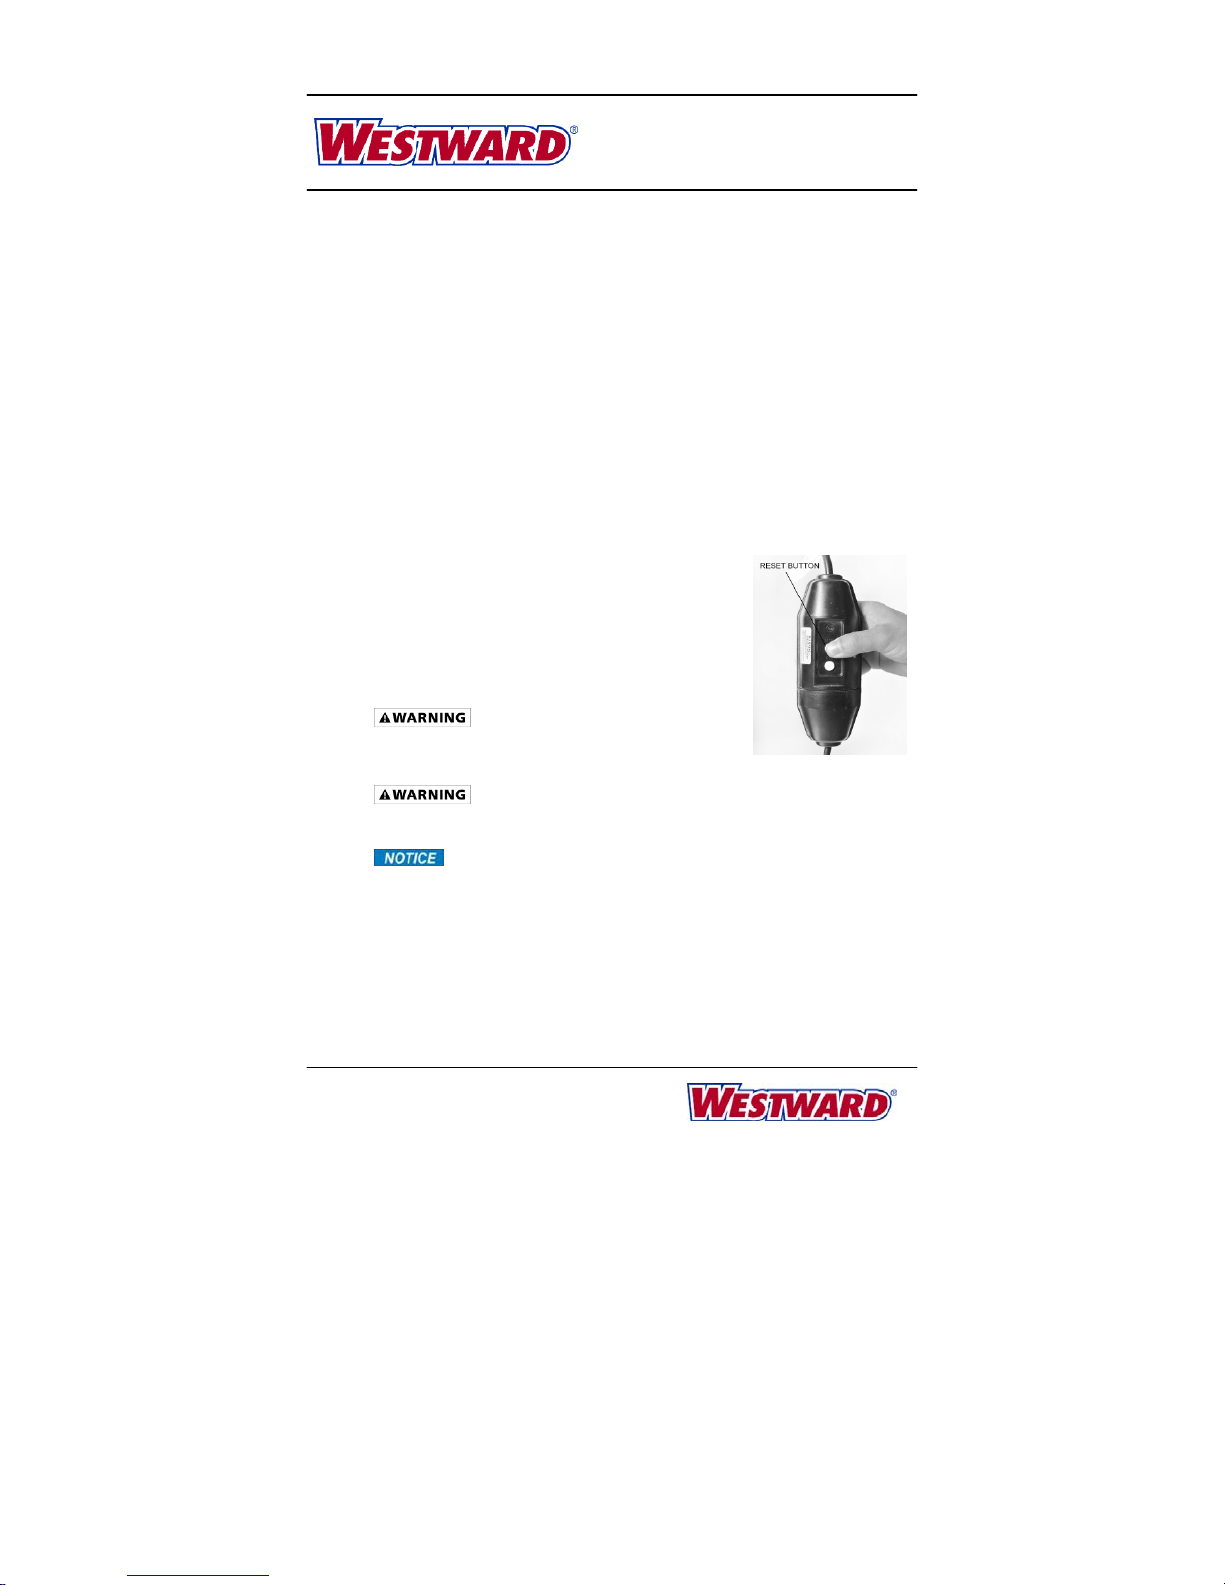
6. Avoidaccidentalstartingofthemachine.MakesuretheRotationSwitchissetatOFF
positionbeforepluggingin.Pluggingintoolsthathavetheswitchon
invitesaccidents.
Note:ThismachinehasaRotationSwitchandanAir‐ActivatedFoot
Switch.TheRotationSwitchisusedtosetthemotoranddrum
rotatingdirection.Ithasthreepositions,representingForward
rotation(FOR),OFF,andReverserotation(REV),respectively.When
readytowork,settheRotationSwitchtoFORandthenpressthe
FootSwitchtoletthemachinerunintheforwarddirection.Stop
machinefirstandwaitforfewsecondstoallowthemachinetostop
beforechangingtherotationdirection.
7. Makesureadjustingkeysareremovedbeforeturningthetoolon.Awrenchorkeythatis
thrownfromarotatingpartofthemachinecanresultinseriouspersonalinjuryordeath.
8. Donotoverreach.Keepproperfootingandbalanceatalltimes.Properfootingandbalance

6
Westward Operating Instructions and Parts Manual 22XP38, 22XP39
Drain Cleaning Machine
enablesbettercontrolofthemachineinunexpectedsituations.
OperationSafety
1. Donotoperatethismachineifyouarenottrainedtodoso.Non‐experiencedoperation
causesmoreaccidentalinjuriesordeaths.
2. Thismachineisdesignedforone‐personoperation.BothoftheFootSwitchandtherotating
cablemustbecontrolledbythesameoperator.
3. Positionmachinewithintwofeetofdrainoperation.Greaterdistancescanresultincable
twistingorkinking.
4. DonotletmachineworkinReverserotationexceptdescribedinbelowsituation.Operating
machineinReverserotationcanresultincabledamage.TheReverseoptionisONLYusedto
retrievecableoutofanobstruction.
5. Donotforcethecableinapipe.Keepglovedhandonthecableforcontrolwhenmachineis
running.Overstressingcablesbecauseofanobstructionmaycausetwisting,kinking,or
breakingofthecableandmayresultinseriousinjury.
6. Afterthedrain‐cleaningwork,disconnecttheplugfromthepowersourceaftercleaningthe
workingareaorcompletinganymaintenancework.Thiscanpreventfromaccidently
startingthetool.
ToolUseandCareSafety
Useclamporanotherpracticalwaytosecureandsupporttheworkpiecestoastableplatform.
Holdingtheworkbyhandoragainstyourbodyisunstableandmayleadtolossofcontrol.
1. Donotforcetool.Usethecorrecttoolforyourapplication.Thecorrecttoolwilldothejob
betterandsaferattherateforwhichitisdesigned.
2. Donotusetoolifswitchdoesnotturnthemachineonoroff.Anytoolthatcannotbe
controlledwiththeswitchisdangerousandmustberepaired.
3. Disconnecttheplugfromthepowersourcebeforemakinganyadjustmentsorstoringthe
tool.Suchpreventativesafetymeasuresreducetheriskofstartingthetoolaccidentally.
4. Storeidletoolsoutofreachofchildrenandotheruntrainedpeople.Toolsaredangerousin
thehandsofuntrainedusers.
5. Maintaintoolswithcare.Keepcuttingtoolssharpandclean.Properlymaintainedtools,
withsharpcuttingedgesarelesslikelytobindandareeasiertocontrol.
6. Checkformisalignmentorbindingofmovingparts,breakageofparts,oranyother
conditionthatmayaffectthetool’soperation.Ifdamaged,havethetoolservicedbefore
using.Manyaccidentsarecausedbypoorlymaintainedtools.
7. Useonlyaccessoriesthatarerecommendedbythemanufacturerforyourmodel.
Accessoriesthatmaybesuitableforonetoolmaybecomehazardouswhenusedonanother
tool.
8. Keephandlesdryandclean,freefromoilandgrease.
9. Toolservicemustbeperformedonlybyqualifiedrepairpersonnel.Serviceormaintenance
performedbyunqualifiedrepairpersonnelcouldresultininjury.
10. Whenservicingatool,useonlyidenticalreplacementparts.Followinstructionsinthe
maintenancesectionofthismanual.Useofunauthorizedpartsorfailuretofollow
MaintenanceInstructionsmaycreateariskofelectricshockorinjury.
11. Maintainandcheckupthemachineroutinely.Makesureallelectricalwiresandpartsare
workingproperly.Neverusethemachinewhenitismalfunctioning.
12. Safe‐guardthecleaningpartstopreventthemfrombeingdamaged.
SpecificSafetyInformation
1. Beforestartingeachjob,pullthecableoutofthedrumtomakesurethecableinthedrum
isnotbrokenorkinked.Alwaysreplaceworn(kinkedorbroken)cableswithgenuine
GENERALreplacementcables.
2. Onlyusethistoolintheapplicationforwhichitwasdesigned.Followtheinstructionsonthe
properuseofthemachine.Otherusesormodifyingthedraincleanerforotherapplications
mayincreaseriskofinjury.

7
Westward Operating Instructions and Parts Manual 22XP38, 22XP39
Drain Cleaning Machine
AssemblyandDisassembly
TurnRotationSwitchtoOFFandunplugbefore
assemblyanddisassembly.
QuickAssembly
HandleMounting
Thehandleisboundtotheframebutisnotmounted.ToassembletheHandle,takeoffthetwo
setsofhandle‐lockingboltsandknobsfromtheframe.Slidethetwoendsofthehandleintothe
twoopeningsontheframe.Then,usehandle‐lockingblotsandhandle‐lockingknobstotighten
them.
ToolboxMountingtotheHandle
Thetoolboxcanbeattachedtothemachinebysimplyaligningthetwo
slotsontheboxwiththetwopokinglatchesontheframeandsliding
thetoolboxdownwardtoallowthetwolatchestoslipintotheslots.
WheelMounting
Toassemblethewheels,pushtheaxlethroughtheholesatthebottom
oftheframe,mountthewheelsontheAxleandthenuseoneflat
washerandonenutoneachsidetoattainthewheelontheaxle.
CableFeeder(Optional)Installation
ToinstalltheCableFeeder,followthesesteps:
1. PushthecablethroughtheCableFeeder’sopening.
2. PlacethemountingbracketatthebottomoftheCableFeederunitonthe
frame.Besuretoaligntheholesforthemountingscrews.
3. Tightenthemountingboltsandnuts.
CableGuide(Optional)Installation
ToinstalltheCableGuide
1. Pullthelockpinontheadapterofthecableguideandslidethe
adapterendoftheCableGuideontothefrontoftheCableFeeder.
2. Makesuretoalignthelockpinwiththeholeontheshorttubeof
theCableFeeder.
3. Releasethelockpintoletitslideintotheholeandholdthecable
guideontheCableFeeder.

8
Westward Operating Instructions and Parts Manual 22XP38, 22XP39
Drain Cleaning Machine
CutterInstallationandRemoval
Themachinecomeswith3cuttersinthetoolbox.Thecutterscanbe
exchangeddependingontheapplication.
1. Toinstallacutterontothecable,simplyslidethemalecoupling
endonthecableintothenotchofthefemalecouplingendonthe
cutterfromthechamferedsideuntilaclickisheard.The
chamferingofthenotchbottomisforeasyconnection.
2. Toremoveacutterfromthecable,insertthekeytipsintothehole
onthecutter.Thenholdthecableendstillwithonehandand
slidethecutteroffwiththeotherhandalongthenotch.
CableConnectionandDisconnection
Withsimilaroperation,thecablecanbeextendedbyaddinganother
cable.Todothis,
1. RemovethecutterfromthecableusingStep2describedabove.
2. Slidethemalecouplingendontheexistingcableintothenotchof
thefemalecouplingendontheextensioncablefromthe
chamferedsideuntilaclickisheard(thesameasthecutter
installationshownabove).Thenusethesamemethodtoinstallthe
cutterontotheotherendoftheextensioncable(Note:Similaroperationisappliedwhen
replacingawornordamagedcableorcutterwithanewone).
BeltRemoval/Installation
Toremovethedrum,motor,ortoreplaceawornbelt,thebeltneeds
toberemovedandinstalled.Todothis,
1. UnscrewtheBeltGuardRetainingScrewandtakeofftheBelt
Guard.
2. Pushthemotordownwithbodyweighttosuppressthespring
beneaththemotorandshortenthedistancefromthepulleytothedrum.
3. Slidethebelttowardthebackofthedrumuntilitisloose.Thentakeitofffromthepulley
andtakeitoutaroundthedrum.
4. Reversetheproceduretoreplacebelt.
DrumRemovalandInstallation
1. RemoveoptionalCableFeederifavailable.
2. Removethebeltguardbyfollowingtheaboveprocedure.
3. Reachbehindthedrumandlocatethedrum‐retaininglatch.
Pullthelatchtoreleasethedrumshaft,thenpullthedrum
forwardofftheframe.
4. Toinstallthedrum,reversetheabovestep.
CableInstallationandRemovalfromDrum
Toinstallcableintothedrum,simplypushthecableintothedrumandmakesurethecablewinds
inthedruminthecounter‐clockwisedirection.Toremoveacablefromthedrum,simplypullthe
cableoutofthedrumuntiltheendcomesoutofthedrum.
Thecableshouldlayinthedruminthecounter‐clockwisedirection.

9
Westward Operating Instructions and Parts Manual 22XP38, 22XP39
Drain Cleaning Machine
CableFeeder(Optional)Disassembly
Ifdisassemblyisrequired,proceedasfollows(Note:putthesepartsinordertoeasere‐
assembly):
1. RemovetheCableFeedertensionknob,springsandspringplunger.Thetoprollercannow
beremoved.
2. Removethesnapringsandthrustwashersfromthebottomhousingcylinders.Thebottom
rollerscannowberemoved.
3. Re‐assemblyisdoneinreverseorder.

10
Westward Operating Instructions and Parts Manual 22XP38, 22XP39
Drain Cleaning Machine
Operation
Alwayswearsafetyglasses,gloves,andotherappropriateprotectiveequipmentwhen
operatingyourdraincleaner.
Set‐up
1.Placemachinewithinapproximately2
feetfromdrainopening.Ifyoucannot
placethemachineclosetothedrain
opening,runthecablethroughthe
optionalCableGuideattachedtothe
optionalCableFeederorametalguide
tubetopreventcablewhipping.On
manualfeedmachines,alwayskeepa
glovedhandonthecable.
2.PositiontheFootSwitchforeasy
accessibility.Themachineisdesigned
forone‐personoperation.Besureyou
canquicklyremoveyourfootfromthe
FootSwitchinanemergency.
3.Besurethemotorpowerswitchisset
toOFFposition.
4.Selectthepropercuttingtool(See
Accessories).Agoodtooltostartwith
istheArrowHeadorBoringBulbCutter.
Afterthepipeisopened,followwithlargerblades,whichscrapetheinsidewallofthepipe,
assuringarealcleaningjob.
5.Slidethemaleendofthecutterintothefemaleendofthecableuntilthereisaclicksound.
OperationwithoutCableFeeder
1.Beginbypullingthecablefromthedrumandslidingitatleastonefootintodrain,sothat
theendofthecablewillnotcomeoutofthedrainandwhiparoundwhenthemachineis
started.
2. Donotleavetoomuchslackonthecablebecausethiswillcausewhipping.Ifthecable
startstobendorbuilduptoomuchtwist,relievethetwistbyturningontheopposite
direction.Pushanyexcesscablebackintothedrumandthencontinue.
3.SettheRotationSwitch(SeefigureinPage5)toFORposition.Holdthecablebygloved
handandpresstheFootSwitchwithonefoottostartthedrumrotation.Feedtherotating
cableslowlyintothedrainbypushingthecabletowardthedrain.
Thepersoncontrollingthecablemustalsocontrolthefootswitch.Donot
operatethedraincleanerwithonepersoncontrollingthecableandanotherperson
controllingtheswitch.Thiscancausethecabletokink,twistandbreak,whichcanalso
causeseriouspersonalinjury.
4.Donotletthecuttergetcaughtinthestoppageasyouworkthroughit.Thiscancause
kinkingandbreakingofthecable.Whenyoufeelthecablestartingtotwistinyourhands,
stopthemachinebyreleasingtheFootSwitchandpullthecableback.Thiswillfreethe
cutterfromtheobstruction.Thenallowthecabletomoveforwardslowlyintothe
stoppage.Remember,nocuttingtakesplacewhenthebladesstopturning.

11
Westward Operating Instructions and Parts Manual 22XP38, 22XP39
Drain Cleaning Machine
5.Ifthecablebecomeslodgedinthedrain,usesharpdownwardthrustwhilethecableis
turning.Thentryagainwhenthecableisnotturning.
6. Ifthelodgingiscausedbyabendandyouhavedifficultygettingthecabletopassthe
bend,youprobablyneedathinnercable.Trytousea3/8”diametercableorevena
smalleroneifnecessary.
Hint:It’softenhelpfultohaveasmallstreamofwaterrunninginthelinetowashthe
debrisawaywhilethemachineisinoperation.
7. Afterthelineisopened,retrievethecablefromthedrainlineandpushitbackintothe
drumwhiletheRotationSwitch(SeefigureinPage5)issetintheFORposition.Thisis
importanttopreventthecablefromtanglinginthedrumorintheline.
DonotsettheRotationSwitchinREVwhenpullingthecableoutofthe
drainline.AlwaysrunthemachineinFORrotation,whetheryouarefeedingthecable
intothelineorpullingitout.
Whenthecuttingtoolisnearthedrainopening,takeyourfootoffthe
FootSwitchtostopdrumrotation.Neverretractthecuttingtoolfromdrainwhilecable
isrotating.Thecablecouldwhipandcauseseriousinjury.

12
Westward Operating Instructions and Parts Manual 22XP38, 22XP39
Drain Cleaning Machine
OperationwithCableFeeder(Optional)
1. Beginbypullingthecablefromthedrumandslidingitat
leastonefootintothedrain,sothattheendofthecable
willnotcomeoutofthedrainandwhiparoundwhenthe
machineisstarted.
2. TightentheknobonthetopoftheCableFeederuntilthe
CableFeederrollertouchesthecable.Thenmakeone
moreturnontheknob.
Donotovertightensincethiscouldcause
excesscablewear.TheCableFeederisdesignedforuse
with1/2"and3/8"cablesonly.
3. TheCableFeederLevercontrolsthefeedingrateand
feedingdirectionofthecable.HoldtheleveruptotheFposition(theletterFismarkedon
theFeedActuator,meaningFeedingForward)topullthecableoutofthedrumandfeedit
forwardintothedrain.ThestrongertheleverispusheduptotheFside,thefasterthecable
willfeed.HoldtheleverdowntoRposition(theletterRismarkedontheFeedActuator,
meaningRetractingBack)toretractthecablefromthedrainandfeeditbackintothedrum.
WhentheleverisheldintheMiddlePosition,thecablewillneithergoforwardor
backward,butrotatewiththedrum.
4. SettheRotationSwitch(seefigureinPage5)attheFposition.Grabtheguidetubeorcable
withaglovedhand,andplaceyourotherhandontheCableFeederLever,whichshouldbe
intheMiddlePosition.PresstheFootSwitchtostartthemachine.
5. FeedthecableintothedrainlinebyholdingtheCableFeederLeveruptoFsidewithafirm,
evenpressure.Whentheresistanceismet,adjustthefeedingratebyadjustingtheforce
ontheCableFeederLever.Donotforcethecable–letthecutterdothework.
Largeforcewillnotgetthejobdoneanyfasterandthecablemightbecome
damaged.
6. Donotleavetoomuchslackonthecable.Itwillcausewhipping.Ifthecablestartstobend
orbuilduptoomuchtwist,relievethetwistbyturningtheDruminthereversedirectionby
hand.Pushanyexcesscablebackintothedrumandthencontinue.
YouMUSTturntheRotationSwitchtoOFFandtakeyourfeetawayfrom
theFootSwitch.Failingtodothismaycauseaccidentalstartingandinjury.
7. Ifyouhavetroublegettingaroundatightbend,trytorunthemachineinstantlyinREV
rotationwhileapplyingsteadypressure.
Donotdothisformorethanafewsecondsatatimesincethiscouldcause
cabletanglinginthedrumorkinking.
8. Ifyoustillcannotpassthebend,thecablesizeisprobablytoolarge.Changeittoa3/8”
diametercable.
9. Whenthecablereachesthestoppage,puttheCableFeederLeverinMiddlePositionfirst.
Thenpushthecableforwardbyhandwithamildforce.DonotusetheCableFeeder.Let
thecutterchewthestoppageasitgoes.Thisslowforwardmovementwillreducestresson
thecablewhiledoingamorethoroughcleaningjob.Abackandforthactionoftenworks
best.
Hint:It’softenhelpfultohaveasmallstreamofwaterrunninginthelinetowashthe
cuttingsawaywhilethemachineisinoperation.
10. Becarefulnottoletthecuttergetcaughtinthestoppageasyouworkthroughit.Thiscan
causecablekinkingandbreaking.Whenyoufeelthecablestarttwistinginyourhands,stop
themachineandpullthecablebackalittletofreethecutterfromtheobstruction.Then
repeattheslowforwardmotion.Remember,nocuttingtakesplacewhenthebladestops
turning.
11. Afterthelineisopened,retrievethecablefromthedrainandreturnittothedrumwiththe
RotationSwitchbeingsettoFORpositionwhiletheCableFeederLeverbeinghelddownat
RSide.Thisisimportanttopreventthecablefromtanglinginthedrumorintheline.

13
Westward Operating Instructions and Parts Manual 22XP38, 22XP39
Drain Cleaning Machine
DonotuseREVrotationtopullthecableoutofthedrain.Alwaysrun
themachinewiththeRotationSwitchsettoFORposition,whetheryouarefeedingthe
cableintothelineorpullingitout.
12. Whenthecuttingtoolisnearthedrainopening,takeyourfootofftheFootSwitchtostop
drumrotation.Neverretractthecuttingtoolfromdrainwhilecableisrotating.Thecable
couldwhipandcauseseriousinjury.
CableClampingwithCableLockScrew
ThismachineisdesignedwithaCableLockScrew.When
strongresistanceismet,puttheCableFeederLevelatthe
middleposition.TightentheCableLockScrewwhenletting
thecutterchewthestoppage.
DonotusetheCableFeederwhentheCable
LockScrewistightened.UsingtheCableFeederwiththe
CableLockScrewbeingtightenedwillcausedamagetothe
machine,whichmayresultinpersonalinjury.Soplease
remembertoreleasethescrewwhenevertheCableFeederisused.
SpecialOperationsWhenCableGetsStuckInLine
Themotorcanbereversedtofreecableifthecablegetsstuckinthelinebyusingthefollowing
procedure:
1. TurntheRotationSwitchtoREVposition,andpushtheCableFeederLevertoMiddle
position
2. DepresstheFootSwitchafewsecondsandpullthecablebackwhilethedrumisrotatingin
Reversedirection.
3. Whenthecablehasbeenfreed,settheRotationSwitchtoFORposition.
DonotrunmotorinReversedirectionformorethanafewsecondsatatimesince
thiscouldcausecabletanglinginthedrumorkinking.
SpecialOperationsWhenCableTanglesinDrum
Tountanglecable,rotatedrumintheREVdirectionwithhand.Thiswillusuallygetthecabletolie
inthedrumproperly.
:YouMUSTturntheRotationSwitchtoOFFandtakeyourfeetawayfromthe
FootSwitch.Failingtodothismaycauseaccidentalstartingandinjury.
Ifcablebecomesseverelytangled,whichshouldnotoccurwhenusedproperly,youwillneedto
replaceitwithanewcable.
OperationwithTorque‐AdjustingThumbWheel
Thismachineisequippedwithatorque‐adjustingThumb
Wheelforlimitingthetorqueappliedtobeltandprevent
cabledamagewithregularoperation.Whenthetorque
transmittedfromthecablereachesthelimitsetbythe
ThumbWheel,thebeltwillsliponthepulley.Thiswill
preventthecablefromtwistingorkinking.
Thetorquehasbeenpre‐adjustedproperlyinmanufacture,
andinmostcaseswillneverneedtobeadjusted.

14
Westward Operating Instructions and Parts Manual 22XP38, 22XP39
Drain Cleaning Machine
Whenanewbeltisinstalled,thetorquemaybetoohigh,andtheThumbWheelneedstobe
adjustedtodecreasethebelttension.
Whenexcessivebeltslippagehappens,thetorquemaybetoolow,andtheThumbWheelneeds
tobeadjustedtoincreasethebelttension.
PerformthefollowingstepstoadjusttheThumbWheel.
NEVERletthemachinerunwithhightensioninordertoprotectthecablefrom
beingdamaged.
1. ScrewdowntheThumbWheelfor3completeturnstoreducethetensionconsiderably.
2. Increasethetensionabitatatimewhiletryingtorunthemachinetoseeifthetensionis
enough.
3. Addabitmorewhenneeded.
MajorMaintenanceandPartReplacement
SettheRotationSwitchtoOFFandunplugthemachinebeforeanymaintenance.
Wearnecessarysafetyequipmentforprotection.
MachineCleaning
Whenneeded,themachinecanbecleanedwithhot,soapywaterand/ordisinfectants.
Donotallowwatertoentermotororotherelectricalcomponents.Makesureunit
iscompletelydrybeforeuse.
Cable
Toobtainmaximumservicefromyourcables,besurethataftereachusetheyarecleanedwith
water,airdried,andwellcoatedwithproperlubricationoil(suchasSAE10W‐30).Thisnotonly
providesrunninglubricationbutgreatlyextendsthelifeofthecablesaswell.Youcanperiodically
pouroildirectlyintothedrum.Asthedrumturns,thecablesgetcompletelubrication.Youcan
alsowipethelubricationoilonthecablewithacloth.
Ifacableloopsoveritselfinthedrum,itwillnotfeedproperly.Removeandreloadthecableby
handtorestorefunction.Ifthecablekinks,itistheevidenceofabuseandtheresultsfromthe
useoftoomuchpressureortheuseofawrongsizecablefortheline.
CableFeeder(Optional)
KeepCableFeederfreeofexcessivesoilandgrit.ItisrecommendedthattheCableFeederbe
flushedwithfreshwaterusingahosefollowedbyair‐dryingtheunitandthenalubricationoilof
themovingparts.Nodisassemblyisnormallyrequired.Ifdirtishardenoughtostoptheroller’s
rotationandflushingitwithwaterdoesnotrestoreitsfunction,thendisassemblingtheCable
Feederisnecessary.

15
Westward Operating Instructions and Parts Manual 22XP38, 22XP39
Drain Cleaning Machine
TroubleshootingChart
ProblemPossibleCauses Solution
Cablekinksor
breaks
OperatorforcedthecableDonotforcethecable.Letthecutter
dothework
Toomuchslackbetween
machineanddrain
Allownomorethan2feetbetween
machineanddrainopening
Cableusedinwrongsizedrain
line
Changetoacablethatissuitablein
diameterforaline
Cableexposedtoacid Cleanandoilcableregularly
Cabletanglesin
drum
OperatorforcedthecableDonotforcethecable.Letthecutter
dothework
MachinerunninginReverse
direction
Usereverseonlyifcablegetscaughtin
pipe
Drumstopswhen
FootSwitchis
pressed
HoleonfootswitchorhoseReplaceasrequired
Groundfault
circuitinterrupter
tripsandwillnot
reset
Damagedpowercordor
extensioncord
ReplaceGFCIintegratedPowerCord
byAuthorizedServiceCenter
Faultygroundfaultcircuit
interrupter
ReplaceGFCIintegratedPowerCord
byAuthorizedServiceCenter
Shortcircuitinmotor ContactAuthorizedServiceCenter
Failuretofeed
WithCable
Feeder
Cabletangledindrum Pulloutthecableandfeedin.
CableFeedermisadjusted ProperlysetthetensionknobofCable
Feeder,nottooloosethatthecable
willslip,nottootightthatthecable
willwearquickly.
CableFeederrollerfrozen CleanandlubricateCableFeeder
rollersregularly.Replacewornrollers.
Worncable Whencablecoilswearflat,cable
shouldbereplaced
Lowcutting
power
Torquesettoolow AdjusttheTorqueLimitertoincrease
thetorquelimit
ForRepairParts,callyourlocalbranch
Pleaseprovidethefollowing:
-ModelNumber
-SerialNumber(ifany)
-Partdescriptionandnumberasshownonpartslist

16
Westward Operating Instructions and Parts Manual 22XP38, 22XP39
Drain Cleaning Machine
Accessories
ItemModelPictureTypicalApplications
BulbAuger,
11/8”Dia.22XP50
Startingtool,ideal
forcuttingand
scraping.
CCutter,
17/8”Dia.22XP51
Finishingtool,works
wellingrease
stoppages.
SpadeCutter,
13/8”Dia.22XP52
Startingtool,to
removeloose
objects.
PinKey22XP54Foruncoupling
cables
ToolSet22XP45
Including
-BulbAuger,11/8”
Dia.,22XP50
-CCutter,17/8”
Dia.,22XP51
-SpadeCutter,1
3/8”Dia.,22XP52
-PinKey,22XP54
CableFeeder22XP41Forcablefeeding
CableGuide49U742Forcableguiding
Cable,3/8In
x75Ft22XP48
Usedtocleandrain
linesfrom11/2"to2
1/2"
Cable,1/2In
x75Ft22XP56Usedtocleandrain
linesfrom2"to4"
Therearenofixedrulesforwhatcuttertouse.Ifonetooldoesn’ttakecareof
stoppage,simplytryanotherone.

17
Westward Operating Instructions and Parts Manual 22XP38, 22XP39
Drain Cleaning Machine
DrainCleaningMachine
No.
PartModel#DescriptionNoPartModel#Description
1‐ HexScrewM8×20mm(4)22TT22XP3811GRetainingSleeve
2‐ PulleyThrustScrewM6×16mm23TT22XP3810GDrumShaftRetainingPin
3‐ KnobNutM6×32mm24‐ AxleΦ14×548mm
4TT22XP3801GMotor(120V/60HZ/250W)25‐ NutM5(2)
5TT22XP3802GPulley26TT22XP3819GRubberLegTip(2)
6‐ V‐BeltA‐4427TT22XP3818G EndPlug(2)
7TT22XP3803GBeltGuard28 WheelMountingScrewM10mm(2)
8‐ Switch29‐ FlatWasherΦ10(2)
9‐ Overheat/Overloadprotector 30TT22XP3817GWheel8”(Dia.)X1.75”(W)(2)
10TT22XP3821G GFCIPowerCord31TT22XP3816GFrameAssembly
11TT22XP3804GMotor‐MountAssembly32TT22XP3815G RubberFoot(2)
12‐ FlatWasherΦ8(4)33 BoltM5X35mm
13‐ SpringWasherΦ8(4)34TT22XP3814GDrumAssembly
14‐ LockNutM8(4)35‐ BoltsM8×20mm(2)
15TT22XP3805GCompressionSpring3622XP48Cable,3/8”X75’
16TT22XP3806GThumbWheel3749U742CableGuide
17TT22XP3820GFootSwitchCapsule 3822XP41CableFeeder
18TT22XP3807GHandle39‐ BoltsM8×35mm(2)
19TT22XP3808GKnobNutM8×50mm(2)40‐ NutM8(2)
20 BoltM8×35mm(2)41TT22XP3813GFrontPost
21TT22XP3810GRetainingPinSpring42‐ BoltsM8×40mm(2)

18
Westward Operating Instructions and Parts Manual 22XP38, 22XP39
Drain Cleaning Machine
CableFeederComponents
No.DescriptionNo.Description
1FeederKnob9WasherM8(6)
2TighteningNutM1010CableFeederBase
3AdjustableBlock11WasherM12(2)
4Spring12RetainingRingInnerM25(2)
5MoveableRollerHolder13FeedActuator
6ActuatorPinΦ5×40mm(3)14GuideTube
7BallBearing608(3) 15LeverRod
8ActuatorPinΦ8×20mm(3)16LevelBall

19
Westward Operating Instructions and Parts Manual 22XP38, 22XP39
Drain Cleaning Machine
DrumAssemblyComponents
No.DescriptionNo.Description
1ShaftSpacer11RearHub
2BoltsM8×8mm12FiberWasherΦ19
3PlasticWasherΦ1913WasherM19
4DrumShaft14DistributorTube
5NutM8(5)15Drum
6LockwasherΦ8(5)16FrontHubBushing
7FlatWasherΦ8(5)17SpringWasherΦ6mm(3)
8BoltsM8×20mm(5)18BoltsM6×16mm(3)
9SpringWasherΦ1919BoltsM8×30mm
10RetainingWasherΦ19(2)

20
Westward Operating Instructions and Parts Manual 22XP38, 22XP39
Drain Cleaning Machine
WESTWARD®ONE‐YEARLIMITEDWARRANTY
ONE‐YEARLIMITEDWARRANTY.Westward®productmodelscoveredinthismanualcoveredby
thisLimitedWarranty(“Product(s)”)arewarrantedbyW.W.Grainger,Inc.(“Grainger”)tothe
originaluseragainstdefectsinworkmanshipormaterialsundernormaluseforoneyearafter
dateofpurchase.IftheProductispartofaset,onlytheportionthatisdefectiveissubjecttothis
warranty.AnyProductorpartwhichisdeterminedtobedefectiveinmaterialorworkmanship
andreturnedtoanauthorizedservicelocation,asGraingerorGrainger’sdesigneedesignates,
shippingcostsprepaid,willbe,astheexclusiveremedy,repairedorreplacedwithanewor
reconditionedproductorpartofequalutilityorafullrefundgiven,atGrainger’sorGrainger’s
designee’soption,atnocharge.Forlimitedwarrantyclaimprocedures,see“WarrantyService”
below.
COVEREDPRODUCTS.ThisLimitedWarrantycoverstheproductmodel(s)identifiedinthis
manual.ThisLimitedWarrantydoesnotcovernormalwearandtearofProductsorportionsof
them,orproductsorportionsofthemwhichareconsumableinnormaluse.Thiswarrantyisvoid
ifthereisevidenceofmisuse,mis‐repair,mis‐installation,abuseoralteration.
WARRANTYDISCLAIMERSANDLIMITATIONSOFLIABILITYRELATINGTOALLCUSTOMERSFOR
ALLPRODUCTS
LIMITATIONOFLIABILITY.TOTHEEXTENTALLOWABLEUNDERAPPLICABLELAW,GRAINGER’S
LIABILITYFORCONSEQUENTIALANDINCIDENTALDAMAGESISEXPRESSLYDISCLAIMED.
GRAINGER’SLIABILITYINALLEVENTSISLIMITEDTOANDSHALLNOTEXCEEDTHEPURCHASE
PRICEPAID.
WARRANTYDISCLAIMER.ADILIGENTEFFORTHASBEENMADETOPROVIDEPRODUCT
INFORMATIONANDILLUSTRATETHEPRODUCTSINTHISLITERATUREACCURATELY;HOWEVER,
SUCHINFORMATIONANDILLUSTRATIONSAREFORTHESOLEPURPOSEOFIDENTIFICATION,AND
DONOTEXPRESSORIMPLYAWARRANTYTHATTHEPRODUCTSAREMERCHANTABLE,ORFITFOR
APARTICULARPURPOSE,ORTHATTHEPRODUCTSWILLNECESSARILYCONFORMTOTHE
ILLUSTRATIONSORDESCRIPTIONS.EXCEPTASPROVIDEDBELOW,NOWARRANTYOR
AFFIRMATIONOFFACT,EXPRESSEDORIMPLIED,OTHERTHANASSTATEDINTHE“LIMITED
WARRANTY”ABOVEISMADEORAUTHORIZEDBYGRAINGER.
PRODUCTSUITABILITY.MANYJURISDICTIONSHAVECODESANDREGULATIONSGOVERNING
SALES,CONSTRUCTION,INSTALLATION,AND/ORUSEOFPRODUCTSFORCERTAINPURPOSES,
WHICHMAYVARYFROMTHOSEINNEIGHBORINGAREAS.WHILEATTEMPTSAREMADETO
ASSURETHATPRODUCTSCOMPLYWITHSUCHCODES,GRAINGERCANNOTGUARANTEE
COMPLIANCE,ANDCANNOTBERESPONSIBLEFORHOWTHEPRODUCTISINSTALLEDORUSED.
BEFOREPURCHASEANDUSEOFAPRODUCT,REVIEWTHESAFETY/SPECIFICATIONS,ANDALL
APPLICABLENATIONALANDLOCALCODESANDREGULATIONS,ANDBESURETHATTHE
PRODUCT,INSTALLATION,ANDUSEWILLCOMPLYWITHTHEM.
CONSUMERSONLY.CERTAINASPECTSOFDISCLAIMERSARENOTAPPLICABLETOCONSUMER
PRODUCTSSOLDTOCONSUMERS;(A)SOMEJURISDICTIONSDONOTALLOWTHEEXCLUSIONOR
LIMITATIONOFINCIDENTALORCONSEQUENTIALDAMAGES,SOTHEABOVELIMITATIONOR
EXCLUSIONMAYNOTAPPLYTOYOU;(B)ALSO,SOMEJURISDICTIONSDONOTALLOWA
LIMITATIONONHOWLONGANIMPLIEDWARRANTYLASTS,SOTHEABOVELIMITATIONMAY
NOTAPPLYTOYOU;AND(C)BYLAW,DURINGTHEPERIODOFTHISLIMITEDWARRANTY,ANY
This manual suits for next models
1
Table of contents
Languages:
Popular Other manuals by other brands

CEMO
CEMO Trolley 60 l AdBlue Car PRO operating instructions

Vaultek
Vaultek PROMXI instruction manual

Whelen Engineering Company
Whelen Engineering Company TIR3 installation guide

Varec
Varec 2920 Installation and operation manual

Glendinning
Glendinning CRMA 16 Installation & operation manual

Westinghouse
Westinghouse WHE5204 instructions