WestwoodOne WEGENER i8640 User manual

Version 1.0 09/10/2015
Page 1of 11
WEGENER i8640 DIGITAL AUDIO SERVER
QUICKSTART INSTALLATION INSTRUCTIONS
This satellite receiver has been provided for the
reception of MRN, WestwoodOne or Compass Sports.
Once installed, please contact network support for
activation and programming.
INTRODUCTION
This Quick Start guide provides direction on how to quickly set up and start
operating the i8640 professional media server in order to receive WestwoodOne
programming. For complete information please go to:
www.dg-tech.net
Please expedite the installation of this receiver as it must be installed and online
no later than four weeks from the original ship date.
To activate this receiver, please contact WestwoodOne Network Operations
Support between 8AM and 10PM ET, Monday through Friday at (888) 435-7450;
option 1, then option 2. Our operators are available to assist with:
Installation questions
Technical assistance
Authorization of the receiver after installation.

Version 1.0 09/10/2015
Page 2of 11
INSTALLATION INSTRUCTIONS
1) This receiver should be installed in a location that maintains a consistent
temperature of 65-75 degrees with ample ventilation to the front, sides and
rear of the receiver.
2) Connect your RG-6 cable from your satellite dish to the RF input (ANT IN) on
the back of the receiver. If more than one receiver is to be connected, a
professional grade splitter with a DC power pass port is recommended.
a. Note: In a multi-receiver installation, it is recommended to use a
professional power inserter and not to power your LNB from the
Wegener receiver.
3) Connect your stations broadband network (internet) to the receiver at the LAN
port.
a. Note: A reliable network connection is required to maintain a network
“return path” communication with our network in order to ensure
proper functionality of the receiver. This is an outbound
communication only and must be maintained at all times. Because of
this requirement, we are unable to authorize equipment not connected
with this “return path”. If your station does not have public internet
access, please contact Network Operations for assistance.
4) Connect the in-house AM and/or FM signal antenna or an independent
AM/FM antenna to AM and/or FM input(s).
a. Note: This is a required connection and must be maintained at all
times.
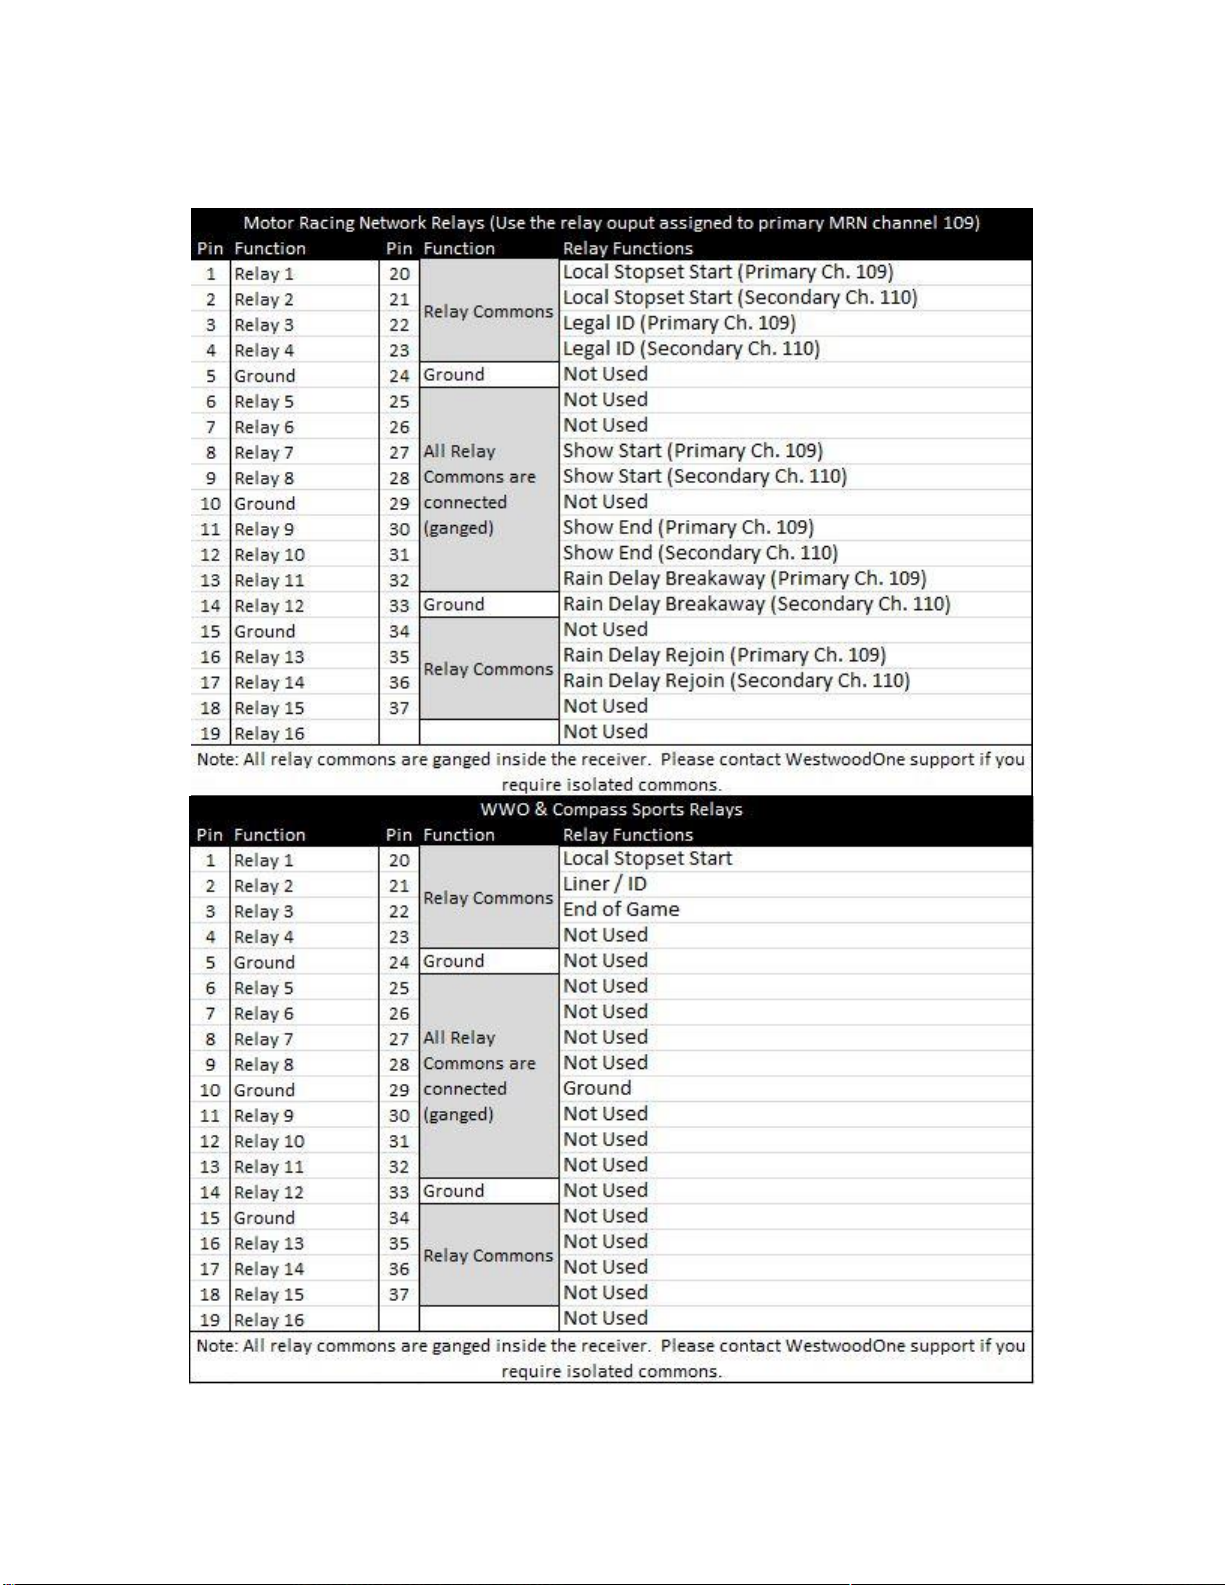
5) Connect your DB9 audio and DB37 relay connectors to the ports
corresponding with the programs identified on page 1 of this document.
6) Plug the receiver into a reliable, stable and properly grounded power source.
a. Note: Wegener and WestwoodOne strongly recommend that you use
an Uninterruptible Power Supply (UPS) with power line filtering to
prevent damage to the unit during electrical storms or power surges.
Please be aware that electrical damage caused by lightning or power
surges is not covered under the warranty. RF surge filtering is also
strongly recommended for this reason.
7) Verify your dish alignment and signal strength by looking at the EbNo and RF
levels via the front panel display. EbNo must be at least 9.0 and RF between
20-60 in order to authorize the receiver.
a. Note: A distribution amplifier is not recommended for main cable runs
less than 250 ft. If amplification is necessary to attain minimum specs,
a line amp ahead of the splitter yields more favorable results.
b. Note: Line attenuators to drop RF to within maximum RF levels should
be used sparingly to avoid unnecessary noise injection.
8) Once all connections are made, and levels meet minimum specifications,
please contact WestwoodOne Network Operations for authorization.

Version 1.0 09/10/2015
Page 3of 11
Common Front Panel Operations
To setup IP address:
1) Use the left/right arrow keys to locate Unit Setup, press ENT
2) Locate IP Setup, press ENT
3) Locate LAN IP Settings, press ENT
4) Press ENT again to unlock (STATIC or DHCP will flash)
5) Use left/right arrows to select STATIC or DHCP then press ENT to lock in
6) Use the left/right arrow keys to view IP, NetMask & Gateway addresses
a) To change the STATIC IP address, press ENT to bring cursor up
b) Use up/down arrow keys to edit digits
c) Use left/right arrow keys for next digit, press ENT when done to lock in
To change Carrier Frequency manually:
If access to this field is denied Contact Network Operations Support at 888-435-7450 option 1, then option 2, for
further assistance.
1) Use the arrow keys to find Unit Setup, press ENT
2) Locate Transport In Setup, press ENT
3) Locate Current Channel, press ENT
4) Locate Download Frequency, press ENT
a) To change Frequency, press ENT to bring cursor up
b) Use up/down arrow keys to edit digits
c) Use left/right arrow keys for next digit, press ENT when done to lock in
For technical assistance call:
(888) 435-7450, option 1 then
option 2
WARNING
Removable hard drives are
NOT hot swappable and
damage will occur if
removed while the unit is
powered up. Please contact
our support hotline for
directions should service
become necessary.

Version 1.0 09/10/2015
Page 4of 11
12 Ft Solid Dish
Notes: Equipment is shipped with network
interfaces set for DHCP IP address assignment.
Units must be manually configured for STATIC IP
Addresses. Connection is required.
Please install equipment in a climate controlled
environment from 65-75 degrees with UPS power
source.
AM/FM Antenna
Station LAN w/
Internet access

Version 1.0 09/10/2015
Page 5of 11
Sports Relay
Pinouts

Version 1.0 09/10/2015
Page 6of 11
ShowDirector - Wegener Programming Quickstart
What it is: A web-based solution to the Wegener receiver that provides access
to your complete programming schedule and the ability to request new
programming or air time changes to existing programming.
How to use:
1) Browse to http://showdirector.westwoodone.com/login
2) Enter your login credentials:
a. Login: Serial # of Wegener receiver (located in and just below
display panel)
b. Password: Call letters assigned to the receiver (located in the
display panel)
Sample Display Panel
3) Click “Login”

Version 1.0 09/10/2015
Page 7of 11
4) If this is your first time logging in, enter a valid email address from which to
send scheduling requests and to receive responses.
5) The main page shows the playback schedule for all programming currently
active for each active port (inactive ports will not be
displayed).
a. A solid blue indicates an approved live playback while a solid green
indicates an approved shifted playback.
b. A live or shifted playback that is pending approval will display with
lighter shaded stripes.

Version 1.0 09/10/2015
Page 8of 11
6) To request a new playback, select the “Schedule Playback” drop down
menu.
7) Select the show desired to schedule the playback time (only shows with
an active contract will be displayed and playbacks are always
scheduled and displayed in Eastern time).
a. The first section is a choice to playback the live feed or select a
time for shifted playback.
b. The second section is a choice to playback the full show or just a
portion of the show.
c. The third section are the days of playback desired (for weekday
feeds you can select a Saturday playback by selecting “Playback
the show Shifted...”

Version 1.0 09/10/2015
Page 9of 11
8) To request a change to an existing playback, left click the desired
scheduled playback, select Edit Schedule and adjust the playback times
accordingly.
9) If you need to update your email address, simply select the “Settings” link
in the upper right corner and re-submit the new address.
10)If you are missing expected shows in the drop down menu or the port you
are trying to program is not active or if you just have general questions,
please feel free to contact Network Operations at 888-435-7450, option 1
then option 2 (no need to wait for the prompts).

Version 1.0 09/10/2015
Page 10 of 11
Safety Summary
The iPump i8640 is designed for safe use with few special precautions required of the user. The
following items are basic precautions to use when installing and working with the iPump i8640:
Do not open the iPump i8640’s chassis cover as this will void the limited product warranty.
Location and Mounting
The iPump i8640 should be mounted in a standard 19-inch equipment rack. After
mounting, maintain a clean, dry environment for the unit.
Precautions
WARNING
This is a Class A product. In a domestic environment this product may cause radio
interference for which the user may need to take mitigating action.
DANGER
To avoid damage to this and other equipment, or personal injury, the following items should be
strictly observed.
Elevated Operating Ambient
When equipment is installed in a closed or multi-unit rack assembly, the operating ambient
temperature of the rack environment may be greater than the room ambient temperature.
Therefore, consideration should be given to the ambient air temperature within the rack, and not
just inside the room, when deciding if the maximum recommended ambient operating
temperature (TMRA) is being met.
Reduced Air Flow
Equipment should be installed such that airflow required for safe operation of the equipment is
not compromised. Units may be stacked with other rack-mount equipment without gaps.
However, to ensure adequate air flow, leave rear and front vents unobstructed. Providing1/2 inch
clearance for the right side air vents results in a longer product life for the iPump 8640.
Mechanical Loading
Mounting of the equipment in a rack should be such that a hazardous condition is not produced
by uneven loading. This unit is not very heavy, but total rack loading must be considered. Also, do
not rest any unsupported equipment on the iPump 8640.
Circuit Overloading
Consideration should be given to the connection of the equipment to the supply circuit and the
effect that overloading of circuits could have on over-current protection and supply wiring. Ensure
that the total rack or breaker power consumption does not exceed the limits of the ac branch
circuit. Appropriate consideration of equipment ratings should be used when addressing this
concern.

Version 1.0 09/10/2015
Page 11 of 11
DANGER
Reliable Earthing
Reliable earthing of rack-mounted equipment should be maintained. Particular attention should
be given to supply connections other than direct connections to the branch circuit (use of power
strips, chassis ground lugs, etc.).
Lithium Battery
Proper disposal and replacement of the motherboard’s lithium battery is necessary. Replacing the
battery with an incorrect type presents the risk of explosion. Dispose of used batteries according
to the package instructions.
Telecommunication Line Cord
To reduce the risk of fire, use only No. 26 AWG or larger telecommunication line cord.
Rack Installation Procedure
The iPump i8640 is sized at 2 RU and will fit an EIA-standard, 19-inch-wide equipment rack.
1) Install angle brackets or cross-supports capable of supporting both the unit and its
connecting cables. Screw or bolt the supports securely to the equipment rack.
2) Place the iPump 8640 on its supports and use four anchor screws or bolts and nuts to
secure the unit's front brackets to the rack.
WARNING
Do not block any of the ventilation or fan opening on the front, side, or rear of the unit. Support
arrangements that do not allow adequate air flow or which block the openings on front, side and
rear vents may result in overheating and damage to the iPump 8640.
WARNING
The front brackets must be secured to the rack. If front brackets are left unsecured, the unit may
shift forward and fall from the rack during installation or operation. Failure to secure the front
brackets may result in personal injury and/or damage to the equipment.
WARNING
Locate the iPump 8640 and its cables to avoid impacts, spills, and pulling cables and to ensure
sufficient air flow. Failure to locate the iPump 8640 in a proper environment may result in damage
to the equipment.
WARNING
The hard drives are NOT hot swappable and permanent damage will occur if removed while the
unit is powered up. Please contact our support hotline for directions if service becomes
necessary.
Table of contents
Other WestwoodOne Server manuals
Popular Server manuals by other brands

HP
HP LC2000r - NetServer - 128 MB RAM Upgrade guide

HP
HP ProLiant BL460c G7 Maintenance and service guide

Moxa Technologies
Moxa Technologies NPort IA5450A Quick installation guide

Supero
Supero SUPERSERVER 5017C-MTF user manual

Supermicro
Supermicro SuperServer 5037C-i user manual

Sun Microsystems
Sun Microsystems Sun Fire X4250 Volume configuration guide

Sun Oracle
Sun Oracle SPARC T3-1 installation guide

HP
HP ProLiant DL380 Quickspecs

Digitus
Digitus WIRELESS 300N AUTO INSTALLATION USB ADAPTER user manual

Opengear
Opengear IM7216-2-24E quick start guide

Supermicro
Supermicro Storage SuperServer SSG-640P-E1CR24H user manual

Fujitsu
Fujitsu M10 Series Installation planning manual