Wetling W200 User manual

WETLING W200
USER GUIDE
Wireless Micro Current Stimulators - Version: 2019-2

1Wetling W200 User Guide | Wireless Micro Current Stimulators | Ver. 2019-2
Please Read This Before You Begin
This User Guide constitutes the “Instructions for Use” (as per MDD 93/42/EEC
Annex I.13) for the Wetling W200 medical device.
This User Guide (Version 2019-2) covers Wetling W200 devices with the
following serial numbers:
• 275 0000 – 275 9999
The W200 device is delivered in either a cardboard box (order number 610-
11xx) or a hard case that is useful for safe transportation of the device (order
number 610-12xx). The last two digits (“xx”) of the order number indicate the
type of 3-pin power plug that is fitted before delivery (see examples on page
12).
Read this user guide carefully to ensure that the device functions properly.
In the unlikely event that the device does not work properly, power off and
consult this manual. If the problem persists, please contact your local Wetling
service agent.
While every effort has been made to ensure that the data in this manual is
accurate, the information, figures, illustrations and specifications herein are
subject to change without notice.
The manufacturer retains the right to modify the equipment without notice.

2
Wetling W200 User Guide | Wireless Micro Current Stimulators | Ver. 2019-2
Contents
Introduction to the WMCS Technology 3
Wetling W200: General Description 4
Wetling W200: Important Safeguards
Intended Purpose 5
Indications for Use 5
Contraindications 5
Side Effects 5
Cautions & Warnings 6
Practical Guidelines:
W200 Related Guidelines 7
Treatment Related Guidelines 8 - 9
Setting up the W200:
Creating an Electrical Circuit 10
Mounting the Console 11
Connecting to Power 12
How to Connect Return Cable & Position Treatment Head 13
Operating the W200:
Control Panel Overview 14
How to Set Microcurrent & Timer 15
How to Set LED Light 16
Starting a Treatment 17
Troubleshooting, Maintenance & Storage 18
The Usage Timer:
How to View the Timer 19
How to Update the Timer 20 - 21
Technical Specifications & Symbol 22
Electromagnetic Compatibility 23 - 24
Declaration of Conformity 25
Warranty & Manufacturer 26

3Wetling W200 User Guide | Wireless Micro Current Stimulators | Ver. 2019-2
Introduction to the Wetling WMCS Technology
The WMCS (Wireless Micro Current Stimulation) technology is invented and
patented by Wetling.
Electrical Stimulation (ES)
WMCS is based on a well-known, scientifically verified method (Oxford CEBM
class 1a evidence); The use of Electrical Stimulation for accelerated wound
healing. However, in spite of its well-established results, historically ES has not
been commonly used due to significant complications in traditional treatment
techniques.
Wireless Micro Current Stimulation (WMCS)
The innovative WMCS technology enables Electrical Stimulation (ES) to be
wirelessly transferred to the wound by using Oxygen's and Nitrogen’s ability
to receive and donate electrons. The radical advantage of WMCS (over
traditional ES), having no physical contact to wound, means that it is very
easy to administer, it significantly improves patients' pain and comfort levels
and it reduces the risk of infections. It also allows for a larger treatment area
per session, thus saving time for both patients and medical staff.
Treatments with Encouraging Results
The WMCS technology produces results that in most cases exceeds the
expectations in conventional wound healing:
• Shorter Healing Times
• Pain Relief
• Reduced Risk of Infections
• Cost Savings
Saving Time & Money
The WMCS technology will shorten healing time, resulting in patient comfort
and reduced nursing costs.

4
Wetling W200 User Guide | Wireless Micro Current Stimulators | Ver. 2019-2
Wetling W200: General Description
The Wetling W200 is a medical device providing Wireless Micro Current
Stimulation (WMCS) for wound and tissue healing. The Wetling W200 is
delivered in a box containing:
1. Main W200 device, consisting of
- Treatment head
- Flexible arm
- Power supply box
- Power supply cable
- Return cable
2. Console for table attachment
3. Wetling W200 User Guide (hard copy)
3. USB memory stick with W200 User Guide (soft copy)
Protection Cap for Transportation:
At delivery, the emitter head is protected by a
yellow plastic cap, make sure to remove this before
use.
1
2
3
4

5Wetling W200 User Guide | Wireless Micro Current Stimulators | Ver. 2019-2
Wetling W200: Important Safeguards
Intended Purpose
The Wetling W200 device is intended to be used in professional health care
environment to delivery Wireless Micro Current Stimulation (WMCS) to
patients. Without direct contact to the injured tissue, WMCS will promote
and accelerate wound and tissue healing by attracting the cells of repair,
changing cell membrane permeability, enhancing cellular secretion through
cell membranes and orienting cell structures through the bioelectrical process
of electrotaxis.
Indications for Use
The Wetling W200 device is suitable for adjunct WMCS treatment of most
types of wounds and injuries, both chronic and acute:
• Pressure ulcers
• Arterial ulcers
• Venous stasis ulcers
• Neuropathic diabetic ulcers
• Burns; first, second and third degree
• Surgical wounds
• Traumatic wounds
• Soft tissue injuries
Contraindications
Do not use the Wetling W200 if:
• The patient is pregnant or nursing.
• The patient has a pacemaker or other implanted electrical device(s).
• The patient has a malignancy close to the wound.
• The patient suffers from epilepsy or other neuroexcitatory conditions.
Side Effects
Light itching, tingling and/or redness may occur during and/or after the
treatment.

6
Wetling W200 User Guide | Wireless Micro Current Stimulators | Ver. 2019-2
Wetling W200: Important Safeguards
Cautions & Warnings
• Only operate the W200 according to the guidelines in this User Guide
(Instructions for Use).
• Do not operate the W200 near shortwave or microwave therapy
equipment.
• Do not simultaneously connect the W200 and any high-frequency
equipment to the patient.
• Do not take the W200 apart, as this can cause electrical shocks.
• Do not use the W200 if there is visible damage to the housing, power box
or cables.
• Patients should not use cellular phones or other communication devices
while during the W200 treatment.
WARNINGS
Use of other equipment adjacent to this equipment should be
avoided because it could result in improper operation. If such
use is necessary, this equipment and the other equipment
should be observed to verify that they are operating
normally.
Portable RF communications equipment (including
peripherals such as antenna cables and external antennas)
should be used no closer than 30 cm (12 Inches) to any part
of the unit, including cables specified by the manufacturer.
Otherwise, degradation of the performance of this equipment
could result.

7Wetling W200 User Guide | Wireless Micro Current Stimulators | Ver. 2019-2
Practical Guidelines
Wetling W200 Related Guidelines
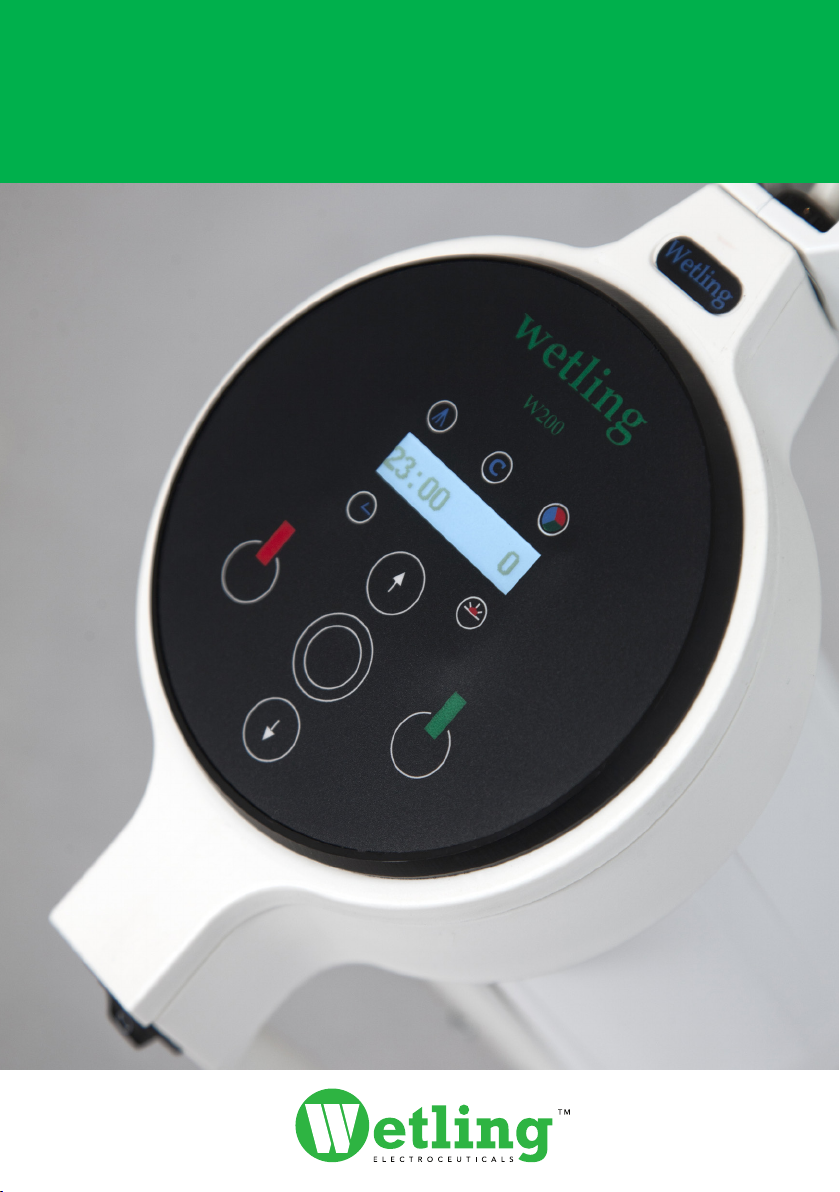
The Wetling W200 Beeping Signal
Do not proceed with a treatment if the Wetling W200 emits a continuous
beeping sound (for more information, see pages: 10, 13 & 18).
The Positioning of the Return Cable
The return cable should be kept away from the treated area; otherwise this
may affect the electrical transfer and reduce the efficiency of the treatment.
Cleaning of the Device
Use no other cleaning agents or disinfectants aside from 60–70% isopropyl
alcohol. Other cleaning liquids may leave a residue on the device that could
attract the negative ions and cause the W200 device to malfunction. Be
careful while cleaning not to damage the tiny emitter threads (see picture on
page 18).
Temperature & Humidity
The working temperature for the W200 should be between 15–30 °C and
the humidity should be kept between 30–60%. Extreme humidity may
negatively affect the treatment. Also avoid using the W200 in dusty or windy
environments.
The W200 LED Light
The LED light can be used to serve as visual indication that a treatment is in
progress, and may have a calming effect on some patients.
How to Setup & Operate the W200
For instructions on setting up and operating the W200, see pages 10–17.
Recommended Treatment Settings
Under normal circumstances, the recommended current is 1.5 µA and the
recommended treatment time is 45–60 min. Treatments should typically be
administered 2–3 times a week. In severe cases such as hospitalized burn
patients, treatments may be administered daily.
Interrupting a W200 Treatment
If a treatment needs to be interrupted, push the red OFF button once, which
will pause the treatment. Remove the return cable from the electrode or the
limb clamp. To continue the treatment, refit the return cable, reposition the
treatment head over the wound and push the green 'ON' button.
Refer all service calls to your local Wetling service agent.

8
Wetling W200 User Guide | Wireless Micro Current Stimulators | Ver. 2019-2
Practical Guidelines
Treatment Related Guidelines
• Inspect the wound regularly, following the procedure recommended by
the prescribing physician.
• If the wound shows signs of infection, treat the wound according to the
instructions of the prescribing physician.
• In the case of malignancy (cancer), any signs of accelerated deterioration
should be followed up with the prescribing physician.
• Consult the prescribing physician if:
- deterioration of the wound occurs or is suspected
- there is excessive scar tissue at the wound sit
- the patient has a major heart disease, uncontrolled bleeding
disorders, or a metallic implant
- the patient's wound has over-granulation (rough) tissue
Wound Size Capacity
When applying the recommended parameters for use (1.5 µA at a distance
of 10–12 cm from the wound), the area of treatment with the W200 device is
approximately 300 cm2 .
Under favourable conditions (temperature, humidity & patient), the treatment
area can be increased to approximately 400 cm2 by increasing the distance
to the wound in small increments. The W200 device will start to beep
continuously when the distance from the wound is too great for the current
conditions. Note that by increasing the distance from the wound, the electrical
charge is distributed over a larger area, causing the energy density per cm2 to
decrease (See page 13, "How to Position the Treatment Head".)
If the wound area is larger than what is stated above, divide the entire area
into smaller sections and apply a full treatment for each. Overlapping sections
impose no risk.

9Wetling W200 User Guide | Wireless Micro Current Stimulators | Ver. 2019-2
Practical Guidelines
Use of Conventional Dressings
WMCS is typically applied as adjunct treatment together with conventional
wound care practice.
When treating most wounds, dressings should be removed before any WMCS
treatment. For chronic wounds it is recommended that WMCS should be
applied over the exposed wound in combination with regular dressing change,
typically 2–3 times per week.
For burns, the first treatment should be given before the initial dressing
is applied. This will generate a thin layer of new skin over the wound. A
recommended primary dressing for burns should then be applied, which can
remain on the wound during subsequent WMCS treatments and only removed
when full epithelialization has occurred. This avoids painful dressing changes
for burns patients at the same time as it reduces nursing costs and the risk of
infections or permanent scarring. (Secondary dressings, such as gauze, should
be removed to allow the ions to reach the wound.) For severe burn patients
who are typically hospitalized, daily WMCS treatments are recommended.
Other acute wounds (such as surgical wounds or wounds caused by trauma)
should preferably have the first WMCS treatment as soon as possible after
the surgery or injury. The wound will then heal faster with less swelling
and reduced risk of infections. Also, the risk of permanent scarring and
pigmentation changes is reduced.
When using wound care products that contain metal ions (e.g. silver
dressings) a temporary darkening of the skin may occur.
Visible Results & Pain Relief
In some cases (e.g. burns) there will be visible results and pain relief already
after the first treatment.

10
Wetling W200 User Guide | Wireless Micro Current Stimulators | Ver. 2019-2
Setting up the W200:
Creating an Electrical Circuit & Positioning the Patient
Creating an Electrical Circuit
As the WMCS therapy works by transfer of electric microcurrent, the patient
has to be in an electrical circuit with the device.
The patient and the treatment bed or chair must be isolated from 'ground' in
such a way that the microcurrent transferred from the W200 can be returned
to the device without interference. It is therefore important that the treatment
bed or chair is insulated from the floor by a non-conductive material such as
rubber or plastic.
The patient will be kept in an electrical circuit with the W200 device through
the return cable. The return cable must be connected to the patient’s intact
skin, away from the area to be treated.
It is recommended that standard disposable ECG electrodes (with 4mm snap
connectors) be used. It is also possible to use reusable (medically approved)
ECG limb clamps.
The important thing is that the return cable has good contact with the
patient's skin and is attached far away from the area to be treated, thus not
exposed to the ions generated by the W200 device.
Warning for Interrupted Circuit
The W200 is equipped with a warning (a continuous beeping) that sounds
if the microcurrent does not reach the patient. (See page 13 for further
instructions).
Positioning the Patient
It is important that the patient is comfortable and able to keep the position of
the treatment site relatively still throughout the duration of the treatment.

11 Wetling W200 User Guide | Wireless Micro Current Stimulators | Ver. 2019-2
In a hospital or a medical clinic, it is recommended
to attach the W200 device to a roller stand
(available as a separate accessory). If this is not
available, it is possible to use the provided table
console. This section explains how this table
console may be used.
Setting up the W200: Mounting the Console
Installing the console on a table:
Adjust the table console to the thickness of the
table and tighten the clamp. Ensure that it is well-
tightened to withstand the torque from the W200.
Make sure that the table is sufficiently stable, lest
the W200 tips over during use.
Attaching the device to the table console:
Slide the W200 device into the console.
The W200 can now be rotated 360°.
If using a small table, increase stability by letting
the device bend across the table as shown below.

12
Wetling W200 User Guide | Wireless Micro Current Stimulators | Ver. 2019-2
Setting up the W200: Connecting to Power
Connecting to a Power Outlet:
The W200 must be connected to a 100–240 VAC power supply outlet with
grounding.
Please check that the W200 device has the correct grounded (“3 pin”) power
plug for the respective power socket. A few examples are shown below.
If required, the power plug must be professionally refitted by a qualified
electrician. Do not use a separate “power plug adapter”.
Non-compliance may result in the device malfunctioning or being damaged. In
such a situation, the warranty will be void.
Turning On the Device:
Once the power cable is properly connected, the
device can be turned on with the On/Off switch
located near the handle.
The LED lights will flash briefly and the firmware
version will be shown in the display for a few
seconds.

13 Wetling W200 User Guide | Wireless Micro Current Stimulators | Ver. 2019-2
Setting Up the W200: How to Connect Return Cable &
How to Position Treatment Head
How to Connect the Return Cable:
It is recommended that the return cable be connected to a regular disposable
ECG electrode (with a 4mm snap connector). This will reduce the infection
risk between patients.
Alternatively, reusable (medically approved) ECG limb clamps may be used.
It is important to attach the return cable to healthy/intact skin anywhere
on the patient, away from the area to be treated. Make sure there is a good
connection between the patient’s skin and the electrode or limb clamp and
that the return cable is securely attached to the 4mm snap connector.
How to Position the Treatment Head:
The W200 is equipped with a warning (a
continuous beeping) that sounds if the transferred
microcurrent does not reach the patient.
At the recommended current transfer of 1.5 µA, the
distance from the treatment head to the wound
should be approximately 10–12cm. If the wound
is large, the treatment area can be increased by
progressively increasing the distance between the
wound and the treatment head, until the warning
tone indicates that the distance is too great.
(See also "Wound Size capacity" on page 8.)

14
Wetling W200 User Guide | Wireless Micro Current Stimulators | Ver. 2019-2
Setting Up the W200: Control Panel Overview
Transferred
Microcurrent
Display
Timer
Decrease
Color of LED Light
Firmware Information
(during startup)
Intensity of LED Light
Increase
Activating
The control panel has the following buttons:
ON, OFF, Activating, Increase and Decrease.

15 Wetling W200 User Guide | Wireless Micro Current Stimulators | Ver. 2019-2
Operating the W200: How to Set Microcurrent & Timer
How to Set the Microcurrent Level:
Press 'Activating' once and the display shows:
The 'indication bar' in the top left position indicates that you are now in the
program for setting the transfer effect from 0.5–4 µA. Use the 'Increase/
Decrease' buttons to set the required microcurrent level.
After setting the level press the 'Activating' again, and the system will
continue to the next program. If you do not press the 'Activating' again, the
system will revert to the idle position.
How to Set the Timer:
Press 'Activating' three times and the display shows:
The 'indication bar' in the bottom left position indicates that you are now in
the program for setting the duration of the treatment (in minutes). The time
can be set from 1–150 min, by using the “Increase/Decrease” buttons.

16
Wetling W200 User Guide | Wireless Micro Current Stimulators | Ver. 2019-2
Operating the W200: How to Set the LED Light
How to Set the LED Light:
Press 'Activating' twice and the display shows:
The 'indication bar' in the top right position indicates that you are now in the
program for setting the wavelength (color) of the LED light to be used during
the treatment.
The options are blue (465 nm), green (530 nm), red (630 nm), and white
(465–630 nm).
How to Set the Intensity of the LED Light:
Press 'Activating' four times and the display shows:
The 'indication bar' in the bottom right indicates that you are now in the
program for setting the intensity of the LED light to be used during the
treatment. The intensity can be set from 0%–100% by using the 'Increase/
Decrease' buttons.

17 Wetling W200 User Guide | Wireless Micro Current Stimulators | Ver. 2019-2
Operating the W200: Starting a Treatment
You have now completed setup.
The display should look similar to the picture below.
The number on the left is the chosen number of minutes for the treatment.
The number on the right is a counter in Coulomb, which is a measure of
electric charge transferred to the patient.
You are now ready to start a WMCS treatment by simply pressing the green
'ON' button.
During Treatment
When started, the W200 will detect the distance and adjust the effect, after
which a short confirmation 'beep' will be heard.
The timer will start to count down and the Coulomb counter will show how
much electrical charge (indicated as a negative value) has been transferred.
When the timer reaches 0, the treatment is automatically terminated.
Once treatment is finished, the Coulomb counter will display the total charge
transferred.
Pressing the OFF button will restore the W200 device to the idle state so that
it is ready for a new treatment.
60:00
0
Chosen time
Coulomb counter
Increase
Activating
Coulomb counter
Decrease

18
Wetling W200 User Guide | Wireless Micro Current Stimulators | Ver. 2019-2
Troubleshooting Guide, Maintenance & Storage
Troubleshooting Guide
If the W200 does not turn on, ensure that:
• The power cable is properly connected and undamaged.
• The power outlet in the room is working (inspect fuses etc.).
If the W200 makes a continuous beeping sound, ensure that:
• The protection cap has been removed from the emitter head.
• The distance from treatment head to treatment site is correct.
• The return cable is properly connected and not damaged.
• The electrode or limb clamp attached to the return cable is fitted closely
to the patient's skin.
• The temperature of the room is between 15–30 °C.
• The humidity is between 30–60%.
• The treatment bed or chair is isolated from the floor.
• The patient is not disrupting the circuit (e.g. touching a 'grounded' object).
W200 does not stay in a fixed position, ensure that:
• Both the table and the table console are firm and level.
• The knob on the arm, close to the treatment head, is properly tightened.
Maintenance:
To ensure that the W200 works as intended, it is recommended that an annual
service check be conducted by the local Wetling service agent.
Cleaning:
The W200 should be cleaned and disinfected using
60–70% isopropyl alcohol whenever necessary.
Other cleaning liquids may leave a residue on the
device that could attract the negative ions and
cause the W200 device to malfunction. When
cleaning, be careful not to damage the tiny emitter
threads (see picture).
Storage:
The W200 should be stored in an indoor facility at room temperature between
15–30 °C and humidity between 30–60%.

19 Wetling W200 User Guide | Wireless Micro Current Stimulators | Ver. 2019-2
The Usage Timer: How to View the Timer
Introduction
The W200 is controlled by a usage timer. This is typically factory-set
depending on the type of contract that has been agreed. The timer indicates
the remaining available treatment time in hours.
This section explains how to view the remaining treatment time and how this
can be updated after acquiring a new "Top-Up Code" from Wetling.
If the device from the factory is set to unlimited usage,
this chapter is not relevant.
View Remaining Usage Time:
To view the remaining usage time press the 'Activating' button three times
until the 'indication bar' is in the bottom left position of the display (over the
'timer' symbol):
Now press and hold the 'Activating' button for approximately 2–3 s. When
the button is released, the machine will acknowledge by beeping twice and
the remaining usage time will be shown on the display. Example “R: 53.2”
indicates that the device can be used for another 53.2 hours (53 hours and 12
min).
If the usage time is unlimited, the display will show '–'.
If the remaining time is less than 10% of the factory-set time, the message
“TIME LOW” will be displayed when turned on. This message will disappear
when any button is pressed.
If zero time is reached during a treatment (meaning all time used), the
machine will continue working till the end of the current treatment, but no
further treatment will be possible.
Pressing the 'Activation' button twice will return the device to the idle state,
ready for a new treatment.
Table of contents
Popular Medical Equipment manuals by other brands

Creative Medical
Creative Medical POD-1a user manual

ARJO HUNTLEIGH
ARJO HUNTLEIGH citadel Quick reference guide

B. Braun
B. Braun Aesculap Lektrafuse GN200 Instructions for use/Technical description

Contec
Contec CMS8000 Service manual

Healthcraft
Healthcraft P.T.Rail Angled manual

C-me
C-me Color Vision BodyGuard 595 Directions for use

ARJO HUNTLEIGH
ARJO HUNTLEIGH First Step Plus Operation manual

ARJO HUNTLEIGH
ARJO HUNTLEIGH Carendo Instructions for use

Smith & Nephew
Smith & Nephew Dyonics 300XL Operation & service manual

MTR+
MTR+ PeroBravo Operator's manual

Amanngirrbach
Amanngirrbach Centrofix instruction manual

C-me
C-me BodyGuard 121 Twins Operator's manual