Wexxar BEL 180 User manual
Operator Manual 65-34-5 Effective APRIL 21, 2010
BEL 180
SEMI-AUTOMATICRANDOM/SELF-ADJUSTING
UNIFORMTOPANDBOTTOMCASETAPESEALER
©Belcor Division of Wexxar Industries Inc.
Phone (604) 270-0811 • Fax (604) 270-7897

BEL 180 SEMI-AUTOMATIC RANDOM TAPE SEALER 2
Introduction
The BEL 180 is capable of applying pressure-sensitive tape to both the top and bottom of various
size cases presented to the machine at random or without manual adjustment between sizes. In
addition, the machine features the ability to use the random function to automatically adjust to a
uniform case size and lock itself in position for longer runs of a single case size.
The features of the BEL 180 are:
DEKKA CADET - 2” high performance tape heads
A special sensor system that activates the dynamic case height adjustment while eliminating a
potential pinch point. Moving parts are concealed by design and by guarding to a high
standard of safety
A stainless steel controls enclosure with logic controller and a second conveniently placed
start/stop switch at the front of the top tapehead holder. There is a solenoid valve as well as a
manual valve for compressed air supply.
Roller infeed section for easier case entry
A robust vertical actuator system for moving the top drive and tape head. It uses air cylinders
with pneumatic rod locks to secure the random case size adjustments, lock the machine in
position for uniform case sizes in ‘Lock’ mode and for safety to prevent unexpected
movement in the case of a sudden electrical or pneumatic power failure.
A tilt-up bottom tapehead holder for easier access to replace the tape roll or remove the
bottom tapehead from the machine.
Heavy duty stainless steel frame.
Interlocked enclosure guard doors.
Standard Specifications:
Length Width Height
Case Size Range Minimum 6” / 152mm 6” / 152mm 6” / 152mm
Maximum 72” / 1829mm* 17” / 432mm 19” / 483mm
*can be made longer
Machine Dimensions 46” / 1175mm 36” / 889mm 54” / 1372mm
In/Outfeed Height Frame 23.5” / 597mm
With adjustable leg extensions
[foot pad] Minimum
Maximum
23.5" / 597mm
30” / 762mm
Speed Up to 10 cases / min.
Shipping Weight Approx. 500 lbs. / 227 kg.
For further detail, see Layout Drawing 75-678
65-34-5 4/21/10

BEL 180 SEMI-AUTOMATIC RANDOM TAPE SEALER 3
Table of Contents
BEL 180 Main Controls & Function Reference................................................................. 4
Connecting Power............................................................................................................... 5
Electric........................................................................................................................ 5
Compressed Air .......................................................................................................... 5
Installing & Removing the Tape Heads.............................................................................. 6
Bottom Tape Head.......................................................................................................... 6
Top Tape Head................................................................................................................ 8
Top Tapehead Downward Force [Pressure Regulator] Adjustment................................... 9
Conveyor Side Force [Pressure Regulator] Adjustment................................................... 10
Feeding Cases to the Machine .......................................................................................... 11
Automatic Random Case Size Operation ..................................................................... 11
Self-Adjusting Uniform Case Size Operation – ‘Lock’ Mode ..................................... 12
Troubleshooting Guide ..................................................................................................... 14
Section 1 - Corrugated Case Quality and Specifications.............................................. 14
General Taping Conditions........................................................................................... 15
65-34-5 4/21/10

BEL 180 SEMI-AUTOMATIC RANDOM TAPE SEALER 4
BEL 180 Main Controls & Function Reference
Machine Status Light
• Steady Green – Ready
• Flashing Green – Bottom tape
head raised and ready to access
• Quick-Flashing Green – Machine
or cycle fault
Control Station
• E-stop
• Reset
• Self-Adjustment
lock function
Front Guard doors
with key interlock
switch
Bottom tape head tilt-up lever
Main Air Supply
• Manual and solenoid air
shut-off valves
• Air filters
Main Controls Enclosure
• Main Electrical Power
Shut-off
• Top tape head lift
switch
• Conveyor drive test
Side belt conveyor
and top tapehead
pressure (force)
adjustment
Bottom tape head
Top tape head
65-34-5 4/21/10

BEL 180 SEMI-AUTOMATIC RANDOM TAPE SEALER 5
Connecting Power
Electric
The BEL 180 is single-phase 110-120 VAC. The conveyor drive system is powered by
dual gear-motors that together draw 5.5 amps.If required, a minimum 14 gauge (AWG)
power extension cord with standard three pin connection must be used to connect the
machine to the power source.
Compressed Air
The BEL 180 requires an air supply that must be clean and dry and at an optimal pressure
of 80 PSI. The volume of air required is 0.02 CF/cycle at 80 PSI (6 Bar). The air supply
line must be of sufficient diameter to provide an adequate amount of air without pressure
drops when the machine is cycling. A ½” air line size is recommended.
One of the most common causes of inconsistent machine performance is inadequate air
supply. Therefore, meeting machine air requirements is important to assure satisfactory
operation.
The BEL 180 is equipped with both solenoid and manual compressed air shut-off / dump
valves and a filter/regulator which should be checked daily to ensure that the air pressure
is adjusted to the proper setting, and any water drained from the filters. The BEL 180
does not use lubrication in the compressed air supply.
Pneumatic Controls
Compressed air
connection
Filter Water Drains
Solenoid Control
Valves
Manual Shut-off
/ Lockout Valve
Main Machine
Pressure
Regulator
Main Air Supply
Solenoid Valve
Pressure Regulators for
Side Belt Conveyor
Gripping Force and Top
Tapehead Downward
Force [see pages 9 & 10]
65-34-5 4/21/10
BEL 180 SEMI-AUTOMATIC RANDOM TAPE SEALER 6
Installing & Removing the Tape Heads
Tape dispensing heads are mounted with pins on their sides that fit into corresponding slots in the
upper and lower tape head mounting positions.
Bottom Tape Head
The bottom tapehead is installed and removed by using the manual lever to rotate it up and out of
the bottom conveyor rollers. It is first necessary to raise the top tapehead holder to be out of the
way using a switch on the main controls enclosure.
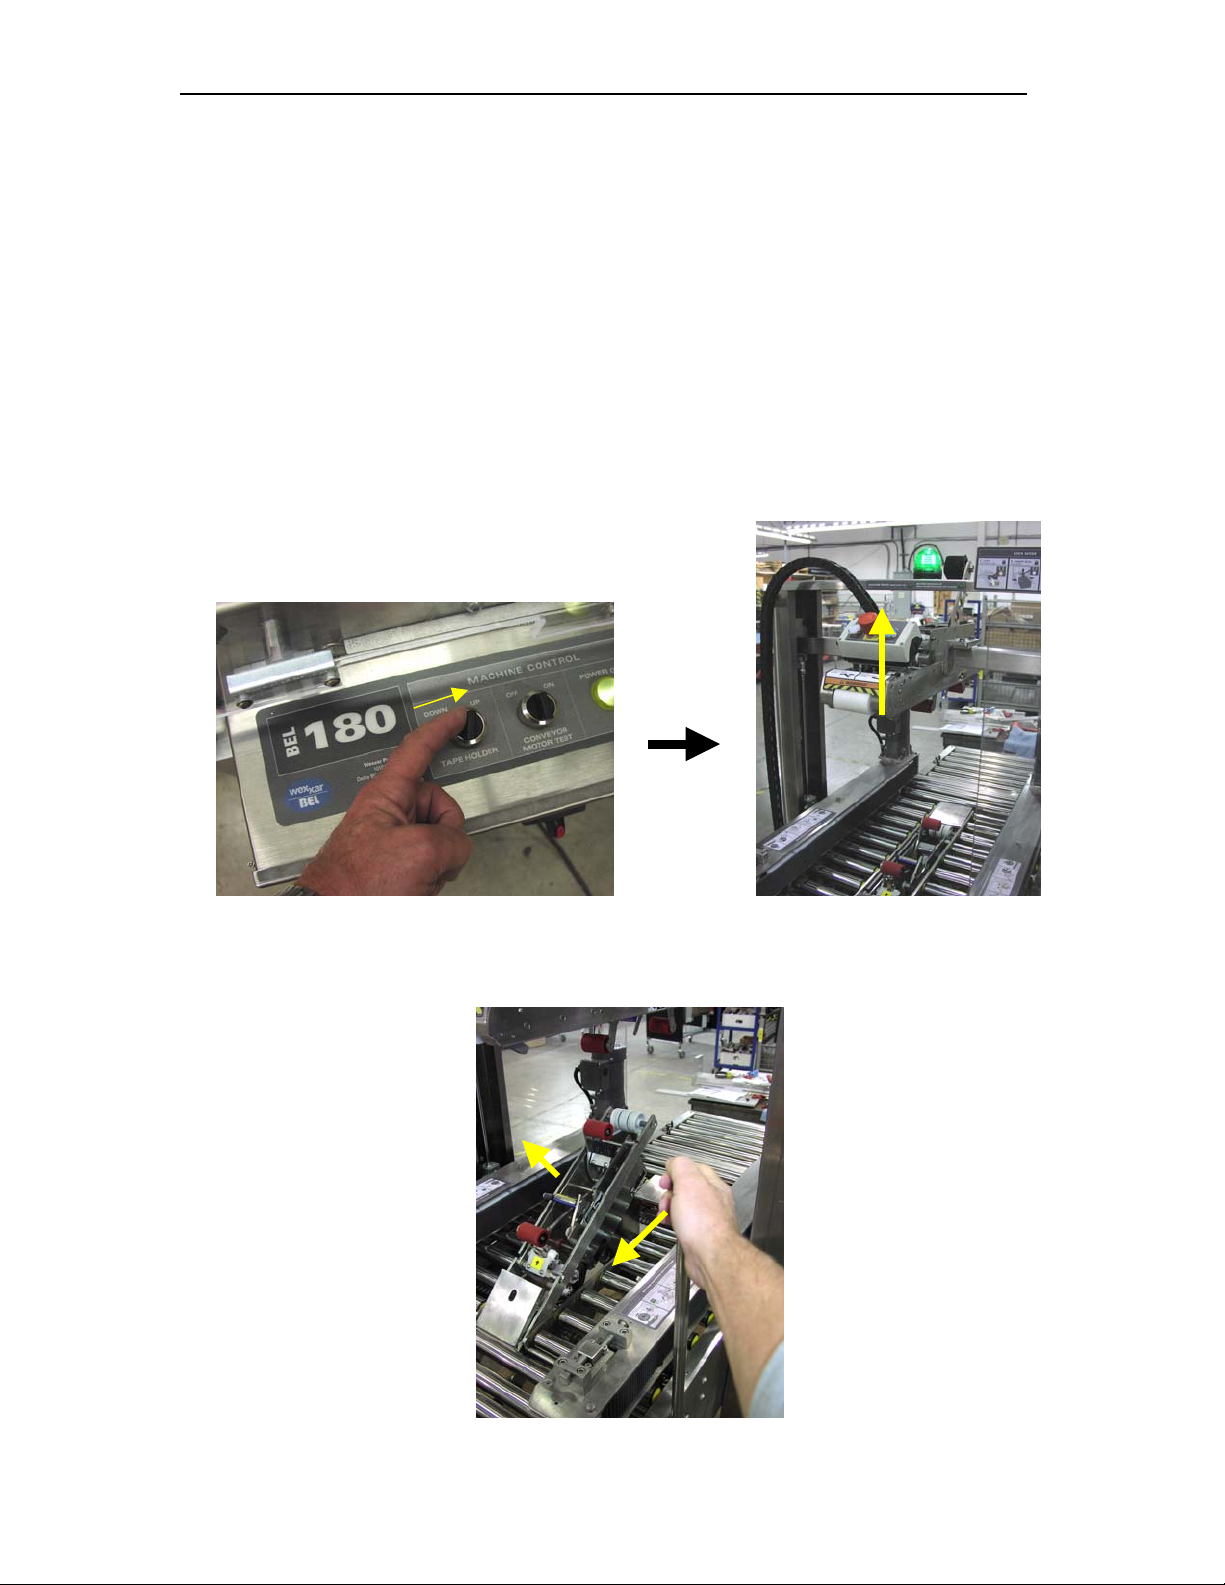
1. With the machine power turned on and all the guard doors closed, turn the TAPE
HOLDER selector switch on the main control panel to ‘UP’. The top tape head holder
will raise it to its maximum height and lock in position, making the bottom tape head
accessible. The green light on top of the machine will flash quickly indicating that the
machine guard door can be opened to reach the bottom tape head.
2. Pull the bottom tapehead holder lever towards you to rotate the bottom head up and out of
the bottom machine frame. The lever has a latching pin to secure it in the up position.
65-34-5 4/21/10

BEL 180 SEMI-AUTOMATIC RANDOM TAPE SEALER 7
3. On the right side of the holder at the top in the raised position, there is a latch that locks
the tape head into the holder. It must be released to remove the head from the holder.
4. To lower the bottom head back down into the machine frame, use the lever to take the
weight of the head and pull the latch pin out to release the lever arm.
5. Once the tape has been changed or the tapehead has been remounted in the bottom holder
and the guard doors closed, turn the TAPE HOLDER selector switch to DOWN and push
the RESET button to lower the holder back down into the bottom frame.
65-34-5 4/21/10

BEL 180 SEMI-AUTOMATIC RANDOM TAPE SEALER 8
Top Tape Head
1. Lower the bottom tape head holder, if raised, pushing the RESET button so that the top
holder will move its lowest position. Turn off the power or open a guard door to shut off the
machine. The top tape roll can be changed in this position.
2. On the top tape head, both the front and rear pins head engage in key-shaped slots. Drop the
head in and then push it back in its holder to engage in retainer clips.
Please consult the tape head manual for instructions on the mounting of tape rolls and the proper
threading of tape through the applicator head.
65-34-5 4/21/10
BEL 180 SEMI-AUTOMATIC RANDOM TAPE SEALER 9
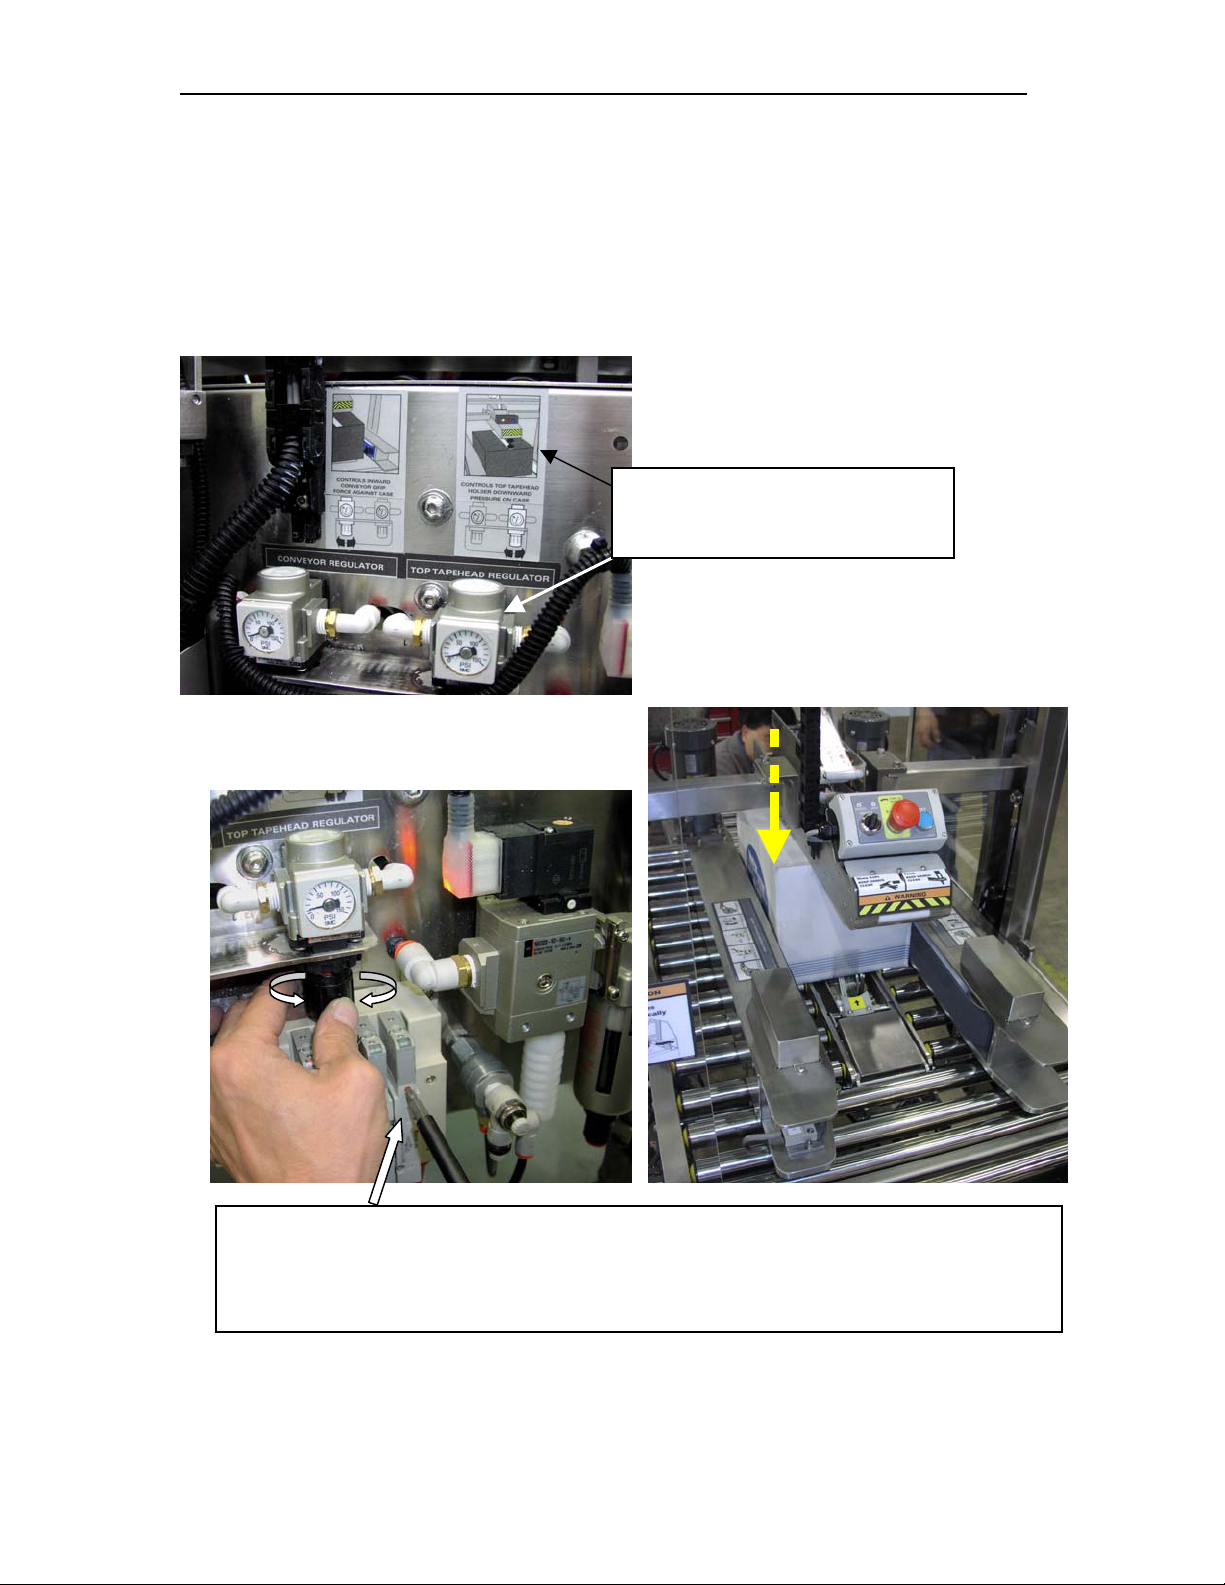
Top Tapehead Downward Force [Pressure Regulator] Adjustment
The top tapehead downward force can be adjusted to provide adequate clamping of the top flaps
and proper taping performance. Too much downward force can cause crushing of the top of the
case or create taping problems. The regulators for the top tape head and conveyor grip are on the
left-hand side of the machine next to the pneumatic air supply and solenoid control valves.
The right hand regulator controls
the top tape head downward force.
To adjust the downward force of the top tapehead, have the machine in ‘Ready’ mode and
use a screwdriver to manually actuate the right-hand end valve on the manifold so that the
pressure indicates on the regulator gauge. Turn the regulator knob to adjust the pressure, it
should be set in the range of 15 psi for average conditions.
65-34-5 4/21/10

BEL 180 SEMI-AUTOMATIC RANDOM TAPE SEALER 10
Conveyor Side Force [Pressure Regulator] Adjustment
The force required to center and grip incoming case in the conveyor drive belts may vary
according to the weight of the product. The amount of force exerted by the conveyor belts can be
adjusted by regulating the air pressure in the conveyor case width adjustment mechanism. The
regulator for the width adjustment is on the left-hand side of the machine behind the main control
enclosure at the outfeed end.
Use just enough pressure to center and drive the case effectively. On soft-sided cases, it will
prevent the case and product from being squeezed unnecessarily. The recommended pressure
range is about 40 PSI.
The left hand regulator controls the side
belt conveyor case centering and gripping
force. It should be set in the range of 40
psi for average conditions
65-34-5 4/21/10
Table of contents
Other Wexxar Food Saver manuals


