Page 2
1
2
3
3
2
1
2
3
FUSE
(CUSTOMER SUPPLIED)
15 AMP FUSE FOR 12V
7.5 AMP FUSE FOR 24V
RED
BLACK
VIOLET
GREEN
BLUE Switch 2
Switch 1 - Scan-Lock™
Switch2-Outlets2&3
Switch3-Outlets1&4
Switch 3
Switch 1
(see “Turn Signal Override”)
(see “Turn Signal Override”)
GREY
WHITE/VIO
WHITE/RED
ALTERNATING
1
2
3
4
OUTLETS
Scan/SyncControlPower
(+)
Battery
(-)
Selecting a mounting location...
The most common choice for a mounting area would be a trunk or similar
compartment. However, due to the wide variety of vehicles onto which the UPS64HA
could be installed, this is not always possible. The following guidelines will help
determine an acceptable alternative:
• The unit should be mounted on a metal surface to aid heat dissipation. Be
sure that this surface is not one that either generates or is exposed to
excessive heat during normal operation of the vehicle.
• Do not select a location where the unit will be exposed to potential
damage from any unsecured or loose equipment in the vehicle.
• Be sure the area selected will not allow the unit to be exposed to water!
• When routing wires, it is important to choose a path that will keep these
wires away from excessive heat and from any vehicle equipment that
could compromise the integrity of the wires (ex. trunk lids, door jams,
etc.).
• When the best mounting location has been determined, securely fasten
the unit to it’s mounting surface using the supplied hardware.
WARNING: The Strobe Light Power Supply is a high voltage device.
Do not touch or remove tube assembly in strobe light head
assemblies while in operation. Wait 10 minutes after disconnecting
the unit from its power source before starting work or
troubleshooting on power supply or system.
1. Position the unit in its proposed mounting location to ensure that it fits properly.
With the unit in place, insert an awl or other suitable tool into the mounting
screw area of the power supply and scribe the areas that are to be drilled.
2. Remove the unit from its mounting area and, using a drill bit sized for a #10
sheet metal screw, drill a hole in each of the areas scribed in the previous step.
3. Return the unit to its mounting location. Using the supplied #10 sheet metal
screws, secure it onto its mounting surface.
Wiring ...
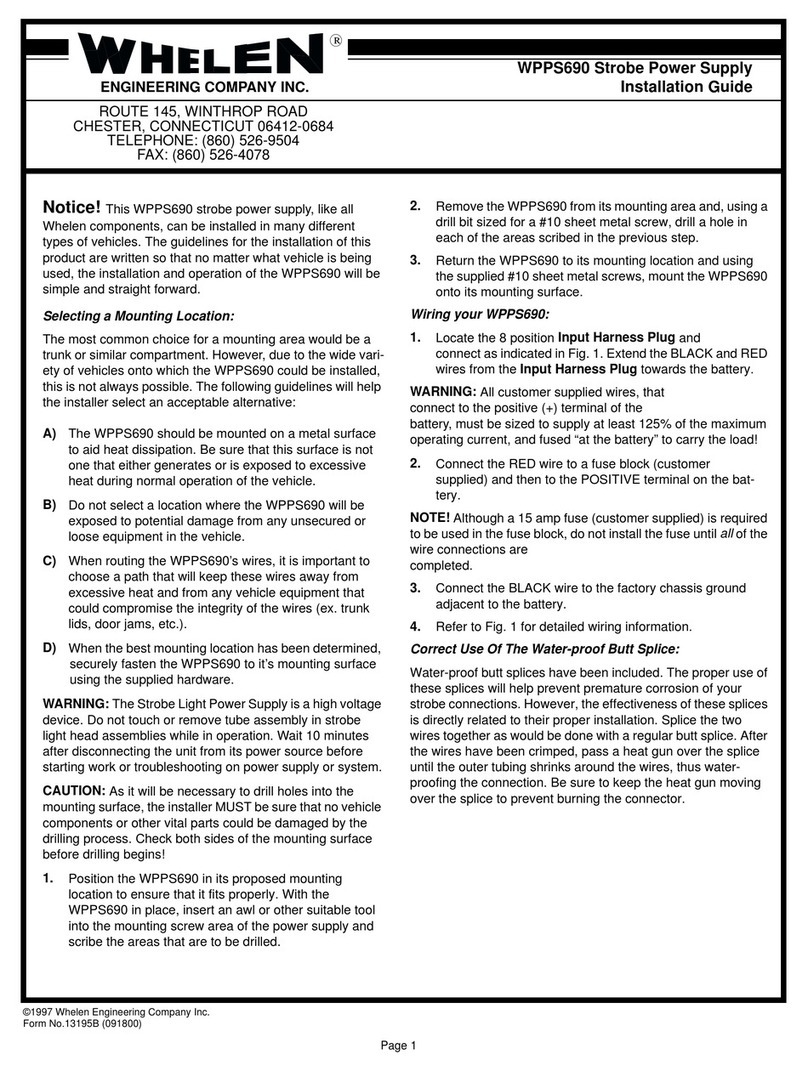
1. Locate the 3 position Power Connector included with your power supply and
plug it into the port indicated in Fig. 1. Extend the BLACK and RED wires
towards the battery.
WARNING! All customer supplied wires that connect to the positive terminal
of the battery must be sized to supply at least 125% of the maximum operating
current and FUSED at the battery to carry that load. DO NOT USE CIRCUIT
BREAKERS WITH THIS PRODUCT!
2. Connect the RED wire to a fuse block (customer supplied) and then to the
POSITIVE terminal on the battery.
NOTE! Although a fuse (customer supplied) is required to be used in the fuse
block, do not install the fuse until all of the wire connections are completed.
3. Connect the BLACK wire to the factory chassis ground adjacent to the battery
(see “Turn Signal Override” for the VIO wire function).
4. Refer to Fig. 2 for wiring information for the Control Connector and for the
Scan-Lock™ Connector.
Turn Signal Override...
This feature will automatically turn off the UPS64HA whenever the vehicle’s turn
signals are in use.
1. Connect the GREY wire (from the Scan-Lock connector) to the positive (+) wire
of the Left turn signal.
2. Connect the VIO wire (from the Power connector) to the positive (+)
wire of the Right turn signal.
Scan-Lock™ Operation...
To cycle through all patterns: Apply the WHT/VIO wire to Ground for less than 1
second and release to cycle forward.
Apply to Ground for more than 1 second and release to cycle backward.
To set a pattern as Default: When the desired pattern is displayed, allow it to run for
more than 5 seconds. The lightheads will now display this pattern when active.
To reset to the Factory Default pattern: Turn off power. While applying the WHT/
VIO wire to Ground, turn power back on.
Available Scan-Lock™ Patterns (in order) -
1) CometFlash® 6) ModuFlash™
2) TripleFlash 7) MicroBurst II™
3) DoubleFlash 8) MicroBurst III™
4) RapidRate™ 9) LongBurst™
5) ActionFlash™ 10) ActionScan™
IMPORTANT! Before returning the vehicle to active service, visually confirm
the proper operation of the flasher system and all vehicle components/
equipment.
Fig. 2
UPS64HA SPECIFICATIONS:
INPUT VOLTAGE - 13.5 VDC (26.5 VDC) ± 20%
INPUT CURRENT @ 4 LAMPS - 7 AMPS (4AMPS)
INPUT CURRENT @ 2 LAMPS - 4 AMPS (2.5 AMPS)
OUTPUT POWER @ 4 LAMPS - 75 Watts
OUTPUT POWER @ 2 LAMPS - 40 Watts
V Ctrl - 13.5 VDC (26.5 VDC) ± 20%
I Ctrl - 100 ma (MAX)
V Output Ctrl - 13.5 VDC (26.5 VDC) ± 20%
I Output Ctrl - 20 ma (MAX)
V Pattern Ctrl - 13.5 VDC (26.5 VDC) ± 20%
I Pattern Ctrl - 5 (MAX)
Strobe Outlets*
*Outlets1&3alternate
withoutlets2&4*
Outlet
Control Power
Fuse
(15A)
Pattern
Control
1234
-15-
Fig. 1
