Whirlpool Vessi User manual

FERMENTOR & DISPENSER
W10894187A

TABLE OF CONTENTS
VESSI™ FERMENTOR & DISPENSER SAFETY ��������������������������������������������������������������3
Important Safeguards ����������������������������������������������������������������������������������������������������4
VESSI™ FERMENTOR & DISPENSER OVERVIEW���������������������������������������������������������5
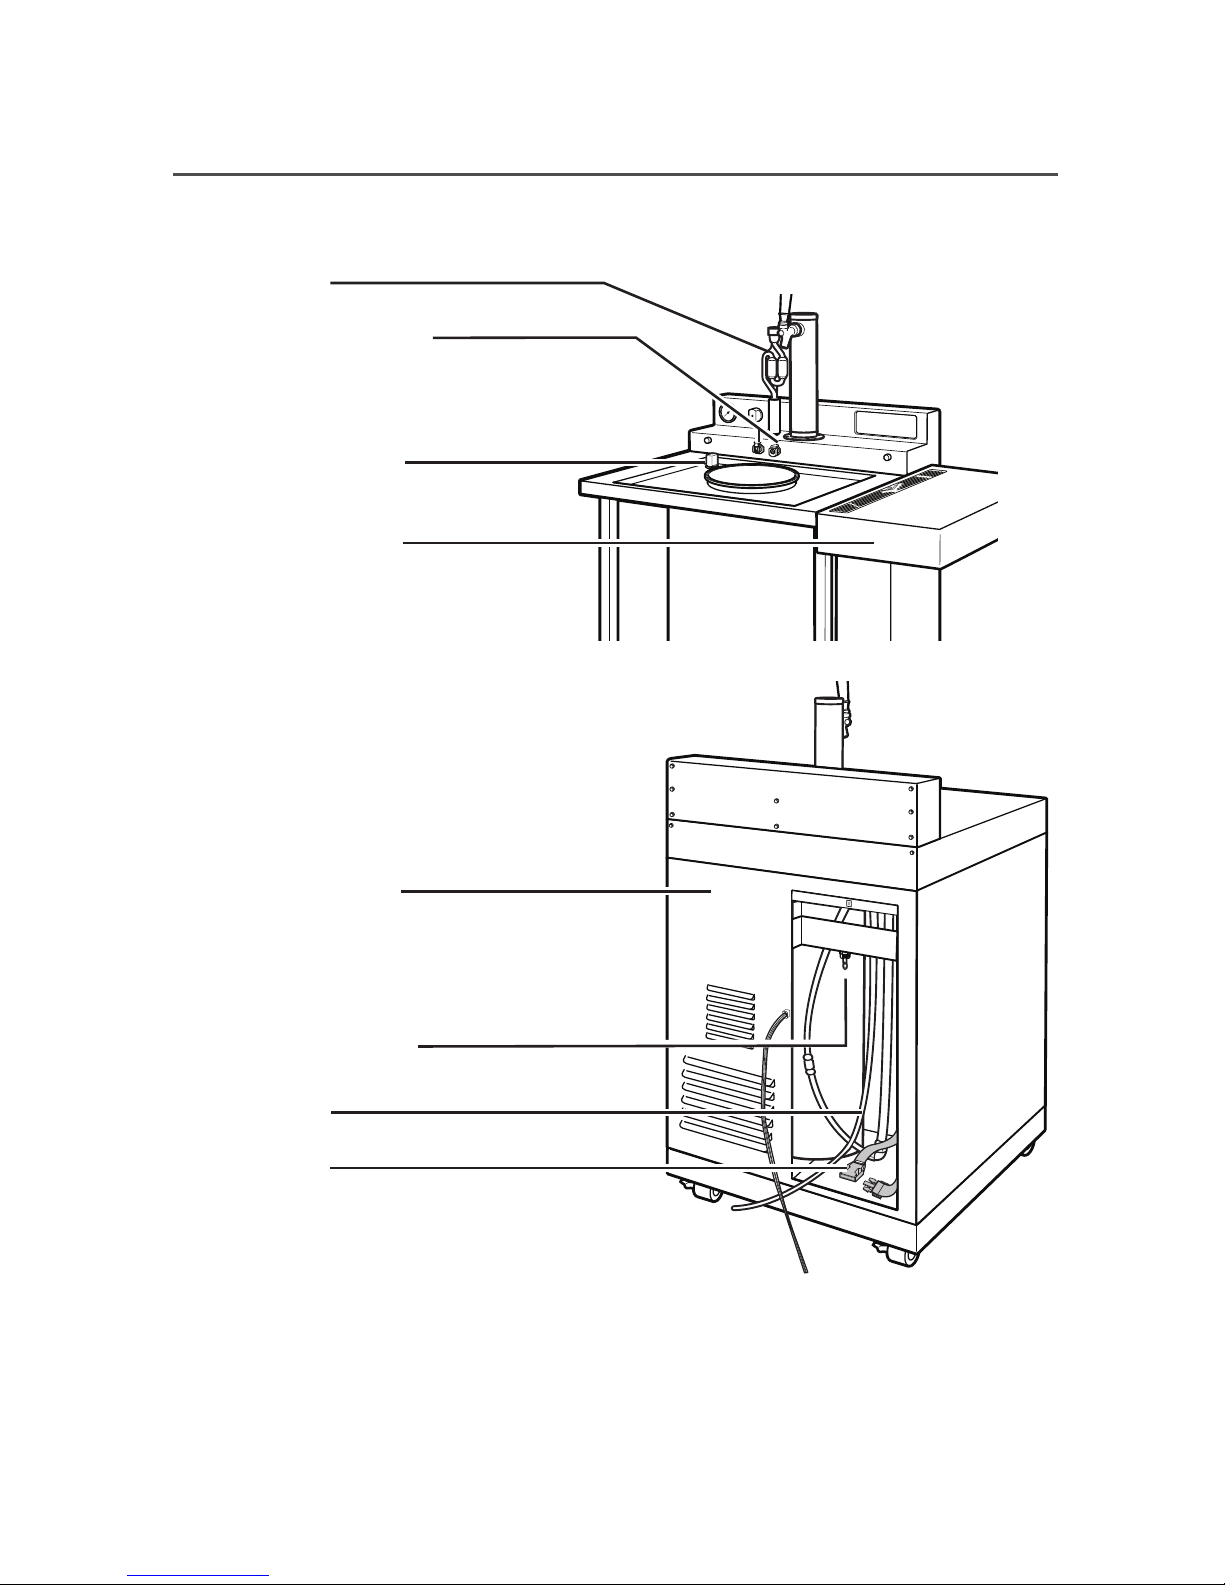
Parts and Features���������������������������������������������������������������������������������������������������������5
From Pitch to Pour In as Little as 7 Days ����������������������������������������������������������������������7
VESSI™ FERMENTOR & DISPENSER PARTS AND ACCESSORIES ���������������������������8
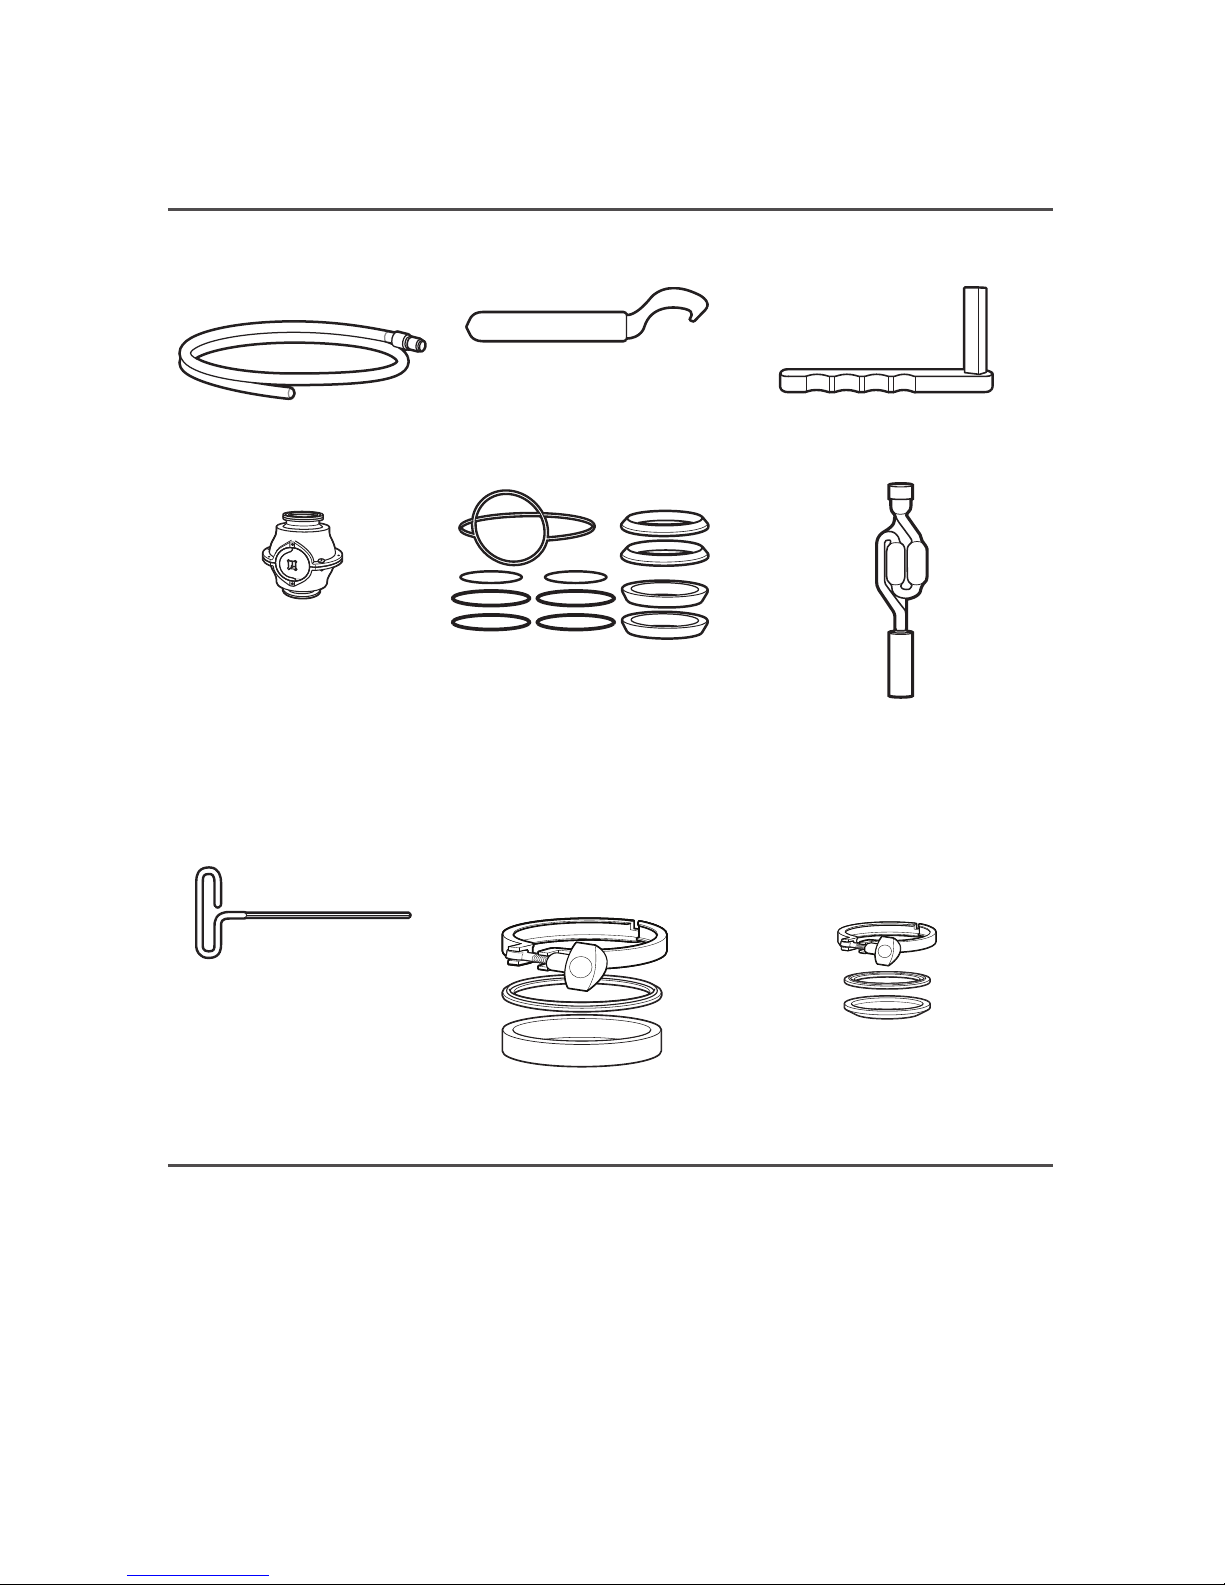
Tools and Parts Provided�����������������������������������������������������������������������������������������������8
Tools Needed�����������������������������������������������������������������������������������������������������������������8
Parts and Accessories Needed �������������������������������������������������������������������������������������9
PRODUCT DIMENSIONS �������������������������������������������������������������������������������������������������10
ELECTRICAL REQUIREMENTS ��������������������������������������������������������������������������������������10
LOCATION REQUIREMENTS�������������������������������������������������������������������������������������������11
SETTING UP YOUR VESSI™ FERMENTOR & DISPENSER ����������������������������������������12
Unpacking �������������������������������������������������������������������������������������������������������������������12
Installing the CO2Tank�������������������������������������������������������������������������������������������������12
Preparing Vessi™ Fermentor & Dispenser for Use������������������������������������������������������16
CLEANING AND SANITIZING YOUR VESSI™ FERMENTOR & DISPENSER ������������17
Disassembling the Sediment Removal System (SRS)�������������������������������������������������17
Remove Heavy Solids From Vessel �����������������������������������������������������������������������������20
Thorough Cleaning of Vessel and Dispensing Lines����������������������������������������������������21
Cleaning the Beverage Lines���������������������������������������������������������������������������������������22
Rinsing �������������������������������������������������������������������������������������������������������������������������23
Sanitizing ���������������������������������������������������������������������������������������������������������������������24
Sediment Removal System (SRS) Assembly���������������������������������������������������������������25
Pressure/Leak Testing��������������������������������������������������������������������������������������������������28
USING YOUR VESSI™ FERMENTOR & DISPENSER ���������������������������������������������������29
Preparing for Fermentation �����������������������������������������������������������������������������������������29
Setting Fermentation Pressure ������������������������������������������������������������������������������������31
Setting the Temperature ����������������������������������������������������������������������������������������������33
Monitoring the Fermentation Process �������������������������������������������������������������������������33
Liquid Injection System (LIS) ���������������������������������������������������������������������������������������33
Sediment Removal�������������������������������������������������������������������������������������������������������35
Specific Gravity Measurement�������������������������������������������������������������������������������������36
Clarification������������������������������������������������������������������������������������������������������������������37
Adding Ingredients/Stirring Beverage��������������������������������������������������������������������������37
Dispensing, Bottling, and Kegging ������������������������������������������������������������������������������38
Accessories and Supplies �������������������������������������������������������������������������������������������39
WARRANTY������������������������������������������������������������������������������������������������������������������������40

VESSI™ FERMENTOR & DISPENSER SAFETY | 3
VESSI™ FERMENTOR & DISPENSER SAFETY
State of California Proposition 65 Warnings:
WARNING: This product contains one or more chemicals known to the State of
California to cause cancer.
WARNING: This product contains one or more chemicals known to the State of
California to cause birth defects or other reproductive harm.
The above warning applies to electrical components within this product only.
Components within this product that contact the beverage do not contain the
chemicals referred to in the above warning.

4 | VESSI™ FERMENTOR & DISPENSER SAFETY
VESSI™ FERMENTOR & DISPENSER SAFETY
IMPORTANT SAFEGUARDS
When using electrical appliances, basic safety precautions
should always be followed, including the following:
1� Read all instructions�
2� Plug into a grounded 3 prong outlet�
3� Do not remove ground prong�
4� Do not use ungrounded (2 prong) adapters�
5� Do not use an extension cord�
6� Disconnect power before servicing�
7� Disconnect power before manually cleaning the inside components�
8� Replace all parts and panels before operating the fermentor�
9� Keep flammable materials and vapors, such as gasoline, away from fermentor�
10� Use nonflammable cleaners�
11� Use two or more people to move and install Vessi™ Fermentor & Dispenser�
12� This fermentor is not intended for use by persons (including children) with
reduced physical, sensory, or mental capabilities, or lack of experience and
knowledge, unless they have been given supervision or instruction concerning
use of the appliance by a person responsible for their safety�
13� Children should be supervised to ensure that they do not play with the fermentor�
14� If the supply cord is damaged, it must be replaced by a special cord or assembly
available from the manufacturer� Do not operate any appliance with a damaged
cord or plug, or after the appliance malfunctions or has been damaged in any
manner� For assistance, call our Customer eXperience Center at 1-866-220-8493�
SAVE THESE INSTRUCTIONS
This product is designed for household use only.

VESSI™ FERMENTOR & DISPENSER OVERVIEW | 5
VESSI™ FERMENTOR & DISPENSER OVERVIEW
PARTS AND FEATURES
Draft tower with faucet
Integrated temperature
controls (35°F to 80°F)
CO2gauge
Adjustable Pressure
Release Valve (APRV)
8-gallon insulated
conical tank for
5-gallon batch
Patent-pending Sediment
Removal System (SRS)
Heavy-duty casters
3-way valve knob

6 | VESSI™ FERMENTOR & DISPENSER OVERVIEW
Counter-pressure bottling
and kegging ports
Liquid Injection System
(LIS)
Modular work surface
with integrated drip tray
(mounts to left side, right
side, or sits on top)
CO2 supply line
Non-Adjustable Pressure
Relief Valve (NAPRV)
CO2 tank straps
(for 5-lb CO2tank)
Bubbler/airlock
with adapter
Machine compartment
VESSI™ FERMENTOR & DISPENSER OVERVIEW
PARTS AND FEATURES

VESSI™ FERMENTOR & DISPENSER OVERVIEW | 7
VESSI™ FERMENTOR & DISPENSER OVERVIEW
FROM PITCH TO POUR IN AS LITTLE AS 7 DAYS*
FERMENT BEER CLEAR SEDIMENT DISPENSE AND ENJOY
Pitch Yeast
Set Temperature
Set Pressure
Use Removal System
Add Flavors
Pour
Bottle
Keg
Dispense a ready-to-drink light blonde ale in as little as 7 days* instead of weeks –
all while exerting more control over the entire fermentation and finishing process�
Speed
Vessi™ Fermentor & Dispenser stays pressurized the entire time, so that what’s
inside stays carbonated� This means there is no need to bottle condition/carbonate**
or force carbonate your beer, cutting days out of your timeline�
Ease
Once the fermentation mixture is in the tank, there is no more transferring� There is
no need to siphon, lift, or jacket either� Everything you need is in one convenient tank
with everything on hand to control the fermentation and finishing process� This allows
you to set the temperature to anywhere between 35°F and 80°F, regardless of whether
you are in a 32°F or 90°F environment�
Confidence
Vessi™ Fermentor & Dispenser helps you reduce the variables that can make good
beer go bad by creating a more controlled environment� Temperature and pressure
control, plus a construction that’s designed to minimize exposure to light and oxygen,
combine to control beer quality� The heating and cooling system helps reach an
optimal fermentation and finishing environment with less effort� So, when it’s all said
and done, this means great beer�
*Light blonde ale 3�3% ABV with use of clarification agent
**Bottling accessory sold seperately

8 | VESSI™ FERMENTOR & DISPENSER PARTS AND ACCESSORIES
VESSI™ FERMENTOR & DISPENSER
PARTS AND ACCESSORIES
TOOLS AND PARTS PROVIDED
Beverage port
cleaning line
Faucet wrench SRS handle
Sediment Removal System
(SRS)
SRS rebuild kit
1 double ring gasket
4 large o-rings
2 small o-rings
2 ball seats
2 end cap seats
Bubbler/air lock
Hex wrench 8" cleaning cap,
gasket, and tri-clamp
(factory installed)
2" cleaning cap,
gasket, and tri-clamp
(factory installed)
TOOLS NEEDED
#2 Phillips screwdriver
7/16 wrench
Large adjustable wrench

VESSI™ FERMENTOR & DISPENSER PARTS AND ACCESSORIES | 9
VESSI™ FERMENTOR & DISPENSER
PARTS AND ACCESSORIES
PARTS AND ACCESSORIES NEEDED
Recommended Basic Fermenting Equipment (not included)
5-lb food grade CO2tank*
90° squeeze bottle*
No-rinse sanitizer*
Brewers detergent*
Graduated cylinder*
Hydrometer*
Thief (for taking samples)
Spray bottle
1/2gallon pitcher
All purpose brush/toothbrush
Dip tube brush for draft and CO2lines
Non-scratch scrub sponge
*Highly recommended
Additional Useful Tools and Accessories (not included)
Brew kettle
Large stainless steel spoon
Thermometer
Wort chiller
Measuring equipment
Siphon tube
Faucet plug
5-gallon bucket
Faucet lock (to keep faucet
from moving)
Spray bottle
2"tri-clamp/hose (for cleaning)
Kegging equipment
5-gallon keg
Vessi™ Fermentor & Dispenser bottler
Clarification agent

10 | ELECTRICAL REQUIREMENTS
PRODUCT DIMENSIONS
ELECTRICAL REQUIREMENTS
Electrical Shock Hazard
Plug into a grounded 3 prong
outlet.
Do not remove ground prong.
Do not use an adapter.
Do not use an extension cord.
Failure to follow these instructions
can result in death, fire, or
electrical shock.
WARNING Voltage: 115 VAC
Frequency: 60 Hz
Current: 1�7 Amps
Plug into a grounded 3 prong outlet�
14" wide
(61cm)
24" wide
36" wide
(92 cm)
24" 24"
39"

LOCATION REQUIREMENTS | 11
WARNING
Explosion Hazard
Keep flammable materials and
vapors, such as gasoline, away
from VESSI™ Fermentor &
Dispenser.
Failure to do so can result in
death, explosion, or fire.
IMPORTANT: Place the Vessi™
Fermentor and Dispenser in a well
ventilated area where it can remain for
the duration of the fermenting process
and dispensing period�
WARNING
Explosion Hazard
Do not store CO2 tank in areas
that reach temperatures above
125°F.
Doing so can result in death,
explosion, or serious injury.
Vessi™ Fermentor & Dispenser is
designed to function (i�e�, to ferment and
dispense) in ambient environments that
are between 32°F and 90°F�
Place the Vessi™ Fermentor & Dispenser
on a flat, level surface�
LOCATION CLEARANCES
To back wall: 1"
To side wall(s): 0"
LOCATION REQUIREMENTS
1"
0"

12 | SETTING UP YOUR VESSI™ FERMENTOR & DISPENSER
UNPACKING
1
Cut straps, open top flaps, and
remove foam blocks and corner
posts� Lift the carton off� Dispose
of/recycle all packaging materials�
2Using a 7/16 wrench, remove the
4 shipping brackets�
WARNING
Excessive Weight Hazard
Use two or more people to move
and install VESSI™ Fermentor
& Dispenser.
Failure to do so can result in
back or other injury.
3Using 2 or more people, lift the
fermentor from the pallet�
4
The Vessi™ Fermentor &
Dispenser has 2 swivel casters in
the rear and 2 non-swivel locking
casters in the front� Push the
fermentor from the front, keeping
the swivel casters forward for
proper steering�
Set the fermentor in place and,
if desired, lock the 2 front casters�
5
Remove accessory bag from inside
the vessel and from the base shelf�
Unpack and dispose of/recycle
all packaging materials�
INSTALLING THE CO2TANK
WARNING
Asphyxiation Hazard
Do not use a CO2 tank larger
than 5 lbs.
Doing so can result in death or
serious injury.
A 5-lb food grade CO2tank (to be
installed inside the fermentor) is needed�
One may be rented from a gas supply
company�
IMPORTANT: Reference all warnings
provided with the CO2tank�
SETTING UP YOUR VESSI™ FERMENTOR
& DISPENSER

SETTING UP YOUR VESSI™ FERMENTOR & DISPENSER | 13
TO INSTALL THE CO2TANK
1
Check that the 3-way valve knob
on the control panel is in the
Off position�
2
The back panel is attached with
a strike and catch at the top and
2 metal tabs at the bottom�
Firmly pull out and lift to remove
the back panel�
3Unpack the provided CO2
tank regulator�
IMPORTANT: Make sure the 3-way
valve knob on the control panel is
in the Off position�
4
Using an adjustable wrench, screw
the regulator onto the CO
2
tank so
that the regulator is protruding to the
left and the gauges are facing out�
5
Connect the white CO2supply
line to the regulator� The supplied
regulator has a push-lock fitting�
Firmly push the white CO2supply
line into the push-lock fitting until
it locks into place�
Pull down on the line to check that
the line is fully locked in place�
NOTE: See the “To Replace the
CO2
Tank” section for instructions on
how to remove the
CO2supply
line�
SETTING UP YOUR VESSI™ FERMENTOR
& DISPENSER

14 | SETTING UP YOUR VESSI™ FERMENTOR & DISPENSER
6
Place the CO2tank into the
compartment and secure with
the provided strap�
7
Open the CO2tank valve� The top
gauge will measure the CO2tank
output pressure to the fermentor�
The gauge on the left will display
the CO2tank pressure� The CO2
tank output pressure should be
approximately 15 to 20 psi�
CO2tank
output
pressure
CO2 tank
pressure
CO2tank valve
8
To increase CO2tank output
pressure, turn the regulator knob
clockwise while monitoring the
pressure on the output gauge�
To decrease CO2tank output
pressure, alternately turn
the regulator knob a 1/4 turn
counterclockwise and release
pressure using the pressure relief
valve� Listen for any gas leaks�
NOTE: The CO2tank output
pressure should be approximately
5 psi above your intended
fermentation pressure�
Pressure relief valve
Regulator knob
9
Open the supply line shut-off valve�
NOTE: Valve is open when the lever
is in the down position�
Supply line
shut-off valve
(open position)
SETTING UP YOUR VESSI™ FERMENTOR
& DISPENSER

SETTING UP YOUR VESSI™ FERMENTOR & DISPENSER | 15
10
Reinstall the back panel by placing
the tabs in the slots at the bottom
of the cabinet and firmly pushing
the strike at the top of the panel
into the catch on the cabinet�
11
The gas system is now ready for
use� The 3-way valve on the control
panel determines whether the
gas pressure is Off, pressurizing
the LIS, or pressurizing the
fermentation vessel�
TO REPLACE THE CO2 TANK
1Close the CO2tank valve�
2
Relieve pressure to the gas line by
pulling on the regulator pressure
relief valve�
Collar
3
Remove white CO2
supply
line from
the regulator� Press up on the collar
while pulling down on the gas line�
NOTE: Remove the CO2tank
regulator before taking the empty
CO2tank to be refilled�
4
Repeat steps 1 through 9 in the
“Install CO2Tank” section to
reinstall the CO2tank�
SETTING UP YOUR VESSI™ FERMENTOR
& DISPENSER

16 | SETTING UP YOUR VESSI™ FERMENTOR & DISPENSER
PREPARING VESSI™
FERMENTOR & DISPENSER
FOR USE
ASSEMBLY
1Remove all protective film from
the fermentor�
2Remove the modular work surface
from the top of the cabinet�
3
If desired, attach the modular
work surface using the keyhole
slots and posts located on either
side of the cabinet�
NOTE: If the fermentor is being placed
adjacent to, or in a cabinet, the posts
and shims can be removed for a flush fit�
4
Install the faucet tower�
Remove the faucet tower from
its packaging�
Remove the 4 screws holding
the black gasket to the console�
Align the faucet tower and black
gasket with the 4 screw holes in
the console�
Black
gasket
5
Loosely screw in all 4 stainless steel
screws provided, then hand-tighten
all screws�
SETTING UP YOUR VESSI™ FERMENTOR
& DISPENSER

CLEANING AND SANITIZING YOUR VESSI™ FERMENTOR & DISPENSER | 17
IMPORTANT: Make sure all equipment
is properly cleaned and sanitized� Failure
to follow these recommended steps
could result in unsatisfactory results�
Make sure the vessel is not pressurized�
For depressurizing instructions, see
steps 1 and 2 in “Cap Removal for
Stirring or Adding Ingredients” in the
“Adding Ingredients/Stirring Beverage”
section�
NOTE: For best results, clean and rinse
immediately after each use and sanitize
just prior to your next use�
1
Use warm water to prepare a
1-gallon bucket of mild detergent
(such as liquid dish soap) for
cleaning of the SRS, and 3 gallons
of sanitizing liquid in a bucket�
Follow sanitizer manufacturer’s
directions�
IMPORTANT: Do not use bleach
to sanitize the fermentor� Bleach
can damage stainless steel surfaces
and will void the warranty�
Do not place SRS components
in the dishwasher�
HELPFUL HINT: We recommend using
STAR SAN®sanitizer� For ordering
information, see the “Accessories and
Supplies”section�
DISASSEMBLING THE
SEDIMENT REMOVAL
SYSTEM (SRS)
2
Unpack or remove the SRS from
the vessel by unscrewing the
tri-clamp�
3Remove the 4 screws using
the provided 1/8" hex wrench�
4
Remove both stainless steel
end caps and separate from
the ball assembly�
Stainless steel
end cap
Ball assembly
Stainless steel
end cap
5Remove the double-ring gasket
from the ball assembly�
CLEANING AND SANITIZING YOUR VESSI™
FERMENTOR & DISPENSER

18 | CLEANING AND SANITIZING YOUR VESSI™ FERMENTOR & DISPENSER
6
Remove the 2 white ball seats
from the clear plastic ball� Insert a
fingernail into the crevice between
the white ball seat and clear plastic
ball to pry loose�
White
ball seats
7Remove the 2 large black o-rings
from the grooves in the ball�
HELPFUL HINT: You can use a credit
card to pry any of the large o-rings out
of the grooves�
8
Remove the piston from the inside
of the ball by pushing it out with
your thumbs�
Remove the 2 small black o-rings
from the piston�
Piston
HELPFUL HINT: Squeeze the o-ring
while sliding your fingers together
to stretch the small o-ring out of the
groove� This will enable you to grasp
the o-ring to remove it�
CLEANING AND SANITIZING YOUR VESSI™
FERMENTOR & DISPENSER

CLEANING AND SANITIZING YOUR VESSI™ FERMENTOR & DISPENSER | 19
9
Remove the 2 white end cap seats
from the end caps� Insert a fingernail
into the crevice between the white
end cap seat and stainless steel end
cap to pry loose�
White end
cap seat
10
Remove the large black o-ring
from the groove in the back of
each of the white end cap
seats� Use of a credit card may
be helpful�
11
Place all components into a
bucket of mild detergent and
let them soak for a minimum
of 15 minutes� Scrub all the SRS
components with an all-purpose
brush, then transfer them to
a bucket of warm rinse water�
Transfer components to a bucket
of sanitizing liquid and let sit for
5 minutes�
End cap
Large o-ring
White end
cap seat
White ball seat
Double-ring
gasket
Clear plastic ball
Large o-ring
White ball seat
Small o-ring
Piston
Small o-ring
White end
cap seat
Large o-ring
End cap
Screws
Screws
Stopper
HELPFUL HINT: You can complete these
transfers as you are working through
the vessel cleaning process�
CLEANING AND SANITIZING YOUR VESSI™
FERMENTOR & DISPENSER
Large o-ring

20 | CLEANING AND SANITIZING YOUR VESSI™ FERMENTOR & DISPENSER
REMOVE HEAVY SOLIDS
FROM VESSEL
1Prepare at least 2 gallons
of brewers detergent�
HELPFUL HINT: PBW®(Powdered
Brewery Wash) is a standard detergent
used in this application� For ordering
information, see the “Accessories and
Supplies”section� We recommend
mixing brewers detergent in a standard
5-gallon bucket�
2
Remove the 8" stainless steel cap,
gasket, and tri-clamp� Add them to
the bucket of brewers detergent�
3
Check that the 2" cap is attached
to the bottom of the fermenting
vessel and that the tri-clamp is
securely hand-tightened�
4
Pour 2 quarts (64 oz) of prepared
brewers detergent liquid into the
vessel� Using a non-scratch scrub
sponge (not provided), scrub the
inside of the vessel, as well the
groove and neck at the top of
the vessel�
IMPORTANT: The inside of the
fermentor has a polished finish� Use
only non-scratch scrub sponges�
5
Remove the bottom 2" cap to empty
contents into the collection pan
�
6
IMPORTANT: Inspect the interior
of the vessel to ensure all solids
are removed before proceeding�
If needed, use additional water
to rinse solids from the vessel�
7
Using a non-scratch scrub sponge,
scrub the groove and neck at the
bottom of the vessel�
CLEANING AND SANITIZING YOUR VESSI™
FERMENTOR & DISPENSER
Table of contents
Other Whirlpool Dispenser manuals