White Duck Outdoors Alpha Wall Tent Series User manual

Alpha Wall Tent (10’x12’,12’x14’,14’x16’,16’x 20’)
Owner’s Manual
Let’s go hunting!
SLEEPS UP
TO 8
SLEEPS UP
TO 10
SLEEPS UP
TO 12 5’
9’
5’
9’
5’
9’
10’
12’
14’
16’
12’
14’
SLEEPS UP
TO 14 5’
9’
20’
16’
BEFORE YOU GO CAMPING, DO THIS FIRST!
Before you start putting up your tent, we encourage you to assemble
your wall tent at home or any place, prior to your camping trip to get
familiar with the set up process before you arrive at camp.
Make sure to read the owner’s manual carefully before you start setting
up your canvas tent.
SEASONING YOUR TENT
With your canvas tent set up, we recommend that you spray the tent
with water and allow it to dry completely. This process is known as
seasoning the canvas. The water causes the bers to swell and tighten
up, closing any ber holes made in the manufacturing process. You
only need to “season” your tent once.
The set up process requires only one person and it takes around twenty
minutes. If you have a helping hand, it can be done faster. Make sure
to read the warnings and care instructions to ensure longevity of your
tent. As it’s made from durable canvas, it will last longer and worth
every cent of your investment!
Please contact us if you have any questions, any bright ideas or if you
think we should do things differently. We would love to hear about
your experience!

Key Components:
10x12ft Wall Tent:
Canvas Tent (1)
Adjustable Guylines
(10)
Metal Tension
Adjusters (10)
Bungee Cord (10)
Frame:
Foot Pole (8)
Roof/Tapper Pole
(Two-jointed) (8)
Side & Middle
Ridge Pole (9)
Connection Pole (3)
3-way Angle kit (3)
4-way Angle kit (9)
Steel Wire (1)
Tool Kit:
Jpegs (8)
Vpegs (10)
Pins (13)
Rubber Mallet (1)
Storage Bags:
Waterproof Storage
Bag for Tent and
Frame (2)
Pole Bag (1)
Tool Kit Bag (1)
12x14ft Wall Tent:
Canvas Tent (1)
Adjustable Guylines
(14)
Metal Tension
Adjusters (14)
Bungee Cord (14)
Frame:
Foot Pole (8)
Roof/Tapper Pole
(Two-jointed) (8)
Side & Middle
Ridge Pole (9)
Connection Pole (3)
3-way Angle kit (3)
4-way Angle kit (9)
Steel Wire (1)
Tool Kit:
Jpegs (8)
Vpegs (14)
Pins (13)
Rubber Mallet (1)
Storage Bags:
Waterproof Storage
Bag for Tent and
Frame (2)
Pole Bag (1)
Tool Kit Bag (1)
14x16ft Wall Tent:
Canvas Tent (1)
Adjustable Guylines
(14)
Metal Tension
Adjusters (14)
Bungee Cord (14)
Frame:
Foot Pole (10)
Roof/Tapper Pole
(Three-jointed) (10)
Side & Middle
Ridge Pole (12)
Connection Pole (3)
3-way Angle kit (3)
4-way Angle kit (12)
Steel Wire (1)
Tool Kit:
Jpegs (10)
Vpegs (14)
Pins (15)
Rubber Mallet (1)
Storage Bags:
Waterproof Storage
Bag for Tent and
Frame (2)
Pole Bag (1)
Tool Kit Bag (1)
16x20ft Wall Tent:
Canvas Tent (1)
Adjustable Guylines
(16)
Metal Tension
Adjusters (16)
Bungee Cord (16)
Frame:
Foot Pole (10)
Roof/Tapper Pole
(Three-jointed) (10)
Side & Middle
Ridge Pole (12)
Connection Pole (3)
3-way Angle kit (3)
4-way Angle kit (12)
Steel Wire (1)
Tool Kit:
Jpegs (10)
Vpegs (16)
Pins (15)
Rubber Mallet (1)
Storage Bags:
Waterproof Storage
Bag for Tent and
Frame (2)
Pole Bag (1)
Tool Kit Bag (1)
Bungee Cord
VPegs
Foot Pole
Ridge Pole
3- way angle kit
4- way angle kit

10’x12 ‘
3 Sections
4 Columns
Pole Diameter: 1.181” (30 mm)
Pole Thickness: 0.079 ” (2 mm)
12’x14’
3 Sections
4 Columns
Pole Diameter: 1.181” (30 mm)
Pole Thickness: 0.079 ” (2 mm)
14’x16’
4 Sections
5 Columns
Pole Diameter: 1.181” (30 mm)
Pole Thickness: 0.079 ” (2 mm)
16’x20’
4 Sections
5 Columns
Pole Diameter: 1.575” (40 mm)
Pole Thickness: 0.079” (2 mm)
POLE DIA
& THICKNESS TYPE OF POLES POLE MEASUREMENT POLES
Roof/Tapper Pole
Side & Middle Ridge Polet
Foot Pole
Connection Pole
Roof/Tapper Pole
Side & Middle Ridge Polet
Foot Pole
Connection Pole
Roof/Tapper Pole
Side & Middle Ridge Polet
Foot Pole
Connection Pole
Roof/Tapper Pole
Side & Middle Ridge Pole
Foot Pole
Connection Pole
92.5 cm/ 36.42 inch 82.5 cm/ 32.48 inch
65.5 cm/ 25.79 55.5 cm/ 21.85 inch
78 cm/ 30.71 inch 68 cm/ 26.77 inch
50 cm/ 19.68 inch
111 cm/ 43.70 inch 101 cm/ 39.76 inch
76 cm/ 29.92 inch 66 cm/25.98 inch
78 cm / 30.71 inch 68 cm/ 26.77 inch
50 cm/ 19.68 inch
89 cm/ 35.03 inch 79 cm x 2/ 31.10 inch
65.5 cm/ 25.79 55.5 cm/ 21.85 inch
78 cm/ 30.71 inch 68 cm/ 26.77 inch
50 cm/ 19.68 inch
100 cm/ 39.37 inch 90 cm x 2/ 35.43 inch
81 cm/ 31.89 inch 71 cm/ 27.95 inch
78 cm/ 30.71 inch 68 cm/ 26.77 inch
50 cm/ 19.68 inch
X 8 sets (2 jointed)
X 9 sets (2 jointed
X 8 sets (2 jointed)
X 3 sets
X 8 sets (2 jointed)
X 9 sets (2 jointed
X 8 sets (2 jointed)
X 3 sets
X 10 sets (3 jointed)
X 12 sets (2 jointed)
X 10 sets (2 jointed)
X 3 sets
X 10 sets (3 jointed)
X 12 sets (2 jointed)
X 10 sets (2 jointed)
X 3 sets
Silver coated Angle kits for Side Ridge
Poles, Roof and Foot Poles
Golden coated Angle kits for Middle Ridge Poles
and Roof Poles
Middle Ridge Poles
Roof Poles
Side Ridge Poles
Foot Poles
Image #1: the image depicts 2 sections and 3 columns Image# 2: the image depicts 3 sections and 4 columns

Angle Kits: All the 3 way or 4 way angle kits that t into the middle ridge poles and roof poles
are golden, whereas, all the angle kits that t into side ridge poles, roof poles and foot poles are
silver.
All the adjustment pins/buttons on Middle & Side Ridge Poles and Roof Poles are color coded;
golden or silver.
For angle kits, look at their color code; golden or silver. All the poles will t in the angle kit accord-
ing to their respective colors (look at the buttons/pins on poles, they are either golden or silver that
matches with their respective angle kits). 3-way angle kits go on the end of tent frame and the
4-way angle kits in the middle, side and front of frame. The color coded angle kits will t into the
poles (pay special attention to pin color) and can be seen once the frame is assembled.
Alpha Wall Tent 10’x12’ 3 (1 golden, 2 silver) 9 (3 golden, 6 silver)
Alpha Wall Tent 12’x14’ 3 (1 golden, 2 silver) 9 (3 golden, 6 silver)
Alpha Wall Tent 14’x16’ 3 (1 golden, 2 silver) 12 (4 golden, 8 silver)
Alpha Wall Tent 16’x20’ 3 (1 golden, 2 silver) 12 (4 golden, 8 silver)
Size Three-way Angle Kits Four-Way Angle Kits
4-way 4-way 4-way 3-way
4-way 4-way 4-way 4-way 3-way
Connection Poles: Three of the 4-way Angle Kits (1 golden, 2 silver) at the front are used to
provide an extension to add connection poles that is used to put an awning or porch at the front of
your tent, an added feature which could be utilized during the summer or winter season perfectly.
Steel Wire: There is an additional steel wire that goes at the front of the wall tent and provide the
frame extra support and prevent the frame from collapsing during heavy winds and snow load.
The Center tting hook of the steel wire is golden for easy identication.
Silver coated
Golden coated
Pins are used to stake the tent through
bottom eyelet/grommet at front door and
back wall. Also, to stake the mud ap at
each section.
Jpegs are used to stake the foot pole into
the ground.
Vpegs are used to stake the guylines
attached to the bungee cord outside the
wall tent.

WARNINGS
Fire Safety:
KEEP ALL FLAME AND HEAT SOURCES AWAY FROM THIS PRODUCT FABRIC
The materials used in the manufacture of the Fire Water Repellent fabric meet the ame
resistance requirements of CPAI-84. It is not reproof. The fabric will ignite and burn if left in
continuous contact with any open ame or other sources of ignition. The application of any
foreign substance to the tent fabric may render the ame resistant properties ineffective.
Canvas tents are not for use with open re pits. Fire safety is the responsibility of the user. We
encourage you to educate yourself and practice vigilant re safety. Do not hesitate to contact
us if you have any questions or concerns at any time. It is imperative to acknowledge the
local rules and regulations and if you are unsure, to ask about camp site / local policies or
refer to the local civil protection/defense, forestry, re service websites for further information.
Always check local re restrictions prior to starting a re as rules and regulations may change
frequently throughout the year.
NOTE: White Duck Outdoors cannot be held liable for any damage or injury to persons or
property resulting from the use or misuse of re or ammable materials in or around our tents.
PRECAUTIONS:
The following precautions should be taken when camping:
Be certain that your tent is properly ventilated (especially if you decide to ignore the rst
warning and use a heater in your tent). Carbon monoxide is real. Don’t die by suffocation.
Vents and screens are built into the tent body.
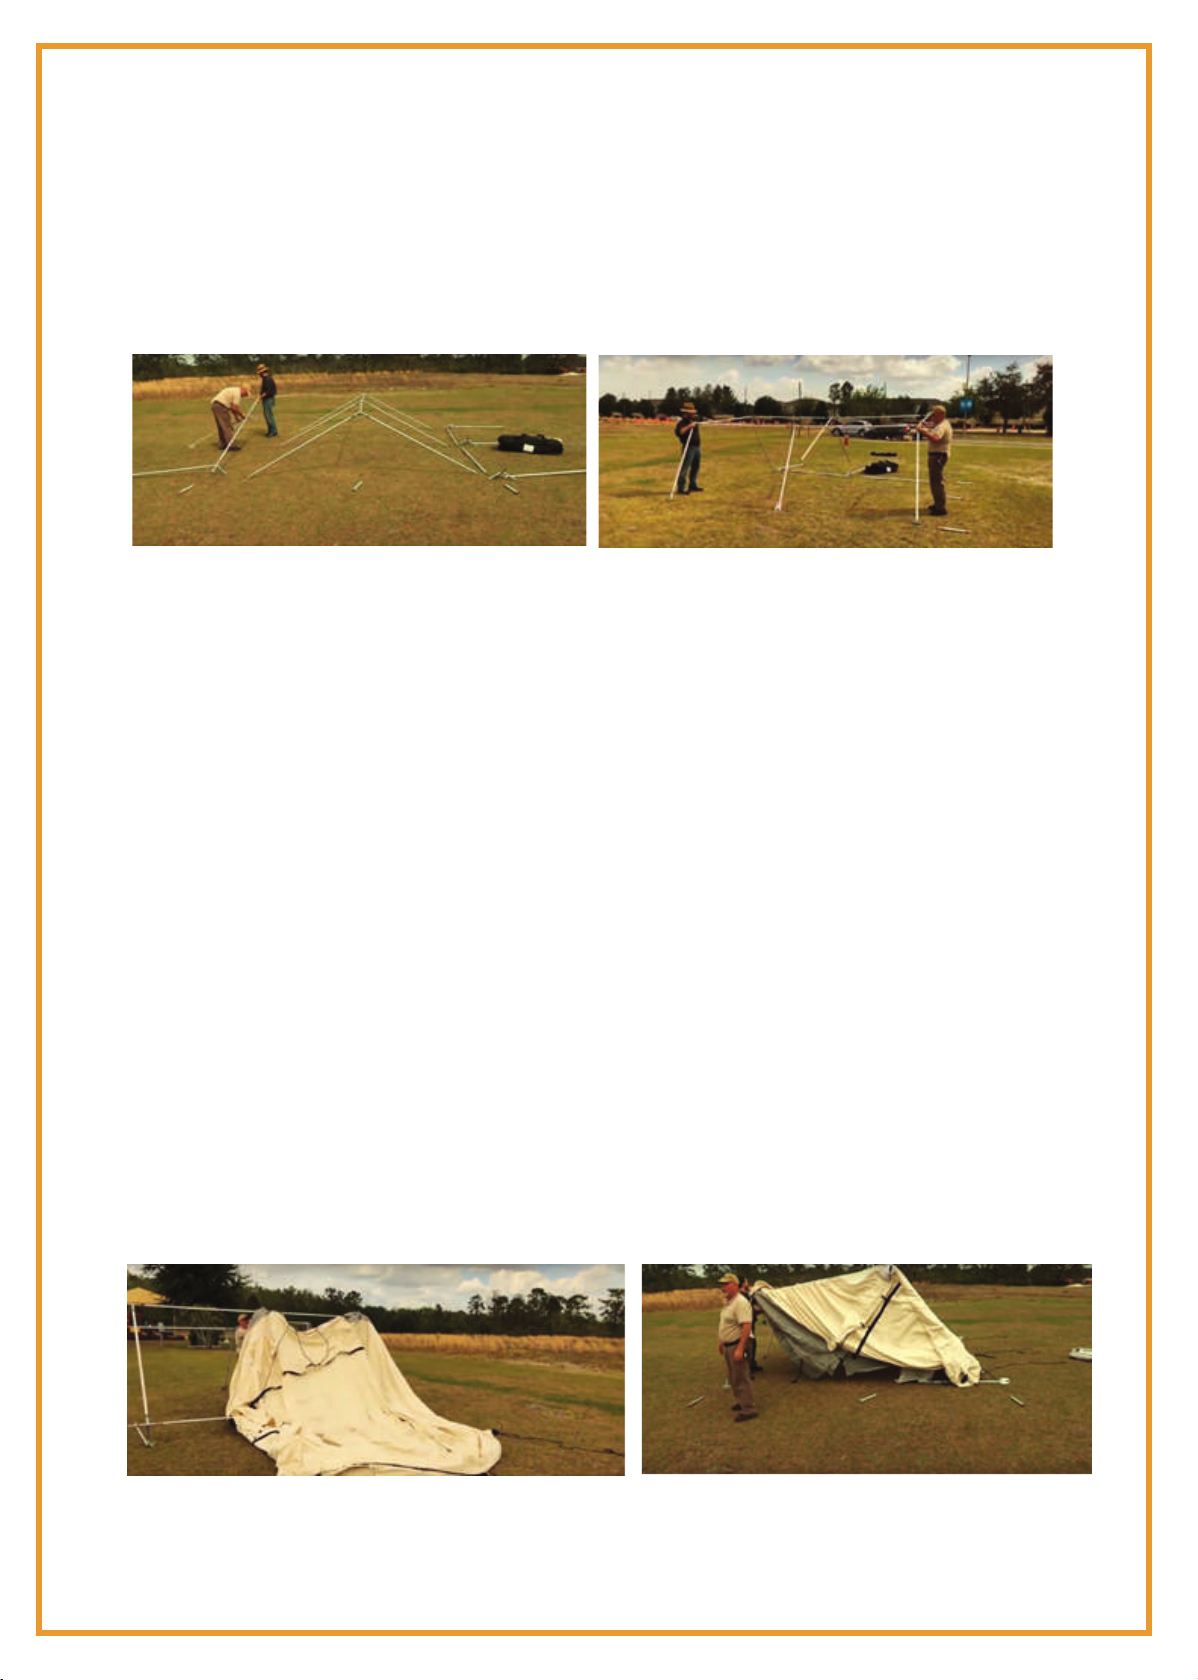
Be sure to anchor your tent properly—this is not a free-standing tent—follow these instructions
for proper staking practices and ensure that all guylines & pegs are securely xed.
Be certain that children are supervised in and around the tent at all times.
Do not use candles, matches or open ames of any kind in or near a tent.
It is better to not cook inside a tent, but if you are, do not leave cooking unattended. Make
sure grills, cooking appliances and similar must not be placed nearer than 1 meter to tent
canvas. There should be no use of open res or glowing charcoal inside tents or near tent
canvas - re can spread very quickly. There should be no use of open res or glowing char-
coal inside tents or near tent canvas as there is a signicant risk from the buildup of Carbon
Monoxide (CO), particularly in a conned space inside the tent. All exible tubes and
couplings to the gas burner should be checked for leakage and that it is in good order
Build campres downwind and several meters away from a tent and be sure to fully extin-
guish campres before leaving a campsite or before retiring for the night.

Exercise extreme caution when using fuel-powered lanterns or heaters inside a tent and use
battery-operated lanterns whenever possible. Do not refuel lamps, heaters or stoves inside a
tent. Extinguish or turn off all lanterns before going to sleep.
Ensure that electrical appliances are in good condition with no frayed wires etc. Do not leave
laptops or phones tables plug in and charging unattended
Do not smoke in a tent or store ammable liquids inside a tent. Installation of log burners or
heating equipment at your own risk.
Do not pitch under trees, on cliffs or places where risk of falling
White Duck Outdoors strives to manufacture the best possible products for our customers. Our
one year warranty covers products against defects in materials or workmanship. This warranty
is cheerfully extended to the original owner only and excludes normal wear and tear (e.g.,
zippers that wear out after extended use) or misuse. Please follow care instructions. If, after
inspection, a product is determined by us to be defective in workmanship or materials, we will
repair or replace it at our option, at no cost to you.
FIRST! Remember, a dry tent is a healthy tent. Do not store your tent when it is damp. If you
must break camp and roll up a damp tent, be sure to stake it back out and set it up fully when
you get home so it can air dry. Even small amounts of moisture (when your tent is stored) can
cause mold to grow on the natural bers of the canvas. This same mold will also damage your
tent’s water repellency. Mold growth on your tent is not covered by warranty.
For more details, please visit our website:
https://whiteduckoutdoors.com/pages/warranty-policy
WARRANTY:
QR CODR

NOTE:
Pitch your tent on a clear ground, remove debris, rocks or sticks where you plan to set up your
canvas wall tent. The adjustment pins on poles and angle kits are color coded as golden and
silver to simplify the setting up process. (Refer to Image 2)
The roof poles which are inated or deated and the side & middle ridge poles are used to
make the roof frame structure. The measurement of the poles is given below for easy
identication, all you need is a measuring tape. The foot poles have a base plate with buckle
clip lock system at the end so it’s easy recognizable.
Step # 1: Unpack the tent and poles bags
TIP: Lay every component out before assembling, this will make the pitching process fast and
easy.
Take the tent cover, poles and angle kits out from their waterproof bags.Lay out all the key
components on the ground and sort out all frame pieces i.e. poles and angle kits. Determine
canvas tent orientation (direction of entrance you prefer) and position angle kits & tent frame on
oor in appropriate location for set up. Layout the pieces in progression in which they will be
assembled. Keep this manual in front of you while taking out all the tent items from the box.
Step # 2: Assemble the tent frame:
Assemble the middle ridge poles forming one long piece with the help of 3-way and 4-way
golden colored angle kits.
Place the roof poles in angle kits to complete the frame
Then, attach side ridge poles one by one along with silver colored angle kits
Look down the frame to make sure all the Side Ridge, Middle Ridge and Roof poles are in line
and properly positioned in the angle kits as per their color codes (golden and silver). In the
end, attach the steel wire on top front part of tent frame on side (silver) and middle (golden)
angle kits.

Step # 4: Place tent fabric on top of frame:
TIP: Unzip all door zippers to prevent strain on zippers.
Once the roof is together and the frame is low to the ground at one side, pull the tent cover over
the roof making sure to orient the front door as desired and position tent so it ts over the frame
at all angles. Grab the bottom part of the tent and pull up and over the frame.
Tip: Flip up the side walls above the eaves of the tent for easy installation of foot poles and tie
up the Stove Pipe Shield ap
Pull down side walls of the tent to ground level over the frame, keeping it even as you pull. The
angles of the tent wall should match with the angles of the frame. Work it over the frame gradu-
ally. Make adjustments to even or square the tent.
TIP: Adjust your tent to the frame. Do not pull hard on your tent or seams and zipper doors will
be weakened. The canvas fabric cover should t the tent effortlessly and smoothly without
requiring any force.
TIP: Do not drag the tent cloth when assembling and dismantling in order to avoid damage to
canvas
Step # 3: Install foot poles on the tent:
Attach foot poles (with base plate at the end) of one lateral side to (side) ridge poles. Lift the
edge of the tent frame and place the foot poles in the angle kits of side ridge poles. All of the
pins on tent poles and angle kits are color coded so the color of the pole button should match the
one on angle kit for accurate installation of the tent. Make sure the wall poles are up only on one
side, this will make the next step easier.
STORE YOUR CANVAS TENT
STEP 1: Clean Out Your Tent
Sweep the tent out completely. Remove all of your belongings from the tent and close all of the
windows.
Once again, allow the tent to dry out completely before storing it.
STEP 2: Breakdown Tent
When you are sure your tent is COMPLETELY BONE DRY, pull out all the pegs. Place them in the
tool kit bag provided. Make sure to remove any loose dirt before putting them in the bag.
Unzip and detach the groundsheet and canvas fly cover.Remove the door entrance pole and center
pole, disassemble it, and return it to the bag provided.
Note: Remove the pins now and store them in the tool kit bag provided. Do not pull up on the tent
loops to remove your pegs and pins, this could cause the loops to tear.
STEP 3: Pack the Canvas Tent
Make sure to never store it either wet or damp. The moisture trapped inside will make the life of tent
shorter. At times, you don’t have much of a choice but to pack it; in damp condition, make sure you
hang it up to dry within a day. Don’t set up the tent again, just let it dry at any place as it needs
air.
Remember the groundsheet is detached from the canvas tent cover, make sure it is facing the
ground to protect your tent. Keep the tent off the grass or ground (to keep it clean and tint free).
Fold front and back edges of the tent to the middle. Fold the tent lengthwise down the middle (fold
half of the tent over). Now fold the bottom up from both sides and roll the whole tent into a tight
bundle. Make sure that the folded tent should be the size of the tent bag. Use the ties to secure the
tent as a roll. Next, lift one end, slip the bag over the tent and place everything else inside. Place
both the pole bag and tool kit bag inside while folding the tent or you can put it on top of the tent
inside the bag.
Make sure groundsheet is facing the ground, it will protect the canvas tent from getting any dirt or
stains on it. Once the tent cover is securely packed, roll the groundsheet and pack it in the pole
bag provided.

Step # 6: Insert the stakes into the ground
Place the stakes through the guylines, staking down the perimeter of the tent. In line with each
bungee cord on the eaves of the tent, place a stake in the ground at least ve feet away from the
tent. Attach and tighten the guylines gently through the metal runners to adjust the tension. Pound
the stakes in a way that top of the stake is touching the ground.
First insert the pins that are used to stake the tent through bottom eyelet/grommet at front door and
back wall. Also, to stake the mud ap at each section.
Jpegs are used to stake the foot pole into the ground. Make sure the clip at the end of foot pole’s
base plate is locked.
Vpegs are used to stake the guylines attached to the bungee cord outside the wall tent to the
ground, then adjust the tension accordingly.
TIP: Stakes should be driven in at a 45 degree angle away from the tent for optimal pitching. Guy
ropes are approximately at the same angle as the tent roof. In case of high winds, tie the guy ropes
to trees, stumps or logs. Another method is to have two guy ropes and stakes for each eave corner.
Tip 2: All the guy ropes need to follow the lines of the seams in the roof. Adjust the guy rope slider
which will allow adjustment in both directions. It is important to make sure the tent stays
symmetrical and that the tension is evenly spread
Step # 5: Tent Walls
Install remaining foot poles on the opposite
side of tent
Mount the lateral side and attach remain-
ing legs on the other side of the tent
Sweep the tent out completely. Remove all of your belongings from the tent and close all of the
When you are sure your tent is COMPLETELY BONE DRY, pull out all the pegs. Place them in the
tool kit bag provided. Make sure to remove any loose dirt before putting them in the bag.
Unzip and detach the groundsheet and canvas fly cover.Remove the door entrance pole and center
Note: Remove the pins now and store them in the tool kit bag provided. Do not pull up on the tent
Make sure to never store it either wet or damp. The moisture trapped inside will make the life of tent
shorter. At times, you don’t have much of a choice but to pack it; in damp condition, make sure you
hang it up to dry within a day. Don’t set up the tent again, just let it dry at any place as it needs
Remember the groundsheet is detached from the canvas tent cover, make sure it is facing the
ground to protect your tent. Keep the tent off the grass or ground (to keep it clean and tint free).
Fold front and back edges of the tent to the middle. Fold the tent lengthwise down the middle (fold
half of the tent over). Now fold the bottom up from both sides and roll the whole tent into a tight
bundle. Make sure that the folded tent should be the size of the tent bag. Use the ties to secure the
tent as a roll. Next, lift one end, slip the bag over the tent and place everything else inside. Place
both the pole bag and tool kit bag inside while folding the tent or you can put it on top of the tent
Make sure groundsheet is facing the ground, it will protect the canvas tent from getting any dirt or
stains on it. Once the tent cover is securely packed, roll the groundsheet and pack it in the pole

Step # 7: Attach the groundsheet
Finish up by laying the free oating ground sheet inside the tent. Fold the mud ap inside and put
the groundsheet on top of it to prevent insects or water from coming inside the tent.
Note: Turn it around for upward
and downward movement

HOW TO PACK UP YOUR ALPHA WALL TENT:
Please follow the tips below on packing up your tent after a fun trip.
Fold your walls to the inside so the interior of your tent always touches the inside of the walls to
keep the inner tent clean.
Take down your tent in reverse order of assembly.
Unzip your door zippers.
Before removing the tent cover from the frame, clean the inside and outside sections of your mud
ap with the help of towel. When you fold your tent with mud on it, the inside of the tent will get
dirty. Clear the snow build upon the tent during winters.
The outside part of your tent always has dirt, dust, tree pitch etc, on it. Fold your tent walls to the
inside of the canvas tent so the interior of the tent should touch the inside of the tent to keep the
inner part clean (when taking down the tent or when folding the tent for storage).
Do not pull the wall stakes out by using the canvas wall as this might damage the tent. Use a claw
hammer instead!
Disassemble the frame by rst removing the foot poles. Count the components during packing the
tent and poles back into their bags.
Enjoy! Reach out to us if you have any questions.

TIPS TO CARE FOR YOUR ALPHA WALL TENT
Please follow the tips below on packing up your tent after a fun trip. The tent is not designed to get
through one festival season or getaway, it’s made from high density tightly woven canvas with a
breathable high-performance finish, thus, more durable and will last much longer. Do not leave your
tent unattended in severe weather conditions!
Set-up your
tent properly
Leakage
Golden Role:
Never, repeat, NEVER store or pack
your tent and ropes away wet, damp
or dirty.
If you own a cotton canvas tent, make sure to
never store it either wet or damp, even the
ropes. The moisture trapped inside will make the
life of tent shorter. At times, you don’t have
much of a choice but to pack it; in damp
condition, make sure you hang it up to dry
within a day or two. Otherwise, fungus can
affect the tent leading to tiny little black spots all
over your tent which are permanent.
Simple yet effective way to ensure enhanc-
ing your tent’s life span. The canvas can
become stressed if the tent isn’t set-up
correctly which would eventually lead
towards damage.
To remove marks, use a soft brush or sponge with
fresh water and mild detergent only and rinse with
clean water. Allow to dry thoroughly. Wipe down all
metal surfaces with damp cloth.
After beach use or wet conditions treat all zips and
metal components with silicon spray. Remove the
stains as soon as they appear, its way easier to brush
off the dirt and dried mud when the tent is dry
byusing a scrubbing brush.
Cotton canvas fabric normally expands when
exposed to wet environment to make itself
waterproof.There might be a possibility that it
may leak a bit when you set it up for the first
time. The cotton fibres will swell and close up
any tiny holes that might cause the leakage
again. Don’t freak out, it’s totally okay as this
will no longer happen again because of the
natural cotton phenomenon.
Ventilation
Make absolutely sure that your tent is stored
in a dry place which is well ventilated. Due
to insufficient ventilation, fungus can affect
the canvas. It is important to store your tent
dry so no fungus or other stains can appear.
Keep it clean
Leakage
Set-up your
tent properly

ENJOY!
Reach out to us if you have any questions.
www.whiteduckoutdoors.com
www.facebook.com/whiteduckoutdoors
www.instagram.com/whiteduck_outdoors
www.twitter.com/wduckoutdoors
This manual suits for next models
4
Table of contents
Other White Duck Outdoors Tent manuals
Popular Tent manuals by other brands

Turtleplay
Turtleplay TPE0080213010 Care Instructions

U-Line
U-Line H-9235 manual

ShadeLogic
ShadeLogic Sun Shade Sail 25720 Assembly instructions

Adlonco Holdings
Adlonco Holdings STM5X8 quick start guide

Jack Wolfskin
Jack Wolfskin gossamer manual

Boutique Camping
Boutique Camping Nova Air Dome instruction manual