manuals.online logo
Brands
  1. Home
  2. •
  3. Brands
  4. •
  5. Whitehall
  6. •
  7. Outdoor Furnishing
  8. •
  9. Whitehall BALMORAL MAILBOX User manual

Whitehall BALMORAL MAILBOX User manual

A
B
C
D
B
C
FIG. 1A
FIG. 2A
B
C
BALMORAL MAILBOX
©2023 Whitehall Products, LLC Customer Service: 800.728.2164 www.whitehallproducts.com AW-1073
Need additional assistance? If you have questions about your mailbox you may call Whitehall Products Customer Service: 800.728.2164
MONOGRAM AND SIDE ADDRESS PLAQUE INSTALLATION
Parts Included:
On a flat clean surface, place the Side Plaques (B)
and Monogram (C) with the personalization facing
down.
Without removing the adhesive backing, place four
(4) of the provided tape squares (D) in the corners
of each Side Plaque (B) approximately 1/4”-1/2”
from each edge. Place one (1) tape square in the
center of the monogram. Be sure to give each
square enough space to avoid overlap or overhang.
(FIG. 1A)
Once evenly spaced, peel off one (1) plastic backer
of each adhesive tape square one by one and
replace EXACTLY with the sticky side down (TAPE
BONDS IMMEDIATELY). Press firmly for 15
seconds to FULLY activate adhesive. Repeat for
each tape square.
Once the tape is set, peel off the remaining plastic
backers. Ensure correct plaque orientation before
installation. The adhesive bonds IMMEDIATELY
and cannot be repositioned. At a 45 degree
angle, rest the bottom edge of the plaque along the
inside bottom edge of the recessed side
plaque/monogram frame on the mailbox (A) for
level application. Tilt plaque forward and press
firmly for 15 seconds to FULLY activate adhesive.
Repeat for each plaque. (FIG. 2A)
Enjoy your new personalized Balmoral Mailbox!
1)
2)
3)
4)
5)
Instructions:
Balmoral Mailbox
Side Plaques - 2 (optional)
Door Monogram (optional)
2” x 2” Adhesive Tape Squares - 12
A)
B)
C)
D)
CAPITOL MAILBOX
©2023 Whitehall Products, LLC Customer Service: 800.728.2164 www.whitehallproducts.com AW-1072
A
BC
FIG. 1A
ADDRESS SIDE PLAQUE TAPE INSTALLATION
Parts Included:
On a flat clean surface, place the Side Plaques
(B) with the personalization facing down.
Without removing the adhesive backing, place four
(4) of the provided tape squares (C) in the corners
of each plaque (FIG. 1A) approx. 1/4”-1/2” from
each edge. Be sure to give each square enough
space to avoid overlap or overhang.
Once evenly spaced, peel off one (1) plastic
backer of each adhesive tape square one by one
and replace EXACTLY with the sticky side down
(TAPE BONDS IMMEDIATELY). Press firmly for
15 seconds to FULLY activate adhesive. Repeat
for each tape square.
Once the tape is set, peel off the remaining plastic
backers. Ensure correct plaque orientation before
installation. The adhesive bonds IMMEDIATELY
and cannot be repositioned. At a 45 degree
angle, rest the bottom edge of the plaque along the
inside bottom edge of the recessed side/door
plaque frame on the mailbox (A) for level
application. Tilt plaque forward and press firmly for
15 seconds to FULLY activate adhesive. Repeat
for next plaque.
Enjoy your new personalized Capitol Mailbox!
1)
2)
3)
4)
5)
Instructions:
Capitol Mailbox
Side Plaques - 2 (optional)
2” x 2” Adhesive Tape Squares - 8
A)
B)
C)
FOR PERSONALIZED MAILBOX DOOR PLAQUE INSTALLATION
SEE INCLUDED INSTRUCTION SHEET AW-341
Need additional assistance? If you have questions about your mailbox you may call Whitehall Products Customer Service: 800.728.2164
Street-Side Mailbox Door Plaque Drilling Template
Drilling Instructions:
1) Cut out template along dotted lines.
2) Place template onto the front of the mailbox
door. Use tape to secure if desired.
3) Using a nail punch, nail or other sharp tool, mark the
position for the three holes in the face of the mailbox door.
4) Using a 1/4“ drill bit, drill the mailbox door at the
marked locations.
Note: You may wish to drill a small pilot hole rst to keep the
drill bit from moving out of position.
Need additional assistance? If you have questions about your mailbox you may call Whitehall Products Customer Service: 800.728.2164
©2023 Whitehall Products, LLC Customer Service: 800.728.2164 www.whitehallproducts.com AW-795
To attach yourPersonalized Door Plaques
t
o your
Whitehall Capitol Mailbox Follow steps below.
Personalized Door Plaque install for Whitehall Capitol Mailbox:
1) Follow instructions on AW-795 to drill holes through mailbox door with a 1/4” drill
bit with drilling template.
2) Apply a small amount of Silicon Sealer (E, Included with mailbox post package)
in and around the holes in the back side of the door plaque. Insert the (3)
threaded studs (A) into the back side of the door plaque. Tighten with Allen
wrench (B).(See Figure 1)
3) Position the Door plaque (C) so the studs are pushed through the holes drilled in
the mailbox door and the plaque is located within the border. (See Figure 2)
4) Apply a small amount of Silicon Sealer (E) to the inside of the mailbox around the
studs where they come through the mailbox door. Using the acorn nuts provided
(D), secure the plaques from the inside of the mailbox.
(See Figure 3) (Pliers or a small socket wrench are helpful)
Figure 2
C
Figure 1
A B
Plaque
Figure 3
D
Plaque
Mailbox Door
Included
A- Threaded Studs - 3
B- Allen Wrench - 1
C- Door Plaque - 1
D- Acorn Nuts - 3
E- Silicon Sealer
Tools needed
Pliers or small
Socket wrench
E
E
Need additional assistance? If you have questions about your mailbox you may call Whitehall Products Customer Service: 800.728.2164
©2023 Whitehall Products, LLC Customer Service: 800.728.2164 www.whitehallproducts.com AW-341

Other Whitehall Outdoor Furnishing manuals

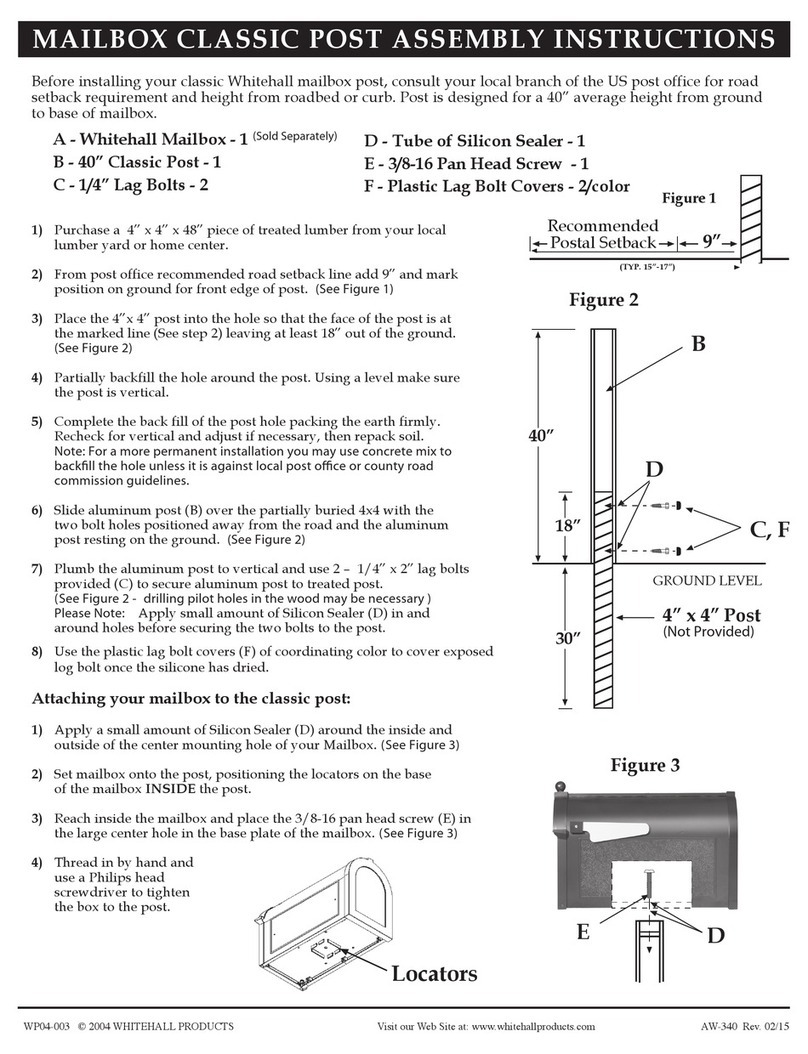
Whitehall MAILBOX CLASSIC POST User manual

Whitehall

Whitehall MAILBOX CLASSIC POST User manual

Whitehall AW- 1048 R091119 SP User manual

Whitehall

Whitehall AW- 1048 R091119 SP User manual

Popular Outdoor Furnishing manuals by other brands

felton industries FELEPG5T6 Assembly instruction

felton industries

felton industries FELEPG5T6 Assembly instruction

Dreamo OTF-503S quick start guide

Dreamo

Dreamo OTF-503S quick start guide

Garden Furniture Direct Borrowdale Assembly instructions

Garden Furniture Direct

Garden Furniture Direct Borrowdale Assembly instructions

Rowlinson Clarendon Assembly instructions

Rowlinson

Rowlinson Clarendon Assembly instructions

Garden Treasures 8201268 Assembly instructions

Garden Treasures

Garden Treasures 8201268 Assembly instructions

Safavieh Outdoor Marson PAT7062 quick start guide

Safavieh Outdoor

Safavieh Outdoor Marson PAT7062 quick start guide

SSC-LUXon 990070716 Assembly & operating instructions

SSC-LUXon

SSC-LUXon 990070716 Assembly & operating instructions

supremo LEISURE 2-Seat Stool 110*40cm Assembly instruction

supremo LEISURE

supremo LEISURE 2-Seat Stool 110*40cm Assembly instruction

Hatteras Hammocks DCA1-K-HH instructions

Hatteras Hammocks

Hatteras Hammocks DCA1-K-HH instructions

Lemeks Palmako PA120-5959 Assembly, installation and maintenance manual

Lemeks

Lemeks Palmako PA120-5959 Assembly, installation and maintenance manual

OLT 24 Assembly manual

OLT

OLT 24 Assembly manual

forest-style HACIENDA 2354 Building instructions

forest-style

forest-style HACIENDA 2354 Building instructions

Courtyard Creations RUS0188-WM Assembly instructions

Courtyard Creations

Courtyard Creations RUS0188-WM Assembly instructions

kingsley-bate MC-55 Assembly instructions

kingsley-bate

kingsley-bate MC-55 Assembly instructions

Weltevree Carrier product manual

Weltevree

Weltevree Carrier product manual

Grange Fencing Elite Arch Assembly instructions

Grange Fencing

Grange Fencing Elite Arch Assembly instructions

Grosfillex AUVENT YR14 Assembly instructions

Grosfillex

Grosfillex AUVENT YR14 Assembly instructions

X-METAL EAGLE 33511 Assembly instructions

X-METAL

X-METAL EAGLE 33511 Assembly instructions
manuals.online logo
manuals.online logoBrands
  • About & Mission
  • Contact us
  • Privacy Policy
  • Terms and Conditions

Copyright 2025 Manuals.Online. All Rights Reserved.