Whittaker ROTO WASH R3 User manual

Cleaning floors around the world
with
the Roto Wash Cleaning System
302 S. Croton Avenue
P.O. Box 989
New Castle, PA 16103
800-422-7686 or 724-658-8568
FAX 724-658-8731
www.rewhittaker.com
R109 5/15/03
ROTO WASH®
Operator’s Manual
Please read manual before using the machine and pay
attention to the safety advice.
Index
Safeguards 1
Unpacking & Assembly 2
Operation 6
Maintenance 8
Troubleshooting 9
Specifications 10
Cleaning Specs 11
Brush Range 13
Accessories 14

You have just purchased the best dual cylindrical
brush scrubber/extractor available anywhere in the
world.
The Roto Wash is built to last. Its housing is made of die cast
aluminum. It has a brushless induction high performance electric
motor and is gear driven. Since its brushes turn in opposite
directions, the Roto Wash appears to glide over the surface
when, in fact, it exerts about 5 pounds per square inch of brush
pressure. With each brush turning at 780 rpm, there is an
unprecedented amount of mechanical action. But, since these
brushes are cylinder shaped, there is no heat buildup.
The Roto Wash can clean under a mere 9 inches of vertical
clearance. By drawing the handle back to a horizontal position,
the machine can go under almost any ledge, overhang or table
support system.
Extraction is purely mechanical and designed to keep all the
waste water debris and potential airborne particulate/vapor
underneath the Roto Wash. The brushes scrub into the tiniest
irregularities and remove the waste by “flicking” it onto a slowly
rotating drum which, in turn, is cleaned by a stainless steel
stripping blade. The waste is collected in a removable recovery
tray.

ELECTRICAL SAFEGUARDS
Basic safety precautions must be exercised while using the Roto Wash machine.
*Avoid damage to the power cord.
Do not run machine over cord.
Do not pull cord around sharp objects, run over it with
heavy objects, or close doors on it.
Always disconnect power cord by grasping the plug.
Pulling on the cord can cause damage to the
insulation and internal plug connections.
*Disconnect power cord from outlet prior to servicing the machine, such as
changing brushes, cleaning the machine, or
emptying/filling tanks.
*Connect power cord only to a grounded (3-wire) electrical outlet.
GROUNDING METHODS
This machine should be grounded while in use to protect the operator from
electric shock. The machine is equipped with a three-conductor cord and a three-
prong grounding type receptacle. The green (or green and yellow) conductor in
the cord is the grounding wire. Never connect this wire to anything other than the
grounding blade.
GFCI equipped power cord is available.
GENERAL PRECAUTIONS
Keep hands and feet clear when operating. Do not operate near loose electrical
or computer wires which may become wrapped up in the brushes.
1
GROUNDING PIN
COVER OF
GROUNDED
OUTLET BOX
ADAPTER
GROUNDING
MEANS
(A) (B) (C)

UNPACKING & ASSEMBLY
R4 Models
1. Machine is shipped in two cartons.
2. Open smaller carton. Lift fork to vertical position.
Remove machine from carton.
3. Remove the handle and tank from the larger carton
and secure looped handle to the fork with the snap-in
handle connectors. (Fig. 1)
4. Be sure the 2 gallon tank is mounted correctly to
handle. The fill opening of tank is located at the front
of the machine. Clear plastic tube attaches to tank
valve stem and may be inserted through lid also.
5. Electrical system should be turned to “Off” position
by tilting handle forward.
6. Place electric cable in cable holder (left side of
handle). This helps to prevent accidentally running
over the cable.
7. Slide the solution release cable through the hole in
the cover of the front solution tank and insert into the
red solution tube. (Fig. 1) Fasten finger tight, as over-
tightening may destroy red solution tube.
8. To install brushes remove the front and rear axles by
pushing from either end. Position brushes and insert
axles. Turn brush slightly to make it easier to align
the axle with the hexagonal hole on the other side of
the machine Hint: Placing axles in from side of
machine with power cord is easier.
2
Sidebrush
For improved cleaning along walls or under recesses, a sidebrush
unit may be used.
The sidebrush is attached firmly to the brushaxle and is pushed
into the RotoWash machine as a complete unit. This unit also
includes a brushcover.
15

ROTO WASH Accessories
Product Order #/Description
_________________________________________________
Utility Tray GT-100 - 15” x 24” plastic tray used to
clean, lubricate machines
Hand Sprayer HPS-2.0 - 2 Gallon Pump Up
Side Brush Extends scrubbing right up to the wall,
includes splash guard (fender)
__________________________
14 3
Solution Control
Handle
Electrical Cable
Holder
Fill Opening
Solution Valve
Handle Connector
Bolt
Fork
Brush Pressure
Regulator
Red Solution
Tube
Solution Release
Cable
Overload Button
(Circuit Breaker)
Recovery Tank
Solution Tank
Transport Wheels
(Automatically Lift
As Machine Is
Turned On)
Axles
Three Gallon
Tank
Figure 1

UNPACKING & ASSEMBLY
R3 Models
1. Open carton. Lift fork to vertical position.
Remove machine from carton.
2. Assemble the two parts of the handle. A spring-
loaded button will lock the two parts together.
3. Remove the connecting pin from the handle connect-
or, fit handle over handle connector, and replace
connecting pin to secure handle. (Fig. 2) The slot
in the handle should fit the notch on the left side of
the handle connector. If the handle connector was
incorrectly positioned on the fork, the handle will face
backwards.
4. Electrical system should be turned to “Off” position
by tilting handle forward.
5. Place electrical cable in the cable holder on the
handle. This helps to prevent accidentally running
over the cable.
6. Slide the solution release cable through the hole in
the cover of the front solution tank and into the red
solution tube. (Fig. 2) Fasten finger tight as over-
tightening may destroy the red solution tube.
7. To install brushes remove the front and rear axles by
pushing from either end. Position brushes and insert
axles. Turn brush slightly to make it easier to align
the axle with the hexagonal hole on the other side of
the machine. Hint: Placing axles in from side of
machine with power cord is easier.
4
BRUSH RANGE AND APPLICATIONS
Technical
Specifications Standard Scrub
Brush High Pile Carpet
Brush Horsehair
Brush Grit Abrasive
Brush*
Color black lt. grey brown dk. grey
Bristle Dia. .007 .005 N/A .022
Size-length
3.5” - side brush .
11” - R3 . . . .
15” - R4 . . . .
Hard Floors
Vinyl/lino . . .
Terrazzo/marble . . .
Concrete/stone . . .
Rubber/rubber
stud . . .
Quarry tiles . .
Safety floors . .
Resin floors . .
Wood floors . . .
Carpet
Industrial .
Commercial .
Domestic/
residential . .
Special
Applications
Entrance matting .
Sports floors . .
ROTOWASH brushes are constructed from high quality polypropylene raw materials and are designed to work
with most modern cleaning chemicals.
All brushes come with removable end caps for easy maintenance & replacement.
*Impregnated with grit material for heavy duty stripping.
13

II. CLEANING CARPETING
1. Variables
a. Pile thickness
b. Type of fiber
c. Amount and type of soil
d. Chemical used
e. Temperature
Model Extremely Soiled Lightly Soiled
Surface Surface
R3 500 sq. ft./hr. 2,800 sq. ft./hr.
R4 700 sq. ft./hr. 3,800 sq. ft./hr.
Depending on the above variables, the Roto Wash,
when operated like a lawnmower, uses 6 to 8 quarts
of solution per 1000 square feet when cleaning carpet.
MOTOR & ELECTRICAL SYSTEM
Roto Wash is gear driven: Series of seven nylon gears.
Brushless induction motor:
R3: 1/2 hp R4: 1/2 hp
110 volts - 60 cycle - 800 watts
Capacitors
R3: 35 uf running capacitor
R4: 35 uf running capacitor
Motor Protector (Circuit Breaker): 10 amps
Power Cord: 50’: 16 gauge with ground
Brush R.P.M.: 780
12
5
Solution Control
Button
Electric Cable
Holder
Connecting Pin
Bolt
Fork
Recovery Tank
Red Solution
Tube
Solution Tank
Brush Pressure
Regulator
Solution Release
Cable
Handle
Connector
Overload Button
(Circuit Breaker)
Transport Wheels
(Automatically Lift
As Machine Is
Turned On)
Axles
Figure 2

USING THE ROTO WASH
1. Tilt handle forward to disconnect the electrical system.
2. Fill the solution tank, of the R3 and R4, with cleaning
solution. On R4 models water may also be added to the
handle mounted tank. Check to see that solution valve of
the handle mounted tank is in off position before adding
water.
3. Solution valve of the handle mounted tank is used to add
water as required to the solution tank and is off when at
90º to tank.
Do not use foaming type solutions.
4. At right side of machine is a knob which adjusts the brush
pressure. (Fig. 1 or 2) Brush pressure can only be adj-
usted when the handle is in “Off” position.
5. Adjust the pressure so that the brushes touch the surface
to be cleaned and give the feeling of a floating action. Turn
as far to “increase” as possible for maximum
cleaning.
6. To start the machine:
a. Lift and tilt handle to your right and pull back slowly on
the handle. As you pull the handle slowly toward you,
the wheels automatically retract and the machine
begins to brush the floor. Be sure to stop handle
briefly in neutral (straight up) to allow brushes to reach
full speed before making contact with the floor.
b. Should the Roto Wash stall during operation due to
high friction, the handle should immediately be return-
ed to the “Off” position. Decrease the brush pressure,
tilt machine on one wheel, or change brushes to elim-
inate this condition. When cleaning carpet we recom-
mend that you use the accessory gray tray to moisten
the brushes and also to clean them upon completion of
the job.
PLEASE NOTE: It is important to use the handle to start and
stop the Roto Wash. Any other method may wear out the
gears prematurely.
6
MATERIAL MAKE UP
Aluminum die cast body - plastic tanks.
Front Solution Tank and rear Recovery Tank capacities:
R3: 1-1/2 quarts R4: 2 quarts
Note: R4 is equipped with a 2 gallon solution tank.
BRUSHES
All machines equipped with 2 standard polypropylene
brushes. Additional brushes are available:
Polypropylene (black) - carpet & hard surface polishing
Grit (gray) - hard surface scarifying and stripping
Horsehair - buffing & polishing rubber studded tile
Brush sizes: R-3” 11” R-4: 15”
ROTO WASH TIME CLEANING SPECS
I. CLEANING HARD SURFACE - Cement, vinyl, quarry
tile, ceramic tile, terrazzo, etc.
1. Variables
a. Type of surface
b. Type and amount of soil
c. Chemicals used
d. Temperature
Model Extremely Soiled Lightly Soiled
Surface Surface
R3 2,000 sq. ft./hr. 3,500 sq. ft./hr.
R4 3,000 sq. ft./hr. 4,500 sq. ft./hr.
Depending on the above variables, the Roto Wash,
when operated like a lawnmower, uses 3 to 4 quarts
of solution per 1000 square feet when cleaning a hard
surface. 11

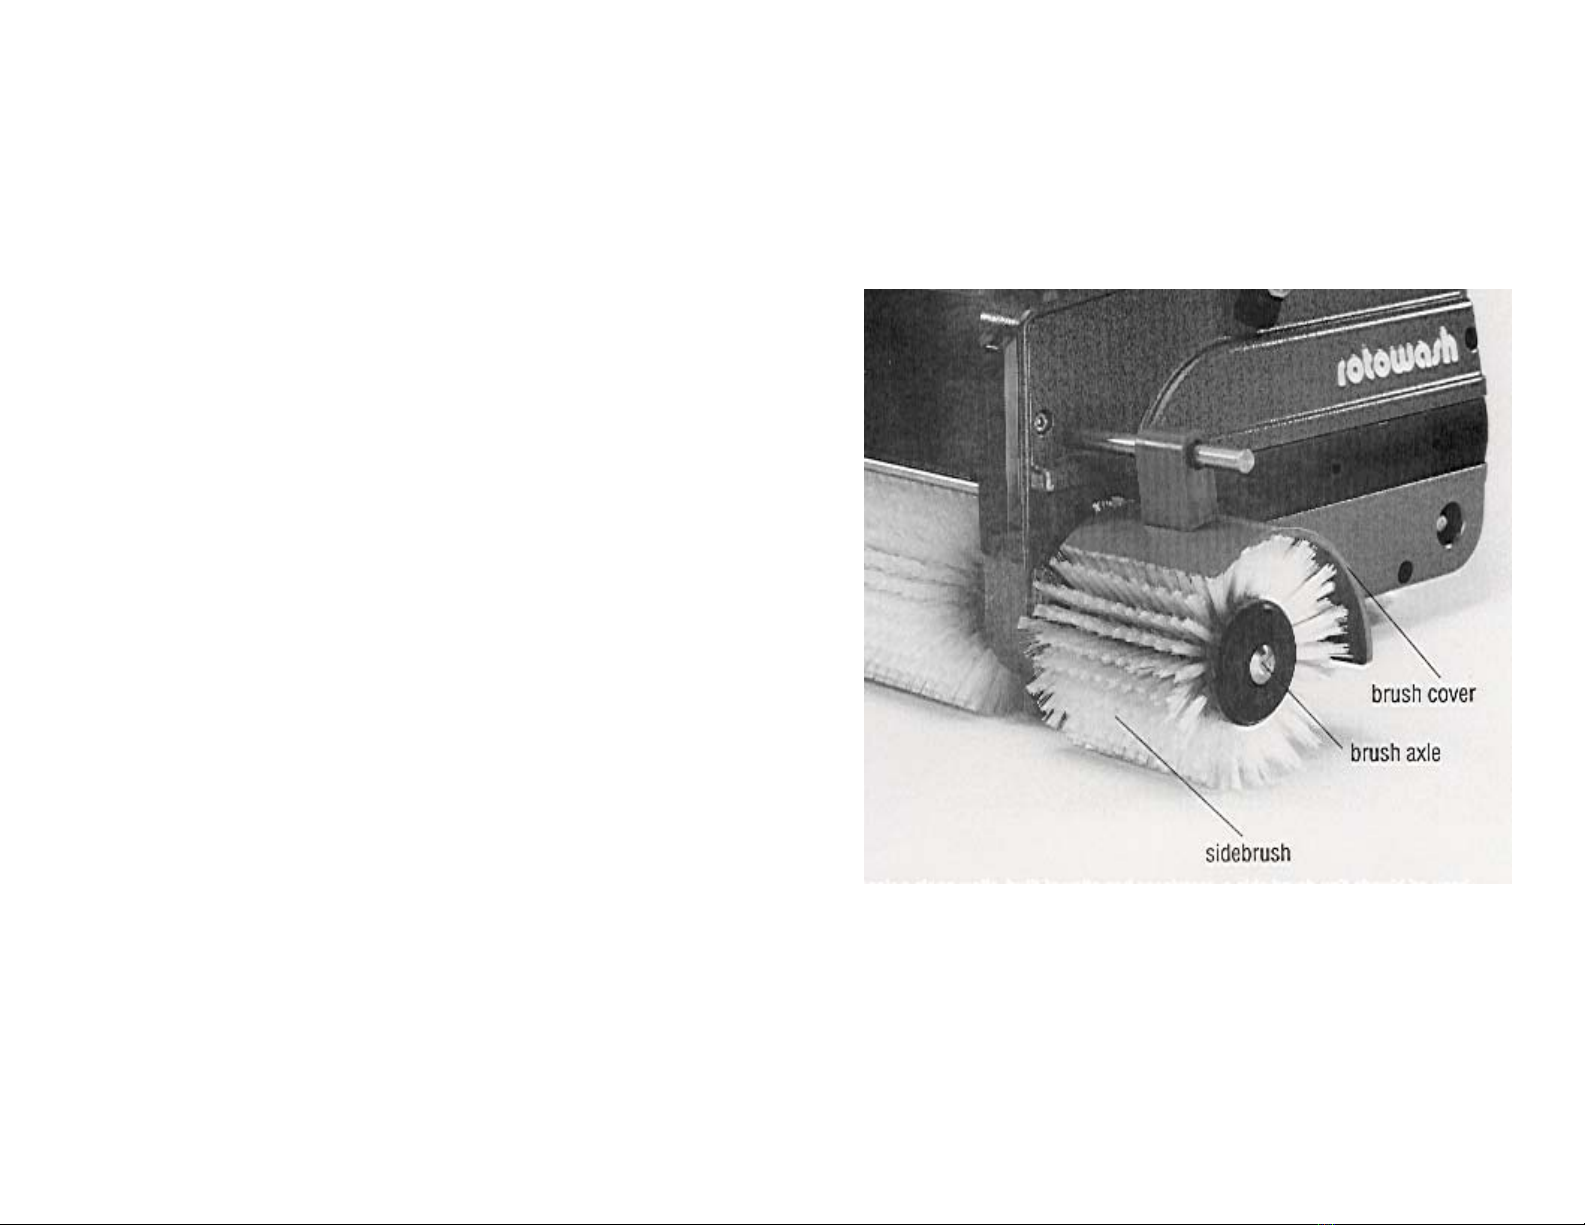
6. Brush Redeposits Lint on Carpet
a. Clean machine as in steps 2 and 3 of maintenance
section. This occurs on new or plush carpets.
7. Machine Streaks Floor
a. Brushes are not overlapping on successive passes.
b. Weepholes of Solution Tank are clogged. Flush,
use a pin or remove water distributor and clean.
c. Prespray chemical before cleaning.
d. Heavy soil accumulation, run machine in crisscross
direction.
e. Replace Stripper Blade if worn.
f. Clean machine as in steps 2 and 3 of maintenance
section.
8. Machine Vibrates Or No Longer Floats On Surfaces
a. Machine is out of alignment.
b. Brushes are worn excessively and once rotated create
too much friction.
c. Brush end caps may be rounded out and worm.
9. Axle Is Hard To Push In Or Out
a. Machine is out of alignment
b. Debris between brush and machine.
10.Tanks Are Hard To Get In And Out
a. Machine is out of square.
11.Wheels Will Not Retract
a. Lever-part is bent, usually occurs by dropping mach-
ine on wheels.
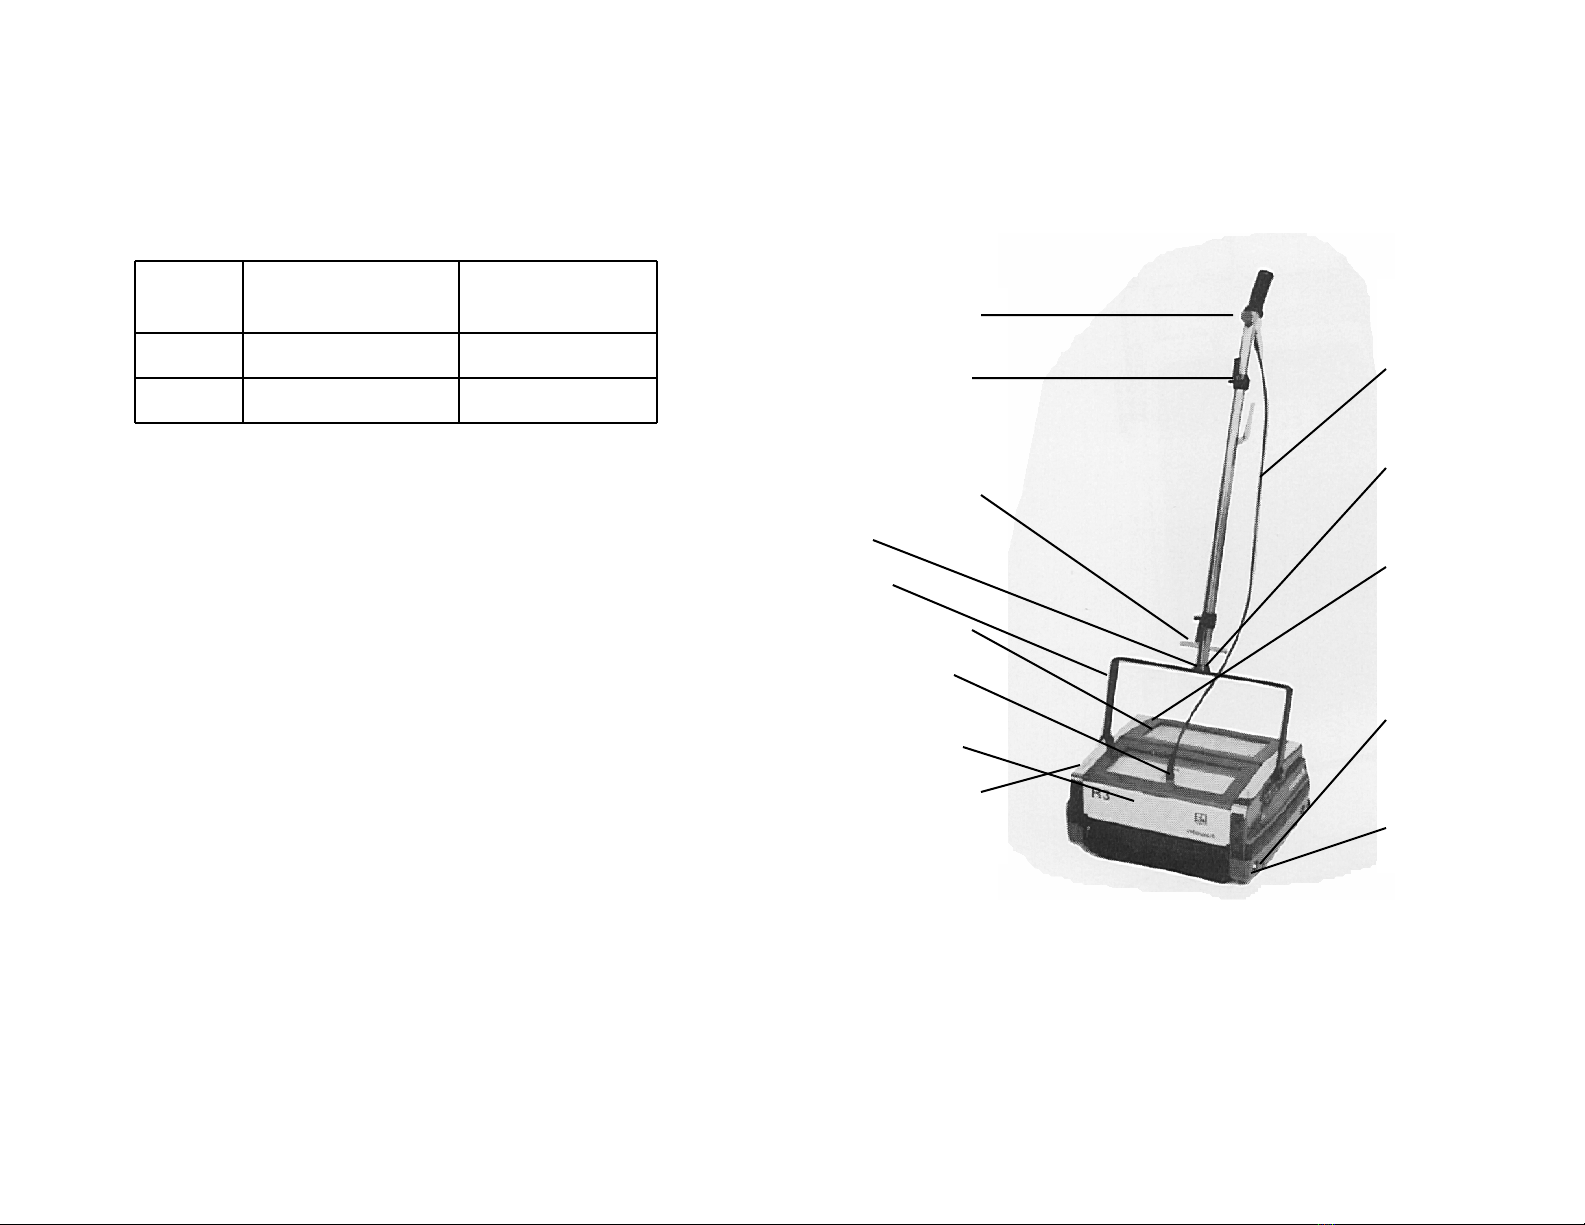
ROTO WASH SPECIFICATIONS
Dimensions
Model Weight Width Depth Height Brush Width
R3 45 lbs. 16” 12” 9” 11”
R4 60 lbs. 20” 12” 9” 15”
Length of handle & fork: 38”. Handle folds down
parallel with machine enabling it to clean under 9”
clearances.
Model R3: Stick Handle Model R4: Loop Handle
10
7. Depress the solution control button (R-3) or pull upward on
the Solution Control Handle (R-4) to release the cleaning
solution as needed. PLEASE NOTE: A little goes a long
way and over-saturation of the brushes is self defeating.
Solution should be fed only momentarily - not continuously.
8. When cleaning, the machine should be run so that the
cleaning paths of the brushes slightly overlap.
9. When cleaning, we recommend the area be pre-sprayed
by spraying the proper chemical on the surface using a
tank sprayer. The dirt will be activated by the chemical
prior to the brushing action. Do not use a foaming cleaner.
Use rinse water in the solution tank, to reduce residue.
10.When cleaning carpets and a rinse is required, follow Step 9.
The solution tank should only be filled with clear water to
facilitate proper rinsing.
11.If the electric cable or anything else should get caught in
the brushes by accident, stop the machine immediately.
This is done by pushing the handle forward to its off
position. Disconnect power cord. Remove the obstruction.
If the machine will not start again, push the Overload
Button located just below the cable until it clicks.
Hint: A pen or small object may be needed to push it
in far enough.
12.When the Recovery Tank is near full, shut the machine off. Lift
the rear cover of the container, remove the tray and empty.
13.Do not use machine for wet pick up where liquid level
exceeds 1/8” or in flood type conditions.
14.Remove liquid from the Solution Tank only if Solution
Release Cable is in place, otherwise leakage will occur.
15.A spring loaded pin, located in the lid, compresses as the
lid is removed and holds the lid firmly in place after lid
installation.
16.The Roto Wash can be moved over short distances using
the wheels on the machine. This can be done by placing
the handle in a vertical position, lifting straight up on the handle
7

and pulling it toward the rear. The wheels will not retract and
the tilted handle can be used to push the machine. For moving
over greater distances, we recommend the use of a 4 wheel cart
for stability.
MAINTENANCE
Be sure to disconnect cable from power source before
attempting to service. The following procedures should be
performed at the times specified on the schedule. Never hose the
Roto Wash with water while cleaning.
DAILY:
1. Wash brushes. This can be accomplished by placing
clean water in the utility tray (water level should not
exceed 1/8 inch), then placing the machine in the
tray, and running the machine with the brushes
lowered into the water. Rotate brushes end to end
frequently to prevent permanent bristle set.
2. Unplug power cord.
3. Remove and clean the Recovery Tank and the Solu-
tion Tank.
4. Wipe the inside and outside of the machine with a
damp cloth. To avoid motor damage, do not spray
unit with large amounts of any liquid.
5. Check Stripper Blade of the Recovery Tank for un-
even wear. Any jaggedness or roughness or excessive
sharpness will indicate the Stripper Blade should be
replaced immediately to avoid the possibility of scoring
the drum.
THREE MONTHS:
1. Remove side covers and clean inner housings.
a. Use a damp cloth or brush to remove excess
accumulation of dirt and carpet fiber.
2. Remove grease cap (Part #211, electrical side) and pack
with grease.
8
TROUBLESHOOTING
1. Machine Stalls
a. Pull the handle back slowly allowing the machine time
to run in neutral before beginning to clean. At the
same time tilt the machine to one side, it will usually
allow the machine to start without high friction.
b. Moisten the brushes.
c. Reduce the brush pressure.
d. Change to a softer brush for high pile or thickly padded
carpets, and certain rubber floorings.
2. Machine Does Not Start
a. Check the wall plug.
b. Check to see that the fork is fully seated in the
housing. When fork is pulled straight up, switch will
not activate machine. (Machine will not run but elec-
tricity is still present)
c. Check the Overload Button on the right side of the
machine. Push it in till it clicks. Motor may need to
cool for a few minutes, first. Use a pen or other small
object to push in completely.
3. Drum and/or Brushes Do Not Rotate
a. Gear needs replacing.
b. Axle not connected properly on one or both sides of
machine.
4. Dirty Liquid Not Removed From Floor
a. Clean the springs and stainless steel blade of
Recovery Tank.
b. Recovery Tank needs to be emptied.
c. Check brush height adjustment.
d. Check brushes to see if they are worn and need
replaced.
e. Replace Stripper Blade if worn.
5. Machine Leaks Water
a. Valve is not closing in Solution Tank. After emptying
solution tank, unscrew valve and replace or reseat
O-ring on brass end.
or
b. Slide grommet at bottom of solution release cable back
and then turn adjusting bolt clockwise to decrease
water flow.
9
This manual suits for next models
1
Table of contents