Wicked Thumb Destroyer 750 User manual

!"##$%"&
Destroyer 750/ 750S
Assembly Manual
UPDATED 9/22

Welcome to the Wicked Thumb Army and congratulations on taking
ownership of your new Destroyer 750!!
Over the next dozen or so pages we will go over everything you need to
know to get your bike uncrated, assembled and ready for it’s maiden
voyage.
Your safety is our number one priority. As such, if at any point during the
assembly (including right now!), if you are unsure of your ability to
assemble the bike in a safe fashion, we strongly suggest taking it to your
local bike shop, where they will be able to safely complete the process,
while also checking for anything that may have loosened up during transit
and tuning specific sytems to your riding ability and preference.
Before continuing any further, if there is any severe damage to the outside
of the carton, please take pictures before removing the bike and send
them to [email protected]. Time isof the essence if
there is carrier related damage to your new bike.
Let’s get started!
TOOLS NEEDED FOR ASSEMBLY:
Scissors
13mm crescent wrench (provided)
15mm crescent wrench (provided)
4mm allen key (provided)
Tire pump
Phillips screwdriver (for headlight lens grill)

In the box:
1. Destroyer 750 Electro
Cycle
2. Front Wheel Assembly
3. Handlebars w/controls
4. Seat assembly
5. Pedals
6. Headlight
7. Battery Charger
8. 4mm allen wrench
9. 13/15mm crescent wrench

IMPORTANT
IT IS NOT UNCOMMON FOR THE OUTER CARTON TO ARRIVE DAMAGED.
WE PACK THE BIKE VERY SECURELY, BUT IT IS INEVITABLE THERE IS
OCCASIONAL DAMAGE IN SHIPPING.
IF THERE IS DAMAGE TO YOUR BOX:
TAKE PICTURES OF ALL 6 SIDES PRIOR TO
OPENING. FAILURE TO DO SO MAY VOID ANY
DAMAGE CLAIMS.
AFTER TAKING PICTURES OF THE OUTER CARTON, OPEN THE BOX AND
TAKE PHOTOS SHOWING THE INNER PACKING
BEFORE REMOVING ANY COMPONENTS FROM
THE BOX.
CAREFULLY INSPECT YOUR BIKE FOR DAMAGE. NOTE ANY DAMAGE.
IF YOU NOTICE ANY DAMAGE TO ITEMS SUCH
AS THE FENDERS, FORKS, CHAINRING, BRAKES,
ETC. DO NOT RIDE YOUR BIKE UNTIL YOU
HAVE BEEN CLEARED BY WICKED THUMB
CUSTOMER SUPPORT.
RIDING A DAMAGED BIKE AND THEREFORE CAUSING FURTHER
DAMAGE WILL VOID YOUR WARRANTY ON THE ADDITIONAL DAMAGED
PARTS.
IF EVERYTHING LOOKS GOOD ON INSPECTION, CONTINUE WITH THE
REST OF THIS MANUAL AND ASSEMBLE YOUR BIKE AS INSTRUCTED.

First remove seat assembly and lift accessory box out from next to rear
wheel. Set aside. Cut corners on long side of box and fold down to
create a work surface. remove all zip ties and packing material.
After you have installed wheel, stand over bike and Adjust handle
bar angle to your personal comfort level. Fasten the 4 handlebar
clamp bolts in an X pattern so they are snug plus 1/4 turn . MAKE
SURE HANDLEBARS ARE SECURE. DO NOT OVERTIGHTEN!
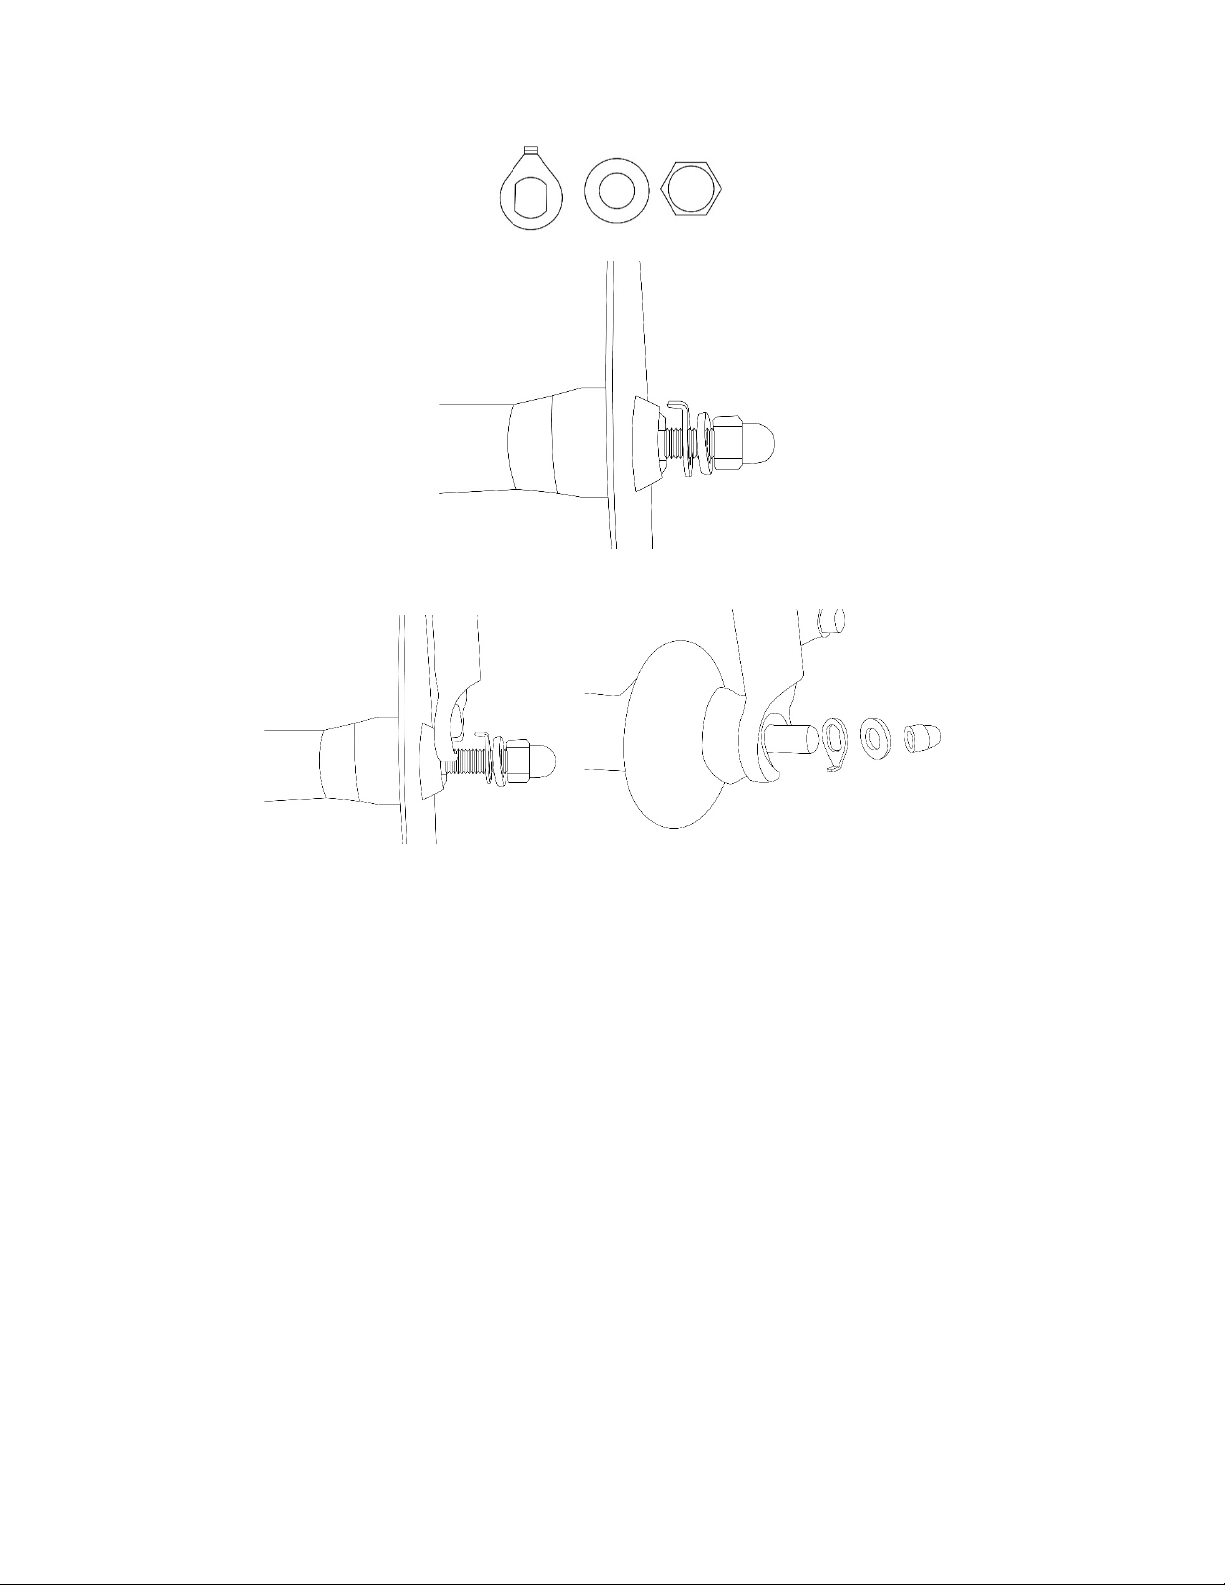
Stem A
A
B
Center bolt (C)
Attach&Handle&Bars&
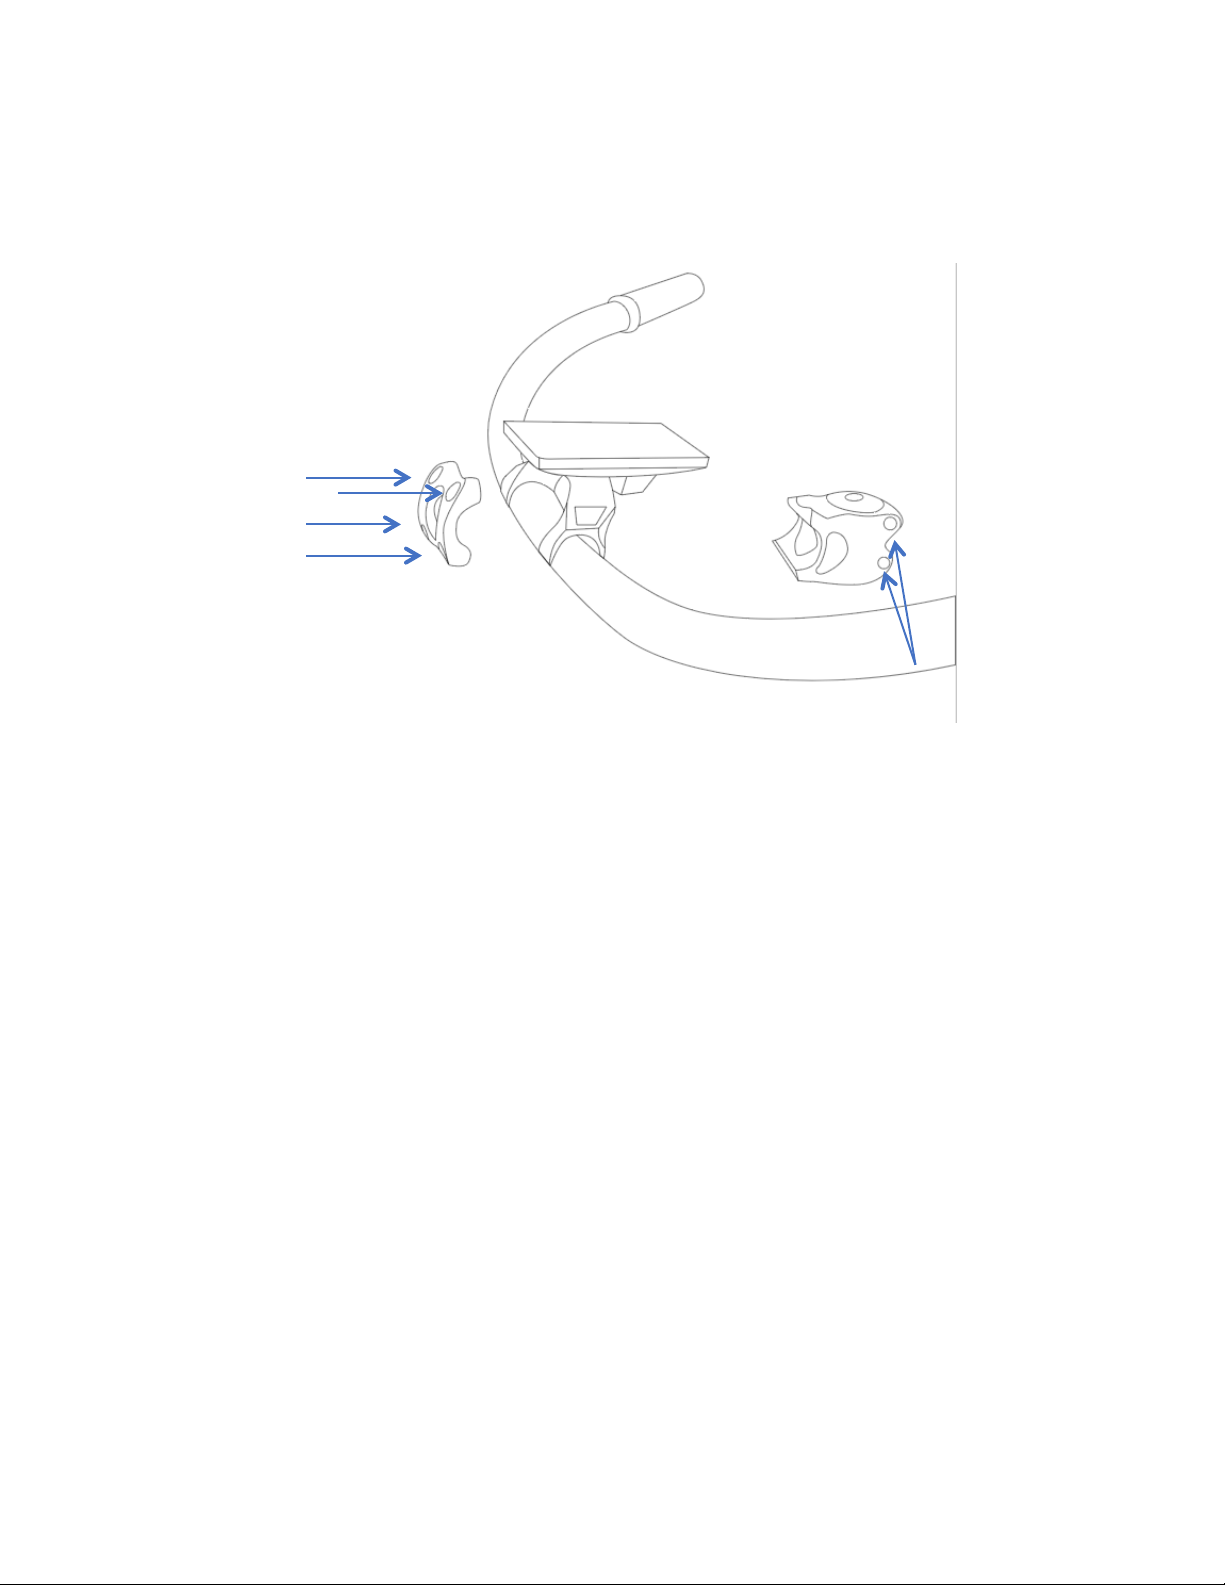
When&moving&bars&be&careful¬&to&pull&right&brake&lever&closed&until&the&front&
wheel&has&been&installed.&Using&the&supplied&4mm&allen&
wrench,&loosen&the&2&stem&pinch&bolts&(A)&and&rotate&the&
stem&180°rees&so&the&4&handlebar&clamp&bolts&are&facing&
forward.&
You may also need to very slightly loosen the center bolt of the stem (C) to
turn the neck. Remove the dust cap to access the bolt. Please be sure to
retighten center bolt (C) FIRST after rotating the stem forward.
Tighten snug plus an extra half turn. Replace dust cap.
ITighten&the&pinch&bolts (A)&snug plus a 1/4 turn to&lock&the stem &in&place.&&&&
Next,&remove&the&4&allen&bolts&(&B&)&and&gently&remove&front&of&handlebar&clamp.&
Center&handlebars&into&rear&clamp&and&reinstall&front&clamp&using&4&bolts&
removed&from&prior&step.& Tighten&just&enough&to&hold&bars&in&place.&&
Continue to installation of front wheel.

Install Front Wheel
Loosen front axle nuts and slide washer and lock tab out towards loose nut (Suspension Fork/Springer
Models will not have a lock tab). For 750S Model Front Brake Assembly Goto Appendix A.
Align the front brake disc into center offront brake pads and lower front forks down onto axle. Rotate
lock tab to the one o-clock position and insert lock tab into hole on fork. Tighten front axle nuts byhand.
Slowly depress front brake lever until firm. Tighten front axle cap nuts with 15mm wrench until snug.
Return to Red Print of 'Attach Handlebars' Instructions on Prior
Page to Adjust Bars and Lock Down Handlebar Clamp Bolts.
0"#*&$"# 6.%:# +4/( 4/ *2$ 4*&$"# 5%9? MN GNF 98,, 6.%:# ,#3#.<

R*/$%,,&)#%+&U45"$&
Attach the Headlight Mounting Bracket to the Lower Fork Crown Using 2
Provided Allen Head Bolts. Before Installing Head Light, Use a 13mm wrench to
remove and install side bolts and washers to install head light. R866#.&;%/"#./&74$&
6#$;##*&"#%+,%19&"28/4*5&%*+&128*$4*5&6.%(:#$/<&&'+J8/$&"#45"$&%*+&%*5,#?&
$"#*&7%/$#*&%,,&$"#&62,$/<&!2**#($&$"#&,45"$&92;#.&(%6,#<&&&

R*/$%,,&W#+%,/&
R*/$%,,&$"#&9#+%,&1%.:#+&;4$"&%*&XUY&2*&$"#&,#7$/driver's&/4+#&crank. It threads in counter-
clockwise. The&9#+%,&1%.:#+&;4$"&%*&XQY&installs 2*&$"#&.45"$&/4+#&crank and threads in
clockwise. -#&(%.#78,¬ to&(.2//&$".#%+&$"#&9#+%,/<&&F45"$#*&;4$"&%&C\11&;.#*("<&&&

R*/#.$&%*+&'+J8/$&]%++,#&)#45"$&
N9#*&!,%19&,#3#.&%*+&4*/#.$&/#%$92/$&4*$2&/#%$92/$&$86#<& & W2/4$42*&$2&+#/4.#+&"#45"$&%*+&
(,2/#&(,%19<& & R7&/#%$92/$&.2$%$#/?&29#*&(,%19&%*+&$;4/$&2*#&$8.*&(,2(:;4/#&;"4,#&"2,+4*5&
6%(:&*8$<& & !,2/#&%5%4*<& & Q#("#(:&72.&.2$%$42*<& & Q#9#%$&9.2(#//&%5%4*&47&*#(#//%.I<&

!"%.5#&-%$$#.I&6#72.#&^28.&_4./$&Q4+#&
L%:#&/8.#&$2&("%.5#&I28.&6%$$#.I&$2&78,,&(%9%(4$I&6#72.#&I28.&74./$&.4+#<& & N*&$"#&,2;#.&,#7$&
/4+#& $%*:?& .#123#& ("%.5#& 92.$& (%9& %*+& 4*/#.$& ("%.5#.& 9,85<& & W,85& ("%.5#.& 4*$2& ;%,,& %*+&
6#54*&("%.54*5&A&.#+&,45"$&;4,,&$8.*&2*&B<& & 0"#*&$"#&6%$$#.I&4/&78,,I&("%.5#+?&$"#&("%.5#.&
/$%$8/& ,45"$& ;4,,& $8.*& 7.21& Q#+& $2& S.##*<& & =*9,85& ("%.5#.& %*+& .#9,%(#& ("%.5#& 92.$& (%9<&
F"#& ("%.5#.& ;4,,& /$29& ("%.54*5& %*+& #*$#.& $.4(:,#& ("%.5#& 12+#& ;"#*& 78,,?& 68$& ;#& +2*`$&
.#(211#*+&,#%34*5&$"#&("%.5#.&(2*$4*828/,I&"22:#+&89&;"#*&*2$&4*&8/#<& & &

-%$$#.I&NGaN__&/;4$("&
F"#&9.234+#+&6%$$#.I&/;4$("&/"28,+&6#&$8.*#+&277&;"#*&I28.&64:#&4/&*2$&4*&8/#&$2&9.#/#.3#&
6%$$#.I&,47#<& & R$&%,/2&/#.3#/&%/&%&:4,,&/;4$("&4*&$"##*$&I28&*##+&$2&b84(:,I&+4/%6,#&$"#&
12$2.<& & &

F49/&$2&#H$#*+&6%$$#.I&,47#&
l^28.&6%$$#.I&4/&+#/45*#+&$2&,%/$&72.&cZDEE&("%.5#&(I(,#/&47&1%4*$%4*#+&9.29#.,I<
l'324+&#H$.#1#&$#19#.%$8.#/&$2&9.2,2*5&6%$$#.I&,47#<&'324+&"#%$&%623#&CC\&+#5.##/&47
92//46,#<&M2&*2$&/$2.#&I28.&6%$$#.I&*#%.&%*&29#*&7,%1#?&#H$.#1#&"#%$&2.&%*I
(2168/$46,#/<& & M2&*2$&/$2.#&$"#&6%$$#.I&;"#.#&4$&(%*&6#&/86J#($#+&$2&.4/4*5&;%$#.<
F"#&6%$$#.I&/"28,+&2*,I&6#&29#*#+&6I&%&6%$$#.I&/#.34(#&9.27#//42*%,&2.
1%*87%($8.#.<& & N9#*4*5&$"#&(%/#&;4,,&324+&I28.&;%..%*$I<
lU4:#&%&5%/&5%85#?&F"#&6%$$#.I&,#3#,&4*+4(%$2.&2*&$"#&+4/9,%I&/(.##*&4/&*2$&%,;%I/
%((8.%$#&A4<#<&4$&1%I&/"2;&\Ed&68$&2*,I&6#&V\d&%$&$"%$&121#*$<& & 0#&/855#/$
5#$$4*5&%&7##,&72.&I28.&6%$$#.I`/&,47#&.#,%$#+&$2&I28.&/9#(474(&.4+4*5&"%64$/&6#72.#
#H9#($4*5&%&(#.$%4*&.%*5#<
l_.#b8#*$&/$%.$/a/$29/&%*+&29#*&$".2$$,#&%((#,#.%$42*&+.%4*&I28.&6%$$#.I&18("
b84(:#.&$"%*&5.%+8%,&("%*5#/<& & Q#,I&2*&$"#&9#+%,&%//4/$&12/$&27&$"#&$41#&%*+&8/#
$"#&$".2$$,#&%/&*#(#//%.I&$2&5#$&89&$2&/9##+?&(,416&"4,,/?&(.2//&$.%774(&#$(<
lF8.*&$"#&NGaN__&/;4$("&$2&$"#&N__&92/4$42*&;"#*&9%.:4*5&I28.&64:#<
l_2.&,2*5&$#.1&/$2.%5#?&.#+8(#&6%$$#.I&,47#&$2&%99.2H41%$#,I&\Ed&%*+&.#123#&7.21
64:#&%*+&/$2.#&4*&%&+.I&%*+&12+#.%$#&$#19#.%$8.#&9,%(#<
l0"4,#&$"#&64:#&4/&;%$#.&.#/4/$%*$?&F"4/&64:#&4/&GNF&;%$#.9.227<&M2&*2$&$%:#&4$&$".285"
;%$#.&+##9#.&$"%*&e&4*("#/?&2$"#.;4/#&$"#.#&4/&%&.4/:&27&$"#&(2*$.2,,#.&/"2.$
(4.(84$4*5<& & 0%$#.&+%1%5#&4/&*2$&(23#.#+&6I&I28.&;%..%*$I<
l^28.&6%$$#.I&/"28,+&78,,I&("%.5#&4*&\Zc&"28./<& & R7&4$&"%/*`$&78,,I&("%.5#+&;4$"4*&D
"28./?&9,#%/#&(2*$%($&9.2+8($&/8992.$&%$&/8992.$f;4(:#+#,#($.4(64:#/<(21

=*4*/$%,,&g&R*/$%,,&-%$$#.I&
F2&%((#//&$"#&6%$$#.I?&6#54*&6I&.#1234*5&$"#&$;2&,2;#.&>11&%,,#*&/(.#;/&2*&$"#&+.43#.&
/4+#&A,#7$&/4+#B&$%*:&(23#.<& & & &
F2&.#123#&6%$$#.I?&8/#&$"#&/%1#&>11&',,#*&h#I&$2&.#123#&$"#&>&62,$/&2*&$"#&6%$$#.I<&
=*9,85&62$"&(2**#($2./&%$&$"#&7.2*$&27&$"#&6%$$#.I&%*+&(%.#78,,I&98,,&28$<& & & &

)#%+&U45"$&!2*$.2,&
W8/"&$"#&68$$2*&+2;*&$2&%($43%$#&,2;&6#%1&%*+&89&$2&%($43%$#&"45"&6#%1<&
M2*`$&72.5#$&$2&/;4$("&277&$"#&,45"$&%*+&6%$$#.I&;"#*&I28&74*4/"&.4+4*5<& &

Setting your Display
To power on the bike, make sure the battery switch is turned to the on
position and hold down the power on/off switch on the left handlebar. The
Wicked Thumb logo will show on screen and you are ready to go.
Hold the ‘SET’ button for 2
seconds to enter the configuration
menu. The passcode is 2112.
Use ‘SET’ to save a value and
move to the next field, +/- to scroll
thru parameter values.
Ex: + 2X to select '2'; ‘SET’ saves
‘2’ in field 1 and moves to field 2. +
to choose ‘1’, ‘SET’ to save and
move to field 3. + to choose ‘1’.
‘SET’ to save and move to field 4.
“+“ two times to choose '2' and
‘SET’ to save.
‘SET’ to “ENTER”
You should not have a need to enter the settings unless you want to
limit the speed of the bike, deactivate the throttle, change the mode
or check an error message.
General Settings
Option 1.1 (Trip Clear). ‘SET’ to
Y to reset tripmeter.
1.2 (Brightness) 'SET' to select,
up and down to change level.
1.3 (Speed Limiter in KM) '99' is
unlocked. 34 will limit the bike to
20mph. Multiply each value
by .6 to determine the mph limit
(i.e 15mph is 25).
1.4 (Wheel Size) = 29 due to the
fat tires. Do Not Change This.
1.5 (Unit) You can toggle
between MPH and KPH

1.6 (Voltage) is 48v unless you
have a 52V battery upgrade
1.7 (Mode) Choose Normal, ECO
or Power
1.8 (Exit to Main Menu)
Option 2 (Advanced Settings):
Settings 2.1, 2.2 and 2.3 should
NEVER be altered unless
directed by Wicked Thumb
support. You may render your
bike inoperable and void your
motor, controller and battery
warranty.
2.4 (Throttle Speed) You can
limit the throttle to 6km/h or
unlock it
Option 2.5 (Throttle Level)
default ‘N’ – this setting
determines whether the throttle is
linked to the pedal assist level.
By switching to ‘Y’ the throttle will
stay limited to the current pedal
assist level.

Your first ride
We strongly encourage you to wear aproper fitting helmet and
eyewear when riding your bike. Trucks and cars have been known to
throw arock or two into the air, bugs have a knackering to find a way into
your eyes and while it might not seem you are going that fast, falling from
5-6 feet in the air will do some unwanted remodeling to your noggin.
WEAR A HELMET!
Now is a great time to recheck your handlebars to make sure they won't
slide forward or backwards or twist side to side independent of the
wheel. Remember pinch bolts and center bolt from (Attach Handlebars
Page) If bars are loose please tighten the handlebar clamp bolts slightly
tighter for front to back movement and the center bolt for side to side
movement.
Before taking your first ride, check the tire pressure and set to 15-20 PSI.
DO NOT EXCEED 20 PSI. The Tube is not designed for higher PSI.
The +/- buttons will control your pedal assist (PAS) level. Default is ‘1’.
Get used to this level first, then start moving up and down as you feel
comfortable. Going down to ‘0’ will turn the motor off.
Please see
tips below.
On your first ride, we suggest riding away from any traffic or obstructions
just to be safe. Remember at any moment tapping the brakes will
disengage the motor.
Tips:
1. Get used to riding the Destroyer as a regular bicycle, with no motor
(PAS 0), shifting through gears, setting your seat and handlebar
position and gaining an overall feel for the bike.
2. Learn to understand how much stress is on the bike when climbing
hills, or starting from a stop, based upon how much stress is on
your legs.

3.
Pedal along
. Remember the motor is there to enhance your
power, not completely replace it.
4. Review our blog post on battery life here
5. After the first 100 miles, take your bike to a local bike shop (LBS)
and have them perform a 100 mile tuneup/inspection. Here they
will check fasteners for tightness, inspect for uneven wear, any
misalignment, diagnose noises, etc. While predominantly a safety
check, it’s also key in preventing rapid or uneven wear to
components on your bike. It’s also nice to have a tech familiar
with your bike throughout it’s lifetime.
6. Remember to turn your lights on at night or in lower visibility
settings, winding roads, fog, rain etc.
GO HAVE FUN. Riding a bike will forever be changed this day forward.
Email or call with any questions, comments, feedback, etc.
Thank you so much for joining us on this adventure! Cheers!
-The Wicked Thumb Army

WICKED THUMB
®LIMITED WARRANTY
To make awarranty claim always keep your vehicle model, date of purchase,
vehicle serial number and retailer where you purchased the vehicle from.
The warranty is limited to the terms listed below:
Motor and controller: 1year for parts. 3months for labor
Frame: 1 year parts and labor
Charger: 1year for parts
Battery: 2 years.Warranty on the battery starts the date of purchase of the
vehicle as new. The battery is sealed and cannot be opened or fixed. The battery
should not have a percentage of nominal charge retention of
60% or less. Misuse of the battery, negligence or attempt to open
or repair it will void the warranty.
General vehicle: The vehicle is backed up by a general 1-year warranty. Certain
components listed on this chart or consumables may be subject
to adifferent period of coverage or not included in this warranty. Visit
wickedthumb.com/warranty for full warranty details.
Consumables: Components subject to wear are not covered by the warranty:
Tires, inner tubes, brake lines, brake pads, wheel lining tape, light bulbs, LEDS,
fuses, etc.

If the warranty is void for any reason the customer shall bear any repair or replacement
costs resulting from vehicle misuse, negligence or abuse. Always follow care and
preventive maintenance procedures. Always keep receipts from any services
performed to the vehicle by an authorized distributor or service center.
The warranty will be voided by any of the following circumstances:
(1) Failure to follow all directions or recommendations listed in this warranty and
user’s manual.
(2) Cycling collision, accident or vehicle damage caused by careless parking or
storage.
(3) Acts in violation of laws and regulations.
(4) Never performed service or maintenance on components
(5) DIY repairs on electronic components.
(6) Abusive use of the vehicle on off-road terrain, mud, snow, water, sand, gravel
(7) If vehicle isused asrental unit ortaxi
(8) Damages caused by natural disasters such as earthquakes, lightning, fire,
flooding and other hazards .
(9) Rust and/or paint fading caused by heavy exposure to rain, hail, snow or
sunlight.
(10) Overloading beyond recommended capacity .
(11) Damages caused by nails, needles, broken glass ,debris ,sharp rocks or other
foreign objects .
(12) If vehicle is used for stunts, jumping from ramps, stairs or elevated surfaces.
(13) If vehicle isused incompetition orracing
(14)If motor, electrical system, suspension frame, wheels have been modified for any
purposes
(15)Use of other components not approved by the manufacturer
(16)Damages resulted from improper transportation
(17)Filing a Chargeback while in possession of the bike
(18)Riding a bike with an unresolved technical issue that
results in further damage
(19)Riding a bike damaged during shipping therefore
causing further damage
(20) Second owner or purchased a demo unit from a dealer
(21) Paint and other cosmetic defects are not covered under
warranty
Other manuals for Destroyer 750
1
This manual suits for next models
1
Table of contents
Other Wicked Thumb Bicycle manuals