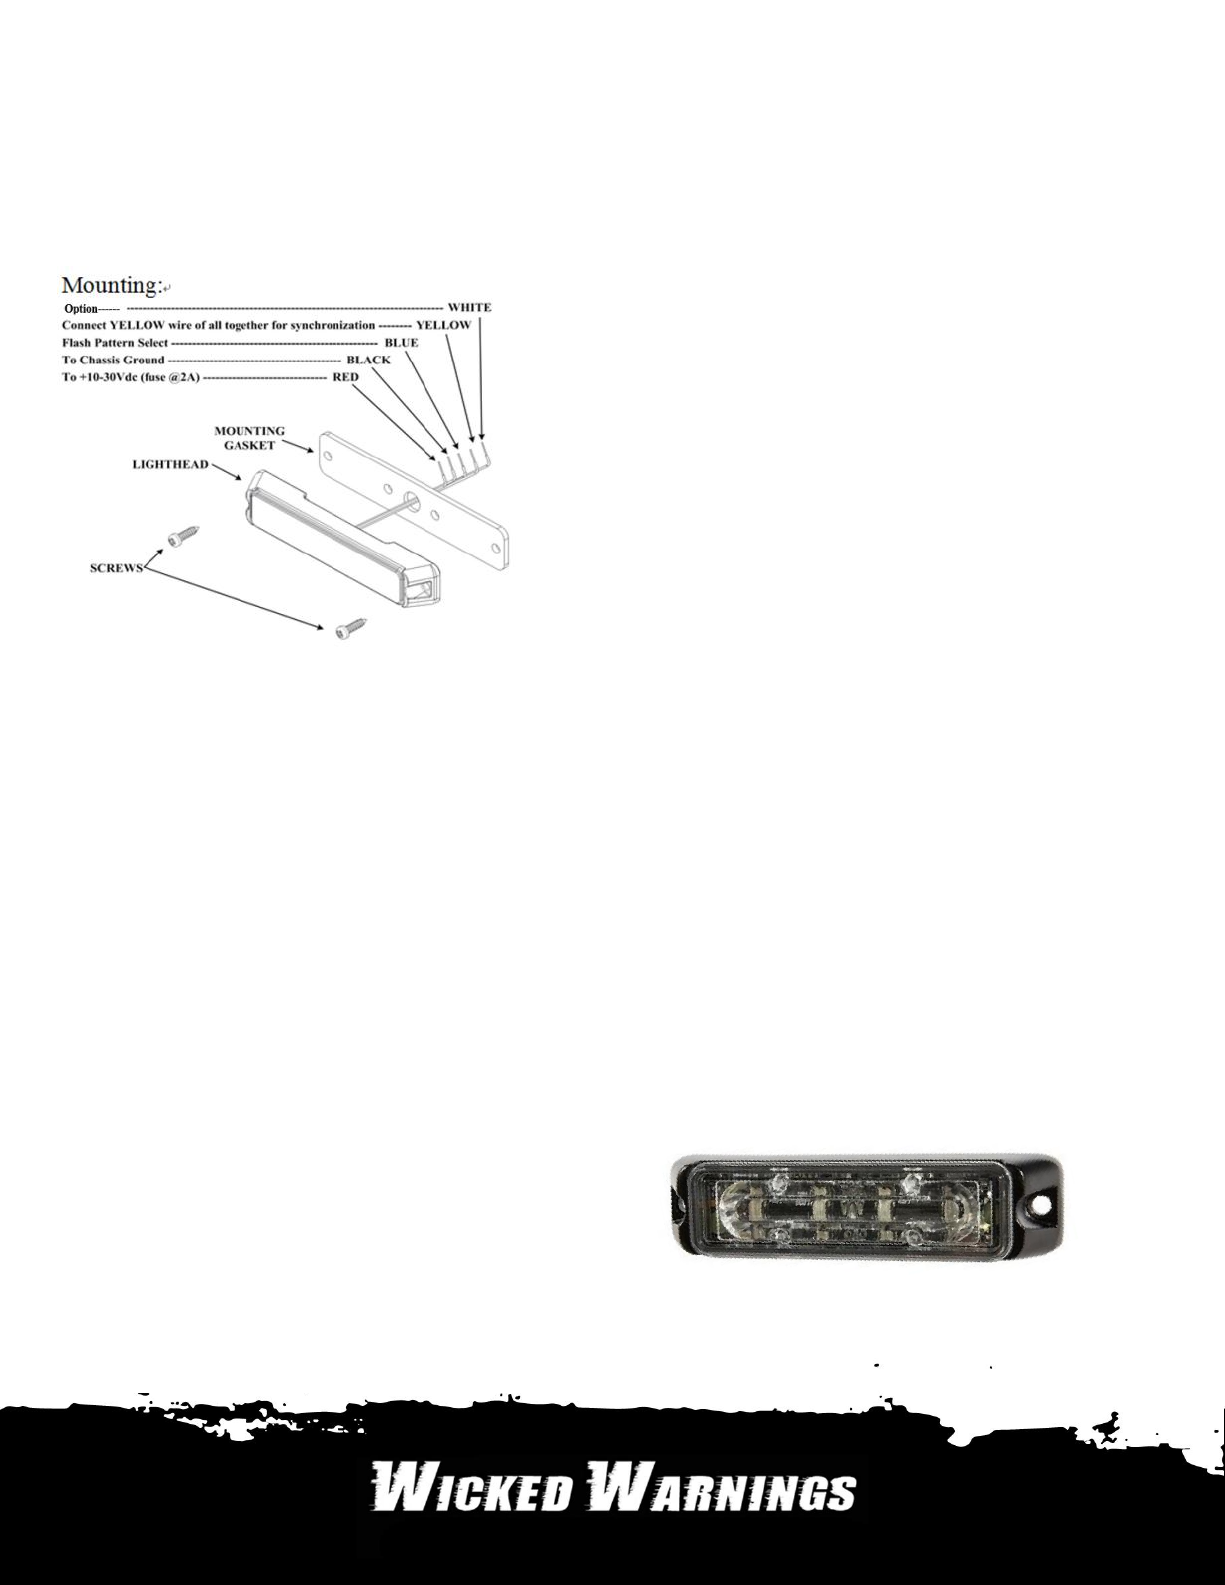
manuals.online logo
Brands
  1. Home
  2. •
  3. Brands
  4. •
  5. Wicked Warnings
  6. •
  7. Lighting Equipment
  8. •
  9. Wicked Warnings LIN-6 Owner's manual

Wicked Warnings LIN-6 Owner's manual

WIRE
RED: Positive (need to add 2A Fuse)
BLACK: Negative
BLUE: Pattern Switch
YELLOW: Synchronized Function
WHITE: Stop/Turn/Brake/Tail Light Switch
*Maximum of 8 Heads can be synchronized*
Wicked Warnings LIN-6
Installation and Operation Instructions
IMPORTANT: Please read all of the following instructions before installing your new LIN-6. WARNING: Failure to install or use this product
according to manufacturer’s recommendations may result in property damage, serious injury, and/or death to those you seek to protect!
TROUBLESHOOTING
The LIN-6 series has been factory tested and
approved. If the functions of device fail, please check
the following:
1. After connecting with the power supply, be sure
that the power source end is joined in correct
way. And then, make sure that there is no
short-circuited power occurring.
2. Ensure Power switch is turned to "ON" position.
3. Press the Pattern Switch to be sure the “OFF”
pattern is not selected. If the blue wire touches
black wire over 5 seconds, it would switch to OFF
pattern. It would be lighted up again when using
blue wire touches black wire less than 1 second.
4. To synchronize 2 lights together, first set both
lights on the same pattern. 2nd connect the
YELLOW wires together for the lights you want
synchronized (max 8) and they will either flash
simultaneously or alternating depending on the
phase of pattern you chose.
www.wickedwarnings.com ● [email protected] ● (630) 361-4390
OPERATION
Apply BLUE TO BLACK wire:
●Less than 1 sec. for next pattern
●between 1-3 sec. for previous pattern
●between 3-5 sec. for factory default
●more than 5 sec. for turn off
Apply + TO WHITE wire: (Option Function)
●Stop/Turn/Brake/Tail Light Steady Burn pattern
SEE PATTERNS AND SAFETY INFO
ON THE NEXT PAGE
Wicked Warnings LIN-6
Installation and Operation Instructions
PATTERNS & SAFETY
Pattern Description
P1 Single 75 Ph1
P2 Single 75 Ph2
P3 Single 75 Alt.
P4 Single 120 Ph1
P5 Single 120 Ph2
P6 Single 120 Alt.
P7 Double 75 Ph1
P8 Double 75 Ph2
P9 Double 75 Alt.
P10 Double 120 Ph1 (R65)
P11 Double 120 Ph2 (R65)
P12 Double 120 Alt
P13 Quad 75 Ph1
P14 Quad 75 Ph2
P15 Quad 75 Alt.
P16 Quad 150 Ph1
P17 Quad 150 Ph2
P18 Quad 150 Alt.
P19 Triple 75 Ph1
P20 Triple 75 Ph2
P21 Triple 75 Alt.
P22 Quint 150 Ph1
P23 Quint 150 Ph2
P24 Quint 150 Alt.
Pattern Description
P25 Steady - Single
P26 Steady Burn
P27 Modulation
P28 2 Double, 2 Triple Alter
P29 4 Single, 2 Quad
P30 OFF
NOTES
LIN-6 Factory Default: P13-Quad 75
*Phase Operation: Ph1= Phase 1 / Ph2=Phase 2
*Phase 1 (Ph1) flashes simultaneously with Ph1
*Phase 2 (Ph2) flashes simultaneously with Ph2
*Ph1 alternates with Ph2
SAFETY INSTRUCTIONS
*Do not stare directly into these lights.
*DO NOT install this product or route any wires in the Air Bag Deployment Zone.
Refer to vehicle Owner’s Manual for deployment zones.
*The installer must be sure that no vehicle components or other vital parts could be
damaged by the drilling process during installation.. Install grommets into all wire
passage holes.
*Inspect and operate this product regularly to confirm proper operation.
*For this product to operate at optimum efficiency, a good electrical connection to
chassis ground must be made. The recommended procedure requires the product
ground wire to be connected directly to the NEGATIVE (-) battery post.
If this product uses a remote device to activate or control this product, make sure
that this control is located in an area that allows for safe operation.
*FAILURE TO FOLLOW THESE SAFETY PRECAUTIONS AND INSTRUCTIONS COULD
RESULT IN DAMAGE TO THE PRODUCT OR VEHICLE AND/OR SERIOUS INJURY TO
YOU AND YOUR PASSENGERS.
www.wickedwarnings.com ● [email protected] ● (630) 361-4390

Other Wicked Warnings Lighting Equipment manuals

Wicked Warnings 2 Series Owner's manual

Wicked Warnings

Wicked Warnings 2 Series Owner's manual

Wicked Warnings LED HAW DUO User manual

Wicked Warnings

Wicked Warnings LED HAW DUO User manual

Popular Lighting Equipment manuals by other brands

Chauvet SlimPAR 56 IRC IP user manual

Chauvet

Chauvet SlimPAR 56 IRC IP user manual

ADJ ILLUSION DOTZ 3.3 User instructions

ADJ

ADJ ILLUSION DOTZ 3.3 User instructions

EuroLite AKKU 41700320 user manual

EuroLite

EuroLite AKKU 41700320 user manual

LED2WORK SPOTLED II operating instructions

LED2WORK

LED2WORK SPOTLED II operating instructions

Meteor TETRISS 2.0 installation guide

Meteor

Meteor TETRISS 2.0 installation guide

ADJ FS600LED User instructions

ADJ

ADJ FS600LED User instructions

Fiilex P180E user manual

Fiilex

Fiilex P180E user manual

Aspöck Systems MultiLED IV Mounting instructions

Aspöck Systems

Aspöck Systems MultiLED IV Mounting instructions

iSolution IM-5W user guide

iSolution

iSolution IM-5W user guide

brennenstuhl Chip LED L CN 110 IP65 operating instructions

brennenstuhl

brennenstuhl Chip LED L CN 110 IP65 operating instructions

Klein Tools 29610 instructions

Klein Tools

Klein Tools 29610 instructions

Wenglor LBA Series operating instructions

Wenglor

Wenglor LBA Series operating instructions

FeherGuard PREMIUM Assembly instructions

FeherGuard

FeherGuard PREMIUM Assembly instructions

Jefferson JEFFES22M-110 user guide

Jefferson

Jefferson JEFFES22M-110 user guide

Scanic Lightstand II PRO 3,3m operating instructions

Scanic

Scanic Lightstand II PRO 3,3m operating instructions

Briteq BT-GLOWPANEL Operation manual

Briteq

Briteq BT-GLOWPANEL Operation manual

Stagg FlatPar 4 user manual

Stagg

Stagg FlatPar 4 user manual

Kody Technologies RockyMounts GuideRail Installation instruction

Kody Technologies

Kody Technologies RockyMounts GuideRail Installation instruction

manuals.online logo
manuals.online logoBrands
  • About & Mission
  • Contact us
  • Privacy Policy
  • Terms and Conditions

Copyright 2025 Manuals.Online. All Rights Reserved.