Wider 50236BH User manual

MANUAL DE INSTRUCCIONES - INSTRUCTION MANUAL
VENTILADOR TECHO 75CM - 30” CEILIGN FAN
55W
REF 50236BH
230V 50HZ
LEA Y GUARDE ESTAS INSTRUCCIONES - ATENCION: EL GANCHO DE SOPORTE PARA TECHO NO ESTA
INCLUIDO EN LA COMPRA DE ESTE VENTILADOR
READ AND SAVE THESE INSTRUCTIONS - WARNING: CEILING HOOK HANGER IS NOT INCLUDED IN
THIS PRODUCT

SEGURIDAD
Lea todas las instrucciones con cuidado aunque esté familiarizado con este aparato.
Para reducir el riesgo de incendio, choque eléctrico y / o lesiones, debe tener en cuenta las siguientes
precauciones básicas de seguridad:
1. El ventilador debe ser instalado por un electricista cualificado de acuerdo con las normas locales,
regionales y estatales de electricidad. Cualquier modificación o adición del circuito eléctrico de la
salsa donde se instalará el ventilador, debe ser certificado por un eléctrico con autorización
administrativa.
2. El ventilador debe estar conectado a un suministro eléctrico de 230 V CA 50Hz.
3. Todo trabajo eléctrico debe llevarse a cabo tras desconectar la corriente eléctrica retirando los
fusibles o apagando el interruptor.
4. El ventilador debe estar conectado a tierra.
5. El ventilador debe instalarse de modo que las aspas estén al menos 2.3metres por encima del suelo.
6. El ventilador debe colgarse de una estructura capaz de soportar un peso de al menos 45 kg. La
fijación debe ser capaz de soportar el peso del ventilador en movimiento y no debe bambolear o
soltarse.
7. Asegúrese de que en el lugar de instalación las aspas no entren en contacto con cualquier objeto.
Dejar siempre un espacio libre mínimo de 150 mm (6 ") de la punta de las aspas a la pared o el techo.
Tenga en cuenta que cuanto mayor sea este espacio mejor será el flujo de aire del ventilador.
8. No usar en un espacio abierto ni donde pueda ser expuesto al agua o la humedad.
9. No conectar el motor del ventilador a un regulador de intensidad. Podría dar un rendimiento
insatisfactorio (zumbido del motor) y causar daños al motor.
10. Los niños menores de 3 años deben mantenerse fuera del alcance del aparato a menos que sean
continuamente supervisados.
Los niños desde 3 años y menores de 8 años deben sólo encender/apagar el aparato siempre que éste
haya sido colocado o instalado en su posición de funcionamiento normal previstas que sean
supervisados o hayan recibido instrucciones relativas al uso del aparato de una forma segura y
entiendan los riesgos que el aparato tiene. Los niños desde 3 años y menores de 8 años no deben
enchufar, regular y limpiar el aparato o realizar operaciones de mantenimiento.
Este aparato pueden utilizarlo niños con edad de 8 años y superior y personas con capacidades físicas,
sensoriales o mentales reducidas o falta de experiencia y conocimiento, si se les ha dado la
supervisión o formación apropiados respecto al uso del aparato de una manera segura y comprenden
los peligros que implica. La limpieza y el mantenimiento por el usuario no deben realizarlos los niños
sin supervisión.
11. No deje que nadie juegue con este aparato.
12. El ventilador no puede ponerse en marcha en una habitación con un aparato de gas en
funcionamiento al mismo tiempo.
13. Antes e invertir la dirección del giro de las aspas parar el ventilador por completo. Esto evitará

cualquier daño en el motor del ventilador o el controlador (si está instalada).
14. No introduzca ningún objeto en las aspas del ventilador mientras están girando. Esto puede
dañarlas y alterar el equilibrio del ventilador hasta tumbarlo.
15. Después de que el ventilador esté completamente instalado asegúrese de que todas las fijaciones
están bien sujetas para evitar cualquier tambaleo o caída de la máquina.
16. Debido al movimiento natural del ventilador, algunas conexiones podrías aflojarse. Comprobar las
conexiones de soporte, los agarres y las aspas dos veces al año para asegurarse de que siguen siendo
seguras. Apretar si están flojos.
17. Este producto presenta sujetacables tipo “Y”. Si el cordón de alimentación está dañado, este debe
ser reemplazado por el fabricante o su agente de servicio o por personal calificado para evitar el
riesgo.
18. Con el fin de evitar peligro, toda reparación del aparato debe ser realizada por un servicio técnico
profesional. Nunca por usted mismo.
19. Antes de acceder a los bornes todos los circuitos de alimentación deben estar desconectados.
20. Limpiar con un paño seco humedecido en agua y jabón. Secar bien. Desenchufar de la corriente
antes de limpiar. No permita que entre agua en el interior.
MONTAJE
Sacar el ventilador cuidadosamente de la caja y retirar todas las piezas y componentes. Colocar todo
sobre un paño o una superficie suave para evitar daños. No sacar el motor de la carcasa porque
podría dañarse.
Antes de comenzar la instalación, comprobar que todas las piezas estén incluidas. Nota: Mire bien
dentro del material de embalaje de espuma para asegurarse de que no quedado ningún componente.

1. Asegúrese de que en el lugar de instalación las aspas en rotación no entran en contacto con
cualquier objeto y de que hay un espacio libre mínimo de 150 mm (6 ") de la punta de la aspa a la
pared o el techo. Tenga en cuenta que cuanto mayor sea este espacio mejor flujo de aire.
No use al aire libre. Instalar en un espacio donde no pueda ser expuesto al contacto con agua ni a la
humedad.
Colocar en una viga u otra estructura con resistencia para soportar un peso de 45 kgs. Instalar un
soporte de 5.1cm x 10.2 cm entre las viga del techo y el soporte.
Fijar a la viga del techo u otra estructura adecuada con los dos tornillos de fijación largos
suministrados. Asegúrese de que al menos 30 mm del tornillo se enroscan en el soporte.
2. Coloque el ventilador montado en el soporte y hacer las conexiones eléctricas
3. Colocar la cubierta sobre el soporte, alinear los orificios de la campana con los tornillos y
apretarlos.

CONEXIONES ELECTRICAS
Para su facilidad el ventilador se suministra con las conexiones eléctricas interiores ya realizada.
Esquema de conexiones:
CONSEJOS ÚTILES
Para un mejor resultado y mayor seguridad se recomienda que la instalación y colocación del
ventilador sea realizada por un electricista. Si piensa colgarlo en una caja eléctrica previamente
realice pruebas peso para asegurar la velocidad y la resistencia.
Si el ventilador gira a una velocidad lenta se produce un leve sonido debido a la condensación por la
baja potencia de vatios.
1. EL VENTILADOR NO ARRANCA:
Revise el cableado para asegurar que todas las conexiones están aseguradas
Compruebe el capacitador y el control de velocidad.
2. EL VENTILADOR TAMBALEA:
Las aspas son desiguales. El ángulo es incorrecto debido al montaje.
Compruebe los ángulos de las hojas. Deje funcionar el ventilador durante un par de horas. Si la
oscilación no se corrige, a continuación, "cambiar" dos hojas que están al lado una de la otra.
3. MOTOR ATASCADO O FRIO:
Aunque esto no se espera que suceda llegado el caso hay que sustituir el motor.
MEDIO AMBIENTE
No tire aparatos eléctricos en la basura doméstica. Utilice instalaciones de recogida
selectiva. Infórmese en su ayuntamiento para obtener más información. Si los
aparatos eléctricos se depositan en vertederos los componentes peligrosos pueden
filtrarse en las aguas subterráneas y entrar en la cadena alimentaria, dañando su
salud y bienestar.

SAFEGUARDS
Read all instructions carefully, even if you feel you are quite familiar with this type of appliance.
When using electrical appliances, in order to reduce the risk of fire, electric shock, and/or injury,
these basic safety precautions should always be followed:
1. This appliance must be installed by a Qualified Electrical Contractor in accordance with the local
regulations, and all local, state and national electrical codes. Any alterations or additions to building
wiring must be completed by a licensed electrical mechanic, or person authorized by legislation to
work on the fixed wiring of any electrical installation.
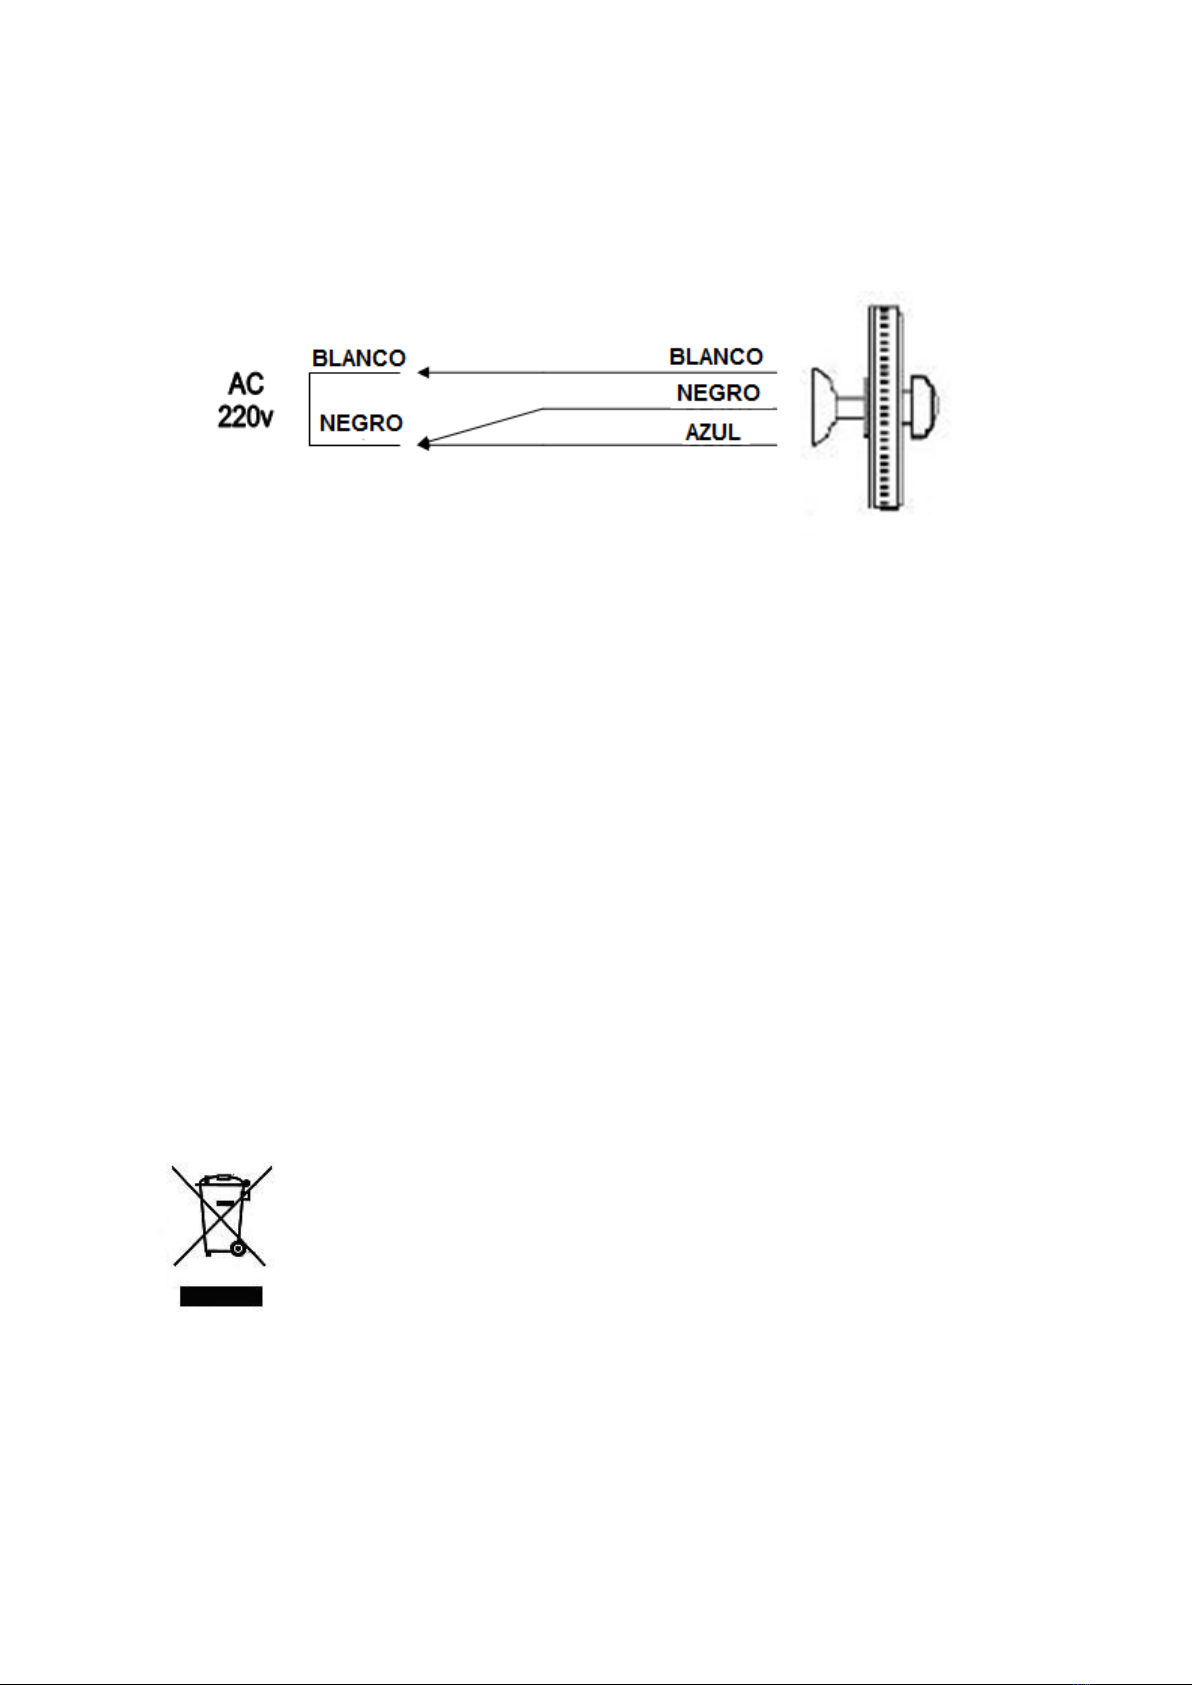
2. The ceiling fan must be connected to a 230V AC 50Hz power supply.
3. All electrical work must only be undertaken after disconnection of the power by removing fuses or
turning off the circuit breaker, to ensure all pole isolation of the electrical supply.
4. The fan must be earthed.
5. The fan must be installed so that the blades are at least 2.3metres above the floor.
6. The structure that the ceiling fan is connected to must be capable of supporting a weight of at least
45kg. The fixing must be able to support the moving weight of the fan and must not twist or work
loose.
7. Make sure that the installation site will not allow the rotating fan blades to come into contact with
any object and that there is a minimum clearance of 150mm (6”) from the blade tip to the wall or
ceiling. Please note that the bigger this clearance is the better the airflow from your fan will be.
8. Do not use outdoors. Installing the fan in a position where it could be exposed to water or moisture
is dangerous.
9. Do not connect the fan motor to a dimmer switch. This may give an unsatisfactory performance
(motor hum) and cause damage to the motor.
10. Children of less than 3 years should be kept away unless continuously supervised.
Children aged from 3 years and less than 8 years shall only switch on/off the appliance provided that
it has been placed or installed in its intended normal operating position and they have been given
supervision or instruction concerning use of the appliance in a safe way and understand the hazards
involved. Children aged from 3 years and less than 8 years shall not plug in, regulate and clean the
appliance or perform user maintenance.
This appliance can be used by children aged from 8 years and above and persons with reduced
physical, sensory or mental capabilities or lack of experience and knowledge if they have been given
supervision or instruction concerning use of the appliance in a safe way and understand the hazards
involved. Children shall not play with the appliance.
Cleaning and user maintenance shall not be made by children without supervision.
11. Young children should be supervised to ensure that they do not play with the appliance.
12. It is not recommended that ceiling fans and gas appliances be operated in the same room at the
same time.
13. The fan must be turned off and stopped completely before reversing the fan direction. This will

prevent any damage to the motor of the fan or controller (if installed).
14. Do not insert anything into the fan blades whilst they are spinning. This will damage the blades
and upset the balance of the fan causing the unit to wobble.
15. After the fan is completely installed make sure that all base and fan blade fixings are secured and
tightened to prevent any problems.
16. Because of the fan’s natural movement, some connections may loosen. Check the support
connections, brackets and blade attachments twice a year to make sure they remain secured. If any
are loose, tighten.
17. This product has tie type "Y". If the cord is damaged, it must be replaced by the manufacturer or
its service agent or qualified personnel to avoid risk.
18. Danger: You should not repair the appliance by yourself. It must be done just by qualified
specialists. Only original spare parts may be used for repair.
19. To unplug before to touch the sockets.
20. Wipe with a dry cloth moistened with soap and water. Dry thoroughly. Unplug the power before
cleaning. Do not allow water inside.
PREPARATION
Unpack your ceiling fan carefully, then remove all parts and components, and lay on a cloth or soft
surface to avoid damage. Do not lay the motor housing on its side, the housing may get damaged.
Before commencing installation, check that all parts are included. NB: You may need to remove all
foam packaging material to ensure there are no missing components
1. Make sure that the installation site will not allow the rotating fan blades to come into contact with

any object and that there is a minimum clearance of 150mm (6”) from the blade tip to the wall or
ceiling. Please note that the bigger this clearance is the better the airflow from your fan will be.
DO NOT use outdoors. Installing the fan in a position where it could be exposed to water or moisture
is dangerous.
If the location you have chosen does not have a suitable support beam capable of supporting 45Kg,
install a brace 2” x 4” between the ceiling joists as a support medium.
Secure the hanging bracket to the ceiling joist or suitable structure that is capable of carrying a load of
at least 45Kg, with the two long fixing screws provided. Ensure that at least 30mm of the screw is
threaded into the support.
2. Place the assembled fan into the bracket and make the wiring connection
3. Place the canopy over the bracket, align the canopy holes with the screws and tighten.
ELECTRICAL CONNECTIONS
For your convenience, and to assist in easy installation & cleaning, the ceiling fan is connected for
your convenience, and to assist in easy installation & cleaning, the ceiling fan is connected

HELPFUL HINTS
It is recommended by that you have a qualified electrician to install your fan for best results and
safety. If you mount your fan on an electrical box, you should first add a brace as the fan’s weight and
speed could cause damage.
1. FAN DOES NOT START :
Check wiring to insure all connections are secured
Check capacitor and solid state speed control.
2. FAN WOBBLES, MOVES ONE INCH OR MORE :
Uneven blades, arm angles or warped blades due to shipping prior to installation.
Check angles of blades. Let the fan run for a few hours. If wobble is not corrected, then “switch”
two blades that are next to each other.
3. MOTOR JAMMED OR FROZEN UP
Although this is not expected to happen, it could and the fan motor will be replaced.
DISPOSAL
This marking indicates that this product should not be disposed with other household
wastes throughout the EU. To prevent possible harm to the environment or human
health from uncontrolled waste disposal, recycle it responsibly to promote the
sustainable reuse of material resources.
Table of contents
Languages:
Other Wider Fan manuals
Popular Fan manuals by other brands

Romlair
Romlair CLS Installation and maintenance instructions

TroposAir
TroposAir Ninja owner's manual

NOMA
NOMA 052-8399-0 owner's manual

Flex-a-Lite
Flex-a-Lite Black Magic 155 installation instructions

Monte Carlo Fan Company
Monte Carlo Fan Company 5HS52 Series owner's manual

Craftmade
Craftmade DC Epic installation guide