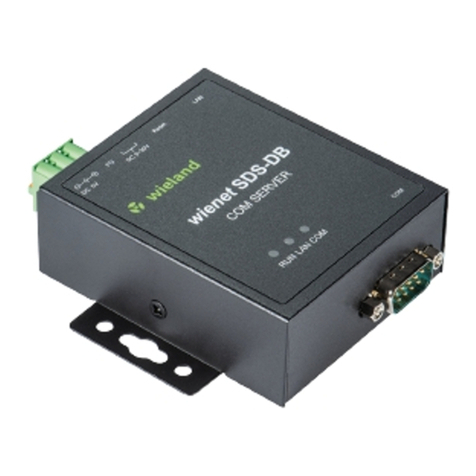
Wieland WIENET SDS Series User manual

Montageanleitung
(Original) / Installation i
nstructions (Translation
from
original
)
wienet
SDS
Industrial Serial Device Server
Wieland Electric GmbH
rennerstraße 10-14
96052 amberg
Tel.: +49 (951) 9324-0
Fax: +49 (951) 9324-198
Internet: www.wieland-electric.com
Email: info@wieland
-
electric.com
Doc. # BA001079 – 02/2020 (Rev. ) wienet SDS DE/EN 1
SDS
-
D
83.040.0500.0
SDS-T 83.040.0501.0
SDS-D Kit 83.040.0502.0
SDS-T Kit 83.040.0503.0
SDS2-T 83.040.0506.0
H I NWE I S
•
Personal, welches dieses Gerät installiert, programmiert,
in etrieb nimmt oder wartet,
muss diese Anleitung gelesen und verstanden haben.
•
Verwenden Sie das Gerät nur gemäß seiner estimmung. eachten Sie dazu insbesondere
die Angaben in den Technischen Daten.
W A R N U N G
•
Das Personal muss gründlich mit allen
Warnungen, Hinweisen und Maßnahmen gemäß
dieser etriebsanleitung vertraut sein.
•
Ggf. erforderliche Schutzmaßnahmen und Schutzeinrichtungen müssen den gültigen Vor-
schriften entsprechen.
•
eschädigte Produkte dürfen weder installiert noch in etrieb genommen werden.
•
Das Gerät darf nicht geöffnet werden.
•
Führen Sie keine Fremdobjekte in das Gerät ein!
•
Halten Sie das Gerät von Wasser und Feuer fern!
Weitere eschreibungen finden Sie im Internet unter www.wieland-electric.com
Funktionsbeschreibung
Serieller Geräte-Server zur Konvertierung serieller Daten (RS-232/422/485 über Software ein-
stellbar) in Ethernet-Daten (RJ45).
Funktionselemente und Anzeigen
LEDs
Name
LED
tatus
Beschreibung
COM 1/
COM 2 grün
Keine Datenübertragung am Serial Port
•
Datenübertragung am Serial Port
LAN
grün
100Mbps Netzwerk nicht verbunden
•
100Mbps Netzwerk Datenübertragung
gelb
10Mbps Netzwerk nicht verbunden
•
10Mbps Netzwerk Datenübertragung
RUN grün
Nicht an Versorgungsspannung
•
Normalbetrieb
Fehlerfall
= aus; = an;
•
= blinkt
Versorgungsanschlüsse
Pin
1
2
3
Schraube
ignal
V+
V
-
FG
⏚
N OT E
•
Personnel which installs, programs, operates or maintains this dev
ice must have read and
understood these instructions.
•
Use the device only as intended. Especially observe the specifications in the technical
data
.
W A R NI NG
•
The personnel must be thoroughly familiar with all warnings, notes and procedures de-
scribed in these operating instructions.
•
Where necessary, safety precautions and safety devices must comply with the applicable
regulations.
•
Damaged products must neither be installed nor put into operation.
•
The unit must not be opened.
•
Do not insert any objects into the unit!
•
Keep
the unit
away from fire and water!
Additional information can be found at www.wieland-electric.com
1Function description
Serial Device Server for converting serial data (RS-232/422/485 selectable by software) into
Ethernet data (RJ45).
Functional elements and indicators
LEDs
Name
LED
tatu
s
Description
COM 1/
COM 2 green
Data is not transmitting on serial port
•
Data is transmitting on serial port
LAN
green
Ethernet is disconnected on 100Mbps
•
Data is transmitting on Ethernet
100 Mbps
yellow
Ethernet is disconnected on
10Mbps
•
Data is transmitting on Ethernet
10 Mbps
RUN green
System is not powered on
•
System r
unning normally
System i
s not running
= off; = on;
•
= flashes
Power connectors
Pin
1
2
3
crew
ignal
V+
V
-
FG
⏚
D -DB, D -TB
D
-
TB
:
5
-
pol.
Klemme
/ 5
-
pin terminal block
D -DB: 9-pol. D-Sub uchse / 9-pin D-Sub connector
D 2-TB
D 2
-
TB:
2×
5
-
pol.
Klemme
/
2× 5-pin terminal block
2
3
2
1
4
1
3
1
2
3
1
2
2
7
,
8

Montageanleitung
(Original) / Installation i
nstructions (Translation
from
original
)
wienet
SDS
Industrial Serial Device Server
Wieland Electric GmbH
rennerstraße 10-14
96052 amberg
Tel.: +49 (951) 9324-0
Fax: +49 (951) 9324-198
Internet: www.wieland-electric.com
Email: info@wieland
-
electric.com
Doc. # BA001079 – 02/2020 (Rev. ) wienet SDS DE/EN 2
SDS
-
D
83.040.0500.0
SDS-T 83.040.0501.0
SDS-D Kit 83.040.0502.0
SDS-T Kit 83.040.0503.0
SDS2-T 83.040.0506.0
Pinbelegung der Anschlüsse
9-polige D- ub Buchse für R -232/422/485
Pin
1
2
3
4
5
6
7
8
9
RS
-
232
DCD
RxD
TxD
DTR
SG
DSR
RTS
CTS
RI
RS
-
422 /
4
-
Wire RS485
–
TxD+
RxD+
–
SG
–
RxD
-
TxD
-
–
2
-
Wire RS485
–
DATA+
–
–
SG
–
–
DATA
-
–
5-polige Klemme für R -232/422/485
Pin
1
2
3
4
5
RS
-
232
RxD
CTS
TxD
RTS
SG
RS
-
422 / 4
-
Wire RS485
T
xD
+
T
xD
-
R
xD
+
R
xD
-
SG
2
-
Wire RS485
DATA+
DATA
-
–
–
–
RJ45 10/100BA E-T(X) Ethernet
Pin
1
2
3
4
5
6
7
8
Signal
Tx
+
Tx
-
R
x
+
–
–
R
x
-
–
–
Montage
Anbringen auf Trägerschiene (Abb. 3)
1. efestigen Sie die Wandhalter mit vier Schrauben am Gerät.
2. Kippen Sie das Gerät etwas nach hinten.
3. Haken Sie das Gerät oben auf der Schiene ein.
4. Drücken Sie das Gerät nach unten und gegen die Schiene, bis es einrastet.
5. Prüfen Sie, ob das Gerät fest auf der Tragschiene sitzt.
Anschluss an pannungsversorgung
Schließen Sie eine geeignete Spannungsversorgung an den wienet SDS an.
Anschluss von Netzwerkgeräten
Schließen Sie Ihre Netzwerkgeräte über Standard-UTP/STP-Kabel mit RJ45-Steckverbindern
an den wienet SDS an.
Zugriff auf den erial Device erver
1. Verbinden Sie Ihren PC via Ethernet-Kabel mit dem SDS.
2. Ändern Sie die Netzwerkeinstellungen am PC so, dass dieser eine IP-Adresse im selben
Netzwerk erhält, z. . 10.0.50.2.
3. Der SDS wird via Web- rowser parametriert. Logindaten zur Web-Oberfläche:
A
dresse: 10.0.50.1
00
enutzername: admin
Passwort: wienet123
Werkeinstellungen wiederherstellen
Drücken Sie den Taster "Reset" für mehrere Sekunden, um die Werkeinstellungen wiederherzustel-
len.
Demontage (Abb. 4)
W A R N U N G
Schalten Sie die
Spannungs
versorgung aus und trennen Sie das Gerät vom Netz.
Drücken Sie das Gerät nach unten, und kippen Sie es nach oben.
Technische Daten
D
-
DB, D
-
TB
D 2
-
TB
Anschlüsse
Ethernet
RJ4
5,
10/100 Mbps
, Standard IEEE
802.3
Serial Interface
,
über Software einstellbar
SDS
-
D :
9
-
pol.
D
-
Sub uchse: RS
-
232/422/485
SDS-T : 5-pol. Klemme: RS-232/422/485
SDS2
-
T : 2×
5
-
pol. Klemme
: RS
-
232/422/485
aud R
ate
1200 – 230400 bps
Parity
None, Odd, Even, Space,
Mark
Data
its
7, 8
Stop
its
1, 2
Flow Control
None, Xon / Xoff, RTS/CTS
(nur
RS
-
232)
Anschlusstechnik
Anschlusstechnik
Power /
S
erial
"Push In" Klemme, 3
-
/
5
-
polig
Anschluss
querschnitt
0,25
…
2,5 mm (AWG 26
…
12)
Abisolierlänge
8
–
9
mm
pannungsversorgung
Spannungsversorgung
9
–
30 V DC
Eingangsstrom max.
1
A (
0
–
30
V DC)
Leistungsaufnahme
<1,5
W
<3
W
Redundan
z
5 V
DC uchse für Redundanz
betrieb
Allgemeine Daten
etriebsumgebungstemperatur
-
4
0
…
+
70
°C
Relative Luftfeuchte
5 … 95
% RH, 55
°C keine Kondensation
Lagertemperatur
-
40 … +85 ºC
Montage auf
DIN Hutschiene 35 mm (EN60715)
, mit Wandhalterung
Schutzart
IP30
Abmessungen
siehe Maßzeichnung, Abb. 1
Gewicht
ca.
2
00 g
Gehäusematerial
Metall
Modulerdung
⏚
Erdungsschraube und durch Aufrasten auf geerdete Hut-
schiene (Achtung: niederimpedant durchführen)
chock und Vibration
Schock / Vibration /
Freier Fall
IEC 60068
-
2
-
27 / IEC 60068
-
2
-
32 / IEC 60068
-
2
-
64
Normen und Zulassungen
EMV
Störaussendung:
Störfestigkeit:
EN 55032, EN 61000
-
6
-
4, EN 55024, EN 61000
-
6
-
2, EN61000
-
4-2, EN61000-4-3, EN61000-4-4, EN61000-4-5, EN61000-4-6,
EN6
1
000
-
4
-
8, IEC 61000
-
4
-
11
Zulassung
FCC Part 15
Pin assignments of connectors
9-pin D-sub connector for R -232/422/485
Pin
1
2
3
4
5
6
7
8
9
RS
-
232
DCD
RxD
TxD
DTR
SG
DSR
RTS
CTS
RI
RS
-
422 /
4
-
Wire RS485
–
TxD+
RxD+
–
SG
–
RxD
-
TxD
-
–
2
-
Wire RS485
–
DATA+
–
–
SG
–
–
DATA
-
–
5-pin terminal block for R -232/422/485
Pin
1
2
3
4
5
RS
-
232
RxD
CTS
TxD
RTS
SG
RS
-
422 / 4
-
Wire RS485
T
xD
+
T
xD
-
R
xD
+
R
xD
-
SG
2
-
Wire RS485
DATA+
DATA
-
–
–
–
RJ45 10/100BA E-T(X) Ethernet
Pin
1
2
3
4
5
6
7
8
Signal
Tx
+
Tx
-
R
x
+
–
–
R
x
-
–
–
Installation
Mounting on support rail (see fig. 3)
1. Attach the wall mounting kit with four screws to the device.
2. Tilt the unit slightly backwards.
3. Fit the unit over top hat rail.
4. Push downwards and against the rail for locking.
5. Check that the unit is locked into position.
Connecting to power
Prepare a suitable power source and connect to wienet SDS.
Connecting to network device by Ethernet
Connect your device by standard UTP/STP cable with RJ45 connectors to wienet SDS.
Access to the erial Device erver
1. Connect your PC via Ethernet to the SDS.
2. Change the network settings on your PC so that it receives an IP address in the same net-
work, e.g. 10.0.50.2.
3. The SDS is parameterized via web browser. Login parameters to web interface:
Address: 10.0.50.1
00
User name: admin
Password: wienet123
Reset to factory settings
Press the "Reset" button for several seconds to restore the factory settings.
Removal from DIN rail (see fig. 4)
W A R NI NG
Switch mains power off and disconnect your system from the supply network.
Push down the device, and tilt upwards.
Technical data
D
-
DB, D
-
TB
D 2
-
TB
Connector
s
Ethernet
RJ45,
10/100 Mbps
, Standard IEEE 802.3
Serial i
nterface
,
software selectable
SDS
-
D :
9
-
pin D
-
Sub connector: RS
-
232/422/485
SDS-T : 5-pin terminal block: RS-232/422/485
SDS2
-
T : 2×
5
-
pin terminal block: RS
-
232/422/485
aud r
ate
1200 – 230400 bps
Parity
None, Odd, Even, Space, Mark
Data b
its
7,
8
Stop b
its
1,
2
Flow c
ontrol
None, Xon / Xoff, RTS/CTS
(RS
-
232 only)
Connect
ing
Wiring
p
ower /
s
erial
"Push In"
t
erminal,
3
-
/ 5
-
poles
Rated conductor size
0.25
…
2.5 mm (AWG 26
…
12)
Conductor
strip length
8
–
9
mm
Power supply
Supply voltage
9
–
30 V DC
Input current
max.
1
A (
0
–
30
V DC)
Power consumption
<1.5
W
<3
W
Redundance
5 V DC jack for redundance
General data
Ambient operating temperature
-
4
0
…
+
70
°C
Ambient relative humidity
5 … 95
% RH, 55
°C non
-
condensing
Storage temperature
-
40 … +85 ºC
Mounting on
DIN rail 35 mm (EN60715)
, with wall mounting kit
Degree of protection
IP30
Dimensions
see dimensional drawing, fig. 1
Weight
Ca.
2
00 g
Housing material
Metal
Module earth
⏚
screw and by snapping onto earthed DIN rail
(Caution: must be with low impedance)
hock and vibration
Shock
/
vibration
/
free fall
IEC 60068
-
2
-
27 / IEC 60068
-
2
-
32 / IEC 60068
-
2
-
64
Norms and approvals
EMC
Emission:
Immunity:
EN 55032, EN
61000
-
6
-
4, EN 55024, EN 61000
-
6
-
2, EN61000
-
4-2, EN61000-4-3, EN61000-4-4, EN61000-4-5, EN61000-4-6,
EN
1
6000
-
4
-
8, IEC 61000
-
4
-
11
Approval
FCC Part 15
Other manuals for WIENET SDS Series
1
This manual suits for next models
10
Other Wieland Server manuals
