Wile 500 User manual

Moisture and temperature meter for baled
hay, haylage, straw and silage
EN
Operator’s Manual

2
Thank you for choosing Wile 500. It ensures quick and easy measurement of moisture and
temperature of baled hay, haylage, straw and silage. Patent pending automatic bale density
compensation allows it to determine how dense the bale is and to adjust moisture results
accordingly for improved accuracy.
Other user friendly features include offset calibration, temperature compensation, automatic
moisture result update each time the probe is pushed forward (patent pending), memory
holding up to 1000 readings for transfer to a PC via USB, and a backlit display. High quality
materials and robust stainless steel probe ensure durability.
Read this manual carefully to learn how to operate this device correctly.
1 Package Contents
Wile 500 moisture/temperature meter
Battery
Operator’s manual
USB cable
2 Part Locator
1 Battery plug
3 USB port
5 Display
6 Probe shaft
2 Handle
4 Keypad
7 Probe tip
3 Keypad and Display Symbols
Key functions change with the situation:
l
- Power ON
- Power OFF (long keypress)
- Go to main menu or go back in a menu
e
- Select
- Alternate between temperature and moisture measurement
d u
- Navigate down or up in a menu
- Select a different bale
p
- Start a measurement
- Force a moisture measurement
Symbols at the bottom of the display indicate functions of the adjacent keys:
or
Switch between temperature or moisture measurement mode
Enter the menu

3
Select
Store to memory
Go back / up / down
Other display symbols:
Battery should be replaced
Malfunction. Remove the battery, wait a short while and re-
place the battery. Power on. If fault repeats, take a note of the
error code number displayed next to this symbol and contact
your dealer or an authorized Wile service partner
Measurement memory is almost full. See chapters 7 and 8 for
instructions on memory clearing
4 Before Use
1. Check that the probe is dry and clean and that the device appears undamaged.
2. Install or change the battery as illustrated.
3. Power on by pressing the lkey.
4. Configure device settings to suit your preferences, see chapter 5.
5. Run the quick calibration procedure (see chapter 9.2).
Pull battery plug out.
Release battery by pressing in and
tilting up.
Insert a fresh battery
(observe polarity).
Lock battery in its
place by pressing in
and down
Replace the battery plug.
5 Settings
1. Power on by pressing the lkey.
2. There is a menu symbol at the bottom left corner of the display. Enter the main
menu by pressing the lkey located below it.
3. Use the arrow keys uor d, until "+SETTINGS" text is chosen (light text on dark
background; "+SETTINGS" in English) and press the ekey.
The settings menu contains the following settings:
Display language selection ("Language" in English)
Temperature unit selection (degrees of Celsius or Fahrenheit)

4
Automatic power-off delay adjustment
Averaging length for moisture measurement (= the number of most recent moisture
results to be calculated in the displayed average and high moisture estimate)
Display backlight brightness (NOTE: affects battery life)
Display contrast (adjust this if it is difficult to read the display)
Remaining battery capacity display
Calibration. Quick calibration of moisture measurement (may improve measure-
ment accuracy). See chapter 9.2.
Device information (this could be important upon communication with customer ser-
vice)
6 Usage
A large number of measurement results may be stored in the internal memory of the device.
You may store results for 64 different bales. Results are saved for the calculation of average
moisture and high moisture estimate and for saving on a personal computer using the USB
port. The type of each bale (e.g. hay or straw1) is selected before measurement can start.
You may choose not to store results in the memory, but it is important to select the correct
bale type to ensure proper operation and accuracy.
Accurate measurement of moisture requires bale temperature to be known. However,
temperature measurement is much slower than moisture measurement, as hay is a thermal
insulator that very slowly warms up or cools down a strong metal probe. Pushing into dense
bales also warms up the probe due to friction. Therefore, temperature should be measured
separately, before moisture measurement.
Power on by pressing the lkey. The meter will start with either moisture or temperature
measurement mode depending on which state it was previously. The display will show the
following information:
Temperature measurement display:
1. Bale number (= memory slot number)
2. Bale type
3. Result of the latest temperature measurement (”---C” or ”--
-F”, if there is no result yet).
4. MIN: Lowest temperature stored in memory
5. MAX: Highest temperature stored in memory
6. MEM: Latest temperature stored in memory (NOTE: when
starting moisture measurement, this value may be chosen to
be used as bale temperature for temperature compensation of
moisture.
Moisture measurement display:
1. Bale number (= memory slot number)
2. Bale type
1The selection of bale types may change with geographical location and the selection may grow with
updates.

5
3. Result of latest moisture measurement (”---%”, if there is no
result yet, or e.g. <8% if bale was too dry to be measured or
e.g. >80% if bale was too wet to be measured)
4. AVG: Average of stored moisture results
5. HI: Estimate of the highest moisture inside the bale, based
on the stored values within the chosen averaging length
6. n: Number of measurements used for calculation of aver-
age and high moisture estimate
7.Bale temperature as used for temperature compensation of
the displayed moisture result. NOTE: This is NOT the current
probe temperature.
8.Moisture offset correction you have chosen for this bale
type as applied to the displayed result (this area is empty if no
offset correction has been set). See chapter 7.
Switch between temperature or moisture measurement modes by pressing the ekey un-
der the (or ) symbol on display.
If you wish to change the bale to be measured, press one of the arrow keys uor dto
browse the bale list and the ekey to select a bale. The first few bales have pre-selected
bale types for easy access. Whenever you start to measure a new bale, select a memory
slot (bale) whose type matches your bale or one that has no bale type chosen yet, i.e. whose
type is listed as ”----”. Alternatively, you may choose to clear the bale memory in the main
menu (see chapter 7). The meter will ask to select bale type if it hasn’t been selected yet.
Press the yellow measurement key pto start the measurement.
6.1 Temperature Measurement
If you selected temperature measurement, current probe tem-
perature will now be continuously updated on the display.
You may store temperature results to memory by pressing the
ekey located under the displayed symbol. The stored re-
sult will then appear on display next to the word ”MEM” and
the minimum (MIN) and maximum (MAX) stored temperature
readings will update accordingly and the symbol will disap-
pear from the screen.
To end temperature measurement, press the lkey located
under the displayed symbol.
Note: Temperature measurement settling time varies greatly with bale type. Wet and dense
gives faster settling than dry and light. Time after which 90% of temperature change has
been achieved ranges typically from 8 minutes with 60% haylage, to 30 minutes with 16%
straw.
6.2 Moisture Measurement
Unless you have recently measured moisture of this bale, the meter will ask for bale temper-
ature before moisture measurement can start. There are up to 4 ways to give the tempera-
ture, chosen by pressing the key drawn next to each option:

6
e
Measure bale temperature now. Remember that it will
take a long time for the probe temperature to reach bale
temperature.
u
Use the latest temperature value stored in memory for this
bale (only shown if available).
d
Set temperature manually. The core temperature of a
large bale follows the average ambient temperature with
a delay of several days to a couple of weeks unless a de-
composition process is heating up the bale.
p
Use temperature value previously used for temperature
compensation for this bale (only shown if available).
Once bale type and bale temperature have been set, moisture measurement may start:
The meter asks you to push the probe into the bale. Hold the
meter by the handle only.
The meter estimates bale density during the push by measur-
ing push force and probe motion. It uses the density estimate
to improve accuracy of the moisture measurement.
Push at least 15 cm deep into the bale. Make sure that there
is at least 15 cm or hay around and in front of the probe tip.
After the push has stopped, moisture measurement will start
automatically.
NOTE: If the required push force is very low, the push may not
be detected. In this case, you may force measurement to start
by pressing the pkey. Density compensation will then as-
sume that the bale is very light.
Result will be shown on display after measurement. You may
choose to store the result by pressing the ekey located under
the displayed symbol. Average (AVG) and high moisture
estimate (HI) values will then update on display and the
symbol will disappear from the screen.
If you now push the probe deeper into the bale, moisture will
be measured again. You may also pull the probe out of the
bale and push it to another location.
When done probing the bale, exit moisture measurement by
pressing the lkey located under the displayed symbol.
6.3 Power Off
The meter is powered off by a long press of the red lkey.
Automatic shutdown feature will power off after a pre-set delay starting from the latest key-
press. The power-off delay may be adjusted in the settings menu.

7
7 Functions of the Main Menu
Enter the main menu by pressing the lkey located under the displayed menu symbol .
Browse the menu using the arrow keys uor dand select a function by pressing the ekey.
Some functions allow removal of large amounts of data from the memory. The meter will ask
to confirm these operations. In this case, press the ekey to continue or the lkey to cancel.
CLEAR AVG/HI
Clears average and high moisture estimate for the currently
selected bale. All measurement results remain in memory.
Therefore, if you later increaseaveraging length in the settings
menu (see chapter 5), previous results will be included in cal-
culation again. If averaging length was set to infinite (∞), it will
switch to 50 to allow clearing to be done.
CLEAR BALE
Clears the bale type of the currently selected bale and erases
all measurement results stored for this bale.
CLEAR ALL
Clears the entire measurement memory. Allmoisture and tem-
perature results and bale type selections will be erased.
MOIST.OFFSET
The moisture display may be adjusted to match an oven test
or another reference method using the moisture offset setting.
Once set, the offset correction will be applied to all moisture
measurements of the same type (e.g. all hay bales), even re-
sults previously stored in memory.
Use the arrow keys uor dto adjust the offset. You may clear
the offset by pressing the arrow keys uand dsimultane-
ously. Confirm your adjustment by pressing the ekey under
the displayed symbol.
As a reminder, the offset will be displayed above the moisture
result on the moisture measurement screen in small letters
(e.g. OFFSET +0.6%). The offset will also be shown upon bale
selection.
NOTE: Offset correction will only work well fairly close to the
moisture where it was originally set. Therefore, if you for
example apply offset correction for wet haylage, please clear
the offset before measuring dry hay.
T-COMP.
Set bale temperature for use in temperature compensation of
moisture measurement. See chapter 6.2.
+SETTINGS
Enter the settings menu. See chapter 5.
8 USB Data Transfer
Measurement results stored in memory may be transferred to a personal computer using the
USB port. Pull out the USB plug and use the supplied cable. Software required for data
transfer will be available on our web page at http://wile.fi.

8
9 Cleaning and Maintenance
Store the meter in a dry place, protected from direct sunlight. Remove the battery before
long term storage. There are no user serviceable parts inside the device. Do not remove the
screws and open the device.
9.1 Cleaning
The device may be cleaned by wiping with a damp cloth. Do not use strong detergents or
running water.
The tip of the probe must be kept clean and dry to retain measurement accuracy. The tip
should be wiped dry and clean immediately after use, before it becomes difficult to clean.
Stubborn stains may be removed by gently wiping with a damp soft scouring pad.
9.2 Quick Calibration
Moisture measurement accuracy may be improved by periodically performing the quick cal-
ibration procedure. We recommend it to be done at least always after storage. It is more
important for measurement of dry bales than wet.
If you often measure bales whose core temperature is very high or very low, it may be ben-
eficial to calibrate near the bale temperature. To do this, leave the probe inside such bale for
e.g. 15 minutes, and calibrate immediately after pulling it out.
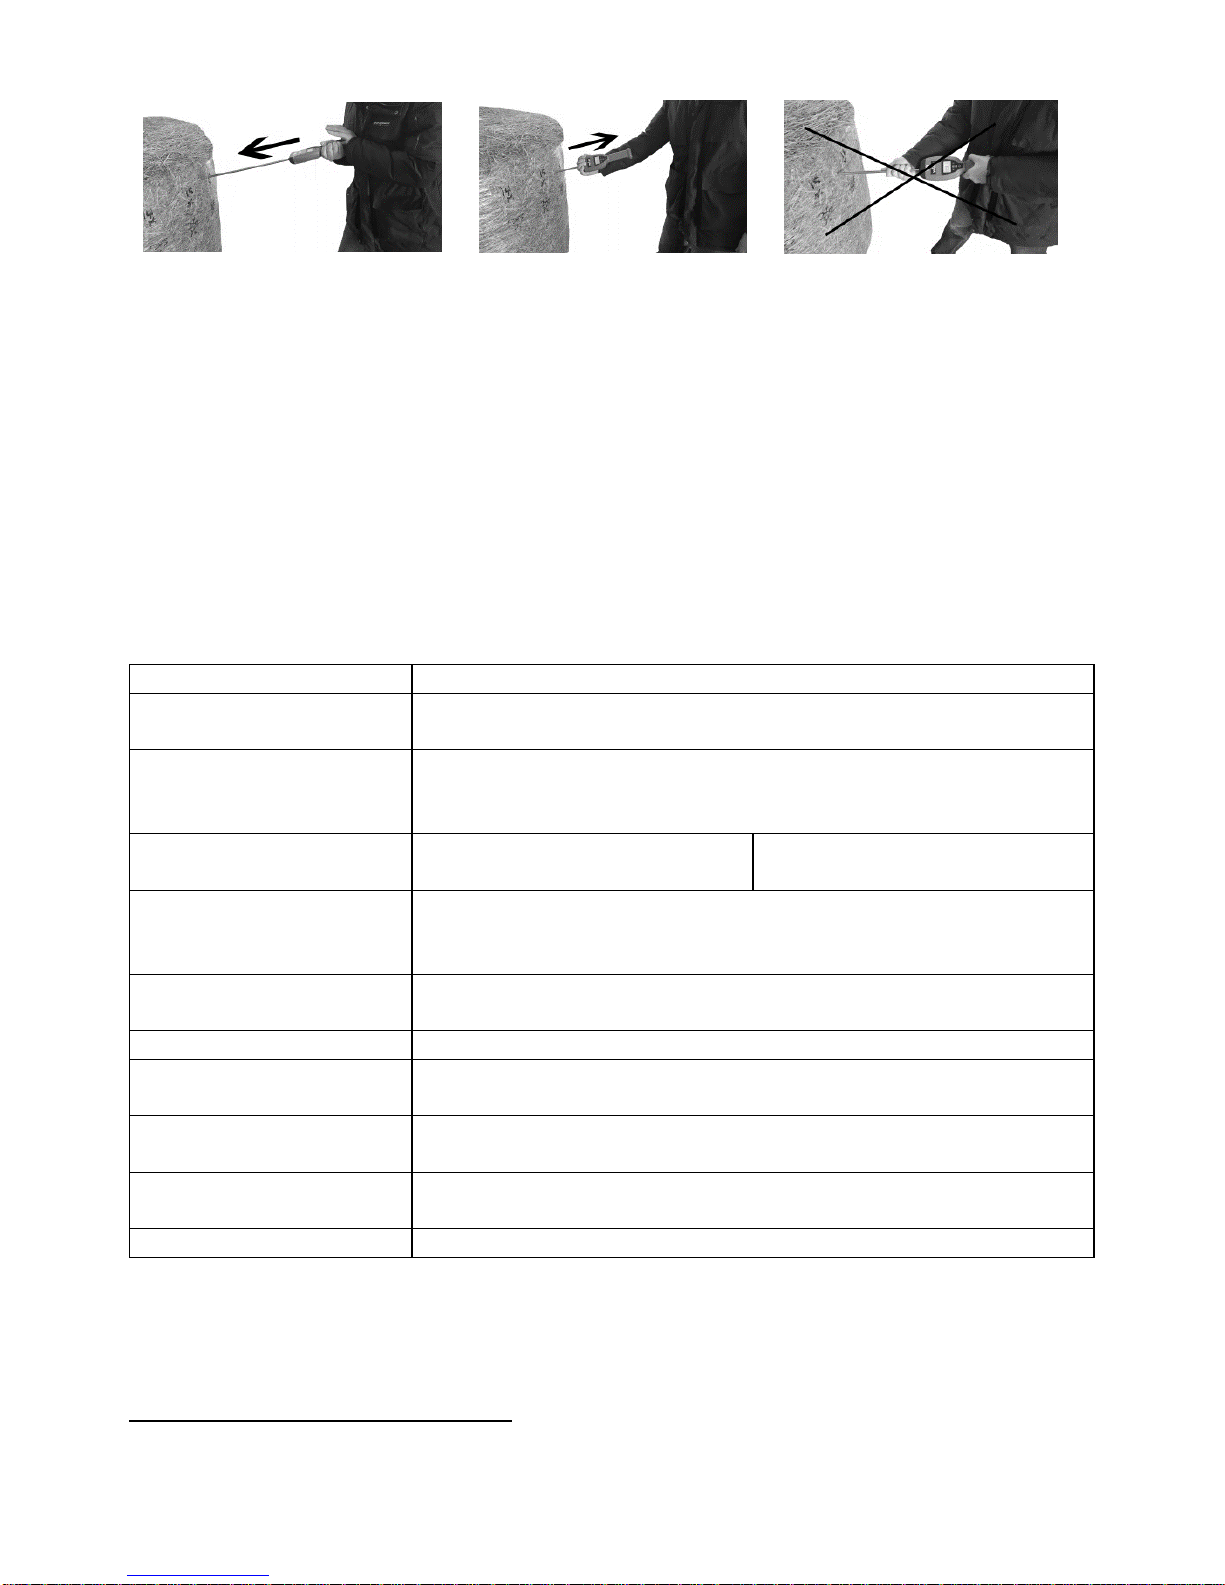
Quick calibration is performed as follows:
1. Verify that the probe is clean and dry.
2. Power on and select “CALIBRATION” in the settings menu.
3. Hold the tester so that the entire probe is surrounded only by clean, dry air with no
objects closer than 30 cm to the probe in any direction. Do not touch the probe.
4. Start calibration by pressing the ekey.
Result of the quick calibration will be stored to memory. It will be effective until the next quick
calibration, or factory calibration duringservice or until you reset factory defaults (see chapter
9.5).
NOTE: Incorrectly performed calibration may weaken measurement accuracy signifi-
cantly!
9.3 Factory Calibration
Authorized Wile service can perform full factory calibration, where the device is checked and
calibrated at its entire moisture range. Push force measurement and temperature measure-
ment will be checked and firmware may be updated.
9.4 Updates
Wemay publish firmware updates that improve measurement accuracy or usability. Updates
are installed via the USB port using a personal computer. Updates and update instructions
will become available on our web page at http://wile.fi.
9.5 Factory Reset
If the meter does not function as expected for example, if you have chosen a language
that you do not understand factory default settings may be restored as follows: Power off

9
with the lkey. Press the ekey and keep it pressed. Press the lkey once to power on
the meter. Lift the ekey when a confirmation screen appears. Accept factory reset by press-
ing the pkey.
Factory reset sets all settings to their factory default values, selects the default language
(usually English), clears offset correction of all bale types, erases the entire measurement
memory and clears the quick calibration. Factory calibration remains untouched.
10 Instructions for Best Accuracy
Always average several results, as bales tend to have significant local variation in moisture,
quality and density. The higher the bale moisture, the more measurements should be aver-
aged and the more important it is to use temperature compensation correctly.
There must be a sufficiently thick layer of hay in front of the probe tip and around it, at least
15 cm to all directions. Do not push to a hole from a previous measurement or closer than
10 cm to a previous measurement.
When measuring small square bales, push from a direction where the probe is surrounded
by as much hay as possible. Avoid loose areas between sections of square bales.
Do not push the probe all the way to the soft core of a round bale. Do not push to the flat
end of a round bale.
Push the probe using the handle and the end of the handle. Do not touch the probe during
a push or measurement. Otherwise push force measurement or the electrical moisture
measurement may not function as intended.
Take care not to bend the probe, especially when pulling it out of a bale. The probe is
made of strong steel, but it is quite thin to keep required push force reasonable. It is easiest
to pull the probe out of a bale by grabbing the top of the meter as illustrated below.

10
When measuring a bale with thick wrapping, puncture the wrapping with the probe tip before
measurement to make sure the force required for making a hole in the wrapping will not
affect density measurement.
Accuracy of the moisture measurement may be affected if a strong heating reaction (“sweat-
ing”) is in progress, or if the bale has spoiled, or if the effect of preservatives has not yet fully
stabilised.
Keep the probe clean and dry. Any other electronic devices possibly connected to the bale
must be powered off during measurement.
11 Technical Data
Battery
9 V alkaline battery, IEC type 6LR61 tai 6LF22
Dimensions
810 mm x 105 mm x 45 mm, probe length: 50 cm, weight (with
battery): 800 g
Moisture measurement
range
Hay and haylage: 8% … 80%, Straw: 8% ... 25%, Hay Silage:
30% ... 84%, Corn Silage: 40% ... 76%, Alfalfa: 8% ... 75%
(percentage of water in weight at 15°C (59°F) temperature)
Moisture measurement
accuracy2
10% to 20%: 1.4%
20% to 30%: 2%
30% to 50%: 4%
50% to 70%: 6%
Reference method for
moisture determination
Oven dry method according to ISO 6496:1999,
EY N:o 152/2009, with samples acquired using a core sampler
drill from the depth of moisture measurement
Moisture measurement
principle
Electronic impedance measurement
Density compensation
Automatic, based on push force and motion measurement
Temperature compen-
sation
Semi-automatic, optional
Operating temperature
range
Handle/display: -10°C ... +50°C (14°F ... 122°F),
Probe: -10°C ... +80°C (14°F ... 176°F)
Temperature measure-
ment range
-10°C ... +80°C (14°F ... 176°F)
Measurement memory
64 bales, with total of 1000 moisture or temperature results
12 Warranty
This product has a warranty valid for one (1) year from the date of purchase. The warranty
covers the materials and workmanship. To claim the warranty, the customer should return
2Instructions in chapter 10 must be followed to achieve full accuracy. Typical accuracy specified for
baled timothy/fescue mix without preservatives. Accuracy with other products may vary. As substantial
variation in measurement accuracy is possible, the manufacturer will not accept any claims for direct or
consequential damage due to incorrect display.

11
the defected product to the Manufacturer, reseller or the nearest Wile Service Partner at the
customer’s own expense. The warranty claim must be accompanied with the description of
the fault, copy of the sales receipt and customer’s contact information. The Manufacturer /
Service Partner will repair or replace the defected product and return it as soon as possible.
The warranty does not cover any damages that are caused by incorrect or careless use of
the product, installation that does not correspond to the provided instructions and other dam-
ages which may arise due to causes beyond the control of the Manufacturer. The liability of
the Manufacturer is limited to the price of the product at a maximum. The Manufacturer does
not accept any responsibility for any direct, indirect or consequential damages that are
caused by the use of the product or the fact that the product could not be used. The warranty
does not cover the battery.
13 EU WEEE Statement
According to the WEEE directive 2012/19/EU, this product should not be
discarded along with household waste but instead collected and treated
separately as electronic equipment in compliance with governing local leg-
islation.
14 EU Declaration of Conformity
According to ISO/IEC 17050-1, the Manufacturer,
Farmcomp Oy
Jusslansuora 8
04360 TUUSULA, FINLAND
Declares, that the product described in this instruction manual conforms to the EMC directive
2014/30/EU by following the harmonised standard EN 61326-1:2013, and to the RoHS di-
rective 2011/65/EU. Signed Declaration of Conformity documents are filed at Farmcomp Oy,
Tuusula.

Jusslansuora 8
04360 TUUSULA, FINLAND
Tel. +358 9 7744 970
http://wile.fi
Patents pending
Copyright © Farmcomp Oy 2017, All Rights Reserved
Table of contents
Other Wile Measuring Instrument manuals
Popular Measuring Instrument manuals by other brands

Keysight Technologies
Keysight Technologies EXA N9010A Functional Tests

Chauvin Arnoux
Chauvin Arnoux C.A 6240 user manual

BANTE
BANTE A151 instruction manual

PCB Piezotronics
PCB Piezotronics IMI SENSORS ICP 601A61 Installation and operating manual

EUTECH INSTRUMENTS
EUTECH INSTRUMENTS 2700 instruction manual

SICK
SICK GM700 operating instructions