Wilier Triestina Aldar Rack KIt User manual

GUIDA ALL’INSTALLAZIONE DEL KIT PORTAPACCHI ADLAR_ PAG. 2
ADLAR RACK KIT INSTALLATION GUIDE_ PAG. 8
GUIDE D’INSTALLATION DU KIT DE PORTE-BAGAGES ADLAR _ PAG. 14
ANLEITUNG ZUR MONTAGE DES ADLAR-GEPÄCKTRÄGER-KITS _ SEITE. 20
GUÍA DE INSTALACIÓN DE KIT DE PORTABULTOS DE ADLAR _ PÁG. 26
IT
EN
FRA
DEU
ES

GUIDA ALL’INSTALLAZIONE DEL KIT PORTAPACCHI ADLAR
Il portapacchi per ADLAR è il risultato di un’attenta progettazione e ingegnerizzazione, finalizzato a offrire
un’esperienza di ciclismo superiore per i nostri clienti. Nell’ottica di mantenere elevati standard di sicurezza
e prestazioni, è essenziale che il montaggio venga eseguito correttamente. Questo manuale costituisce una
risorsa fondamentale al fine di garantire che ogni bicicletta ADLAR equipaggiata con Il portapacchi sia pronta
per affrontare le sfide più impegnative.
Si prega di seguire attentamente ciascun passaggio, facendo riferimento alle immagini esplicative per una
chiara comprensione del processo di installazione. Si consiglia inoltre di prestare particolare attenzione
alle specifiche tecniche fornite, garantendo così che il portapacchi ADLAR sia montato in conformità con gli
standard Wilier Triestina.
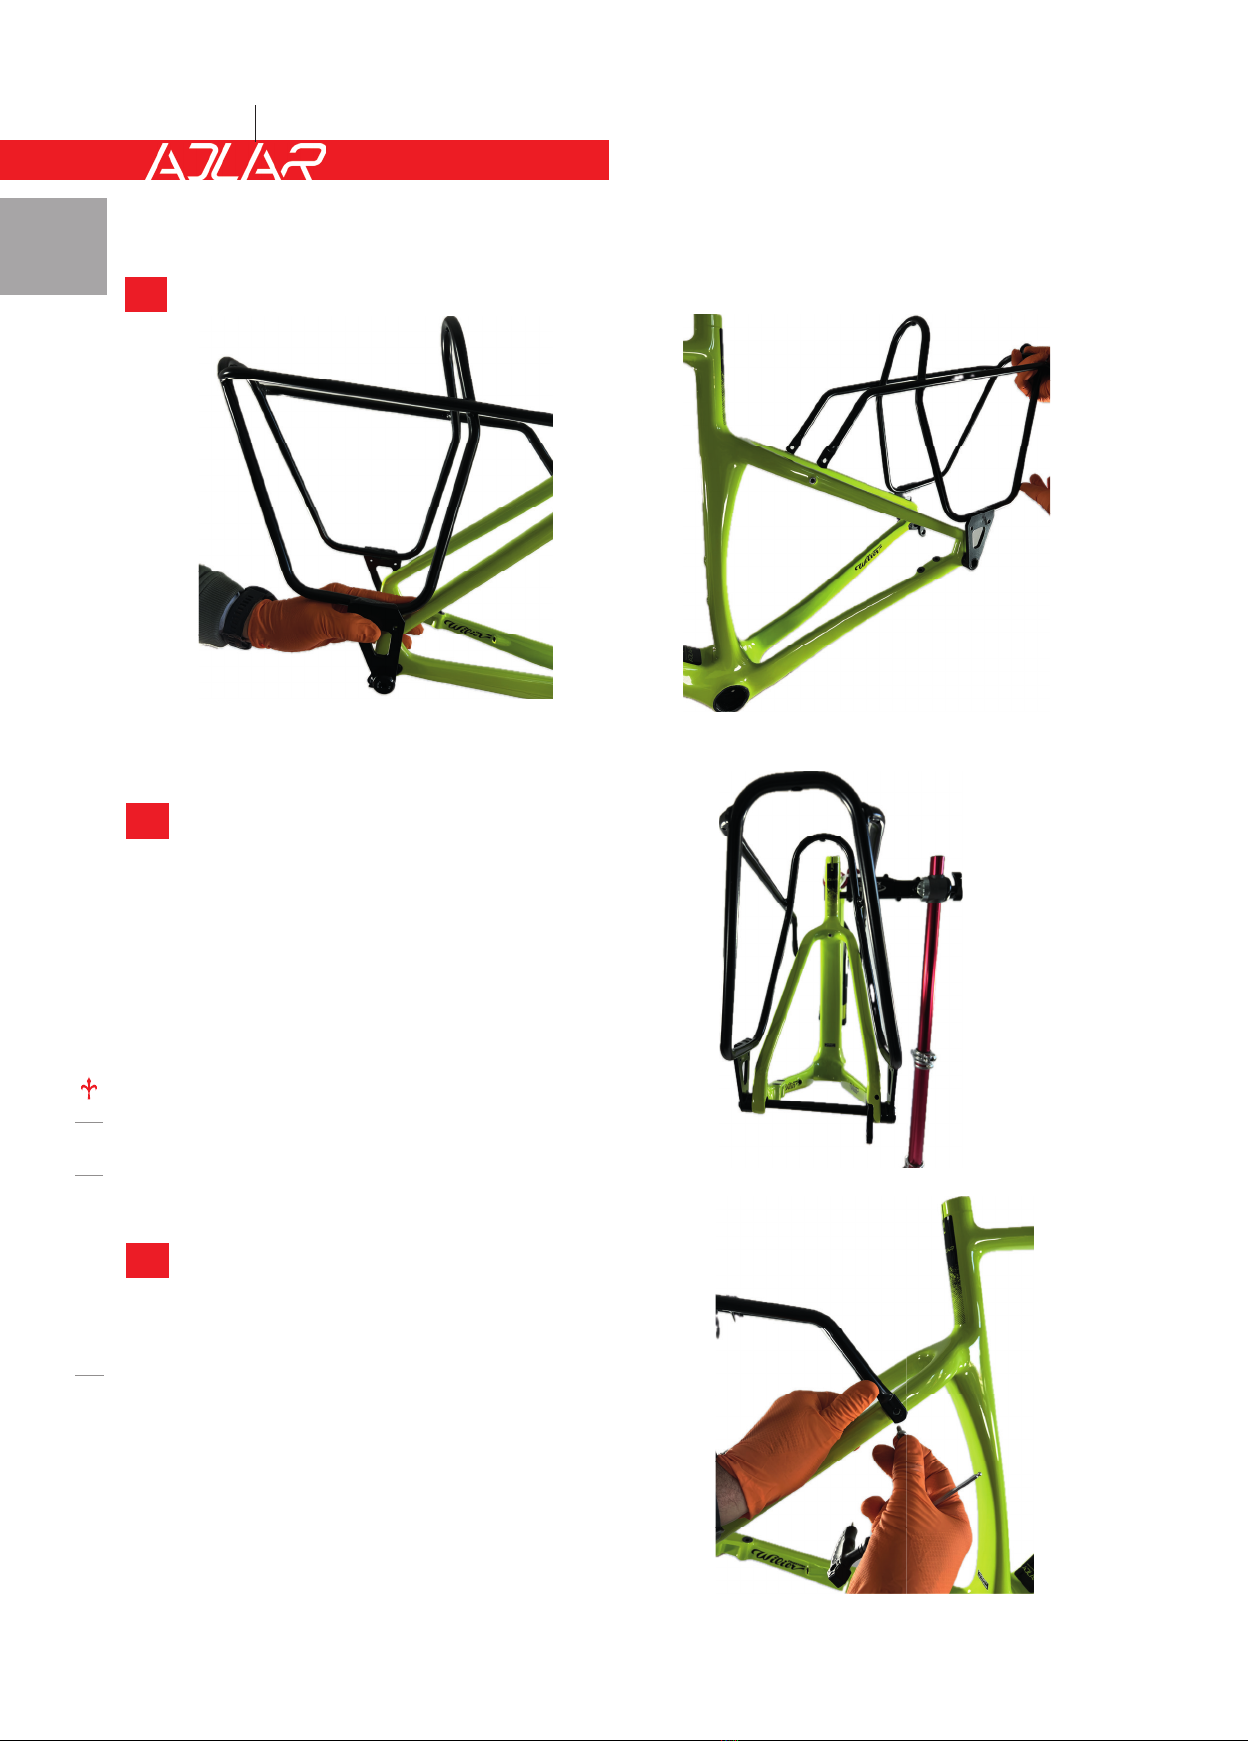
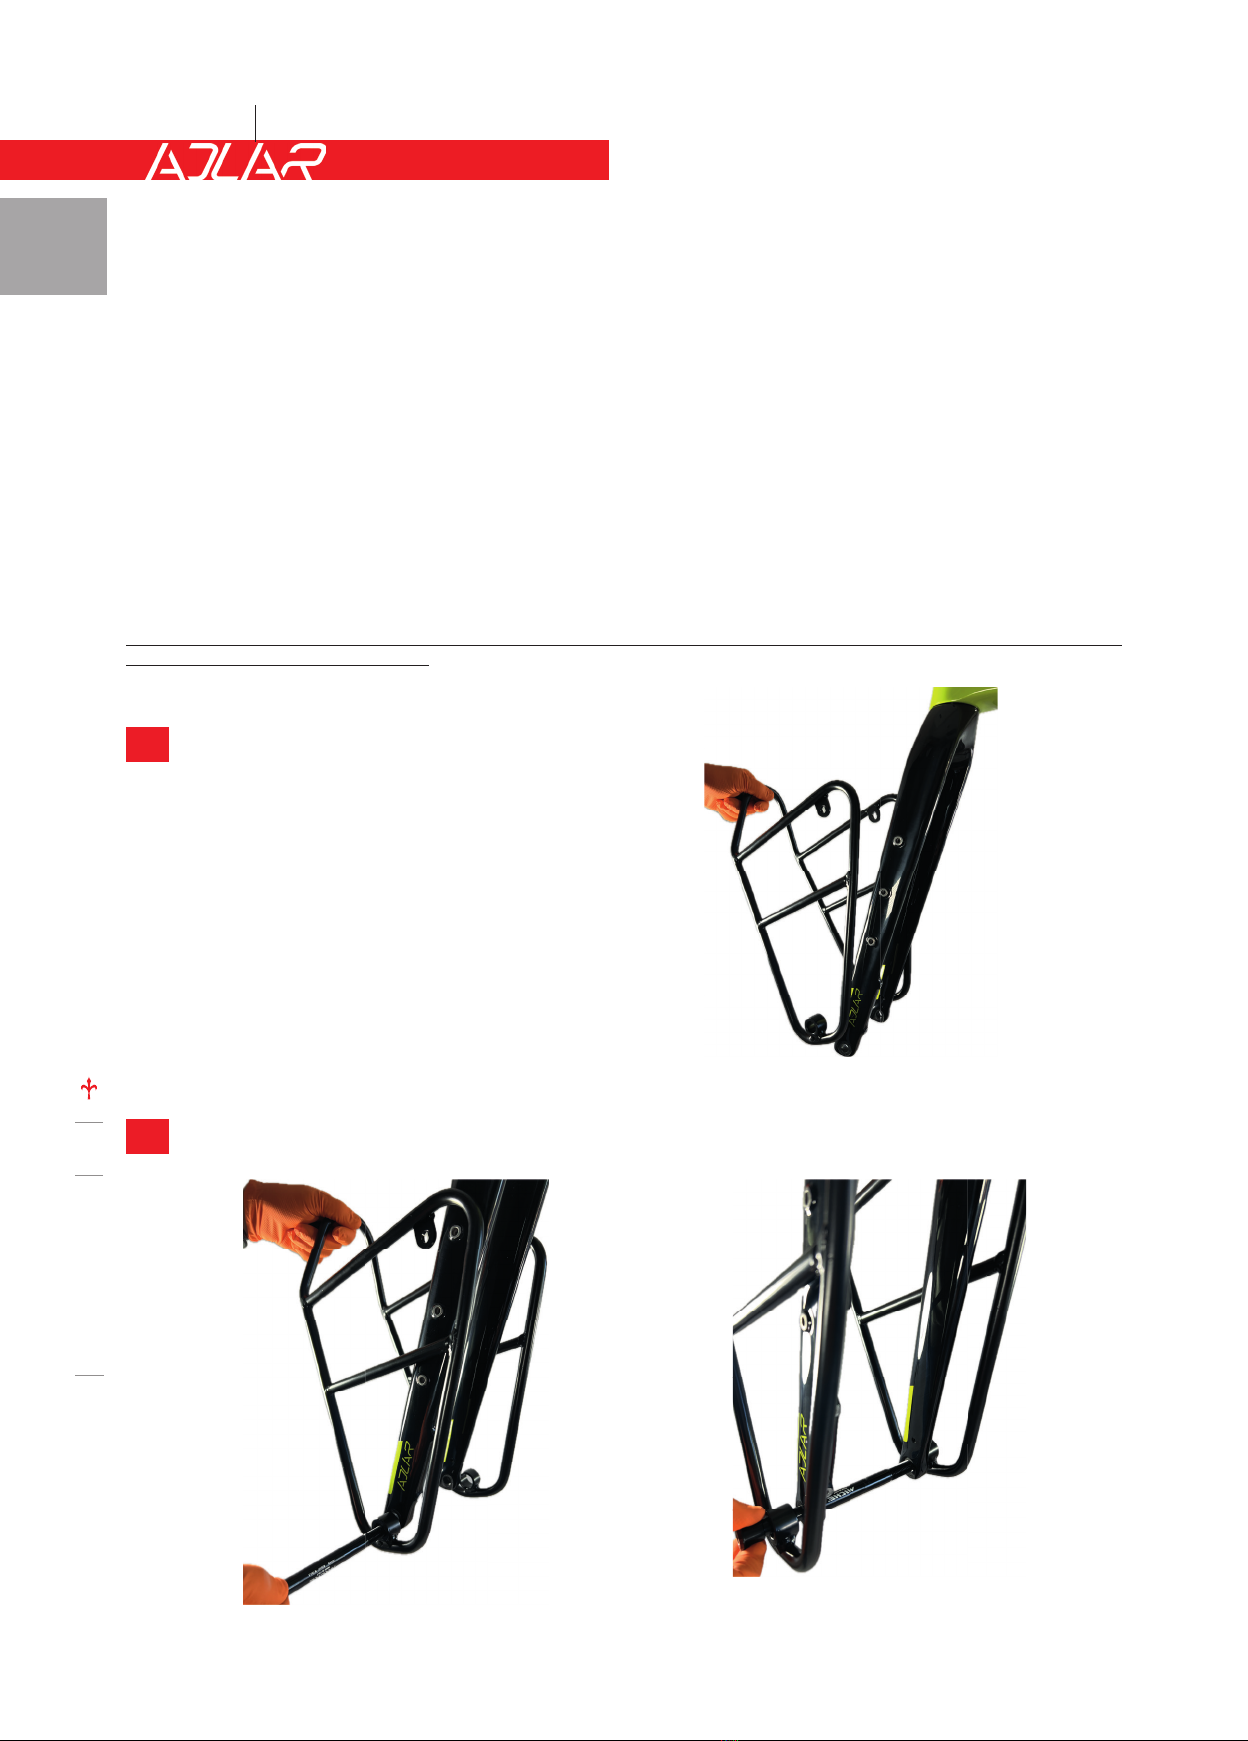
INSTALLAZIONE DEL KIT PORTAPACCHI ANTERIORE
* Per una migliore comprensione, le immagini qui sotto mostrano le operazioni senza la ruota installata. Tali operazioni devono essere eseguite con la
ruota correttamente posizionata tra i foderi.
Installazione del kit portapacchi anteriore
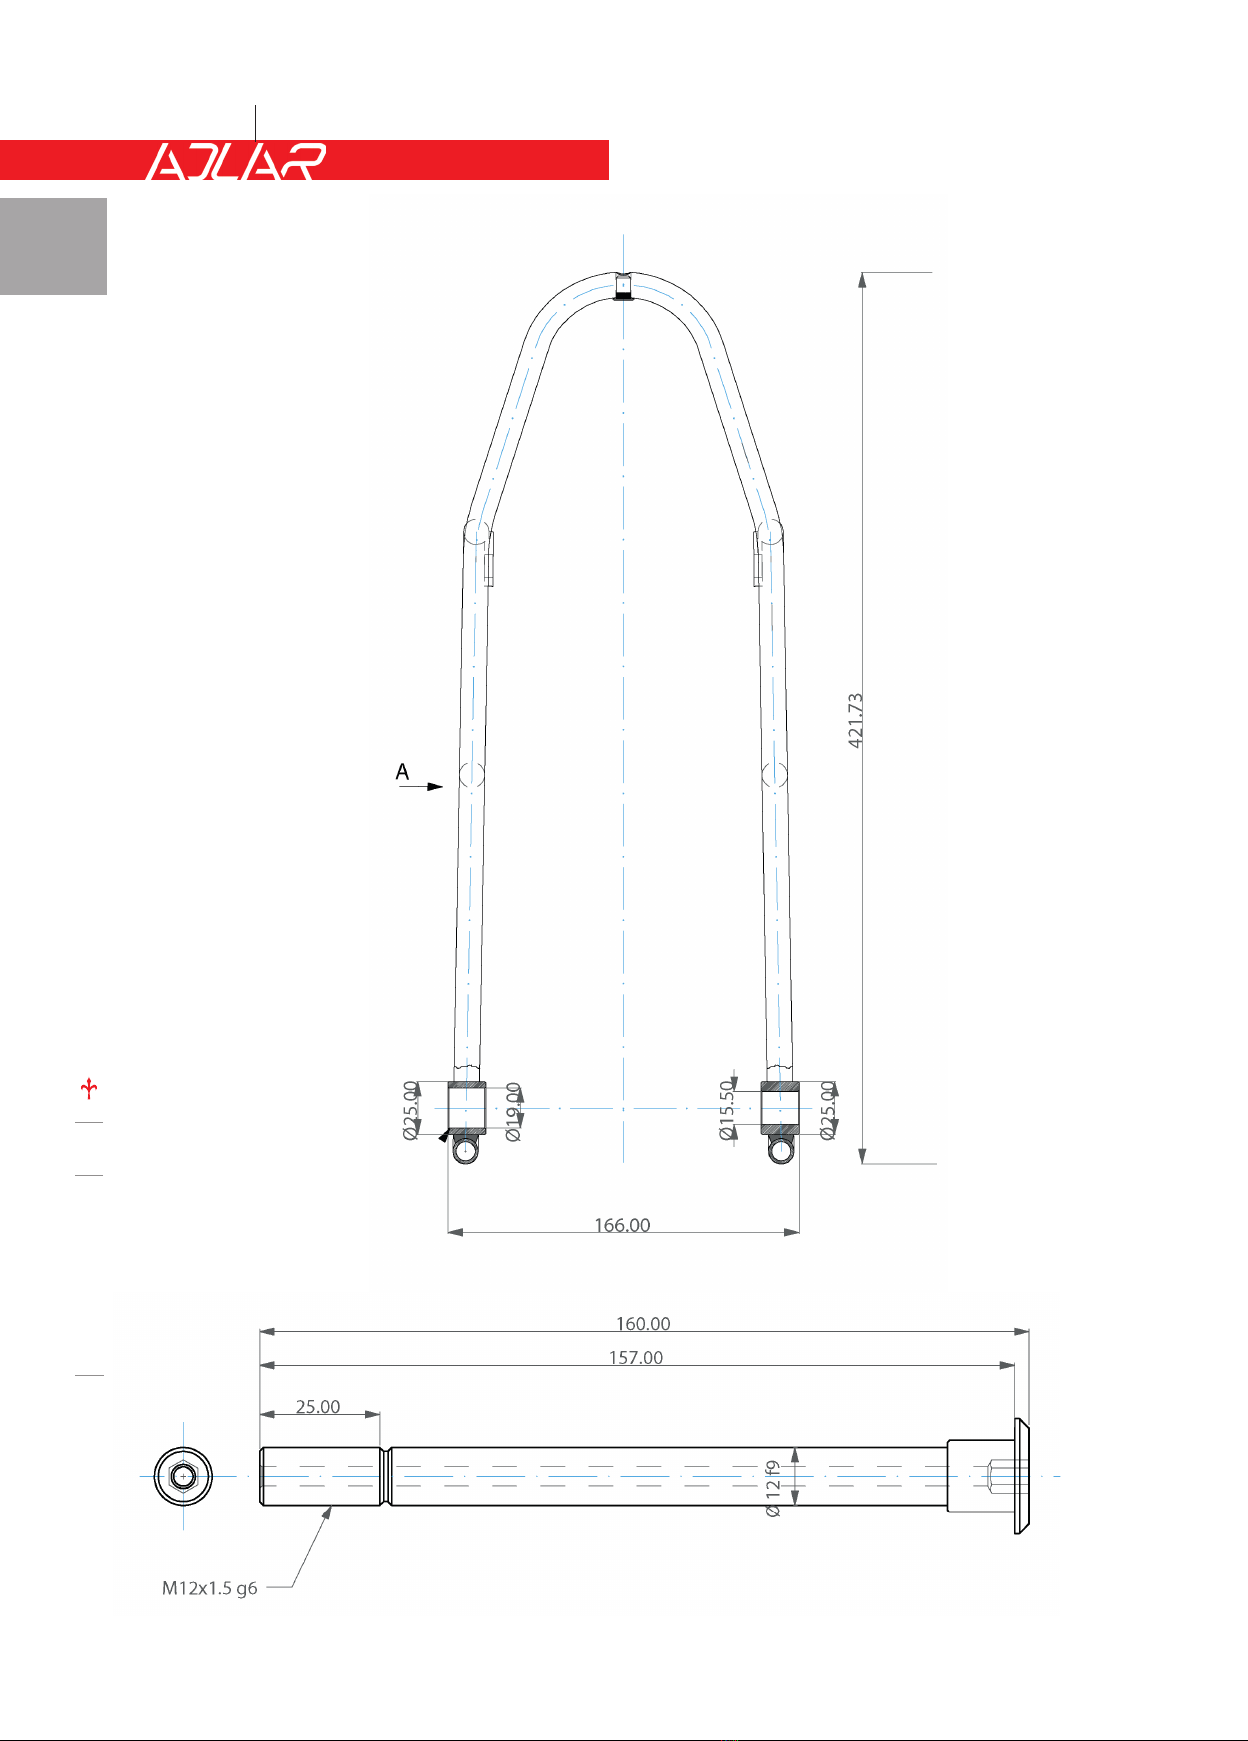
WT-FRONTKBP composto da portapacchi anterio-
re WT-RACKSF e perno anteriore 12x160.
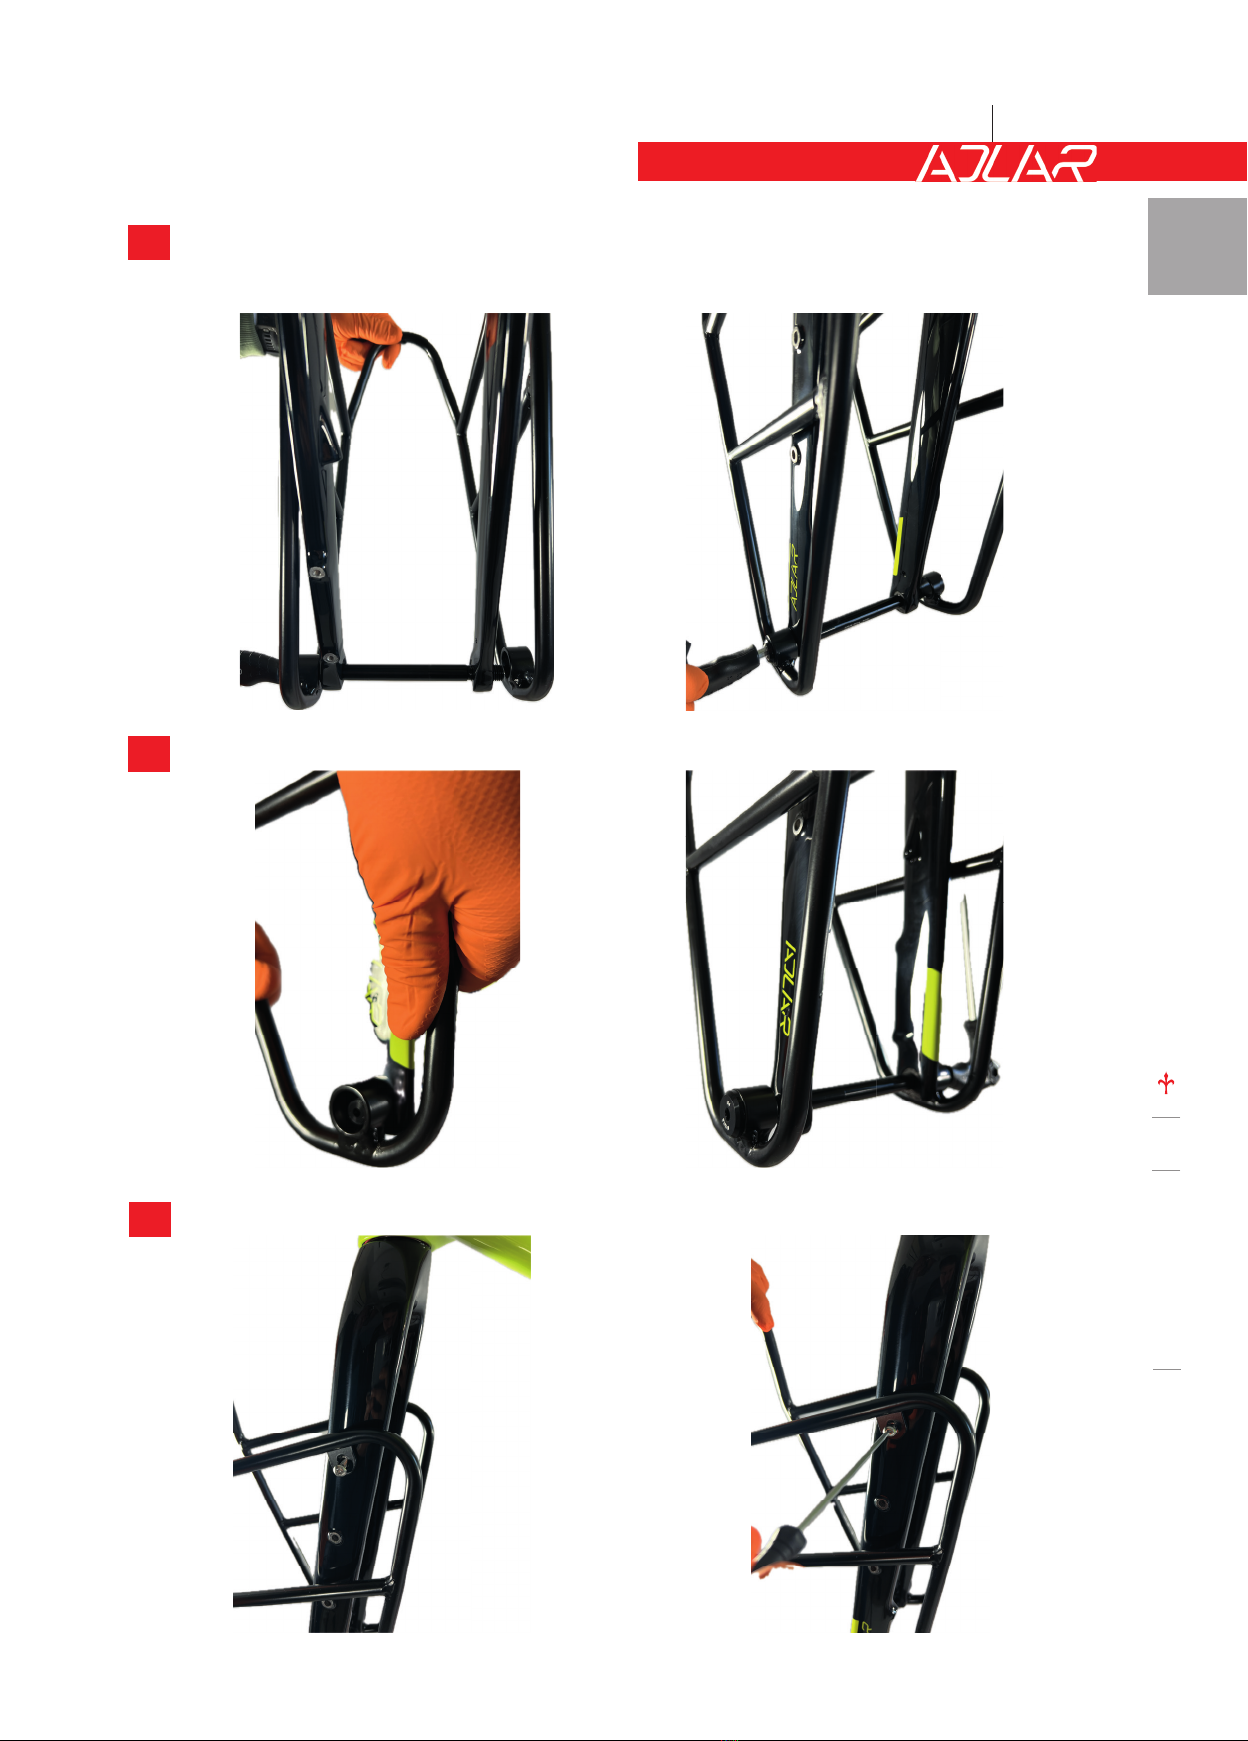
Fissare il portapacchi anteriore con il perno anteriore. Verificare attentamente che il perno sia installato
in modo tale che le parti filettate del perno e della forcella possano aderire perfettamente tra di loro.
1
2
WILIER.COM #LOVEMYWILIER
WILIERPEDIA 2024
2
GRAVEL COLLECTION
ITA

Avvitare il perno all’estremità filettata della forcella, utilizzando una chiave a brugo-
la, fino a farlo sporgere dall’estremità opposta. La lunghezza del filetto del perno è proget-
tata appositamente in modo più lungo, consentendo così di fuoriuscire dalla parte opposta.
Fissare la boccola alla parte filettata del perno.
Fissarelapartesuperioredelportapacchiairivetti forcella, siaalfoderodestrochealfodero sinistro.
3
4
5
WILIERPEDIA 2024
3
GRAVEL COLLECTION
WILIER.COM #LOVEMYWILIER
ITA

WILIER.COM #LOVEMYWILIER
WILIERPEDIA 2024
4
GRAVEL COLLECTION
ITA

INSTALLAZIONE DEL KIT PORTAPACCHI POSTERIORE
* Per una migliore comprensione, le immagini qui sotto mostrano le operazioni senza la ruota installata. Tali operazioni devono essere eseguite con la
ruota correttamente posizionata tra i foderi.
Installazione del kit portapacchi posteriore WT-REARKBP composto da portapacchi posteriore
WT-RACKSR e perno posteriore 12x200.
Fissare il portapacchi posteriore con il perno posteriore. Verificare attentamente che il perno sia in-
stallato in modo tale che le parti filettate del perno e del carro posteriore possano aderire perfetta-
mente tra di loro.
Avvitare il perno all’estremità filettata del carro posteriore, utilizzando una chiave a brugola da 6, fino
a farlo uscire dall’estremità opposta. La lunghezza del filetto del perno è progettata appositamente in
modo più lungo, consentendo così di fuoriuscire dalla parte opposta.
mente tra di loro.
1
2
3
WILIERPEDIA 2024
5
GRAVEL COLLECTION
WILIER.COM #LOVEMYWILIER
ITA

Fissare la boccola alla parte filettata del perno uscente.
Portare a chiusura la boccola.
Fissare il portapacchi posteriore alla parte supe-
riore dei foderi del carro.
Utilizzare le viti in dotazione sia per il fodero de-
stro che per quello sinistro.
4
5
6
WILIER.COM #LOVEMYWILIER
WILIERPEDIA 2024
6
GRAVEL COLLECTION
ITA

WILIERPEDIA 2024
7
GRAVEL COLLECTION
WILIER.COM #LOVEMYWILIER
ITA

ADLAR RACK KIT INSTALLATION GUIDE
ADLAR’s rack is the result of a detailed design and engineering, aimed to provide a superior cycling experien-
ce to our customers. In order to maintain high safety and performance standards, it is essential to assemble
correctly the rack. This manual serves as a fundamental resource to ensure that the ADLAR, equipped with
the rack, is ready to tackle the most challenging endeavors.
For a clear understanding of the installation,process, please carefully follow each step, referring to the ima-
ges. Additionally, pay close attention to the technical specifications, ensuring that ADLAR’s rack is mounted
in accordance with Wilier Triestina standards.
FRONT RACK KIT INSTALLATION
*For better comprehension, the images below depict the operations without the wheel installed. These operations should be performed with the wheel
correctly positioned between the fork blades.
Install the front rack kit WT-FRONTKBP consisting
of the front rack WT-RACKSF and the front 12x160
axle.
Secure the front rack with the front axle. Verify carefully that the axle is installed in such a way that the
threaded parts of the axle and the fork perfectly match to each other.
1
2
WILIER.COM #LOVEMYWILIER
WILIERPEDIA 2024
8
GRAVEL COLLECTION
ENG

Fully screw the axle into the threaded of the fork, using a 6mm Allen key, until it protrudes from the
opposite side. The axel length is intentionally designed to be longer, allowing it to protrude from the
opposite side.
Attach the bushing to the threaded part of the axle.
Secure the top of the rack to the fork rivets, both on the right and left blades.
3
4
5
WILIERPEDIA 2024
9
GRAVEL COLLECTION
WILIER.COM #LOVEMYWILIER
ENG

WILIER.COM #LOVEMYWILIER
WILIERPEDIA 2024
10
GRAVEL COLLECTION
ENG

REAR RACK KIT INSTALLATION
*For better comprehension, the images below depict the operations without the wheel installed. These operations should be performed with the wheel
correctly positioned between the fork blades.
Install the rear rack kit WT-REARKBP consisting of the rear rack WT-RACKSR and the rear 12x200 axle.
Secure the rear rack with the rear axle. Verify carefully that the axle is installed in such a way that the
threaded parts of the axle and the rear dropouts perfectly match to each other.
Fully screw the axle into the threaded end of the rear dropouts, using a 6mm Allen key, until it protrudes
from the opposite side. The axel length is intentionally designed to be longer, allowing it to protrude from
the opposite end.
1
2
3
WILIERPEDIA 2024
11
GRAVEL COLLECTION
WILIER.COM #LOVEMYWILIER
ENG

Attach the bushing to the threaded part of the protruding axle.
Close the bushing securely.
Secure the rear rack to the top of the seat stays.
Use the supplied screws for both the right and left
stays.
4
5
6
WILIER.COM #LOVEMYWILIER
WILIERPEDIA 2024
12
GRAVEL COLLECTION
ENG

WILIERPEDIA 2024
13
GRAVEL COLLECTION
WILIER.COM #LOVEMYWILIER
ENG

GUIDE D’INSTALLATION DU KIT DE PORTE-BAGAGES ADLAR
Les porte-bagages pour ADLAR sont le résultat d’une conception et d’une ingénierie minutieuses visant à of-
frir une expérience de cyclisme supérieure à nos clients. Afin de maintenir des normes élevées de sécurité et
de performance, c’est essentiel que l’assemblage soit réalisé correctement. Ce manuel constitu une ressour-
ce fondamentale pour garantir que chaque vélo ADLAR équipé des porte-bagages soit prêt à faire face aux
défis les plus exigeants.
Veuillez suivre attentivement chaque étape, en vous référant aux images explicatives pour une compréhens-
ion claire du processus d’installation. De plus, veuillez accorder une attention particulière aux spécifications
techniques fournies, garantissant ainsi que le porte-bagages ADLAR soit monté conformément aux normes
de Wilier Triestina.
INSTALLATION DU KIT DE PORTE-BAGAGES AVANT
* Pour une meilleure compréhension, les images ci-dessous montrent les opérations sans la roue installée. Ces opérations doivent
être effectuées avec la roue correctement positionnée entre les fourreaux de la fourche.
Installez le kit de porte-bagages avant WT-FRON-
TKBPcomposé du porte-bagages avant WT-RACK-
SF et de l’axe avant 12x160.
Fixez le porte-bagages avant avec l’axe avant. Vérifiez attentivement que l’axe soit installé de manière
que les parties filetées de l’axe et de la fourche adhèrent parfaitement l’une à l’autre.
1
2
WILIER.COM #LOVEMYWILIER
WILIERPEDIA 2024
14
GRAVEL COLLECTION
FRA

Vissez l’axe dans l’extrémité filetée de la fourche, à l’aide d’une clé Allen de 6 mm, jusqu’à ce qu’il
passer à l’extrémité opposée. La longueur du filetage de l’axe est délibérément conçue pour être plus
longue, lui permettant ainsi de passer à l’extrémité opposée.
Fixez la bague à la partie filetée de l’axe.
Fixez la partie supérieure du porte-bagages aux rivets de la fourche,sur les bases droite et gauche.
3
4
5
WILIERPEDIA 2024
15
GRAVEL COLLECTION
WILIER.COM #LOVEMYWILIER
FRA

WILIER.COM #LOVEMYWILIER
WILIERPEDIA 2024
16
GRAVEL COLLECTION
FRA

INSTALLATION DU KIT DE PORTE-BAGAGES ARRIÈRE
* Pour une meilleure compréhension, les images ci-dessous montrent les opérations sans la roue installée. Ces opérations doivent
être effectuées avec la roue correctement positionnée entre les fourreaux de la fourche.
Installez le kit de porte-bagages arrière WT-REARKBP composé du porte-bagages arrière WT-RACKSR
et de l’axe arrière 12x200.
Fixez le porte-bagages arrière avec l’axe arrière. Vérifiez attentivement que l’axe soit installé de ma-
nière que les parties filetées de l’axe et des pattes arrière adhèrent parfaitement l’une à l’autre.
Vissez l’axe dans l’extrémité filetée des pattes arrière, à l’aide d’une clé Allen de 6 mm, jusqu’à ce qu’il
passe à l’extrémité opposée. La longueur du filetage de l’axe est délibérément conçue pour être plus
longue, lui permettant ainsi de passer à l’extrémité opposée.
1
2
3
WILIERPEDIA 2024
17
GRAVEL COLLECTION
WILIER.COM #LOVEMYWILIER
FRA

Fixez la bague à la partie filetée de l’axe dépassant.
Fermez solidement la bague.
Fixez le porte-bagages arrière à la partie
supérieure des haubans arrière. Utilisez les vis
fournies pour les haubans droit et gauche.
4
5
6
WILIER.COM #LOVEMYWILIER
WILIERPEDIA 2024
18
GRAVEL COLLECTION
ENG

WILIERPEDIA 2024
19
GRAVEL COLLECTION
WILIER.COM #LOVEMYWILIER
ENG

ANLEITUNG ZUR MONTAGE DES ADLAR-GEPÄCKTRÄGER-KITS
Der ADLAR-Gepäckträger ist das Ergebnis sorgfältiger Entwicklung und Ingenieursarbeit mit dem Ziel, un-
seren Kunden ein hervorragendes Fahrraderlebnis zu bieten. Um die hohen Sicherheits- und Leistungsstan-
dards aufrechtzuerhalten, ist es entscheidend, dass die Montage korrekt durchgeführt wird. Dieses Handbuch
dient als grundlegende Ressource, um sicherzustellen, dass jedes mit dem Gepäckträger ausgestattete
ADLAR bereit ist, sich den anspruchsvollsten Herausforderungen zu stellen.
Bitte folgen Sie jedem Schritt sorgfältig, indem Sie sich auf die erläuternden Bilder beziehen, um ein klares
Verständnis des Installationsprozesses zu erhalten. Beachten Sie außerdem die bereitgestellten technischen
Spezifikationen, um sicherzustellen, dass der ADLAR-Gepäckträger gemäß den Wilier Triestina Normen mon-
tiert ist.
MONTAGE DES FRONT-GEPÄCKTRÄGER-KITS
*Für ein besseres Verständnis zeigen die untenstehenden Bilder die Vorgänge ohne installiertes Laufrad. Diese Vorgänge sollten jedoch mit dem Laufrad
durchgeführt werden, das korrekt zwischen den Gabelbeinen positioniert ist.
Montage des Front-Gepäckträger-Kits WT-FRON-
TKBP, bestehend aus dem Front-Gepäckträger
WT-RACKSF und der vorderen Achse 12x160.
Befestigen Sie den Front-Gepäckträger mit der vorderen Achse. Überprüfen Sie sorgfältig, dass die Ach-
se so eingebaut ist, dass die Gewindeteile der Achse und der Gabel perfekt miteinander verbunden sind.
1
2
WILIER.COM #LOVEMYWILIER
WILIERPEDIA 2024
20
GRAVEL COLLECTION
DEU
Table of contents
Languages: