manuals.online logo
Brands
  1. Home
  2. •
  3. Brands
  4. •
  5. William Kent
  6. •
  7. Stroller
  8. •
  9. William Kent POUSSETTE ODYSSEE User manual

William Kent POUSSETTE ODYSSEE User manual

Conforme aux exigences de sécurité.
• ODYSSEE V1
SICATEC
BP16
13713 LA PENNE-SUR-HUVEAUNE Cedex
FRANCE
Service clients : Importé par :
AUBERT FRANCE
4 rue de la Ferme - BP 30130
68705 CERNAY Cedex
FRANCE
N° Cristal : 0 969 320 658
www.aubert.com
POUSSETTE ODYSSEE
NOTICE D‘ UTILISATION
INSTRUCTIONS FOR USE
GEBRAUCHSANLEITUNG
2
AV E RT I S S E M E N T S
p o u S S E T T E
IMpoRTANT !
CoNSERVER CES INSTRuCTIoNS pouR CoNSuLTATIoN uLTÉRIEuRE.
NouS VouS CoNSEILLoNS dE LIRE ATTENTIVEMENT CETTE NoTICE ET dE MANIpuLER VoTRE
pRoduIT AVANT d’yINSTALLER VoTRE ENfANT.
Conforme aux exigences de sécurité.
Conforme à la norme EN 1888:2012.
• Ce véhicule est conçu pour des enfants, à partir de 6 mois et jusqu’à 15 kg pour la poussette seule.
• Cette poussette est conçue pour supporter le poids d’un seul enfant. Elle ne doit pas être utilisée avec plus
d’un enfant à la fois.
• Ce véhicule ne remplace pas un couffin ou un lit. Lorsque l’enfant a besoin de dormir, il convient de le placer
dans une nacelle, un couffin ou un lit approprié.
• Ne jamais soulever la poussette lorsque votre enfant y est installé.
• N’emprunter jamais d’escaliers ou escalators avec votre enfant dans la poussette.
• Le frein doit toujours être enclenché lorsque vous placez ou sortez votre enfant de la poussette.
• Utiliser toujours le frein lorsque la poussette est immobile, même si vous ne vous arrêtez qu’un instant !
• Charge maximale admise par le panier 2 kg.
• Toute charge attachée au poussoir et/ou à l’arrière du dossier et/ou sur les côtés du véhicule peut influer sur la
stabilité du véhicule.
• Seules les pièces de rechange fournies ou recommandées par le fabricant doivent être utilisées.
• N’utiliser que des accessoires vendus et approuvés par le fabricant.
CoNSEIL d’ENTRETIEN du ChASSIS ET dE LA houSSE :
• Nous vous conseillons de contrôler les parties mécaniques tous les 15 jours et, si besoin, de les nettoyer.
• Nettoyer les parties métallique et plastique à l’aide d’un chiffon propre, légèrement humide.
• Nettoyer les parties textiles avec une éponge et un savon doux. Ne pas utiliser de détergent abrasif.
A V E R T I S S E M E N T S
• AVERTISSEMENT Ne jamais laisser votre enfant sans surveillance.
• AVERTISSEMENT S’assurer que tous les dispositifs de verrouillage sont enclenchés avant utilisation.
• AVERTISSEMENT Pour éviter toute blessure, maintenir votre enfant à l’écart lors du dépliage et
du pliage du produit.
• AVERTISSEMENT Vérifier que les dispositifs de fixation du siège sont correctement enclenchés
avant utilisation.
• AVERTISSEMENT Ne pas laisser votre enfant jouer avec ce produit.
• AVERTISSEMENT Ce siège ne convient pas à des enfants de moins de 6 mois.
• AVERTISSEMENT Toujours utiliser le système de retenue.
• AVERTISSEMENT Ce produit ne convient pas pour faire du jogging ou des promenades en rollers.
• AVERTISSEMENT Pour éviter les risques d’étouffement, conserver les sacs plastique de l’emballage hors de
portée des bébés et des jeunes enfants.
3
WA R N I N G S
S T R o L L E R
IMpoRTANT !
KEEpThESE INSTRuCTIoNS foR fuTuRE REfERENCE.
WARNING: WE RECoMMENd you REAd ThESE INSTRuCTIoNS VERy CAREfuLLy ANd GET uSEd
To hANdLING youR pRoduCT bEfoRE pLACING youR ChILd IN IT.
Complies with standard EN 1888: 2012.
• This vehicle is designed for children from 6 months up to 15 kg for single stroller using.
• Never transport more than 1 child at a time in your pushchair.
• This vehicle does not replace a Moses basket or cot. When the child needs to sleep, put it into an appropriate
basket or cot.
• Never lift up the pushchair while your child is sitting in it.
• Never use stairs or escalators with your child sitting in the pushchair.
• The brake must always be engaged when placing the child in the pushchair and removing him or her from it.
• Always use the brake when the pushchair is not moving even if you only stop for a moment!
• Only use accessories that are sold and approved by the manufacturer.
• Maximum load permitted for the shopping basket is 2 kg.
• Attaching a load attached to the pusher and / or rear of the backrest and / or sides of the vehicle can affect its
stability.
• Only use spare parts that are sold and recommended by the manufacturer.
ChASSIS ANd CoVERS CARE AdVICE :
• We advise you to check and if necessary clean mechanical parts every fortnight.
• Wipe the frame with a clean cloth.
• Use a sponge and mild soap. Do not use detergent.
• WARNING Never leave your child unattended.
• WARNING Ensure that all locking devices are engaged before use.
• WARNING To avoid injury, keep your child away during unfolding and folding of the product.
• WARNING Make sure that the fastening devices of the basket, seat or car seat are properly engaged before use.
• WARNING Do not let children play with this product.
• WARNING This seat is not suitable for children under 6 months.
• WARNING Always use the restraint system.
• WARNING This product is not suitable for jogging or skating.
• WARNING To avoid risk of suffocation, keep plastic bags from the packaging away from babies and young
children.
W A R N I N G
5
6
8
7
9
10
1- zip d’ouverture de l’aération de la capote
2- arceau de sécurité
3- harnais
4- panier
5- commande de pliage
6- sangle d’ajustement du dossier
7- frein
8- bouton de déverrouillage du pliage
9- actionnement du pliage
10- adaptateurs poussette pour groupe 0+
«Pebble Plus» de Bébé Confort/ Maxi Cosi
presentation / introduction / präsentation
1
2
3
4
F
GB D
WA R N h I N W E I S E
f A h R z E u G
WICHTIG !
BEWAHREN SIE DIESE ANLEITUNG ZUM SPÄTEREN NACHSCHLAGEN.
WI REMpfEhLEN IhNEN, dIESE GEbRAuChSANWEISuNG AufMERKSAM duRChzuLESEN uNd dAS
pRoduKT pRobEMäSSIG zu hANdhAbEN,bEVoR SIE IhR KINd dARIN INSTALLIEREN.
Getestet im zugelassenen Labor gem. EN 1888:2012 Standard.
• Dieses Fahrzeug ist für Kinder von 6 Monaten bis zu 15 kg für einzelne Kinderwagen entworfen.
• Dieser Kinderwagen ist entworfen, um das Gewicht eines Kindes zu unterstützen
• Nie mehr als 1 Kind im Kinderwagen transportieren.
• Dieser Babywipper ist kein Ersatz für eine Tragetasche oder ein Bett. Soll das Kind schlafen, muss es in eine
geeignete Tragetasche oder ein geeignetes Bett gelegt werden.
• Nie den Kinderwagen hochheben, wenn ein Kind darin sitzt.
• Nie Stiegen oder Rolltreppen nehmen, wenn Ihr Kind im Kinderwagen sitzt.
• Die Bremse muss beim Hineinsetzen bzw. Herausnehmen Ihres Kindes immer gesichert sein.
• Die Bremsen immer betätigen, sobald der Kinderwagen stillsteht, selbst wenn dies nur für einen kurzen
Moment ist.
• Zulässiges Höchstgewicht für den Korb: 2 Kg.
• Alle Gewichte am Drücker und / oder Rückseite des Gehäuses und / oder Seiten des Kinderwagens kann die
Stabilität des Kinderwagens beeinträchtigen.
• Verwenden Sie nur Zubehör, welches vom Hersteller verkauft bzw. zugelassen ist.
pfLEGEhINWEISE füR dAS GESTELL uNd dAS bEzuGS :
• Der Kinder- bzw. Sportwagen muss regelmässig gepflegt bzw. gewartet werden, damit er Sie vollständig zufrieden stellt.
• Wir empfehlen, die mechanischen Teile alle 2 Wochen zu kontrollieren und bei Bedarf zu reinigen.
• Das Gestell mit einem sauberen Lappen reinigen.
• Das Gestell nach jedem Gebrauch auf schlammigem oder sandigen Boden bzw. in feuchter Umgebung reinigen.
• Mit Schwamm und milder Seife. Kein Reinigungsmittel verwenden.
A C h T u N G
• WARNUNG Lassen Sie Ihr Kind nicht unbeaufsichtigt.
• WARNUNG Stellen Sie sicher, dass alle Verriegelungen vor Gebrauch eingerastet sind.
• WARNUNG Um Verletzungen zu vermeiden, halten Sie Ihr Kind weg beim Entfalten und Falten des Produkts
• WARNUNG Prüfen Sie vor der Verwendung, dass die Elemente zur Befestigung der Babywanne, des Sitzes oder
der Babyschale korrekt eingerastet sind.
• WARNUNG Lassen Sie Kinder nicht mit diesem Produkt spielen.
• WARNUNG Dieser Sitz ist für Kinder unter 6 Monaten nicht geeignet.
• WARNUNG Immer das Anschnallsystem benutzen.
• WARNUNG Dieses Produkt nicht beim Joggen oder Rollerbladen verwenden.
• WARNUNG Um jegliches Erstickungsrisiko auszuschließen, halten Sie die Plastikverpackung außerhalb der
Reichweite von Babys und kleinen Kindern.
4
5
1- canopy ventilation opening zip
2- safety bar
3- harness
4- basket
5- folding control
6- backrest adjusting strap
7- brake
8- folding unlocking button
9- folding start
10- pushchair adapters for 0+
Pebble Plus seats from Bébé Confort/
Maxi Cosi
1- Reißverschluss zum Öffnen der Lüftung des
Verdecks
2- Sicherheitsbügel
3- Befestigungsgurt
4- Korb
5- Knopf zum Zusammenklappen
6- Einstellgurt der Rückenlehne
7- Bremse
8- Knopf für die Entriegelung beim
Zusammenklappen des Gestells
9- Betätigungsvorrichtung für das
Zusammenklappen
10- Adapter für Babyschale der Gruppe 0+
„Pebble Plus“ von Bébé Confort/ Maxi Cosi
1
2
CLIC
CLIC CLIC
6 7
dépliage de la poussette / unfolding the pushchair /
öffnen des kinderwagens
1
2
mise en place des roues
installing the wheels
einbau der räder
1 2
CLIC
CLIC
1 2
mise en place / retrait de l’arceau de maintien
putting in place / removing the the satefy bar
einsetzen / entfernen der haltebügel
articulation de l’arceau de maintien
moving the the safety bar
bewegen der haltebügel
34
8 9
utilisation du frein / using the brake / verwendung der bremse
Libérer le frein
Unlock the brake
Bremse lösen
Enclencher le frein
Engage the brake
Bremse einlegen
roues avant fixes ou pivotantes / fixed or swivel front wheels /
vorderräder feststehend oder drehbar.
Roues xes
Fixed wheels
Räder feststehend
Roues pivotantes
Swivel wheels
Räder drehbar
inclinaison du dossier / backrest recline / neigen der lehne
Pour ajuster la position du dossier, tirer sur la gâchette située à l’arrière du dossier et le mettre
dans la position souhaitée.
To adjust the position of the back, press the lever behind the back and put it in the required position.
Um die Position der Rückenlehne einzustellen, ziehen Sie am Hebel an der Rückseite der Lehne
und bringen diese in die gewünschte Position.
F
GB
D
réglage du repose-mollets / adjusting the leg rest /
einstellen der fussraste
Appuyer sur les boutons situés sur les côtés du repose-mollets (1) pour régler l’inclinaison
de celui-ci (2).
Press the buttons located on the sides of the leg rest (1) to adjust the leg rest angle (2).
Drücken Sie die Knöpfe an den Seiten der Fußtstütze (1), um deren Neigung zu verstellen.
F
GB
D
CLIC
utilisation du harnais / use of the harness /
verwendung des haltegurts
1. Installer l’enfant dans le siège et clipper les fermoirs dans la boucle centrale.
2. Ajuster le harnais à la taille de l’enfant.
3. Une forte pression sur le bouton central du harnais permet de libérer l’enfant.
1. Install the child in the seat and clip the fasteners into the central buckle.
2. Adjust the harness for the child.
3. Firmly press the central button of the harness to release the child.
1. Setzen Sie das Kind in den Sitz und klipsen Sie die Schließen in die mittlere Gurtbefestigung ein.
2. Passen Sie den Haltegurt an die Größe des Kindes an.
3. Der Haltegurt wird mit einem festen Druck auf den Knopf in der Mitte geöffnet.
GB
D
F
10 11
positionnement du harnais / adjusting the harness /
einstellen des heltegurts
TouJouRS AJuSTER LE hARNAIS A LATAILLE dE L’ENfANT
ALWAySAdJuSTThE hARNESS foRThE ChILd
pASSEN SIE dEN hALTEGuRT AN dIE KoRpuLENz dES KINdES AN
utilisation du harnais / use of the harness /
verwendung des haltegurts
1
2
.
installation du siège-auto sur la poussette /
using the car seat on the pushchair /
verwendung der autositz auf dem kinderwagen
12 13
pliage / folding / zusammenlegen
1. Régler le dossier du siège en position verticale et enbclencher le frein
2. Rabattre la capote et abaisser l’arceau de maintient .
3. Actionner le mécanisme de pliage en pressant les boutons dans l’ordre indiqué ci contre pour
déclencher le pliage de la poussette.
1. Set the seat in the vertical position and engage the brake
2. Fold back the canopy and lower the holding bar.
3. Start the folding mechanism by pressing the buttons in the order stated opposite to start folding
the pushchair.
1. Stellen Sie die Rückenlehne senkrecht und legen Sie die Bremse ein
2. Klappen Sie dasVerdeck und den Haltebügel nach unten.
3. Drücken Sie die Knöpfe in der daneben gezeigten Reihenfolge, damit sich der Kinderwagen zusam-
menklappen lässt.
GB
D
F
1
2
3
Grâce aux adaptateurs inclus, cette poussette est compatible avec le groupe 0+ «Pebble Plus» de
Bébé Confort/Maxi Cosi. En utilisation combinée, ce véhicule est utilisable de la naissance et jusqu’à
13kg.
AVERTISSEMENT
Lors de l’utilisation de la poussette en combinaison avec le groupe 0+,le poids maximum d’utilisation
est celui Indiqué sur le groupe 0+.
Placer toujours le groupe 0+ face à vous lors de son utilisation en combinaison avec la poussette.
AVERTISSEMENT: Vérier que les dispositifs de xation du siège-auto sont correctement enclenchés
avant utilisation.
Veuillez vous référer à la notice du groupe 0+ pour les instructions d’installation de votre enfant dans
le siège auto.
F
CLIC
CLIC
14 15
installation du siège-auto sur la poussette /
using the car seat on the pushchair /
verwendung der autositz auf dem kinderwagen
2
installation du siège-auto sur la poussette /
using the car seat on the pushchair /
verwendung der autositz auf dem kinderwagen
F1
GB
D
1- Enclencher le frein et abaisser le dossier de la poussette
2- De part et d’autre de l’assise, dégrafer les boutons de pression pour accéder aux
support des adaptateurs siège auto.
3- Faire glisser les adaptateurs gauche et droit sur leurs supports respectifs, jusqu’au clic
de verrouillage.
4- Avant de mettre en place le siège auto, toujours vérier que les adaptateurs sont
correctement verrouillés. Puis clipper le siège face pousseur sur les adaptateurs.
Dank seiner Adapter ist dieser Kinderwagen mit der Babyschale Gruppe +0 „Pebble Plus“ von
Bébé Confort/Maxi Cosi kompatibel.AlsTravel System kann dieser Kinderwagen von der Geburt
bis zu einem Gewicht von 13 kg verwendet werden.
WARNHINWEIS
BeiVerwendung des Kinderwagens in Kombination mit einer Babyschale Gruppe 0+ ist das auf
der Babyschale angegebenen Höchstgewicht zu beachten.
Wenn Sie den Kinderwagen als Travel System mit einer Babyschale verwenden, montieren Sie
diese immer entgegen der Fahrtrichtung.
WARNHINWEIS: Prüfen Sie vor derVerwendung, dass die Elemente zur Befestigung der
Babyschale korrekt eingerastet sind.
Befolgen Sie die Anweisungen in der Anleitung Ihrer Babyschale Gruppe 0+,wenn Sie Ihr Kind in
die Babyschale legen.
1 - Legen Sie die Bremse ein und drücken Sie die Rückenlehne des Kinderwagens nach unten
2 - Lösen die Druckknöpfe auf beiden Seiten der Sitzäche, um auf die Halterung der Babyschalen-
Adapter zugreifen zu können.
3 - Schieben Sie den rechten und den linken Adapter auf die jeweilige Halterung, bis sie hörbar
einrasten.
4 - Kontrollieren Sie stets, dass die Adapter korrekt eingerastet sind,bevor Sie die Babyschale
installieren. Clipsen Sie dann die Babyschale auf die Adapter
With the adapters supplied, this pushchair is compatible with Pebble Plus 0+ car seats from Bébé
Confort/Maxi Cosi.With combined use, this vehicle may be used from birth to 13 kg.
WARNING
While using the pushchair in combination with the 0+ seat, the maximum usage weight is that
stated on the 0+ seat.
Always place the 0+ seat facing you when used in combination with the pushchair.
WARNING: Make sure that the fastening devices of the car seat are properly engaged before use.
Please refer to the instructions of the 0+ seat for instructions for installing your child in the car
seat.
1. Engage the brake and lower the backrest of the pushchair
2. On each side of the seat, undo the press studs to access the car seat adapter supports.
3. Slide the left and right adapters on their respective supports till they snap in place.
4. Before putting the car seat in place, always make sure that the adapters are properly locked, then
clip the seat facing the pusher on the adapters.
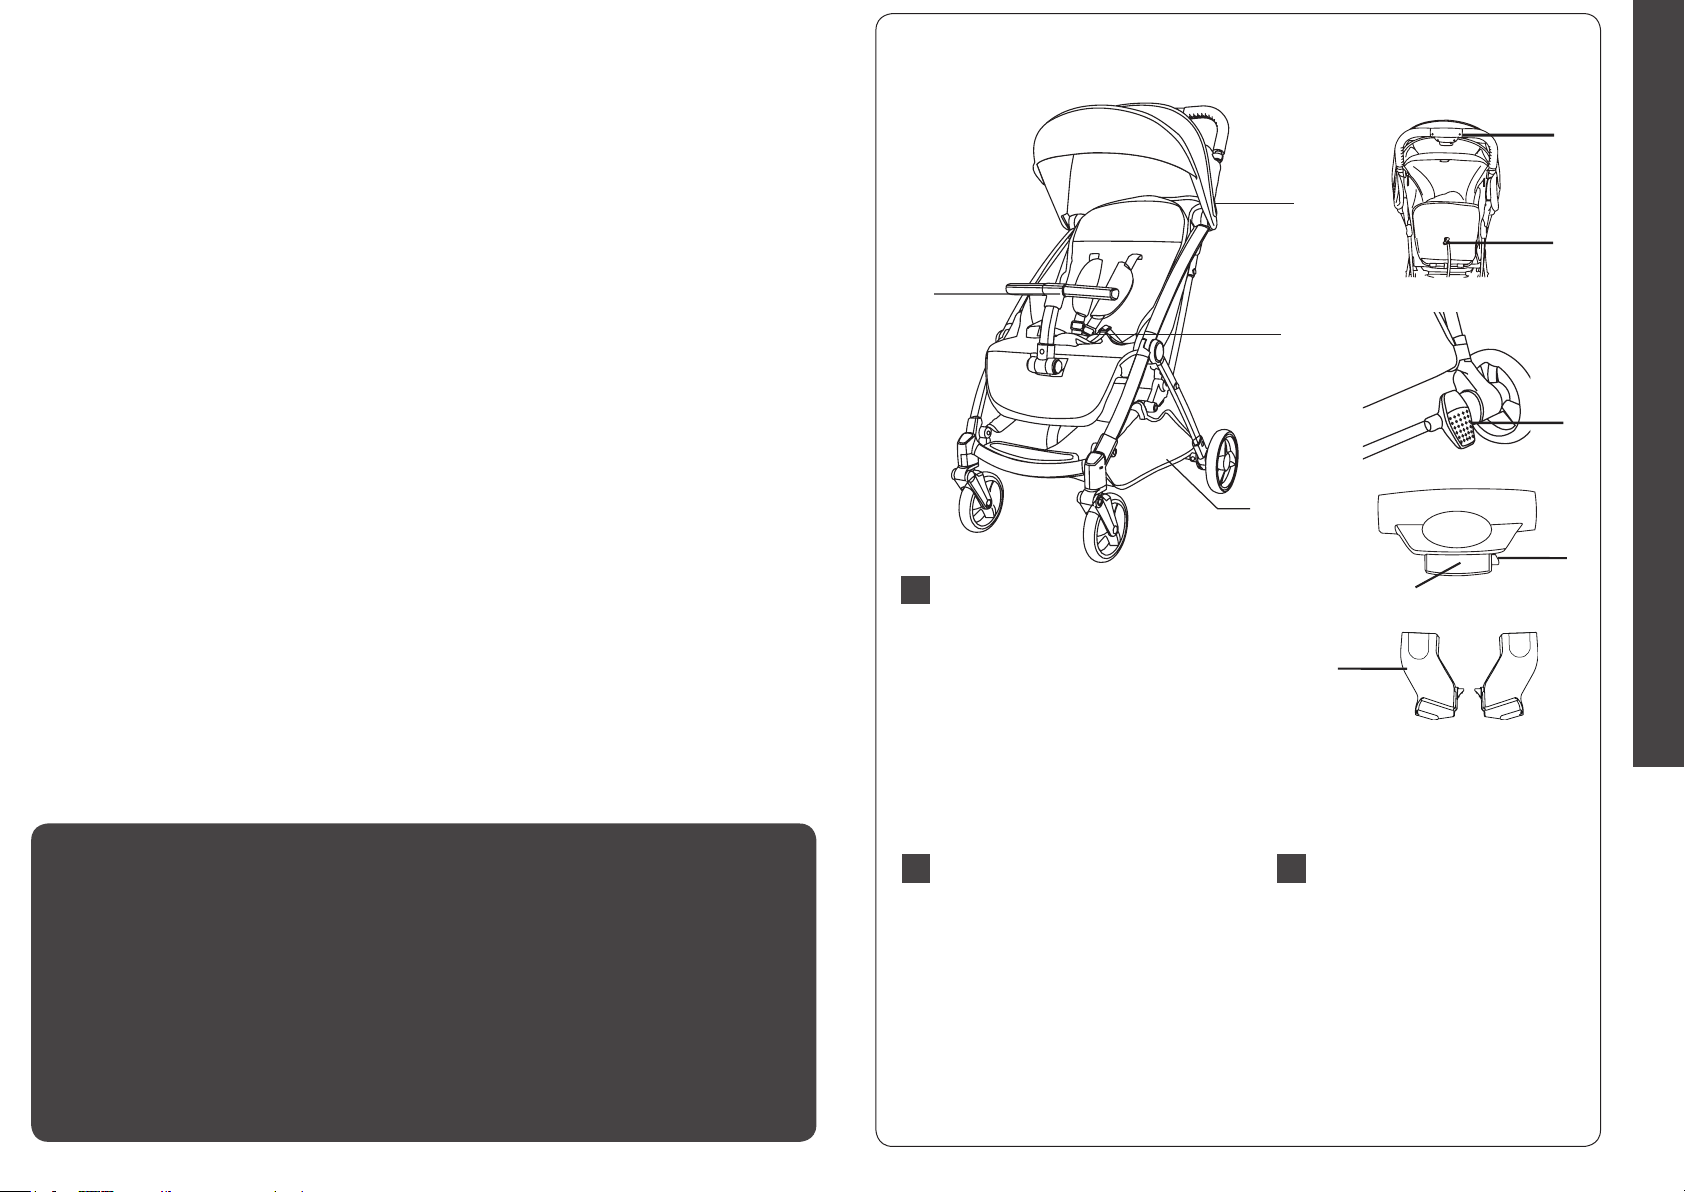
1- Presser les boutons de déverrouillage situés sur les cotés du siège pour le libérer.
2- Pour retirer les adaptateurs tirer le petit levier en façade de l’adaptateur vers le haut et faites
glisser l’ensemble vers l’arrière.
1. Press the unlocking buttons located on the sides of the seat to release it.
2.To remove the adapters, pull up the small lever on the front of the adapter and slide the assembly
back.
1 - Drücken Sie die Entriegelungstasten an den Seiten der Babyschale, um sie zu lösen.
2 - Zum Entfernen der Adapter ziehen Sie den kleinen Hebel an derVorderseite des Adapters nach
oben und schieben die gesamteVorrichtung nach hinten.
16
GB
D
F
desassemblage du siège-auto sur la poussette /
moving the car seat off the pushchair /
abnehmen der autositz vom kinderwagen
C E R T I f I C A T d E G A R A N T I E
William Kent 1733 vous garantit que ce produit est conforme aux exigences de sécurité telles que dénies par la réglementation en
vigueur, et qu’il ne présente aucun défaut de conception et fabrication au moment de son achat par le revendeur. Si après votre achat, du-
rant une période de 24 mois, ce produit présentait un défaut dans le cas d’une utilisation normale telle que dénie dans la notice d’emploi,
William Kent 1733 s’engage à vous le réparer ou à vous le changer hors les cas d’exclusion suivants:
• utilisation et destination autres que celles prévues dans la notice d’utilisation,
• installation non conforme à la notice,
• réparation effectuée par une personne ou un revendeur non agréé,
• défaut de présentation d’une preuve d’achat,
• manque d’entretien de votre produit,
• remplacement de toutes pièces d’usure (roues, parties en frottement...) en utilisation normale.
A partir de quand?
A compter de la date d’acquisition du produit.
Pour combien de temps?
24 mois consécutifs et non transmissibles, seul le premier acheteur en est l’unique bénéciaire.
Que devez-vous faire?
A l’achat de votre produit, vous devez impérativement garder votre ticket de caisse où gure la date d’achat. En cas de défaut, le produit
devra être rapporté dans le magasin d’achat.
G u A R A N T E E C E R T I f I C A T E
William Kent 1733 guarantees that this product complies with safety requirements as dened by the applicable regulations, and that it
had no design or manufacturing faults when purchased by the retailer. If, within 24 months of purchase by you, this product should reveal
any fault, subject to normal use as dened in the instructions for use, William Kent 1733 undertakes to repair it for you or to replace it,
subject to the following exclusions:
• use and purpose other than those indicated in the instructions for use,
• installation not in accordance with the instructions,
• repair carried out by a non-approved person or retailer,
• proof of purchase not presented,
• product not maintained,
• replacement of any parts subject to wear (wheels, areas which rub, etc.) during normal use.
From when?
From the date the product is purchased.
For how long?
For 24 consecutive months, non-transferable; only the rst purchaser benets from this.
What do you have to do?
After you purchase your product, you must keep the sales receipt showing the date of purchase. If a problem should arise, the product
must be taken back to the retailer from whom it was bought.
G A R A N T I E - z E R T I f I K A T
Garantie-Zertikat: William Kent 1733 garantiert Ihnen, dass dieses Produkt den Sicherheitsanforderungen gemäß der derzeit gültigen Ge-
setzgebung entspricht und zum Kaufzeitpunkt beim Fachhändler keinerlei Konzeptionsoder Fabrikations- Mängel aufweist. Sollten während
eines Zeitraumes von 24 Monaten nach dem Kauf trotz normalen Gebrauchs - wie in der Gebrauchsanweisung deniert - Mängel beim
Produkt auftreten, verpichtet sich William Kent 1733 das Produkt entsprechend zu reparieren oder es zu tauschen, außer in folgenden
Fällen:
• andereVerwendung oder Bestimmung als die in der Gebrauchsanweisung aufgeführten,
• Montage, die nicht der Gebrauchsanweisung entspricht,
• Reparatur, die durch eine nicht befugte Person oder einen nicht berechtigten Händler durchgeführt wurde,
• wenn kein Kaufbeleg (Kassazettel) vorgelegt werden kann,
• wenn das Produkt nicht entsprechend gewartet und gepegt wurde,
• Tauschen aller sich abnützenden Teile (Räder, reibendeTeile …) bei normalem Gebrauch.
Ab wann?
Ab Kaufdatum des Produktes.
Wie lange?
24 aufeinander folgende und nicht übertragbare Monate, ausschließlich der Erstkäufer ist der alleinige Nutznießer.
Was müssen Sie tun?
Nach Kauf des Produktes, den Kaufbeleg (mit lesbarem Kaufdatum) sorgfältig aufbewahren.
Beim Auftauchen eines Problems muss das Produkt zum entsprechenden Fachhändler, bei dem der Artikel gekauft wurde, zurückgebracht
werden.

Other William Kent Stroller manuals

William Kent DUO LYRA User manual

William Kent

William Kent DUO LYRA User manual

William Kent CANNE CITY User manual

William Kent

William Kent CANNE CITY User manual

William Kent CANNE HYDRA User manual

William Kent

William Kent CANNE HYDRA User manual

William Kent LYNX User manual

William Kent

William Kent LYNX User manual

William Kent DUO DELTA User manual

William Kent

William Kent DUO DELTA User manual

Popular Stroller manuals by other brands

Joovy Caboose 40X instruction manual

Joovy

Joovy Caboose 40X instruction manual

Dorel Maxi-Cosi Mura manual

Dorel

Dorel Maxi-Cosi Mura manual

Winther 448 Assembly instruction

Winther

Winther 448 Assembly instruction

Gilis Bebe Stars 192 user manual

Gilis

Gilis Bebe Stars 192 user manual

Delta Childrens Products 11308 instruction manual

Delta Childrens Products

Delta Childrens Products 11308 instruction manual

Graco Mosaic Owner's manuel

Graco

Graco Mosaic Owner's manuel

Peg-Perego GT3 Instructions for use

Peg-Perego

Peg-Perego GT3 Instructions for use

Special Tomato EIO Push Chair user manual

Special Tomato

Special Tomato EIO Push Chair user manual

Thomashilfen tRide product manual

Thomashilfen

Thomashilfen tRide product manual

Britax Steelcraft Agile SH908 user guide

Britax

Britax Steelcraft Agile SH908 user guide

Peg-Perego pliko p3 compact Instructions for use

Peg-Perego

Peg-Perego pliko p3 compact Instructions for use

Chicco Goody Instructions for use

Chicco

Chicco Goody Instructions for use

BOB SPORT UTILITY STROLLER Owner's instruction manual

BOB

BOB SPORT UTILITY STROLLER Owner's instruction manual

Nuna tavo child tray instructions

Nuna

Nuna tavo child tray instructions

Cosco US120 quick start guide

Cosco

Cosco US120 quick start guide

Chariot Carriers CADDIE owner's manual

Chariot Carriers

Chariot Carriers CADDIE owner's manual

Greentom classic manual

Greentom

Greentom classic manual

Nuna Tavo manual

Nuna

Nuna Tavo manual

manuals.online logo
manuals.online logoBrands
  • About & Mission
  • Contact us
  • Privacy Policy
  • Terms and Conditions

Copyright 2025 Manuals.Online. All Rights Reserved.