manuals.online logo
Brands
  1. Home
  2. •
  3. Brands
  4. •
  5. WINGNUT WINGS
  6. •
  7. Toy
  8. •
  9. WINGNUT WINGS DH.9a NINAK Post War User manual

WINGNUT WINGS DH.9a NINAK Post War User manual

Popular Toy manuals by other brands

FUTABA GY470 instruction manual

FUTABA

FUTABA GY470 instruction manual

LEGO 41116 manual

LEGO

LEGO 41116 manual

Fisher-Price ColorMe Flowerz Bouquet Maker P9692 instruction sheet

Fisher-Price

Fisher-Price ColorMe Flowerz Bouquet Maker P9692 instruction sheet

Little Tikes LITTLE HANDIWORKER 0920 Assembly instructions

Little Tikes

Little Tikes LITTLE HANDIWORKER 0920 Assembly instructions

Eduard EF-2000 Two-seater exterior Assembly instructions

Eduard

Eduard EF-2000 Two-seater exterior Assembly instructions

USA Trains EXTENDED VISION CABOOSE instructions

USA Trains

USA Trains EXTENDED VISION CABOOSE instructions

Modellbau Laffont Z1601 Assembly instructions

Modellbau Laffont

Modellbau Laffont Z1601 Assembly instructions

NOCH 12905 instruction manual

NOCH

NOCH 12905 instruction manual

Eduard Ki-61-Id quick start guide

Eduard

Eduard Ki-61-Id quick start guide

Viessmann Vollmer 45616 Mounting instruction

Viessmann

Viessmann Vollmer 45616 Mounting instruction

Vollmer 42004 Mounting instruction

Vollmer

Vollmer 42004 Mounting instruction

Phoenix Model CLASSIC-EP instruction manual

Phoenix Model

Phoenix Model CLASSIC-EP instruction manual

H-KING Sopwith Camel British WW1 Fighter instruction manual

H-KING

H-KING Sopwith Camel British WW1 Fighter instruction manual

MODSTER Predator 4x4 Crawler user manual

MODSTER

MODSTER Predator 4x4 Crawler user manual

DHK Hobby 8136 User instruction manual

DHK Hobby

DHK Hobby 8136 User instruction manual

THUNDER TIGER Raptor 50 V2 kit manual

THUNDER TIGER

THUNDER TIGER Raptor 50 V2 kit manual

Timberkits Skateboarder instructions

Timberkits

Timberkits Skateboarder instructions

Hangar 9 Funtana 125 Assembly manual

Hangar 9

Hangar 9 Funtana 125 Assembly manual

manuals.online logo
manuals.online logoBrands
  • About & Mission
  • Contact us
  • Privacy Policy
  • Terms and Conditions

Copyright 2025 Manuals.Online. All Rights Reserved.

www.wingnutwings.com
Richard Alexander 2015
e AMC DH.9a (Aircraft Manufacturing Company de Havilland 9a) bomber arrived late in the Great War and was born out of the
necessity to find a replacement for the under performing DH.9. Intended as a replacement for the 275-350hp Rolls Royce Eagle
powered DH.4, with the pilot and gunner repositioned closer together for improved communications, the DH.9 was in fact a great
leap backwards due in no small part to the inferior performance and unreliability of its 230hp Puma engine.
Due to the workload at AMC the initial design work for the improved DH.9a was undertaken by Westland Aircraft Works who
modified AMC built DH.9 C6350 to accept a 350hp Rolls Royce Eagle VIII engine in anticipation of the imminent arrival of the
plentiful 400hp Liberty V12 engine from America. With its larger wings and re-designed nose, C6350 started flight testing in
February 1918. e 2nd prototype, and the 1st to be fitted with a Liberty engine, was AMC built C6122 which took to the air on 19
April 1918. In July 1918 it appeared that the supply of Liberty engines could dry up so a 3rd prototype, Westland built B7644, was
produced to accept the 350hp Eagle VIII, but as it turned out the supply of Liberty engines proved to be enough for RAF needs.
Remarkably, an initial production order for 400 DH.9a was placed with the Whitehead Aircraft Co in January 1918, a month before
the 1st prototype flew. e DH.9a was manufactured by Whitehead, AMC, Mann Eggerton & Co and e Vulcan Motor &
Engineering Co as well as numerous rebuilds and small post war production orders from the likes of the de Havilland Aircraft Co,
Handley Page Ltd, HG.Hawker Engineering Co Ltd and Short Bros amongst others. An American order for 4000 USD-9A was placed
with the Curtis Aeroplane and Motor Company but was canceled due to the Armistice and it appears that only 13 USD-9A were built,
all prototypes. At least 2700 unlicensed copies were built in the newly formed Soviet Union as the Polikarpov R-1. Post war
developments (as provided in this model) included improved undercarriage, an auxiliary radiator, additional gravity petrol tank and
leading edge wing slats. Further developments included a raised 'hump back' fuselage and oleo suspension undercarriage.
e DH.9a ‘Ninak’ (Nin = 9, ack = A) entered front line service with the RAF and USMC in late 1918 and went on to lengthy post war
service with the RAF in Germany, Russia and the Middle East and saw service in Canada, Australia and in the Soviet Union and China
(as the Polikarpov R-1).
Early aircraft colours are contentious at the best of times and we have done our best to provide what we consider to be accurate
painting information. Towards the end of 1918 the RAF replaced PC10 with AMAPD (AMA Protective Dope) which contained
pigments giving a 'dark chocolate brown appearance' and AMAPDT (AMA Protective Dope Tropical) dark reddish brown for aircraft
destined for service in the tropics. In the 1920s most aircraft were silver doped overall with their aluminium engine cowlings
frequently unpainted. Steel components, fittings and brackets were usually painted black unless overpainted with silver. e
Polikarpov R-1 appears to have initially been finished overall in a pale finish (white or silver?) and later with a dark olive green
'zashchitnyi' (protective) finish on the upper surfaces and light blue-grey undersides. Almost all Polikarpov R-1 featured extensive
political slogans.
Handbook on the DH.9a Aeroplane, Air Ministry, 1924 - Schedule for DH.9a - Windsock International v20 #3 2004, Windsock
International v20 #4 2004 - Windsock Datafile 139 & 141, AMC DH.9a ‘Ninak’volume 1 & 2, John Alcorn 2010 - e DH.4/DH.9 File, Ray
Sturtivant & Gordon Page, Air Britain 1999 - de Havilland DH.9a (RAF 1918-30), Profile Publications, Chaz Bower 1973 - FliegerRevue
Extra #24, 2009 e Vintage Aviator Ltd - RAF Museum Hendon - 1914-18 Aviation Heritage Trust - Colin Owers - Private Collections
.303 (7.7mm) Vickers gun and 1 or 2 .303 (7.7mm) Lewis gun on Scarff ring. Up to 660lb (300kg) of bombs.
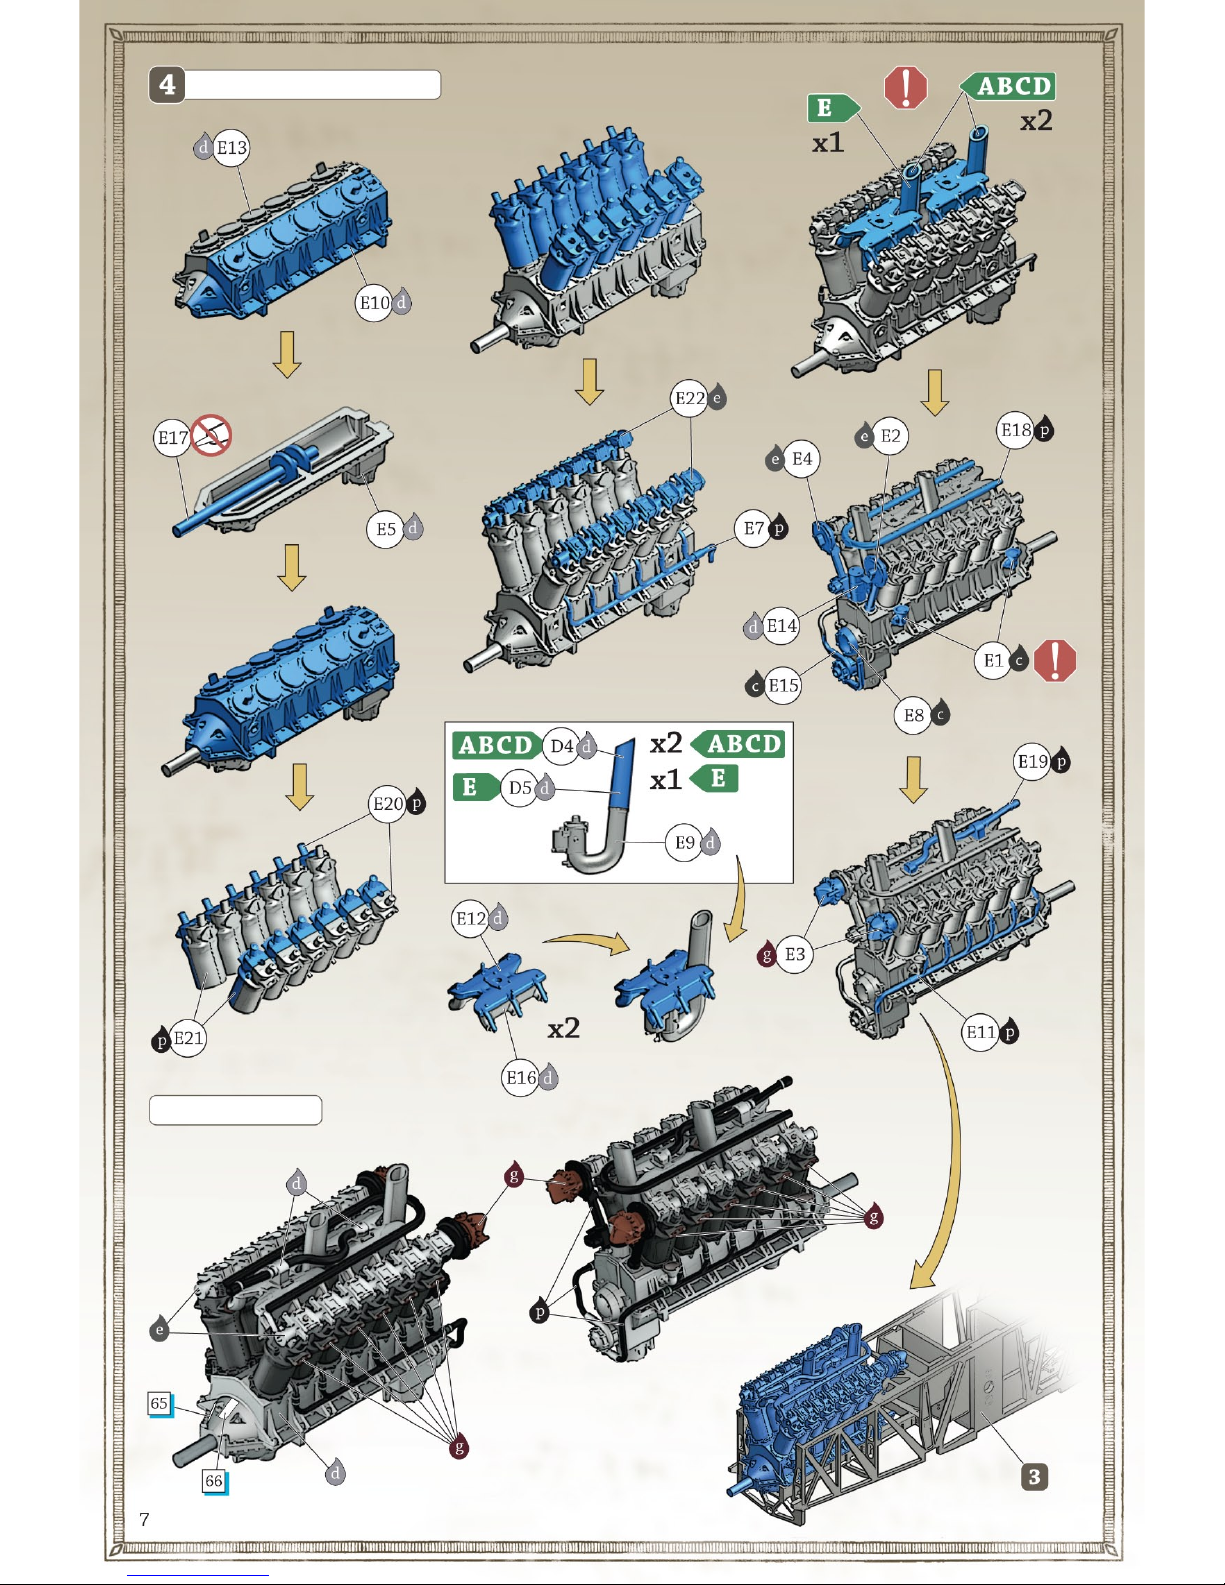
400hp Liberty V12
February 1918 to 1928
Approximately 2000
120mph (193kph)4815lb (2184kg)
30’ 3” (9.22m)
45’ 11” (14m)
18,000’ (5486m)
Wingspan: Length: Max Weight: Max Speed:
No. manufactured: Production: Engine: Ceiling:
Armament:
References:
Warning: Choking hazard. Keep small parts and plastic bags away from children. Use glue and paint in a well
ventilated area. Always wear protective eyewear when cutting and a protective mask when painting,
gluing and sanding. Do not breathe dust from polyurethane resin parts (if included).
Beware of sharp edges on metal parts.
Assembly: Read all the instructions carefully before starting assembly. Use glue intended for plastic models.
Assemble metal and resin parts (if included) using Cyanoacrylate (CA) or epoxy glue.
Before assembly select a marking option and note optional parts required in instructions.
Rigging: If installing rigging please drill out all location holes with a 0.5mm drill bit to a depth of at least 1mm.
Painting: Only use paints designed and suitable for plastic model kitsets.
Decals: Cut out each decal as required. Soak in warm water for 15 seconds. Slide off backing paper onto gloss painted
surface of model (not just clear coated plastic). For large decals it is helpful to apply a drop of water to the
area they are being applied to. is will make it easier to maneuver them into the correct position.
Hints & Tips: Please visit our website for additional photos, hints and tips to assist you in getting the best result from
your Wingnut Wings model.
Part Number
Photo Etch Part
Decal
Paint Colour
Attention
Do Not Cement Drill
Other Side
Option
Cement For Metal
Choose Remove
Construction Step
Federal Standard
HumbrolTamiya
All colours
a
b
c
d
e
f
g
h
i
j
k
l
m
n
o
p
q
r
s
33481
30045
30219
26405
35164
36314
34095
30111*
35042
30340*
11350
54
12
27004
27001
27003
74
113
62
121
106
65
11(x1) + 34(x1)
160(x1) +121(x2)
102
98*
85
66
93*
60
X31
XF6
X10
XF16
XF56
XF60
XF9
XF52
XF55
XF82
XF12
XF16(x2) + XF19(x1)
XF9(x1) + XF55(x2)
XF67
XF68*
X18
XF69
XF78*
XF7
Brass
Copper
Gun Metal
Aluminium
Steel
Mustard Yellow - matt
Rust
Leather - semi gloss
Clear Doped Linen (CDL) - semi gloss
Battleship Grey - semi gloss
Grey-Blue - semi gloss
Aluminium Dope - gloss
Red Oxide Primer bled through linen - matt
Zashchitnyi Olive Green - semi gloss
Dark Wood* - semi gloss
Black - semi gloss
Rubber - matt
Light Wood* - semi gloss
Red - matt
Note: Apply clear varnish to achieve the desired gloss or semi-gloss finish. *See our website hints and tips for painting wood.
H
G
D x2
E
C
F
JR x2
Decals
Photo Etch
BA
COCKPIT Pilot’s control
column
Observer’s
rudder bar
Pilots rudder bar
Paint fuel
tank bag
Observer’s
control column
not always fitted
Grease pump for
Constantinesco (CC)
synchronizing system
Pilot’s throttle
Tailplane
elevating gear
Observer’s
throttle
Paint metal
brackets & fittings
Very flare pistol
Radiator
shutter lever
Lewis gun
magazine
Lewis gun
magazine
COCKPIT continued
Paint leather padding
Pilot’s seat
Accumulator
(battery)
Engine ignition
switch
Remove
Instrument
board lamp and
electrical wire.
Pattern 253
compass
Compass
Instrument board
Safety belts
Optional camera
Paint camera knobs
RAF Mk.II
Compass Paint
padding
Instrument board detail from F1010 after full restoration to
WW1 specifications. Note that post war instrument panels were
noticeably different.
Pilot’s seat, throttle and tailplane elevating gear details.
Note the aluminium magazine for Vickers ammunition.
Control column with firing handle for the Vickers. Note
the bomb sighting hole in the floor.
Observer’s throttle , seat and Lewis gun ammunition
drums . Note the interior colour of the linen fuselage
covering.
Observer’s windshield storage detail and empty hole for his
RAF Mk.II compass.
Accumulator (battery), grease
pump for the Constantinesco
(CC) Vicker gun synchronizing
system and empty bracket for
the Very flare pistol. e switch
board controlled the instrument
board lights.
ENGINE BAY
Paint metal
brackets and fittings
PAINTING GUIDE
Note detail this
side only
RIGGING GUIDE
Engine bearers
Rigging material not supplied
LIBERTY V12 400hp ENGINE
PAINTING GUIDE
is side only
Prop shaft
Sump
Crank case Camshafts &
rocker boxes
Water
pipe
Tube for spark
plug leads
Water
pipe
Water
pipe
Magnetos
Cylinders
Intake
manifold
Carburettor
FUSELAGE
PAINTING GUIDE
Paint interior of the same as
Lewis gun
magazines
Drill holes for
generator mount
Drill holes for
Polikarpov R-1
Vickers gun
fittings
Drill holes for external
cable fairing
Remove starboard
foot step details
Lewis gun magazines
Remove stitching detail
Remove stitching
detail Remove starboard
foot step details
Updated stitching detail
Cut
hole for
storage
locker
FUSELAGE continued
Radiator
pipe
Petrol pumps
Aldis sight
Cover for CC
grease pump
Petrol gauges
Drill hole for
Aldis sight
mount
External
cable fairing
> Late model DH.9a fuselage under
construction at AMC clearly showing the
extended ply area near the tail and if you
look closely in the bottom left corner you
can see the cowling top cover for the
petrol tank. Hopefully someone will be
inspired to model this scene with their
model and we look forward to seeing it.
Aldis sight