manuals.online logo
Brands
  1. Home
  2. •
  3. Brands
  4. •
  5. Winplus
  6. •
  7. Automobile Accessories
  8. •
  9. Winplus AC54870 User manual

Winplus AC54870 User manual

AC54870
User Manual
12V CAR JUMP STARTER
& Portable Power Bank
Have a comment or question? Email us at:[email protected]
or visit us online at www.winplus.com
820 South Wanamaker Avenue, Ontario, CA 91761 | Tel: 866-294-9244
© 2015 Winplus North America Inc. All Rights Reserved.
®
ML-54870_V1
PROP 65 WARNING: This product contains lead, a chemical known to the
state of California to cause cancer, birth defects or other reproductive harm.
PACKAGE CONTENTS
PRODUCT SPECIFICATIONS
Power Level Indicator Lights
Jump Start Socket
Power Button
LED Flashlight
USB 5V Output
12V 1A Input
Power Bank
3 in 1 Mobile Phone Charging Cable
AC Power Adaptor
12V Power Adaptor
Jumper Cable
User Manual
Product Dimensions: 5.16 x 2.95 x 0.98 inch (131 x 75 x 25 mm)
Product Weight: 1.1 lbs (500g)
Capacity: 8000 mAh
Input: 12V 1A
Output: USB2.0; 5V 2A; 12V for car jump starter
Charging Time: 3 hours
Starting Current: 200A
Peak Current: 400A
Operating Temperature: -4ºF ~ 140ºF (-20ºC ~ 60ºC)
OPERATION
To charge your Power Bank
At home:
1. Plug the AC Power Adaptor into any 120V outlet.
2. Connect the DC plug into the 12V 1A input port on the Power Bank.
In Car:
1. Plug the 12V car adaptor into the 12V socket.
2. Connect the DC plug into the 12V 1A input port on the Power Bank.
To use ashlight
Press the power button for 3 seconds to start the LED illumination.
You can then select from 3 modes (On/Strobe/SOS) by pressing the power
button lightly in sequence.
To power your mobile devices
1. Plug the mobile connector cable into the USB 5V 2A output port on
the Power Bank.
2. Select the appropriate connector cable for your mobile phone or tablet
and connect it to your device. The product will identify and charge the
electronic device automatically. The power level indicator lights will be on
when charging.
3. You may also use your original manufactuer's USB cable that came with
your device.
Power Level Indicator Lights
Press the power button to check the capacity of the Power Bank
When charging, the indicator lights will ash one by one. The number of
solid lights indicates the battery capacity. When all the indicator lights are
solid then the Power Bank is fully charged.
To jump start the vehicle battery, proceed as follows:
Jumper cables are color coded, RED for POSITIVE (+)
and BLACK for NEGATIVE (-). DO NOT mix up the cables
or allow the metal ends to touch together because this
may damage the battery, charging system and/or
electronics on a vehicle.
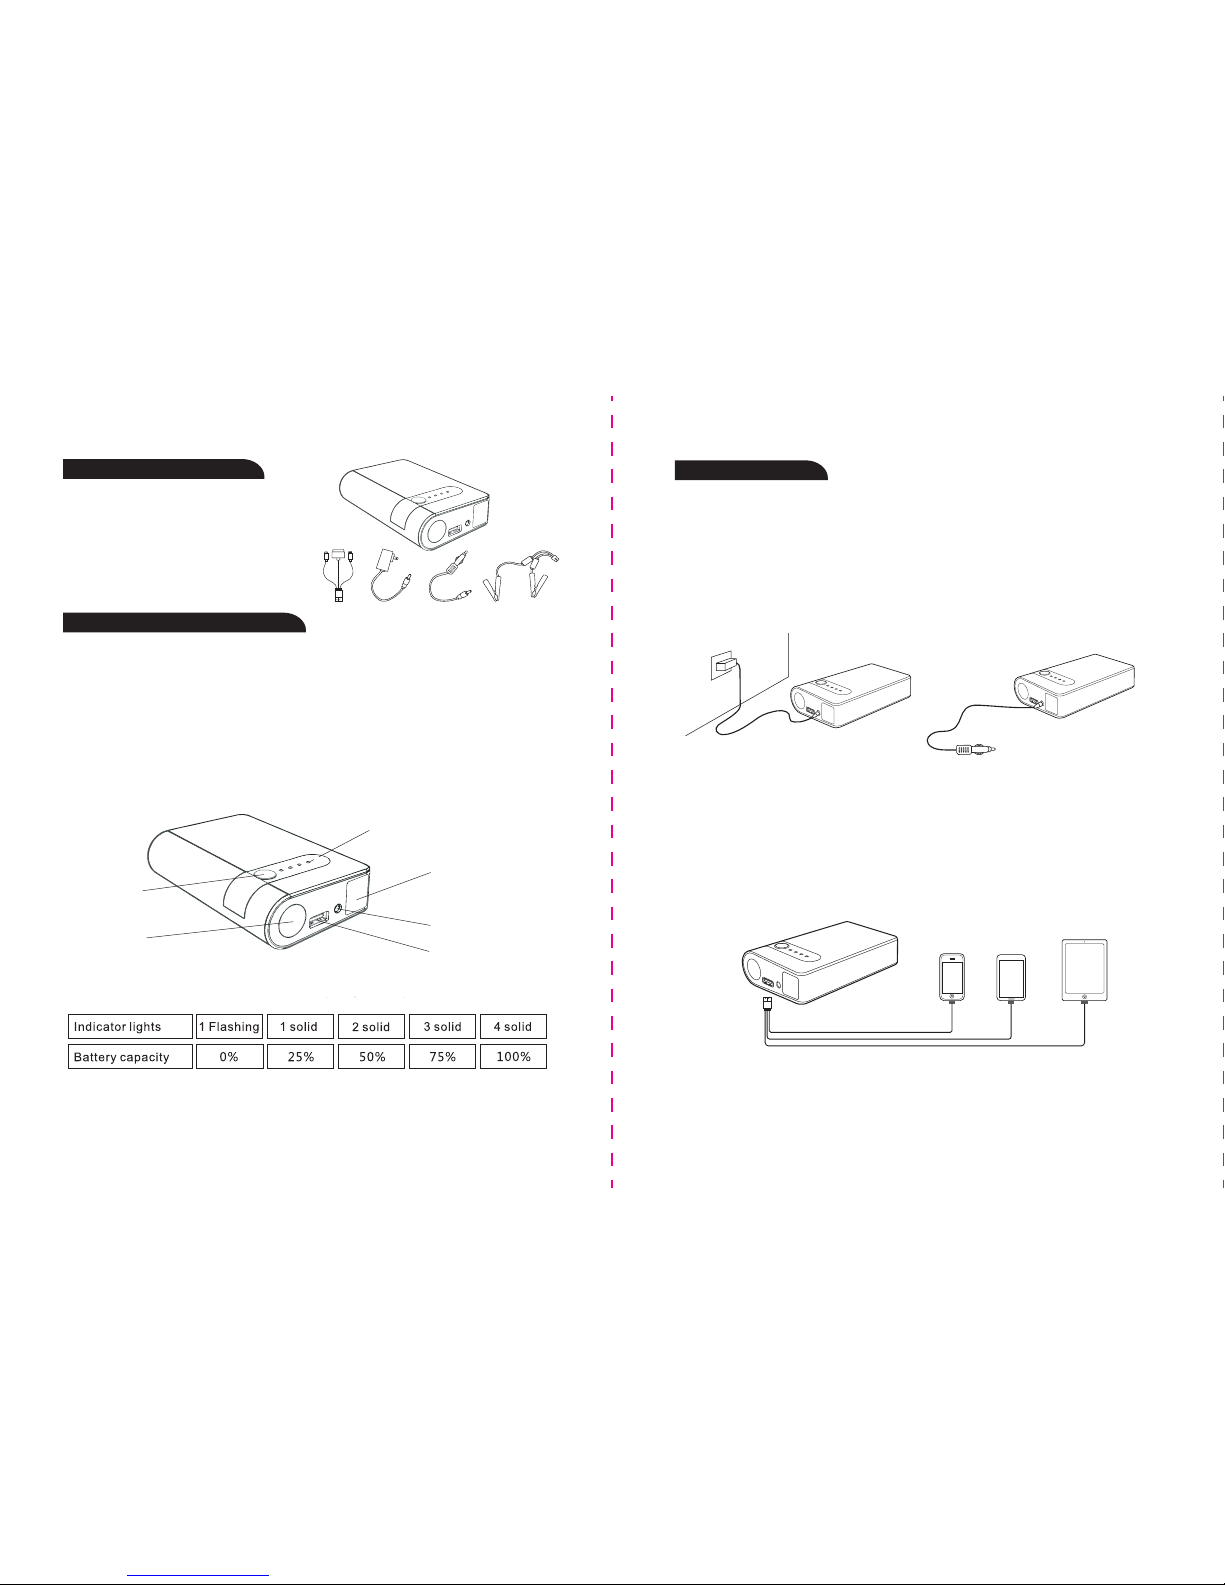
1. Press power button on the power bank once and check that the power
level indicator is 3 lights or higher. Do not connect the jumper cables to
the power bank at this time.
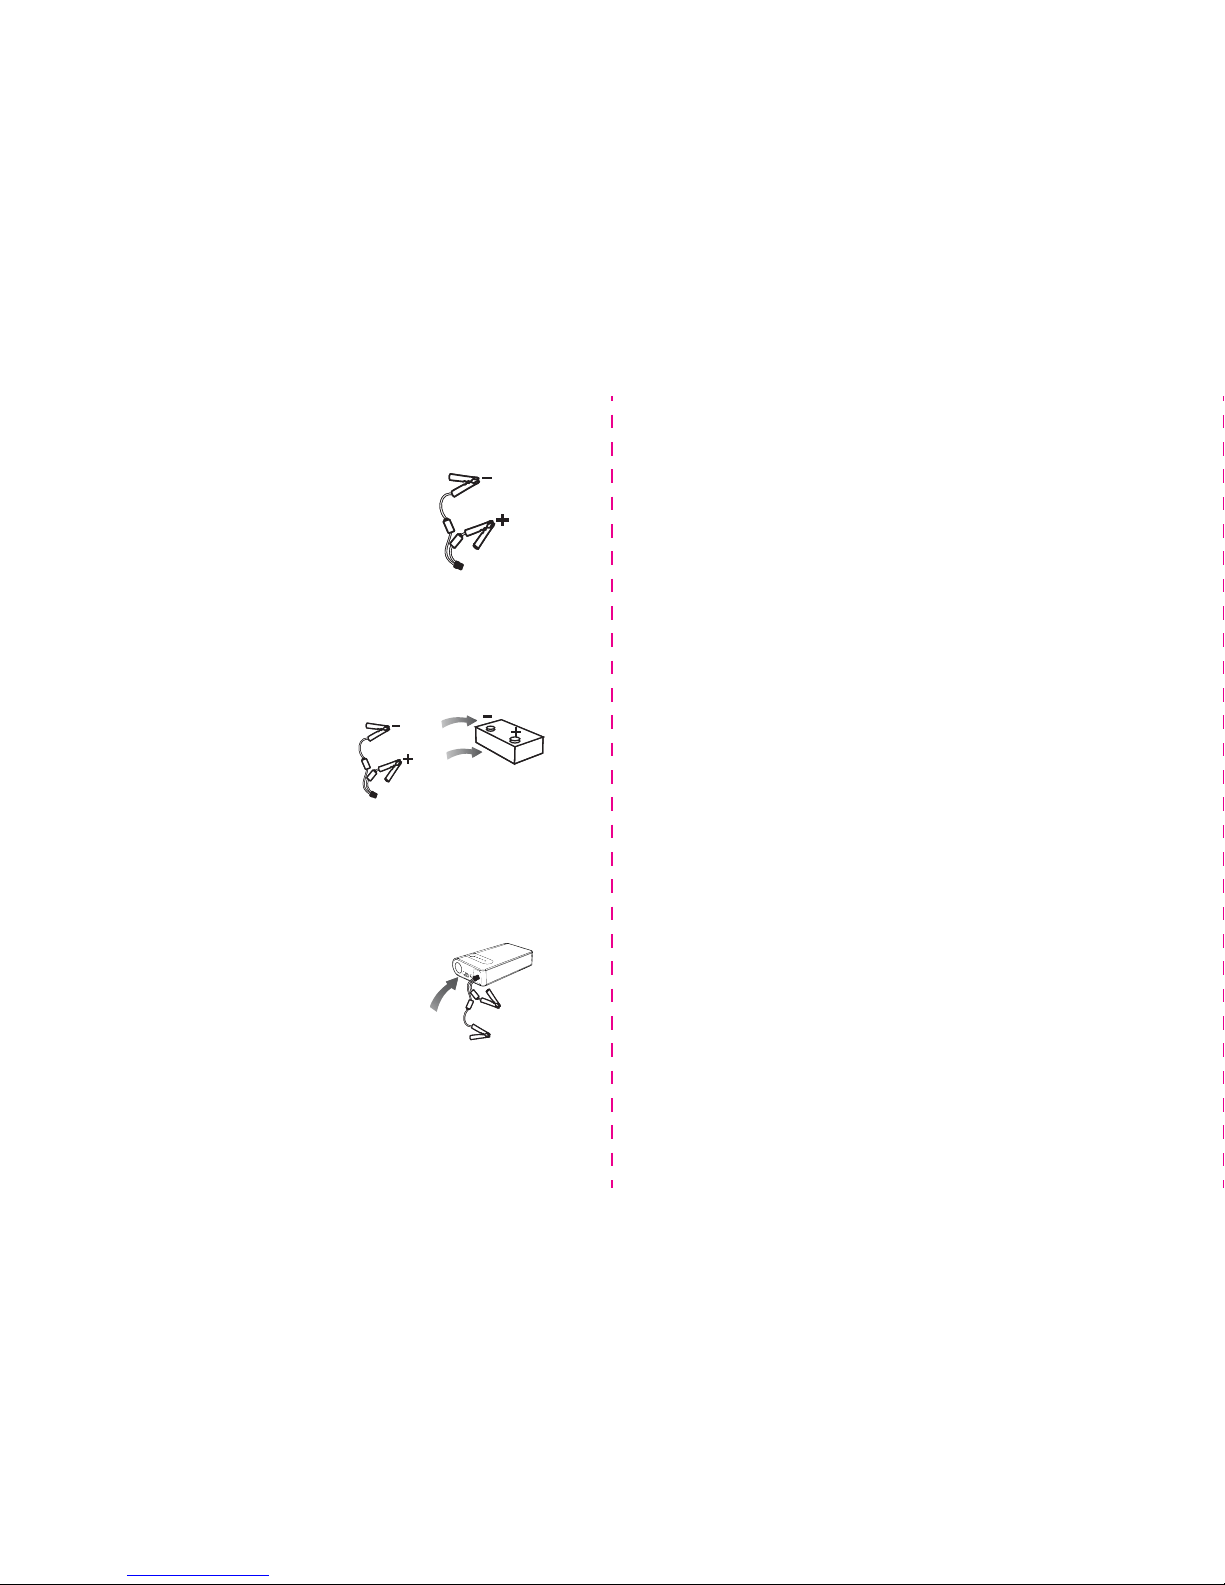
2. Clamp the RED jumper cable to the POSITIVE (+)post on the dead battery.
The POSITIVE battery post will be slightly larger than the NEGATIVE post,
and will be marked with a PLUS (+) sign. There may also be a RED plastic
protective cover over the positive battery post.
3. Clamp the BLACK jumper cable to
the NEGATIVE (-) post on the dead battery.
The NEGATIVE will be marked with a
MINUS (-) sign. There may also be a
BLACK plastic protective cover over
the negative battery post.
NOTE: Do not connect the red clamp (+) and the black clamp (-) at the same time.
NOTE: On some vehicles the battery is not easily accessible (because it is
located inside a fender panel, trunk, etc.), so there may be special jumper
connections in the engine compartment for jump starting the vehicle.
Reference your vehicle user manual for details.
CAUTION: DO NOT lean directly over the battery while making jumper
connections.
4. Take the BLUE end of the jumper cable and plug it into
the power bank jump start socket which is located
underneath the black cover.
5. The power bank will automatically power on.
6. Now you can start the vehicle. If it does not crank or cranks
very slowly, wiggle the jumper connections to make sure they are
making good contact. Then try again. The engine should start if there
are no other problems (such as a bad starter or ignition circuit problem).
Do not attempt to jump start the vehicle more than 3 times from the Power
Bank. If the vehicle fails to start then it is likely that there is an alternative reason.
7. As soon as the engine starts, disconnect both jumper cables within 30
seconds. First remove the RED/POSTIVE end and then the BLACK/NEGATIVE
clamp. Do not allow the metal ends of the jumper cables to touch each
other or the RED cables to touch anything metal on the car.
• You can also unplug the BLUE end of the jumper cable from the power bank.
Now you can safely remove the RED and BLACK jumper cable clamps from
the vehicle battery. In 10 seconds the power bank will power o automatically.
8. Keep the engine running 20 to 30 minutes, or drive the car to recharge
the battery.
NOTE: If the engine dies shortly after it has been jump started, or as soon
as the jumper cables are disconnected, it probably means the vehicle
charging system is not working (bad alternator, voltage regulator, wiring
problem or loose/dirty battery cables). Please seek professional help.
WARNING:
• Always wear safety glasses when jump starting a battery (to protect your
eyes), and gloves when handling a battery (to protect your hands).
• When jump starting a vehicle please ensure that the blue plug is securely
tted into the jump start socket on the Power Bank.
• Ensure the battery clamps are connected correctly, and the connectors
are free from rust and dirt.
• Do not allow this product to become wet.
• Do not immerse the product in water.
• Do not operate the product in explosive atmospheres, such as in the
presence of ammable liquid, gas or dust.
• Do not modify or disassemble this product.
• Do not store in locations where the temperature may exceed 140ºF (60ºC).
• Charge only using the charger provided.
• Under extreme heat conditions, battery leakage may occur. Avoid contact
with your skin. In case of skin or eye contact, rinse immediately with
clean water and seek medical attention.
BATTERY DISPOSAL
The battery is self-contained and not consumer replaceable. The battery
must be disposed of properly when it no longer holds a charge. Proper
charging practices will increase the life of the product. For Information on
battery recycling, call toll-free 800-822-8837.
Black
Red
Black
Red
WARRANTY
WINPLUS NORTH AMERICA
LIMITED WARRANTY
Winplus North America warrants, to the original purchaser, that its
products are free from defects in material and workmanship for 1 year
from the date of original purchase. Where permitted by law, Winplus North
America’s liability shall be limited to that set forth in this limited express
warranty. This limited express warranty shall be the exclusive remedy of
the purchaser and Winplus North America makes no other warranty of any
kind aside from the limited express warranty stated above.
NOTE: Warranty only applies for North American customers of purchases
made in North America.
CONDITIONS OF WARRANTY
If during the 1 year warranty period your new product is found to be
defective, Winplus North America will repair such defect, or replace the
product, without charge for parts or labor subject to the following
conditions:
1. All repairs must be performed by Winplus North America.
2. All warranty claims must be accompanied by a copy of the sales receipt
or bill of sale.
3. The equipment must not have been altered or damaged through
negligence, accident, improper operation, or failure to follow the
product instructions for installation, use, or care.
4. The replacement of parts is excluded from the warranty when
replacement is necessary due to normal wear and tear.
5. Repair or replacement parts supplied by Winplus North America under
this warranty are protected only for the unexpired portion of the
original warranty.
6. This is a “repair or replace” warranty only, and does not cover the costs
For information regarding air travel safety with batteries please reference
this website by the U.S. Department of Transportation:
http://phmsa.dot.gov/safetravel/batteries
Note: This 12V Car jump starter and portable power bank contains the
equivalent of 2.4g of lithium and gives 30 watt hours of power.
incurred for the installation, removal or reinstallation of the product, or
damage to any mobile phone, electronic device or vehicle.
OWNER’S RESPONSIBILITIES:
Winplus North America will make every eort to provide warranty service
within a reasonable period of time. SHOULD YOU HAVE ANY QUESTIONS
ABOUT SERVICE RECEIVED OR IF YOU WOULD LIKE ASSISTANCE IN
OBTAINING SERVICE, PLEASE CALL TOLL FREE 1.866.294.9244
DURING REGULAR BUSINESS HOURS MONDAY THROUGH FRIDAY 9:00 AM
TO 5:00PM (Pacic Standard Time). For customer service and technical
support, please call us at 1.866.294.9244 or email us at
[email protected]om. If at that time it is determined that a
replacement unit is needed, the support representative will issue a Return
Authorization and instruct on how to get a new unit. Winplus North
America makes no other warranty of any kind aside from the limited
express warranty stated herein.
DISCLAIMER OF WARRANTIES, INCLUDING WARRANTY OF MERCHANT-
ABILITY AND WARRANTY OF FITNESS FOR PARTICULAR PURPOSE: EXCEPT
AS SPECIFICALLY SET FORTH HEREIN, NO WARRANTY OR REPRESENTA-
TION, EXPRESS OR IMPLIES, IS MADE AS TO THE CAR JUMP STARTER
EXCEPT AS EXPRESSLY SET FORTH HEREIN, WINPLUS NORTH AMERICA
AND/OR ITS AFFILIATES EXPRESSLY DISCLAIMS, WITHOUT LIMITATION,
ANY STATUTORY WARRANTIES AND ALL IMPLIED WARRANTIES, INCLUD-
ING ANY IMPLIED WARRANTY OF MERCHANTABILITY OR FITNESS FOR A
PARTICULAR PURPOSE.
Winplus North America and/or its aliates are not responsible for a user’s
intended or actual use of the Car Jump Starter. In no event shall Winplus
North America and/or its aliates have any liability for any losses (whether
direct or indirect, in contract, tort or otherwise) incurred in connection
with the Car Jump Starter, including but not limited to damaged property,
personal injury and/or loss of life. Neither shall Winplus North America
and/or its aliates have any liability for any decision, action taken based
on relying on the stability or performance of the Car Jump Starter.
Winplus North America and/or its aliates, the manufacturer, distributor
and seller shall not be liable for any injury, loss or damage, incidental or
consequential, arising out of the use or intended use of the product.

Other Winplus Automobile Accessories manuals

Winplus 3.5 VEHICLE BACKUP CAMERA WIRELESS SYSTEM User manual

Winplus

Winplus 3.5 VEHICLE BACKUP CAMERA WIRELESS SYSTEM User manual

Winplus TypeS BT56883 Guide

Winplus

Winplus TypeS BT56883 Guide

Winplus Yada Blind Spot Assist System User manual

Winplus

Winplus Yada Blind Spot Assist System User manual

Winplus AutoXS AU170023 User manual

Winplus

Winplus AutoXS AU170023 User manual

Popular Automobile Accessories manuals by other brands

Mottez A021P2 Fitting instructions

Mottez

Mottez A021P2 Fitting instructions

Webasto Telestart T70 installation instructions

Webasto

Webasto Telestart T70 installation instructions

Vigia NM343 manual

Vigia

Vigia NM343 manual

Connects2 CTUJP01 instruction manual

Connects2

Connects2 CTUJP01 instruction manual

APS iBoard IB-R001 manual

APS

APS iBoard IB-R001 manual

BGS technic 9694 manual

BGS technic

BGS technic 9694 manual

Volvo 31359397 Installation instructions, accessories

Volvo

Volvo 31359397 Installation instructions, accessories

Havis C-DMM-3015 installation instructions

Havis

Havis C-DMM-3015 installation instructions

Beeper REC110X-N User& installer's manual

Beeper

Beeper REC110X-N User& installer's manual

travall TDG 1535D FITTING INSTRUCTION

travall

travall TDG 1535D FITTING INSTRUCTION

COVERKING DG1214 owner's manual

COVERKING

COVERKING DG1214 owner's manual

Lippert Components COACH STEP Installation, operation and service manual

Lippert Components

Lippert Components COACH STEP Installation, operation and service manual

RSI SMARTCANOPY Assembly instructions

RSI

RSI SMARTCANOPY Assembly instructions

Evenflo Secure Kid owner's manual

Evenflo

Evenflo Secure Kid owner's manual

CARID G3 68.013 Fitting instructions

CARID

CARID G3 68.013 Fitting instructions

Dynojet Power commander V installation instructions

Dynojet

Dynojet Power commander V installation instructions

Directed Directechs DB3 installation guide

Directed

Directed Directechs DB3 installation guide

Acdeos AXS FL manual

Acdeos

Acdeos AXS FL manual

manuals.online logo
manuals.online logoBrands
  • About & Mission
  • Contact us
  • Privacy Policy
  • Terms and Conditions

Copyright 2025 Manuals.Online. All Rights Reserved.