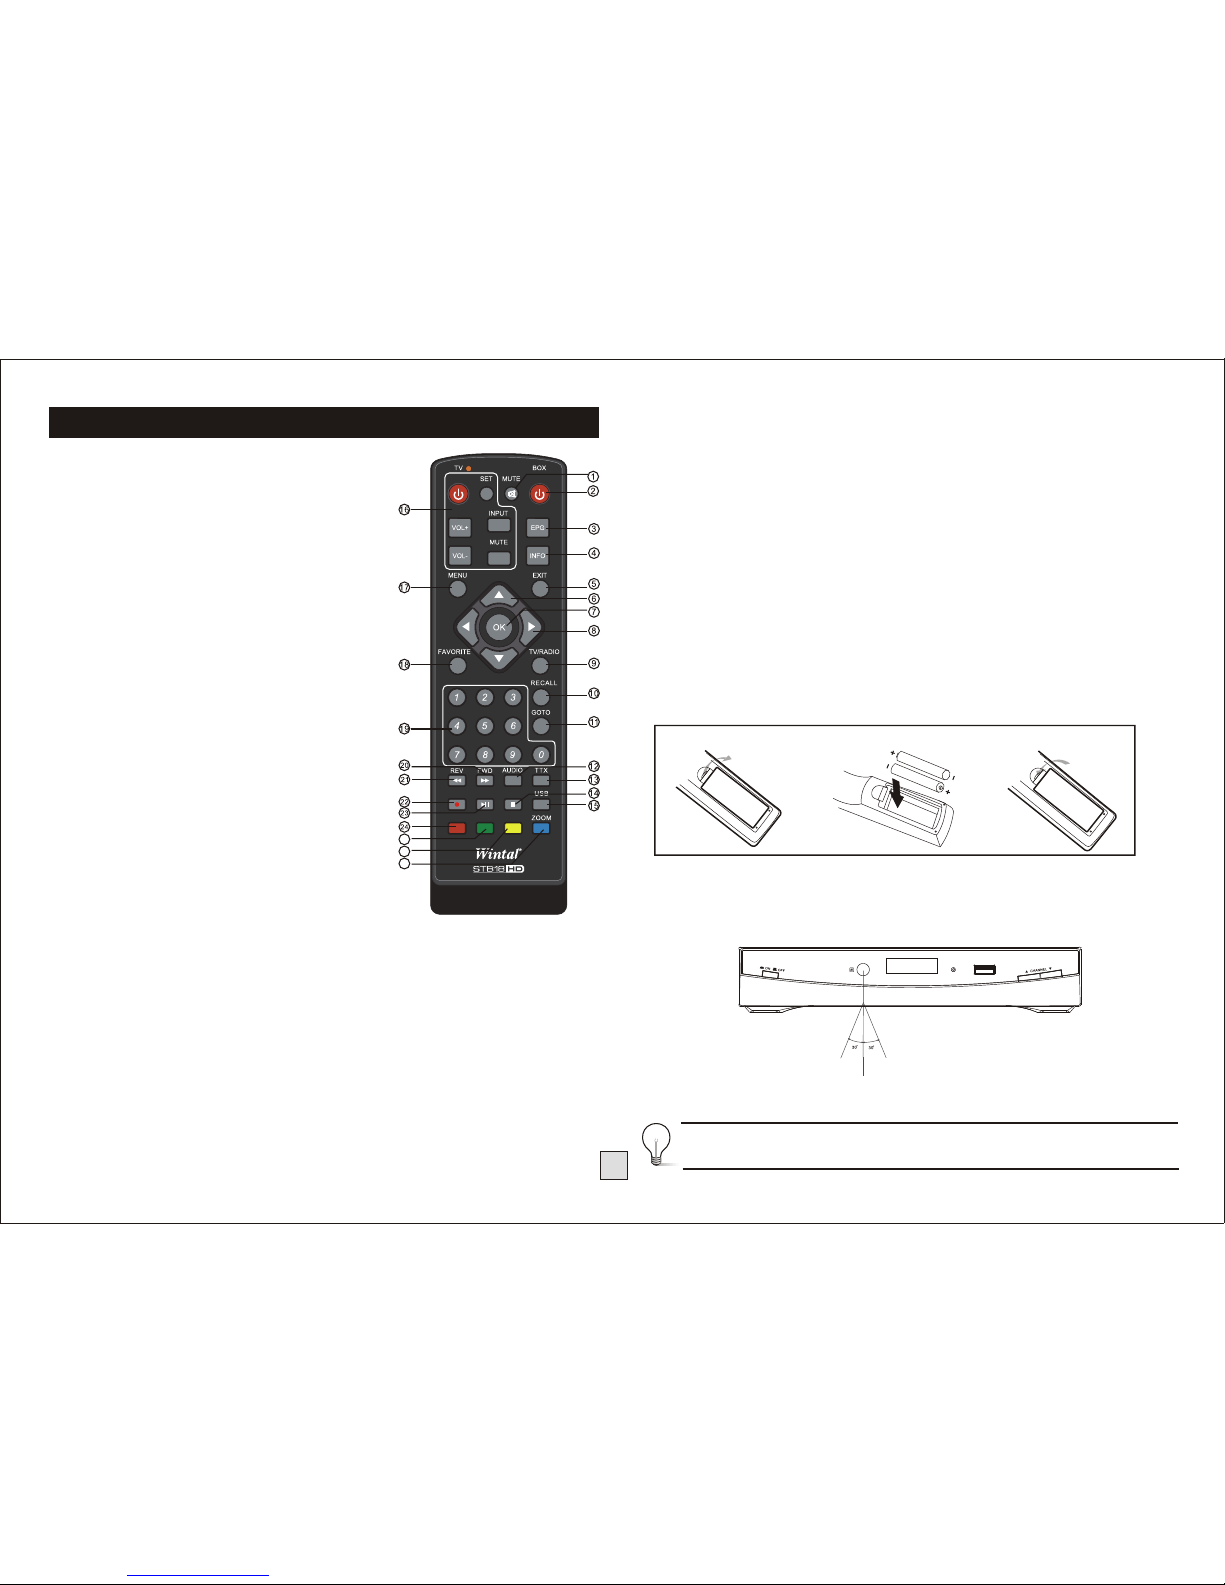
Wintal STB18HD User manual

User Manual
Please read this User Manual carefully to ensure proper use of this product and keep this manual
for future reference.
STB18HD
High Definition Digital Set Top Box
With Recording Via USB

1) Read theseinstructions.
2) Keep theseinstructions.
3) Heed allwarnings.
4) Follow allinstructions.
5) Do notuse this apparatusnear water.
6) Clean onlywith dry cloth.
7) Do notblock any ventilationopenings, install inaccordance with the
instructions.
8) Do notinstall near anyheat sources suchas air conditioners, stoves, or
other apparatus (includingamplifiers) that produceheat.
9)
onvenience receptacles, andthe point wherethey exit fromthe
apparatus.
11) Onlyuse attachments/accessories specifiedby the manufacturer.
12) Unplug thisapparatus and itsantenna connections beforethe approach
of lightning stormsor when unusedfor long periodsof time.
13) Refer allservicing to qualifiedservice personnel. Servicingis required
when the apparatushas been damagedin any way, such aspower-supply
cord or plugis damaged, liquidhas been spilledor objects havefallen into the
apparatus, the apparatushas been exposedto rain ormoisture, does not
operate normally,or has beendropped.
14) The mainsplug is usedas the powerdisconnect device, andthe disconnect
device shall remainreadily operable.
15) Ventilationshould not beimpeded by coveringthe ventilation openings
with items suchas newspapers, table-cloth,curtains, etc.
16) No nakedflame sources, suchas lighted candles,should be placedon or
near the apparatus.
17)
18) This deviceis not warrantedfor use inunreasonably hot, cold,or humid
environments
19) The apparatusshall not beexposed to drippingor splashing, andno
objects filled withliquids, such asvases, shall beplaced on ornear the
apparatus.
20) This deviceis designed forindoor, fixedlocation use only.
It must notbe used inportable or mobileapplications as vibrationor excessive
forces may causedamage.
Ensure mains plugfits correctly inits socket. Poorconnection can result
in picture interferenceand potential safetyhazards.
10) Protect thepower cord frombeing walked onor pinched particularlyat
plugs, c
Your attention is drawn to the environmental aspects of battery disposal.
Important Safety Instructions
This symbol indicates that there are important operating and
maintenance instructions in the literature accompanying this unit.
This symbol indicates that dangerous voltages constituting a risk of
electric shock are present within this unit.
This symbol indicatesthat this productincorporates double insulation
between hazardous mainsvoltage and useraccessible parts.
When servicing, useonly identical replacementparts.
CAUTION:
If the apparatushas been involvedin an electrostaticevent, it may
malfunction and needto be resetby the user. Remove the mains power
lead from thewall socket forseveral minutes, thenre-apply mains
power. You may needto re-scan theTV channels andcheck that any
programmed events (eg.PVR recording) havebeen correctly retained.
WARNING:
When using aUSB memory stickwith this unit,it should beplugged
into the unitdirectly. USBextension cables orhubs should NOTbe
used, to avoiddata transfer errorsor interference causedto TV
reception.
WARNING:
Toreduce the riskof fire orelectric shock, donot expose thisapparatus
to rain ormoisture.

Table of Contents
1
1. Front panel
2. Rear panel
1
2
3
4
6 COMPONENT VIDEO OUT:
8
RF IN : This socket connects to your external TV antenna.
RF LOOP THROUGH: This socket will feed through the TV RF signal to
either your TV or another video system.
COAXIAL: This RCA socket connects to the Coaxial digital audio input
socket on your surround sound system.
HDMI:
These three RCA sockets connect to your TV
component video input terminals.
7
MAINS CABLE: This is used to connect to your mains power supply.
High definition audio and video output used to connect to an HDMI
equipped device (eg. flat screen TV).
5VIDEO: This RCA socket outputs a composite video signal.
AUDIO L/R: These RCA sockets output Analog Audio L/R signals.
Front and Rear Panel
100-240V~
50/60Hz
12345678
Front and RearPanel.............................................................................1
Remote Control.....................................................................................2
Connecting to aTelevision......................................................................3
Connecting to a DVD Recorder or VCR....................................................3
Connecting to an Audio System..............................................................4
First Time Installation.........................................................................4-5
Menu settings....................................................................................5-9
Electronic Program Guide (EPG)............................................................6
USB Personal VideoRecorder (PVR)..................................................9-11
Troubleshooting..................................................................................12
Technical Specifications......................................................................12
1 POWER BUTTON:Used to turn on/off the mainpower supply.
2 STANDBYINDICATOR: Used to visually show power state of the set top
box, the LEDwill turn redif the set top box enter standby mode.
3
4 REMOTE CONTROL SENSOR: Used to receive the signal from the remote
control.
5 USB:
6 CHANNEL UP/DOWN: Used to change channels without using the remote
control.
LED DISPLAY WINDOW: Used to display channel number.
Data input fromUSB storage devices.

REP
REC.LISTSUB SCH
2
Installing the Batteries
Remove the battery cover from the and put 2xAAAsize
batteries inside the compartment. Alkaline batteries are recommended for
longer life.
The diagram inside the Battery Compartment shows the correct way to
install the batteries.
Remote Control
OPEN
CLOSE
1.Open the cover 2.Install batteries 3.Close the cover
Using the Remote Control
Touse the Remote Control, point it towards the front of the Digital Set Top Box.
The Remote Control has a range of up to 5 metres from the Set Top Box at an
angle of up to 60 degrees.
The Remote Control will not operate if the path between it and the Set Top Box
is blocked.
Sunlight or very bright light will decrease the sensitivity and reduce
the range of the Remote Control.
Remote Control
1. MUTE: Mute or Restore Audio Output.
2. STANDBY: Switch the product to on or standby.
3. EPG: (Electronic Program Guide)Turns on the
program guide menu.
4. INFO: Displays additional channel or video
information.
5. EXIT:Exits the current Menu or returns tothe
previous Menu
6. UP / DOWN: Navigates through the Menus.
Selects the next or previous Channel.
7. OK: Confirms an entry or selection.
Displays the list of channels.
8.RIGHT / LEFT: Navigates through the Menus.
Increases or decreases volume.
9. TV/RADIO: Togglebetween TV and RADIO mode.
10. RECALL: Used to switch between the last two
viewed channels.
11. GOTO: Selects the play time of media.
12. AUDIO: Selects an Audio Language orAudio
Mode.
13. TTX:
14. STOP: Stops media play.
15. USB:
16. LEARNING FUNCTION MANUAL:
(1). Press and hold the(SET) key for2 seconds,
enter the learning mode when the LED turns ON.
(2).Press the learning button, you will bein the learning
mode when the LED light is blinking.
(3).Put two transmitting tube focus at eachother with same level in 10 mm distance,
press the button of thelearnt one foranother 1 second, then release it.
(4).After learning successful, LED light will keepstayingON after flashed 3 times
rapidly. You can choose another button to changethe mode.
(5).If you want learn other function. repeatstep from 2 to 4.
(6).Press(SET) button to save and exit learningmode after completion, LED light will
turn OFF.
17. MENU: Turns on Main Menu.
18.FAVOURITE:Turns on Favourite Menu.
19.0-9 (Numeric Buttons): Selects a channel or setting.
20. FWD: Searches forwards during media playback.
21. REV: Searches backwards during media playback.
Displays TeletextInformation.
Data input from USB storage devices.
22. REP/
23. PLAY/PAUSE: Starts or resumes media playback; Pauses mediaplayback.
24. SUBTITLE: Selects Subtitles Language.
25. REC.LIST:
26. SCH: Show View/Record schedule list.
27. ZOOM: Zoom in or zoom out viewing area.
REC: Used to record the program.
Displays a list of recorded programs onthe currently connected USB
drive.
Selects Repeat or turns off Repeatmode;
25
26
27

3
Connecting to a DVD Recorder or VCR
Connecting to a Television
For a basicconnection from thisSet Top Box to your television, use the
Composite video connectionoutlined below.
For a higherquality connection, usethe Component Videoconnection
outlined below combinedwith the L/RAudio outputs.
For the highestquality connection usea direct HDMIconnection, see below.
TV Antenna
100-240V~
50/60Hz
TV Antenna
Cr
Cb
Component video Composite video and audio
HDMI
YELLOW
VIDEO IN
(Audio) (Video)
100-240V~
50/60Hz
ALLOWS THE RECORDER TO
RECORD DIFFERENT TVCHANNELS
ENABLES THE RECORDER TO
RECORD THE DIGITAL CHANNEL YOU
ARE WATCHING
Composite video andaudio

4
Connecting to an Audio System First Time Installation
Getting Started :
Once you haveconnected this SetTopBox (STB) to the appropriate video and
audio input socketson your TV, and have selected the matching inputs on the
TV to receivethese signals, youwill need tobe comfortable withselecting
several basic operationsbefore setting upyour Set Top Box for the first time.
Firstly, theSTB has two power modes: Standby and On. In Standby mode, the
STB is poweredup, but awaitsa "power On"command from eitherthe Remote
Control or fromthe Standby push-buttonlocated on thefront of the STB. In this
mode, the frontpanel LED indicatorglows red incolour.
When the STBis switched fromStandby to theOn mode, the power LED
indicator on thefront panel willchange colour fromRed to Greento indicate
that the unitis fully poweredup.
As most receiveroperations are accessedusing the suppliedRemote Control,
please take thetime to reviewthe button designationson page 2 of this manual.
Especially take noteof the mostcommonly used buttons;the cursor arrow
buttons (LEFT, RIGHT, UP, DOWN) surroundingthe OK buttonin the middle
section of theremote control, aswell as theMENU button at the top-left of the
cursor keys, andthe EXIT buttonat the top-right of the cursor keys.
First Powering onthe STB :
When you firstpower up yourSTB, (or youreset the STBto its factory settings),
it will automaticallydisplay the InstallationGuide menu. Thisis where the Set
TopBox searches foravailable TV stationsand stores the station details it finds.
Make sure asuitable TV antennais connected before proceeding with this
operation.
Alternatively, atany time you can select the Channel Search menu and use the
"Auto Search" option"to force thereceiver to locateall the available TV
stations.
100-240V~
50/60Hz
BASS
TREBLE
ECHO
DOWN UP
VOLUME
INPUT SELECTOR
MUTE
KARAOKE
CHANNEL
TEST
MODE
3STEREO
PROLOGIC
BYPASS
EXCITE
POWER
MIC
2
1
1
MICVOL
2
MIC
Amplifier
Coaxial
Coaxial cable
(Digital audio)
(Analogue audio)

(1) Program Manage Settings
Toaccess the Menu, pressthe MENU button onthe Remote and select[Program]
from the icon selectionsat the top ofthe screen. This Menu provides options to
adjust the Program ManageSettings. Select an optionand press OK orRIGHT to
adjust that setting. Pressthe EXIT button toexit the Menu.
By default, the InstallationGuide will be locked to English as theOn-Screen
Display (OSD) language. Usethe DOWN cursor key on the Remote Controlto
select the Country entryline (which should be pre-set to AUSTRALIA),and then
use the DOWN cursorkey to select the Channel Search line. PressOK to start the
channel tuning process anddisplay a Channel Search progress screen. Your STB
will now scan throughall the digital TVstations that it canreceive using the
connected antenna. This processmay take several minutes,but once completed,
the STB will skipto the first DTV program that was located
during the Search process.
NB. Any Radioprograms located during thechannel tuning process aresound-
only services associated withthe TV networks, andare not DAB+ radio
broadcasts.
Basic Operation :
Once your STB hascompleted the tuning process and is receiving adigital TV
service, you can usethe UP/DOWN cursor keys to manually change thechannel
you wish to receive.To adjust the sound level,set the volume control on your TV
to a commonly usedlevel, and then use the STB LEFT/RIGHT cursorbuttons to
increase or decrease thevolume to a comfortable level.
Togain better use ofyour Set Top Box, please nowreview the Menu settings on
the following pages ofthis User Manual.
(2) Program Edit
Toedit your programpreferences (lock, skip,favourite, move ordelete), you
will need toenter the ProgramEdit Menu. ThisMenu requires a password to
access. Enter thedefault password '000000'.
Set Favourite Program
You can create a shortlist of favourite programs that you can easily access.
Set Favourite TVor Radio program:
1. Select thepreferred program thenpress the FAVOURITE buttonon the
remote control.
A Favourite Typesub-menu will appear, use the cursor keys on the Remote
Control to select one of the 4 types of favourites, then press OK.
2. Repeat theprevious step toselect more Favouriteprograms.
3. To confirm andexit the Menu,press the EXITkey
Disable favourite TVor Radio Program:
Select the TVchannel from thelist on screen,the press theFAVOURITE
button on the Remote Control. Use the favourite Type sub-menu to select
Disable, then press OK.
View Favourite Program
1. Press theFavourite button onthe remote andthe Favourite Menuwill appear.
2. Press theLEFT/RIGHT cursor buttonson the remote to select the type of
Favourite channel to recall. Options are: Movies, News, Sport, Music.
3. Press UP/DOWNto select yourFavourite Programs.
4. Press OKto select yourfavourite program.
Delete a TVor Radio Program
1. Select theProgram and thenpress the BLUEbutton on theremote.
A message will appear on screen. Press OK to delete the program
2. Repeat theprevious step toselect more programsto delete.
3. To return adeleted channel tothe Program list,perform a ChannelScan.
Skip TV orRadio Program
1. Select theprogram you wouldlike to skipand press theGREEN button.
A skip symbol is displayed. The program is marked as a skip.
2. Repeat theprevious step toselect more programs.
3. To confirm andexit the menu,press the EXITkey.
Disabling a skip TV or Radioprogram:
Press the GREEN button on the skip program when a TV channelwith the
skip symbol is shown.
5

6
Use the UP/DOWN keysto step through thelisting; the red andgreen buttons
allow you to stepthrough the listing aday at a time.
On the right side,a program description isdisplayed for the highlighted
program. If there ismore than one pageof information, the yellowand blue
buttons allow you accessto the second page,or you can simplyuse the up and
down cursor buttons tostep through the availableprograms.
Use the left andright cursor buttons toselect different TVor radio stations.
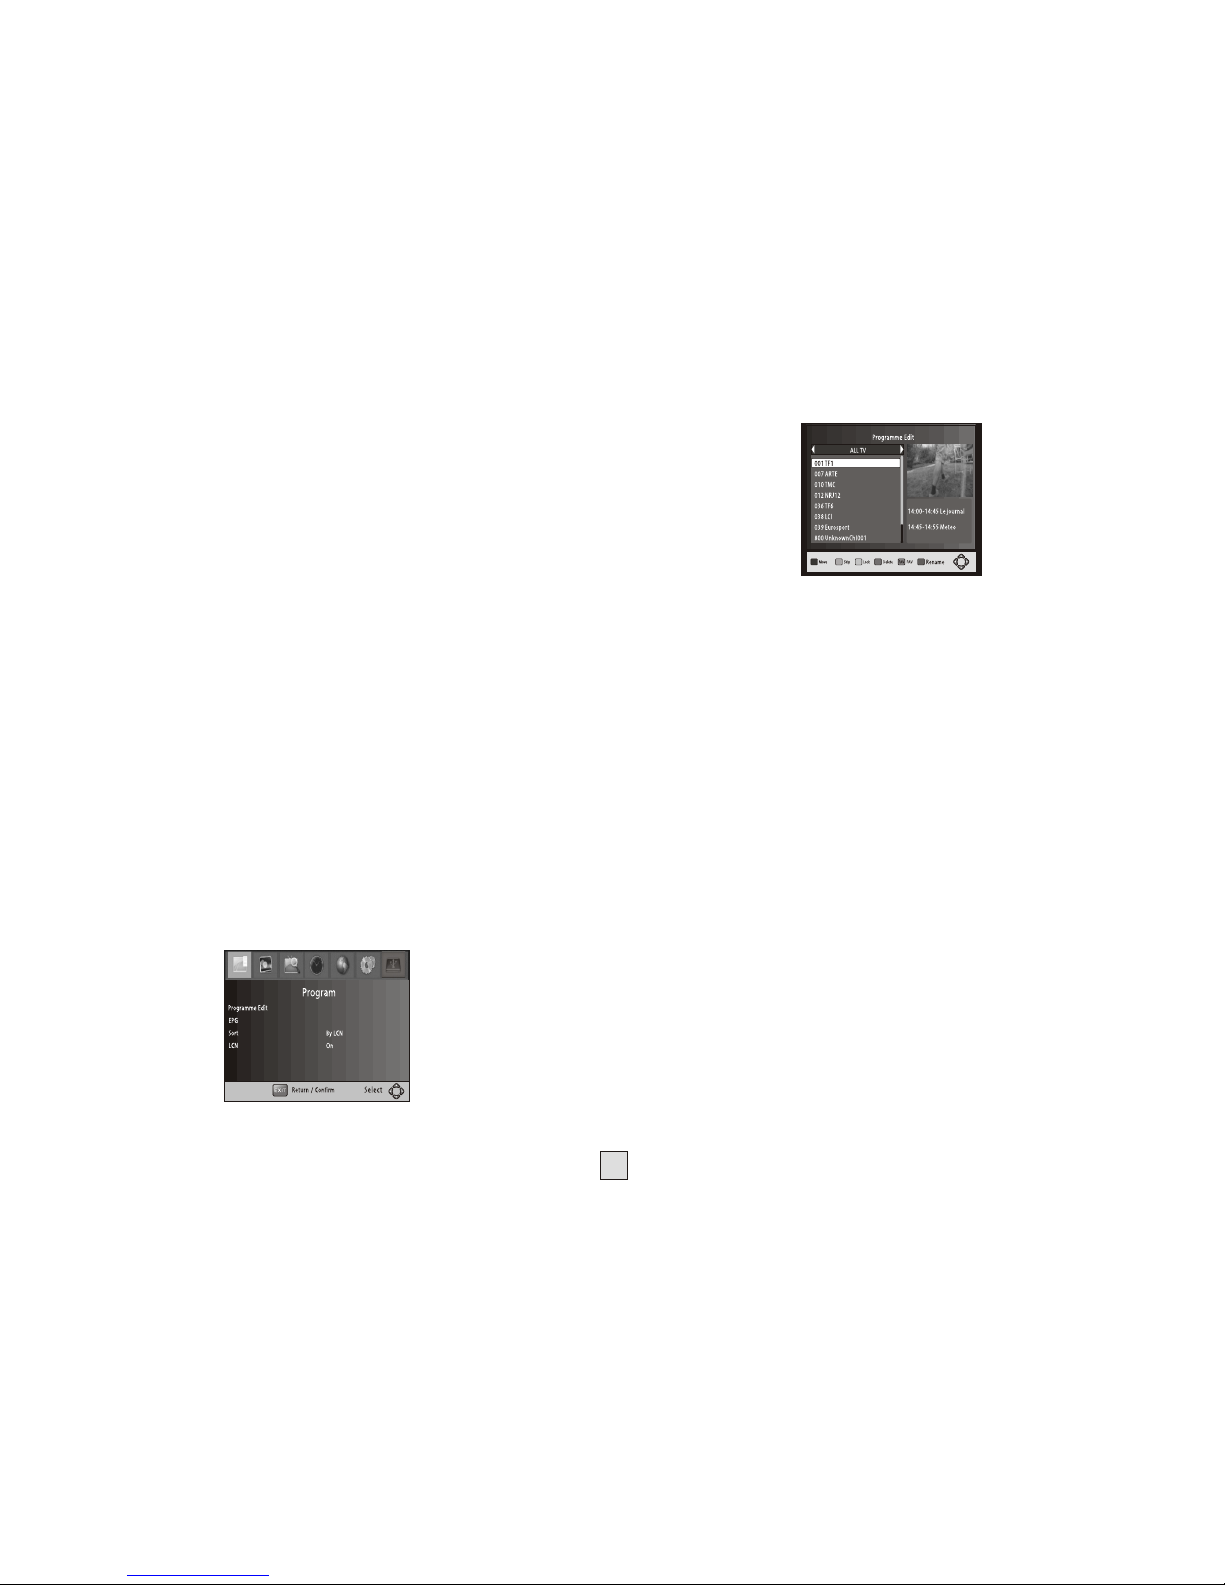
(4) Sort
Sort your channels fromthe following options:
[LCN] - Sorts thechannels in ascending order, (Logical channel Number)
[Name] - Sorts thechannels in alphabetical order.
Move a TV or Radio Program
1. Select the preferred program then press the RED button. A move symbol
will appear
2. Press UP/DOWN to move the program within the list of TVor Radio stations.
3. Press OK to confirm
4. Repeat the above steps to move more channels
Lock Program
You can lock selected programs for restricted view.
Lock a TVor Radio Program:
1.Select the preferred program then press the YELLOW button. A lock-\shaped
symbol is displayed. The program isnow marked as locked
2. Repeat the previous step to select more programs
3. To confirm and exit the menu, press the EXIT button
4. Press the YELLOW button todisable the locked program
5. To view the locked program, you will be required to enter either the default
password '000000' or your last set password.
(3) EPG (Electronic Program Guide)
The EPG is an on-screen TVguide that shows scheduled programs up to seven
days ahead for every tuned channel. It also allows you to automatically set timer
recordings (see page 10). Press the EPG button on the Remote Control to
access, press again to remove.
(1). Aspect Ratio
(2). Resolution
(3). TV format
You must set the display format to either 4:3 PanScan, 4:3 Letter Box,16:9
Wide Screen or4:3 Full, 16:9Pillar Box, 16:9PanScan, orAuto to getthe
maximum display whenwatching TV.
If the videodoes not appearcorrectly, changethis setting. Thissetting is to
match the mostcommon setting forHDMI.
[576i] for PAL system TV.
[576P]: for PAL system TV.
[720P]: for NTSCor PALsystem TV.
[1080i]: for NTSCor PALsystem TV.
[1080p]: for NTSC or PAL system TV.
If the TVreception does not appear correctly,you may needto change this
setting. This shouldmatch the most common setting for TVs in yourcountry.
[NTSC]: for NTSCsystem TV.
[PAL]: forPAL system TV.
PALsettings are themost commonly usedin Australia.
[Service Name] -Sorts the channelsaccording to thestation
(5) LCN (Logicalchannel number)
Set LCN Onor Off If LCN isoff, during tuning, stations are simply numbered
in the orderthey are found.
If LCN ison, station numbersare assigned bythe TV stationthemselves, eg
ABC is number2, 7 networkis number 7,9 in number9 and so on.
Note: If youwant to usethe “Sort byLCN” method, LCNmust be set to “on”
before scanning thechannels.
Toaccess this Menu,press MENU thenselect [Picture]. TheMenu
provides options toadjust the videosettings. Press UP/DOWNto select an
option and pressRIGHT/LEFT to adjust that setting. Press EXIT to exit the
menu and savethe changed setting.
.
[Service ID] -Sorts the channelsby station ID.
.
(6) Video Setting

7
(7) Channel Search
and M
SC
s
to exit M
Toaccess the menu,press MENU select [Channel Search]. The enu
provides options toadjust the earch hannel settings.
Select an optionand press RIGHT/LEFTto adjust the setting .
Press EXIT the enu.
1 .Auto Search
Search and installall DTV andRadio channels automatically. This option
overwrites all presetchannels.
1. Select [AutoSearch] and pressOK or RIGHTto start the channel search.
2. To cancel channel search, press EXIT.
2. Manual Search
Install new channelsmanually. This option adds new channels without
changing the currentchannels list.
1. Select [ManualSearch] then press OK or RIGHT. The channel search
screen will appear.
2. Press theRIGHT/LEFT key toselect the channel frequency
Enables AntennaPower (approx 5Vdc, 100mA) tobe connected tothe RF IN
socket for useby an externalactive antenna.
Warning: Do not activate the Antenna Power option unless you are certain
that any devicesin the coaxline between yourTV antenna andset top box
are compatible withpassing or operatingfrom 5V dc.If in doubt,consult with
a TV orinstallation technician.
(8) Time Setting
M then M
Press UP/DOWN tos
s
3. Press OKto start searchingchannels
If a channelis found, itis saved andadded to thechannels list. Ifchannels
can't be found,then exit themenu.
(3) Country
Select your countryof residence.
(4) Antenna power
Toaccess the enu, press MENU select [Time]. The enu provides
options to adjustthe time settings.
elect an optionand press RIGHT/LEFTto adjust the
setting . Press EXITto exit the menu.
(1) Timeoffset
Select Autoor manual for GMT offset adjustments.
(2) Country Region
Select the Country Region when [Time Offset] isset to Auto.
(3) TimeZone
Select the Time Zone Offset when [Time Offset] is setto Manual.
(4) Auto Standby
If this setting is off, thisfunction does notwork. When this setting is on, the
Set Top Box willgo into sleep mode after 3 hours of no user-operation.
(9) Option
Toaccess the Menu, press MENU and select [Option]. The menu provides
options to adjust the OSD Language, Subtitle Language and Audio
Language.
Select an option and press RIGHT/LEFTto adjust the setting. Press EXITto
exit the Menu.

8
(1). OSD Language
The OSD (OnScreen Display) languageis fixed toEnglish.
(2). Subtitle Language
(3). Audio Language
Toaccess the enu, press MENU select [System].The menuprovides
options to adjustthe system settings.
elect an optionand press RIGHT/LEFTto
adjust the setting.
Press EXIT toexit the enu and saveany changed settings.
Selects the preferredsubtitle language. Oncechanged from theoff setting,
subtitles will alwaysbe shown duringDTV reception (whensubtitles are
available).
Selects the preferredaudio language forwatching TV channels.
If the languageis not available,the default programlanguage will beused.
(10) System Setting
M and
Press the UP/DOWNkey to s
M
(4) DigitalAudio
Selects the digitalaudio output mode.Refer to youraudio amplifiers user
manual for itsrequired input format.
(1) Parental Guidance
You can restrict access to channels that are unsuitable for children.
Torestrict/lock the channel you will needto enter eitherthe default
password '000000' oryour own password.Use the RIGHTcursor button to
select the requiredclassification restriction, then press OK to confirm and
press EXIT toexit the menu.
(2) Set Password
Set or changethe password forlocked programs. Enteryour old password
or the defaultpassword '000000'. You will then be asked to enter your new
password. To confirm, re-enter your new password again.
Once it isconfirmed, press EXITto exit the Menu.
(3) Restore FactoryDefault
Resets your SetTopBox to the Default Factory Settings.
In Main Menuselect [Restore FactoryDefault] and press OK or RIGHTto
select. Enter yourpassword or the default password '000000' and press
OK to confirm.This option willdelete all presetchannels and settings.
(4) Information
View model, hardwareand software information.
(5) Software update
1. OAD
If the statusis set 'ON', it will scan new software from TV broadcastsaccording
to your preferredtime in ''Starttime''. We recommendthis be left 'OFF'
unless advised otherwise.
2. USB upgrade
This is forupdating the STB’s internal software.DO NOT activatethis function
unless you havevalid GH5944 softwareas the only file on a USB drive that is
connected to theSTB.
(11) USB support Multimediaplayback :

Toaccess the Menu,press the MENUbutton and select[USB] using the
RIGHT/LEFT keys. The menu provides options to playback Music, Photo
and Multimedia files.It can supportoff-air DTV recordingsmade by this unit, as
well as various low data-rateAVI, MPEG4,MP3, JPEG and BMP format files.
(a) Multimedia:
When a USBdevice is attachedyou can selectfrom Music, Photo,Movie or
PVR options usingthe RIGHT/LEFT keysand OK to select. If a USB device
is not connected,the warning message"No USB deviceis Found" willappear.
9
(b) Photo configure:
-Slide Time:adjust slide showinterval to 1~8seconds.
-Slide Mode: adjustslide show effectas mode 0~59 or random.
-Aspect Ratio:
[Keep]: Play picturein its originalaspect.
[Discard]: Play picturein full screenmode.
(c) Movie Configure:
- Subtitle Font:
[Small]: Displays thesubtitle as smallmode.
[Normal]: Displays thesubtitle as normalmode.
[Big]: Displays thesubtitle as bigmode.
- Subtitle Background:
[White]: Displays thesubtitle in whitebackground.
[Transparent]: Displays the subtitle in transparent background.
[Grey]: Displays thesubtitle in greybackground.
[Yellowgreen]: Displays the subtitle in yellowgreen background.
- Subtitle FontColor:
Choose the subtitlefont colors fromRed, Blue, Green,Black or White.
Note:
- We cannot guarantee compatibility (operation and/or bus power) with all
USB mass storagedevices and assumeno responsibility forany loss of
data that mayoccur when connectedto this unit.
- With largeamounts of data,it may takelonger for thesystem to readthe
contents of aUSB device.
- Some USBdevices may notbe properly recognised.
- Even whenthey are ina supported format,some files maynot play or
display depending onthe content.
- USB extensioncables should beavoided as theymay degrade performance.
PVR FUNCTION
The GH5944 canalso function asa Personal VideoRecorder (PVR),
allowing you torecord off-air DigitalTV programs onto a USB 2.0 flash drive or
USB 2.0 harddrive.
Media Limitations:
FAT32and NTFS-formattable USB hard drives are suitable.
Standard drives ina USB adaptorharness are unlikely to work.
Most modern USBHard drives usethe NTFS formatfile system. ThisSTB
will format mostUSB hard-drives andflash drives toeither the FAT32 or
NTFS formats.
Press “Menu”, selectUSB > PVRConfigure >Format. Therewill be a short
delay while thedrive is inspected,followed by details of the drive size and
format type. Selectthe File Systemline, press or to select theformat
type, then selectthe Format line(typically “USB I/C”)then press OKto
format the drive.
Warning: All existingdata and recordingswill be erased by the formatting
process. Desired programsshould first becopied onto another storage
medium (eg. viaa computer's USBconnection).
The USB PVRfunction relies onthe use ofhigh quality USB2.0 drives
( or USB3.0 drives operatingin USB2.0 compatibilitymode), and assuch
may not becompatible with somespecific USB devices.
USB drives upto at least2 Terabytes (2,000GB) canbe used; however
USB-powered drives largerthan 500MB mayexceed the USBsocket's
power rating andneed to bepowered using anexternal power supply.
Drives above 500GBmay also takean unacceptably longtime to start
recording or playingback material.
Most Flash Drivescan record StandardDefinition TV; driveswith slower
memory components maynot reliably recordHDTV.
Camera Cards (SDetc) may workthrough a card-to-USBadaptor; but not
all adaptors arecompatible with thisunit.
There are noline inputs; recording is only possible from digital TV
broadcasts. Recordings aremade by directlystoring the transmitted data
stream.

10
Data Rates:
Australia: About 2GB/hrfor SD broadcastsand about 4GB/hrfor HD
broadcasts, although thiscan vary dependingon the broadcaster.
RECORDING :
To recordthe program the Set-top Box is currently tuned to:
With a USBdrive connected tothe Set-top box,press “Record” (next to the
red “Standby “buttonon the remotecontrol). An on-screen message
“Record Initializing” willappear briefly,then recording will commence. Once
recording is underway, onlythe STOP, EXIT, CHANNEL and STANDBYbuttons
will be operative.An elapsedtime counter willappear in thetop left hand
corner of thescreen.
This will disappearafter a fewseconds, or youcan press the“EXIT” button to
hide it. Pressthe INFO buttononce to displaythe elapsed time counter, or press
INFO twice todisplay a detailedINFO screen showingremaining space on the
USB drive, recordingbit rate andfile name.
During recording, itis possible towatch one channelwhile recording another,
but only ifthe second channelis from thesame transmitter asthe one being
recorded. For exampleyou can recordABC1, whilealso watching ABC2, ABC3,
or ABCNews 24, butnot a channelfrom another network(such as 7, 72 or 7
Mate). If youattempt to changeto a channelon a different network, you will get
a message askingif you wantto terminate therecording first.
NOTE: The “Pause”button is non-functional during recording.
If the USBdrive is fullor is anunsuitable format, youwill get an error
message. If theUSB device hasan indicator light,it may also blink when
recording is takingplace. To stop recording,simply press theStop button
(above the yellowbutton on theRemote Control), thenOK to confirm.
Record Cut -Off Timer:
Once the Recordbutton is pressed,recording will continueuntil either
STOP is pressed or the USB storage medium runs out of space. To time-limit
the recording, pressRECORD a secondtime. Acut-off time willappear on
screen, starting with30 minutes. Successivepresses of theRecord button
will increase thisin 30 minuteincrements. After300 minutes itwill return to
zero.
NOTE:
1. The extrabutton presses will not register until recording has actually
commenced.
2. You can set longer time-limited recordings by using the Timer function
(see page11).
PLAYBACK :
Toview a listof recorded DTVfiles on theUSB drive, press the LIST button on
the Remote Control(next to theMute button), oruse the Menu function to select
USB>Multimedia>PVR>HBPVR>OK.
A listof the recordedfiles will appearin the followingformat :
{TV Channel name}{Month/Day/Year} {Start time of Recording}
{Program name}.mts
The ".mts" atthe end ofeach recording isthe file nameextension for the
recorded digital TVdata stream.
Immediate Playback:
Once you havethe list ofrecorded files visible,use the Up/Down cursor buttons
on the RemoteControl to selectthe required filefor playback, andpress the
PLAY button (directly above the Red colour button at the bottom of theRemote
Control). The filewill play back in full screen mode, and you can use the Forward,
Reverse, and Pausebuttons on theRemote during playback.For Fast Forward
or Fast Reverseoperation, press theForward or Reversebuttons repeatedly to
select between 2xto 32x speedoptions.
PLAYBACK FILE MANAGEMENT :
Select your preferredrecorded file asabove, but press“OK” instead of “Play”.
The list offiles now remainson the screenand a small window shows playback
of your selectedfile, plus informationabout its lengthetc. To switch between
full-screen playback andthe small window, press the Red button at the bottom
of the remote.
Deleting files: Todelete a selectedfile that is playing, you must first press Stop;
then press theyellow button onthe Remote control.A tick symbol will appear
beside the selectedfile. Further filesmay be selectedby using the up and down
arrows and furtherpresses of theyellow button; (To see what you are deleting,
press the OKbutton before theyellow button; thiswill start windowed playback).
When you haveselected all thefiles to bedeleted, press OK.You will see a
“confirm deletion” optionmessage; pressing OKa second timewill delete the
files. The deletionprocess may take several minutes for larger files.
Renaming files: Select a fileusing the upand down arrowsand press the
Green button.An image ofa keypad willappear in screen.Use the arrow keys to
select the letters,OK to confirmselection. “Extend” givesan alternative
character set, “Back”deletes the lastcharacter entered, “OK”completes the
task, “Cancel” exitswithout changing thefile name.
Note: you canalso rename filesusing a computer(see FILE FORMATon page
11)

Manually setting thetimer: During reception of the DTV channelyou wish to
record, press the bluebutton, then thered button onthe
Remote control.A boxtitled “Schedule” shouldappear. Selectthe channel with
the left andright arrow buttons,select start andfinish times with the up and
down arrows, andenter the dateand time usingthe number keyson the remote
control.
Mode: This has twooptions: “Record” and“View”. In View Mode, at the set time,
the PVR willautomatically turn onand switch tothe selected channel,but not
record. This isuseful if you want to record onto a separate device such as a
VCR or DVDrecorder. (You must also set the record time on your recording
device). It canalso be usedto ensure thatyou do notmiss the start of a
particular program whileyou are watchinganother. (NOTE:this function cannot
switch between fileplayback and liveprogram).
If MODE is setto “Record” (default),the PVR willrecord the program.
Press “OK” toadd the programto the “Schedule”list, then press “Exit”.
Repeat: This allows youto record the same program on a daily or weekly basis.
For example, theevening news orfavourite weekly program(s).
Options are once(default), daily orweekly. Ifset to daily or weekly,when the
recording is completed,the scheduled recordtime is advancedby another 24
hours (or 7days).
Setting the timerusing the EPG:
The PVR's timercan also beset automatically bythe Electronic Program Guide.
Press “EPG”, findyour desired programusing the arrowbuttons, then press
“OK. The “EventAdd” box will appear, except this time all the information from
the selected EPGitem will havebeen automatically inserted.Press “OK” to add
it to theSchedule list.
TIME SHIFT (“LIVEPAUSE”)
When a liveprogram is beingviewed while aUSB device isinserted, pressing
the “Pause” buttonwill effectively freezethe live program. What actually
happens is thatthe PVR startsrecording the program,and when you press
“Play” it startsplaying back therecording from thebeginning, while 11
TIMER FUNCTIONS:
This device cancarry out “Scheduled”recordings, similar tothe timer record
function in aVCR or DVDrecorder. As well as allowing the user to manually
enter the dateand time, thetimer can alsobe automatically setusing the
Electronic Program Guide(EPG). Timerfunctions will activatewhether or not
the PVR isswitched to standby. When thetimer is readyto activate, a
warning message willappear.
IMPORTANT:
1. Make surethe time zoneis set correctly!(see “Time” Menu)
2. The timerwill not activateduring USB playback.
simultaneously recording therest of theprogram. If you allow at least 15
minutes before pressing“Play” you willbe able toFast Forward through
undesired parts ofthe program. (However, once you “catch up”with the live
recording point, obviously you cannot FastForward past that!)
CAUTION:
1. Programs are notalways transmitted atthe time statedin the EPG:most
programs often runa few minutes late. To avoid missing the end of a program,
you can modifythe finish timemanually, e.g.a finish time of 14:30 can be
manually “bumped” to14:40 to ensurethe entire program gets recorded. Use
the left andright arrows toselect the characterposition, and enterthe new time
numbers with thenumeric keypad.
2. The timerfunction will not activate while you are playing back a recording.
If you stopplayback in themiddle of aperiod meant tobe recorded, recording
will commence after playback ceases.
3. The timer function over-rides the record off-timer setting.
FILE FORMAT:
All recordings are stored in amain folder named“HB PVR”. Theactual program
data is storedas “MTS” filesin subfolders carryingthe recording's namee.g.
ABC2-02272012-1030-Program name.mts
MTS format filesare similar to MPEG2 files andcan be read by most programs
that can read MPEG2 files.
PLAYING BACK OTHER MEDIAFILES :
This unit canalso play backother types ofvideo files, includingvarious
resolutions of MPEG4/H264 movie downloads,files from tapeless video
cameras and JPEGimage files (seepage 8).
Note: This unitwill not playDV-AVI files from MiniDV and Digital-8 video
cameras.
It some casesit is possibleto play directlyfrom camera SDcards via anSD to
USB adaptor,but the preferredprocedure is totransfer the filesonto a USB
type drive first.
All playback modes(PVR and Movie)will play sequentially. That is,when one
program finishes, thenext one willstart playing. Bypressing the blue“repeat”
button you canalso set theunit to continuouslyrepeat the current
program, repeat theentire list ofprograms, or playback programs ina random
sequence.

Technical Specifications
Item Sub Item Parameter
Tuner
Video
Audio
Power
Input Frequency
RF Input level
IF Bandwidth
Modulation
Decoder Format
Output Format
Output Port
Decoder Format
Audio output
Voltage
Power
177.5MHz~226.5MHz
522.5MHz~830.5MHz
-25~-78dBm
7MHz and 8MHz
QPSK,16QAM,64QAM
MPEG4 AVC/H.264HP@L4
MPEG2 [email protected]
576p, 720p, 1080i,1080p,
4:3 and 16:9
HDMI via HDMI-ASocket
Composite/Component via RCA
phono sockets
MPEG-1 (layer1&2)
Digital audio: S/PDIF
Analogue audio: RCAsockets
100-240V~ 50/60Hz
Max 8W Lessthan 1W standby
12
Troubleshooting
Problem Potential Reasons What to do
No picture
Screen shows
No Signal
No sound from
speaker
Only sound,
no image onthe
screen
Remote control
unit is notworkable
The image stopsor
freezes suddenly or
produce mosaic
patterns
Power isn't connected
The power switchis not on
Antenna not connected
Incorrect setting
No or incorrectconnection
with audio cable
Sound is muted
Incorrect sound track
No or incorrectconnection
with AVcable
The program isa radio
program
The batteries areexhausted
Remote not pointedat front
panel or istoo far away
from it
The signal istoo weak
Connect the power
Switch on thepower
Check antenna cableand
plug
Set up correctparameter
Check plug coloursmatch
sockets
Adjust volume control
Press Mute buttonon
Remote Control
Try another soundtrack
Check plug coloursmatch
sockets
Press <TV/RADIO> keyto
shift into TVmode
Replace batteries, ensure
they are fittedcorrectly
Adjust the wayof holding
the remote controlunit and
operate it closerto the front
panel of theSet Top Box
Improve the antennaand
its cabling


Table of contents
Other Wintal Set-top Box manuals