Wisdom S10P User manual

Owner’s Manual
S10P
Small Footprint 500W Powered Subwoofer

Table of Contents
1. Safety |3
2. FCC Statement | 3
3. Introduction | 4
4. Overview | 4
5. Unpacking the S10P | 4
6. Rear Panel Features | 5
7. Setting Up your S10P | 6
8. DSP Control Via Rear Panel (User Level) | 7
9. Up/Down-Firing Setup | 8
10. Placement and Installation | 9
11. Cleaning and Care | 10
12. North American Warranty | 11
13. Obtaining Service | 12
14. Specifications | 13
DOCUMENT CONVENTIONS
This document contains general safety, installation, and operation instructions for the Wisdom
Audio S10P Small Imprint Subwoofer. It is important to read this document before attempting to use
this product. Pay particular attention to:
WARNING: Calls attention to a procedure, practice, condition or the like that, if not correctly
performed or adhered to, could result in injury or death.
CAUTION: Calls attention to a procedure, practice, condition or the like that, if not correctly
performed or adhered to, could result in damage to or destruction of part of or the entire product.
Note: Calls attention to information that aids in the installation or operation of the product.

Safety
FCC Statement
This device complies with Part 15 of the FCC Rules. Operation is subject to the following
two conditions:
1. This device may not cause harmful interference, and
2. This device must accept any interference received, including interference that may
cause undesired operation.

Introduction
Congratulations on purchasing your Wisdom Audio subwoofer. The S10P delivers
tremendous bass performance in terms of depth, dynamics, and distortion, resulting in
articulate bass that integrates seamlessly with high-resolution main speakers such as
Wisdom Audio’s Insight Series On-Wall models.
This manual focuses on the S10P subwoofer itself. Additional information can be found on
the Wisdom Audio website, including advanced operation of the DSP amplifier.
Overview
The S10P is a versatile 10" Powered Subwoofer with an integrated 500W DSP amplifier
that produces powerful clean bass from an incredibly compact cabinet. It is finished in
luxurious high gloss piano black and is convertible from a freestanding upright to down-
firing or up-firing horizontal platform, allowing the S10P to easily be placed behind,
beneath, or beside sofas or cabinets. The ultra-compact design also lends itself to multi-
subwoofer layouts for improved bass performance.
At only 7.6" (193mm) deep, including power cable, the stylish S10P is discreet and easy to
install. Its versatility and flexibility are increased through the use of 3 summing stereo
input options, XLR, RCA, and ¼" TRS. These inputs are passed to stereo XLR and RCA
outputs via DSP channels that can be configured with high-pass filters and delay (default is
flat with zero delay).
Unpacking the S10P
After unpacking your S10P, keep all packing materials for future transport. If you need
to ship your subwoofer, only the original, purpose-designed shipping carton is acceptable.
Any other method of shipping this product runs a significant risk of damage to the
subwoofer –damage that would not be covered by the warranty. (If you lose your
packaging and need to ship your subwoofer, replacement packaging can be purchased
from Wisdom Audio.) See the “Obtaining Service” section of this product manual.
CAUTION
We DO NOT recommend lifting the S10P subwoofer by yourself. Unpacking this
subwoofer is a two-person job. Exercise caution and avoid bending or twisting from the
waist. Use your legs for lifting, not your back.

Rear Panel Features
1
Power Mode:
Select either
AUTO
or
ON
(always-on) power mode.
•
Auto:
Amp turns on when signal is detected. It goes into standby after 20 minutes with
no input signal.
*
•
On:
Amp is always on, regardless of input signal status.
*
Once audio signal is detected, the amp will automatically turn on in typically one second or less.
2
Input Level: Affects analog balanced and unbalanced inputs only.
•
Hi Level:
Attenuates input signal by -6dB.
•
Normal:
No attenuation. (Default)
3
USB Control: THIS IS AN ADVANCED FEATURE AND NOT NEEDED FOR NORMAL USE. See
website
for more information on the use of this feature.
•
Used for PC-GUI communication with custom PC software included with your subwoofer.
4
Feature Control: THIS IS AN ADVANCED FEATURE AND NOT NEEDED FOR NORMAL USE
•
Rotary control with single & double-click actuation.
•
Rotate to navigate feature menu and change selection. [Volume, High Pass, Low Pass,
Phase, High-pass Delay, Subsonic Filter, PEQ (Parametric Equalizer), Preset Save/Load]
•
Pressing once activates displayed function or exits the selected function.
•
Pressing twice exits operation or returns to the home position.
5
Limiter LED:
Lit when Limiter is active (Red)
.
6
Standby/On LED:
•
Red
:Amp is in energy saving “stand by” state.
•
Green
:Amp is “ON” and operating normally.
Welcome

Setting Up your S10P
The S10P is setup to work with any standard AV Receiver or Surround Preamp/Processor
when using the “LFE” or “Subwoofer” outputs. It will reproduce the low frequency effects
and any audio from bass management of the processor to which it is connected (assuming
speaker settings within the processor are set to small). The S10P is Plug-and-Play,
meaning it comes pre-configured to reproduce output if signal is present at the input.
No changes in configuration are required to begin enjoying your S10P.
BASIC SETUP AND CONNECTIONS
1. Connect the mains power. The unit is factory set for the proper voltage.
2. Connect the audio input,
a. Use either the unbalanced RCA input or Balanced XLR
b. For Mono input use the LEFT input only
c. For Stereo input use LEFT and RIGHT
3. Switch on the AC Main Power Switch
4. The S10P will start up and the LED will light to show status:
•Red: Amp is in energy saving “stand by” state
•Green: Amp is on and operating normally
RECOMMENDATION: We recommend using the S10P with the default settings as shipped:
•Power Mode = AUTO
•Input Level = NORMAL
•Factory Defaults for S10P speaker EQ (no change needed)

DSP Control Via Rear Panel (User Level)
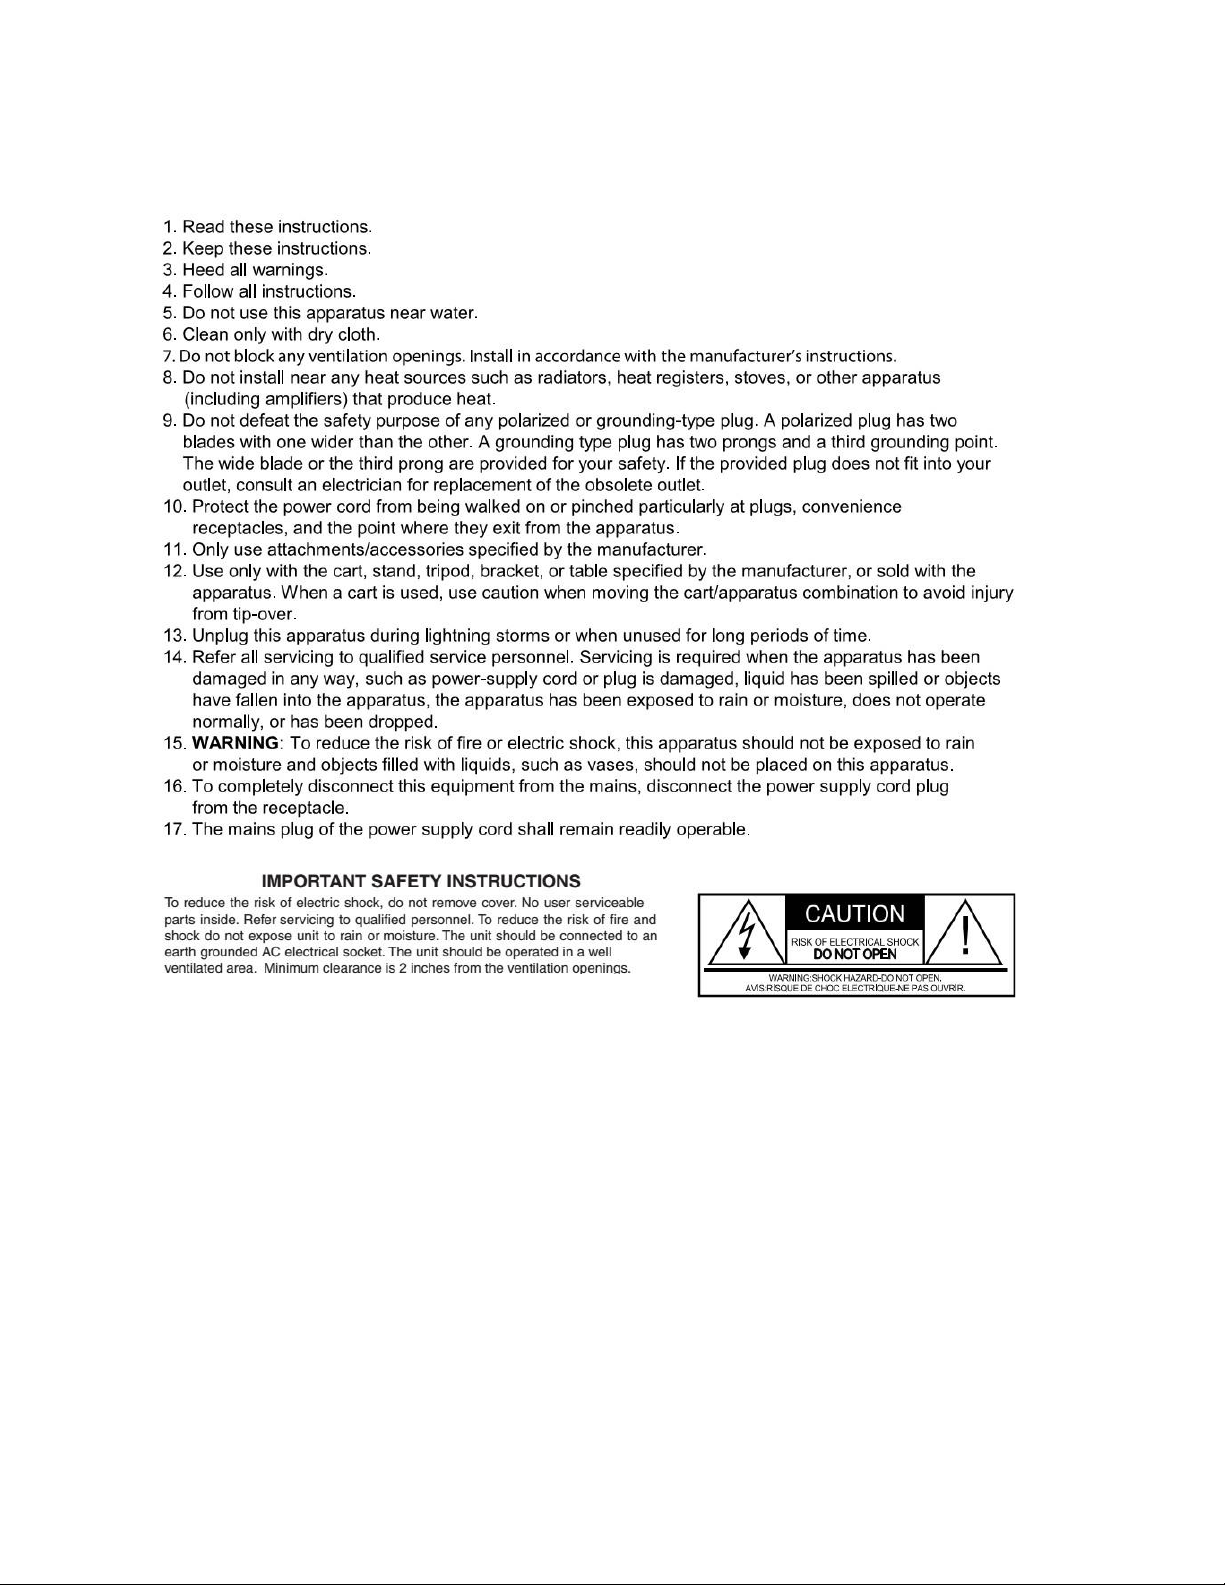
Activate the rear-panel Feature Menu by pressing the Feature Control knob.
“VOLUME”is the default Feature displayed after power up. The Feature
Menu will time-out after approximately 3 minutes of inactivity.
Rotate the knob to Step through the Features listed
below. Rotation of the knob is also used to change
the parameters of the selected Feature.
Press the control knob to Enter the displayed
Feature. Rotation of the knob allows for the
parameter changes listed below. (A complete
Feature Flow Chart with their operations is listed on
the last page.)
Double Press the control knob to Exit the Feature.
A single press can also be used to exit some Features.
MENU Selections
Volume Level: 0dB to -99dB, (0.1dB/step).
Changes only the subwoofer level.
High Pass Filter: (line level output only)
Frequency Range: Disabled or 30 –125Hz, (1Hz/step)
Slope Select: -12dB/-24dB
Low pass Filter: (subwoofer amp output only)
Frequency Range: Disabled or 30 –125Hz, (1Hz/step)
Slope Select: -12dB/-24dB
Phase: 0° –180°, (1°/step)
High Pass Delay: 0 –10msec, (0.1msec/step)
Frequency Range: Disabled or 25 –40Hz, (1Hz/step)
Slope Select: -12dB/-24dB
Frequency Range: 10 –200Hz, (1Hz/step)
Level Range: -12dB to +6dB, (0.1dB/step)
Q Factor Range: 0.6 –14, (0.1/step)
Preset Save/Load: 3 Presets
NOTE: The rear panel control is defeated when the subwoofer is linked to a PC. Unplug the USB
cable to return control to rear panel.
Restoring Factory Defaults does not erase the 3 User Presets.
Changes are applied in real-time. No confirmation or save is required except for Presets 1-3.

Up/Down-Firing Setup
The small footprint of the S10P allows it to be used effectively in many situations where a
more conventional “bass cube” would be either cumbersome or impossible. Examples
include locating it behind a couch, in the small space between a couch and wall, lying flat
under a set of risers, under a couch/table, within a cabinet, or beneath a bed.
Your S10P subwoofer can be used in a down-firing or up-firing configuration, allowing it to
be installed in more locations. We recommend down-firing as the preferred horizontal
platform configuration. Converting it is done in 7 simple steps. When completed, ensure
that all the screws are installed and there are no holes in the cabinet creating air leaks.
1. Lay the subwoofer on a soft surface (carpet or similar) making sure you have
access to the feet and the front or rear (whichever surface the feet will be
mounted). DO NOT lay the subwoofer directly on the amplifier or its controls.
Doing so can damage it. The foam and cloth wrap from the packaging can be used
to support the speaker and prevent it from being scratched or damaged.
2. Use a 5mm Hex key/Allen wrench to remove the four 20mm screws from the
surface where the feet will be mounted. This will become the new bottom of the
subwoofer. For the down-firing configuration it is necessary to remove the grille.
3. Use a 5mm Hex key/Allen wrench to remove the four 30mm screws that mount
the rubber feet to the bottom of the subwoofer.

4. Attach the gaskets to the 4 metal spacers (included in the accessories) by peeling
the backing from the gaskets and pressing them onto the two sides. Use care to
center the gaskets.
5. Install the four feet with the four metal spacers onto the surface that will now
become the bottom of the subwoofer. Pass the 55mm screws (included in the
accessories) through the rubber feet and then through the metal spacers, (see
photo below). Tighten the screws using a 5mm Hex key/Allen Wrench. The gaskets
are used to ensure the high gloss finish of the subwoofer is not scratched.
6. Use a metric 5mm Hex key/Allen Wrench to re-install the four 20mm screws into
the holes where the rubber feet were factory installed.
7. NOTE: Ensure that screws are securely installed in all the holes of the enclosure!
Placement and Installation
Subwoofers offer flexibility in placement since the frequencies they reproduce are not
readily localizable by the human ear. This is because the wavelengths they reproduce are
more than 10 feet (three meters) long and do not contribute meaningfully to the imaging
that the main speakers create. However, this fact does not mean that the placement of
the subwoofers has no effect on the sound quality in the room. Far from it. Low
frequencies and thus Subwoofers suffer from response irregularities created by the room
itself, operating, as they do, below approximately 80 Hz in most systems.
Recent research into speaker placement has concluded that proper placement of two or
more smaller subwoofers in a room can have significant advantages over a single large
woofer. If you have the luxury of doing so, this can reduce a room’s response irregularities
from 20 decibels down to as little as 6-8 decibels –a tremendous improvement.

Cleaning and Care
Cleaning your subwoofer enclosure can be done using a clean, soft-cotton or microfiber
cloth using a gentle circular motion. Fingerprints or other contaminants can be removed
from the high-gloss surface using a damp cloth with mild detergent or glass cleaner
following the manufacturer’s instructions. Cleaning agents should only be applied to the
cloth, not the subwoofer. Do not apply any liquids directly onto the cabinet or the rear-
panel electronics. Do not use any liquids for cleaning the rear-panel electronics.
Your S10P subwoofer is maintenance-free. However, care should be taken to avoid
placing your subwoofer in direct sunlight or near any heat sources. Ensure all electrical
cables are secured and don’t present a tripping hazard. Please contact your Wisdom
Audio dealer with any specific questions.

North American Warranty
Standard Warranty
When purchased from and installed by an authorized Wisdom Audio dealer, Wisdom
Audio loudspeakers are warranted to be free from defects in material and workmanship
under normal use for a period of 10 years from the original date of purchase on the
cabinet and passive drivers.
IMPORTANT: Wisdom Audio loudspeakers are designed for installation and operation in
environmentally controlled conditions, such as are found in normal residential
environments. When used in harsh conditions such as outdoors or in marine applications,
the warranty is three years from the original date of purchase.
During the warranty period, any Wisdom Audio products exhibiting defects in materials
and/or workmanship will be repaired or replaced, at our option, without charge for either
parts or labor, at our factory. The warranty will not apply to any Wisdom Audio product
that has been misused, abused, altered, or installed and calibrated by anyone other than
an authorized Wisdom Audio dealer.
Any Wisdom Audio product not performing satisfactorily may be returned to the factory
for evaluation. Return authorization must first be obtained by either calling or writing the
factory prior to shipping the component. The factory will pay for return shipping charges
only if the component is found to be defective as mentioned above. There are other
stipulations that may apply to shipping charges.
There is no other express warranty on Wisdom Audio products. Neither this warranty nor
any other warranty, express or implied, including any implied warranties of
merchantability or fitness, shall extend beyond the warranty period. No responsibility is
assumed for any incidental or consequential damages. Some states do not allow
limitations on how long an implied warranty lasts and other states do not allow the
exclusion or limitation of incidental or consequential damages, so the above limitation or
exclusion may not apply to you.
This warranty gives you specific legal rights, and you may also have other rights, which
vary from state to state. This warranty is applicable in the United States and Canada only.
Outside of the U.S. and Canada, please contact your local, authorized Wisdom Audio
distributor for warranty and service information.

Obtaining Service
We take great pride in our dealers. Experience, dedication, and integrity make these
professionals ideally suited to assist with our customers’ service needs.
If your Wisdom Audio loudspeaker must be serviced, please contact your dealer. Your
dealer will then decide whether the problem can be remedied locally, or whether to
contact Wisdom Audio for further service information or parts, or to obtain a Return
Authorization. The Wisdom Audio Service Department works closely with your dealer to
solve your service needs expediently.
IMPORTANT: Return authorization must be obtained from Wisdom Audio’s Service
Department BEFORE a unit is shipped for service.
It is extremely important that information about a problem be explicit and complete. A
specific, comprehensive description of the problem helps your dealer and the Wisdom
Audio Service Department locate and repair the difficulty as quickly as possible.
A copy of the original bill of sale will serve to verify warranty status. Please include it with
the unit when it is brought in for warranty service.
WARNING: All returned units must be packaged in their original packaging, and the
proper return authorization numbers must be marked on the outer carton for
identification. Shipping the unit in improper packaging may void the warranty, as Wisdom
Audio cannot be responsible for the resulting shipping damage.
Your dealer can order a new set of shipping materials for you if you need to ship your
loudspeaker and no longer have the original materials. There will be a charge for this
service. We strongly recommend saving all packing materials in case you need to ship your
unit someday.
If the packaging to protect the unit is, in our opinion or that of our dealer, inadequate to
protect the unit, we reserve the right to repackage it for return shipment at the owner’s
expense. Neither Wisdom Audio nor your dealer can be responsible for shipping damage
due to improper (that is, non-original) packaging.

Specifications
All specifications are subject to change at any time to improve the product.
Amplifier Power
•500W [100Hz @115VAC, Input: -10dBV (L+R), 3 seconds
on, 3 seconds off test]
Amplifier Gain
•+43.0dB
THD+N Ratio
•< 1%, Rated Power @ 100Hz
Maximum SPL
•114 dB
Auto ON sensitivity
Auto OFF time
•3mV
•20 minutes
Inputs
•Stereo XLR Balanced, Non-inverting, Pin 2 positive
•Stereo RCA Unbalanced
Outputs
•High Pass Stereo XLR Line Level
•High Pass Stereo RCA Line Level
Features
•Internal Low Pass and Parametric EQ (Subwoofer)
•Selectable High Pass Output with Delay (Line Level
Output)
•Signal Sense Auto On/Off
•USB for PC GUI Advanced Setup
Power amplifier Protection
•A- Short-circuit
•B- Thermal protection
•C- Power Supply Protection
Power Consumption:
•0.5W Standby Mode
•7.5W On (Idle)
•569W Rated Power
Product Weight
•41 lbs. (18.6 kg) with grille
Product Dimensions –Height
•Upright including feet = 15.9" (40.4cm)
•Down-firing including feet = 7.8" (19.8cm) *
All Dimensions Below (Height x Width x Depth)
Dimensions With Grille
•15.9" x 15.3" x 6.9" (40.4cm x 38.9cm x 17.5cm) HxWxD*
Dimensions Without Grille
•15.9" x 15.3" x 6.4" (40.4cm x 38.9cm x 16.3cm) HxWxD*
Dimensions Down firing w/feet
•7.8" x 15.3" x 15.3" (19.8cm x 38.9cm x 38.9cm) HxWxD*
Mains Voltage Range
•100V-120V, or 220-240V, 50Hz/60Hz –Switch selectable
on the rear panel. Note: Mains Fuse must be changed if
voltage is changed. (See below)
S10P is shipped pre-configured for destination country.
Mains Fuse (FOR 115V ONLY)
•T6.3A H250V Ceramic (5x20mm) Slow Blow (115V ONLY)
Mains Fuse (FOR 230V ONLY)
•T3.15A H250V Ceramic (5x20mm) Slow Blow (230V ONLY)
Mains Input Connector
•IEC 60320 C18
Shipping Weight
•50 lbs (23Kg)
Shipping Dimensions
•21.25" x 20.25" x 12.5" (54cm x51.4cm x 31.8cm)
*Allow additional 0.8" (35mm) for power cord and input wiring

WISDOM and the stylized W are registered trademarks of Wisdom Audio.
Wisdom Audio1572 College Parkway, Suite 164
Carson City, Nevada 89706 USA
TEL (775) 887-8850
FAX (775) 887-8820
wisdomaudio.com
S10P OM RevB © 1/2024 Wisdom Audio, Inc. All rights reserved. Printed in U.S.A.
Table of contents
Other Wisdom Subwoofer manuals

Wisdom
Wisdom SCS-2 User manual

Wisdom
Wisdom STS User manual

Wisdom
Wisdom S55i User manual

Wisdom
Wisdom S10 User manual

Wisdom
Wisdom Sage SCS User manual

Wisdom
Wisdom S90-f/c User manual

Wisdom
Wisdom S110i User manual

Wisdom
Wisdom Sage Cinema Series Installation instructions

Wisdom
Wisdom Sage S90i User manual

Wisdom
Wisdom Audio SAS Subwoofer User manual
Popular Subwoofer manuals by other brands

Kicker
Kicker Solo-Baric VS10L5 user manual

Alpine
Alpine SWE-815 Application guide

Atlantic Technology
Atlantic Technology 172 PBM instruction manual

Niles
Niles CM960SUB Specification sheet

Blaupunkt
Blaupunkt Blue Magic Xlb 300 A instruction manual

Farenheit
Farenheit CK-12D Installation instructions and service guide