Wisdom Sage S90i User manual

!
1!
Owner’s Manual
S90i
High Output RTL®Subwoofer

!
2!
Table of Contents
Introduction & Overview....................................................................3-4
Unpacking………………………….….................................................4-5
Placement & Installation……………...................................................6-10
Connections…………………….……..................................................10-11
North American Warranty ..................................................................12
Obtaining Service ..............................................................................13
Specifications & Accessories ..............................................................14
S90i Dimensions ................................................................................15
DOCUMENT CONVENTIONS
This document contains general safety, installation and operation instructions for the Wisdom Audio
S90i Subwoofer. It is important to read this document before attempting to use this product. Pay
particular attention to:
WARNING: Calls attention to a procedure, practice, condition or the like that,
if not correctly performed or adhered to, could result in injury or death.
CAUTION: Calls attention to a procedure, practice, condition or the like that, if not correctly
performed or adhered to, could result in damage to or destruction of part of or the entire
product.
Note: Calls attention to information that aids in the installation or operation of the product.

!
3!
Introduction
Congratulations on purchasing your Wisdom Audio in-wall subwoofer. The S90i’s
Regenerative Transmission LineTM technology delivers tremendous bass
performance in terms of depth, dynamics, and distortion resulting in articulate bass
that integrates seamlessly with high-resolution main speakers such as Wisdom
Audio’s Insight or Sage Series.
This manual focuses on the S90i subwoofer itself. In order to fully understand the
system, we recommend you also review the manual for the SC-2/3 System
Controller, or SW-1 subwoofer amplifier, or MiniDSP-1 subwoofer processor,
without one of which this subwoofer will not perform correctly.
While we expect your local Wisdom Audio dealer to take care of the setup and
calibration of the system, we still recommend that you at least briefly review this
and the other manuals to understand the system’s full capabilities.
Overview
Your Wisdom Audio S90i subwoofer uses a modern implementation of an old idea
for high quality, low distortion bass reproduction. While the roots of the
Regenerative Transmission LineTM go back to the 1950’s, it is the combination of
modern computer modeling and the vastly more powerful motors of contemporary
driver design that make the RTLTM so special.
There is a class of bass enclosures that has been around since the 1950’s, which
can be described generically as “low frequency tapped waveguides” or “tapped
pipes”. It was an idea that was a bit ahead of its time then, since fully optimizing
its use required both powerful drivers and computer modeling. But, if you are into
such things, check out US Patent 2,765,864 (filed in 1955), and an AES paper
published in 1959, “Analysis of a Low Frequency Loudspeaker System”.
We have utilized sophisticated modeling software in order to fully optimize our
enclosures, and have developed drivers that are specifically optimized for this
application. We call our unique implementation of this relatively old idea a “Re-
generative Transmission LineTM” subwoofer, or “RTL” sub for short.
All dynamic drivers develop energy on both sides of the diaphragm, with the rear
energy being 180° out of phase with the front energy. If you allow the driver to
operate in free space (no enclosure), the front and rear energies largely cancel each
other out — especially at low frequencies.

!
4!
Overview (continued)
In our Regenerative Transmission LineTM subwoofer, the energy from the back side
of the driver is sent along a long, folded path in such a way that its lowest
frequencies arrive back at the front side of the driver in phase, effectively summing
to an increase of 6 dB in output. Thus, the energy from both sides of the woofer
cone is used in a productive way, resulting in a substantial reduction in distortion
and an effective surface area double compared to what you would otherwise
expect. As an example, the effective radiating surface area of the two 5”x7”
woofers in the S90i is equivalent to a 12”-13” woofer in more conventional
enclosures.
The results are quite stunning. Low frequencies are strikingly dynamic and
responsive, and integrate quite seamlessly with the fast and detailed Sage Series
planar magnetic hybrids. As an example, the S90i has an output in excess of 123
dB at 20 Hz.
Unpacking the S90i
The Wisdom Audio S90i subwoofer is a substantial piece of equipment. Please
exercise caution when unpacking your S90i to ensure that you do not strain
yourself from its (perhaps unexpected) weight.
CAUTION:
Do not attempt to lift your S90i by yourself. Unpacking this subwoofer is clearly a
two-person job. It is unwise for a single person to attempt doing so.
Do not attempt to lift your S90i while bending or twisting from the waist. Use your
legs for lifting, not your back.
Always stand as straight as possible and keep the S90i close to your body to reduce
strain on your back.

!
5!
The S90i is fully assembled on delivery:
The front surface has a smooth, resin-
coated paper finish that can be taped and
spackled, and then painted to match the
adjacent drywall (gypsum board).
The end of the speaker that contains the
grille assembly also includes the “pig-
tail” for connecting the speaker to the
system, as well as some “feet” to support
the S90i slightly above the sole plate, to allow room for the wiring and the base-
board of the finished wall. (Rooms with unusually tall baseboards may require the
S90i to be mounted somewhat higher still.)
The grille itself is friction-fit into its frame
using rubber channels on its edges.
Removing the grille exposes the black
service panel, which only needs to be
removed in the unlikely case that one or
more drivers needed to be replaced after
installation in the wall.
The Regenerative Transmission LineTM
opening occupies a little less than half the
space covered by the grille.
The serial number for the S90i can be
found on the inside of the opening for the
Regenerative Transmission Line. Record
this serial number below for easy reference
should you need it in the future.
s/n: ________________________

!
6!
Subwoofer Placement
Subwoofers offer somewhat greater flexibility in placement, since the frequencies
they reproduce are not readily localizable by the human ear. This is due to the fact
that the wavelengths they reproduce are more than ten feet (3 meters) long, but our
ears are located only about 6-7 inches (17 cm) apart. Thus these extremely long
waves do not contribute meaningfully to the imaging that the main speakers create.
However, this fact does not mean that the placement of the subwoofers has no
effect on the sound quality in the room. Far from it. The subwoofers are the most
likely to suffer from the response irregularities introduced by the room itself,
operating as they do below approximately 80 Hz in most systems.
Recent research into the behavior of rooms as a function of speaker placement has
concluded that — if you have the freedom to do so — there are significant
advantages to placing several smaller subwoofers around the room, rather than
relying on a single large woofer. Moreover, the optimum placement is usually
centered on each of the four walls, or deep in the corners of the room. If you have
the luxury of doing so, this simple placement strategy can reduce the size of the
room’s response irregularities from 20 decibels down to perhaps as little as 6-8
decibels—a tremendous improvement.
Reducing the room’s inherent problems to this degree provides a huge advantage.
It allows the SC-2/3 System Controllers to put its considerable abilities to work on
perfecting your system’s response, rather than on trying to perform major corrective
surgery.
Room Treatment
Rectangular rooms have six reflecting surfaces (four walls, ceiling and floor)
that reflect sound to the listener, after various delays introduced by the indirect
routes the sound take on their way to the listener. These first reflections are
particularly damaging to sound quality. Looking at the simplest case of stereo
reproduction, you have a minimum of twelve first reflection points in your room
that deserve some attention.
Unfortunately, it is often difficult to do much about the ceiling and floor reflections,
even though they are arguably the most destructive. (The minimization of these
reflections is one of the strongest arguments for the tall, line source loud- speakers
that Wisdom Audio builds.) This leaves you with eight “first reflections” that you

!
7!
Room Treatment (continued)
should consider minimizing somehow. These points are easily found by having an
assistant slide a small mirror along the four walls of the room, while you sit at the
listening position. Any place on the wall where you can see a reflection of any
speaker is a first reflection point. Concentrate on the first reflections for the Left
and Right speakers first.
If you can, arrange to apply either absorption or diffusion at these eight points
(don’t forget the wall behind you). Absorption can be as simple as heavy, insulated
drapes; diffusion can be provided by a well-stocked bookcase with books of varied
sizes. Alternatively, you can buy purpose-designed room treatments (some sources
listed under References, below).
The important things to remember are these: a good room should have a balance of
absorption and diffusion; and if you are going to treat only a few areas of the room,
the first reflection points are the most important ones to treat.
Professional Acoustic Design
Does this all sound too complicated? For good reason: it is complicated.
The difference between the average listening room and one that is professionally
designed and implemented is huge. A great listening room will disappear to an
astonishing degree, letting the experiences captured in your recordings speak to
you directly. A well-designed room is also quieter and more comfortable. It can
easily become a favorite retreat for peace and rejuvenation.
If you decide to investigate the possibility of improving your room with the help of
a professional, it is important to find someone who focuses on residential spaces.
Most acousticians are trained to deal with large spaces — airports, auditoriums,
lobbies in commercial buildings, etc. The problems seen in “small” rooms
(residential spaces) are quite different, and outside the experience of most
acousticians. Find someone who specializes in and has a great deal of experience
designing home studios, home theaters, and the like. Your Wisdom Audio dealer
may be such a person; failing that, he/she can help you find such a professional.
References
Books on Acoustics:
The Master Handbook of Acoustics, F. Alton Everest, TAB Books
Sound Reproduction: The Acoustics and Psychoacoustics of Loudspeakers and
Rooms by Dr. Floyd Toole, Focal Press

!
8!
Installing the S90i in a Wall
Your dealer has extensive knowledge of wall construction, and will customize
these installation instructions to suit the needs of your particular situation. But
these notes provide an overview of the process.
Note that the Regenerative Transmission Line opening that vents the low
frequencies into the room may be placed either up near the ceiling, or down near
the floor. In most rooms, these are largely equivalent positions in terms of
acoustics. The difference will usually be aesthetic rather than performance- based.
As seen from above, a cross sectional view of the S90i as mounted in a typical 2 x
6 stud wall looks like this:
The front board of the S90i is made from 5⁄8” MDO plywood, which presents a
smooth, paintable finish surface similar to dry wall. It can be butted up against the
5⁄8” dry wall, taped, and spackled, and painted like any other section of wall. It
will also readily accept skim-coating if the construction calls for plaster walls.

!
9!
Installing the S90i in a Wall (continued)
The process of installing the S90i in a standard stud wall is quite straightforward.
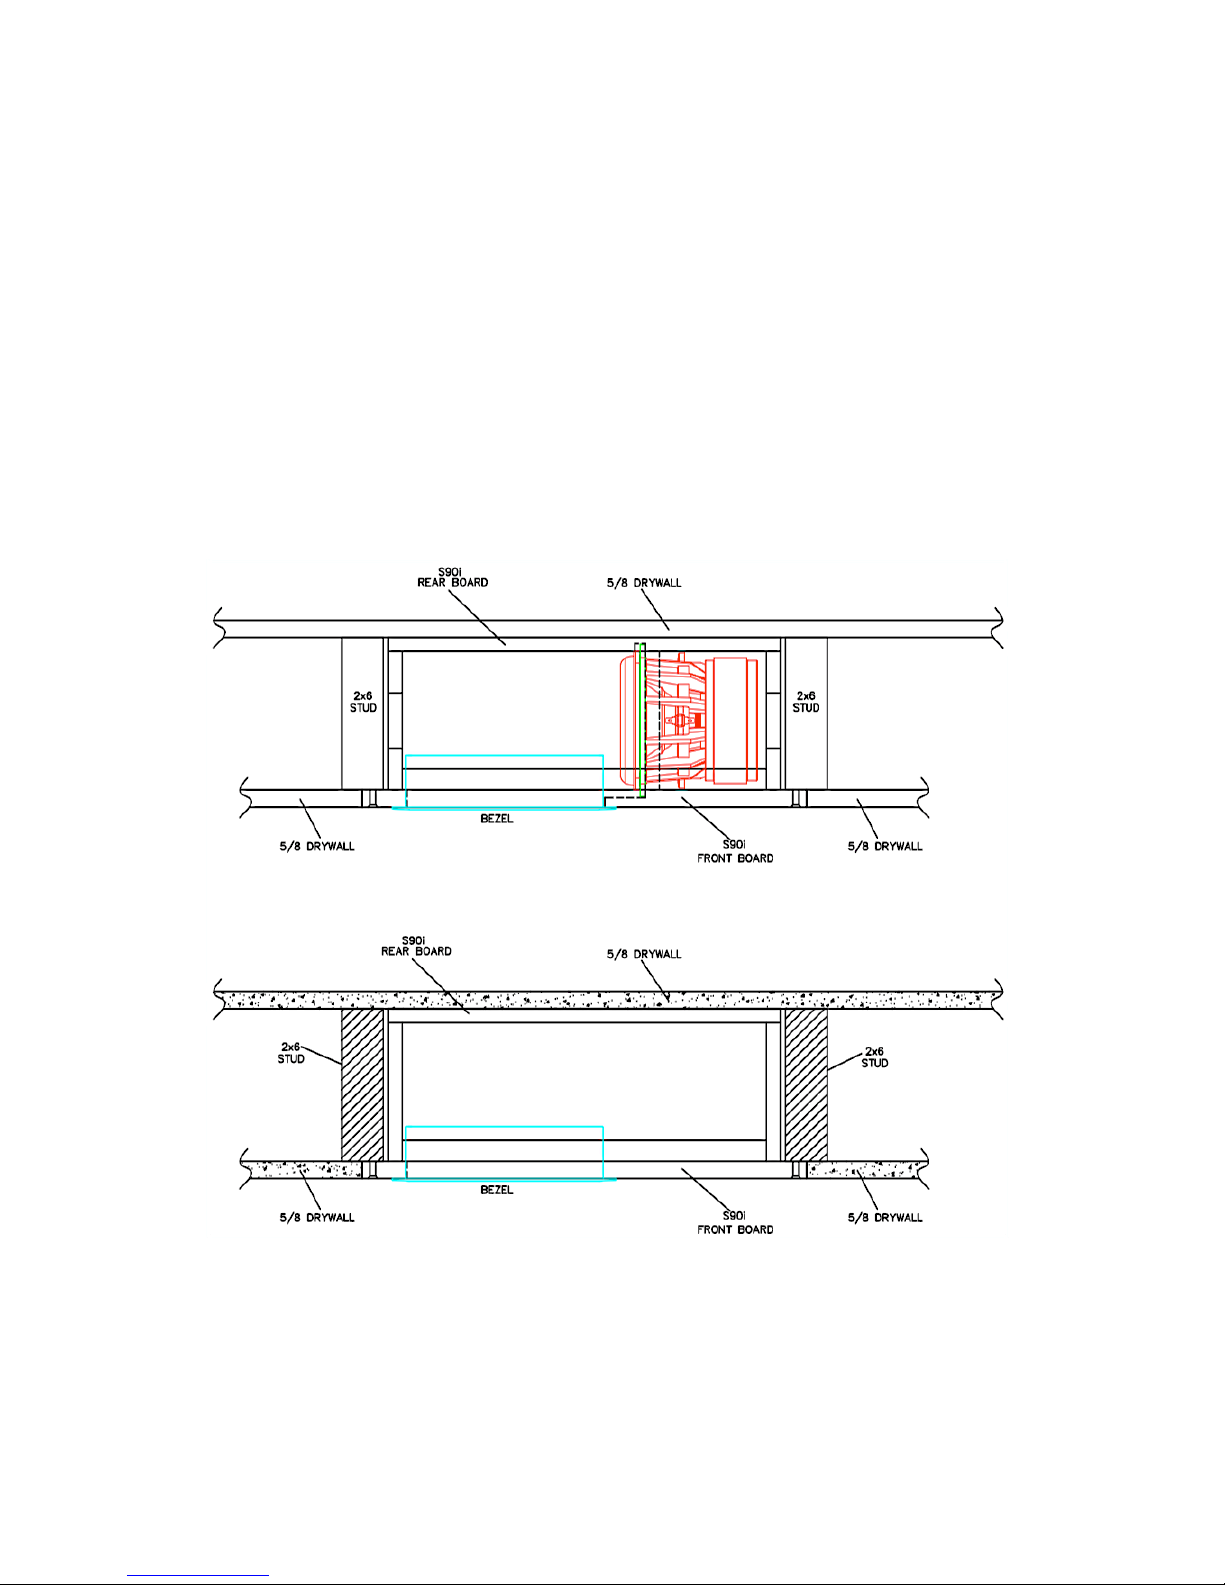
1. Open the 2 x 6 stud bay to be used
a. The existing dry wall (if any) should be cut back so it covers about half of
the 2 x 6 on each side of the bay. The flange of the front board of the
S90i will cover the other half. Obviously, there cannot be any plumbing
or wiring in this stud bay, nor firebreaks. The S90i will use virtually all
of the available space in a standard eight foot 2 x 6 stud bay.
2. Stand the S90i in front of the bay in which it will reside; make the electrical
connections
a. There are two methods commonly used for making these connections.
b. If you have access to the adjacent stud bay, drill a hole through the 2 x 6
stud between where the S90i’s feet will be when it is in place, and feed
the pigtail through the hole. You can then make the connection in the
adjacent stud bay, where you will have plenty of room to work. You can
even put the connections inside a J-box for future serviceability if you so
desire.
c. Alternatively, sometimes it works out easier to bring the connecting wire
through the top plate or sole plate of the same stud bay in which the
S90i is located. If so, the connection can be made in the space between
the feet at the end of the S90i with the pigtail. If the signal is coming
through the attic and the top plate, the S90i will need to be “upside
down” with its feet at the top of the bay. This places the grille high on
the wall, which may be preferred aesthetically (since it can be mistaken
as a surround speaker).
d. The preferred method for making the electrical connection is to solder
the wires together and then insulate the connection with shrink tubing. If
this is impractical, use appropriately-sized wire nuts and wrap the wire
nut connections in black electrical tape to prevent any chance of the
connection vibrating loose.
3. Stand the S90i in the stud bay, dress the wires so that they cannot rattle, and
screw the front board to the studs with drywall screws
a. The S90i has predrilled, countersunk screw holes so standard #8 dry wall
screws will sit with their heads below the surface, so they can be tapes
and spackled without any trace. A total of eighteen (18) dry wall screws
are used.
b. The S90 should be supported or suspended in a manner that does not
subject it to twisting or torsional forces that would stress the enclosure.
No wooden or metal enclosure should be forced against an irregular
surface. If the studs are curved or warped in an installation the installer
must insert shims between the S90 front panel and the stud surfaces to
avoid such stresses, as would be the case for any in-wall loudspeaker.

!
10!
Installing the S90i in a Wall (continued)
4. Tape and spackle the seams
5. After&everything&has&been&painted,&slice&the&paint&along&the&edge&of&the&
foam&plug&in&the&bass&vent.&Remove&and&discard&the&foam.
a. The!foam!plug!is!there!simply!to!protect!the!inside!of!the!S90i,!and!
particularly!the!woofers!themselves,!from!being!splattered!with!paint.!!
Once!that!purpose!has!been!served,!it!needs!to!be!removed.!!A!sharp!
utility!knife!can!be!used!to!break!any!paint!that!may!have!leaked!into!the!
area.!
Making the S90i Connections
As with any system, you should make changes to the connections only when the
power is turned off to avoid any chance of inadvertently causing a problem (such
as a short-circuit).
We recommend using heavy-gauge speaker wire, particularly when the installation
forces you to use longer wires than you might otherwise. A good rule of thumb is
to keep the “loop resistance” below 0.07 ohms.
The loop resistance can be easily measured with an inexpensive volt-ohm meter.
Simply twist the two conductors at one end of the cable together, and then measure
the DC resistance across the two conductors at the other end of the speaker wire.
Doing this measures the total resistance going down one side and back the other,
hence the term “loop resistance.” If this figure is at or below 0.07 ohms, you are in
good shape.
For the purposes of this manual, we will assume that you have already connected
the SC-2/3 System Controller as per the instructions found in its manual. As such,
you should have signal coming from your source component(s) to a
preamp/processor that provides bass management (to create the subwoofer
channel(s), and then on to the SC-2/3; following the SC-2/3, the signal for the sub-
woofer is sent to a high quality amplifier such as the Wisdom Audio SA Series
amplifiers.
A “pigtail” connection is provided at one end of the S90i. Since the S90i fills a
standard 2 x 6 stud bay, the simplest thing is to drill a hole in one of the 2 x 6 studs
and thread the pigtail through to the adjacent bay, where you have ample room to
make connections and run the wires.

!
11!
Making the S90i Connections (Continued)
Alternatively, the incoming signal can be routed directly into the small space
provided by the “feet” of the S90i, and the connection to the pigtail can be make
just prior to installing the S90i in the wall.
Connect the outputs of your Wisdom Audio SA-series amplifier to the subwoofer,
taking care to get the polarity correct. Connect the positive (+) terminals on the SA-
Series amplifier to the red wire in the pigtail; likewise, connect the negative (–)
terminals on the amplifier to the black wire in the pigtail.
We recommend using wire nuts and then wrapping the resulting connection in
electrical tape to preclude any chance of the wire nut working loose over time.

!
12!
North American Warranty
Standard Warranty
When purchased from and installed by an authorized Wisdom Audio dealer,
Wisdom Audio loudspeakers are warranted to be free from defects in material and
workmanship under normal use for a period of ten years from the original date of
purchase.
Important
Wisdom Audio loudspeakers are designed for installation and operation in
environmentally controlled conditions, such as are found in normal residential
environments. When used in harsh conditions such as outdoors or in marine
applications, the warranty is three years from the original date of purchase.
During the warranty period, any Wisdom Audio products exhibiting defects in
materials and/or workmanship will be repaired or replaced, at our option, without
charge for either parts or labor, at our factory. The warranty will not apply to any
Wisdom Audio products that has been misused, abused, altered, or installed and
calibrated by anyone other than an authorized Wisdom Audio dealer.
Any Wisdom Audio product not performing satisfactorily may be returned to the
factory for evaluation. Return authorization must first be obtained by either calling
or writing the factory prior to shipping the component. The factory will pay for
return shipping charges only in the event that the component is found to be
defective as mentioned above. There are other stipulations that may apply to
shipping charges.
There is no other express warranty on Wisdom Audio products. Neither this
warranty nor any other warranty, express or implied, including any implied
warranties of merchantability or fitness, shall extend beyond the warranty period.
No responsibility is assumed for any incidental or consequential damages. Some
states do not allow limitations on how long an implied warranty S90i and other
states do not allow the exclusion or limitation of incidental or consequential
damages, so the above limitation or exclusion may not apply to you.
This warranty gives you specific legal rights, and you may also have other rights,
which vary from state to state. This warranty is applicable in the United States and
Canada only. Outside of the U.S. and Canada, please contact your local,
authorized Wisdom Audio distributor for warranty and service information.

!
13!
Obtaining Service
We take great pride in our dealers. Experience, dedication, and integrity make
these professionals ideally suited to assist with our customers’ service needs.
If your Wisdom Audio loudspeaker must be serviced, please contact your dealer.
Your dealer will then decide whether the problem can be remedied locally, or
whether to contact Wisdom Audio for further service information or parts, or to
obtain a Return Authorization. The Wisdom Audio Service Department works
closely with your dealer to solve your service needs expediently.
IMPORTANT: Return authorization must be obtained from Wisdom Audio’s
Service Department BEFORE a unit is shipped for service.
It is extremely important that information about a problem be explicit and
complete. A specific, comprehensive description of the problem helps your dealer
and the Wisdom Audio Service Department locate and repair the difficulty as
quickly as possible.
A copy of the original bill of sale will serve to verify warranty status. Please
include it with the unit when it is brought in for warranty service.
WARNING: All returned units must be packaged in their original packaging, and
the proper return authorization numbers must be marked on the outer carton for
identification. Shipping the unit in improper packaging may void the warranty, as
Wisdom Audio cannot be responsible for the resulting shipping damage.
Your dealer can order a new set of shipping materials for you if you need to ship
your loudspeaker and no longer have the original materials. There will be a charge
for this service. We strongly recommend saving all packing materials in case you
need to ship your unit some day.
If the packaging to protect the unit is, in our opinion or that of our dealer,
inadequate to protect the unit, we reserve the right to repackage it for return
shipment at the owner’s expense. Neither Wisdom Audio nor your dealer can be
responsible for shipping damage due to improper (that is, non-original) packaging.

!
14!
Specifications
All specifications are subject to change at any time, in order to improve
the product.
•Number of required amplifier channels: 1
•Frequency response: 28Hz – 80 Hz ± 2dB relative to the target curve
•Impedance: 4Ω
•Sensitivity: 93 dB/2.83V/1m
•Power handling, peak: 1000w
•Maximum SPL: 123dB / 20 Hz /1m
•Dimensions: see appropriate dimensions drawings on next page
•Shipping weight, each: 65 lbs. (30 kg)
For more information, see your Wisdom Audio dealer, or contact:
Wisdom Audio
1572 College Parkway, Suite 164
Carson City, NV 89706
www.wisdomaudio.com
Ph: 775.887.8850
Accessories
Extension Port “f/c” Kit
The S90i’s port can be extended up to 30” (76 cm) for mounting under the floor, in
the ceiling or venting the sub from an adjacent room. For more information and
pricing please consult your approved Wisdom Audio dealer.

!
15!
S90i Dimensions

!
16!
WISDOM and the stylized W are registered trademarks of Wisdom Audio.
Wisdom Audio1572 College Parkway, Suite 164
Carson City, Nevada 89706 USA
Telephone: 775.887.8850
Fax: 775.887.8820
www.wisdomaudio.com
S90I OM-2.0 © 4/11/18 Wisdom Audio, Inc. All rights reserved. Printed in U.S.A.
!
Other manuals for Sage S90i
1
Table of contents
Other Wisdom Subwoofer manuals

Wisdom
Wisdom SCS-2 User manual

Wisdom
Wisdom Audio SAS Subwoofer User manual

Wisdom
Wisdom S10P User manual

Wisdom
Wisdom S110i User manual

Wisdom
Wisdom S10 User manual

Wisdom
Wisdom S55i User manual

Wisdom
Wisdom S90-f/c User manual

Wisdom
Wisdom Sage STS User manual

Wisdom
Wisdom Sage SCS User manual

Wisdom
Wisdom S55i User manual