I. Product Overview
1. Reset Button
2. Micro SD Card Slot
3. Blue Indicator Light
4. Camera Lens
II. What’s In the Box
-1× Bulb Camera -1× Remote Controller
III. Network Setup
3.1. Install the “BulbCam” APP on your Smartphone or tablet PC.
3.1.1. Search for “BulbCam” APP in your App store or Google Play and install it on
your smartphone or tablet PC.
3.2. LAN or P2P Mode Setup
>> Insert a SDHC Class 10 Micro SD card (4GB-32GB, format it for the first usage)
into the bulb’s card slot.
>> Screw the bulb into a standard E27 light socket. The LED beads will be illumi-
nated for 10 seconds and then turn off, while the blue indicator light will stay illumi-
nated for 10 seconds and turn off, indicating the bulb’s WIFI signal is ready.
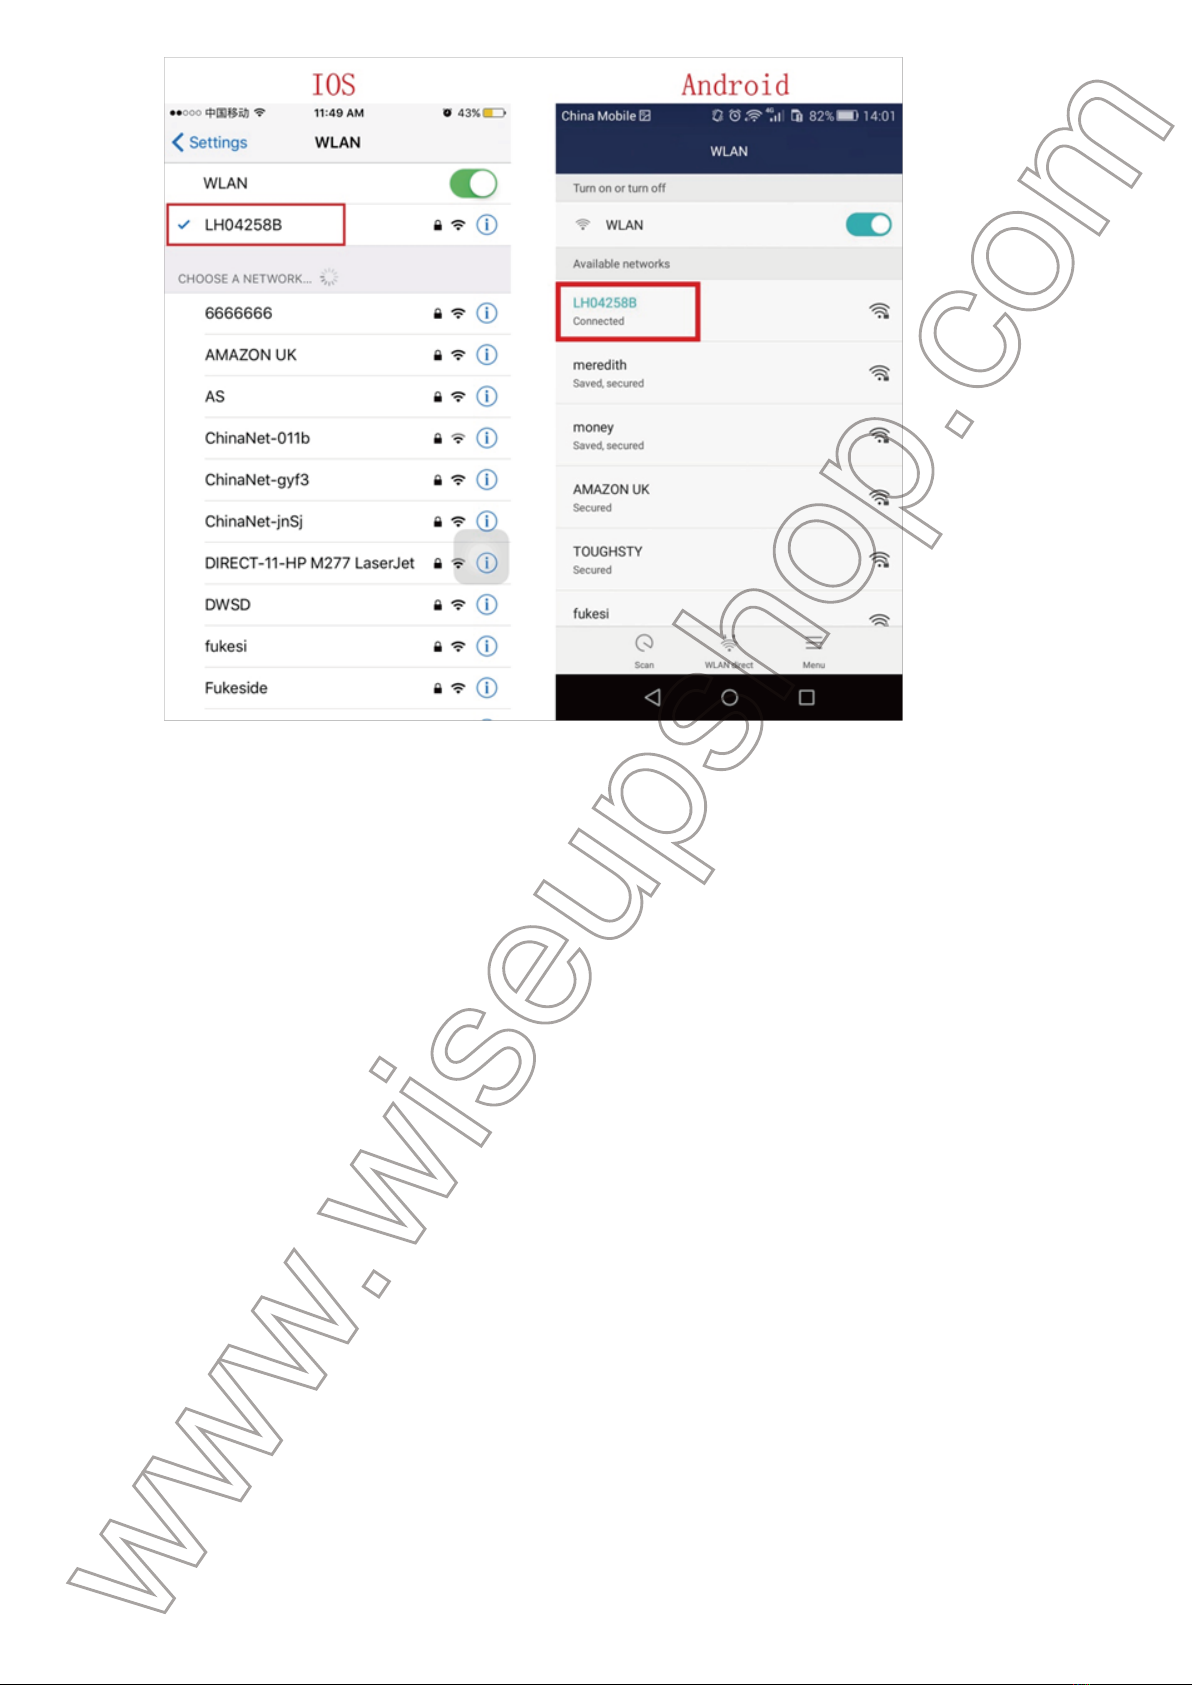
3.2.1. Go to the WLAN settings on your smartphone or tablet PC and connect to
the bulb’s WIFI signal. The bulb’s WIFI network password is “88888888”; the SSID
starts with “LH******” will appear on your WLAN settings page as below:
[Note]: If the bulb’s WIFI signal cannot be found for a long time, press the Reset Button for 5 sec-
onds or push the Reboot Button once to reset all settings to factory default. The bulb camera will
restart automatically.
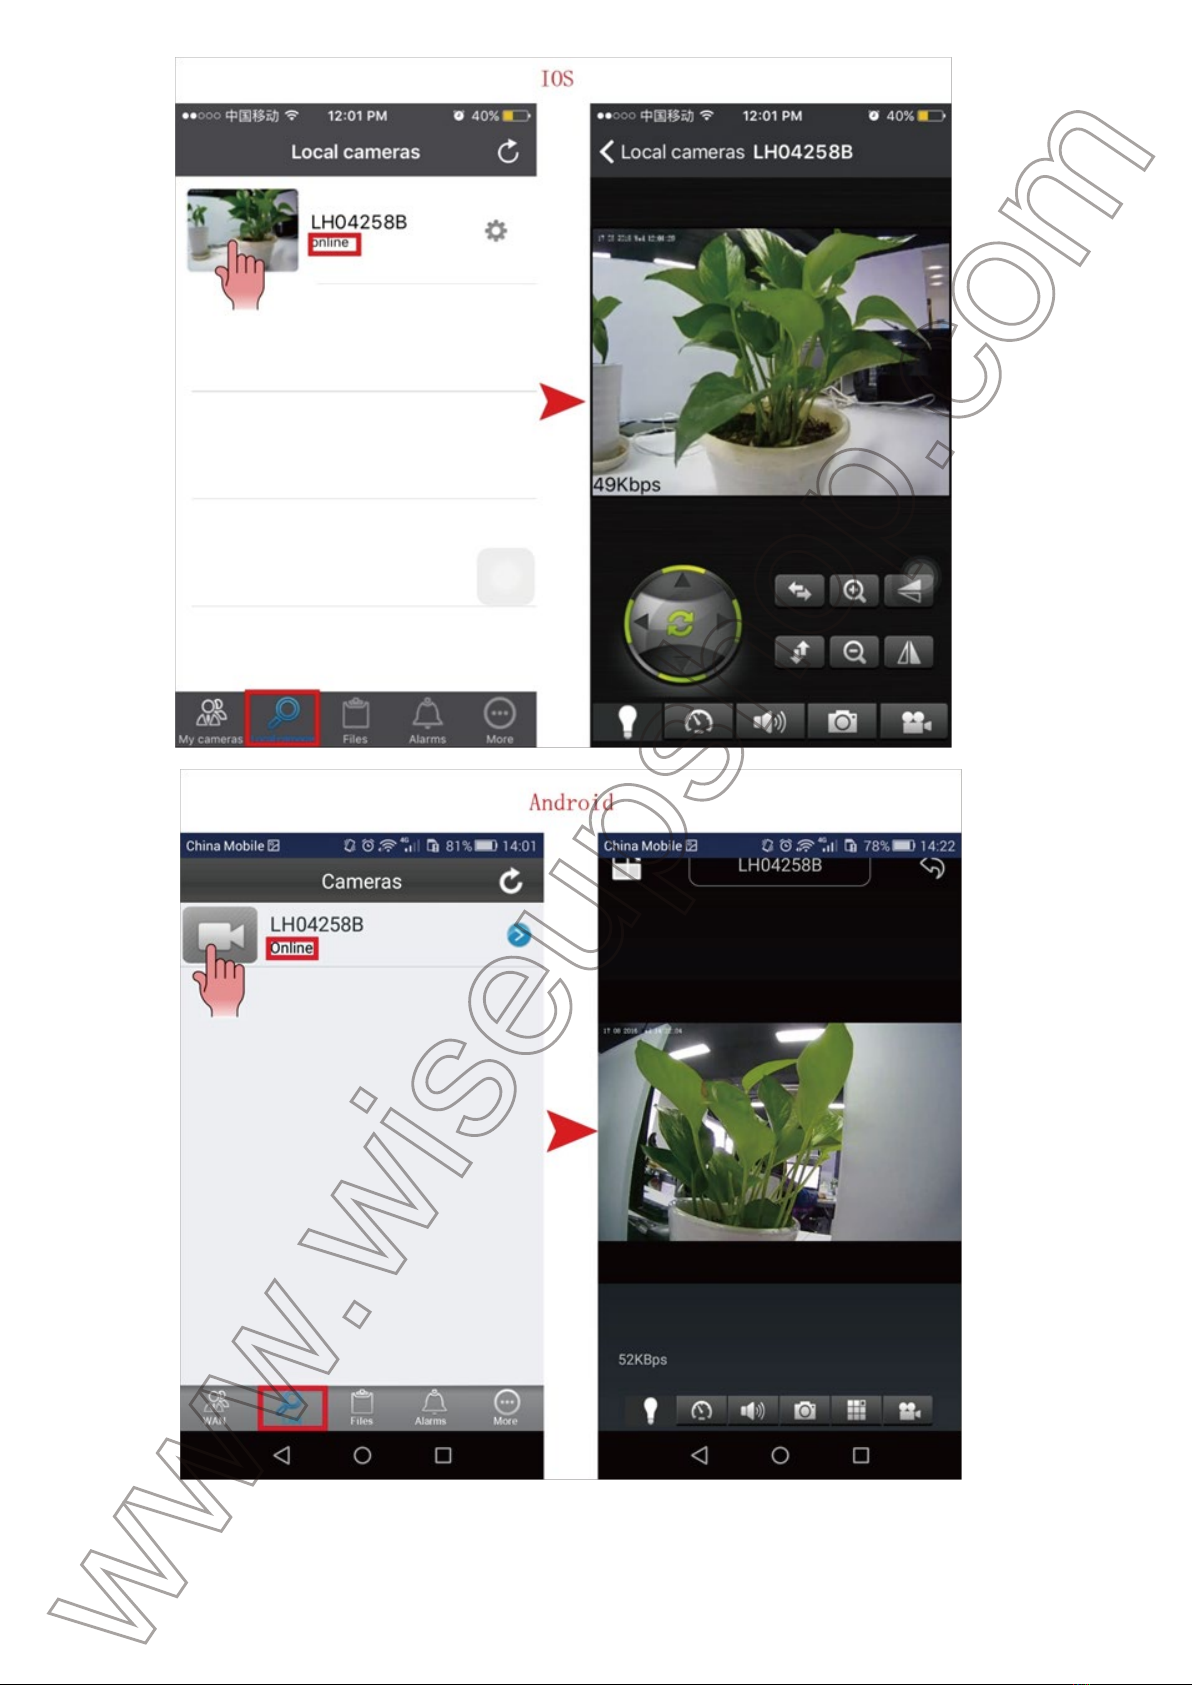
3.2.2. Launch the “BulbCam” APP. Tap “Local cameras” (Android: LAN) at the
bottom of the screen and the camera will pop up in a few seconds.
3.2.3. If the camera shows “Online” on the “Local cameras” (Android: LAN) page,
it means the P2P (LAN) connection is successful and you can watch a live video
feed of the camera in the P2P (LAN) mode.
[Note]: See the table below for an explanation of the different functions available:
3.3. WAN Mode or Remote View Setup
>> Before the WAN configuration, please confirm that the bulb camera is success-
fully added to your smartphone or tablet PC in the P2P (LAN) mode, and that the
P2P (LAN) connection works well.
3.3.1. Launch the “BulbCam” APP.
3.3.2. Set up the WAN mode or remote view.
For IOS:
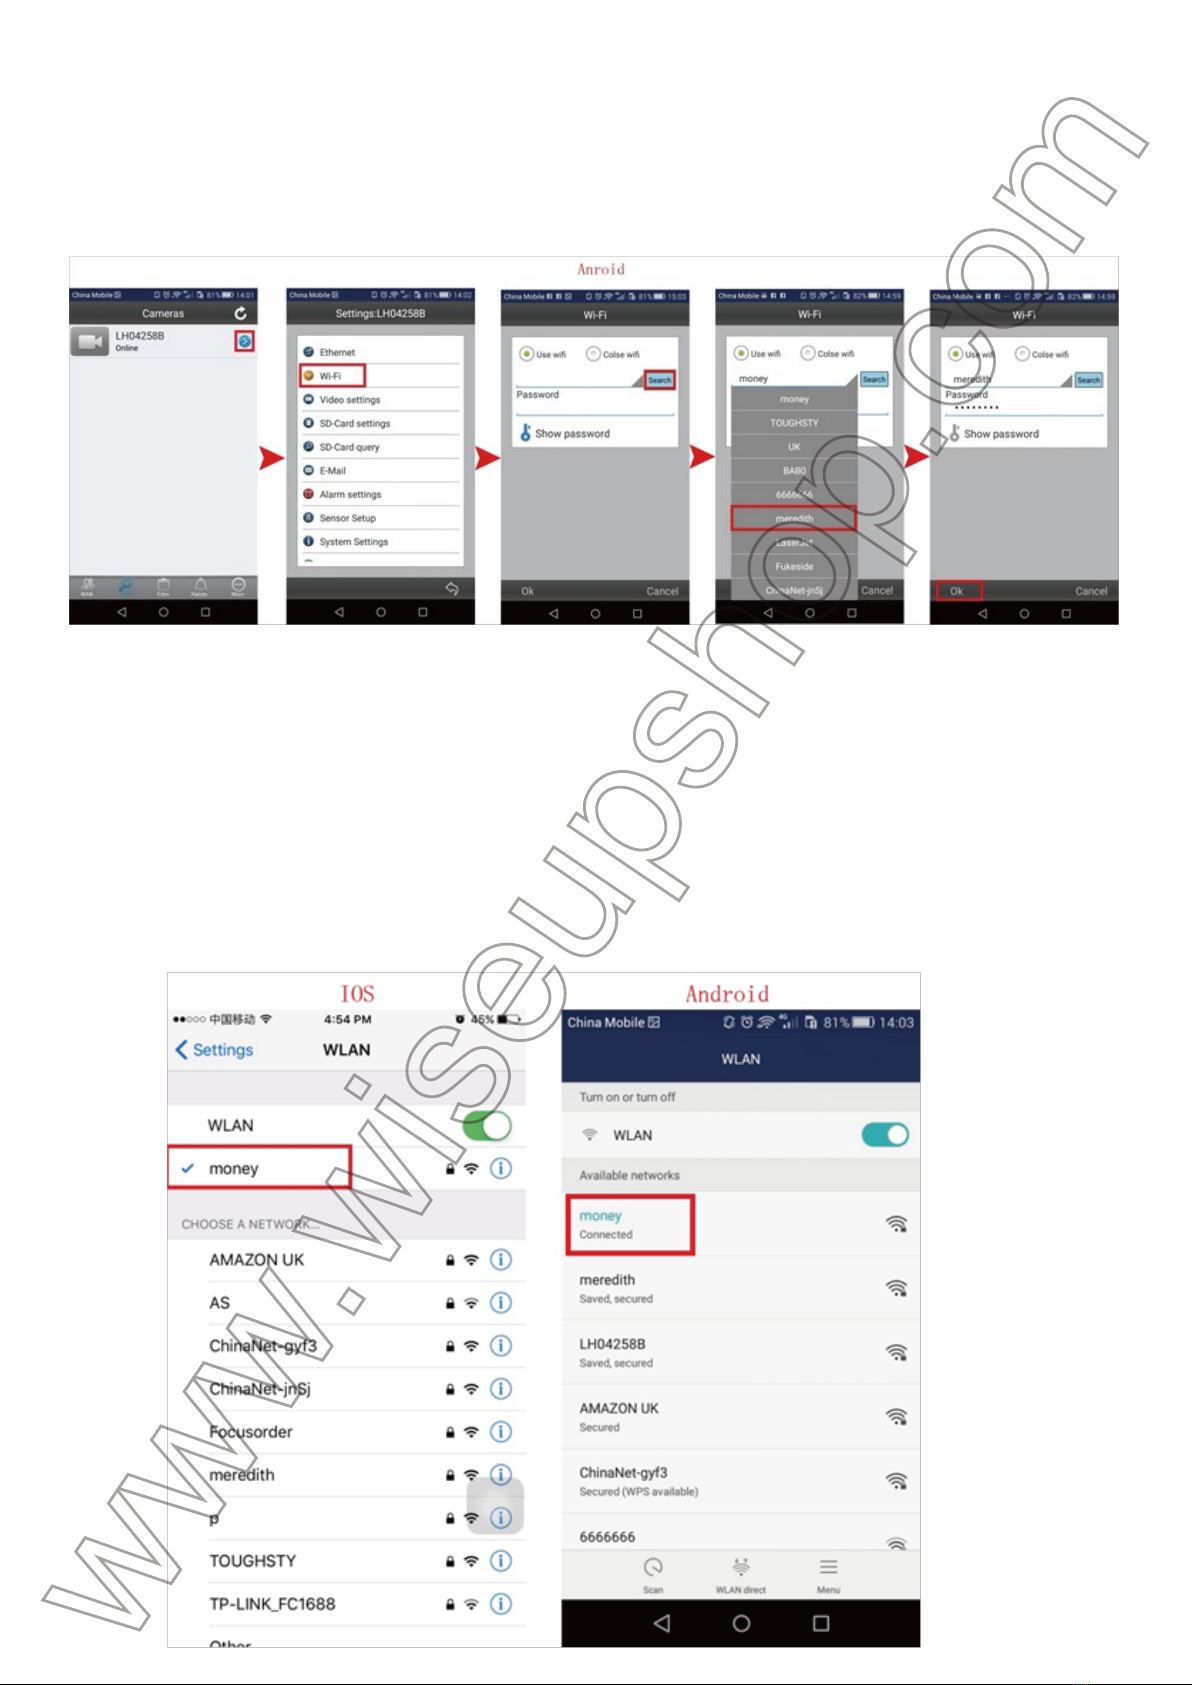
Step 1: tap the setting icon on the “Local cameras” page and select “Wireless
settings”.
Step 2: tap the exclamation mark icon and select a desired WIFI network to enroll
the camera in.
Step 3: tap “Done” to confirm the WIFI configuration.
For Android:
Step 1: tap the setting icon on the “LAN” page and select “Wi-Fi”.
Step 2: tap “Search” and select a desired WIFI network to enroll the camera in.
Step 3: tap “Ok” to confirm the WIFI configuration.
3.3.3. The camera will restart automatically.
Check if the WAN mode or remote view setup works!
1. Exit the “BulbCam” APP.
2. Go to the WLAN setting page on smartphone or tablet PC and join to another
WIFI network which must be different from the current one, or you can use your
mobile network.
3. Launch the “BulbCam” APP again.
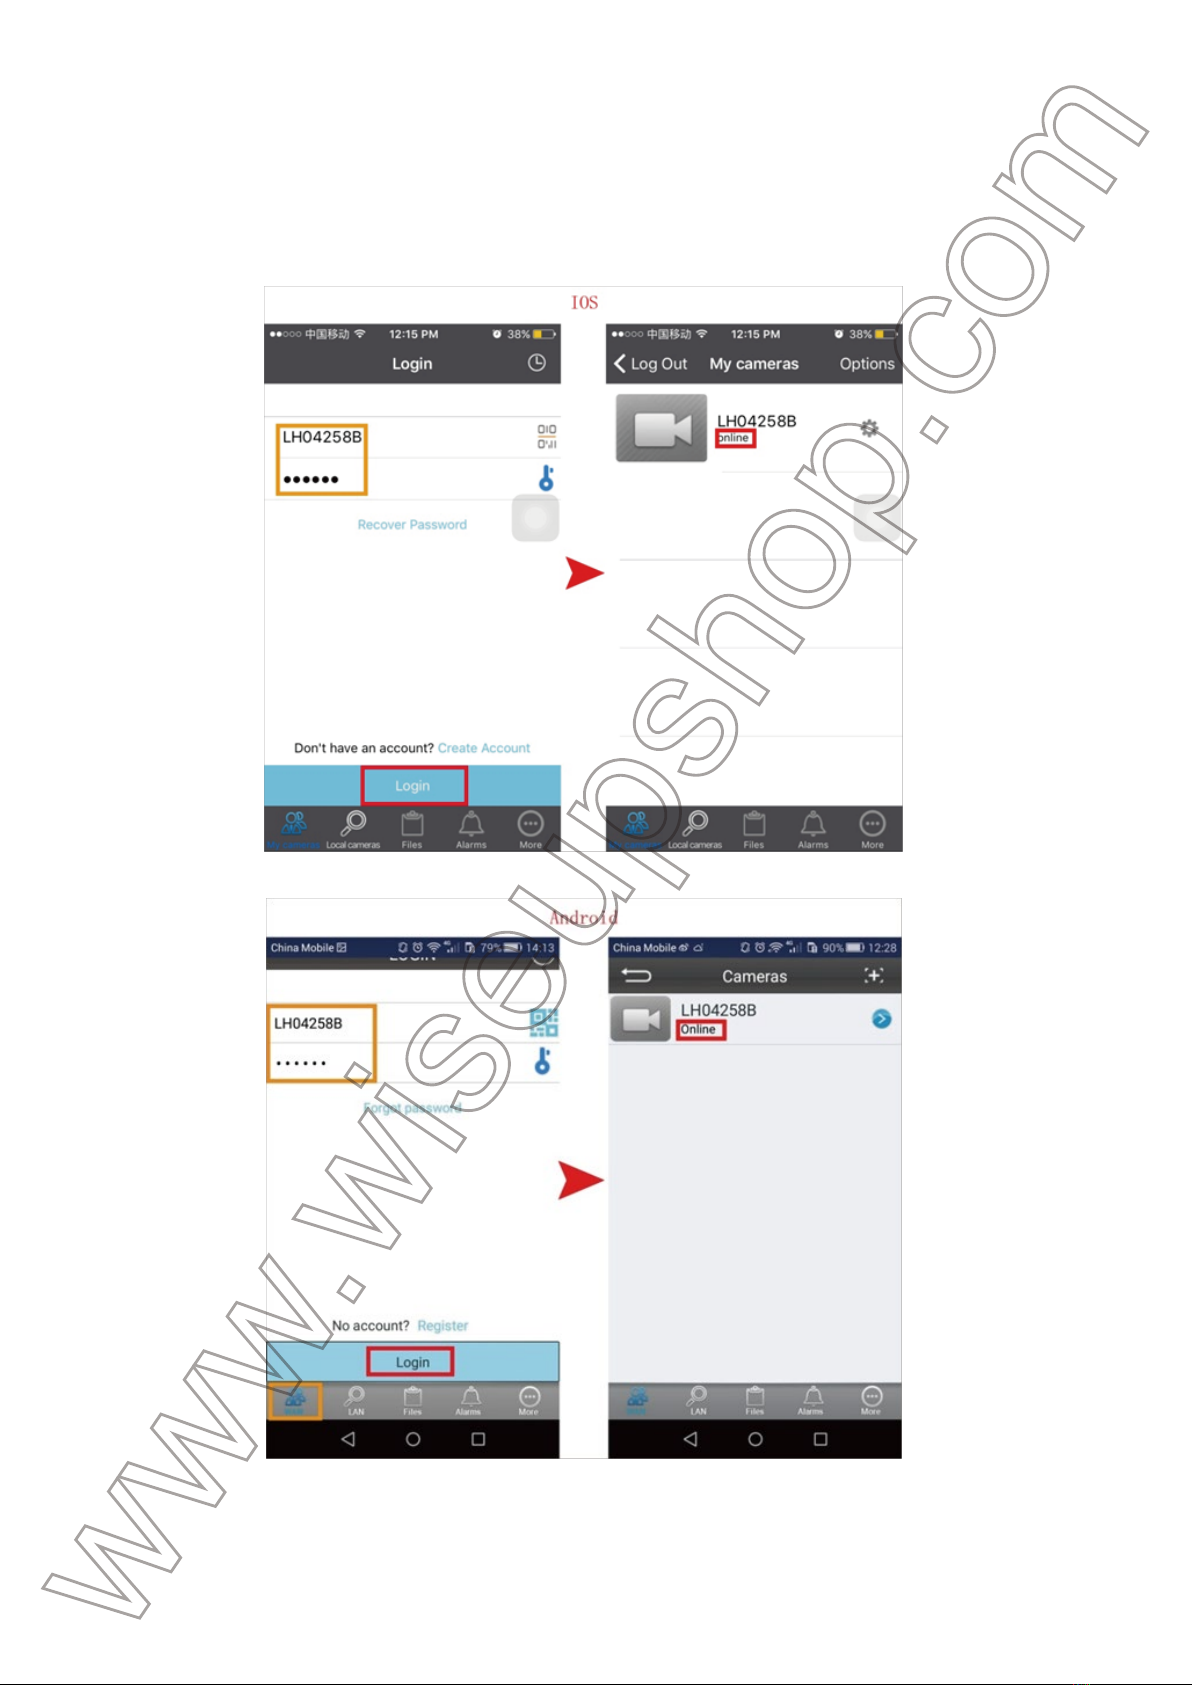
4. Tap “My cameras” (Android: WAN) at the bottom of the screen. Input the bulb
camera’s UID and password, then tap “Login”. The camera will pop up in a few
seconds. If the camera shows “Online” on the “My cameras” (Android: WAN)
page, it means the remote view (WAN) setup is successful.
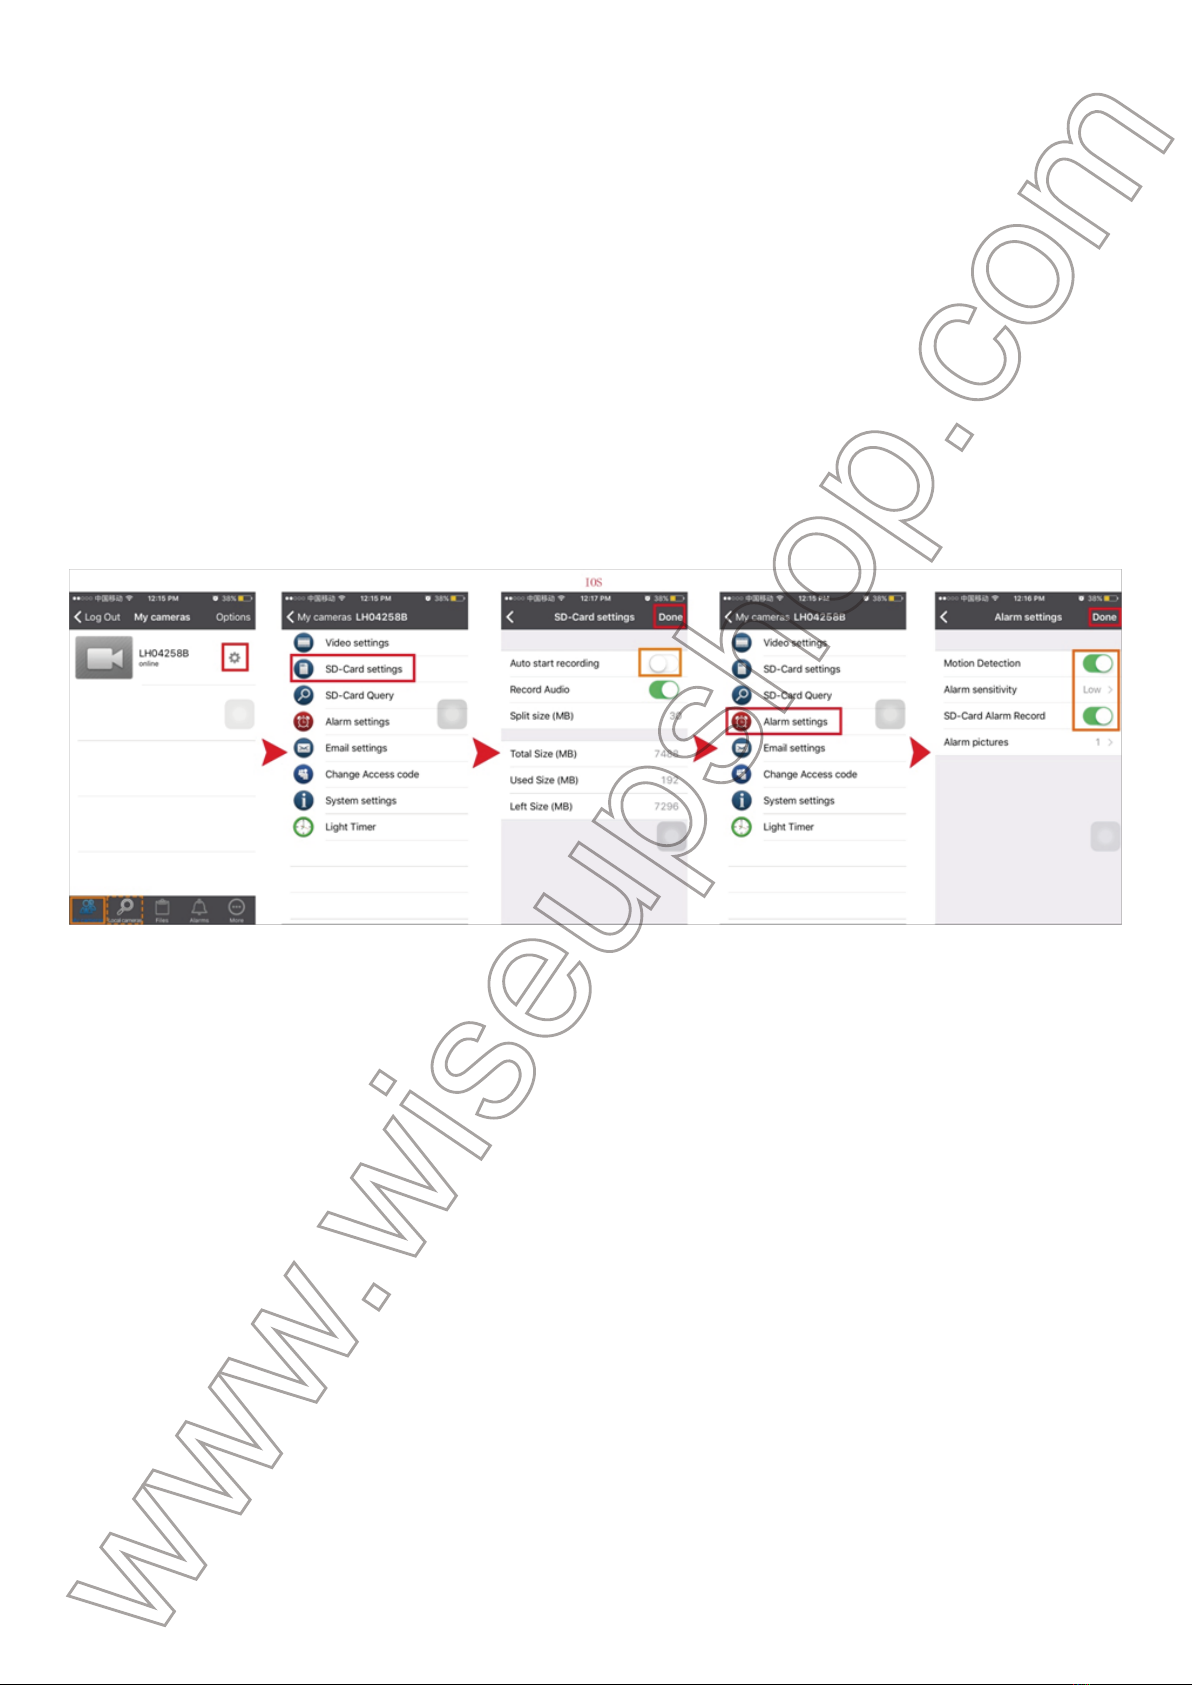
IV. Motion Detection Recording Setup
>> Please make sure a Micro SD card (4GB-32GB) is securely fitted into the bulb’s
SD card slot. A SDHC Class 10 Micro SD card is recommended.
4.1. Launch the “BulbCam” APP.
4.2. Set up motion detection recording.
For IOS:
Step 1: tap the setting icon on the “Local cameras” or “My cameras” page and
select “SD-Card settings”.
Step 2: disable “Auto start recording” and tap “Done” to confirm the SD-Card
settings.
Step 3: go back to the previous page and select “Alarm settings”.
Step 4: enable motion detection recording function and tap “Done” to confirm the
alarm settings.
For Android:
Step 1: tap the setting icon on the “LAN” or “WAN” page and select “SD-Card set-
tings”.
Step 2: disable “Start automatic recording” and then tap “Ok” to confirm the
SD-Card setting.
Step 3: go back to the previous page and select “Alarm settings”.
Step 4: enable motion detection recording function and tap “Ok” to confirm the
alarm settings.
4.3. The bulb camera will start recording video automatically when a movement is
detected. The video files will be saved in the bulb’s Micro SD card. Remove the
card and insert it into a PC computer. Install the PC Client software to play back
the video files on your PC computer (See FAQ).
[Note]: Video Format: HKV
V. Recording Video to Smartphone or Tablet PC
>> Before recording, make sure there is enough space in your smartphone or
tablet PC to store video footage.
5.1. Launch the “BulbCam” APP.
5.2. Set up the video resolution for remote video recording.
For IOS:
Step 1: tap the setting icon on the “Local cameras” or “My cameras” page and
then select “Video settings”.
Step 2: enable “Main Stream” (1280×720P) if you want the camera to record
video with HD quality.
Step 3: tap “Done” to confirm the video settings.
For Android:
Step 1: tap the setting icon on the “LAN” or “WAN” page and then select “Video
settings”.
Step 2: choose your desired video resolution from “sub-stream” (640×384) and
“main-stream” (1280×720P).
Step 3: tap “Ok” to confirm the video settings.
5.3. Record video to your smartphone or tablet PC.
Step 1: on the “Local cameras” or “My cameras” (Android: LAN or WAN) page,
tap the camera icon to enter the live streaming screen.
Step 2: click Remote Video Recording Button to start or stop recording
video to your smartphone or tablet PC.
Step 3: click Audio Button and Headphone Button to record
audio to your video file.
5.4. Go back to the previous page and tap “Files” at the bottom of the screen to
check out the video files.
[Note]: Video Resolution: 640×384, 1280×720P Optional Video Format: MOV, AVI
VI. Recording Video to the Local Micro SD Card
>> Please make sure a Micro SD card (4GB-32GB) is securely fitted into the bulb’s
SD card slot. A SDHC Class 10 Micro SD card is recommended.
6.1. Launch the “BulbCam” APP.
6.2. Set up continuous video recording to the Micro SD card.
For IOS:
Step 1: tap the setting icon on the “Local cameras” or “My cameras” page and
select “SD-Card settings”
Step 2: enable “Auto start recording” and “Record Audio”, then set your desired
video clip length.
Step 3: click “Done” to confirm the SD-Card settings and the camera will record
video to the camera's Micro SD card continuously.
For Android:
Step 1: tap the setting icon on the “LAN” or “WAN” page and select “SD-Card set-
tings”.
Step 2: enable “Start automatic recording” and “Voice recording”, then set your
desired video clip length.
Step 3: click “Ok” to confirm the SD-Card settings and the camera will record video
to the camera's Micro SD card continuously.
Button Function Name Function Description
Audio
Snapshot
Remote Video
Recording
Light
Tap this button to enable the live audio output.
Tap this button to turn on or off the light.
Tap the button to take a screenshot of the live video. The
pictures will be saved in your smartphone or tablet PC.
Tap this button to start or stop recording video and the
video files will be saved in your smartphone or tablet PC.
6.3. The video files will be saved in the camera’s Micro SD card.
[Note]: Video Format: HKV
VII. Changing the Camera’s Login Password
>> Please confirm that the camera has been successfully added to your smart-
phone or tablet PC in the remote view (WAN) mode, and that the remote view
(WAN) connection works well.
For IOS:
Step 1: tap “Options” on the “My cameras” page and then select “Change Pass-
word”.
Step 2: input a new password and confirm it.
Step 3: click “Done” to confirm the change.
For Android:
Step 1: tap the plus icon on the “WAN” page and then select “Update login pass-
word”.
Step 2: input a new password and click “Ok” to confirm the change.
VIII. Resetting
If for any reason the bulb camera stops working or isn’t working properly, a reset
will restore it back to normal operation.
Operation: Press the Reset Button for 5 seconds or push the Reboot Button once
to reset all settings to factory default. The bulb camera will ring a few times and
then restart automatically.
Frequently Asked Questions
Q: What kind of memory card can I use in this camera?
A: You are recommended to use a SDHC Class 10 Micro SD card (4GB-32GB). If
the memory card does not work, remove and format it on a PC computer before
trying it in the camera again.
Q: What should I do if the bulb’s WIFI signal cannot be found on my smart-
phone or tablet PC?
A: Press the Reset Button for 5 seconds or push the Reboot Button once to reset
all settings to factory default. (See VIII)
Q: Why the video files on the SD card cannot be played back on my comput-
er?
A: For privacy protection, the video files can only be played back on the PC Client
Software. You could download the PC client software at: goo.gl/oCUU23
Q: How do I reset my bulb camera back to the way I got it?
A: Press the Reset Button for 5 seconds or push the Reboot Button once to reset
all settings to factory default. (See VIII)
Q: How can I stop others from accessing my bulb camera?
A: Change your bulb camera’s login password. (See VII)