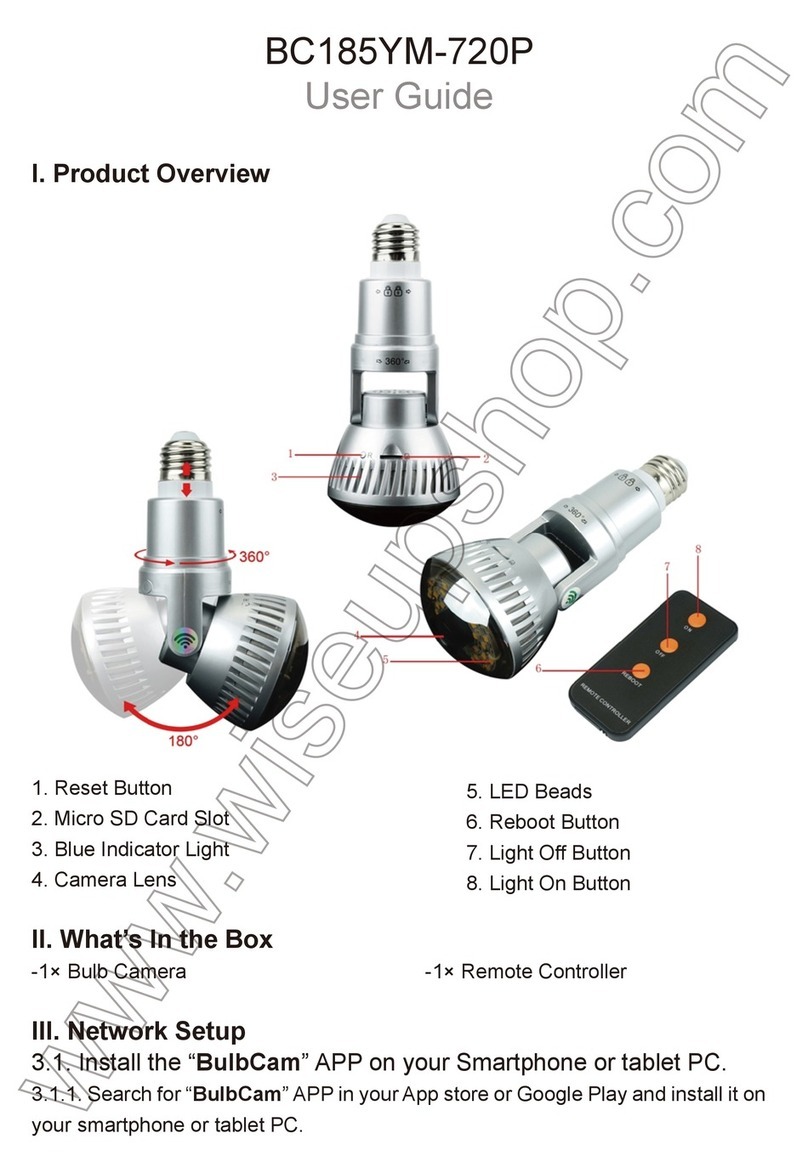
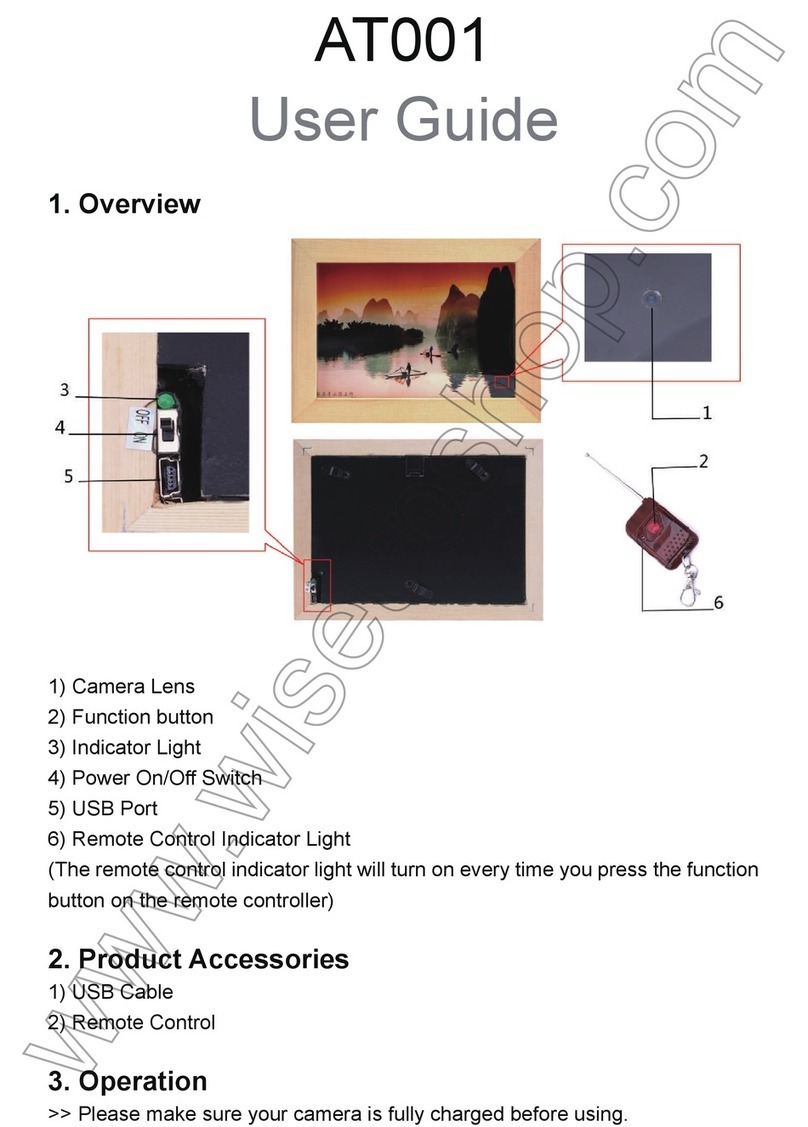
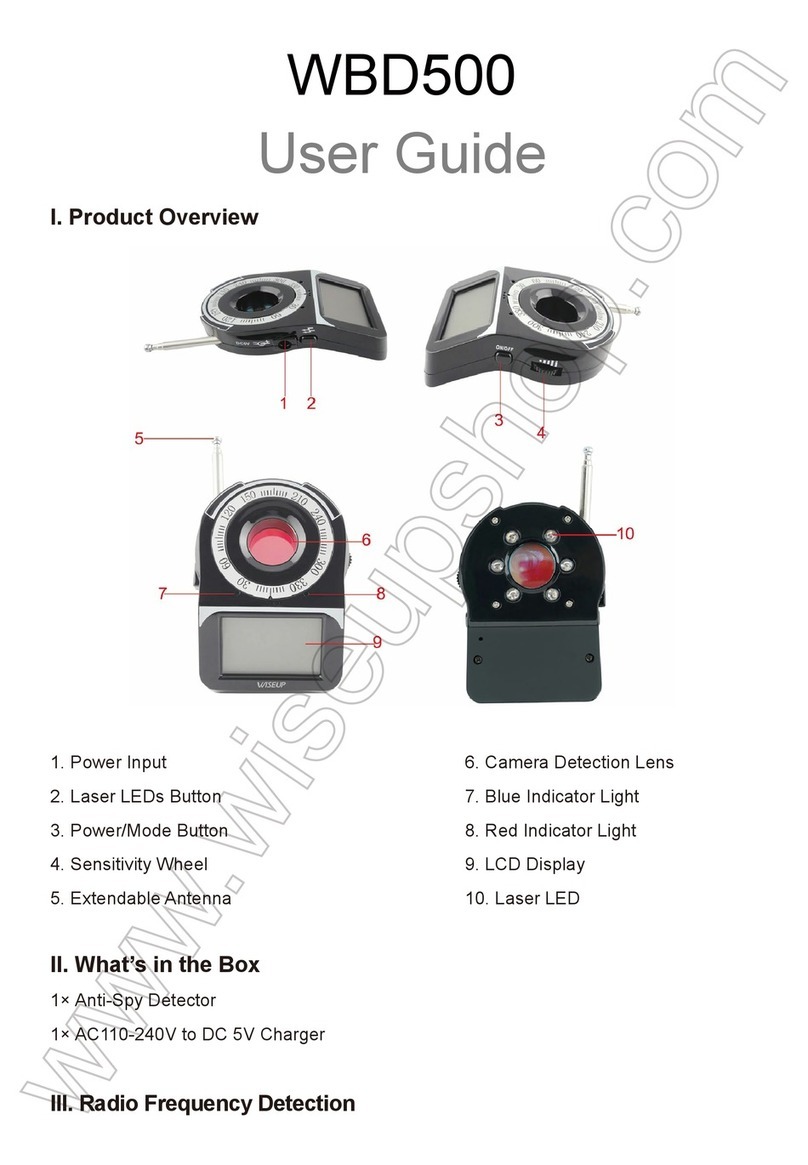
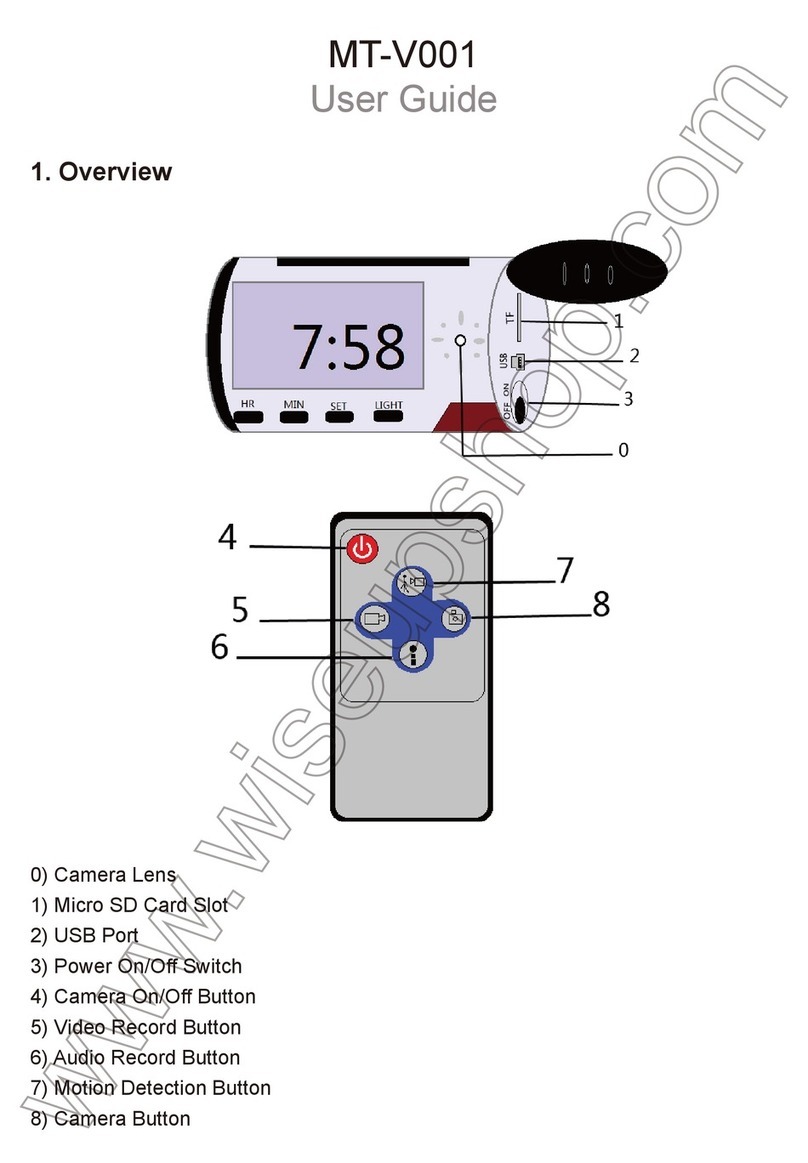
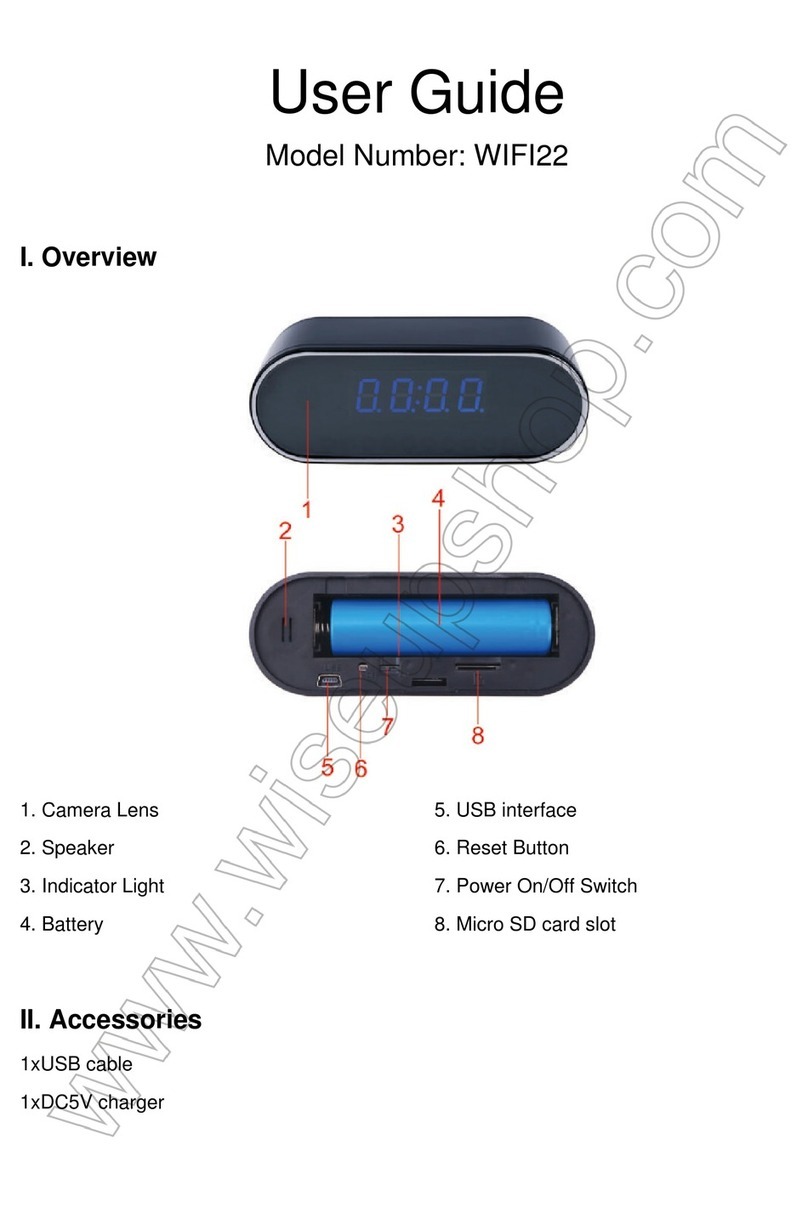
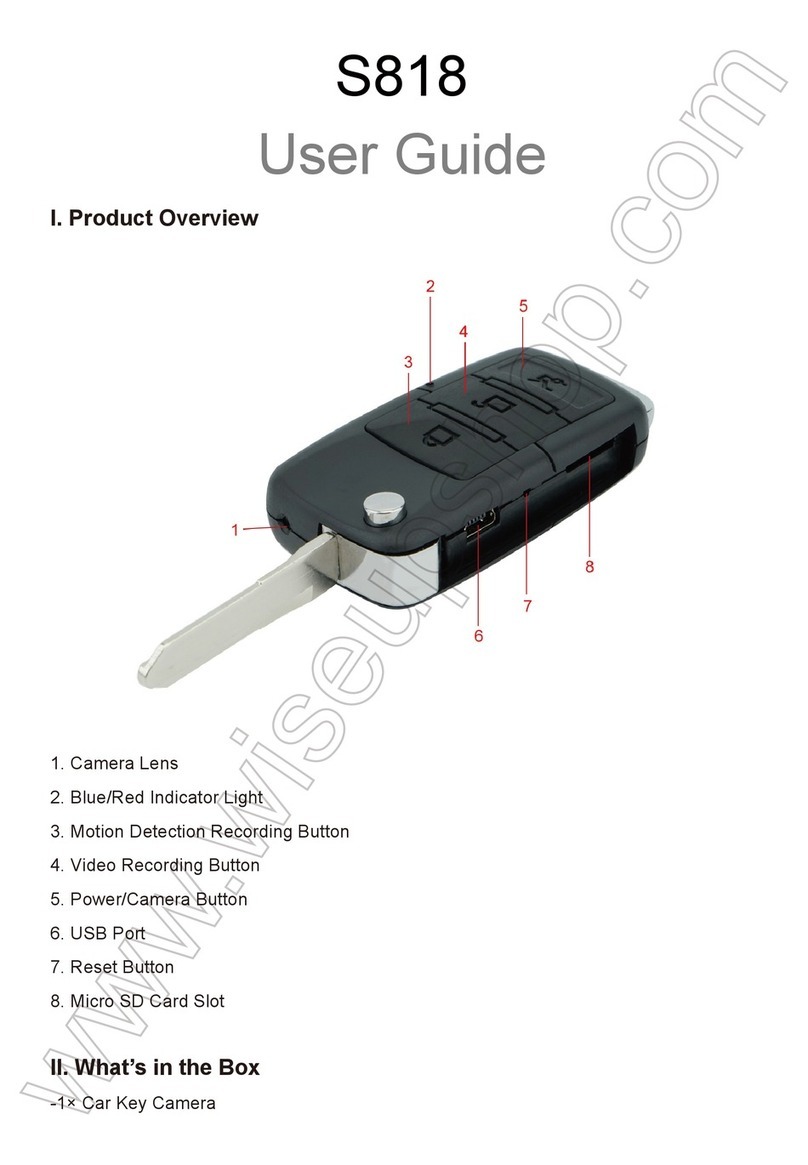
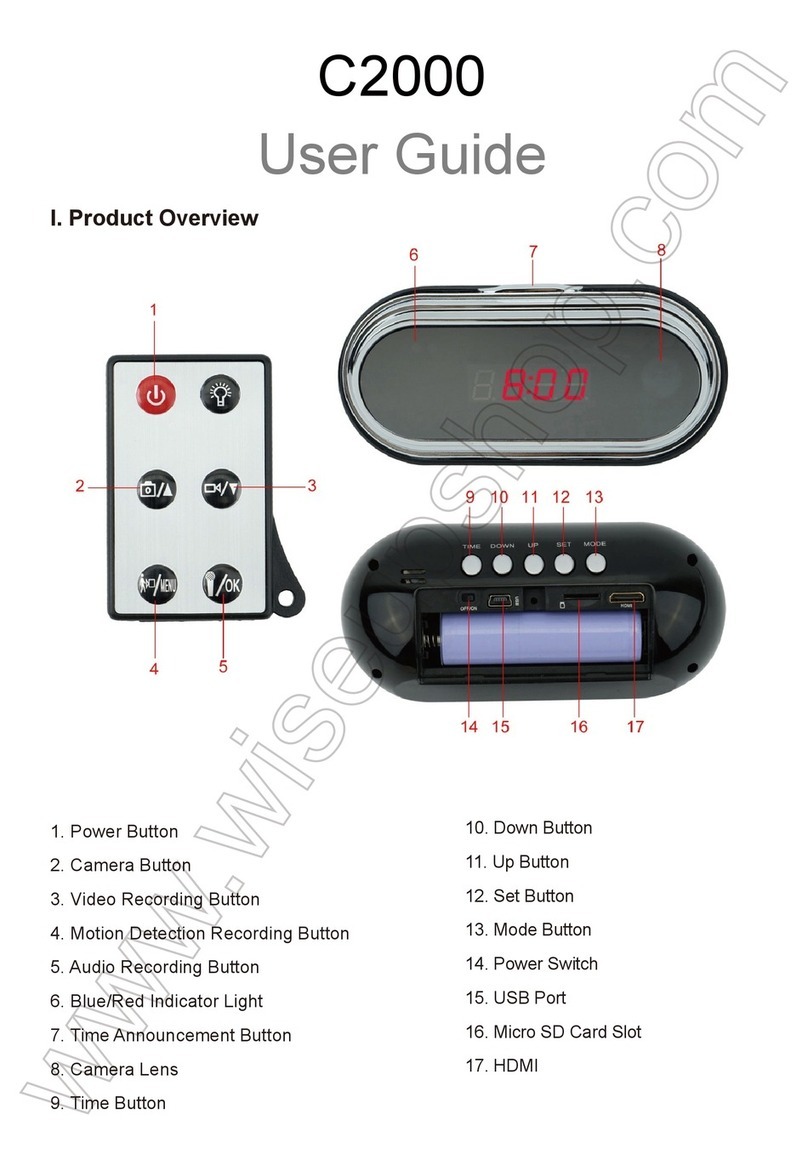
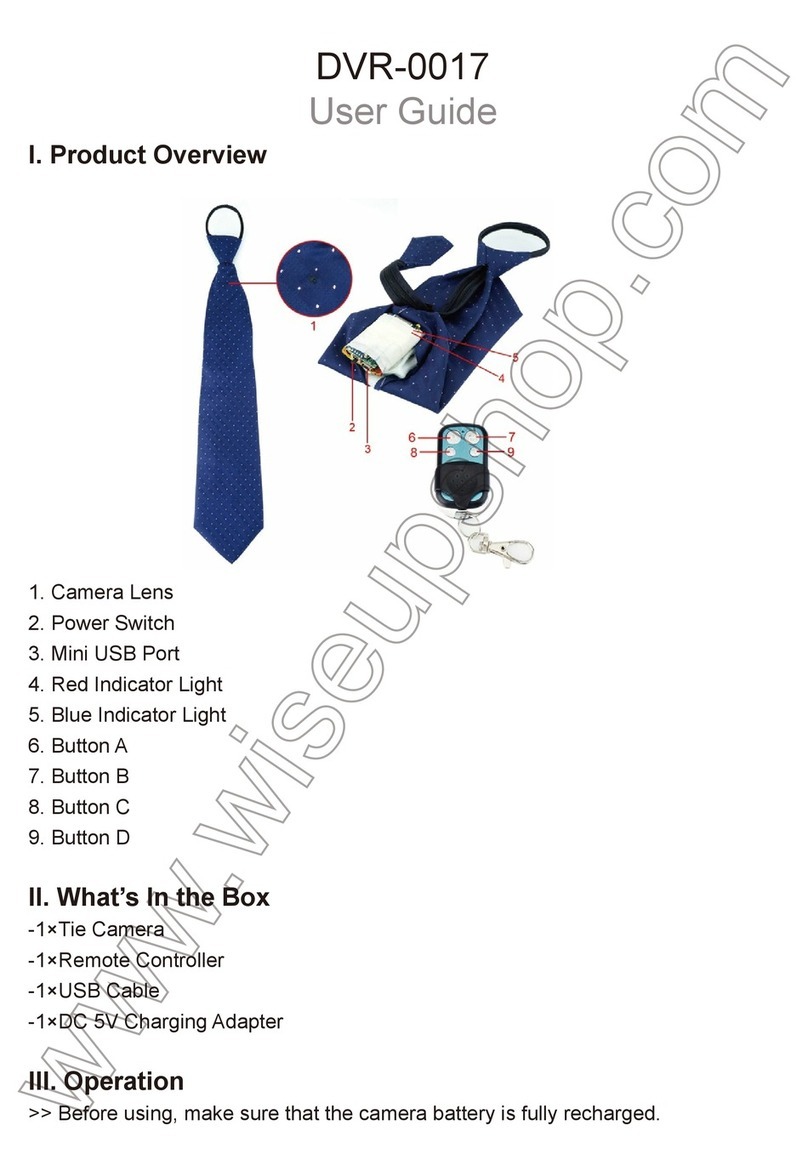
Wiseup T182 User manual

T182
User Guide
I. Product Overview
1. Camera Battery
2. Camera Lens
3. Video Recording Button
4. Camera Button
5. Power Button
6. Indicator Light
7. Button A
II. What’s in the Box
-1× Mini DIY Camera Module
-1× 2.4GHz Remote Controller
-1× USB/AV Cable
-1×AC110-230V to DC 5V Charging Adapter
-1× 8GB Micro SD Card (fitted into the Micro SD card slot already)
III. Operation
>> Please make sure your camera battery is fully recharged and connected to the camera
before using.
>> Please make sure the Micro SD card (4GB-32GB, formatted already) is securely fitted
into the camera’s SD card slot, or it will not work. A SDHC Class 10 Micro SD card is
recommended. If no Micro SD card is fitted into the camera, the indicator light will flash
red and blue 14 times, then turn off. The camera will shut down automatically.
>> If you want the camera to provide 24/7 service, please remove the battery and connect
the camera to power supply directly.
3.1. POWER ON/OFF
3.1.1. Slide the Power Switch to the ON position (opposite to the USB port). Power on the
camera by pressing the Power Button or Button A for 2 seconds. The indicator light will
flash red and blue once, turn off, then glow solid red, indicating the camera has entered
into standby mode automatically.
3.1.2. Power off the camera by pressing the Power Button or Button A for 2 seconds
again. The indicator light will flash red and blue 3 times, then turn off.
[Note]: The camera will shut down automatically if it is in standby mode without any operation
more than 2 minutes.
3.2. VIDEO RECORDING
3.2.1. Slide the Power Switch to the ON position (opposite to the USB port). Power on the
camera by pressing the Power Button or Button A for 2 seconds. The indicator light will
flash red and blue once, turn off, then glow solid red, indicating the camera has entered
into standby mode automatically.
3.2.2. Press the Video Recording Button or Button B once to record video. The indicator
light will flash red twice then turn off.
3.2.3. Press the Video Recording Button or Button B once again to stop recording video.
The indicator light will glow solid red, indicating the camera is back to standby mode.
[Note]:
1). A video file will be generated and saved every 10 minutes automatically.
2). The camera can record video for 5.5 hours continuously on a full charge.
3). Video Resolution: 1920×1080P Video Format: MOV
4). The camera supports loop recording.
3.3. CAMERA/STILL PHOTOGRAPHY
3.3.1. S Slide the Power Switch to the ON position (opposite to the USB port). Power on
the camera by pressing the Power Button or Button A for 2 seconds. The indicator light
will flash red and blue once, turn off, then glow solid red, indicating the camera has
entered into standby mode automatically.
3.3.2. Press the Camera Button or Button C once to take a photo. The indicator light will
flash red and blue once, then turn off and glow solid red, indicating the camera is back to
standby mode.
3.4. MOTION DETECTION RECORDING
3.4.1. Slide the Power Switch to the ON position (opposite to the USB port). Power on the
camera by pressing the Power Button or Button A for 2 seconds. The indicator light will
flash red and blue once, turn off, then glow solid red, indicating the camera has entered
into standby mode automatically.
3.4.2. Press the Button D once to enter into motion detection recording mode. The
indicator light will flash blue 3 times and then turn off.
3.4.3. The camera will record video automatically when a movement is detected.
3.4.4. Press the Button D once again to exit motion detection recording mode. The
indicator light will glow solid red, indicating the camera is back to standby mode.
IV. Video/Image Files Uploads
4.1. Power off the camera, remove the Micro SD card and insert it into a card reader.
4.2. Insert the card reader into a PC computer.
4.3. The Micro SD card will be recognized as a removable disk drive.
4.4. All the files can be accessed in the “DCIM” folder.
V. Setting Time/Date Stamp
5.1. Power off the camera, remove the Micro SD card and insert it into a card reader.
5.2. Insert the card reader into a PC computer.
5.3. Removable disk drive folder appears.
5.4. Click on the drive in the root directory and inside the root directory, create a file
named “TIMESET.txt”.
5.5. Write the current date and time in the “time.txt” file with the correct format:
YYYY.MM.DD HH:MM:SS (For example: 2016.04.12 14:24:32). Save this file.
5.6. Restart the camera and the system will upgrade the program automatically.
VI. Charging
6.1. Connect the camera to an outlet AC power socket by using the USB cable and the
DC5V charging adapter provided.
6.2. The indicator light will keep flashing red during the charging process.
6.3. The indicator light will glow solid red and blue when the camera is fully recharged.
6.4. It will take 5 hours to obtain a full charge.
VII. Live Video Output
7.1. Connect the camera to a TV or monitor by using the AV cable provided as below:
7.2. Select the camera video signal source on the TV or monitor.
7.3. Power on the camera and start recording video (See 3.2), then you can watch the
camera’s live video on the TV or monitor during the video recording process.
7.4. You can experience other functions of this camera in the live view mode.
8. Button C
9. Button B
10. Button D
11. Power Switch
12. USB Port
13. Micro SD Card Slot

I. Product Overview
1. Camera Battery
2. Camera Lens
3. Video Recording Button
4. Camera Button
5. Power Button
6. Indicator Light
7. Button A
II. What’s in the Box
-1× Mini DIY Camera Module
-1× 2.4GHz Remote Controller
-1× USB/AV Cable
-1×AC110-230V to DC 5V Charging Adapter
-1× 8GB Micro SD Card (fitted into the Micro SD card slot already)
III. Operation
>> Please make sure your camera battery is fully recharged and connected to the camera
before using.
>> Please make sure the Micro SD card (4GB-32GB, formatted already) is securely fitted
into the camera’s SD card slot, or it will not work. A SDHC Class 10 Micro SD card is
recommended. If no Micro SD card is fitted into the camera, the indicator light will flash
red and blue 14 times, then turn off. The camera will shut down automatically.
>> If you want the camera to provide 24/7 service, please remove the battery and connect
the camera to power supply directly.
3.1. POWER ON/OFF
3.1.1. Slide the Power Switch to the ON position (opposite to the USB port). Power on the
camera by pressing the Power Button or Button A for 2 seconds. The indicator light will
flash red and blue once, turn off, then glow solid red, indicating the camera has entered
into standby mode automatically.
3.1.2. Power off the camera by pressing the Power Button or Button A for 2 seconds
again. The indicator light will flash red and blue 3 times, then turn off.
[Note]: The camera will shut down automatically if it is in standby mode without any operation
more than 2 minutes.
3.2. VIDEO RECORDING
3.2.1. Slide the Power Switch to the ON position (opposite to the USB port). Power on the
camera by pressing the Power Button or Button A for 2 seconds. The indicator light will
flash red and blue once, turn off, then glow solid red, indicating the camera has entered
into standby mode automatically.
3.2.2. Press the Video Recording Button or Button B once to record video. The indicator
light will flash red twice then turn off.
3.2.3. Press the Video Recording Button or Button B once again to stop recording video.
The indicator light will glow solid red, indicating the camera is back to standby mode.
[Note]:
1). A video file will be generated and saved every 10 minutes automatically.
2). The camera can record video for 5.5 hours continuously on a full charge.
3). Video Resolution: 1920×1080P Video Format: MOV
4). The camera supports loop recording.
3.3. CAMERA/STILL PHOTOGRAPHY
3.3.1. S Slide the Power Switch to the ON position (opposite to the USB port). Power on
the camera by pressing the Power Button or Button A for 2 seconds. The indicator light
will flash red and blue once, turn off, then glow solid red, indicating the camera has
entered into standby mode automatically.
3.3.2. Press the Camera Button or Button C once to take a photo. The indicator light will
flash red and blue once, then turn off and glow solid red, indicating the camera is back to
standby mode.
3.4. MOTION DETECTION RECORDING
3.4.1. Slide the Power Switch to the ON position (opposite to the USB port). Power on the
camera by pressing the Power Button or Button A for 2 seconds. The indicator light will
flash red and blue once, turn off, then glow solid red, indicating the camera has entered
into standby mode automatically.
3.4.2. Press the Button D once to enter into motion detection recording mode. The
indicator light will flash blue 3 times and then turn off.
3.4.3. The camera will record video automatically when a movement is detected.
3.4.4. Press the Button D once again to exit motion detection recording mode. The
indicator light will glow solid red, indicating the camera is back to standby mode.
IV. Video/Image Files Uploads
4.1. Power off the camera, remove the Micro SD card and insert it into a card reader.
4.2. Insert the card reader into a PC computer.
4.3. The Micro SD card will be recognized as a removable disk drive.
4.4. All the files can be accessed in the “DCIM” folder.
V. Setting Time/Date Stamp
5.1. Power off the camera, remove the Micro SD card and insert it into a card reader.
5.2. Insert the card reader into a PC computer.
5.3. Removable disk drive folder appears.
5.4. Click on the drive in the root directory and inside the root directory, create a file
named “TIMESET.txt”.
5.5. Write the current date and time in the “time.txt” file with the correct format:
YYYY.MM.DD HH:MM:SS (For example: 2016.04.12 14:24:32). Save this file.
5.6. Restart the camera and the system will upgrade the program automatically.
VI. Charging
6.1. Connect the camera to an outlet AC power socket by using the USB cable and the
DC5V charging adapter provided.
6.2. The indicator light will keep flashing red during the charging process.
6.3. The indicator light will glow solid red and blue when the camera is fully recharged.
6.4. It will take 5 hours to obtain a full charge.
VII. Live Video Output
7.1. Connect the camera to a TV or monitor by using the AV cable provided as below:
7.2. Select the camera video signal source on the TV or monitor.
7.3. Power on the camera and start recording video (See 3.2), then you can watch the
camera’s live video on the TV or monitor during the video recording process.
7.4. You can experience other functions of this camera in the live view mode.

T182
Benutzerhandbuch
I. Produktübersicht
1. Kamera-Batterie
2. Kameraobjektiv
3. Video-Aufnahmetaste
4. Kamera-Taste
5. Netzschalter
6. Kontrollleuchte
7. Schaltfläche A
II. Was ist in der Box
-1 × Mini-DIY Kameramodul
-1 × 2.4GHz Fernsteuerpult
-1 × USB / Handels Kabel
-1 × AC110-230V zu DC 5V aufladenadapter
-1 × 8GB Micro SD-Karte (in den Micro SD-Kartensteckplatz bereits eingebaut)
III. Betrieb
>> Stellen Sie bitte sicher, dass Ihr Kamerabatterie völlig aufgeladen und an die Kamera
angeschlossen ist, bevor Sie verwenden.
>> Bitte stellen Sie sicher, dass die Micro SD-Karte (4GB-32GB, bereits formatiert) sicher
in den SD-Kartenslot der Kamera eingesetzt ist, oder es funktioniert nicht. Eine SDHC
Klasse 10 Micro SD-Karte wird empfohlen. Wenn keine Micro SD-Karte in die Kamera
eingebaut ist, blinkt die Kontrollleuchte rot und blau 14 Mal und schaltet sich dann aus.
Die Kamera wird automatisch heruntergefahren.
>> Wenn Sie möchten, dass die Kamera 24/7 Service zur Verfügung stellt, entfernen Sie
bitte den Akku und schließen Sie die Kamera direkt an die Stromversorgung an.
3.1. EINSCHALTEN / AUSSCHALTEN
3.1.1. Schieben Sie den Netzschalter in die Position ON (gegenüber dem USB-Anschluss).
Schalten Sie die Kamera ein, indem Sie 2 Sekunden lang die Ein- / Aus-Taste oder die Taste
A drücken. Die Kontrollleuchte blinkt einmal rot und blau, schaltet sich aus und leuchtet dann
rot, was bedeutet, dass die Kamera automatisch in den Bereitschaftsmodus geschaltet
wurde.
3.1.2. Schalten Sie die Kamera aus, indem Sie die Ein- / Aus-Taste oder die Taste A erneut 2
Sekunden lang drücken. Die Kontrollleuchte blinkt dreimal rot und blau und schaltet sich dann
aus.
[Hinweis]: Die Kamera schaltet sich automatisch ab, wenn sie sich im Standby-Modus
befindet, ohne dass der Betrieb länger als 2 Minuten ist.
3.2. VIDEOAUFNAHME
3.2.1. Schieben Sie den Netzschalter in die Position ON (gegenüber dem USB-Anschluss).
Schalten Sie die Kamera ein, indem Sie 2 Sekunden lang die Ein- / Aus-Taste oder die Taste
A drücken. Die Kontrollleuchte blinkt einmal rot und blau, schaltet sich aus und leuchtet dann
rot, was bedeutet, dass die Kamera automatisch in den Bereitschaftsmodus geschaltet
wurde.
3.2.2. Drücken Sie die Video-Aufnahmetaste oder die Taste B einmal, um Video aufzuzeichnen.
Die Kontrollleuchte blinkt zweimal rot und schaltet dann aus.
3.2.3. Drücken Sie die Video-Aufnahmetaste oder die Taste B erneut, um die Aufnahme zu
beenden. Die Kontrollleuchte leuchtet rot und zeigt an, dass die Kamera wieder in den
Standby-Modus zurückkehrt.
[Hinweis]:
1). Eine Videodatei wird alle 10 Minuten automatisch generiert und gespeichert.
2). Die Kamera kann Video für 5,5 Stunden kontinuierlich auf eine volle Aufladung aufzeichnen.
3). Video-Auflösung: 1920 × 1080P Video-Format: MOV
4). Die Kamera unterstützt die Loop-Aufnahme.
3.3. KAMERA / STILL FOTOGRAFIE
3.3.1. S Schieben Sie den Netzschalter in die Position ON (gegenüber dem USB-Anschluss).
Schalten Sie die Kamera ein, indem Sie 2 Sekunden lang die Ein- / Aus-Taste oder die Taste
A drücken. Die Kontrollleuchte blinkt einmal rot und blau, schaltet sich aus und leuchtet dann
rot, was bedeutet, dass die Kamera automatisch in den Bereitschaftsmodus geschaltet
wurde.
3.3.2. Drücken Sie die Kamera-Taste oder die Taste C einmal, um ein Foto aufzunehmen. Die
Kontrollleuchte blinkt einmal rot und blau, dann aus und leuchtet rot, was bedeutet, dass die
Kamera wieder in den Standby-Modus zurückkehrt.
3.4. BEWEGUNGSERKENNUNG
3.4.1. Schieben Sie den Netzschalter in die Position ON (gegenüber dem USB-Anschluss).
Schalten Sie die Kamera ein, indem Sie 2 Sekunden lang die Ein- / Aus-Taste oder die Taste
A drücken. Die Kontrollleuchte blinkt einmal rot und blau, schaltet sich aus und leuchtet dann
rot, was bedeutet, dass die Kamera automatisch in den Bereitschaftsmodus geschaltet
wurde.
3.4.2. Drücken Sie die Taste D einmal, um in den Aufnahmemodus für die
Bewegungserkennung zu gelangen. Die Kontrollleuchte blinkt dreimal blau und schaltet
sich dann aus.
3.4.3. Die Kamera nimmt das Video automatisch auf, wenn eine Bewegung erkannt wird.
3.4.4. Drücken Sie die Taste D erneut, um den Modus für die Bewegungserkennung zu
verlassen. Die Kontrollleuchte leuchtet rot und zeigt an, dass die Kamera wieder in den
Standby-Modus zurückkehrt.
IV. Video / Bilddateien Uploads
4.1. Schalten Sie die Kamera aus, entfernen Sie die Micro SD-Karte und stecken Sie sie
in einen Kartenleser ein.
4.2. Stecken Sie den Kartenleser in einen PC-Computer.
4.3. Die Micro SD-Karte wird als Wechseldatenträger erkannt.
4.4. Auf alle Dateien kann im Ordner "DCIM" zugegriffen werden.
V. Einstellzeit / Datumsstempel
5.1. Schalten Sie die Kamera aus, entfernen Sie die Micro SD-Karte und stecken Sie sie
in einen Kartenleser ein.
5.2. Stecken Sie den Kartenleser in einen PC-Computer.
5.3. Wechseldatenträgerordner wird angezeigt.
5.4. Klicken Sie auf das Laufwerk im Stammverzeichnis und im Stammverzeichnis,
erstellen Sie eine Datei mit dem Namen "TIMESET.txt".
5.5. Schreiben Sie das aktuelle Datum und die Uhrzeit in der Datei "time.txt" mit dem
richtigen Format:
YYYY.MM.DD HH: MM: SS (Beispiel: 2016.04.12 14:24:32). Speichern Sie diese Datei.
5.6. Starten Sie die Kamera neu und das System aktualisiert das Programm automatisch.
VI. Aufladen
6.1. Schließen Sie die Kamera an eine Netzsteckdose an, indem Sie das USB-Kabel und
den mitgelieferten DC5V-Ladeadapter verwenden.
6.2. Die Anzeigelampe blinkt während des Ladevorgangs rot.
6.3. Die Kontrolllampe leuchtet rot und blau, wenn die Kamera vollständig aufgeladen ist.
6.4. Es dauert 5 Stunden, um eine volle Ladung zu erhalten.
VII. Live-Videoausgang
7.1. Schließen Sie die Kamera über ein mitgeliefertes AV-Kabel an ein Fernsehgerät oder
einen Monitor an:
7.2. Wählen Sie die Kamera-Videosignalquelle auf dem Fernsehgerät oder dem Monitor
aus.
7.3. Schalten Sie die Kamera ein und starten Sie das Aufnehmen des Videos (siehe 3.2),
und Sie können während der Videoaufzeichnung das Live-Video der Kamera auf dem
Fernseher oder dem Monitor ansehen.
7.4. Sie können andere Funktionen dieser Kamera im Live View-Modus erleben.
8. Schaltfläche C
9. Taste B
10. Schaltfläche D
11. Netzschalter
12. USB-Anschluss
13. Mikro-Sd-Einbauschlitz
I. Produktübersicht
1. Kamera-Batterie
2. Kameraobjektiv
3. Video-Aufnahmetaste
4. Kamera-Taste
5. Netzschalter
6. Kontrollleuchte
7. Schaltfläche A
II. Was ist in der Box
-1 × Mini-DIY Kameramodul
-1 × 2.4GHz Fernsteuerpult
-1 × USB / Handels Kabel
-1 × AC110-230V zu DC 5V aufladenadapter
-1 × 8GB Micro SD-Karte (in den Micro SD-Kartensteckplatz bereits eingebaut)
III. Betrieb
>> Stellen Sie bitte sicher, dass Ihr Kamerabatterie völlig aufgeladen und an die Kamera
angeschlossen ist, bevor Sie verwenden.
>> Bitte stellen Sie sicher, dass die Micro SD-Karte (4GB-32GB, bereits formatiert) sicher
in den SD-Kartenslot der Kamera eingesetzt ist, oder es funktioniert nicht. Eine SDHC
Klasse 10 Micro SD-Karte wird empfohlen. Wenn keine Micro SD-Karte in die Kamera
eingebaut ist, blinkt die Kontrollleuchte rot und blau 14 Mal und schaltet sich dann aus.
Die Kamera wird automatisch heruntergefahren.
>> Wenn Sie möchten, dass die Kamera 24/7 Service zur Verfügung stellt, entfernen Sie
bitte den Akku und schließen Sie die Kamera direkt an die Stromversorgung an.
3.1. EINSCHALTEN / AUSSCHALTEN
3.1.1. Schieben Sie den Netzschalter in die Position ON (gegenüber dem USB-Anschluss).
Schalten Sie die Kamera ein, indem Sie 2 Sekunden lang die Ein- / Aus-Taste oder die Taste
A drücken. Die Kontrollleuchte blinkt einmal rot und blau, schaltet sich aus und leuchtet dann
rot, was bedeutet, dass die Kamera automatisch in den Bereitschaftsmodus geschaltet
wurde.
3.1.2. Schalten Sie die Kamera aus, indem Sie die Ein- / Aus-Taste oder die Taste A erneut 2
Sekunden lang drücken. Die Kontrollleuchte blinkt dreimal rot und blau und schaltet sich dann
aus.
[Hinweis]: Die Kamera schaltet sich automatisch ab, wenn sie sich im Standby-Modus
befindet, ohne dass der Betrieb länger als 2 Minuten ist.
3.2. VIDEOAUFNAHME
3.2.1. Schieben Sie den Netzschalter in die Position ON (gegenüber dem USB-Anschluss).
Schalten Sie die Kamera ein, indem Sie 2 Sekunden lang die Ein- / Aus-Taste oder die Taste
A drücken. Die Kontrollleuchte blinkt einmal rot und blau, schaltet sich aus und leuchtet dann
rot, was bedeutet, dass die Kamera automatisch in den Bereitschaftsmodus geschaltet
wurde.
3.2.2. Drücken Sie die Video-Aufnahmetaste oder die Taste B einmal, um Video aufzuzeichnen.
Die Kontrollleuchte blinkt zweimal rot und schaltet dann aus.
3.2.3. Drücken Sie die Video-Aufnahmetaste oder die Taste B erneut, um die Aufnahme zu
beenden. Die Kontrollleuchte leuchtet rot und zeigt an, dass die Kamera wieder in den
Standby-Modus zurückkehrt.
[Hinweis]:
1). Eine Videodatei wird alle 10 Minuten automatisch generiert und gespeichert.
2). Die Kamera kann Video für 5,5 Stunden kontinuierlich auf eine volle Aufladung aufzeichnen.
3). Video-Auflösung: 1920 × 1080P Video-Format: MOV
4). Die Kamera unterstützt die Loop-Aufnahme.
3.3. KAMERA / STILL FOTOGRAFIE
3.3.1. S Schieben Sie den Netzschalter in die Position ON (gegenüber dem USB-Anschluss).
Schalten Sie die Kamera ein, indem Sie 2 Sekunden lang die Ein- / Aus-Taste oder die Taste
A drücken. Die Kontrollleuchte blinkt einmal rot und blau, schaltet sich aus und leuchtet dann
rot, was bedeutet, dass die Kamera automatisch in den Bereitschaftsmodus geschaltet
wurde.
3.3.2. Drücken Sie die Kamera-Taste oder die Taste C einmal, um ein Foto aufzunehmen. Die
Kontrollleuchte blinkt einmal rot und blau, dann aus und leuchtet rot, was bedeutet, dass die
Kamera wieder in den Standby-Modus zurückkehrt.
3.4. BEWEGUNGSERKENNUNG
3.4.1. Schieben Sie den Netzschalter in die Position ON (gegenüber dem USB-Anschluss).
Schalten Sie die Kamera ein, indem Sie 2 Sekunden lang die Ein- / Aus-Taste oder die Taste
A drücken. Die Kontrollleuchte blinkt einmal rot und blau, schaltet sich aus und leuchtet dann
rot, was bedeutet, dass die Kamera automatisch in den Bereitschaftsmodus geschaltet
wurde.
3.4.2. Drücken Sie die Taste D einmal, um in den Aufnahmemodus für die
Bewegungserkennung zu gelangen. Die Kontrollleuchte blinkt dreimal blau und schaltet
sich dann aus.
3.4.3. Die Kamera nimmt das Video automatisch auf, wenn eine Bewegung erkannt wird.
3.4.4. Drücken Sie die Taste D erneut, um den Modus für die Bewegungserkennung zu
verlassen. Die Kontrollleuchte leuchtet rot und zeigt an, dass die Kamera wieder in den
Standby-Modus zurückkehrt.
IV. Video / Bilddateien Uploads
4.1. Schalten Sie die Kamera aus, entfernen Sie die Micro SD-Karte und stecken Sie sie
in einen Kartenleser ein.
4.2. Stecken Sie den Kartenleser in einen PC-Computer.
4.3. Die Micro SD-Karte wird als Wechseldatenträger erkannt.
4.4. Auf alle Dateien kann im Ordner "DCIM" zugegriffen werden.
V. Einstellzeit / Datumsstempel
5.1. Schalten Sie die Kamera aus, entfernen Sie die Micro SD-Karte und stecken Sie sie
in einen Kartenleser ein.
5.2. Stecken Sie den Kartenleser in einen PC-Computer.
5.3. Wechseldatenträgerordner wird angezeigt.
5.4. Klicken Sie auf das Laufwerk im Stammverzeichnis und im Stammverzeichnis,
erstellen Sie eine Datei mit dem Namen "TIMESET.txt".
5.5. Schreiben Sie das aktuelle Datum und die Uhrzeit in der Datei "time.txt" mit dem
richtigen Format:
YYYY.MM.DD HH: MM: SS (Beispiel: 2016.04.12 14:24:32). Speichern Sie diese Datei.
5.6. Starten Sie die Kamera neu und das System aktualisiert das Programm automatisch.
VI. Aufladen
6.1. Schließen Sie die Kamera an eine Netzsteckdose an, indem Sie das USB-Kabel und
den mitgelieferten DC5V-Ladeadapter verwenden.
6.2. Die Anzeigelampe blinkt während des Ladevorgangs rot.
6.3. Die Kontrolllampe leuchtet rot und blau, wenn die Kamera vollständig aufgeladen ist.
6.4. Es dauert 5 Stunden, um eine volle Ladung zu erhalten.
VII. Live-Videoausgang
7.1. Schließen Sie die Kamera über ein mitgeliefertes AV-Kabel an ein Fernsehgerät oder
einen Monitor an:
7.2. Wählen Sie die Kamera-Videosignalquelle auf dem Fernsehgerät oder dem Monitor
aus.
7.3. Schalten Sie die Kamera ein und starten Sie das Aufnehmen des Videos (siehe 3.2),
und Sie können während der Videoaufzeichnung das Live-Video der Kamera auf dem
Fernseher oder dem Monitor ansehen.
7.4. Sie können andere Funktionen dieser Kamera im Live View-Modus erleben.

I. Produktübersicht
1. Kamera-Batterie
2. Kameraobjektiv
3. Video-Aufnahmetaste
4. Kamera-Taste
5. Netzschalter
6. Kontrollleuchte
7. Schaltfläche A
II. Was ist in der Box
-1 × Mini-DIY Kameramodul
-1 × 2.4GHz Fernsteuerpult
-1 × USB / Handels Kabel
-1 × AC110-230V zu DC 5V aufladenadapter
-1 × 8GB Micro SD-Karte (in den Micro SD-Kartensteckplatz bereits eingebaut)
III. Betrieb
>> Stellen Sie bitte sicher, dass Ihr Kamerabatterie völlig aufgeladen und an die Kamera
angeschlossen ist, bevor Sie verwenden.
>> Bitte stellen Sie sicher, dass die Micro SD-Karte (4GB-32GB, bereits formatiert) sicher
in den SD-Kartenslot der Kamera eingesetzt ist, oder es funktioniert nicht. Eine SDHC
Klasse 10 Micro SD-Karte wird empfohlen. Wenn keine Micro SD-Karte in die Kamera
eingebaut ist, blinkt die Kontrollleuchte rot und blau 14 Mal und schaltet sich dann aus.
Die Kamera wird automatisch heruntergefahren.
>> Wenn Sie möchten, dass die Kamera 24/7 Service zur Verfügung stellt, entfernen Sie
bitte den Akku und schließen Sie die Kamera direkt an die Stromversorgung an.
3.1. EINSCHALTEN / AUSSCHALTEN
3.1.1. Schieben Sie den Netzschalter in die Position ON (gegenüber dem USB-Anschluss).
Schalten Sie die Kamera ein, indem Sie 2 Sekunden lang die Ein- / Aus-Taste oder die Taste
A drücken. Die Kontrollleuchte blinkt einmal rot und blau, schaltet sich aus und leuchtet dann
rot, was bedeutet, dass die Kamera automatisch in den Bereitschaftsmodus geschaltet
wurde.
3.1.2. Schalten Sie die Kamera aus, indem Sie die Ein- / Aus-Taste oder die Taste A erneut 2
Sekunden lang drücken. Die Kontrollleuchte blinkt dreimal rot und blau und schaltet sich dann
aus.
[Hinweis]: Die Kamera schaltet sich automatisch ab, wenn sie sich im Standby-Modus
befindet, ohne dass der Betrieb länger als 2 Minuten ist.
3.2. VIDEOAUFNAHME
3.2.1. Schieben Sie den Netzschalter in die Position ON (gegenüber dem USB-Anschluss).
Schalten Sie die Kamera ein, indem Sie 2 Sekunden lang die Ein- / Aus-Taste oder die Taste
A drücken. Die Kontrollleuchte blinkt einmal rot und blau, schaltet sich aus und leuchtet dann
rot, was bedeutet, dass die Kamera automatisch in den Bereitschaftsmodus geschaltet
wurde.
3.2.2. Drücken Sie die Video-Aufnahmetaste oder die Taste B einmal, um Video aufzuzeichnen.
Die Kontrollleuchte blinkt zweimal rot und schaltet dann aus.
3.2.3. Drücken Sie die Video-Aufnahmetaste oder die Taste B erneut, um die Aufnahme zu
beenden. Die Kontrollleuchte leuchtet rot und zeigt an, dass die Kamera wieder in den
Standby-Modus zurückkehrt.
[Hinweis]:
1). Eine Videodatei wird alle 10 Minuten automatisch generiert und gespeichert.
2). Die Kamera kann Video für 5,5 Stunden kontinuierlich auf eine volle Aufladung aufzeichnen.
3). Video-Auflösung: 1920 × 1080P Video-Format: MOV
4). Die Kamera unterstützt die Loop-Aufnahme.
3.3. KAMERA / STILL FOTOGRAFIE
3.3.1. S Schieben Sie den Netzschalter in die Position ON (gegenüber dem USB-Anschluss).
Schalten Sie die Kamera ein, indem Sie 2 Sekunden lang die Ein- / Aus-Taste oder die Taste
A drücken. Die Kontrollleuchte blinkt einmal rot und blau, schaltet sich aus und leuchtet dann
rot, was bedeutet, dass die Kamera automatisch in den Bereitschaftsmodus geschaltet
wurde.
3.3.2. Drücken Sie die Kamera-Taste oder die Taste C einmal, um ein Foto aufzunehmen. Die
Kontrollleuchte blinkt einmal rot und blau, dann aus und leuchtet rot, was bedeutet, dass die
Kamera wieder in den Standby-Modus zurückkehrt.
3.4. BEWEGUNGSERKENNUNG
3.4.1. Schieben Sie den Netzschalter in die Position ON (gegenüber dem USB-Anschluss).
Schalten Sie die Kamera ein, indem Sie 2 Sekunden lang die Ein- / Aus-Taste oder die Taste
A drücken. Die Kontrollleuchte blinkt einmal rot und blau, schaltet sich aus und leuchtet dann
rot, was bedeutet, dass die Kamera automatisch in den Bereitschaftsmodus geschaltet
wurde.
3.4.2. Drücken Sie die Taste D einmal, um in den Aufnahmemodus für die
Bewegungserkennung zu gelangen. Die Kontrollleuchte blinkt dreimal blau und schaltet
sich dann aus.
3.4.3. Die Kamera nimmt das Video automatisch auf, wenn eine Bewegung erkannt wird.
3.4.4. Drücken Sie die Taste D erneut, um den Modus für die Bewegungserkennung zu
verlassen. Die Kontrollleuchte leuchtet rot und zeigt an, dass die Kamera wieder in den
Standby-Modus zurückkehrt.
IV. Video / Bilddateien Uploads
4.1. Schalten Sie die Kamera aus, entfernen Sie die Micro SD-Karte und stecken Sie sie
in einen Kartenleser ein.
4.2. Stecken Sie den Kartenleser in einen PC-Computer.
4.3. Die Micro SD-Karte wird als Wechseldatenträger erkannt.
4.4. Auf alle Dateien kann im Ordner "DCIM" zugegriffen werden.
V. Einstellzeit / Datumsstempel
5.1. Schalten Sie die Kamera aus, entfernen Sie die Micro SD-Karte und stecken Sie sie
in einen Kartenleser ein.
5.2. Stecken Sie den Kartenleser in einen PC-Computer.
5.3. Wechseldatenträgerordner wird angezeigt.
5.4. Klicken Sie auf das Laufwerk im Stammverzeichnis und im Stammverzeichnis,
erstellen Sie eine Datei mit dem Namen "TIMESET.txt".
5.5. Schreiben Sie das aktuelle Datum und die Uhrzeit in der Datei "time.txt" mit dem
richtigen Format:
YYYY.MM.DD HH: MM: SS (Beispiel: 2016.04.12 14:24:32). Speichern Sie diese Datei.
5.6. Starten Sie die Kamera neu und das System aktualisiert das Programm automatisch.
VI. Aufladen
6.1. Schließen Sie die Kamera an eine Netzsteckdose an, indem Sie das USB-Kabel und
den mitgelieferten DC5V-Ladeadapter verwenden.
6.2. Die Anzeigelampe blinkt während des Ladevorgangs rot.
6.3. Die Kontrolllampe leuchtet rot und blau, wenn die Kamera vollständig aufgeladen ist.
6.4. Es dauert 5 Stunden, um eine volle Ladung zu erhalten.
VII. Live-Videoausgang
7.1. Schließen Sie die Kamera über ein mitgeliefertes AV-Kabel an ein Fernsehgerät oder
einen Monitor an:
7.2. Wählen Sie die Kamera-Videosignalquelle auf dem Fernsehgerät oder dem Monitor
aus.
7.3. Schalten Sie die Kamera ein und starten Sie das Aufnehmen des Videos (siehe 3.2),
und Sie können während der Videoaufzeichnung das Live-Video der Kamera auf dem
Fernseher oder dem Monitor ansehen.
7.4. Sie können andere Funktionen dieser Kamera im Live View-Modus erleben.

T182
Mode d'emploi
I. Aperçu du Produit
1. Batterie de Caméra
2. Objetf Caméra
3. Bouton d'enregistrement vidéo
4. Bouton de l'appareil photo
5. Bouton d'alimentation
6. Voyant
7. Bouton A
II. Qu'y a-t-il dans la boite
Module caméra DIY -1 × Mini
-1 × Télécommande 2.4GHz
-1 × Câble de AV / USB
-1 × AC110-230V à DC 5V adaptateur de charge
-1 × 8 GB carte SD Mémoire (insérée dans la fente pour carte SD Mémoire déjà)
III. Opération
>> Assurez-vous que la batterie de votre appareil est complètement rechargée et
connecté à l'appareil photo avant d'utiliser s'il vous plaît.
>> Assurez-vous que la carte SD Mémoire (4 GB-32GB, déjà formaté) est solidement fixé
dans la fente de la carte SD de l'appareil photo, ou il ne fonctionnera pas. La SDHC
Classe 10 carte SD Mémoire est recommandée. Si aucune carte SD Mémoire est insérée
dans l'appareil photo, le voyant clignote rouge et bleu 14 fois, puis éteignez. L'appareil
photo est éteint automatiquement.
>> Si vous voulez que la caméra pour fournir un service 24/7, retirez la batterie et
connecter l'appareil photo à l'alimentation directement s’il vous plaît.
3.1. MARCHE / ARRÊT
3.1.1. Faites glisser l'interrupteur d'alimentation à la position ON (opposé au port USB).
Allumez l'appareil photo en appuyant sur le bouton d'alimentation ou le bouton A pendant
2 secondes. Le voyant lumineux clignote en rouge et bleu, une fois, éteignez, puis briller
solide rouge, indiquant que l'appareil est entré en mode veille automatiquement.
3.1.2. Mise hors tension de l'appareil photo en appuyant sur le bouton d'alimentation ou
le bouton A pendant 2 secondes. Le voyant lumineux clignote rouge et bleu 3 fois, puis
éteignez.
[Note]: L'appareil photo arrête automatiquement si elle est en mode veille sans aucune
opération de plus de 2 minutes.
3.2. ENREGISTREMENT VIDEO
3.2.1. Faites glisser l'interrupteur d'alimentation à la position ON (opposé au port USB).
Allumez l'appareil photo en appuyant sur le bouton d'alimentation ou le bouton A pendant
2 secondes. Le voyant lumineux clignote en rouge et bleu, une fois, éteignez, puis briller
solide rouge, indiquant que l'appareil est entré en mode veille automatiquement.
3.2.2. Appuyez sur le bouton ou le bouton d'enregistrement vidéo B une fois pour
enregistrer de la vidéo. Le voyant rouge clignote deux fois puis éteignez.
3.2.3. Appuyez sur le bouton ou le bouton d'enregistrement vidéo B une fois de plus pour
arrêter l'enregistrement vidéo. Le voyant devient rouge solide, indiquant que l'appareil est
en mode veille.
[Remarque]:
1). Les fichiers vidéos seront générés et enregistrés tous les 10 minutes automatiquement.
2). La caméra peut enregistrer des vidéos pendant 5,5 heures en continu sur une charge
complète.
3). Résolution de la vidéo: Format 1920 × 1080P vidéo: MOV
4). La caméra prend en charge l'enregistrement en boucle.
3.3. CAMERA / PHOTOGRAPHIE
3.3.1. S Glisser l'interrupteur d'alimentation à la position ON (opposé au port USB).
Allumez l'appareil photo en appuyant sur le bouton d'alimentation ou le bouton A pendant
2 secondes. Le voyant lumineux clignote en rouge et bleu, une fois, éteignez, puis briller
solide rouge, indiquant que l'appareil est entré en mode veille automatiquement.
3.3.2. Appuyez sur le bouton de l'appareil photo ou le bouton C une fois pour prendre une
photo. Le voyant lumineux clignote en rouge et bleu, une fois, puis éteignez et l'éclat
rouge solide, ce qui indique que l'appareil est en mode veille.
3.4. DETECTION DE MOUVEMENT D'ENREGISTREMENT
3.4.1. Faites glisser l'interrupteur d'alimentation à la position ON (opposé au port USB).
Allumez l'appareil photo en appuyant sur le bouton d'alimentation ou le bouton A pendant 2
secondes. Le voyant lumineux clignote en rouge et bleu, une fois, éteignez, puis briller solide
rouge, indiquant que l'appareil est entré en mode veille automatiquement.
3.4.2. Appuyez sur le bouton D une fois pour entrer en mode d'enregistrement de détection
de mouvement. Le voyant clignote bleu 3 fois puis éteignez.
3.4.3. L'appareil photo enregistre la vidéo automatiquement lorsqu'un mouvement est
détecté.
3.4.4. Appuyez sur le bouton D une fois de plus pour quitter le mode d'enregistrement de
détection de mouvement. Le voyant devient rouge solide, indiquant que l'appareil est en
mode veille.
IV. Vidéo / Image Fichiers Envois
4.1. Mise hors tension de l'appareil photo, retirez la carte SD Mémoire et l'insérer dans un
lecteur de carte.
4.2. Insérez le lecteur de carte dans un ordinateur.
4.3. La carte SD Mémoire sera reconnu comme un lecteur de disque amovible.
4.4. Tous les fichiers peuvent être consultés dans le dossier "DCIM".
V. Réglage Heure / Date Stamp
5.1. Mise hors tension de l'appareil photo, retirez la carte SD Mémoire et l'insérer dans un
lecteur de carte.
5.2. Insérez le lecteur de carte dans un ordinateur.
5.3. dossier de disque amovible apparaît.
5.4. Cliquez sur le lecteur dans le répertoire racine et à l'intérieur du répertoire racine, créez
un fichier nommé "TIMESET.txt".
5.5. Écrivez la date et l'heure actuelle dans le fichier " time.txt" avec le format correctment:
YYYY.MM.DD HH: MM: SS (Par exemple: 2016.04.12 14:24:32). Enregistrez ce fichier.
5.6. Redémarrez l'appareil photo et le système de mise à niveau du programme
automatiquement.
VI. Se charge
6.1. Branchez l'appareil photo à une prise de courant alternatif de sortie en utilisant le
câble USB et l'adaptateur de charge DC5V fourni.
6.2. Le témoin gardera rouge clignotant pendant le processus de charge.
6.3. Le voyant devient rouge solide et bleu lorsque l'appareil est complètement
rechargée.
6.4. Il faudra 5 heures pour obtenir une charge complète.
VII. En direct Sortie vidéo
7.1. Branchez l'appareil photo à un téléviseur ou un moniteur en utilisant le câble AV
fourni comme
ci-dessous:
7.2. Sélectionnez la source de signal caméra vidéo sur le téléviseur ou moniteur.
7.3. Allumez l'appareil photo et commencer l'enregistrement vidéo (voir 3.2), alors vous
pouvez regarder la vidéo en direct de la caméra sur le téléviseur ou le moniteur pendant
le processus d'enregistrement vidéo.
7.4. Vous pouvez découvrir d'autres fonctions de cet appareil dans le mode d'affichage
en direct.
8. Bouton C
9. Bouton B
10. Bouton D
11. Interrupteur d'alimentation
12. Port USB
13. Slot pour carte SD Mémoire

I. Aperçu du Produit
1. Batterie de Caméra
2. Objetf Caméra
3. Bouton d'enregistrement vidéo
4. Bouton de l'appareil photo
5. Bouton d'alimentation
6. Voyant
7. Bouton A
II. Qu'y a-t-il dans la boite
Module caméra DIY -1 × Mini
-1 × Télécommande 2.4GHz
-1 × Câble de AV / USB
-1 × AC110-230V à DC 5V adaptateur de charge
-1 × 8 GB carte SD Mémoire (insérée dans la fente pour carte SD Mémoire déjà)
III. Opération
>> Assurez-vous que la batterie de votre appareil est complètement rechargée et
connecté à l'appareil photo avant d'utiliser s'il vous plaît.
>> Assurez-vous que la carte SD Mémoire (4 GB-32GB, déjà formaté) est solidement fixé
dans la fente de la carte SD de l'appareil photo, ou il ne fonctionnera pas. La SDHC
Classe 10 carte SD Mémoire est recommandée. Si aucune carte SD Mémoire est insérée
dans l'appareil photo, le voyant clignote rouge et bleu 14 fois, puis éteignez. L'appareil
photo est éteint automatiquement.
>> Si vous voulez que la caméra pour fournir un service 24/7, retirez la batterie et
connecter l'appareil photo à l'alimentation directement s’il vous plaît.
3.1. MARCHE / ARRÊT
3.1.1. Faites glisser l'interrupteur d'alimentation à la position ON (opposé au port USB).
Allumez l'appareil photo en appuyant sur le bouton d'alimentation ou le bouton A pendant
2 secondes. Le voyant lumineux clignote en rouge et bleu, une fois, éteignez, puis briller
solide rouge, indiquant que l'appareil est entré en mode veille automatiquement.
3.1.2. Mise hors tension de l'appareil photo en appuyant sur le bouton d'alimentation ou
le bouton A pendant 2 secondes. Le voyant lumineux clignote rouge et bleu 3 fois, puis
éteignez.
[Note]: L'appareil photo arrête automatiquement si elle est en mode veille sans aucune
opération de plus de 2 minutes.
3.2. ENREGISTREMENT VIDEO
3.2.1. Faites glisser l'interrupteur d'alimentation à la position ON (opposé au port USB).
Allumez l'appareil photo en appuyant sur le bouton d'alimentation ou le bouton A pendant
2 secondes. Le voyant lumineux clignote en rouge et bleu, une fois, éteignez, puis briller
solide rouge, indiquant que l'appareil est entré en mode veille automatiquement.
3.2.2. Appuyez sur le bouton ou le bouton d'enregistrement vidéo B une fois pour
enregistrer de la vidéo. Le voyant rouge clignote deux fois puis éteignez.
3.2.3. Appuyez sur le bouton ou le bouton d'enregistrement vidéo B une fois de plus pour
arrêter l'enregistrement vidéo. Le voyant devient rouge solide, indiquant que l'appareil est
en mode veille.
[Remarque]:
1). Les fichiers vidéos seront générés et enregistrés tous les 10 minutes automatiquement.
2). La caméra peut enregistrer des vidéos pendant 5,5 heures en continu sur une charge
complète.
3). Résolution de la vidéo: Format 1920 × 1080P vidéo: MOV
4). La caméra prend en charge l'enregistrement en boucle.
3.3. CAMERA / PHOTOGRAPHIE
3.3.1. S Glisser l'interrupteur d'alimentation à la position ON (opposé au port USB).
Allumez l'appareil photo en appuyant sur le bouton d'alimentation ou le bouton A pendant
2 secondes. Le voyant lumineux clignote en rouge et bleu, une fois, éteignez, puis briller
solide rouge, indiquant que l'appareil est entré en mode veille automatiquement.
3.3.2. Appuyez sur le bouton de l'appareil photo ou le bouton C une fois pour prendre une
photo. Le voyant lumineux clignote en rouge et bleu, une fois, puis éteignez et l'éclat
rouge solide, ce qui indique que l'appareil est en mode veille.
3.4. DETECTION DE MOUVEMENT D'ENREGISTREMENT
3.4.1. Faites glisser l'interrupteur d'alimentation à la position ON (opposé au port USB).
Allumez l'appareil photo en appuyant sur le bouton d'alimentation ou le bouton A pendant 2
secondes. Le voyant lumineux clignote en rouge et bleu, une fois, éteignez, puis briller solide
rouge, indiquant que l'appareil est entré en mode veille automatiquement.
3.4.2. Appuyez sur le bouton D une fois pour entrer en mode d'enregistrement de détection
de mouvement. Le voyant clignote bleu 3 fois puis éteignez.
3.4.3. L'appareil photo enregistre la vidéo automatiquement lorsqu'un mouvement est
détecté.
3.4.4. Appuyez sur le bouton D une fois de plus pour quitter le mode d'enregistrement de
détection de mouvement. Le voyant devient rouge solide, indiquant que l'appareil est en
mode veille.
IV. Vidéo / Image Fichiers Envois
4.1. Mise hors tension de l'appareil photo, retirez la carte SD Mémoire et l'insérer dans un
lecteur de carte.
4.2. Insérez le lecteur de carte dans un ordinateur.
4.3. La carte SD Mémoire sera reconnu comme un lecteur de disque amovible.
4.4. Tous les fichiers peuvent être consultés dans le dossier "DCIM".
V. Réglage Heure / Date Stamp
5.1. Mise hors tension de l'appareil photo, retirez la carte SD Mémoire et l'insérer dans un
lecteur de carte.
5.2. Insérez le lecteur de carte dans un ordinateur.
5.3. dossier de disque amovible apparaît.
5.4. Cliquez sur le lecteur dans le répertoire racine et à l'intérieur du répertoire racine, créez
un fichier nommé "TIMESET.txt".
5.5. Écrivez la date et l'heure actuelle dans le fichier " time.txt" avec le format correctment:
YYYY.MM.DD HH: MM: SS (Par exemple: 2016.04.12 14:24:32). Enregistrez ce fichier.
5.6. Redémarrez l'appareil photo et le système de mise à niveau du programme
automatiquement.
VI. Se charge
6.1. Branchez l'appareil photo à une prise de courant alternatif de sortie en utilisant le
câble USB et l'adaptateur de charge DC5V fourni.
6.2. Le témoin gardera rouge clignotant pendant le processus de charge.
6.3. Le voyant devient rouge solide et bleu lorsque l'appareil est complètement
rechargée.
6.4. Il faudra 5 heures pour obtenir une charge complète.
VII. En direct Sortie vidéo
7.1. Branchez l'appareil photo à un téléviseur ou un moniteur en utilisant le câble AV
fourni comme
ci-dessous:
7.2. Sélectionnez la source de signal caméra vidéo sur le téléviseur ou moniteur.
7.3. Allumez l'appareil photo et commencer l'enregistrement vidéo (voir 3.2), alors vous
pouvez regarder la vidéo en direct de la caméra sur le téléviseur ou le moniteur pendant
le processus d'enregistrement vidéo.
7.4. Vous pouvez découvrir d'autres fonctions de cet appareil dans le mode d'affichage
en direct.

T182
Guida utente
I. Panoramica del Prodotto
1. Camera Battery
2. Camera Lens
3. Pulsante Video Recording
4. Pulsante Camera
5.Pulsante di alimentazione
6. Spia
7. Pulsante A
II. Cosa c'è nella scatola
-1 × Mini Modulo telecamera fai da te
-1 × 2,4 GHz Remote Controller
-1 × USB / Cavo AV
-1 × AC110-230V a CC 5V adattatore di carico
-1 × 8 GB Micro SD Card (montato nello slot per schede Micro SD già)
III. operazione
>> Si prega di assicurarsi che la batteria sia completamente ricaricato e collegato alla
videocamera prima di utilizzarla.
>> Si prega di verificare che la scheda Micro SD (4GB-32GB, già formattato) è montato
saldamente nella slot per scheda SD della fotocamera, o non funzionerà. Si raccomanda
un SDHC Classe 10 scheda Micro SD. Se nessuna scheda micro SD è montato nella
fotocamera, la spia lampeggia rosso e blu 14 volte, poi si spegne. La fotocamera si
spegne automaticamente.
>> Se si desidera che la telecamera di fornire un servizio 24/7, si prega di rimuovere la
batteria e collegare la fotocamera alla rete elettrica direttamente.
3.1. ACCENSIONE / SPEGNIMENTO
3.1.1. Far scorrere l'interruttore di alimentazione sulla posizione ON (di fronte alla porta
USB). Accendere la fotocamera premendo il pulsante di alimentazione o il pulsante A per
2 secondi. La spia lampeggia in rosso e blu una volta, spegnere, poi bagliore rosso fisso,
indicando la telecamera è entrato in modalità standby automaticamente.
3.1.2. Spegnere la fotocamera premendo di nuovo il pulsante di alimentazione o il
pulsante A per 2 secondi. La spia lampeggia rosso e blu per 3 volte, poi si spegne.
[Nota]: La fotocamera si spegne automaticamente se è in modalità standby, senza alcuna
operazione più di 2 minuti.
3.2. REGISTRAZIONE VIDEO
3.2.1. Far scorrere l'interruttore di alimentazione sulla posizione ON (di fronte alla porta
USB). Accendere la fotocamera premendo il pulsante di alimentazione o il pulsante A per
2 secondi. La spia lampeggia in rosso e blu una volta, spegnere, poi bagliore rosso fisso,
indicando la telecamera è entrato in modalità standby automaticamente.
3.2.2. Premere il tasto o pulsante di registrazione video B una volta per registrare video.
La spia rossa lampeggia due volte poi si spegne.
3.2.3. Premere il tasto o pulsante di registrazione video B, ancora una volta per
interrompere la registrazione del video. La spia si illumina in rosso fisso, indicando la
fotocamera è in modalità standby.
[Nota]:
1). Un file video viene generato e salvato automaticamente ogni 10 minuti.
2). La fotocamera può registrare video per 5,5 ore di continuo su una carica completa.
3). Risoluzione video: 1920 × 1080P video Formato: MOV
4). La fotocamera supporta la registrazione in loop.
3.3. CAMERA / la fotografia
3.3.1. S spostare l'interruttore di alimentazione sulla posizione ON (di fronte alla porta
USB). Accendere la fotocamera premendo il pulsante di alimentazione o il pulsante A per
2 secondi. La spia lampeggia in rosso e blu una volta, spegnere, poi bagliore rosso fisso,
indicando la telecamera è entrato in modalità standby automaticamente.
3.3.2. Premere il pulsante FOTOCAMERA o il pulsante C una volta per scattare una foto.
La spia lampeggia in rosso e blu una volta, quindi spegnere e bagliore rosso fisso,
indicando la fotocamera è in modalità standby.
3.4. RILEVAZIONE MOVIMENTO REGISTRAZIONE
3.4.1. Far scorrere l'interruttore di alimentazione sulla posizione ON (di fronte alla porta
USB). Accendere la fotocamera premendo il pulsante di alimentazione o il pulsante A per
2 secondi. La spia lampeggia in rosso e blu una volta, spegnere, poi bagliore rosso fisso,
indicando la telecamera è entrato in modalità standby automaticamente.
3.4.2. Premere il tasto D una volta per entrare in modalità di registrazione di rilevazione
di movimento. La spia lampeggia in blu 3 volte e poi si spegne.
3.4.3. La fotocamera registrare video automaticamente quando viene rilevato un
movimento.
3.4.4. Premere il pulsante d, ancora una volta per uscire dalla modalità di registrazione di
rilevazione di movimento. La spia si illumina in rosso fisso, indicando la fotocamera è in
modalità standby.
IV. Video/Immagine Carica I File
4.1. Spegnere la fotocamera, rimuovere la scheda Micro SD e inserirla in un lettore di
schede.
4.2. Inserire il lettore di schede in un computer PC.
4.3. La scheda Micro SD verrà riconosciuta come unità disco rimovibile.
4.4. Tutti i file sono accessibili nella cartella "DCIM".
V. Impostazione Di Ora/Data Timbro
5.1. Spegnere la fotocamera, rimuovere la scheda Micro SD e inserirla in un lettore di
schede.
5.2. Inserire il lettore di schede in un computer PC.
5.3. appare cartella sul disco rimovibile.
5.4. Fare clic sul disco nella directory principale e all'interno della directory principale,
creare un file denominato "TIMESET.txt".
5.5. Scrivere la data e l'ora correnti nel file " time.txt" con il formato corretto:
YYYY.MM.DD HH: MM: SS (per esempio:2016.04.12 14:24:32). Salvare il file.
5.6. Riavviare la telecamera e il sistema aggiornerà automaticamente il programma.
VI. Ricarica
6.1. Collegare la fotocamera ad una presa di corrente alternata presa utilizzando il cavo
USB e l'adattatore di carica DC5V fornito.
6.2. La spia continua a lampeggiare rosso durante il processo di carica.
6.3. La spia si illumina di rosso solido e blu quando la fotocamera è completamente
carica.
6.4. Ci vorranno 5 ore per ottenere una carica completa.
VII. Uscita Video Dal Vivo
7.1. Collegare la fotocamera a un televisore o monitor utilizzando il cavo AV in dotazione,
come di seguito:
7.2. Selezionare la sorgente del segnale video della telecamera sul televisore o monitor.
7.3. Accendere la fotocamera e avviare la registrazione video (vedere 3.2), allora si può
guardare il video in diretta della telecamera sul televisore o monitor durante il processo di
registrazione video.
7.4. Si può sperimentare altre funzioni di questa fotocamera in modalità live view.
8. Tasto C
9. Pulsante B
10. Tasto D
11. Interruttore Potenza
12. Porta USB
13. Micro SD Card Slot

I. Panoramica del Prodotto
1. Camera Battery
2. Camera Lens
3. Pulsante Video Recording
4. Pulsante Camera
5.Pulsante di alimentazione
6. Spia
7. Pulsante A
II. Cosa c'è nella scatola
-1 × Mini Modulo telecamera fai da te
-1 × 2,4 GHz Remote Controller
-1 × USB / Cavo AV
-1 × AC110-230V a CC 5V adattatore di carico
-1 × 8 GB Micro SD Card (montato nello slot per schede Micro SD già)
III. operazione
>> Si prega di assicurarsi che la batteria sia completamente ricaricato e collegato alla
videocamera prima di utilizzarla.
>> Si prega di verificare che la scheda Micro SD (4GB-32GB, già formattato) è montato
saldamente nella slot per scheda SD della fotocamera, o non funzionerà. Si raccomanda
un SDHC Classe 10 scheda Micro SD. Se nessuna scheda micro SD è montato nella
fotocamera, la spia lampeggia rosso e blu 14 volte, poi si spegne. La fotocamera si
spegne automaticamente.
>> Se si desidera che la telecamera di fornire un servizio 24/7, si prega di rimuovere la
batteria e collegare la fotocamera alla rete elettrica direttamente.
3.1. ACCENSIONE / SPEGNIMENTO
3.1.1. Far scorrere l'interruttore di alimentazione sulla posizione ON (di fronte alla porta
USB). Accendere la fotocamera premendo il pulsante di alimentazione o il pulsante A per
2 secondi. La spia lampeggia in rosso e blu una volta, spegnere, poi bagliore rosso fisso,
indicando la telecamera è entrato in modalità standby automaticamente.
3.1.2. Spegnere la fotocamera premendo di nuovo il pulsante di alimentazione o il
pulsante A per 2 secondi. La spia lampeggia rosso e blu per 3 volte, poi si spegne.
[Nota]: La fotocamera si spegne automaticamente se è in modalità standby, senza alcuna
operazione più di 2 minuti.
3.2. REGISTRAZIONE VIDEO
3.2.1. Far scorrere l'interruttore di alimentazione sulla posizione ON (di fronte alla porta
USB). Accendere la fotocamera premendo il pulsante di alimentazione o il pulsante A per
2 secondi. La spia lampeggia in rosso e blu una volta, spegnere, poi bagliore rosso fisso,
indicando la telecamera è entrato in modalità standby automaticamente.
3.2.2. Premere il tasto o pulsante di registrazione video B una volta per registrare video.
La spia rossa lampeggia due volte poi si spegne.
3.2.3. Premere il tasto o pulsante di registrazione video B, ancora una volta per
interrompere la registrazione del video. La spia si illumina in rosso fisso, indicando la
fotocamera è in modalità standby.
[Nota]:
1). Un file video viene generato e salvato automaticamente ogni 10 minuti.
2). La fotocamera può registrare video per 5,5 ore di continuo su una carica completa.
3). Risoluzione video: 1920 × 1080P video Formato: MOV
4). La fotocamera supporta la registrazione in loop.
3.3. CAMERA / la fotografia
3.3.1. S spostare l'interruttore di alimentazione sulla posizione ON (di fronte alla porta
USB). Accendere la fotocamera premendo il pulsante di alimentazione o il pulsante A per
2 secondi. La spia lampeggia in rosso e blu una volta, spegnere, poi bagliore rosso fisso,
indicando la telecamera è entrato in modalità standby automaticamente.
3.3.2. Premere il pulsante FOTOCAMERA o il pulsante C una volta per scattare una foto.
La spia lampeggia in rosso e blu una volta, quindi spegnere e bagliore rosso fisso,
indicando la fotocamera è in modalità standby.
3.4. RILEVAZIONE MOVIMENTO REGISTRAZIONE
3.4.1. Far scorrere l'interruttore di alimentazione sulla posizione ON (di fronte alla porta
USB). Accendere la fotocamera premendo il pulsante di alimentazione o il pulsante A per
2 secondi. La spia lampeggia in rosso e blu una volta, spegnere, poi bagliore rosso fisso,
indicando la telecamera è entrato in modalità standby automaticamente.
3.4.2. Premere il tasto D una volta per entrare in modalità di registrazione di rilevazione
di movimento. La spia lampeggia in blu 3 volte e poi si spegne.
3.4.3. La fotocamera registrare video automaticamente quando viene rilevato un
movimento.
3.4.4. Premere il pulsante d, ancora una volta per uscire dalla modalità di registrazione di
rilevazione di movimento. La spia si illumina in rosso fisso, indicando la fotocamera è in
modalità standby.
IV. Video/Immagine Carica I File
4.1. Spegnere la fotocamera, rimuovere la scheda Micro SD e inserirla in un lettore di
schede.
4.2. Inserire il lettore di schede in un computer PC.
4.3. La scheda Micro SD verrà riconosciuta come unità disco rimovibile.
4.4. Tutti i file sono accessibili nella cartella "DCIM".
V. Impostazione Di Ora/Data Timbro
5.1. Spegnere la fotocamera, rimuovere la scheda Micro SD e inserirla in un lettore di
schede.
5.2. Inserire il lettore di schede in un computer PC.
5.3. appare cartella sul disco rimovibile.
5.4. Fare clic sul disco nella directory principale e all'interno della directory principale,
creare un file denominato "TIMESET.txt".
5.5. Scrivere la data e l'ora correnti nel file " time.txt" con il formato corretto:
YYYY.MM.DD HH: MM: SS (per esempio:2016.04.12 14:24:32). Salvare il file.
5.6. Riavviare la telecamera e il sistema aggiornerà automaticamente il programma.
VI. Ricarica
6.1. Collegare la fotocamera ad una presa di corrente alternata presa utilizzando il cavo
USB e l'adattatore di carica DC5V fornito.
6.2. La spia continua a lampeggiare rosso durante il processo di carica.
6.3. La spia si illumina di rosso solido e blu quando la fotocamera è completamente
carica.
6.4. Ci vorranno 5 ore per ottenere una carica completa.
VII. Uscita Video Dal Vivo
7.1. Collegare la fotocamera a un televisore o monitor utilizzando il cavo AV in dotazione,
come di seguito:
7.2. Selezionare la sorgente del segnale video della telecamera sul televisore o monitor.
7.3. Accendere la fotocamera e avviare la registrazione video (vedere 3.2), allora si può
guardare il video in diretta della telecamera sul televisore o monitor durante il processo di
registrazione video.
7.4. Si può sperimentare altre funzioni di questa fotocamera in modalità live view.
Table of contents
Languages:
Other Wiseup Digital Camera manuals

Wiseup
Wiseup WBD500 User manual

Wiseup
Wiseup AT001 User manual

Wiseup
Wiseup BC185YM-720P User manual

Wiseup
Wiseup CUP 100 User manual

Wiseup
Wiseup MT-V001 User manual

Wiseup
Wiseup DVR-0017 User manual

Wiseup
Wiseup DVR-0022C User manual

Wiseup
Wiseup U14 User manual

Wiseup
Wiseup GL4000 User manual

Wiseup
Wiseup C2000 User manual