WiT WTGAHRS2 User manual

WTGAHRS2| manual v0707 | http://wiki.wit-motion.com/english
- 2 -
Tutorial Link
Google Drive
Link to instructions DEMO:
WITMOTION Youtube Channel
WTGAHRS2 Playlist
If you have technical problems or cannot find the information that you need in the
provided documents, please contact our support team. Our engineering team is
committed to providing the required support necessary to ensure that you are
successful with the operation of our AHRS sensors.
Contact
Technical Support Contact Info
Application
● AGV Truck
● Platform Stability
● Auto Safety System
● 3D Virtual Reality
● Industrial Control
● Robot
● Car Navigation
● UAV
● Truck-mounted Satellite Antenna Equipment

WTGAHRS2| manual v0707 | http://wiki.wit-motion.com/english
- 3 -
Contents
Tutorial Link................................................................................................................... - 2 -
Contact............................................................................................................................ - 2 -
Application......................................................................................................................- 2 -
Contents..........................................................................................................................- 3 -
1 Introduction............................................................................................................... - 5 -
1.1 Warning Statement......................................................................................- 6 -
2 Use Instructions with PC...................................................................................... - 7 -
2.1 Connection Method...................................................................................... - 7 -
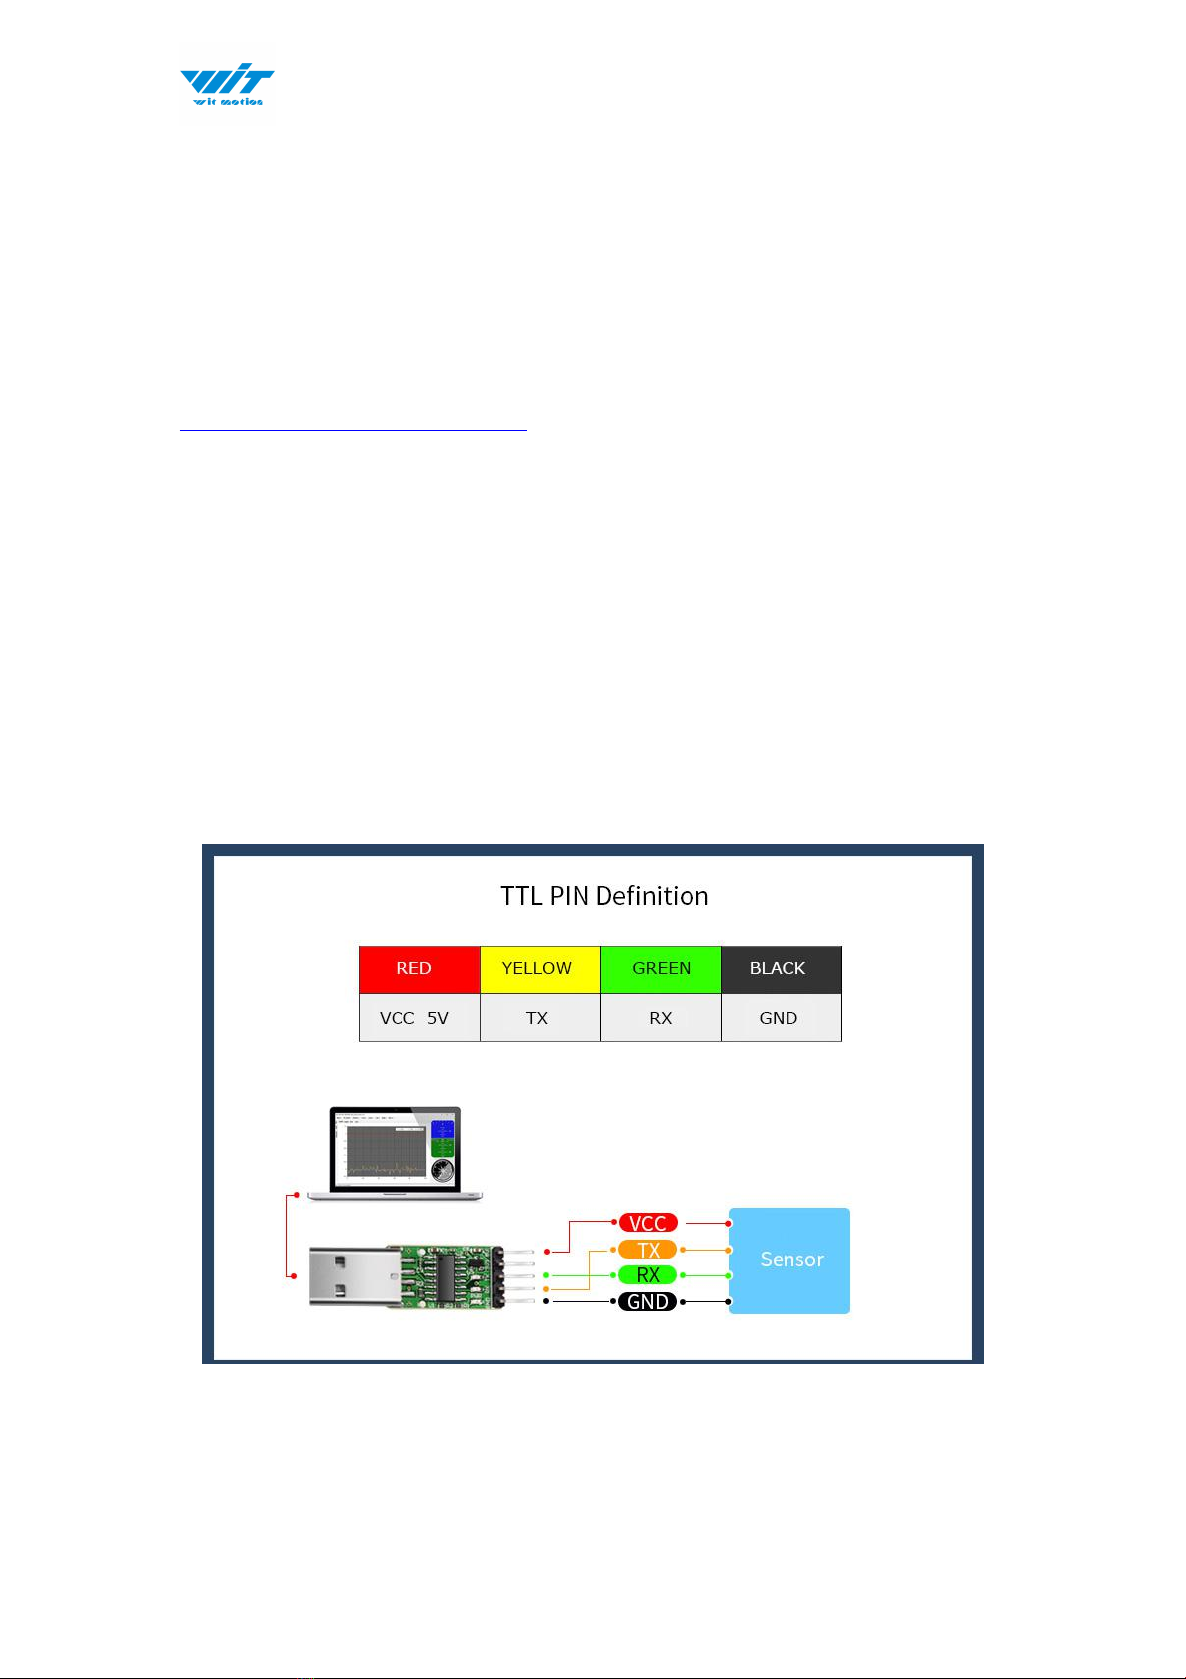
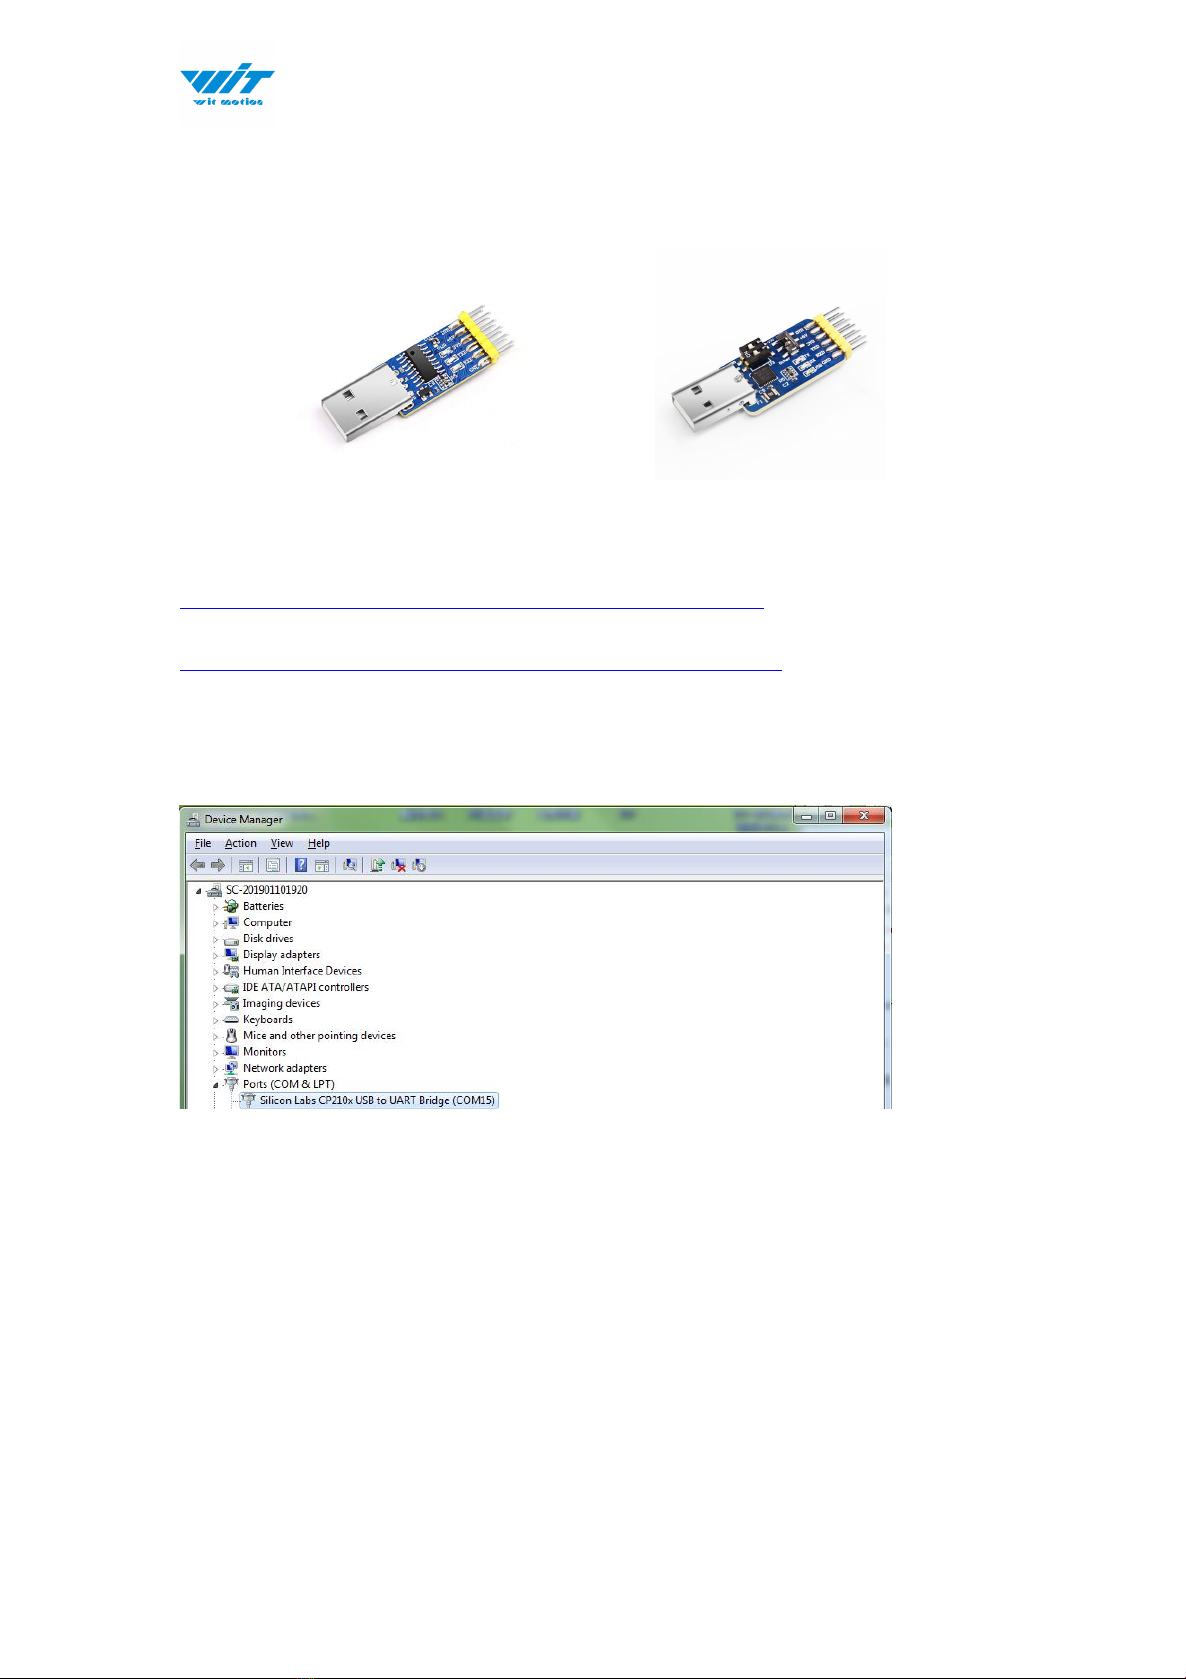
2.1.1 Serial Connection............................................................................. - 7 -
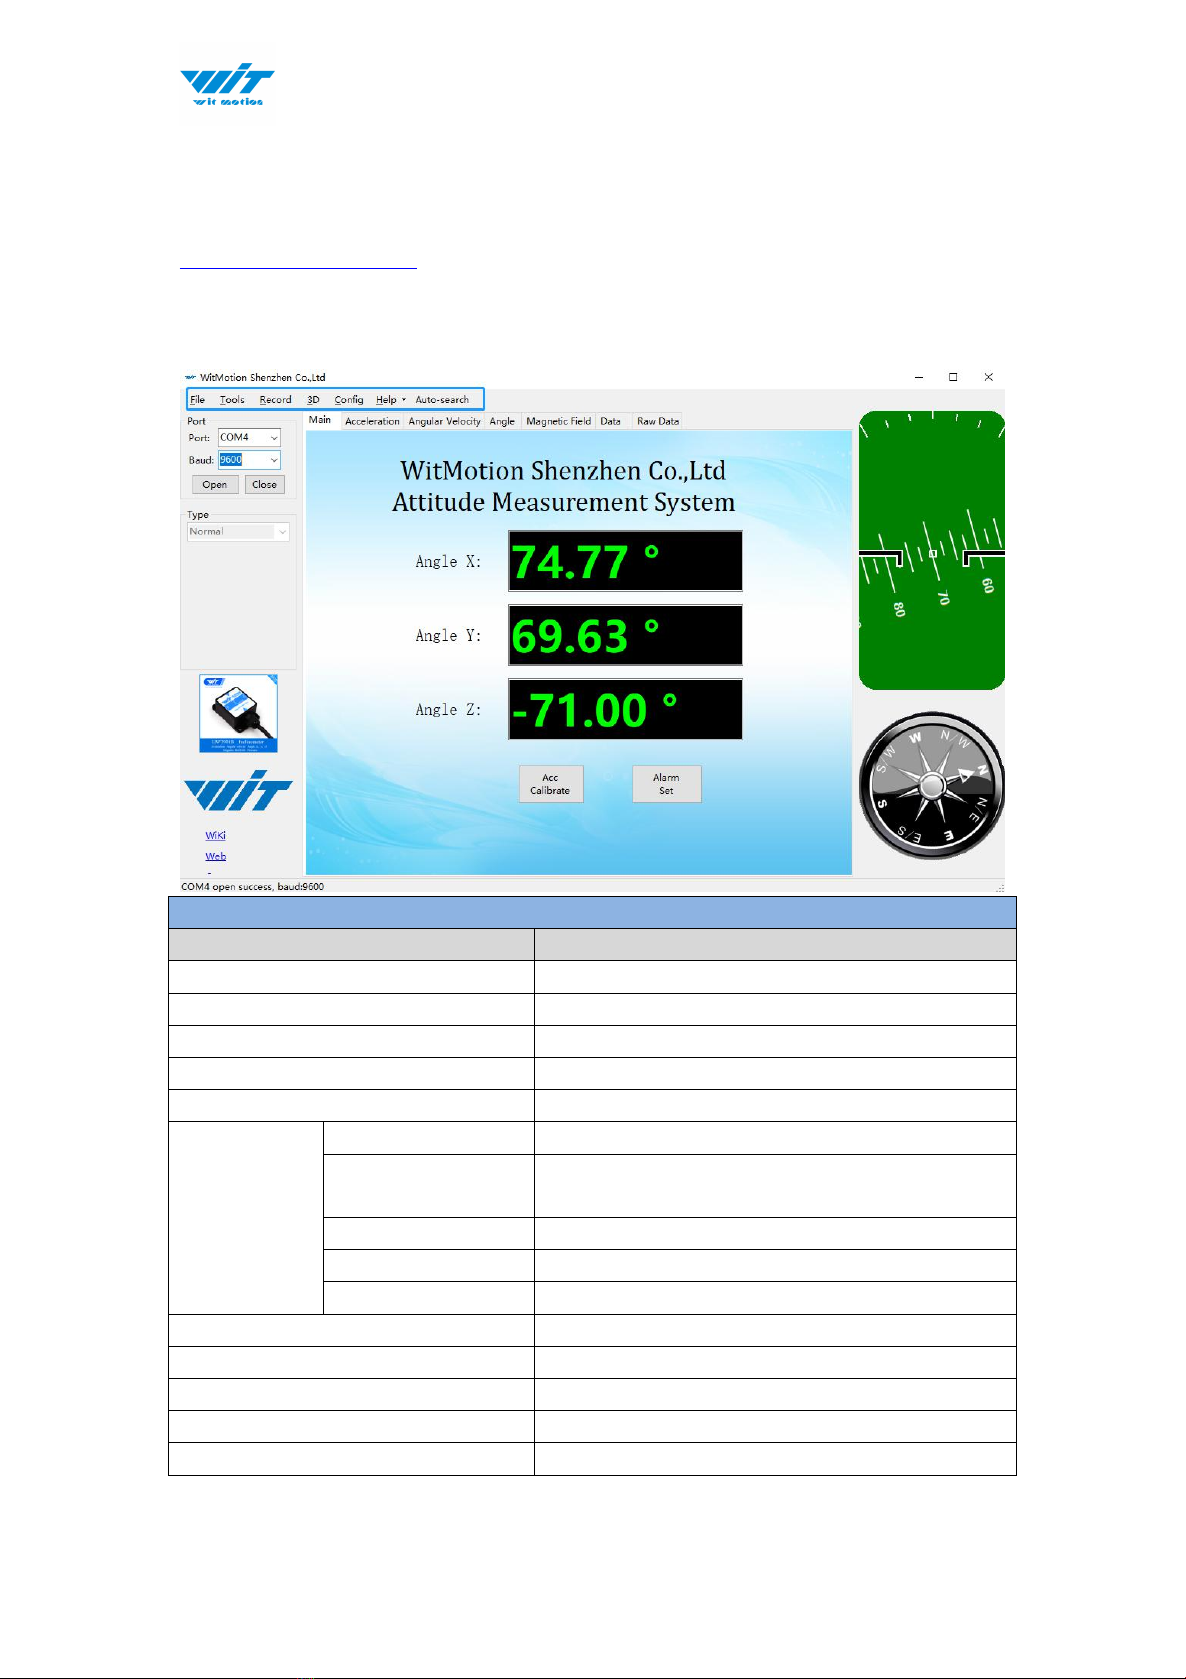
2.2 Software Introduction.................................................................................- 9 -
2.2.1 Main Menu........................................................................................ - 9 -
2.2.2 Menu of Configuration..................................................................- 10 -
2.3 Calibration.....................................................................................................- 14 -
2.3.1 Accelerometer Calibration.......................................................... - 14 -
2.3.2 Magnetic Field Calibration.......................................................... - 16 -
2.3.3 Gyroscope Automatic Calibration............................................ - 18 -
2.3.4 Reset Z-axis Angle........................................................................ - 19 -
2.3.5 Reset Height to 0........................................................................... - 19 -
2.4 Configuration............................................................................................... - 20 -
2.4.1 GPS Positioning...............................................................................- 20 -
2.4.2 Return Content............................................................................... - 23 -
2.4.3 Output Rate......................................................................................- 24 -
2.4.4 Baud Rate..........................................................................................- 25 -
2.4.5 Data Recording............................................................................... - 26 -
2.4.6 Data Playback..................................................................................- 28 -
2.4.7 Standby and Wake Up................................................................. - 30 -

WTGAHRS2| manual v0707 | http://wiki.wit-motion.com/english
- 4 -
2.4.8 Placement Direction......................................................................- 31 -
2.4.9 Bandwidth......................................................................................... - 32 -
3 Use Instructions with Android Phone............................................................- 34 -
3.1 APP Installation...........................................................................................- 34 -
3.2 Hardware Preparation.............................................................................. - 35 -
3.3 Connection....................................................................................................- 36 -
3.4 Calibration.....................................................................................................- 40 -
3.4.1 Acceleration Calibration...............................................................- 40 -
3.4.2 Magnetic Field Calibration.......................................................... - 41 -
4 MCU Connection.................................................................................................... - 42 -
4.1 Arduino...........................................................................................................- 42 -
4.2 STM32.............................................................................................................- 42 -
4.3 Raspberry pi.................................................................................................- 42 -
4.4 C#.................................................................................................................... - 43 -
4.5 C++................................................................................................................. - 43 -
4.6 Matlab............................................................................................................. - 43 -

WTGAHRS2| manual v0707 | http://wiki.wit-motion.com/english
- 5 -
1 Introduction
The WTGAHRS2 is a multi-sensor device detecting acceleration, angular
velocity, angle, magnetic filed as well as GPS. The robust housing and the
small outline makes it perfectly suitable for industrial retrofit applications
such as condition monitoring and predictive maintenance. Configuring the
device enables the customer to address a broad variety of use cases by
interpreting the sensor data by smart algorithms.
WTGAHRS2’s scientific name is GPS IMU sensor. A sensor measures 3-axis
angle, angular velocity, acceleration, magnetic field and GPS data. Its strength
lies in the algorithm which can calculate three-axis angle accurately.
WTGAHRS2 is employed where the highest measurement accuracy is required.
It offers several advantages over competing sensor:
• Heated for best data availability: new WITMOTION patented zero-bias
automatic detection calibration algorithm outperforms traditional
accelerometer sensor
• High precision Roll Pitch Yaw (X Y Z axis) Acceleration + Angular Velocity +
Angle + Magnetic Field output+GPS data
• Low cost of ownership: remote diagnostics and lifetime technical support by
WITMOTION service team
• Developed tutorial: providing manual, datasheet, Demo video, free software
for Windows computer, APP for Android smartphones , and sample code for
MCU integration including 51 serial, STM32, Arduino, Matlab, Raspberry Pi,
communication protocol for project development
• WITMOTION sensors have been praised by thousands of engineers as a
recommended attitude measurement solution

WTGAHRS2| manual v0707 | http://wiki.wit-motion.com/english
- 6 -
1.1 Warning Statement
Putting more than 5 Volt across the sensor wiring of
the main power supply can lead to permanent damage
to the sensor.
GPS positioning requires to be operated outdoors.
For proper instrument grounding: use WITMOTION
with its original factory-made cable or accessories.
Do not access the I2C interface.
For secondary developing project or integration:
use WITMOTION with its compiled sample code.

WTGAHRS2| manual v0707 | http://wiki.wit-motion.com/english
- 7 -
2 Use Instructions with PC
2.1 Connection Method
PC software is only compatible with Windows system.
Link to WTGAHRS2’s demo video
2.1.1 Serial Connection
Step 1. Connect the sensor with a serial converter
PIN Connection:
VCC - 5V
TX - RX
RX - TX
GND - GND
(When connecting with computer, VCC-5V is recommended.)

WTGAHRS2| manual v0707 | http://wiki.wit-motion.com/english
- 8 -
Recommended tools:
3-in-1 serial converter 6-in-1 serial converter
Link to tutorial of 3-in-1 serial converter(CH340 driver)
Link to tutorial of 6-in-1 serial converter (CP2102 driver)
Step 1. Unzip the software and install the driver CH340 or CP2102
(Depending on which accessory for usage.)
Step 2. Insert the converter to computer and confirm the “com port” in device
manager
Step 3. Open the software(Minimu.exe)
Data will appear after auto-search finishes
Notice: If not successful, please operate manually
Choose the com port and baud rate 9600, data will be shown on the software.

WTGAHRS2| manual v0707 | http://wiki.wit-motion.com/english
- 9 -
2.2 Software Introduction
Link to download software
2.2.1 Main Menu
Main Menu of software
Button
Function
File
Launch recorded HEX file (Bin format)
Tools
Hide or display tools box on left side
Record
Record function
3D
3D DEMO
Config
Configuration setting
Help
Language
English or Chinese
Bluetooth Set
Binding device/ unbind, only for Bluetooth
sensor series
Firmware update
Option for firmware update
About Minimu
Info about Minimu.exe
Factory test
For manufacturer internal test only
Auto-search
Auto searching the sensor
Port
Com port selection
Baud
Baud rate selection
Open
Open com port
Close
Close com port

WTGAHRS2| manual v0707 | http://wiki.wit-motion.com/english
- 11 -
Menu of System
Button
Function
Reset
Reset to factory setting
Sleep
Sleep function
Alarm
Alarm function
Algorithm
6-axis algorithm or 9-axis
Installation Direction
Vertical or horizontal installation
Instruction Start-up
Instructions sending to start-up the sensor
Menu of Calibrate
Button
Function
Acceleration
Accelerometer calibration
Magnetic Field
Magnetometer calibration
Reset Height
Reset height data to 0
(only for sensor built-in barometer,
including WT901B, WTGAHRS1, HWT901B,
WTGAHRS2)
Reset Z-axis Angle
Reset Z-axis angle to 0 degree, not available
for WTGAHRS2 in 9-axis algorithm
Angle Reference
Setting current angle as 0 degree
Gyro Auto Calibrate
Auto-calibration of gyroscope
Menu of Range
Button
Function
Acceleration
Acceleration measurement range
Gyro
Gyroscope measurement range
Band Width
Bandwidth range
GPS Time Zone
GPS positioning of time zone

WTGAHRS2| manual v0707 | http://wiki.wit-motion.com/english
- 12 -
Menu of Communication
Button
Function
Baud Rate
Baud rate selection
Output Rate
Return rate selection
Device Address
Interface for R&D
Menu of Content
Button
Function
Time
Time data output
Acceleration
Acceleration data output
Velocity
Angular velocity data output
Angle
Angle data output
Magnetism
Magnetic field data output
Port
Port data output
Pressure
Pressure output, only available with the
sensor built-in barometer like HWT901B,
WTGAHRS1, WTGAHRS2, WT901B, etc
Location
Latitude&Longitude data output, only for
GPS IMU series, such as WTGAHRS1,
WTGAHRS2
PDOP
Ground velocity data output, only for GPS
IMU series, such as WTGAHRS1,
WTGAHRS2
Quaternion
Quaternion data output
Positioning Accuracy
Option for GPS positioning accuracy output,
including Satellite quantity, PDOP, HDOP,
VDOP data, only for GPS IMU series, such as
WTGAHRS1, WTGAHRS2
GPS Original
Only output GPS raw data, only for GPS IMU
series, such as WTGAHRS1, WTGAHRS2
Menu of Port
D0 Model
Extended port D0
D1 Model
Extended port D1
D2 Model
Extended port D2
D3 Model
Extended port D3
Pulse width
Pulse width of PWM
Cycle
Cycle of PWM

WTGAHRS2| manual v0707 | http://wiki.wit-motion.com/english
- 14 -
2.3 Calibration
Preparation:
Make sure the sensor is “Online”.
Calibration on PC software:
It is required to calibrate for the first time usage.
2.3.1 Accelerometer Calibration
Purpose:
The accelerometer calibration is used to remove the zero bias of the
accelerometer. Before calibration, there will be different degrees of bias error.
After calibration, the measurement will be accurate.
Methods:
Step 1. Keep the module horizontally stationary
Step 2. Click the accelerometer calibration
Step 3. Click the “Start calibration”and wait for 3 seconds
Step 4. Click “Complete Calibration”

WTGAHRS2| manual v0707 | http://wiki.wit-motion.com/english
- 15 -
Step 5. Judge the result--confirm if there is 1g on Z-axis acceleration
1. After 1 ~ 2 seconds, the three axial acceleration value of the module is
about 0, 0,1, the X and Y axis Angle is around 0°. After calibration, the x-y
axis Angle is accurate.
Note: When putting the module horizontal, there is 1g of gravitational
acceleration on the Z-axis.

WTGAHRS2| manual v0707 | http://wiki.wit-motion.com/english
- 16 -
2.3.2 Magnetic Field Calibration
Purpose:
Magnetic calibration is used to remove the zero bias of the magnetic field
sensor. Usually, the magnetic field sensor will have a large zero error when it is
manufactured. If it is not calibrated, it will bring a large measurement error,
which will affect the accuracy of the measurement of the z-axis Angle of the
heading Angle.
Preparation:
Sensors should be 20CM away from magnetic and iron and other materials
Methods:
Step 1. Open the Config menu
Step 2. Click the magnetic field calibration button. click the “Start calibration”

WTGAHRS2| manual v0707 | http://wiki.wit-motion.com/english
- 18 -
Step 4. After rotation, click “End calibration”
Successful result:
Most of data dots will be within the ellipse.
If not successful, please stay away from the objective that can create magnetic
field interference.
2.3.3 Gyroscope Automatic Calibration
The gyroscope calibration is to calibrate the angular velocity, and the sensor
will calibrate automatically.
It is recommended that the automatic calibration of gyroscopes can be
inactivated only if the module rotates at a constant speed.

WTGAHRS2| manual v0707 | http://wiki.wit-motion.com/english
- 19 -
2.3.4 Reset Z-axis Angle
Note:
If you want to avoid magnetic interference, you can change the algorithm
to 6-axis, function of resetting Z-axis angle can be used.
The z-axis angle is an absolute angle, and it takes the northeast sky as the
coordinate system can not be relative to 0 degree.
Z axis to 0 is to make the initial angle of the z axis angle is relative 0 degree.
When the module is used before and z-axis drift is large, the z-axis can be
calibrated. When the module is powered on, the Z axis will automatically return
to 0.
Calibration methods as follow: firstly keep the module static, click the “Config”
open the configuration bar and then click “Reset Z-axis Angle” option, you will
see the the angle of the Z axis backs to 0 degree in the module data bar.
2.3.5 Reset Height to 0
You can click the “Reset Height” in the “ config” to complete the setting.
Only available for the module built-in barometer like WT901B, HWT901B,
WTGAHRS1, WTGAHRS2.

WTGAHRS2| manual v0707 | http://wiki.wit-motion.com/english
- 20 -
2.4 Configuration
2.4.1 GPS Positioning
Notice:
The WTGAHRS2 is built-in antenna, which is requiring operation outdoor.
To set GPS positioning, you need to check whether the GPS has original data
output.
Step 1:
Open the configuration bar and click the "GPS original"as output data.
This manual suits for next models
1
Table of contents
Other WiT Measuring Instrument manuals
Popular Measuring Instrument manuals by other brands

Sapphire Instruments
Sapphire Instruments SI-9010A CALIBRATION PROCEDURE

Brüel & Kjær
Brüel & Kjær 1014 instruction & application

Resol
Resol DFA comfort Operation manual

Xylem
Xylem SI Analytics HandyLab 100 operating manual

Itm
Itm 5 Series quick start guide

National Instruments
National Instruments NI PXIe-4139 CALIBRATION PROCEDURE