WiT WIT-601A User manual

INFUSION PUMP WIT-601A
User Manual
Guangzhou WIT Medical Technology Co., Ltd
Version: 3.0

- 1 -
CONTENTS
Introduction............................................................................................................................................................... - 3 -
Safety Tips................................................................................................................................................................. - 3 -
Chapter 1 Overview................................................................................................................................................- 5 -
1.1 Scope of application.................................................................................................................................... - 5 -
1.2 Technical Parameters...................................................................................................................................- 5 -
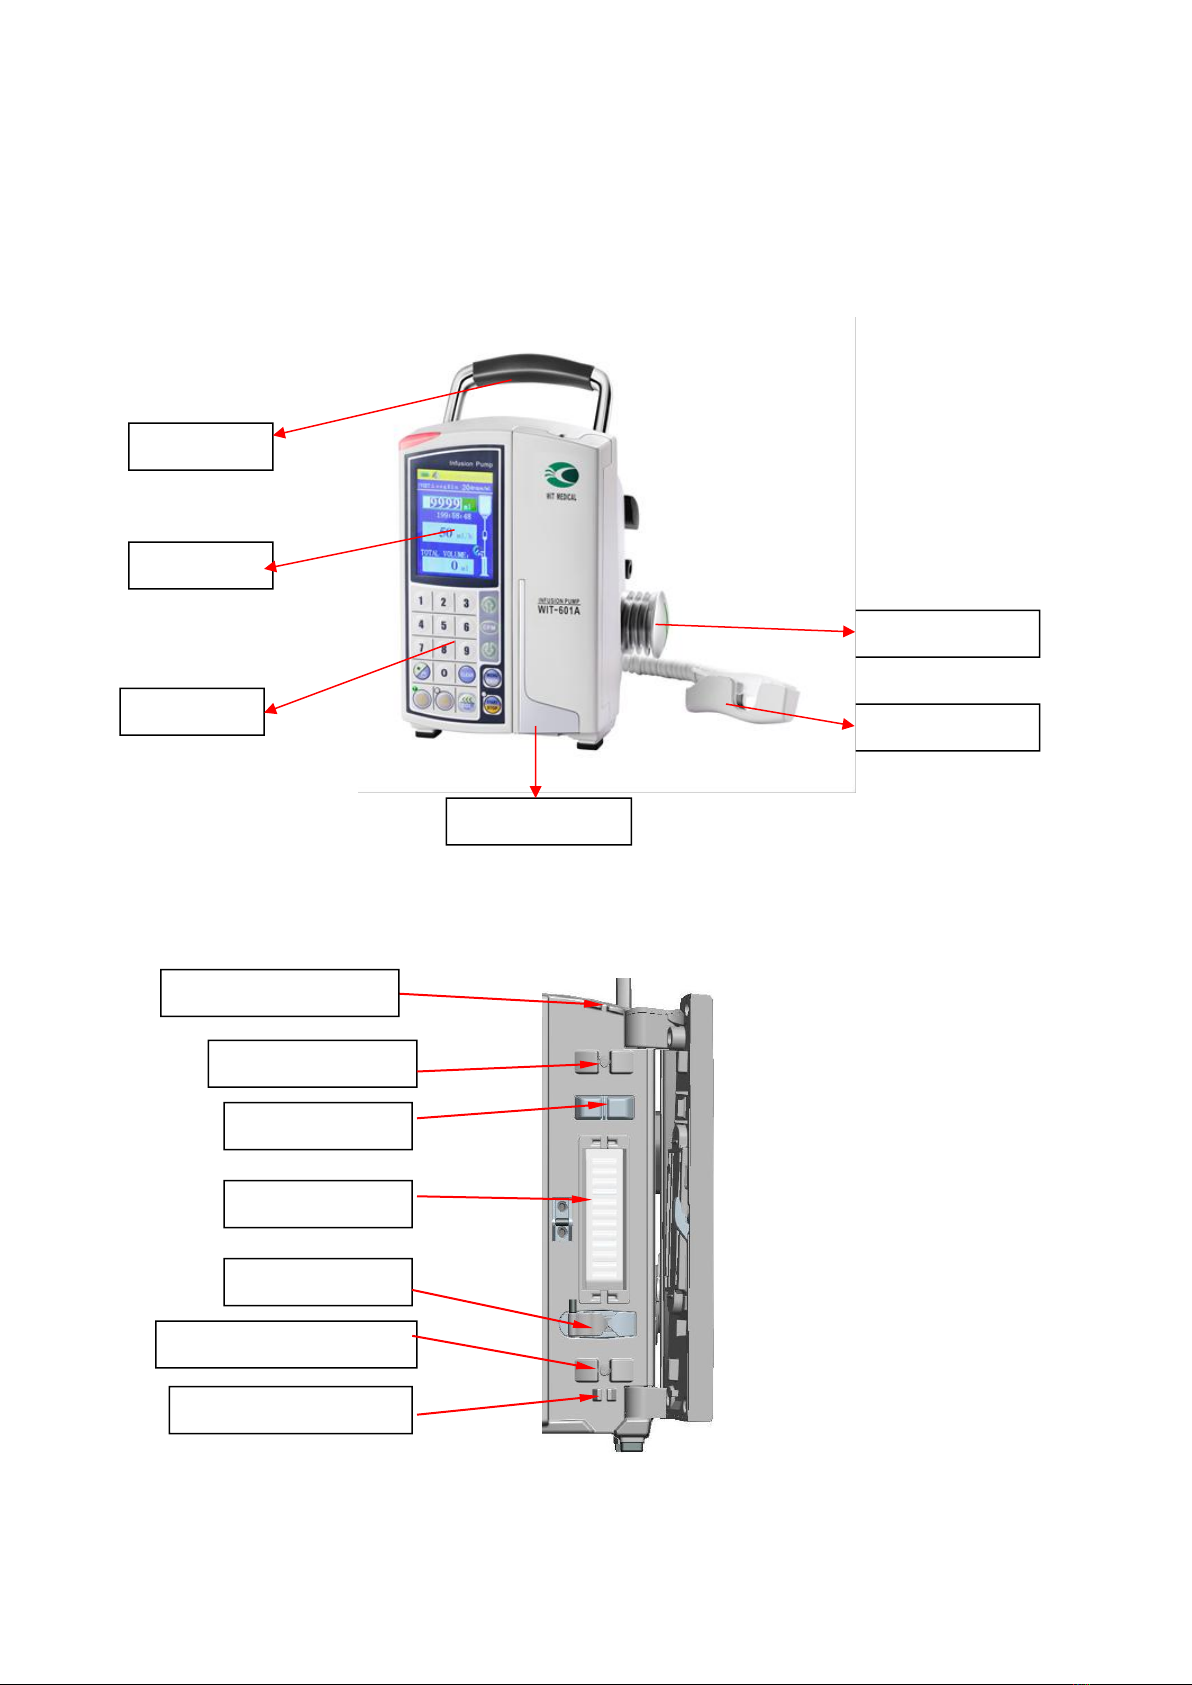
Chapter 2 Components description........................................................................................................................ - 7 -
Exterior components names description........................................................................................................... - 7 -
Infusion tube parts description.......................................................................................................................... - 7 -
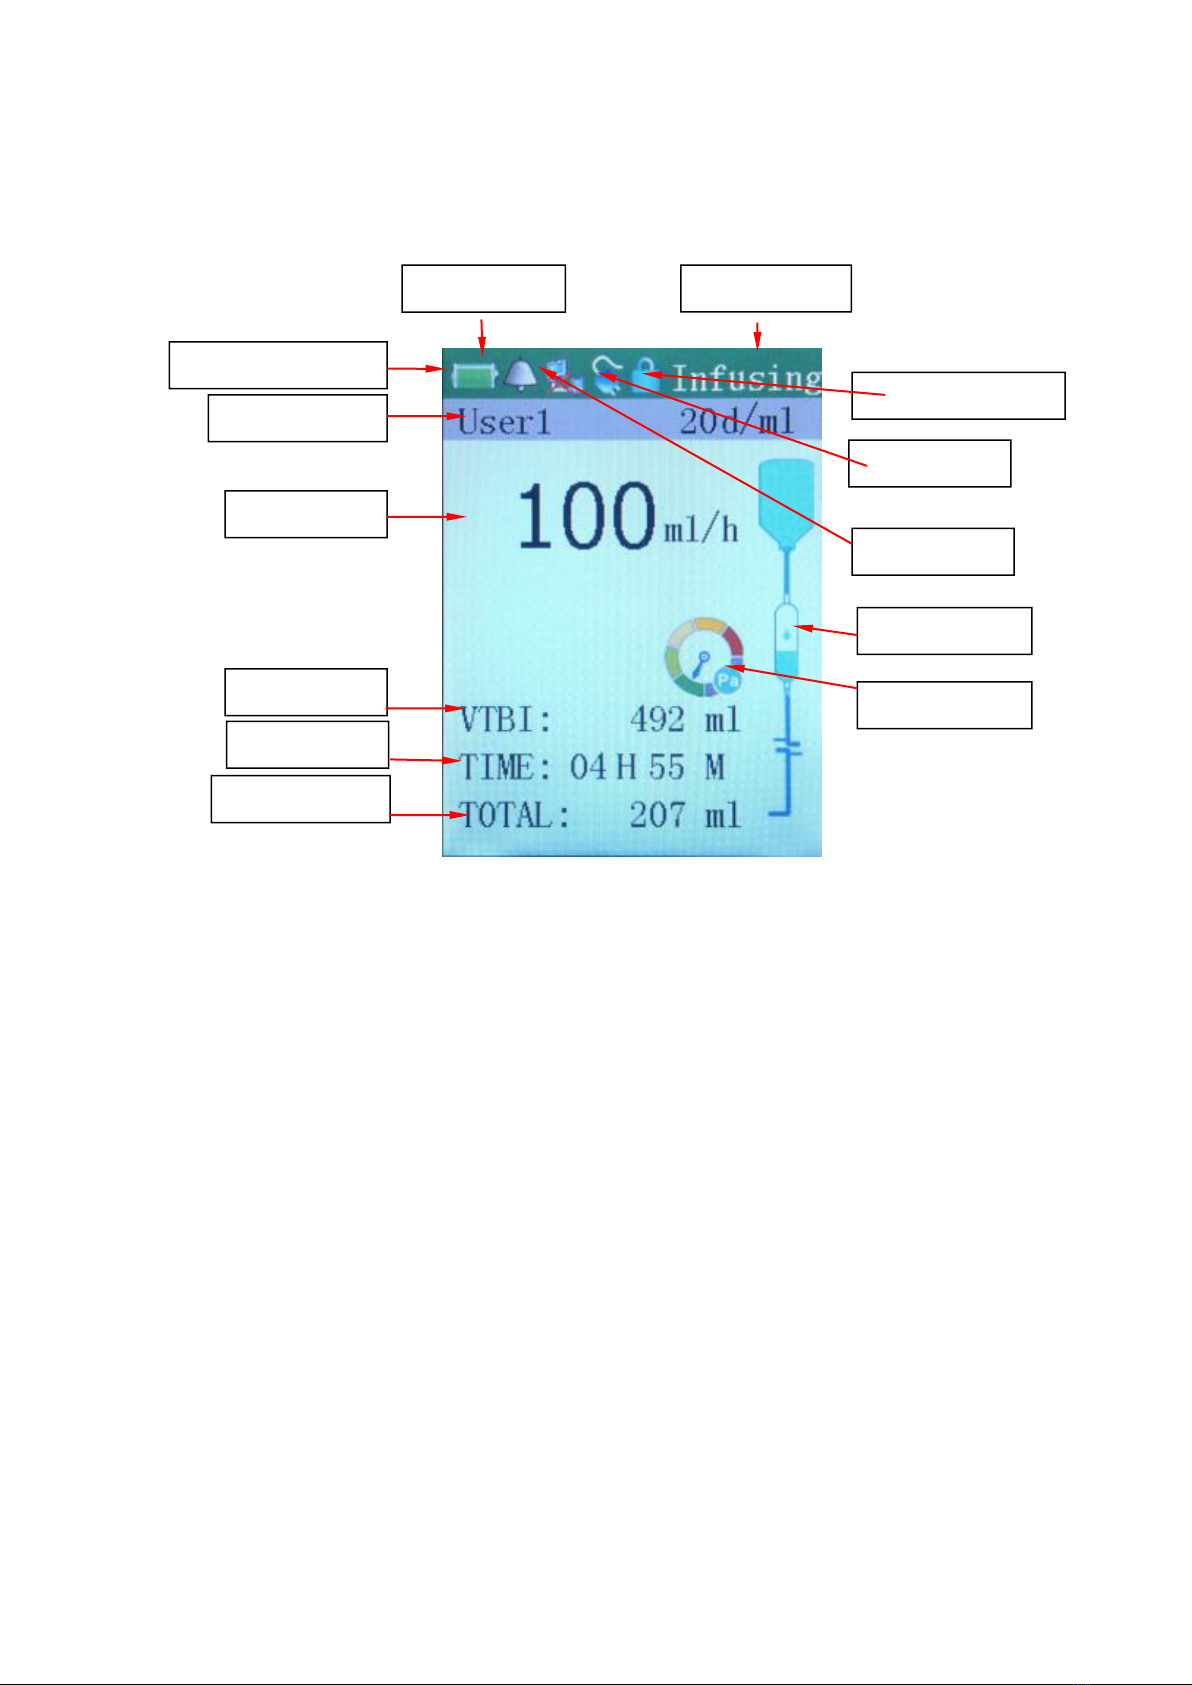
Main information displayed on LCD................................................................................................................ - 8 -
Infusion pump structure.................................................................................................................................... - 9 -
Chapter 3 Assembling
Packing list...................................................................................................................................................... - 10 -
Pump Installation.............................................................................................................................................- 10 -
IV Set Installation............................................................................................................................................- 13 -
Chapter 4 Operation............................................................................................................................................. - 14 -
Function key description................................................................................................................................. - 14 -
Operation Flowchart........................................................................................................................................- 15 -
Volume mode operation...................................................................................................................................- 16 -
VTBI/Rate/Time..............................................................................................................................................- 16 -
Rate/Time........................................................................................................................................................ - 17 -
Simple Rate..................................................................................................................................................... - 17 -
Program mode................................................................................................................................................. - 18 -
Dose/weight mode...........................................................................................................................................- 20 -
Drug library mode........................................................................................................................................... - 21 -
Chapter 5 Special functions..................................................................................................................................- 23 -
Bolus................................................................................................................................................................- 23 -
Auto Bolus.......................................................................................................................................................- 23 -
Manual Bolus.................................................................................................................................................. - 23 -
IV set management..........................................................................................................................................- 24 -
Add IV set........................................................................................................................................................- 27 -
Remove IV Set................................................................................................................................................ - 28 -
Chapter 6 General operation................................................................................................................................ - 29 -
Stop..................................................................................................................................................................- 29 -
Power off......................................................................................................................................................... - 29 -
Standby............................................................................................................................................................- 29 -
(Piggyback)..................................................................................................................................................... - 29 -
Purge................................................................................................................................................................- 29 -
Mute.................................................................................................................................................................- 29 -
Clear alarm...................................................................................................................................................... - 29 -
Clear the VI..................................................................................................................................................... - 30 -
Battery life check.............................................................................................................................................- 30 -
Setting fluid warmer........................................................................................................................................- 30 -
Pre-alarm setting of infusion completion........................................................................................................- 30 -
Bottom occlusion pre-alarm setup.................................................................................................................. - 30 -

- 2 -
key lock (auto).................................................................................................................................................- 30 -
key lock (manual)............................................................................................................................................- 30 -
Chapter 7 History record check............................................................................................................................- 33 -
Check history records in machine...................................................................................................................- 33 -
Export history record.......................................................................................................................................- 33 -
Chapter 8 Security characteristic and alarm........................................................................................................ - 34 -
Trouble shooting..............................................................................................................................................- 34 -
Chapter 9 Routine check...................................................................................................................................... - 37 -
Chapter 10 Electrical specification...................................................................................................................... - 38 -
Chapter 11 Storage and transport......................................................................................................................... - 39 -
User's Guide and Manufacturer’s Statement of Anti-electromagnetic Interference I............................ - 40 -
User’s guide and manufacturer’s statement of anti-electromagnetic interference II............................. - 41 -
Infusion accuracy characteristic..............................................................................................................- 43 -
System statement.....................................................................................................................................- 44 -
Product and service information............................................................................................................................. - 45 -

- 3 -
Introduction
Thank you for choosing WIT-601A Infusion Pump. Please carefully read and understand this manual before
use. Regularly check and maintain the pump to avoid possible injury or risks.
Safety Tips
1. WIT-601A Infusion Pump is not explosion proof type or portable device.
2. WIT-601A Infusion Pump cannot be used in the condition with mixed gases of flammable anesthetic
gases, oxygen, or ammonia.
3. WIT-601A Infusion Pump can only be used by professional. Patients are not allowed to use.
4. Prevent patients from excessive or insufficient flow induced injury by the following methods: set
infusion parameters correctly, use the calibrated infusion device.
5. If there is any anomaly, suspend using should be taken as the preferred safety measure.
6. To avoid malfunction, keep the device away from strong electromagnetic source or noise when using,
such as NMR equipment, microwave generating devices, radiation equipment (X-ray, CT, etc).
7. To avoid malfunction, keep this device away from the high-frequency surgical instruments (such as
rack, cable, electrode feeder plates, etc.), the distance should be at least 25cm; at least 1m away from
the cell phone.
8. Do not use other voltages. Only use the specified voltages on nameplate of WIT-601A Infusion Pump,
or may cause damage or fire.
9. Do not throw batteries into fire or heat them, otherwise it will result in electrolyte leakage, fire, or
explosion.
10. Do not tear up the shell of batteries; otherwise it will cause an explosion or chemical burn hazard.
11. When plugging or unplugging the AC power, grip the plug firmly. Do not touch it with wet hands.
12. It is not recommended to share an outlet with other electrical equipments.
13. Never disassemble or modify the device arbitrarily.
14. Check the device daily. If not used for a long time, be sure that the functions are normal before
re-use.
15. If any anomaly or function loss, discontinue use and contact the supplier in a timely manner.
Otherwise the user shall take sole responsibility for any consequences.
16. Avoid vibration, bumps, direct sunlight or strong light.
17. Avoid direct contact with blowing hot, wet air from heating, electric stove or humidifier.
18. Avoid using the device in the following places: chemical storage place, dusty place,
vibration/shaking and damp places.
19. WIT-601A Series Infusion pump is class I in electrical safety classification. When in doubt in wiring
the protective earth conductor, it must be operated by the internal power supply.
20. WIT-601A Series syringe pump cannot be used in parallel with other brands of pumps.
21. The alarm sound pressure range of WIT-601A Series pump is 47-71 db, and the noise in the
operating environment cannot exceed 60 db.
22. Strictly in accordance with User’s Manual of infusion pump in use and maintenance.
23. Infusion pump using infrared drop sensor, does not apply to dark infusion tubing.

- 4 -
24 The infusion pump is apply to 20d/ml, 60d/ml tubing, if the tubing type was set in Abnormal, there is
a big risk of accuracy deviation. Please make sure the tubing type settings are correct!
25. If not be adjusted based on different tubing type and different drug liquid, it may cause large
deviations in infusion accuracy.
26. if alarms are presented, the related medical personnel should be take the related solutions in time
and restart the infusion pump.
27. In clinical use, what kind of drugs can be used for heating fluids, how many degrees Celsius in
temperature should be rise, you must consult your doctor and strictly follow the doctor's advice

- 5 -
Chapter 1 Overview
1.1 Scope of application
It is applicable to accurate, constant and continuous intravenous infusion in medical institutions.
1.2 Technical Parameters
IV Set Options /Size: Open System for common widely-used brand of 10d/ml、15d/ml、20d/ml、60d/ml
(3.4mm~4.5mm), Also can be customized for dedicated IV set
Function Option
With Drug Lab.
Without Drug Lab.
Drug Lab.
Built-in 500 kinds of drugs, covering
the clinical use of the drug dose of 54
units on the library, and could be
connect with the PC for edit; export
& import.
NONE
Working Mode
Rate/VTBI、Time/VTBI、Rate/Time、Volume、Drop、Micro、Simple Rate、
Programmable、DOSE Weight、Drug Lab、Auto Bolus、Manual Bolus.
IV Set
Open System for 10d/ml、15d/ml、20d/ml、60d/ml (3.4mm - 4.5mm)
IV Set management
could add / remove / edit more than 40 kinds tubes
Accuracy
Volume Mode:≤ ±5%,Drop Mode:≤ ±2% (after calibrate)
Calibrate
Automatic or manual calibration of infusion accuracy
Rate
Volume:0.1ml/h~1200ml/h Purge:600ml/h
Drop:1d/min~400d/min
VTBI
1~9999 ml or OFF
Total Volume Σ
0~9999.9 ml
KVO
1ml/h~5ml/h Adjustable,Default:1ml/h
Programmable
Maximum 8 steps of different infuse rate / time / VTBI
BOLUS
Manual Bolus:long Press the Bolus key to infuse and release to stop
Auto Bolus:short press the Bolus key and set the VTBI & Rate
Upper Pressure
High / Middle / Low, 3 level, could off on the menu.
Down Pressure
200mmHg - 1200mmHg, 20 level, live pressure display, mmHg & kPa two units
Pre-Alarm Occlusion
When the pressure in the tube goes up, it has the function of early warning
Pre-Alarm Finish
1 min~30 min, The alarm can be set ahead of VTBI
Parameters Modify
changes the Rate, Time, Dose, VTBI & other important parameters during the infuse
working
Keypad Locker
Manual / Auto lock keyboard
History Record
Record 20000 infuse records, 10000 alarm records, can be downloaded to the computer

- 6 -
to save & query
Self-Test
safety real time self-test function to ensure the pump working properly
Bubble
Detected by ultrasonic sensor with adjust setting 5 level, 50μL ~ 800μL,
Drop Sensor
Infrared sensor to detect the number of drops, monitoring the status in case the empty
bottles
Alarm
Bubble, Door open, Finish, Pause timeout, Down Occlusion, Up Occlusion, Lower
Battery or damage, Motor error, Incorrect IV Set-type, Pressure test failure, Motor
failure, Abnormal drop rate, Heater failure and etc. 30 kinds safety monitoring alarm
Light Tips
3 color light tips:Green for infuse working;Orange for low level alarm (counting
working);Red for high level alarm (pump stop).
Voice Tips
Compliance YY 0709-2009 medical standard, Alarm and key volume level adjustable,
with Mute function,
Monitor
High brightness color LCD, Adjustable brightness
Communication
RS485 port, connect with PC to update / download
AC Power
AC100V~240V,50Hz/60Hz,25VA
Battery
Ni-MH battery, DC9.6V, 2000mAh (after full charged, could continue work more than
5 hours by 25ml/h rate)
Battery power query
Live-time query battery life and battery charge status
Class
Class IIb, Type CF, IPX4
Installation
For round and square pole,Horizontal / Vertical
Dimension
2.0kg ,130mm×120mm×195mm
Environment
5℃~40℃; 20%~90% humidity; 70kPa~106kpa atmospheric
Use Range
For the patients with constant intravenous infusion of drugs

- 7 -
Chapter 2 Components description
Exterior components names description
Infusion tube parts description
Handle
LCD
Key
Fluid warmer
Drop sensor
Infusion set guide slot
Bubble sensor
Bottom pressure sensor
Infusion set guide slot
Up pressure
Peristaltic pump
Roller clamp
Door latch

- 8 -
Main information displayed on LCD
(1)Machine status bar: battery status icon, sound status icon, networking status icon, AC supply status
icon, infusion status icon, pressure status icon, IV Set brand, specification, and fluid warmer
temperature.
(2)Infusion parameter.
Machine status bar
Battery status
Infusion set info
Flow rate
VTBI
Volume infused
Sound status
AC status
Working status
Keypad lock status
Infusion status
Pressure status
Time needed

- 9 -
Infusion pump structure
Figure 4

- 10 -
Chapter 3 Assembling
Packing list
Please check the follow contents when unpacking:
(1)Infusion pump body……………………………... 1 set
(2)Drop sensor……………………………………… 1 set
(3)Power cord……………………………………… 1 set
(4)User’s manual………………………………….. 1 copy
Pump Installation
Horizontal installation on bracket
Figure 5

- 11 -
Vertical installation on bracket
Installation on cylinder

- 12 -
Installation on square tube
Tips: infusion pump can be placed and used on a flat top, such as bedside cabinet top; do not move a working
pump.
Infusion pump socket description
(1)Plug the corresponding plugs into the rear sockets of WIT-601 series infusion pump according to the
icon shown on pump back.
Notes: if the drop sensor is not connected, “drop sensor failure will
alarm.
(2)If not use the drop sensor, can clamp the sensor on the locking
handle.
Notes: the drop sensor should be placed stably to avoid the risk of damage when movement,
transportation and storage.
AC socket
Network
socket
Drop sensor
socket

- 13 -
IV Set Installation
(1)Under normal conditions, insert an ordinary PVC
IV set into the outlet of infusion bottle/bag.
(2)Slightly squeeze Murphy’s dropper with fingers, to
make its 1/3 volume fill with liquid (see figure 9)
Notes:To ensure normal drip, never fill the dropper with water,
otherwise the infusion pump cannot detect drip drops and will cause
alarm; if the volume is less than 1/4, the bubble will easily go into
the infusion tube and cause bubble alarm.
Notes: Please make sure that the air filter and inlet tube of infusion bottle/bag are smooth, otherwise it may
cause vacuum inside, then up occlusion happens, and prompt alarm.
Purge the air inside the infusion tube, make sure
no bubble inside, then close the adjustable clamp
of ordinary PVC set to prevent loss of liquid.
Open the infusion pump door, turn the locking
clamp (F) to the left to put the infusion tube.
Put the infusion set into guide slot A between
the liquid bottle/bag and the device.
Put the infusion tube into the guide slots B,C,D,E,
F, G and H vertically, so that the infusion tube can
be a straight line, as shown in figure 10.
Close the pump door tightly, then open the
infusion set adjustable clamp.
Notes:1. Make sure the infusion tube is put into the
bottom of ultrasonic sensor (guide slot C),
otherwise bubble alarm would happen.
2. Make sure no liquid drips in the Murphy’s dropper this moment (i.e. no leakage).

- 14 -
Chapter 4 Operation
Function key description
Function keys concentrate upon the front housing, operated easily, the functions are as follows:
Function key
Description
On/Off
Used for boot and shutdown, long press for 1 second to boot, and long press 1 second to shut
down on the condition of no infusion.
Mute
Used when alarm happens, press it, the top left indicator of Mute lights up, and then the mute
status will last 2 minutes. Meanwhile it has mute key function, lasts 2 minutes.
Purge/BOLUS
On the condition of pause, long press to purge air inside tube; in process of infusion, press it
to enter BOLUS setting interface, then can start BOLUS infusion after setting parameters.
CFM/Set
Used to confirm and save the items chose. In the menu, press it to enter next level menu.
Press it in process of infusion, can reset infusion rate.
Menu/Exit
On the condition of pause, press it to enter the menu for parameter setting; and press it to
return to the previous menu; on the condition of standby, press it to exit the standby.
Start/Stop
Press it to start infusion on the condition of pause; and press it to stop infusion in process of
infusion.
Clear
On the condition of alarm, press it to cancel the sound-light alarm; on the condition of
inputting parameters, press it to set parameters to 0.
Lock/Dot
In process of infusion, long press for 1 second to lock or unlock. On the condition of pause,
long press to enter standby status.
Up
Used to move the cursor upwards.
Down
Used to move the cursor downwards.
AC
indicator
Used to indicate AC power connection.
Figure 11

- 15 -
Operation Flowchart
Infusion operational processes
Power On
Connect the power wire, then the light indicator lights up, the AC power is connected, long
press the power button for 3 seconds to start up.
Machine launches self-check after starting up, the contents of self-check include: whether the
batteries is normal, whether the system is normal, whether the pressure sensor is normal, etc., after
self-check completed, machine would enter infusion standby interface, waiting for user to input
infusion parameters.
Notes:Not connect the AC power supply or the AC power is interrupted, machine would switch to battery
power supply automatically, infusion pump would prompt AC falls off; working on the condition of
battery power supply, pay attention to the risks of battery power off, so please connect the AC power
supply as soon as possible.
Pump installation
Power on
IV Set installation
Parameters setting
Purge bubbles
Venous puncture
Start infusion

- 16 -
Volume mode operation
Infusion mode selection
Press in stop, display infusion mode interface. If the present mode is volume mode, so not need to
select mode.
Choose “volume mode” with up or down key.
Press , then return to infusion interface after volume mode is chosen.
VTBI/Rate/Time
Move the cursor to corresponding input boxes of rate, VTBI and time with the up or down key.
Set rate.
Set VTBI
Set time. (if need)
Press
Notes: set every two of these three parameters, the rest one will be calculated automatically, the machine would
calculate another parameter with the two last input parameters. And infusion would begin according to the
two last input parameters.

- 17 -
Rate/Time
Move the cursor to corresponding input boxes of rate and time with the up or down key.
Set rate.
Set time.
Press .
Simple Rate
Move the cursor to VTBI input box with the up or down key, long press for 1 seconds. The VTBI value
would be displayed “OFF”.
Set rate.
Press .
Notes:1. Choose simple infusion mode, should first move the cursor to VTBI input box with the up or down
key, long press for 1 seconds. The VTBI value would be displayed “OFF”. Press any numeric
key (0-9), “OFF” would disappear, exit the simple infusion mode.
2. Drop sensor plays a role in monitoring during simple infusion mode, it would prompt the alarm of
empty when detecting no liquid drips.

- 18 -
Program mode
Custom can himself define 8 stages of program mode to infuse automatically. Allow to suspend
programming in process of infusion, but KVO would be launched during programming pause. If the rate of
previous program is less than 1ml/h, then the KVO begins according to the rate of previous program; if the
rate of previous program is greater than 1ml/h, then the KVO begins according to the rate of 1ml/h.
Infusion mode selection
Press in starting up status, display infusion mode interface.
Choose “program mode” with up or down keys.
Press to enter program mode interface.
VTBI/Rate Setting
Programming interface Preview interface Infusion interface
Move the cursor to corresponding input boxes of VTBI and rate with the up or down keys.
Set VTBI.
Set rate.
Press to save the programming stage.
Program another infusion stage by following the above method. If no need continue, then press , and
enter the overview interface, in order to check whether each programming stage is correct.
Press to begin program infusion.

- 19 -
Pause stage program
Move the cursor to corresponding input boxes of time, VTBI and rate with the up or down keys.
Set time needed to pause.
Set VTBI to zero.
Set rate to zero.
Press .
Preview and modification of each programming stage
When no need more program infusion parameters, press to enter the overview interface, check
whether the parameters of each programming stage are correct; if some parameters of certain stage are
found, then move the cursor with the up and down key to the wrong stage, press to correct.
Choose incorrect stage
After correcting, press to enter the overview interface again.
Press to start programming infusion.
Table of contents
Popular Medical Equipment manuals by other brands

natus
natus Flexicoupler 011445 Instructions for use

Teladoc Health
Teladoc Health Mini MA-20149-003 Quick reference guide

Molift
Molift Smart 150 Tecnichal manual

Patterson
Patterson SAMMONS PRESTON R-FLEX Service manual

Maico
Maico MA 41 operating instructions

MedRx
MedRx AVANT TEM Speech installation manual