Wolf ICON Qi ALARM User manual

ICON
ALARM
INSTRUCTION
MANUAL
ENGLISH
www.wolfint.com

2
FEATURES
•
Ultra Sensitive Vibration Detection - Fully Variable
•
Vibration to Rollerwheel (Auto sensing)
•
High Sensitivity Roller Wheel
•
Roller Wheel Detection - 8 Sensitivity Levels, expandable to
16 via HUBB link
•
Dropback Differentiation and See Saw Elimination
•
High Visibility Dual Bite LED’s - 7 Changeable Colours -
Green, Blue, Cyan, Yellow, Magenta, White or Red
•
LED’S Indicates Forward and Backward - Flashes on
dropback
•
LED’S Times adjustable and Stealth mode (LED’S Off)
•
Piezo Speaker
•
Auto Night Light - 7 Changeable Colours and Auto Level
Adjustment & Manual Level Adjustment via HUBB
•
Light Sensor (Auto Dimming)
•
Indicator Port - Smart LED Drive, colour change on bite
detection
•
IQ Port - Links other ICON Accessories
•
HUBB Link - Receives and Transmits Commands to HUBB
•
Pairing Button
•
Menu Button
•
Extreme Transmit/Receive Range
•
Fully Sealed Waterproof Electronics
•
Battery Level Indication
•
Indication type - Event sent to HUBB
•
Mute - 60/30 Seconds Selectable
•
On/Off - Sensitivity Dial
•
Hard Case (AUTO On/Off)
•
Non-Slip Rubber Grip & Rod Protectors
•
Stainless Steel Stud & Locking Nut
•
Battery Life - 1000 hrs on Standby
•
Beta Light Slots x 2 - Size 6mm x 2mm
•
Rubber Socket Covers
•
Range - 2km - Line of Sight
•
Power Down Alert To HUBB - Anti Theft
•
Volume Settings - Adjustable from Alarm & Main HUBB
•
Tone Settings - Adjustable from Alarm & Main HUBB
•
Dedicated WOLF Vibration Tone
•
Tone difference - Run Forward & Dropback
•
Latching Run Time - 30 Seconds Adjustable via main HUBB
•
Low power mode is available when not paired to Hubb only.
After Hubb pairing LP mode can be re-enabled by a hard
reset of the Bite Alarm
•
UV Stable Material & Robust Symbol Markings
•
1mt Drop Test
•
Warranty 2 Years -
Register you ICON at www.wolfint.com

CONTENTS
FEATURES 3
INSERTING BATTERIES 4
BATTERY LEVEL 4
POWER ON 4
CONTROL KNOBS 5
DROPBACK DETECTION 5
VIBRATION SENSITIVITY 5
LOCAL MUTE 5
LOCAL UNMUTE 5
PAIRING 5
FACTORY DEFAULT 5
SEESAW ELIMINATION 6
ALERTS 6
LED ILLUMINATION COLOURS 6
NIGHTLIGHT LED COLOUR 7
NIGHTLIGHT LED BRIGHTNESS 7
LOCKING NUT 7
PORT RUBBERS 7
IQ PORT 7
SMART PORT 7
ADJUSTMENT OF BITE ALARM
CONTROLS FROM HUBB 8
DEVICE MENU 8
ROLLER SENSITIVITY SETTING LEVELS 8
LED ILLUMINATION COLOURS 8
BITE LED BRIGHTNESS 8
ADVANCED MENU 8
ALERT TIMEOUT 8
ALERT VOLUME 9
ALERT TONE 9
NIGHTLIGHT SETTINGS 9
DEVICE STATUS 9
BATTERY LEVEL INDICATION (PING PONG) 9
RANGE TEST (PING PONG) 9
ANTI-THEFT 9
MUTE 9
VIBRATION DIAL
MOISTURE OUTLET
NIGHT LIGHT
IQ PORT SMART LED PORT
ISOTOPE SLOTS
VOLUME DIAL
MENU BUTTON
LEDLED
NON-SLIP RUBBER GRIP
AND ROD PROTECTOR NON-SLIP RUBBER GRIP
AND ROD PROTECTOR
TONE DIAL
SPEAKER
PAIR/MUTE BUTTON
OFF POSITION
SENSITIVITY Dial
8 SETTINGS

4
To insert batteries use a Philips screwdriver and open
2 screws on battery compartment. When inserting new
batteries always replace all of them and turn off Alarm
before replacing. After use of Alarm in damp conditions
leave to dry out somewhere warm before packing away
and if not going to be used for a while it is recommended
to remove batteries in case of leakage. Be careful when
attaching Alarm to banksticks, buzz bars etc. and avoid
over-tightening. See website for full care advice and
instructions.
BATTERY LEVEL
The Battery Level of the
Bite Alarm can be
displayed by pressing
menu button.
To power up the Bite
Alarm, remove the Hard
Case and ensure the
sensitivity knob is not
in the Off position. On
start-up the battery
level is indicated.
To turn off the Bite
Alarm, replace the Hard
Case or switch the
sensitivity knob to Off.
Await the shutdown
tone to confirm.
3 AA 1.5v
Batteries
INSERTING BATTERIES POWER ON
Good battery level
OK battery level
Bad battery level
RUBBER SOCKET HOLDERS
When IQ Port or Smart LED Port are
not being used the rubber socket
holders should be pressed into ports.
When not needed they should be
pressed into the socket holders on
reverse of Alarm.

5
LOCAL UN-MUTE
The Bite Alarm can be un-muted after it has been muted.
A single press of the button will un-mute the Bite Alarm.
PAIRING
When the receiver device is ready for pairing with HUBB
(see receiver device instructions), press and hold the
button until indicator LED turns Blue then release Button, this
will initiate pairing.
FACTORY DEFAULT
To reset the Bite Alarm to factory settings, and remove all
user data, hold the button while powering on the Bite
Alarm. After the LED’s illuminate, release the button. A
tone will play to confirm the reset.
LOCAL MUTE
The Bite Alarm can be temporarily muted by pressing the
button. Multiple presses of the button achieve
different actions.
BUTTON PRESS DESCRIPTION
1 X The Bite Alarm is muted for 30 seconds.
2 X The Bite Alarm is muted for 60 seconds.
3 X The Bite Alarm is not muted.
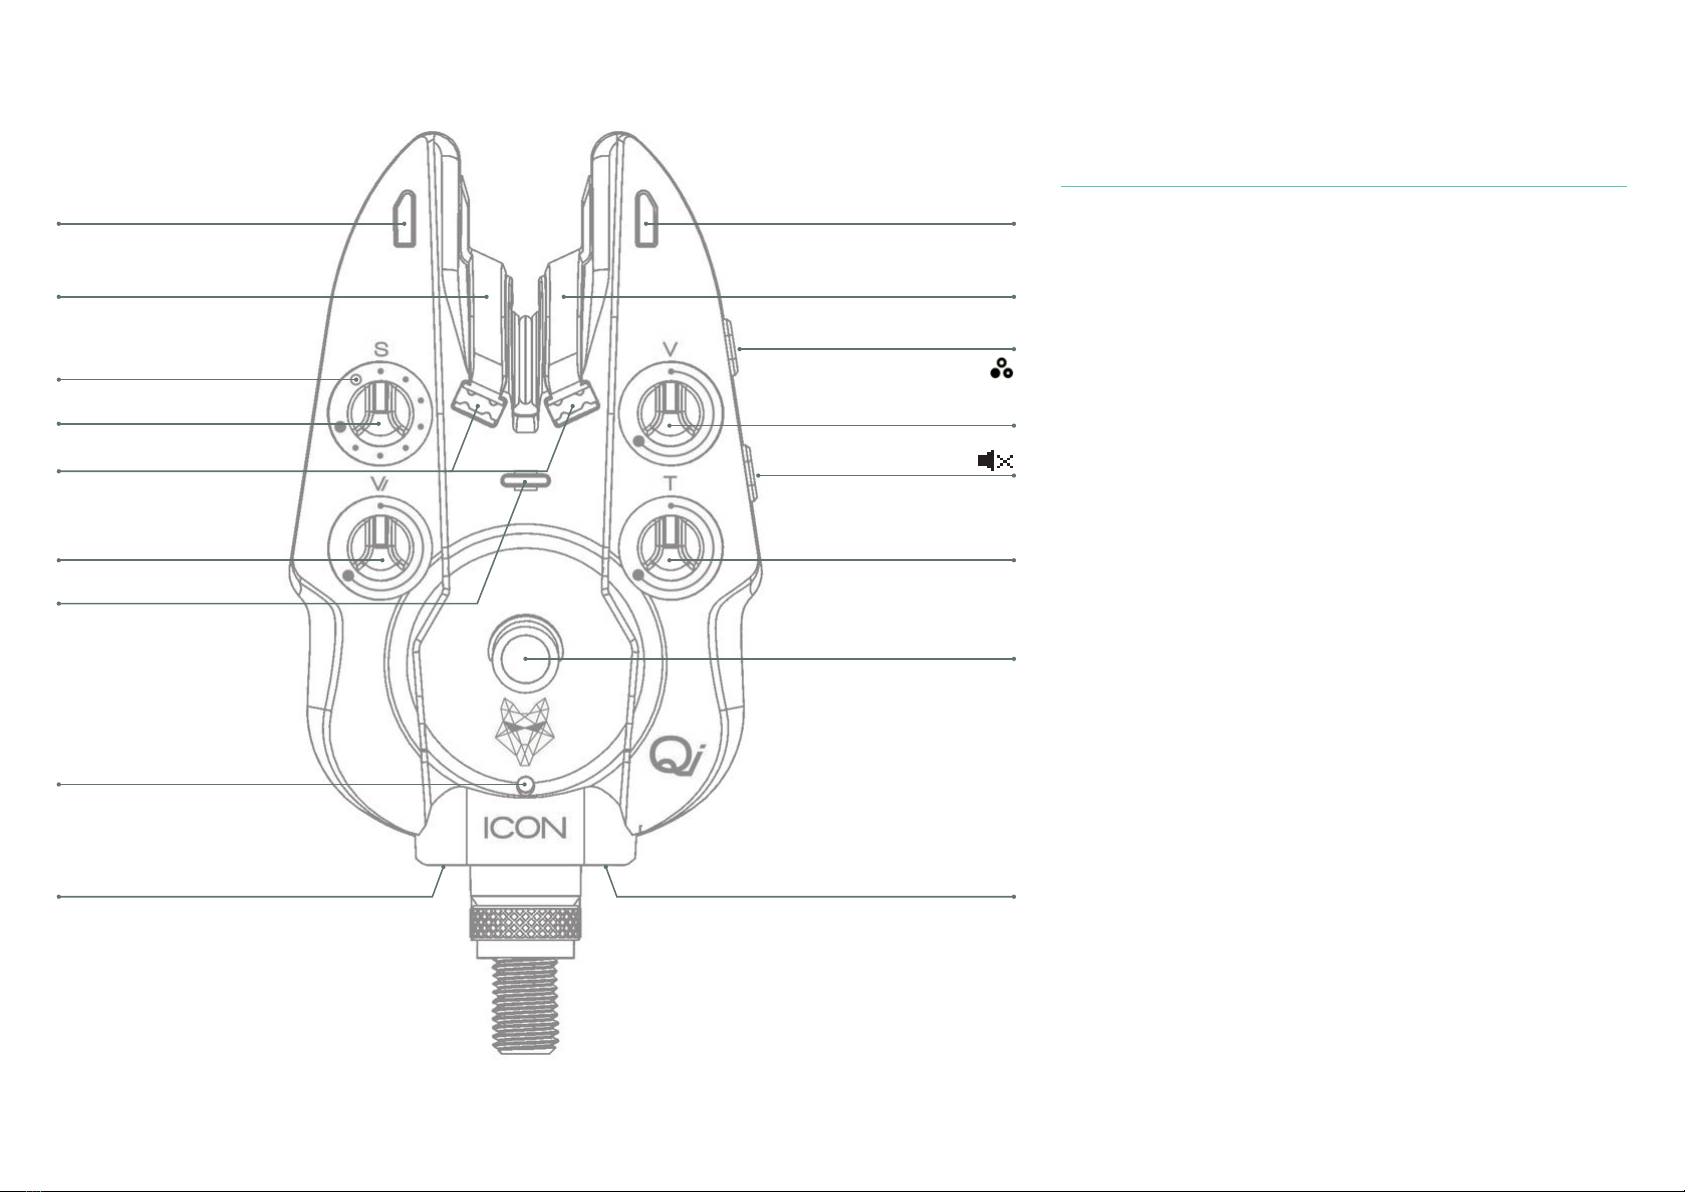
CONTROL KNOBS
The Bite Alarm control knobs can be used to adjust various
settings.
The sensitivity knob adjusts the amount of line
travel before an alert is triggered. There is also an
off position to turn the Bite Alarm off. 8 Sensitivity
Levels, expandable to 16 via HUBB link. 2mm,
6mm, 12mm, 18mm, 25mm, 35mm, 60mm,
100mm. *Additional Hubb Settings 4mm, 8mm,
16mm, 20mm, 30mm, 40mm, 80mm & 300mm.
The volume knob adjusts the volume
of the alerts on the Bite Alarm.
The tone knob adjusts the pitch of the alerts on
the Bite Alarm.
The vibration knob adjusts the Bite Alarm’s
sensitivity to vibrations.
DROPBACK DETECTION
During a dropback detection, a two tone signal is triggered
and the LED’s should flash.
VIBRATION SENSITIVITY
When the vibration sensitivity is turned up high, the
bite alarm detects vibrations up until movement is
detected on the roller wheel.

6
LED ILLUMINATION COLOURS
By pressing and holding the menu button the
configuration menu can be entered, indicated by a
special tone.
While in the
configuration menu
the volume knob
adjusts the colour of
the LED colours.
7 colours are
available:
Blue
Cyan
Yellow
Magenta
White
Green
Red
Stealth Mode (Off)
ALERTS
ALERT
TYPE LED INDICATION SOUND
Forward
Solid Alert Colour
Single Tone at user
selected pitch.
Dropback
Flashing Alert Colour
Tone at alternating pitch.
Vibrate
Solid Alert Colour
Dual Tone at user selected
pitch.
IQ Empty
IQ Trigger
Solid Alert Colour
Piercing security tone.
Battery
Critical
Flashing Red
No tone played.
SEE-SAW ELIMINATION MENU BUTTON
The Bite Alarm includes See-Saw elimination. For a given
distance of line travel 4mm extra in the opposite distance is
needed before an alert is triggered.
WARNING
ABOUT
BRIGHTNESS OF
LED’S AT NIGHT

7
IQ PORT
SMART LED PORT
LOCKING NUT
LED ILLUMINATION BRIGHTNESS
While in the configuration menu the vibration sensitivity knob
adjusts the brightness of the LED’s.
NIGHTLIGHT LED COLOUR
While in the
configuration menu
the tone knob
adjusts the colour
of the Nightlight
LED. There are 7
selectable colours:
Blue - Cyan - Yellow
- Magenta - White -
Green - Red - Off.
Ratur molupta temperi aut volume imporestis eatam harchit
laturib eaquibustem rempor atia ipsus soloreria non entisqui
con rerum sin rerovit ant.
Acescid exped quamenis enem corp
Ratur molupta temperi aut volume imporestis eatam harchit
laturib eaquibustem rempor atia ipsus soloreria non entisqui
con rerum sin rerovit ant.
Acescid exped quamenis enem corp
Ratur molupta temperi
aut volume imporestis
eatam harchit laturib
eaquibustem rempor
atia ipsus soloreria non
entisqui con rerum sin
rerovit ant.

8
ADJUSTMENT OF BITE ALARM
CONTROLS FROM HUBB
LED ILLUMINATION COLOURS
DEVICE MENU
7 Colours: Blue - Cyan - Yellow -
Magenta - White - Green - Red -
Stealth Mode (Off)
When the HUBB has been paired with Alarms press the
corresponding Alarm channel to change any settings. Press
and hold channel button until ‘Device Menu’ is shown on
screen.
On activation of the bite Alarm the tone should be replicated
on the HUBB and the HUBB
LED’s should replicate the alert
colour shown on the bite Alarm.
Depending on the HUBB’s settings,
the HUBB will also vibrate on alert.
When ‘Device Menu’ is shown, use
OK button to enter sub menu.
Go to ‘Sensitivity’ to adjust the connected bite Alarm line
sensitivity. When confirming this option a message will be
sent to the bite Alarm, if successful you will be notified on
screen.
ROLLER SENSITIVITY SETTING LEVELS
8 Sensitivity Levels, expandable to
16 via HUBB Link
2mm, 6mm, 12mm, 18mm, 25mm,
35mm, 60mm or 100mm.
Additional Sensitivity Levels
4mm, 8mm, 16mm, 20mm,
30mm, 40mm, 80mm or 300mm.
BITE LED BRIGHTNESS
ADVANCED MENU
ALERT TIMEOUT
Go to ‘Alert Colour’ to change the
colour used to display alerts on
the bite Alarm and HUBB.
Go to ‘LED Brightness’ to change
the brightness of the LED’s
displayed on the bite Alarm.
Go to ‘Alert Timeout’ to adjust the
time that the LED remains turned
on after an alert on the bite
Alarm.
60 seconds / 30 seconds / 20
seconds / 10 seconds /
5 seconds
Use the back button to leave
‘Device Menu’ and go ‘Advanced
Menu’ and use OK button to enter
this menu.

9
ALERT VOLUME DEVICE STATUS
MUTE
ALERT TONE
NIGHTLIGHT SETTINGS
In ‘Advanced Menu’ go ‘Alert
Volume’ to adjust the volume of
the bite Alarm alert.
In ‘Advanced Menu’ go ‘Alert
Tone’ to adjust the pitch on the
Alarm and the HUBB.
In ‘Advanced Menu’ go ‘Nightlight
Config’. Find the first option titled
‘Nightlight Brightness’ and adjust
to manual setting.
Go to second option ‘Nightlight Brightness’ and adjust as
desired.
Go to option ‘Nightlight Colour’ and adjust as desired.
Colours available:
Red - Green - Blue - Cyan - Yellow - Magenta - White & Off.
Go to ‘Nightlight to Port’. When this option is turned on the
Nightlight colour should be copied to any connected Wolf
hanger or swinger.
Use the back button to leave ‘Advanced Menu’ and navigate
to the option titled ‘Device Status’ and enter sub menu using
OK button.
ANTI-THEFT
When turning off the connected Alarm, a tone should be
played on the Alarm and HUBB for theft prevention.
BATTERY LEVEL INDICATION
(PING PONG)
RANGE TEST (PING PONG)
Navigate to the option ‘Battery
Level’. This provides a detailed
measurement of the Alarms
battery level.
Navigate to the option ‘Range
Test’ and use the OK button to
begin the test. When a connection
is established the HUBB will
report the signal strength of
the connected Alarm and also
indicates that the LED is working.
Pressing the Mute button once should mute all connected
Alarms. On activation neither the HUBB or Alarm should play
a tone. A double press of the Mute button should undo the
mute on the HUBB and Alarms.

10
Patents Pending:
GB 1721169.9
GB 1721166.5
GB 1721158.2
EP 18213109.4
EP 18213012.0
EP 18213022.9
WOLF INTERNATIONAL
Unit 3, 284 Warley Hill, Great Warley,
Brentwood, Essex CM13 3AB
T: +44 203 885 1230
www.wolfint.com
For language translations of all instructions
and functions and care of your Wolf
international ICON Alarm 0r Hubb visit
www.wolfint.com/product-manuals/
Troubleshooting etc.
Xim quibea dellauta que maio. Eceptatates et as sapidic imusaped
etur se endios abo. Cepratus esequi sundiae omnihil illautenis im
landige ndigeni molupitius aut fugia conseque con rescit antorer
umquiassi sum ellaces eum num solest, quatur? Quis e dit est, qui
deruntius, simi, cus quatest ionsed quid qui volo molupti dolorenis
nis autam fugia explisi tiumquiae ium nisquia
Warranty
If you need information to the warranty please visit
www.wolfint.com/product-warranty/
Please ensure to register your new Wolf product at
www.wolfint.com/product-registration/
Customer Support
If you need support you can contact us by:
Telephone: +44 203 885 1230
More information can be found at
www.wolfint.com/customer-support/
www.wolfint.com
Table of contents
Other Wolf Fishing Equipment manuals
Popular Fishing Equipment manuals by other brands

Scotty
Scotty HIGH PERFORMANCE ELECTRIC DOWNRIGGER Installation, Maintenance, Use and Safety

Eletrofisher
Eletrofisher Sum manual

Kamber Tech
Kamber Tech Boilie Cannon user manual

STRIKEMASTER
STRIKEMASTER Mora owner's manual

K-Drill
K-Drill IDRL24 owner's manual

Fishmaster
Fishmaster Casting Platform installation manual

ND tackle
ND tackle S9 BITE ALARM user manual

Humminbird
Humminbird Helix Series INSTALLATION DIAGRAMS

Cannon
Cannon OPTIMUM TS installation instructions

Kongsberg
Kongsberg Simrad SY50 Reference manual

Aquapro Fish Feeders
Aquapro Fish Feeders ADF-25DX Product information guide

Riffe
Riffe RL-1500 installation guide