WONDFO Finecare FIA Meter Plus User manual

Finecare™ FIA Meter Plus(Model No.: FS-113)
Version: 10/03/2016 Guangzhou Wondfo Biotech Co., Ltd.
FinecareTM FIA Meter Plus
Operation Manual
Model No.: FS-113

Finecare™ FIA Meter Plus(Model No.: FS-113)
Version: 10/03/2016 Guangzhou Wondfo Biotech Co., Ltd.
- 1 -
TABLE OF CONTENTS
Section
Content
Page
Ⅰ
Introduction and Principle
4
Ⅱ
Composition of System
5
Ⅲ
Specifications and Operation Conditions
8
Ⅳ
Initial Installation Procedure
9
Ⅴ
Operation Instruction
10
Ⅵ
Instruction for connection with LIS system and PC
21
Ⅶ
Quality Control
31
Ⅷ
Warning, Precautions and Limitations
33
Ⅸ
Service, Maintenance and Disposal
35
Ⅹ
Trouble Shooting
37
Ⅺ
Contact Information
38

Finecare™ FIA Meter Plus(Model No.: FS-113)
Version: 10/03/2016 Guangzhou Wondfo Biotech Co., Ltd.
- 2 -
Index of Symbols
Read all contents of this Manual carefully prior to use.
If the instrument is used in a manner not specified by the manufacturer, the protection provided by the
instrument may be impaired.
The following symbols are used on the Finecare™ FIA Meter Plus, related components and
accessories, labels or in the text of this user manual:
Biohazard
Caution
Consult Operator’s Manual
WEEE (Waste Electrical and Electronic Equipment)
Keep Dry
Operation Temperature Limitation
Storage and Transportation Temperature Limitation
Keep away from Sunlight
For in vitro Diagnostic Use only
Manufacturing Date
Serial Number

- 3 -
Manufacturer
Authorized Representative
Direct current
ON (Power)
○
Off (Power)

Finecare™ FIA Meter Plus(Model No.: FS-113)
Version: 10/03/2016 Guangzhou Wondfo Biotech Co., Ltd.
- 4 -
This manual contains the instructions for the operation of the Finecare™ FIA Meter Plus and for the
sample testing procedures. For specific tests’procedure please refer to the Instruction for Use of specific
products.
Finecare™ FIA Meter Plus manufactured by Guangzhou Wondfo Biotech Co., Ltd., is a portable
instrument for fluorescence detection to quantify concentration of various kind of analytes in human
blood or urine. The Test Device and instrument are for in vitro diagnostic use only. Finecare™ FIA
Meter Plus is intended for professional use.
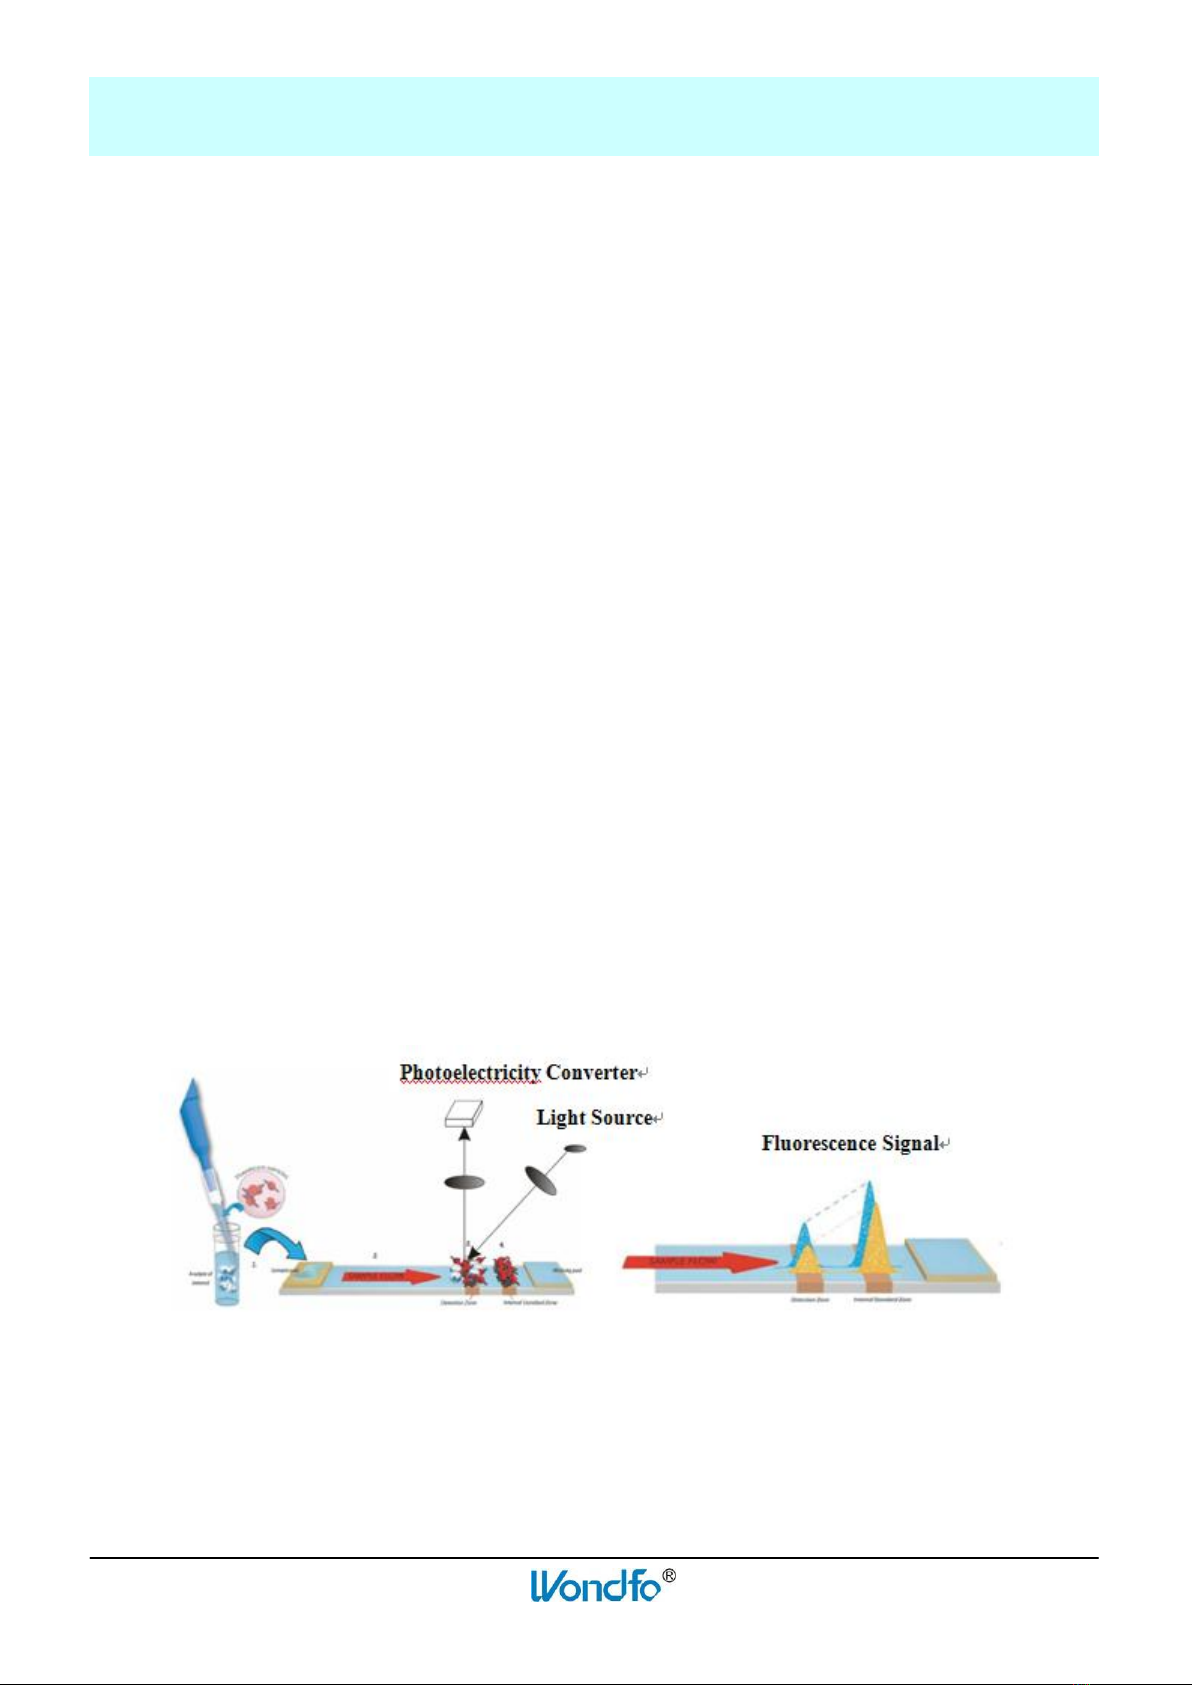
Finecare™ FIA Meter Plus uses an LED as the Excitation Light Source. The emitted light from the
fluorescence dye is collected and converted into an electrical signal. The signals are closely related to
the amount of fluoresceing dye molecules present on the spot under examination.
After a buffer-mixed sample is applied to the Test Device, the Test Device is inserted into Finecare™
FIA Meter Plus and the concentration of the analyte is calculated by a pre-programmed calibration
process. Finecare™ FIA Meter Plus can only accept Test Devices that are designed specifically for use
with this instrument.
Finecare™ FIA Meter Plus is equipped with a built-in Test Device Holder and does not require an
external holder to place the Test Device in. The Test Device Holder will appear through the opening on
the front surface of the instrument.
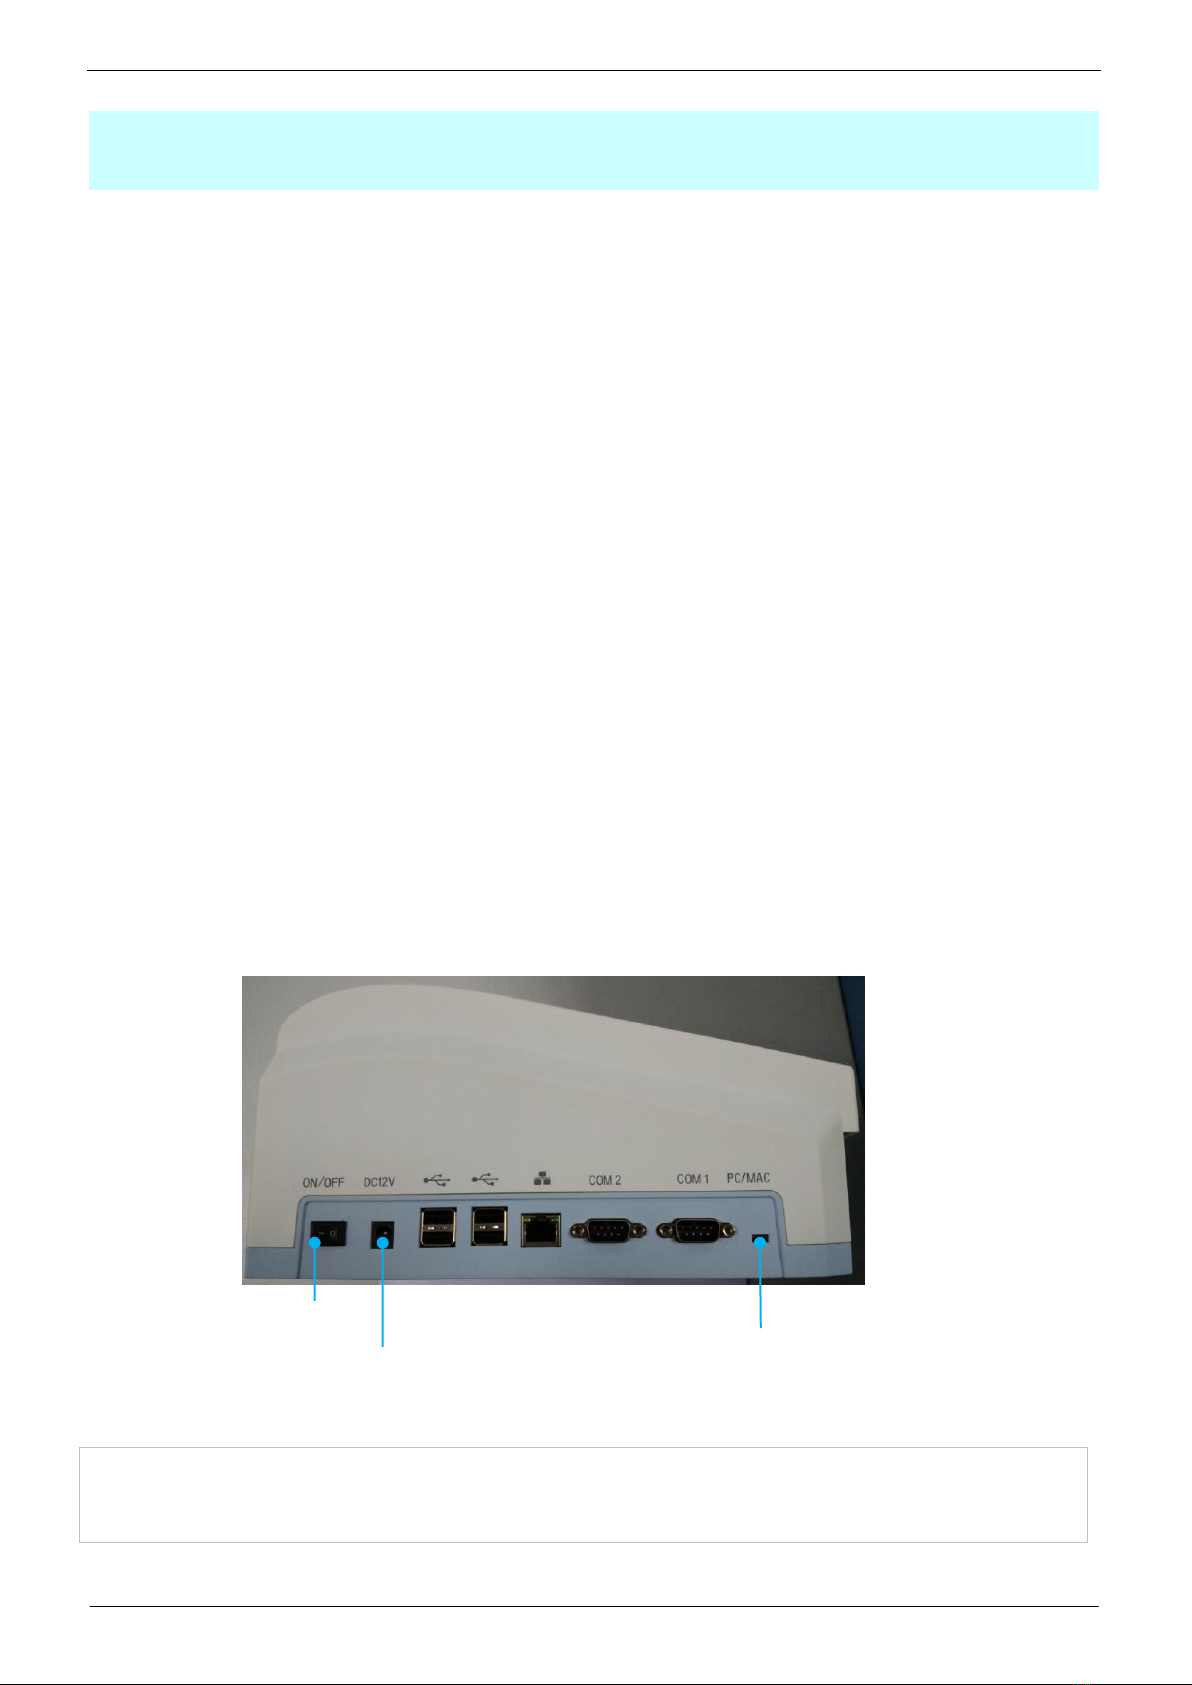
The Power ON/OFF Switch, located on the left of the instrument, which powers the Finecare™ FIA
Meter Plus. The instrument has a built-in printer.
Figure 1 Working Principle
Section
Ⅰ
Introduction and Principle

Finecare™ FIA Meter Plus(Model No.: FS-113)
Version: 10/03/2016 Guangzhou Wondfo Biotech Co., Ltd.
- 5 -
Unpacking
After opening the package box, compare the contents with the list below.
If any item is missing, please contact your sales distributor or Guangzhou Wondfo Biotech Co., Ltd.
Detailed contact information is mentioned in Section
ⅩⅠ
.
Contents
1. Standard contents:
No.
Name
Quantity
1
Finecare™ FIA Meter Plus
1
2
Power adapter for instrument (including the power
cord)
1
3
Quality Control Card
1
4
Ethernet cable
1
5
Printer paper (roll)
1
6
Operation manual
1
7
Quick operation instruction for use
1
8
Warranty Card
1
9
Packing List
1
Section
Ⅱ
Composition of System

- 6 -
Fig. 2.1 Structure Chart of Finecare™ FIA Meter Plus- Front View
Fig. 2.2 Finecare™ FIA Meter Plus Features - Left View
Power switch, Ethernet Port, USB Interface, Serial Interface, Power interface, Selector switch for
operating mode, which are used in Finecare™ FIA Meter Plus’s startup, shutdown, select the operating
mode and connection with PC and Ethernet.
Touch Screen
Printer
Test Device Holder
ID Chip Port
Power and Communication
interface
External Power Interface
USB Interface
Selector for operation
mode: select operation
shipped in instrument
or PC mode.
Ethernet Interface
Power ON/OFF
Serial Port

- 7 -
Fig. 2.3 PowerAdapter
Consumables of Reagent Kit
Fig. 2.4 Test Device Features
(Remark: You shall buy the Test Devices separately)
Fig. 2.5 Test Device ID Chip
(The ID Chip contains the information of test item and lot number)
Fig. 2.6 Quality Control Card
Note: This accessory is Test regent’s consumable
(B)
(A)

- 8 -
1. Basic Specification
Model No.
FS-113
Excitation light source
LED
Excitation spectrum
Center wavelength λ0= 470nm
Absorption spectrum
Center wavelength λ1= 525nm
Test Specimen
Whole blood, serum / plasma and urine
Software system
English and Chinese input method, customized intelligent
management module
Interface
RS232, USB, Ethernet network
Built-in Printer
Thermal
Size
270*238*146mm
Weight
About 2800g
Operating Environment
Temperature
10℃~30℃(50℉-86℉)
Relative Humidity
10%~80%
Atmospheric pressure
86kPa~106kPa
Power
Supply
Adapter
Input: 100-240Vac, 50-60Hz, 1.4-0.7A
Output: 12V 5.0A 60W MAX
Power Input:
12V ,45W
Location
Dry, clean, flat, horizontal surface away from direct sunlight,
mechanical vibration, and strong electromagnetic interferences.
Storage and Transportation Environment
Temperature
-10℃~+50℃
Relative Humidity
≤85%
Performance
Repeatability
CV ≤15%
Stability
CV ≤8%
Section
Ⅲ
Specifications and Operation Conditions

- 9 -
1. Power Requirements
If you are uncertain of your power line, consult with your utility manager. The FinecareTM FIA Meter
Plus can only be used with the power adapter (including the power cord) provided. If the replacement
for Power Adaptor is required, please consult with your sales distributor or Guangzhou Wondfo Biotech
Co., Ltd.
2. Installation
Please be noted that Finecare™ FIAMeter Plus should only be used in 10℃~30℃(The operational
temperature of Test Devices should refer to relevant Instruction for Use) and Relative Humidity of
10%~80% conditions (Detailed information is mentioned in Section
Ⅲ
).
①.Place Finecare™ FIA Meter Plus on a dry, clean, flat, horizontal surface, with the front surface at
least 10 cm inside of the table edge.
②.Connect the Power Cord with Finecare™ FIA Meter Plus to the wall power outlet.
Note: The meter shall be connected to a mains socket outlet with a protective earthing connection.
The mains outlet shall be located in a user accessible position for easy unplugging in emergency.
The mains plug of the power cord set is a disconnect device of the instrument. In order to completely
disconnect the instrument from the supply mains, the mains plug of the power cord set should be
unplugged from the mains outlet.
③.Turn on the Power ON/OFF Switch on the left of Finecare™ FIA Meter Plus to carry out power
startup and shutdown.( See Fig. 4. 1) Fig. 4.1
*Caution:
Keep the power cord for the Power Adapter in suitable place. Power cord without good maintenance
could render hazardous to connect/disconnect the Power Adapter.
Section
Ⅳ
Initial Installation Procedure
Power ON/OFF
External Power Interface
Selector for operation mode

Finecare™ FIA Meter Plus(Model No.: FS-113)
Version: 10/03/2016 Guangzhou Wondfo Biotech Co., Ltd.
- 10 -
FinecareTM FIA Meter Plus provides two test modes, including Standard Test and Quick Test. Under
the standard test mode, the instrument as a incubation place reaction of test item to provide required
standard countdown. Under the quick test mode, the test item shoud be completed incubation prior, the
user can directly conduct testing.
FinecareTM FIA Meter Plus can be operated through LCD screen with finger touch or touch pen, also
can be operated through with a mouse and keyboard.
V.1 Start
V.1.1 Turn on the Power ON/OFF on the left of Finecare™ FIA Meter Plus.
Fig 5.1
V.1.2 The instrument will load the test system.
V.1.3 Waiting for 1 minute, the instrument will show the initial screen, and slot pop-up the Test
Device holder automatically.
V.1.4 Quick Test interface will be showed by default when you turn on Finecare™ FIA Meter
Plus at the first time, after then boot screen displays the initial screen that the user once left off. (See
Fig. 5.2) Fig 5.2 Quick Test interface
Section
Ⅴ
Operation Instruction

- 11 -
A Function Buttons - Touch the button to achieve the corresponding function.
B Information Input - Input Serial Number, Sample number and Sample type.
C Results Display - Display test serial number, item name and test results.
D Quick Set - Reset the slot, slot out, send test result to LIS system, print and print automatically.
【Temperature Display】Display the temperature, the bald thermometer will turn to red by default
when the temperature is above 30℃, the default temperature can be set in the system setting.
【Test】To carry out testing of test item.
【History】Inquire historical record.
【Account】Account the test data.
【QC】FinecareTM FIA Meter Plus selftesting of quality.
【Set Up】Set instrument parameters.
【Test Mode】Choose test mode.
【Start Test】Start to test.
V.2 Test Operation Example
Please insert the ID chip of corrsponding test item before clicking “Test”, Under the initial interface of
Finecare™ FIA Meter Plus, the user can operate instrument by clicking the corresponding function
button for invoking different procedures.
Finecare™ FIA Meter Plus enter the initial test interface after booting, you can freely choose
“Standard Test”mode or “Quick Test”mode according to different needs. (See Fig. 5.3)
Fig. 5.3
*Caution:
If the initial interface doesn’t show after more than 3 minutes please turn off the Power ON/OFF
Switch and restart the instrument. If failure continues, please contact your sales distributor or
Guangzhou Wondfo Biotech Co., Ltd.

- 12 -
2.1 Choose Test mode (Standard Test or Quick Test).
2.2 Input basic patient medical information, including serial number, sample number and sample type. (The
number will be automatically generated by system if you don’t input it.) .Click”Detailed information”
to input more detailed information.
2.3 Add sample to the buffer, mix well.
*Caution:
Please carefully read relevant Instruction for Use of specific Test Device before adding sample to test,
and operate the test according to requirements.
2.4 Prepare a Test Device and apply sample-buffer mixture onto the sample well of Test Device (Refer
to the Instruction for Use of specific Test Device).
2.4.1 If choose Quick Test at step 2.1, insert the Test Device that is completely reacted into the Test
Device Holder of Finecare™ FIA Meter Plus, and click “StartTest”.
2.4.2 If choose Standard Test at step 2.1, immediately insert the Test Device that is into the Test Device
Holder of Finecare™ FIA Meter Plus, and click “StartTest”.
2.5 Finecare™ FIA Meter Plus will scan the Test Device automatically, the screen shows “Testing" and
testing progress. (See Fig. 5.4)
Fig. 5.4
*Caution:
1. It is recommended to insert ID chip after successful boot!
2. Please make sure the “selector switch for operating mode” on the left side of the instrument to
be appropriated for "MAC”, when you choose the test mode of Finecare™ FIA Meter Plus’system.

- 13 -
*Caution:
If the lot number of the ID Chip does not match with the lot number of the Test Device when use the
specific Test Device at the first time, the instrument will show “insert the corresponding ID chip”.
Please check the lot number of ID Chip and Test Device if they are mismatched, please click "
Change reagent and test again " , Finecare™ FIA Meter Plus will pop-up Test Device holder and
show "Cancel test " on the screen. If the lot number of ID Chip and Test Device are matched, please
click "OK", Finecare™ FIA Meter PLUS will automatically recheck ID chip and Test Device.
2.6 The test result will be showed under the “Result Display”of the screen. (See Fig. 5.5)
Fig. 5.5
2.7 Click “Print” to print the test result.
*Caution:
The test result will be printed automatically after ticking off “Print automatically”.
2.8 Take out the Test Device. Insert the next Test Device that is completely reacted for the next testing.
2.9 Click "Read ID card ", Finecare™ FIA Meter Plus will read and keep the ID card information.
2.10 When Finecare™ FIA Meter Plus is not used, click “Reset the slot”, then turn off the power
switch and unplug the power source of the instrument.
2.11 Click “Reset the slot” after completing the test.
V.3 History Operation Example
“History”function provides the user with a function of conditional filter, view the history of
test records. There are Query, Delete and Print buttons to carry out operation of query, delete
and print test results under the interface of “History”.

- 14 -
3.1 Click “History”on the top of the instrument to enter the query interface, the test results of
intraday will be listed. (See Fig. 5.6)
Fig. 5.6
3.2 Click “Query”under the “History”interface, then input the query conditions, Finecare™ FIA
Meter Plus will filter out the test results that match the query conditions to conduct fuzzy query.
(See Fig. 5.7)
Fig. 5.7
3.3 Tick all or specific data record, click “Delete”under the “History”interface, then click “Yes”to
delete the selected records. (See Fig. 5.8)
Fig. 5.8

- 15 -
3.4 Tick all or specific data record, click “Print”under the “History” interface to print a selected
records. When the selected data is greater than 10, only 10 data can be printed.(See Fig. 5.9)
Fig. 5.9
3.5 In the case of the LIS system was connected, select all or specific data record, click “LIS”under
the “History” interface to send corresponding test result to LIS system. (See Fig. 5.10)
Fig. 5.10

- 16 -
V.4 Account Operation Example
Click “Account”on the top of the instrument to enter the statistics interface. “Account”
function provides the user with “Testing Account”and “Workload Account”function.
Click “Testing Account”and “Workload Account”to show statistical results according
to statistic conditions.
4.1 Testing Account: Count the number according to items or samples. (See Fig. 5.11)
Fig. 5.11
4.2 Workload Account: Workload can be accounted according to submitting doctor, submitting
division and inspecting doctor. (See Fig. 5.12)
Fig. 5.12

- 17 -
V.5 Set Up Operation Example
“Set Up”function provides the user with setting function for the machine function parameters,
there are two mode for users, including general users and R & D users, they can enter the appropriate
settings mode by using different password.
Click “Set Up”to see the Software version,input the password in the "Authorization code "
field , then click "Yes" to enter the setting interface.
*Caution:
The users who no password permissions do not have permission about parameter settings.

- 18 -
5.1 General user can only enter the "System Setting" interface to set LIS connection, bald temperature
parameters.
5.2 R & D users interface, in addition to the "System Setting" function, also increase the "Parameter
Setting" function.
5.2.1 ”Item Parameters”under the "Parameter Setting" interface, the users can add and
modify test items and the reference range.
5.2.2 Click “Add”to add items.

- 19 -
5.2.3 Click “Edit”to modify the existing items’ parameters.
5.2.4 Click “Reset”to restore item parameters to the start parameter, then click ”OK”to
complete the reset:
5.2.5 ”Device Parameters”under the "Parameter Setting" interface, the users can set “AD
magnification times”, “Total length of the slot in running”, “Barcode recognition deadline”and
This manual suits for next models
1
Table of contents
Other WONDFO Laboratory Equipment manuals
Popular Laboratory Equipment manuals by other brands

Struers
Struers AbraPol-30 instruction manual

THORLABS
THORLABS Blueline Series Operation manual

Thermo Scientific
Thermo Scientific Dionex ICS-900 Installation and Quick Start Instructions

Sherwood Scientific
Sherwood Scientific 860 Service manual

SciCan
SciCan SALUS Operator's manual

Brooks
Brooks FluidX XSD-1 user manual