R
WOODBRIDGE
WOODBRIDGE WOODBRIDGE
WOODBRIDGE
R
WOODBRIDGE
WOODBRIDGE WOODBRIDGE
WOODBRIDGE
R
WOODBRIDGE
WOODBRIDGE WOODBRIDGE
WOODBRIDGE
R
WOODBRIDGE
WOODBRIDGE WOODBRIDGE
WOODBRIDGE
R
WOODBRIDGE
WOODBRIDGE WOODBRIDGE
WOODBRIDGE
R
WOODBRIDGE
WOODBRIDGE WOODBRIDGE
WOODBRIDGE
R
WOODBRIDGE
WOODBRIDGE WOODBRIDGE
WOODBRIDGE
R
WOODBRIDGE
WOODBRIDGE WOODBRIDGE
WOODBRIDGE
www.woodbridgebath.com 8
R
WOODBRIDGE REMOTE CONTROL ILLUSTRATION
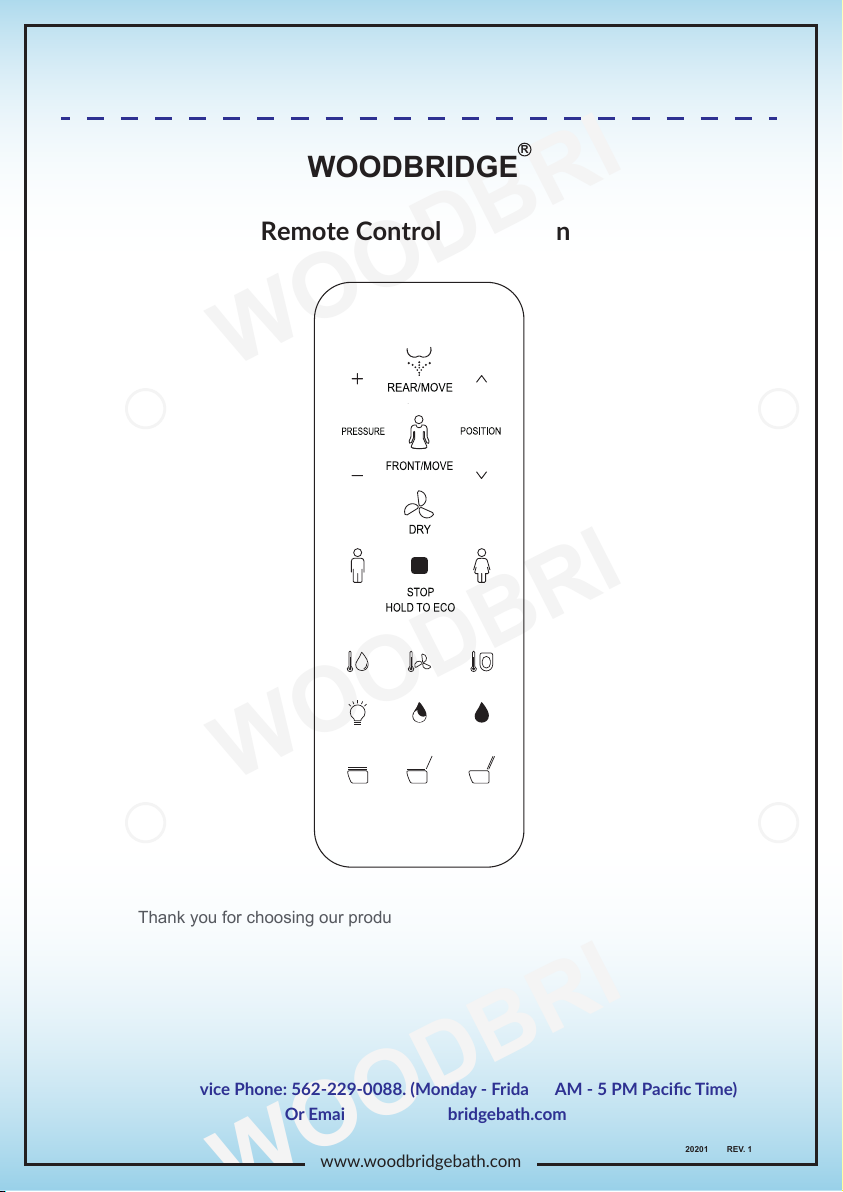
Usage Instruction
· Short press “FULL FLUSH” button, the toilet starts full flushing.
· Short press “HALF FLUSH” button, the toilet starts half flushing.
· Long press “FULL FLUSH” button to turn on/off auto flush function. When the auto flush function is on, when
it’s detected that the user is seated for above 6s and leaves the seat for above 3.5s, it’ll flush automatically.
· Water temperature adjustment
Short press the “WATER TEMP” button to adjust the water temperature. The indicator will show the
water temperature level if it’s on. When the indicator is off, the water level is 0. Short press this button
to adjust water temperature level from 0 to 5 in cycle. (Note: the water temperature is set at 10±2.5℃
in level 0, that is, when the inlet water temperature is higher than 10℃, the water won’t be heated,
while when the inlet water temperature is lower than 10℃, the water will be heated to about 10℃.)
· Dryer temperature adjustment
Short press the “DRYER TEMP” button to adjust the dryer temperature. The indicator will show the dryer
temperature level if it’s on. When the indicator is off, the wind level is 0. Short press this button to adjust
dryer temperature level from 0 to 5 in cycle. ( Only for toilets with drying function.)
· Seat temperature adjustment
Short press the “SEAT TEMP” button to adjust the seat temperature.
The indicator will show the seat temperature level if it’s on. When the indicator is off, the seat level is 0.
Short press this button to adjust seat temperature level from 0 to 5 in cycle.
Night light (Only for toilets with night light function)
·Short press “Night light” button to turn on/turn off night light, long press “Night light” button to enter
into intelligent mode ( Night light will be on or off by detecting the lightness of surroundings). If the
product is on intelligent mode, short press “Night light” button to exit intelligent mode.
LIGHT HALF FLUSH FULL FLUSH
HALF FLUSH FULL FLUSH
SEAT TEMPWATER TEMP DRYER TEMP
Half flush/
Full flush (Only for the toilet with auto flush function)
Temperature adjustment