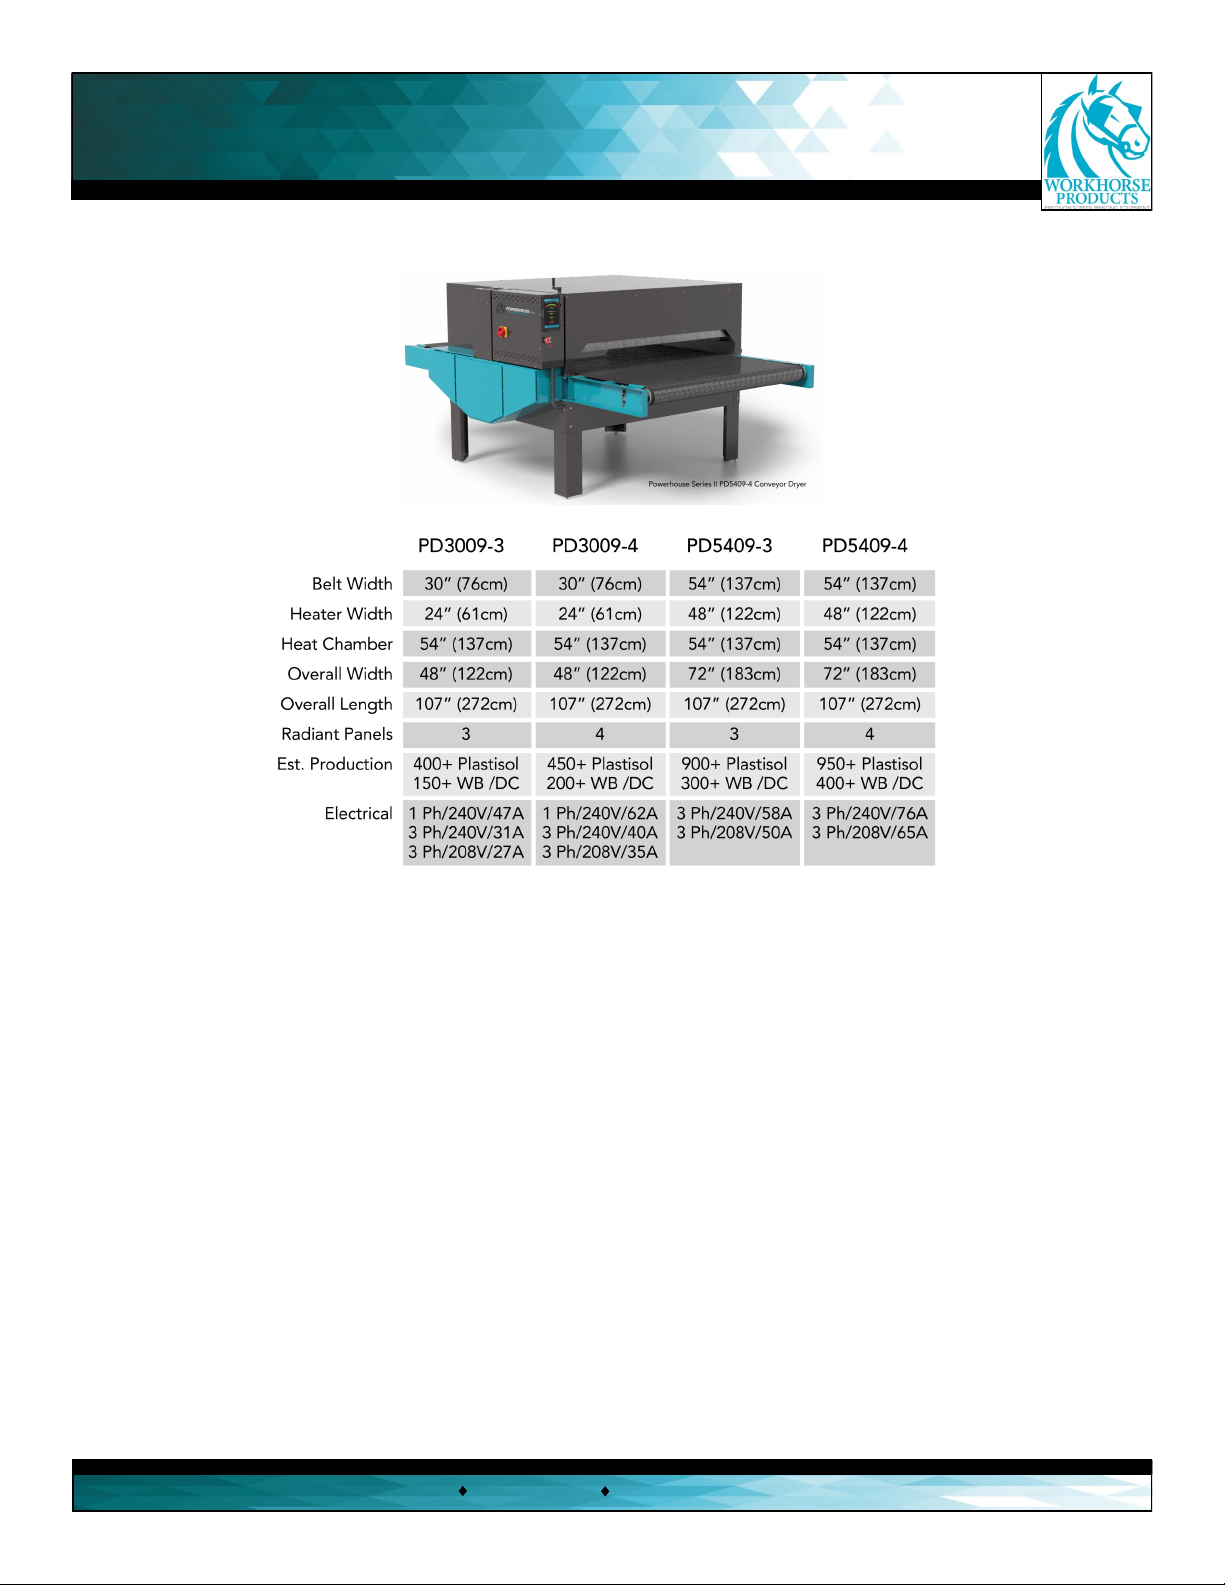
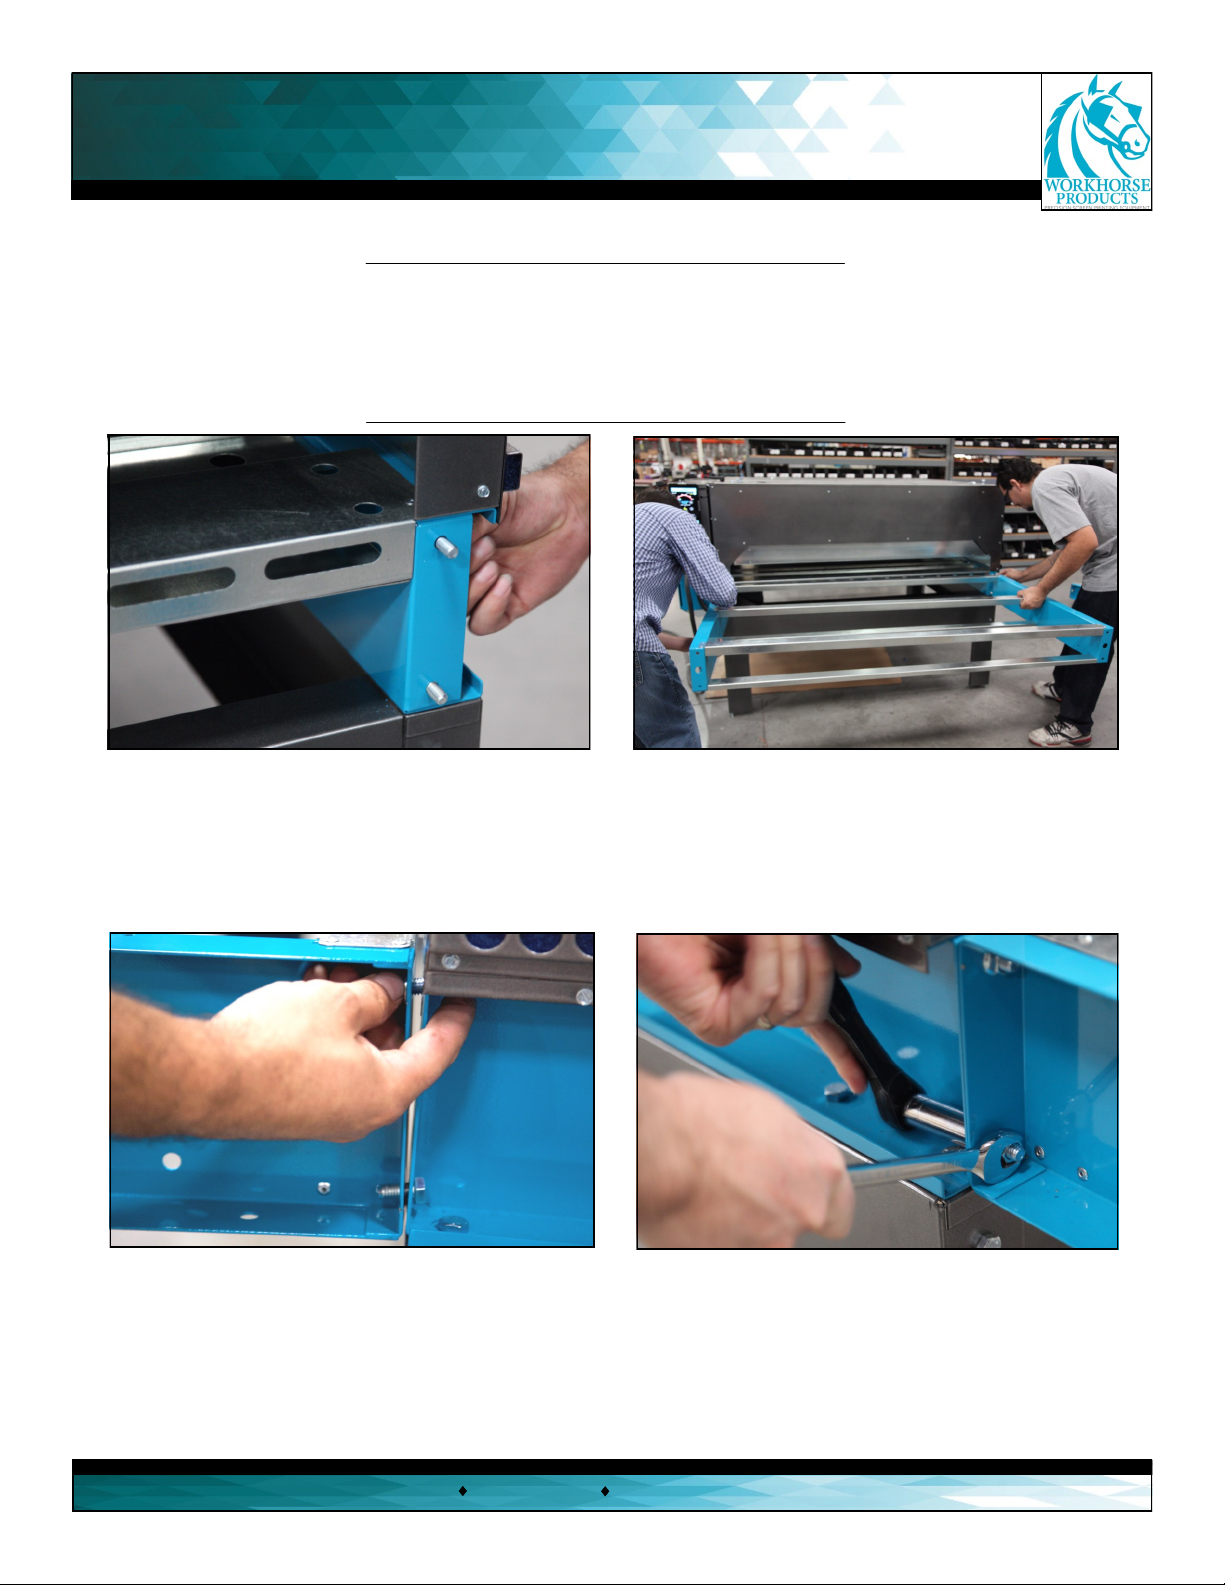
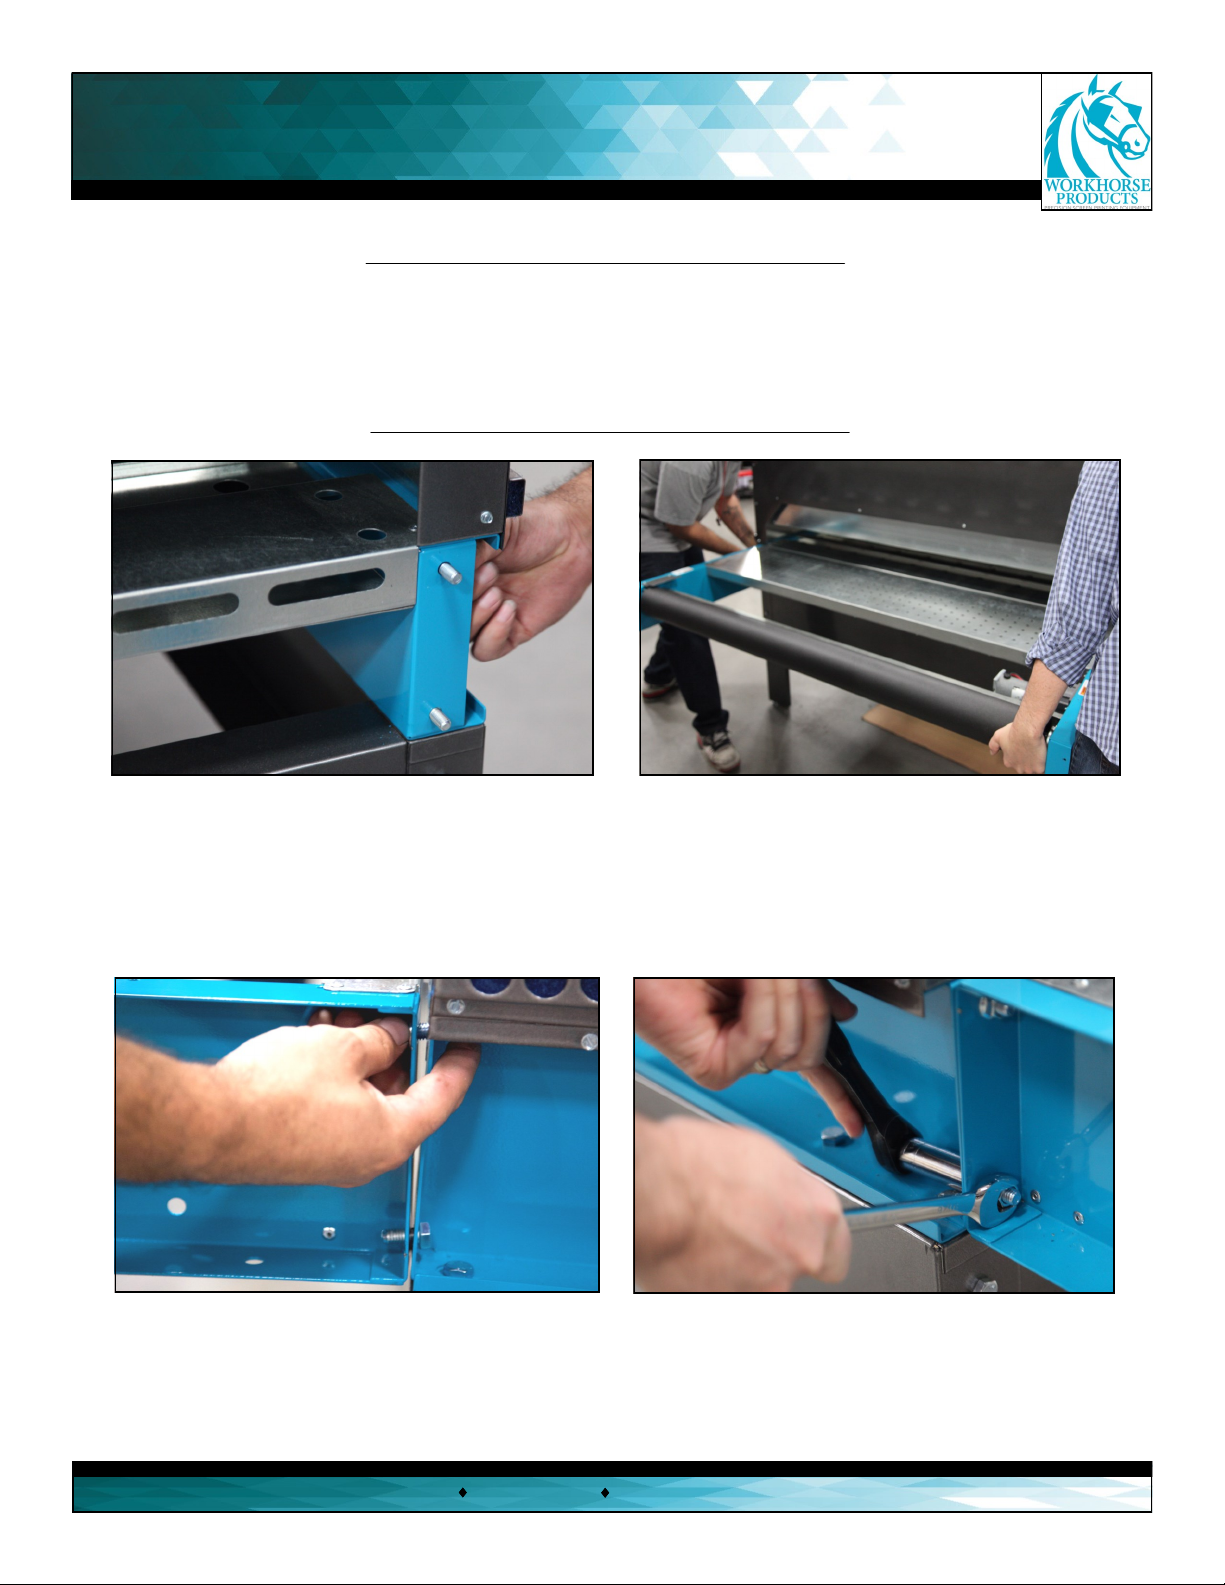
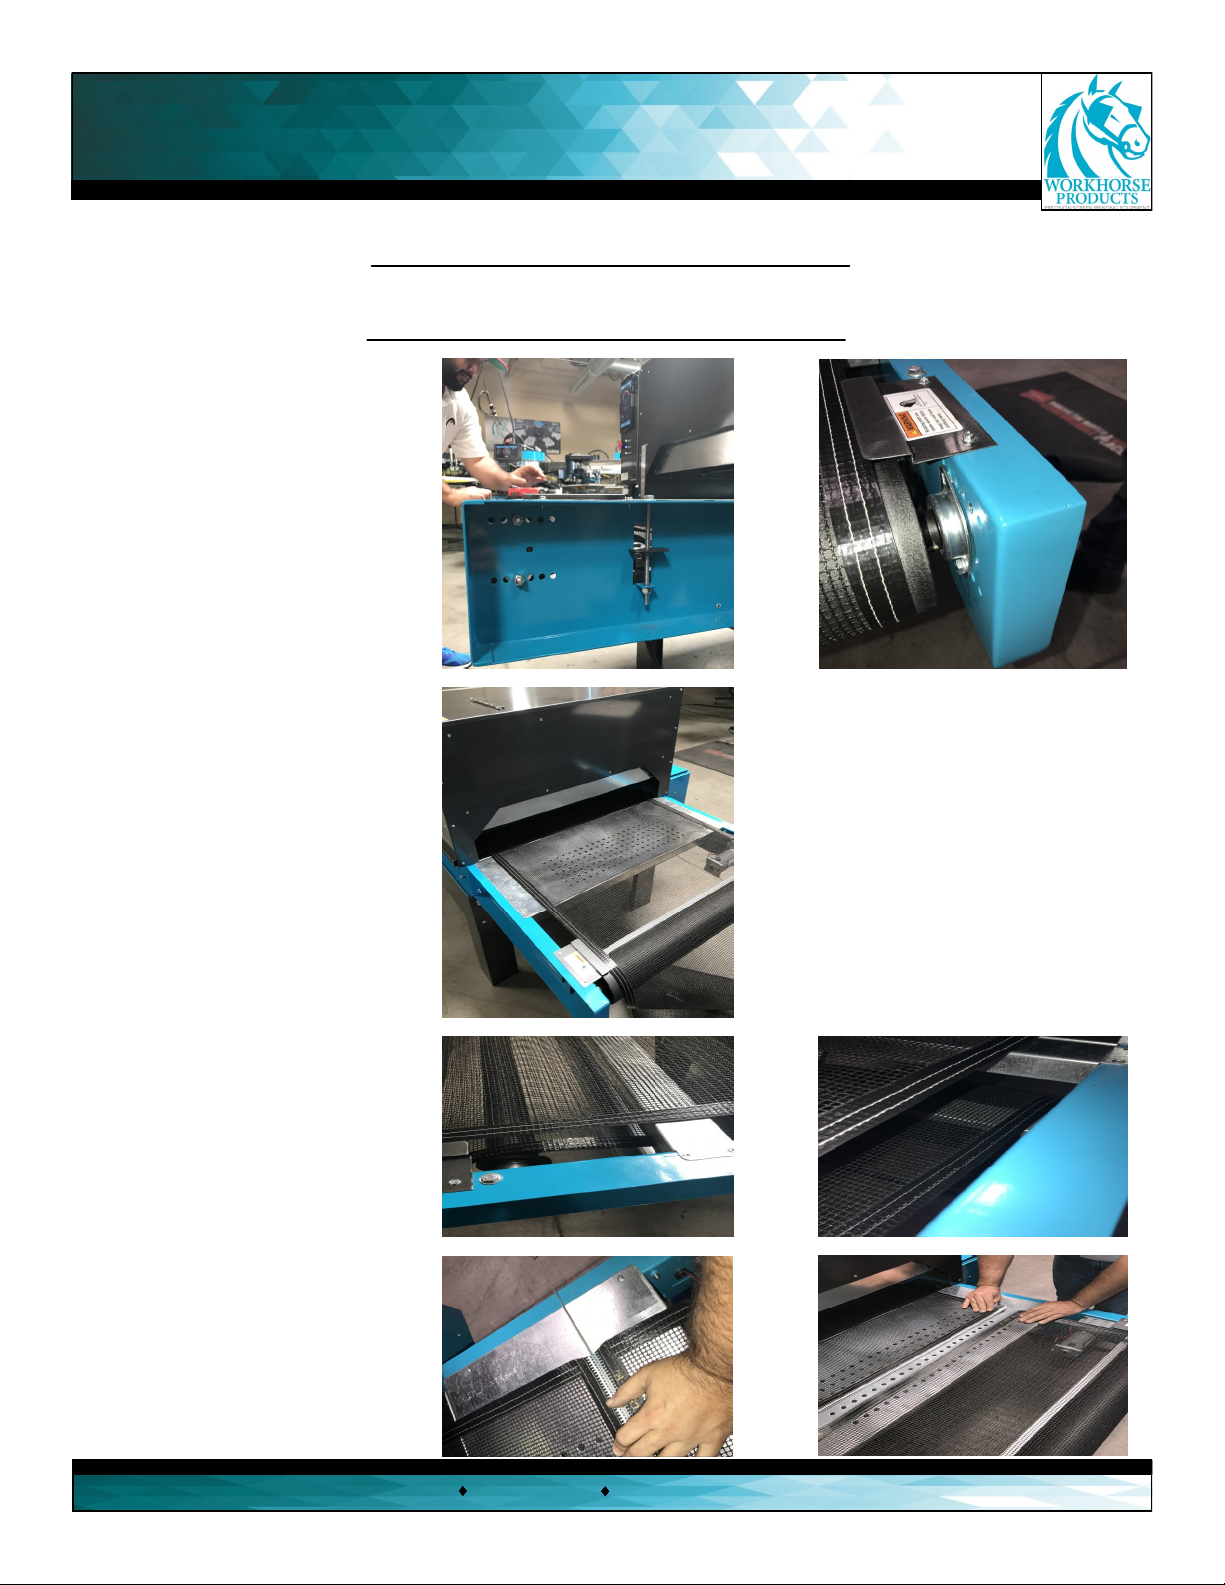
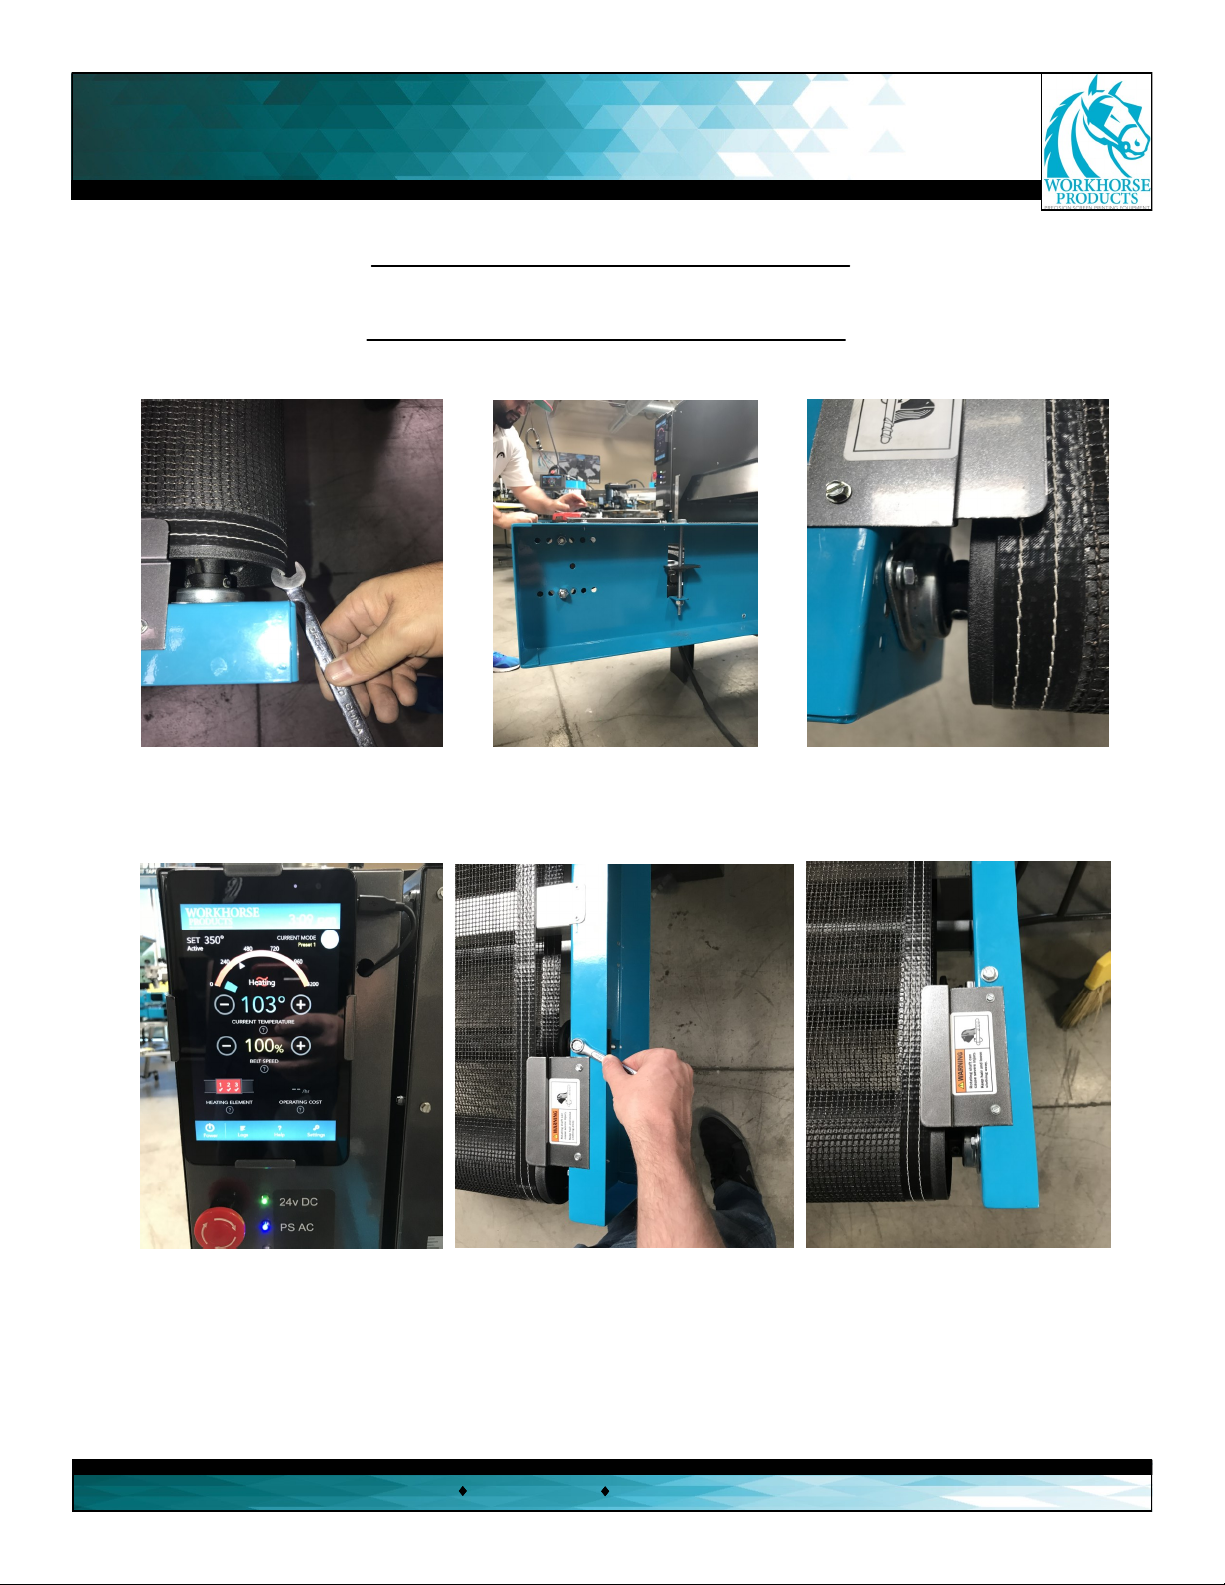
Workhorse PD5409-4 User manual

Owner’s Manual
Powerhouse Series II
3730 E. Southern Avenue, Phoenix, AZ 85040 USA
800-778-8779 Workhorseproducts.com 1
67-1462 REV 717

Table of Contents
3730 E. Southern Avenue, Phoenix, AZ 85040 USA
800-778-8779 Workhorseproducts.com 2
I. Introducon……………………………………………………………………………………..3
II. Assembly of Dryer……………………………………………………………………………..4
III. Safety Procedures…………………………………………………………………………….5
IV. Assembly
Step 1: Aaching the Infeed……………………………………………………………..6
Step 2: Aaching the Oueed…………………………………………………………..7
Step 3: Installing the Belt………………………………………………………………….8
Belt Roung Diagram…………………………………………………………...10
Step 4: Connecng to the Belt Drive Motor……………………………………..11
VI. Controls…………………………………………………………………………………………..12
VII. Recirculaon System……………………………………………………………………...14
VIII. Venlaon…………………………………………………………………………………….15
IX. Maintenance……………………………………………………………………………………16
X. Belt Extension…………………………………………………………………………………..17
XI. Wiring Diagram………………………………………………………………………………..22
XII. Limited Warranty…………………………………………………………………………….25

Introducon
3730 E. Southern Avenue, Phoenix, AZ 85040 USA
800-778-8779 Workhorseproducts.com 3
Congratulaons on your purchase of the Powerhouse Series II Conveyor Dryer.
Check the crate for damages. DO NOT accept the crate if there are any damages caused by improper handling
during shipping. Immediately report any damages to the carrier and contact Workhorse Products at, 800-778
-8779.
Be sure to inspect the crate contents IMMEDIATELTY, while the carrier is sll present. Even though our
packaging has been designed to handle normal shipping condions, we cannot foresee damages caused by
the carrier. We will not be responsible for damages that occur during transportaon.
If there are damages immediately nofy the driver, le a claim with the carrier and call Workhorse Products.
The Importance of the Owner’s Manual:
The purpose of the Owner’s Manual is to familiarize you with the parts and operaons of the Powerhouse
Series II Conveyor Dryer. There are step-by-step instrucons to assemble the product, explanaons of the
product’s key features, and addional informaon that will help with the maintenance of the product.

Assembly of Dryer
3730 E. Southern Avenue, Phoenix, AZ 85040 USA
800-778-8779 Workhorseproducts.com 4
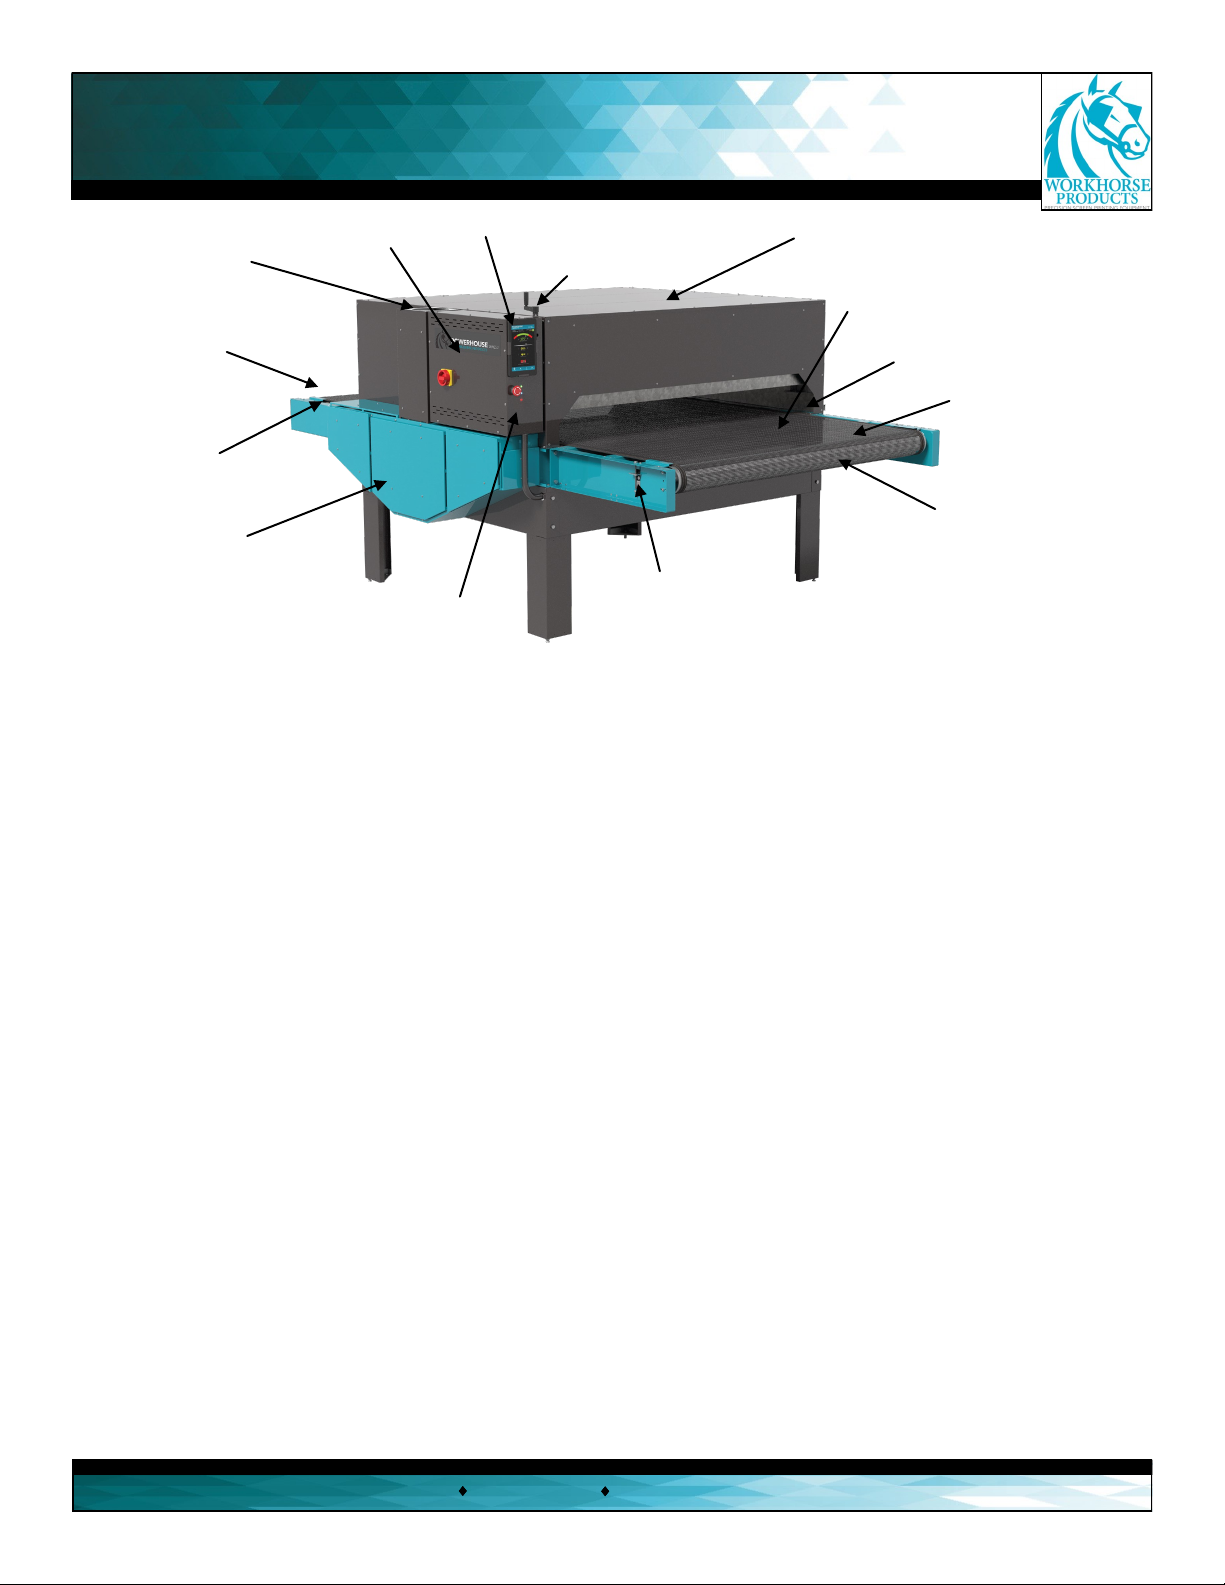
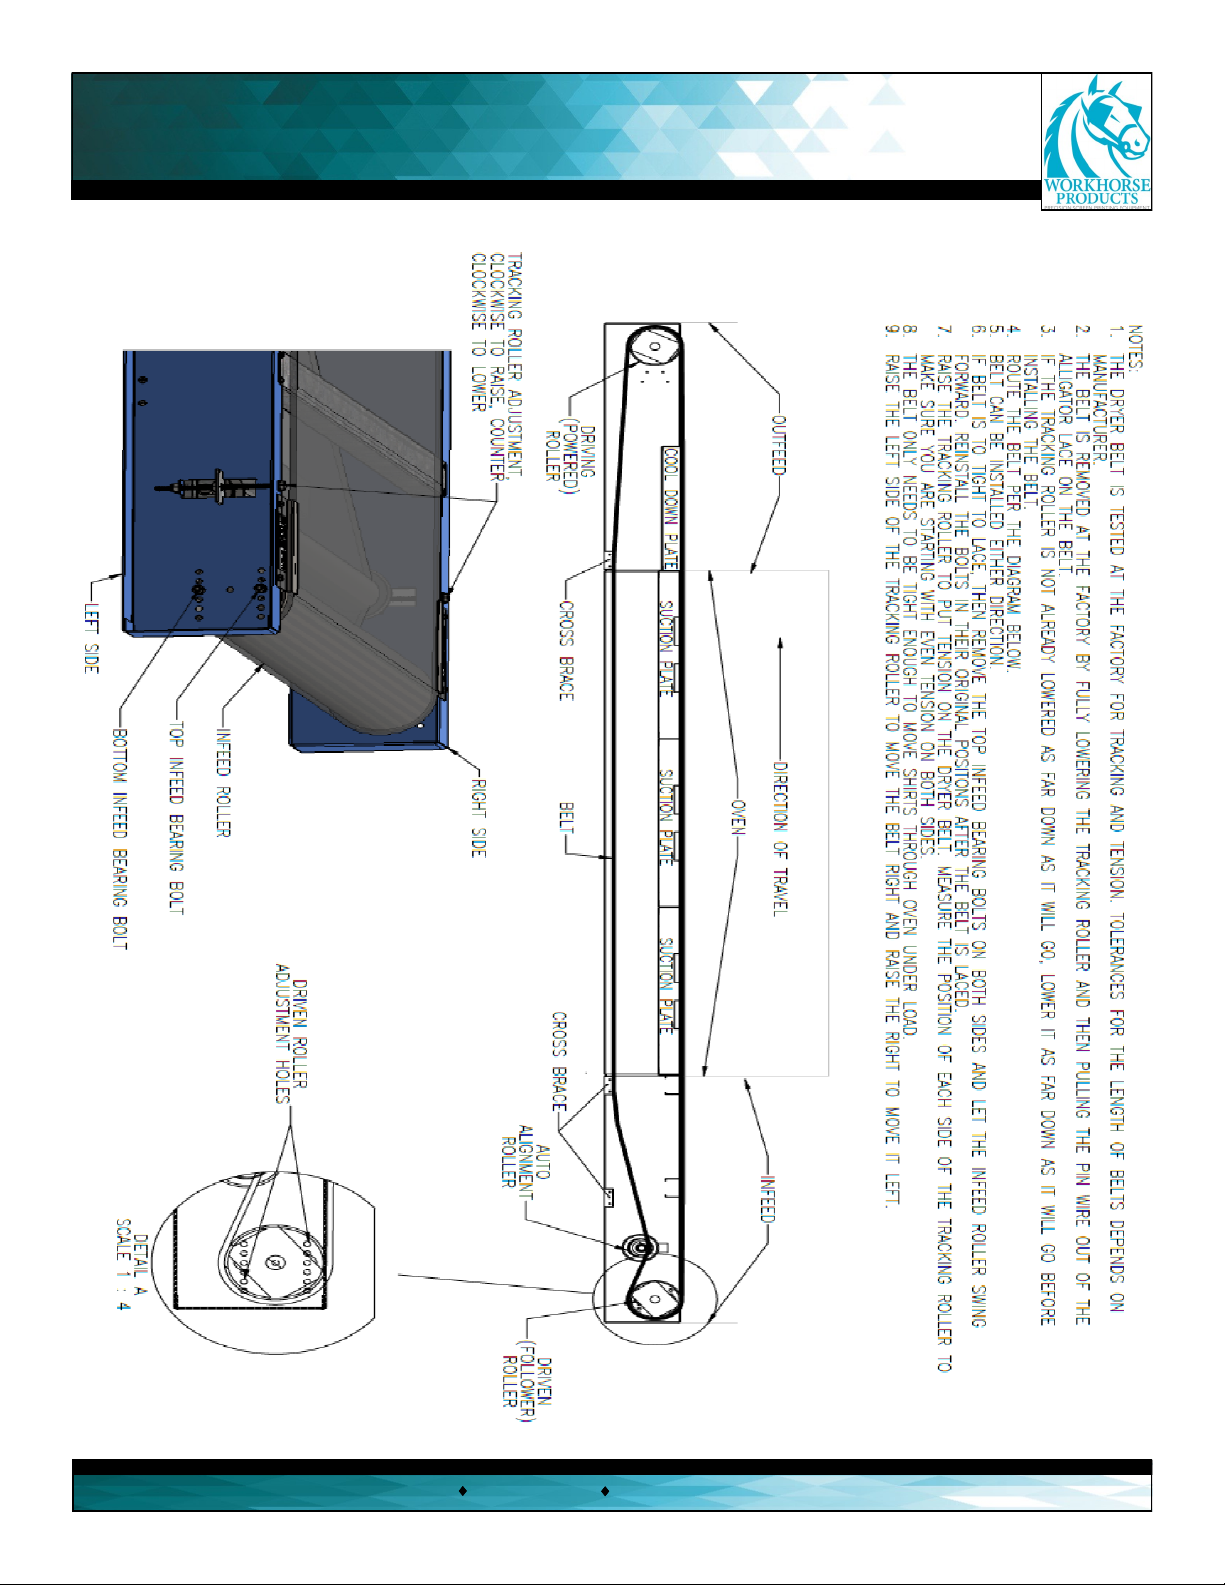
Infeed
Oueed
Conveyor Belt
Front Pulley
Rear Pulley
Belt Tracking
Adjust
Exhaust
Convecon System
Panel Heang Elements
Control Box
Underneath the top panel there are three infrared radiant panel heang elements that are controlled by the tablet
controller. They can cure plassol, water-based ink, and any evaporave cured ink. They are capable of heang up
and cooling down within seconds.
Most of the machine’s electrical components are located within the control box. This box is easily accessible for any
necessary maintenance.
Used to raise and lower the heang elements to adjust heat distance to the garment. To raise the element turn the
crank handle clockwise. Turn the crank handle counterclockwise to lower the element.
The exhaust is used to release heat. Use the push pin handle next to the exhaust to control the amount of heat re-
leased.
Filters the incoming air and needs to be cleaned whenever it becomes lled.
The conveyor belt is created of Teon coated ber glass and is placed on a self-aligning belt tracking system. The
belt is designed to withstand heat, but be sure the belt is always moving when the Powerhouse II is operang
above 300 degrees.
Used for tracking the belt and keeping the belt on the pulley. If the belt moves to the side, use the belt tracking
adjust to center it.
The pulleys are created for precise rolling at an even center.
The tablet controller is the main control system for the Powerhouse Series II. The tablet programs the temperature,
belt speed, warm up, cool down, power consumpon, create presets, access the owner’s portal, and contacts
Workhorse technical support if ever needed.
A precisely designed air system to ulize and release heat within the dryer.
Where the garments are placed to start the curing process.
Where the garments exit the curing process. They land on a cool down table and eventually run o the belt.
Crank Handle
Filtered Intake
Tablet Controller
Panel Heang
Elements
Control Box
Crank Handle
Exhaust
Filtered Intake
Conveyor Belt
Belt Tracking
Adjust
Pulley
Tablet
Controller
Convecon
System
Infeed
Oueed
E-Stop

Safety Procedures
3730 E. Southern Avenue, Phoenix, AZ 85040 USA
800-778-8779 Workhorseproducts.com 5
WARNING!
RISK OF ELECTRICAL SHOCK! Turn ALL power to unit OFF before service.
All service should be done by or under the supervision of a trained technician
1. For your safety, do not store or use gasoline or other ammable vapors and liquids in the vicinity (at least 3’ (1 Meter)) of this or
any other appliance.
2. Vent lines to the outdoors must be installed by a qualied HVAC engineer on all air exhaust components equipped with a vent
ng.
3. Proper grounding (a ground rod at the equipment foong), according to NEC requirements, must be provided for during
electrical connecon by a QUALIFIED ELECTRICIAN.
4. Never alter the internal wiring of this machine.
5. Never place any item other than the substrates to be cured or dried on this dryer’s conveyor belt. Do not overload the belt.
6. Do not let the conveyor belt track o the conveyor drive rollers.
7. Keep all loose arcles (including clothing, hair, jewelry, etc.) away from the conveyor belt.
8. Never leave the machine unaended during operaon.
9. Do not perform maintenance on this machine unl all power has been shut o at the dryer AND at the incoming power circuit
breaker.
THIS ELECTRIC DRYER IS INTENDED SOLELY FOR THE PURPOSE OF CURING INK ON TEXTILE AND CUT GOODS. THIS
DRYER IS NOT INTENDED FOR USE IN HEATING, CURING OR BAKING OF ANY OTHER MATERIALS.
THIS DRYER IS INTENDED FOR INDOOR USE ONLY
THE EXCLAMATION WITHIN AN EQUILATERAL TRIANGLE SYMBOL IS INTENDED TO ALERT THE USER
OF IMPORTANT SAFETY PRECAUTIONS TO BE AWARE OF DURING OPERATION.

Assembly
3730 E. Southern Avenue, Phoenix, AZ 85040 USA
800-778-8779 Workhorseproducts.com 6
Step 1: Aaching the Infeed
Parts needed:
Infeed Arm
4 x Hex Bolt (3/8-16 x 3/4”)
4x Flanged Nuts (3/8-16”)
4 x Flat Washers
Tools needed:
9/16” Socket
Wrench
9/16” Wrench
2. With another person and two anged nuts in
hand, li up the infeed and insert it into the four
exposed hex bolts.
3. While holding the infeed, hand ghten the nut
to the top hex bolt rst. The top hex bolt needs
to be done rst because it relieves weight from
the top. Hand ghten a second nut to the boom
hex bolt. Be sure to do step three on both sides
simultaneously.
4. Using the 9/16” wrench on the top of the bolt
and the 9/16” socket wrench on the nut, ghten
all four hex bolts.
1. The infeed arm (the arm without the cooling
table), must be aached to the side with the
tablet. Insert a hex bolt and washer into the four
holes where the arm will connect. Make sure the
hex bolt is facing out and exposed.

Assembly
Step 2: Aaching the Oueed
Tools needed:
9/16” Socket
Wrench
9/16” Wrench
3730 E. Southern Avenue, Phoenix, AZ 85040 USA
800-778-8779 Workhorseproducts.com 7
1. The oueed arm (the arm with the cooling
table), must be aached to the side opposite of
the tablet. Insert a hex bolt and washer into the
four holes where the arm will connect. Make sure
the hex bolt is facing out and exposed.
2. With another person and two anged nuts in
hand, li up the oueed and insert it into the four
exposed hex bolts.
3. While holding the oueed, hand ghten the nut
to the top hex bolt rst. Hand ghten a second
nut to the boom hex bolt. Be sure to do step
three on both sides simultaneously.
4. Using the 9/16” wrench on the top of the bolt
and the 9/16” socket wrench on the nut, ghten
all four hex bolts.
Parts needed:
Infeed Arm
4 x Hex Bolt (3/8-16 x 3/4”)
4x Flanged Nuts (3/8-16”)
4 x Flat Washers

Assembly
Step 3: Installing and Tracking the Belt
Parts needed:
Belt
Threading Pin
1. When rst installing the belt, on the
infeed side of the dryer, remove the top
nut and bolt holding the infeed roller in
place. Once removed, loosen the boom
nut, but keep in place. Aer loosening the
boom nut, roll the infeed roller forward
so there is less tension on the belt when
installing the pin.
1. 1.
2. Feed the belt from the oueed side of
the dryer, through the top of the
chamber. Pull the belt through the
infeed side and over the infeed roller.
2.
3. Run the belt under the infeed roller
and then above the tension roller and
above the lower support. Then feed the
belt through the lower poron of the
chamber and out the oueed side of the
dryer.
3.
3.
4. On the tablet side of the dryer,
line up the yellow marks on the
teeth. Push the pin through the
teeth making sure to have the
same amount of extra pin on
both sides.
4. 4.
3730 E. Southern Avenue, Phoenix, AZ 85040 USA
800-778-8779 Workhorseproducts.com 8

Assembly
3730 E. Southern Avenue, Phoenix, AZ 85040 USA
800-778-8779 Workhorseproducts.com 9
1. 1. 1.
2. 2. 2.
2. Aer the infeed roller is bolted back into place, turn the dryer on with a belt speed of 100% and let run for 5
minutes. You will be able to see if the belt is tracking correctly. If the belt is not tracking properly, use the bolts for
the tension roller on the infeed side of the dryer. If the belt is moving le, use the right bolt and make a 1/4 turn right
and watch the adjustment. Connue the process unl the belt has tracked correctly. Make the same adjustments on
the other side of the dryer if the belt is moving to the right. When completed, the belt should be tracking underneath
both tracking plates without moving to one side or the other.
1. Once the belt is pinned together, you will need to reinstall the nuts and bolts for the infeed roller. Move the roller
bearing back into place so that the boom bolt and top bolt are aligned. The bolt will go into the bearing from the
roller side of the arm and the nut will ghten down on the outside of the arm.
Step 3: Installing and Tracking the Belt
Parts needed:
Belt
Threading Pin

Belt Roung Diagram
3730 E. Southern Avenue, Phoenix, AZ 85040 USA
800-778-8779 Workhorseproducts.com 10

Assembly
3730 E. Southern Avenue, Phoenix, AZ 85040 USA
800-778-8779 Workhorseproducts.com 11
Step 4: Connecng to the Belt Drive Motor
1. On the oueed side, take the belt drive motor
cable and feed it through the hole located at the
edge of the arm.
The size and specifications of the electrical connections made during installation MUST BE DETERMINED BY
A LICENSED ELECTRICIAN. FOLLOW ALL LOCAL BUILDING AND PLANNING CODES. Failure to do so may
result in damage to the unit, building, or cause serious injury.
Before any electrical connections are made verify all safety precautions have been taken to ensure the safety
of all shop personnel. The dedicated breaker providing power to the dryer MUST BE OFF, AND USE OF A SER-
VICE LOCKOUT TAG IS REQUIRED. This will prevent anyone from turning on the power as the connections are
being made. After all safety precautions have been taken the electrical connections can be made. All electrical
connections must be made by a licensed electrician. Refer to factory specifications for proper installation.
2. Connect the belt drive motor cable to the motor
cable. Congratulaons! The Powerhouse Series II Dry-
er is now fully assembled!

Controls
3730 E. Southern Avenue, Phoenix, AZ 85040 USA
800-778-8779 Workhorseproducts.com 12
Before turning the dryer on make sure that the belt is empty.
Touch the idle screen so it opens up into the main menu:
A. Set Temperature - The temperature the dryer is set to
achieve.
B. Current Temperature - The temperature the dryer is
currently at.
C. Belt Speed - The speed of the belt.
D. Heang Elements - Indicates the status of the heang
element. Whether if the heang element is receiving power
or when it is actually on.
E. Current Mode - The mode the dryer is on. For example, if set
to a preset the preset’s name would be the current mode.
Manual mode means that the dryer is set to manual sengs
without a preset.
F. Operang Costs - Based on temperature, airow, and
exhaust sengs the dryer is able to calculate price per hour
for every job.
G. Power– Turn the dryer on/o.
H. Logs - Specics and logiscs for each job the dryer executes.
I. Help - Opens the help opons menu.
J. Sengs - Opens the sengs menu.
A.
B.
C.
D.
E.
F.
G. H. I. J.
Help Menu:
K. Check for Updates - Checks for system updates (Wi-Fi Connecon
required).
L. Register Machine - Register the machine online.
M. Change Time - Adjusts the date and me on the machine.
N. Congure Wi-Fi - Opens the Wi-Fi conguraon menu where the
machine can connect to Wi-Fi. When connected to the Wi-Fi the machine
can receive updates, communicate with the cloud, and allow for remote
troubleshoong.
O. Restart Tablet - Will restart the machine if needed. This buon should
not be used on a regular basis.
P. Support Connect - Directly connect with Workhorse Products support.
Q. Close - Will close the sub-menu and return to the main menu.
K.
L.
M.
N.
O.
P.
Q.
*Please allow up to 20 minutes for
the dryer to stabilize in temperature
aer seng

Controls (Connued)
3730 E. Southern Avenue, Phoenix, AZ 85040 USA
800-778-8779 Workhorseproducts.com 13
A.
B.
C. D.
E.
F.
G. H.
Sengs Menu:
A. Presets - Set custom presets for
reoccurring jobs.
B. Preset Name - Name the custom
preset, (Workhorse Products has
programed generic custom presets
into the dryer, but they are by no
means presets that should be highly
regarded).
C. Temperature - The set temperature
for that preset.
D. Belt Speed - The set belt speed for
that preset.
E. Kilowa Cost - Operang cost.
F. Inputs/Outputs, PID Values and
Dryer Opons - This grey box is for
Workhorse programming. Users are
unable to access this box and have
read only access.
G. Ok - Click “Ok” to set the sengs.
By hing “Ok” the sengs will be
saved and programmed for the job.
H. Cancel - Click “Cancel” to not save
and exit out of the sengs. By
hing “Cancel” the sengs will not
be programmed for the job.
This what the Powerhouse Series II tablet looks like
when it is in idle mode.

Recirculaon System
3730 E. Southern Avenue, Phoenix, AZ 85040 USA
800-778-8779 Workhorseproducts.com 14
Powerhouse Series II Recirculaon System:
1. The impeller pulls heated air in from the blower box and directs it up through the exhaust chimney.
2. The adjustable exhaust ap directs desired amount of heated air back into the oven chamber via the
exhaust return tray. The remainder of the exhaust exits through the top of the chimney.
3. Heated air in the oven chamber is pulled down through the sucon plates and into the blower box by
the impeller.
4. Fresh air is pulled through chambers between the outer and inner walls and into the blower box. This
recovers the otherwise wasted heat from the inside walls of the oven.
5. Oven air and heated fresh air are mixed in the blower box and pulled into the impeller for exhaust.

Venlaon
3730 E. Southern Avenue, Phoenix, AZ 85040 USA
800-778-8779 Workhorseproducts.com 15
The venlaon port is located next to the control box. This port can be connected to a standard 6” HVAC duct
line vented to the outside of the building. For longer duct lines to the outside of the building; or if local build-
ing codes require roof top venlaon, inline duct boosters may be used.
It is recommended that the venlaon system duct line be professionally installed in compliance with all
local building codes to ensure the safety of all shop personnel.
Venlaon Open:
When the venlaon is open more hot air
is released, which means less hot air in the
chamber. This type of airow is normally
used for water based and discharge inks.
The venlaon system needs to be open
because the evaporave chemicals from
the garments need to be released.
The venlaon system is capable of being adjusted to control the hot airow. The hot airow
interacts with the heang panels and aects how the garments are cured. The two major
sengs are open and closed, everything in-between is a variaon of either open or closed.
Venlaon Closed:
When the venlaon is closed less hot air is
released, which means more hot air in the
chamber. The hot air in the chamber helps
the dryer reach a specic temperature.
More hot air also means that the panels run
less, making it more cost eecve. This is
more like convecon type heat and is
typically used for standard plassol inks.

Filtraon System:
General use of the dryer will cause lint and debris from
garments and the area surrounding the Powerhouse II to
collect inside the internal air chambers. The lter on the side
of the dryer is designed to be easily accessed so the lter can
be cleaned. Wash with a mild soap and water. Use air hose or
allow to air dry. Filter should be completely dry before rein-
stalling into the dryer.
Workhorse Products recommends performing these roune maintenances every three to six months to
maintain opmum performance of your dryer.
Maintenance
3730 E. Southern Avenue, Phoenix, AZ 85040 USA
800-778-8779 Workhorseproducts.com 16
Belt Tracking:
The self-tracking system is designed to keep the belt centered on
the front and rear pulley. However, somemes the belt may come
o-center. To put the belt back on center use a 7/16” socket
wrench on the bolt located on top of the dryer arm. This will lt
that side of the pulley up or down.
Gears and Chains:
Chains can loosen over me and should be inspected, adjusted
and lubricated whenever necessary.

Belt Extension
3730 E. Southern Avenue, Phoenix, AZ 85040 USA
800-778-8779 Workhorseproducts.com 17

Belt Extension (Connued)
3730 E. Southern Avenue, Phoenix, AZ 85040 USA
800-778-8779 Workhorseproducts.com 18

Belt Extension (Connued)
3730 E. Southern Avenue, Phoenix, AZ 85040 USA
800-778-8779 Workhorseproducts.com 19

Belt Extension (Connued)
3730 E. Southern Avenue, Phoenix, AZ 85040 USA
800-778-8779 Workhorseproducts.com 20
This manual suits for next models
4
Table of contents