WorkPro LM3R Setup guide
Rev. 13.09.01
Quick Start User Guide

Read this manual before powering or installing the device, follow the safety precautions listed below and
observe all warnings in this manual.
•Be sure that the local power outlet matches that of the required voltage of the power supply included
with this device.
•To reduce the risk of fire or electrical shock, do not expose the unit to rain or high levels of moisture.
•Do not spill water or other liquids into or on your unit.
•Do not open the unit as there are no user serviceable parts inside.
•Do not dismantle or modify the unit, as this voids all warranties.
•Do not attempt repairs. Repairs by unqualified people could cause damage or faulty operation.
Contact your local authorized service center.
•Unplug this unit when not used for long periods of time.
•Clean only with dry cloth.
•Handle this unit carefully. Any strong shock or vibration may result in malfunction.
User Manual/Manual de Uso
EN
LM 3R - 1 -

1. Contents
●1 LightMouse LM-3R.
●1 Power Supply DC 5V 500 mA.
●1 User manual
2. Technical Data
●DMX receiver via Ethernet Plug & Play.
●Compatible with LightMouse LM-3E.
●Art-Net 2 Node.
●
●Customizable interface.
●Dimensions (Width x Height x Depth): 86 x 42 x 68 mm.
Power supply: 5V 500 mA
3. Front panel
3. Power LED: This LED lights when the unit is powered.
4. Plug In power connector: the device can be powered with the provided power supply by
using this connector. If this is used, then the Micro USB connector (5) MUST NOT
be used.
1. Activity LED: This LED blinks when any activity is detected in the Ethernet network.
2. Link LED: This LED is turned on when an Ethernet network is detected (Ethernet connector
is plugged).
User Manual/Manual de Uso
LM 3R - 2 -
Sub-Net ARTNET/LAN USB 5VDC
EN
5.
6.
7.
8.
Micro USB power connector: the device can be powered with a power supply of 5V DC,
500 mA by using this connector, or using de adequate USB port in the laptop. If this is used,
then the Plug In power connector MUST NOT be used.
5. Connecting the device
4. Rear Panel
LM 3R - 3 -
NOTE: Remember, this port is ONLY for power supply purpose.
ARTNET/LAN: RJ45 connector used to connect the device to an Ethernet network.
Sub-Net / Universe selectors: In Art-NET mode, this selector allows to select up to 16 Sub-Nets
and 16 Universes rotating the selector between 0 to F.
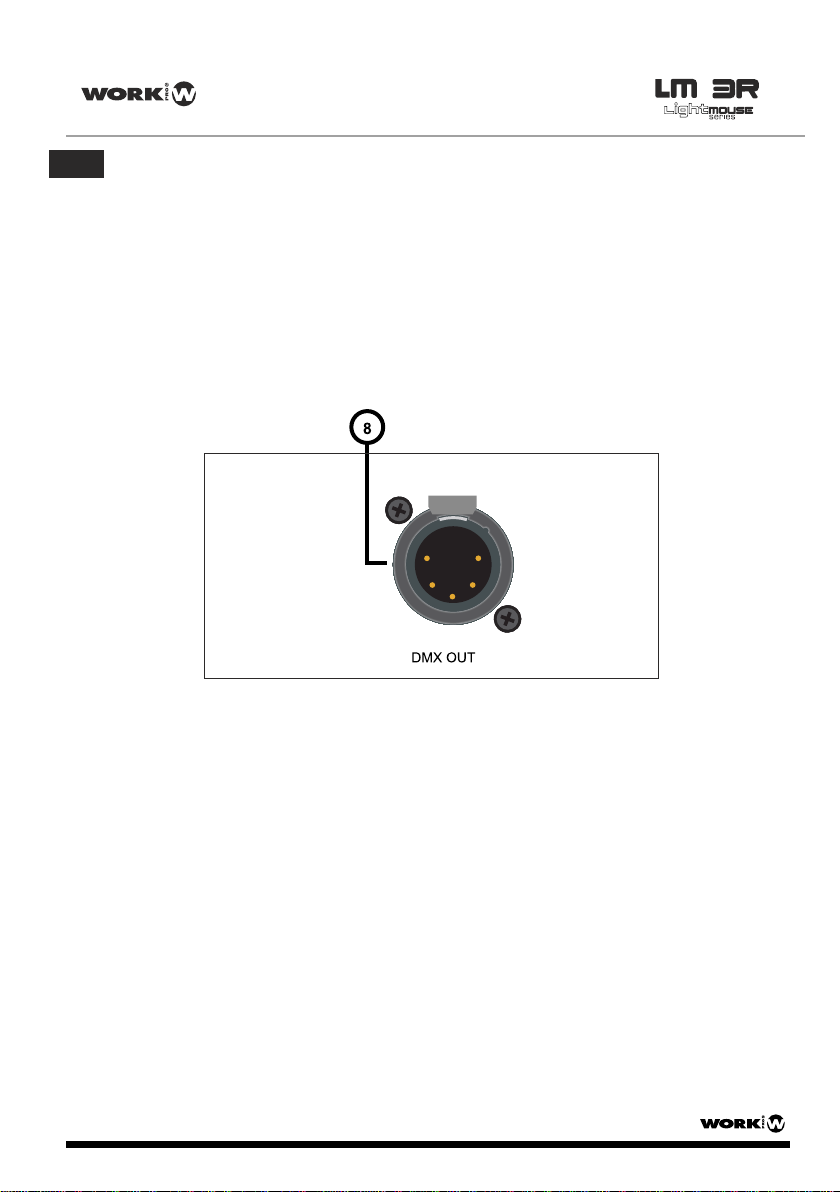
DMX OUT: This XLR-5 female connector is the DMX output signal. It sends DMX frames to
DMX compatible devices like moving heads, scanners,RGB drivers, amplifiers, etc.
1. Select the Sub-Net and Universe with the selectors according to installation requirements (7).
2. Plug in a CAT 5 cable in the Ethernet/LAN connector (6).
3. Plug in a XLR 5 male cable in the DMX OUT connector (8) to send DMX frame to the devices.
4. Plug the included power supply or use a Micro USB power supply or use a microUSB cable
to supply the unit from a standard USB port. The POWER LED (3) will lit immediately. After
some seconds, if the device is plugged to a network, the ACT LED (1) and the LINK LED (2)
will begin to blink.
User Manual/Manual de Uso
EN

The device is Plug and Play. This means that it is able to autoconfigure itself to work in any
network. It achieves this by several ways:
●
●
If the network has got a DHCP server, then the device will take the IP address and subnet
mask given by the server.
●If the network hasn’t got a DHCP server, then the device gets an automatic IP
following the
ZeroConf protocol, this is, it takes an IP address in the range 169.254.X.X and a subnet
mask of 255.255.0.0. Any local device, independent of its IP and subnet mask can access
to this kind of IPs, so no further configuration is required. If
there is no DHCP server, the
startup time will be increased to around 30 seconds, because the device is waiting for the
response of a DHCP server.
LM 3R - 4 -
6. Setting the network options
7. WebServer configuration
LM 3R is a plug and play device. By default, it is automatically configured like an Artnet device
with an IP address 2.x.x.x and Subnet mask 255.0.0.0. Each LM 3R has a sticker at the bottom with
its default setting.
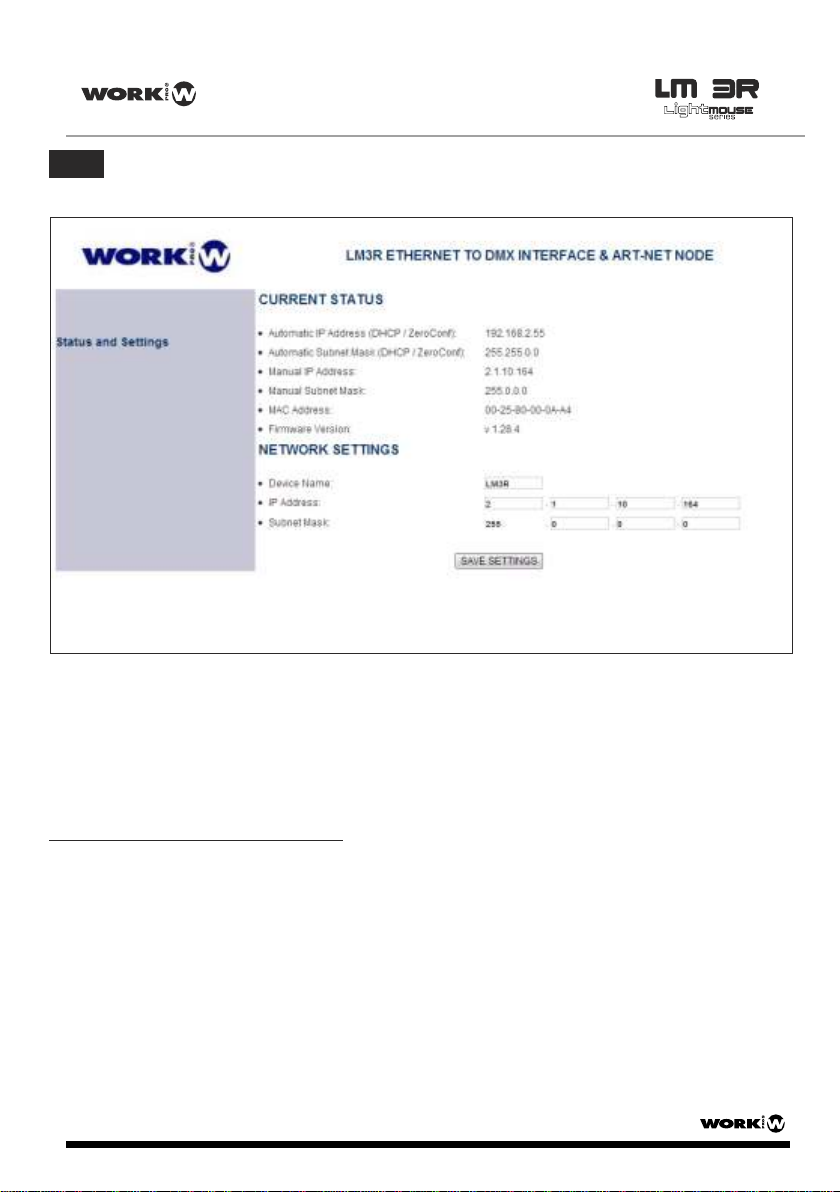
For advanced configuration, LM 3R offers WebServer service which will show all information about
the device and allows to change and configure the device about network or user requirements.
1. Configure your PC with an ArtNet compatible IP (2.x.x.x) and SubNet Mask 255.0.0.0
2. Open your browse (We advice Google Chrome), and type http://lm3r.local/. "lm3" will be the
device name by default the first time you use it. Or use the IP written in the device sticker.
1. The CURRENT STATUS section show us all connection information (Automatic and manual
IPs, MAC address and Firmware version).
2. The NETWORK SETTING section allows to rename the device in order to identify it. Be careful
with this function due to you need to remember the device name in order to access to the
webserver again. In this section it is possible to select the IP and its Subnet.
3. When you finish to set it, press SAVE SETTINGS to store the changes.
NOTE: Take into account that this is the default names and must be typed the first time. If you
change the name, you must write the new name in order to access.
( xxxxxxxx.local/).
LM 3R is automatically configured, which means that it obtains automatically an IP address
2.X.X.X and a Subnet Mask 255.0.0.0, just as Art-Net protocol specifies. However, for
advanced users, network configuration can be modified using the web browse interface, as
seen belowin the next point (7. Webserver configuration).
User Manual/Manual de Uso
EN
8. Using the device
In Art-NET mode, the device can be controlled by any software capable of generateArt-NET, i.e.
Chamsys MagicQ or using a DMX to ArtNet interface as LM 3E.
LM 3R - 5 -
8. 1 Using LM 3E as ArtNet generator
LM 3E is a DMX to ArtNet interface able to convert DMX frame and send this information through
LAN network. This information can be received by one LM 3R configured in the same Subnet.
Depending on the installation, it is possible to configure several LM 3E with different universes in the
same SubNet and setting one LM 3R on each universe for its reception.
In all cases, use the SubNet/Universe switches (7) to set the device according to the right connection
and the chosen universe to be controlled.
User Manual/Manual de Uso
EN

LM 3R - 6 -
8. 2 Using OSCillation software as ArtNet generator
OSCillation is a software which offer several prefixed layouts in order to generate DMX frame in
order to control de devices connected in a LM 3R or LM 5.
Also, this software allows to updated the firmware of the LM series devices and offer all information
about this device (MAC address, IP, etc). This feature is very useful in case of we do not remember
the name of the device o we want to confirm its IP address.
The link to download this software is the following:
http://www.equipson.es/prodDetail.asp?idproducto=1889#
This software offers 3 prefixed layouts: RGB 3CH, 6CH and 512 CH.All of them incorporate the
same control features. For explanation purpose, we will use OSCillation512.
Set the PC ethernet connection in the range 2.x.x.x
NOTE: If you connect LM 3R to a PC directly. You need to use a CROSSOVER cable
User Manual/Manual de Uso
EN

LM 3R - 7 -
- Press View tab in the uper side of the interface and, after, press Devices. An additional
window will offer the devices found in the same LAN (LM-3R MKII in that case).
- In the right window, we can check all information about this device like firmware version, MAC
address, IP address and name. This point is very important in the case of we lost the name of the
device. Simply using this apliance, we can check and comfirm this information.
- Update button allows to update the firmware version when it was available.
- Activate button allows to use the interface to control the device. Press it and check that using the
faders, the value number change according the movement.
NOTE: As you can see, selecting LM 3R causes that SHOWS, SCENES and EDIT section are
disabled. This sections are only enabled using a LM 5.
User Manual/Manual de Uso
EN

•
•Para reducir el riesgo de fuego o descarga eléctrica, no exponga la unidad a la lluvia o la humedad.
•No derrame líquidos en el interior de la unidad.
•No abra la unidad. No hay elementos de control para el usuario en su interior.
•No desmantele o modifique la unidad. Anularía la garantía.
•No trate de reparlo. La reparación per personal no cualificado puede causar daños o fallos de
funcionamiento. Contacte con su distribuidor local.
•Desconecte la unidad si no va a aser utilizada durante largos periodos de tiempo.
•Lipie la unidad sólo con un paño seco.
•Maneje la unidad con cuidado. Un golpe fuerte o vibración puede causar mal funcionamiento.
Lea este manual antes de poner en marca la unidad, sigua las precauciones de seguridad listados
a continuación y observe todas los avisos contenidos en este manual.
Asegúrese que la alimentación local es igual al voltaje requerido para el alimentador incluido
con el dispositivo.
User Manual/Manual de Uso
ES
LM 3R - 8 -

1. Contenido
●1 LightMouse LM-3R.
●1 Alimentador DC 5V 500 mA.
●1 Manual de uso
2. Datos Técnicos
●Receptor DMX via Ethernet Plug & Play.
●Compatible con LightMouse LM-3E
●Nodo ArtNet 2.
●
●Interfaz Customizable.
●Dimensiones (Ancho x Alto x Profundo): 86 x 42 x 68 mm.
Alimentación: 5V 500 mA
3. Panel Frontal
LM 3R - 9 -
3. LED Power: Este LED se ilumina cuando cuando la unidad se alimenta.
4. Conector de alimentación: El dispositivo puede ser alimentado con el alimentador incluido
usando este conector. Si se alimenta mediante este conector, la toma Micro USB (5) NO DEBE
SER USADA.
1. LED ACT: Este LED parpadea cuando el dispositivo detecta actividad en la red Ethernet.
2. Link LED: Este LED se enciende cuando se detecta una red Ethernet (El conector Ethernet
iestá conectado).
Sub-Net ARTNET/LAN USB 5VDC
User Manual/Manual de Uso
ES
This manual suits for next models
1
Table of contents
Languages:
Other WorkPro Media Converter manuals


