Worlde W8806A User manual

Descriptions P. 2
Basic Operation P. 4
Voice P. 5
Selecting a Voice P.5
Selecting a Performance Programme P.5
DSP Type P.5
Transpose P.6
CONTENT
WELCOME
To the happy family of satisfied WORLDE electronic
musical instrument owners! To get the most out of
the many features and functions of the keyboard,
please be sure to read carefully this manual and
Tuning P. 6
Keyboard Percussion P.6
Touch Response P.7
Auto Accompaniment P. 7
Selecting the Auto Accompaniment P.7
Single Finger Chord P. 8
Fingered Chord P.8
Tempo P.9
Start / Stop P.9
SYNC START P.9
Intro / Ending P.9
Fill in P.10
Auto Accompaniment Volume Control P.10
Memory P. 11
Record P. 11
Pedals P. 1 2
External Terminals P. 1 2
Specifications P. 1 3
Maintenance P. 1 3
APPENDIX
VOICE LIST P.14
RHYTHM LIST P.16
DRUM KIT LIST P.17
SINGLE FINGER CHORDS P.19
FINGERED CHORDS P.20
1

DESCRIPTIONS
2
1234
56789

(19) Chord Volume Button
(20) Intro / Ending Button
(21) Fill in
(22) Rhythm Tempo
(23) Keyboard Split Button
(24) Rhythm A /B Button
(25) One Voice Button
(26) Dual Voice Button
(27) Lefthand Voice Button
(28) Demo Button
(29) Keyboard Percussion Button
(30) Rhythm Zone
(31) Digital Display
(32) Memory Button
(33) Voice A/B Button
(34) Memory 1
(35) Memory 2
(36) Memory 3
(1) Headphone Jack
(2) keyboard
(3) Music Stand
(4) Keyboard Cover
(5) Damper Pedal
(6) Sustain Pedal
(7) MIDI Input
(8) MIDI Output
(9) ACAdapter Socket
(10) Master Volume Dial
(11) Transpose Button
(12) Tuning Button
(13) Fingered Button
(14) Singer Finger Button
(15) Chord OFF Button
(16) Start / Stop
(17) Rhythm Volume Button
(18) Sync Start Button
#
A BCDEFGABCDEFGABCDEFF
10 12
11
31
45
44
43
42
40
39
46
47
48
49
50
35 37
34 36
32
33
30
29
28
27
19
24
23 22
21
18
17
15
14
13
51
25
26
2016 4138
3
(37) Memory 4
(38) Voice Zone
(39) Voice Selecting Buttons
(40) Rhythm Selecting Buttons
(41) Number Buttons (1--9)
(42) [+] Button
(43) [- ] Button
(44) DSP Type Button
(45) Touch ON/OFF Button
(46) Record Button
(47) AccompanimentButton
(48) Melody 1
(49) Melody 2
(50) Play Button
(51) Power Switch
(52) AutoAccompaniment Zone
DISPLAY
RHYTHM B
RHYTHM A
MASTER VOLUMEMASTER VOLUME
MIN MAX

BASIC OPERATION
4
MULTI-FUNCTIONAL DISPLAY
POWER
MASTER VOLUME
MIN MAX
DEMO
DEMO
Open the keyboard cover, and set up the music stand.
Pwer & Master Volume
Before connecting to the alternating current, set the Power
Switch to 0 position. Plug the power cable output into te AC
Power Socket(9), then connect the power cable input with
220V alternating current. Set the Power Switch to 1 position,
then 01 shows in the digital display, and then adjust the Master
Volume dial (10) to set the volume you want. .
Initial setting: Voice (01) : PIANO
Rhythm (00): 8 BEAT
NOTICE
You should wait another 2 or 3 seconds to restart this instrument after you just turn it off, for it
needs this time to make the internal circuit discharge completely. Otherwise, some abnormal
phenomenon might occur during the performance.
Listening to the Demo Songs
This instrument has altogether three demo songs. They
are 1. APlace Far Away (a typical Chinese song), 2. Saint
March, 3. Symphony Number 40.
HOW TO PLAY THE DEMOS
1. Press Demo button(28), and ALL shows in the digital
display (31). The demos will play in order. Press the
button again, and the playback will stop.
2. Press number button(41)1,2 or 3 right after the Demo
button, and the playback will start with the demo you
selected. Press the button again, and the playback will
stop.

VOICE
1. Selecting a Voice
Please notice that the keyboard percussion function
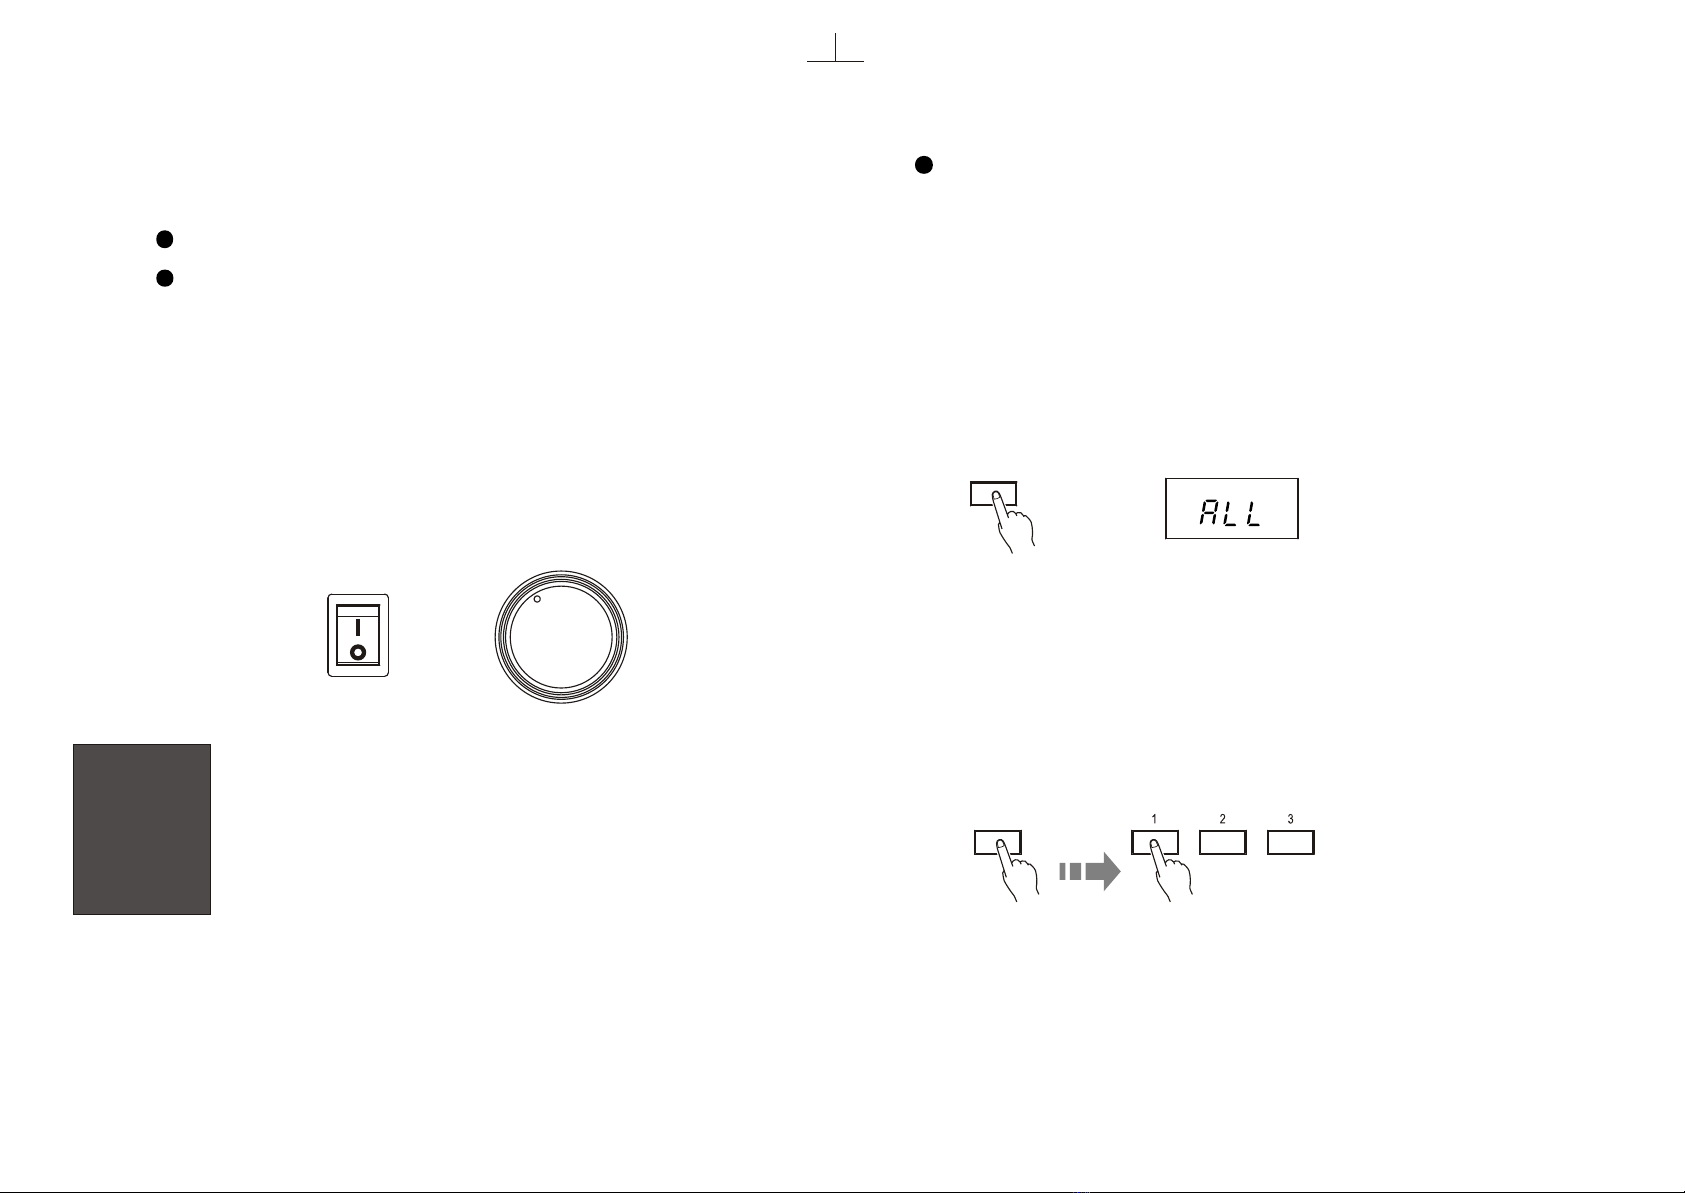
is off. Press first the [VOICE] button, then number
buttons(0--9)or [-]/[+] button to select one of the 128
voices of this instrument. For example, if the number
of the voice is 012, just press number buttons 0,1,2 ,
or press [+](if the present number is below 012) or [-]
(if the present number is over 012). Holding down [+]
or [-] buttons makes the number change successively
and quickly. Release the button when the number you
desire appears. .
5
789
45
12
6
3
0
VOICE
A/B
VOICE
OBOE CLARINET FLUTE PAD1 SYNTH
ACCORDION HARMONICA GUITAR1 GUITAR 2 HARPSI
CHORD
STRING CHOIR AAHS TRUMPET BRAS SECTION SAX
PIANO ELECTRIC
PIANO VIBRAPHONE ORGAN 1 ORGAN 2
LEFT VOICE
K.B SPLIT
ONE VOICE
DUAL
Also you can chose the twenty commonly-used voices
directly from the ten voice buttons in the panel voice
zone. When the light on the left side of the [A/B] button
is on, it means that the voices you select are from the
down-row voices of the voice buttons.
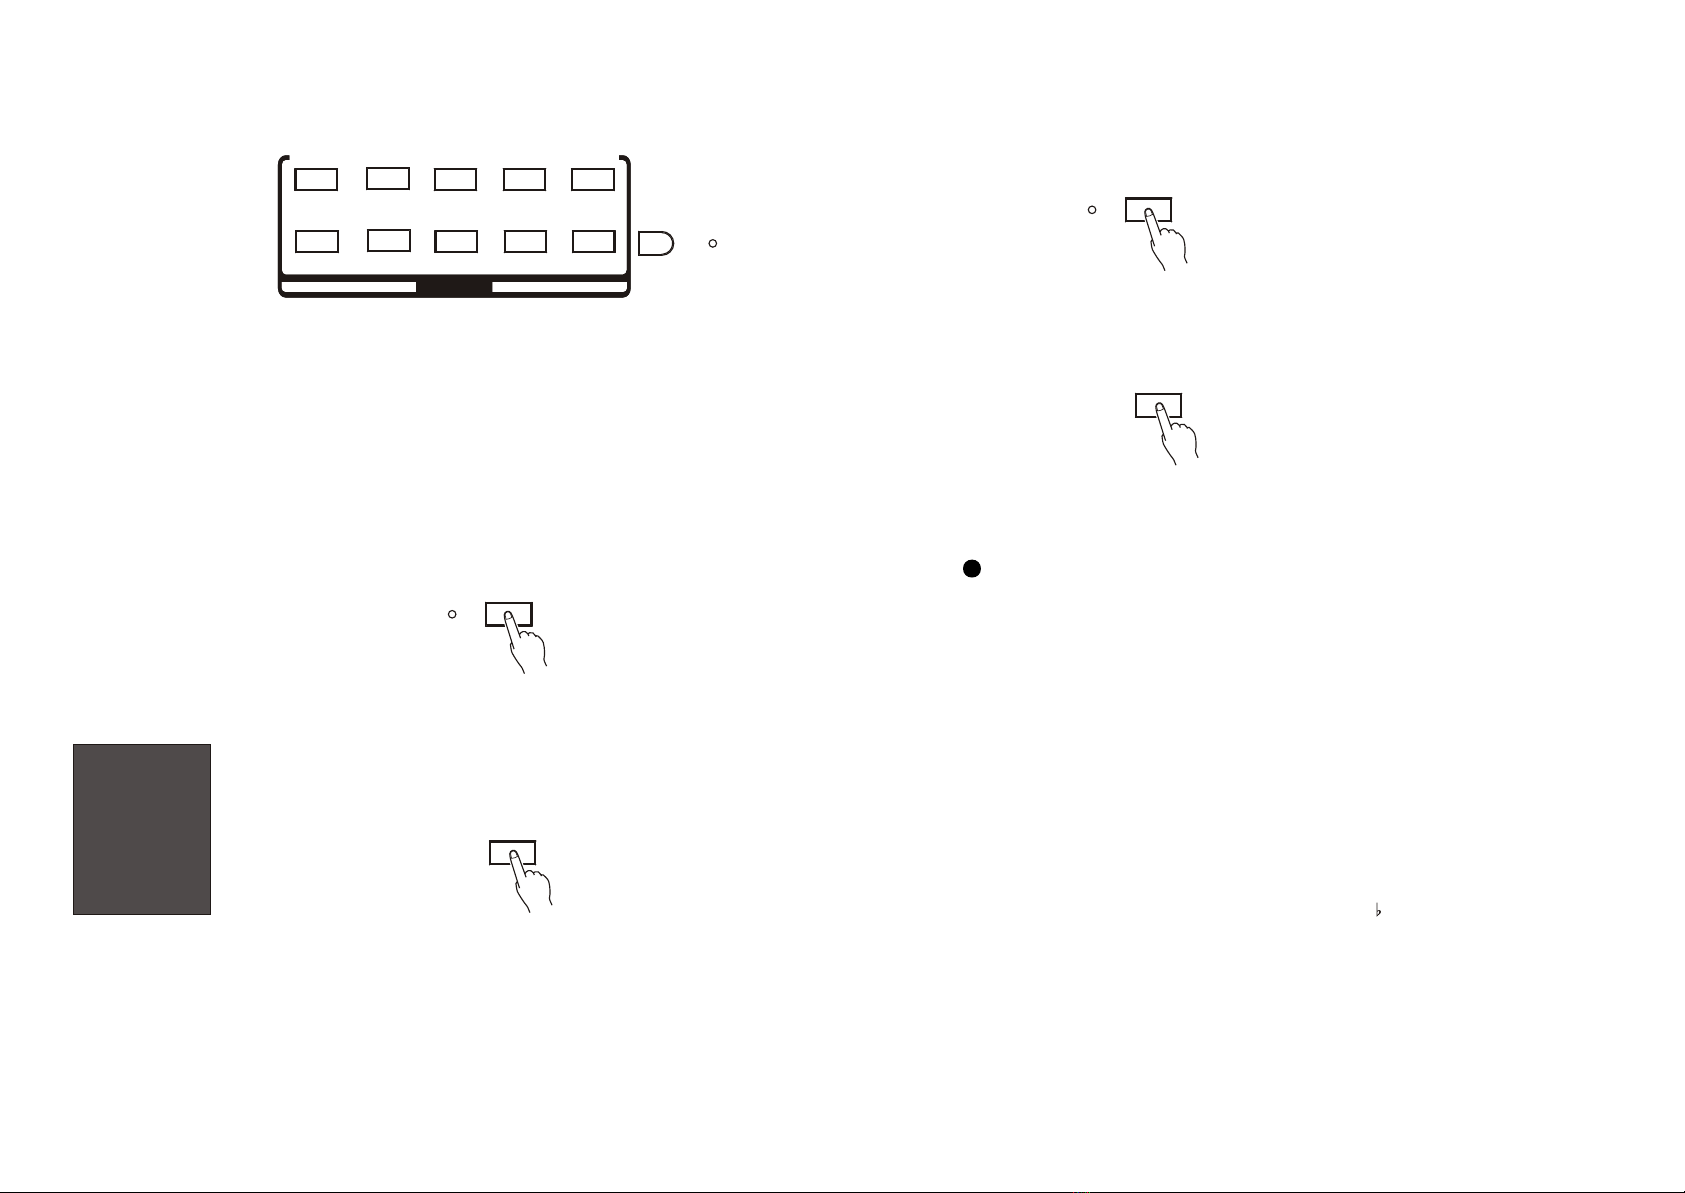
2. Selecting a Performance Programme
There are three different performance programmes of
this instrument: one voice, dual voice, keyboard split.
One Voice: Press this button, and the whole instrument
could only play one voice.
Dual Voice: Press this button, and the whole instrument
could play dual voice.
Keyboard Split: While pressing this button, the its left light
is lit. Chose any key (below D6) as the split point and press
it down, thus the split point is set, then you can select the right
voice. Press the [LEFT VOICE] button once, and the SPLIT
light flickers, then you can select any voice from 128 voices
other than the right one as the left voice. After such selection,
press again the [LEFT VOICE] and the SPLIT light stops
flickering. Then you can play two different voices in a keyboard.
By pressing again the [K.B SPLIT] button, the SPLIT light
will be off, and so will the keyboard split function.
NOTICE:
The newly-set splitpoint will take effect on thefollowing notes. You cannot change the
split point whileplaying a single not.
3. DSP Type
This instrument has digital sound processor, and you can
use them to set the effects needed.

6
7 8 9
45
1 2
6
3
0
7 8 9
45
1 2
6
3
0
7 8 9
45
1 2
6
3
0DSP
TRANSPOSE
TUNING
There are eight DSP types in this instrument.
ROOM 1 ROOM 2
ROOM 3 HALL 1
HALL 2 PLATE
DELAY PANNING DELAY
Using the performance programme buttons [ONE
VOICE], [DUAL], [SPLIT] to select the section you want
to edit. Then press the [DSP] button, and the present
DSP type of the selected section shows in the display.
Use [+]&[-] buttons or number buttons (0--8) to select
the type. (0 means that the DSP function is off.) Press
[+] & [-] buttons at the same time, and DSP type returns
to its default setting.
Several-second hesitation after pressing the [DSP]
button will bring back the present voice value.
NOTICE:
The whole instrumentcan only have one DSPtype, which has influence
on every key. When the DSP typed is set as DELAY OR PANNING DELAY
the rhythm DSPeffect will beclosed.
4. Transpose
This function can move the pitch up or down by min.
a semi-tone, or max. 12 semi-tones(an octave), in
order to make it compatible with other instrument or
singers during the performance.
Press the [TRANSPOSE] button, and its parameter
shows in the display. Use Transpose [+]&[-] buttons
Or [+]&[-] buttons or number buttons (0--9) to set its parameter.
00 stands for normal pitch. Pressing Transpose [-] & [+] buttons
or [-] & [+] buttons at the same time can remove the pitch to its
normal level.
Several-second hesitation after pressing the [TRANSPOSE]
button will bring back the present voice value.
NOTICE:
The newly-set transposevalue will take effect on the following notes. You cannot change
the transpose valuewhile playing a single not.
5. Tuning
This function can tune the pitch during the performance,
in order to match other singers. Its range is -/+ a semitone.
Press the [TUNING] button, and its adjust value shows in
the display. Use Tuning [+]&[-] buttons or [+]&[-] buttons or
number buttons (0--9) to set its parameter.00 stands for
normal value. Pressing Tuning [-] & [+] buttons or [-] & [+]
buttons at the same time can remove the pitch to 00.
Several-second hesitation after pressing the [TUNING]
button will bring back the present voice value.

#
A BCDEFGABCDEFGABCDEFF
7
789
45
12
6
3
0
789
45
12
6
3
0
PERCUSSION
TOUCH
RHYTHM
6. Keyboard Percussion
This instrument has 9 groups of percussion voices. In
first group, there are 61 kinds of percussions ##
(D 1 D 6).
More details please refer to the Appendix 3.
Press [PERCUSSION] button, and then you can play
percussion in the keyboard. Press [+] & [-] buttons or
number buttons to select the percussion type from 9
groups.
Press [PERCUSSION] button again to close this function.
7. Touch Response
This instrument has touch response keyboard function
and non touch response keyboard function. The first one
can adjust the sound according to your touch strength,
and it is the default setting.
Press the [TOUCH] button to quit this function, and press
it again to enable this function.
AUTO ACCOMPANIMENT
This instrument has 50 auto accompaniment rhythms that
can be adopted freely. When auto accompaniment function
is on, if you play on the auto accompaniment section of the
keyboard, it can automatically produce rhythm, bass and
chord accompaniment, and you can still give normal perfo-
rmance in the right section of the keyboard.
1. Selecting the Auto Accompaniment
Press [RHYTHM] button and the present rhythm number
shows in the display, then you can use [+]&[-] buttons or
number buttons (0--9) to select the rhythm you desire.
Also you can chose the twenty commonly-used rhythms
directly from the ten rhythm buttons in the panel rhythm
zone. When the light on the left side of the [A/B] button
is on, it means that the rhythms you select are from the
down-row rhythms of the voice buttons, otherwise, from
the up-row rhythms.

8CHORD OFF
S.FINGER
CHORD OFF
FINGERED
8 BEAT 16 BEAT POP BALLAD DISCO R&B
SWING JAZZ WALT ROSSANOVA TANGO REGGAE
GOSPEL SLOW ROCK HARD ROCK HEAVY METAL ROCK& ROLL
RUMBA SAMBA COUNTRY ROCK MARCH TRAD WALTZ
RHYTHM
UP
RHYTHM
DOWN
RHYTHM
Stop selecting for several seconds, and present voice
shows in the digital display, and current selecting mode
is closed.
Press [S. FINGER] button and its left light is lit. You can
press minimum keys in auto accompaniment section of
the keyboard to play major, major seventh, minor and as
well as minor seventh, in order to play chord accompan-
iment, which matches with the rhythm perfectly.
2. Singer Finger Chord
Press [CHORD OFF] button, and chord function
is closed.(Its light is off.)
Press [FINGERED] button and then immediately you can
add the chords you are playing to the auto accompaniment.
3. Fingered Chord
Press [CHORD OFF] button to close chord function. Its
light is off when this function is closed.
Notice:
Pressing three adjoining keys (including the black
keys) at the same time can cancel the chord accompani-
ment and only leave rhythm channel on.
But there are some exceptions:
1.
Minor 6th chords are recognized only in root position,
however; all other inversions are interpreted as minor
7th/ flatted 5th.
2. Augmented and diminished 7th chords are inverted,
the lowest note will be recognized as the root.
3.Th flatted 5th chords may be played with the lowest
note as the root or the flatted 7th.
4. Augmented 7th and diminished 7th chords are interp-
reted as simple augmented and diminished.
( )
( )
( )
( )

9
7 8 9
45
1 2
6
3
0
RHYTHM TEMPO
START/STOP
SYNC START
CHORD NAME
Major
Sixth
Major seventh
Augmented
Minor
Minor sixth
Minor seventh
Minor seventh flatted fifth
Minor major seventh
Diminished
Diminished seventh
Seventh
Seventh suspend fourth
Seventh augmented
Suspend fourth
One plus two plus five
M
6
M7
aug
m
m6
m7
m7b5
mM7
dim
dim7
7
7sus4
7aug
sus4
1+2+5
1-3-5
1-(3)-5-6
1-3-(5)-7
1-3-#5
1-b3-5
1-b3-5-6
1-b3-(5)-b7
1-b3-b5-b7
1-b3-(5)-b7
1-b3-b5
1-b3-b5-6
1-3-(5)-b7
1-4-5-b7
(1)-3-#5-b7
1-4-5
1-2-5
ABBREVIATION NORMAL VOICING CHORD(C)
C
C6
Cm7
C aug
Cm
Cm6
Cm7
Cm7b5
CmM7
Cdim
Cdim7
C7
C7sus4
C7 aug
Csus4
C1+2+5
Using the key of C as an example, the chart below
shows the types of chords that can be recognized in
the Fingered mode. (Notes enclosed in parentheses
are optional; the chords willbe recognized without them.)
4. Tempo
To fasten or slow down the accompaniment tempo, you
can use the Tempo [+]/[-] buttons, or number buttons(0-9)
or [+]/[-] buttons after pressing [TEMPO] button.
Tempo control range: min 40 beat/min, max 240 beat/min.
Press Tempo [+]/[-] buttons or [+]/[-] buttons together can
bring the tempo to their original setting. (Each rhythm has
its own initial setting.)
5. Start / Stop
Press [START/STOP] button and the accompaniment you
selected will play immediately. The beat will show by the
three circle dots in the display. To stop the accompaniment
just press this button again during the performance.
6. SYNC Start
After pressing [SYNC START] button, the accomp-
animent will automatically play the moment you
start playing a chord in the chord section of the
keyboard.

10
789
45
12
6
3
0
789
45
12
6
3
0
RHYTHM VOL
FILL IN
INTRO/ENDING
CHORD VOL
7. Intro / Ending
After pressing this button, each rhythm will begin with
a corresponding intro. Press this button during the
accompaniment, and it will stop after a corresponding
ending.
8. Fill in
Press this button during the performance, and it will
automatically add a fill-in to the original accompanim-
ent. After the fill-in is done, it will return to the original
accompaniment.
9. Auto Accompaniment Volume Control
Main Rhythm Volume: You can adjust the volume of
the main rhythm by pressing [RHYTHM VOL] [+] / [-]
buttons or pressing number buttons (0 -- 9) right
after pressing [RHYTHM VOL]. The volume range
is from 00(no sound) to 24(max). Press [RHYTH
M VOL] [+] / [-] buttons to return to the initial
setting(21).
Chord Volume: You can adjust the chord volume of the ac-
companiment by pressing [CHORD VOL] [+]/[-] buttons
or pressing number buttons (0--9) right after pressing [CH
ORD VOL]. The volume range is from 00(no sound) to 24
(max). Press [CHORD VOL] [+] / [-] buttons to return to the
initial setting(21).

11
VOICE MEMORY M 1 M 2 M3 M 4
RECORD
RHYTHM
TRACK
MEMORY RECORD
Memory function allows you memory ten voices and
auto accompaniment parameter settings into different
memory back. By pressing relative buttons to recall
different setting.
The data that can be memorized are as follows.
Voice Data:
1. Different voices for the four sections selected
for the performance.
2. Keyboard percussion on/off status, and the
selected percussion voice.
3. The on/off status of the performance and editing.
4. Split point setting
Auto Accompaniment Data:
1. Rhythm type and number
2. Accompaniment volume
3. The Song track key setting
4. Tempo parameter
5. Transpose setting
6. Pitch adjustment.
Setting Method
After setting the data you want to memory, such as vo-
ice, rhythm, press [M1], [M2], [M3] or [M4]while holding
down the [MEMORY] button, in order to memory four
different voices & rhythms.
Recalling the Memorized Data
Press any key from [M1], [M2], [M3] or [M4], and then you
canuse the memorized data.
This instrument can record with three different tracks, in-
cluding two Melody tracks, and one Rhythm/ACCOMP track.
Rhythm Track Record
The data below can be recorded by Rhythm Track:
1. Chord Changes
2. Intro, Main, Fill-in, Ending
3. Accompaniment Volume
4. Rhythm Type and Number
5. Tempo
6. Auto Accompaniment Song Track Key Operation
Status.
7. Accompaniment Track Changes
After selecting the accompaniment type of the song you
want to record and the status you want to use, press [RHY
THM TRACK] button while holding down the [RECORD]
button. Then the up light flickers, and so do the time signa-
tures in the display. The record begins as soon as
you play the keyboard at the auto accompaniment
section, and you can also use the [START/STOP]
button to begin.
This record process will automatically stop if 2000
notes have been recorded. You can also stop it by
pressing [RHYTHM TRACK] button.

12
RHYTHM
TRACK MELODY 1 MELODY2 PLAY
MELODY 1 MELODY 2
RECORD
Melody Track Record
The data below can be recorded with Melody Track.
1. The on/off status of the keys
2. Touch strength
3. Voice number
4. Volume
5. DSP type
After selecting the voice for the main rhythm, the
voice effects and relative parameters that required,
press [MELODY 1] button or [MELODY 2] button while
holding down the [RECORD] button. Then its up light
flickers, and so do the time signatures in the display,
and the record begins. You can also use the [START/
STOP] button to begin. This record process will auto-
matically stop if 2000 notes have been recorded. You
can also stop it by pressing [MELODY 1] button or [ME
LODY 2] button.
Melody track record and Rhythm track record
can be used together, and detail method is just
the same as the ones mentioned above.
Play
Melody 1, Melody 2 and rhythm track can be pl-
ayed either at the same time or individually. Just
set these song tracks to on status(Its light is on)or
leave the tracks off(its light is off), then press [PLAY]
button. The playback will automatically stop if the
recorded material is finished, or you can press [PLAY]
button during the performance to stop the playback.
PEDALS
EXTERNAL TERMINALS
1. Sustain Pedal(6): Using this pedal can bring sustain
effect to the melody.
2. Damper Pedal(5): Using this pedal can diminish the
melody sound.
1. DC Adapter Socket(9)
2. MIDI Input/Output: MIDI(Musical Instrument Digital
Interface) is an international standard. It connects
musical instruments that havethis function inorder to
control and transmitdata to each other. Thus , it makes
all the instrument a bigsystem and greatlyenlarge the
whole function.
3. Headphone Jack:You can connect a headphone with
this instrument throughthis jack.

13
SPECIFICATIONS MAINTENANCE
Keyboard:
88 standard-size keys with touch response.
Voices:
128 standard PCM MIDI voices (max. polyphony: 32)
9 groups of percussions
Number buttons:
0--9, [+], [-]
Voice controls:
Sustain, Transpose, Tuning, DSP
Auto accompaniment:
SYNC, Start/Stop, Intro/Ending, Fill in, Tempo,
Rhythm Volume, Chord Volume
Keyboard controls:
Chord OFF, S. Finger, Fingered, Keyboard Split
MIDI controls:
MIDI IN, MIDI OUT
Record & Play controls:
Three tracks record
Others:
3 demos, 4 memory banks(M1 --M4)
Auxiliary jacks
PHONES/OUTPUT, AC Adaptor jack, MIDI Input/Output
Speakers
16.5cm x 2 + 5cm x 2
Rated Voltage
AC 220V
Dimensions
1320 x 530 x 8 50 mm ( W x H x D)
Gross Weight
65 Kg (including the packing)
Supplied accessories
Music Stand, Owners Manual, Repairing Card, Power
Supply Cord
Location:
Avoid exposure to direct sunlight or other source of
overheat or over humid.
Do not use it close to television sets or other
equipment receiving electromagnetic signals as this
cause interference noise in the other appliance.
Handling:
Avoid rough handling. Do not drop or jolt this
instrument, as this can leave scars or cause other
serious damage.
Pay special attention while transporting, in case the
internal parts might get damaged, or malfunction might
occur.
Do not let liquid, dust, and powder, especially small
metal stuff enter into this instrument. Put down the
keyboard cover after you finish playing.
Power:
The power switch must be at OFF position before
using. Turn off the power if you finish. If you want to
connect it with other devices, first turn off the power,
then connect them.
Avoid placing together the plug of this instrument
and plugs of high power-output appliances such as
refrigerator.
Cleaning:
Clean the exterior with a soft, dry cloth. Using
Chemical solvents will damage the finish.
Modifications:
Never try to dismantle this instrument by yourself.
Any problem please refer to qualified WORLDE
personnel..

14
APPENDIX 1. VOICE LIST (MIDI)
NO ENGLISH NAME
01 Acoustic Grand Piano 1
02 Bright Acoustic Piano 2
03 Electric Grand Piano 3
04 Honky-Tonk Piano
05 Electric Piano 1 1
06 Electric Piano 2 2
07 Harpsichord
08 Clavi
09 Celesta
10 Glockenspiel
11 Music Box
12 Vibraphone
13 Marimba
14 Xylophone
15 Tubular Bells
16 Dulcimer
17 Drawbar Organ
18 Percussive Organ
19 Rock Organ
20 Church Organ
21 Reed Organ
22 Accordion
23 Harmonica
24 Bandoneon
25 Acoustic Guitar Nylon
26 Acoustic Guitar Steel
27 Electric Guitar Jazz
28 Electric Guitar Clean
29 Electric Guitar Muted
30 Overdriven Guitar
31 Distortion Guitar
NO ENGLISH NAME
32 Guitar Harmonics
33 Acoustic Bass
34 Electric Bass Finger
35 Electric Bass Pick
36 Fretless Bass
37 Slap Bass 1 1
38 Slap Bass 2 2
39 Synth Bass 1 1
40 Synth Bass 2 2
41 Violin
42 Viola
43 Cello
44 Contrabass
45 Tremolo Strings
46 Pizzicato Strings
47 Orchestral Harp
48 Timpani
49 String Ensemble 1 1
50 String Ensemble 2 2
51 Synth Strings 1 1
52 Synth Strings 2 2
53 Choir Aahs
54 Voice Oohs
55 Synth Voice
56 Orchestra Hit
57 Trumpet
58 Trombone
59 Tuba
60 Muted Trumpet
61 French Horn
62 Brass Section
63 Synth Brass 1 1
64 Synth Brass 2 2

15
NO ENGLISH NAME
98 Fx 2 Sound Track
99 Fx 3 Crystal
100 Fx 4 Atmosphere
101 Fx 5 Brightness
102 Fx 6 Goblins
103 Fx 7 Echoes
104 Fx 8 Sci-Fi
105 Sitar
106 Banjo
107 SanXian
108 GuZheng
109 Kalimba
110 BagPipe
111 ErHu
112 SuoNa
113 Tinkle Bell
114 Agogo
115 Steel Drums
116 Woodblock
117 Taiko Drum
118 Melodic Ton
119 Synth Drum
120 Reverse Cymbal
121 Guitar Fret Noise
122 Breath Noise
123 Seashore
124 Bird Tweet
125 Telephone Ring
126 Helicopter
127 Applause
128 Gunshot
NO ENGLISH NAME
65 Soprano Sax
66 Alto Sax
67 Tenor Sax
68 Baritone Sax
69 Oboe
70 English Horn
71 Bassoon
72 Clarinet
73 Piccolo
74 Flute
75 Recorder
76 Pan Flute
77 Blown Bottle
78 Shakuhachi
79 Whistle
80 Ocarina
81 Lead 1 Square 1
82 Lead 2 Sawtooth 2
83 Lead 3 Calliope
84 Lead 4 Chiff
85 Lead 5 Charang
86 Lead 6 Voice
87 Lead 7 Fifths
88 Lead 8 Bass+Lead
89 Pad 1 New Age
90 Pad 2 Warm
91 Pad 3 Polysynth
92 Pad 4 Choir
93 Pad 5 Bowed
94 Pad 6 Metallic
95 Pad 7 Halo
96 Pad 8 Sweep
97 Fx 1 Rain

16
NO ENGLISH NAME
30 BEGUINE
31 MAMBO
32 TANGO
33 CUMBIA
34 SALSA
35 REGGAE
36 RUMBA
37 CHACHA
38 SAMBA
39 COUNTRY
40 COUNTRY WALTZ
41 COUNTRY ROCK
42 RAGTIME
43 MARCH
44 MARCH 6/8 6/8
45 POLKA
46 BAROQUE
47 PASOSDOBLE
48 TRAD WALTZ
49 VIENNA WALTZ
APPENDIX 2. RHYTHM LIST
NO ENGLISH NAME
00 8 BEAT 1 8 1
01 8 BEAT 2 8 2
02 16 BEAT 1 16 1
03 16 BEAT 2 16 2
04 FUNK
05 POP BALLAD
06 SOFT BEAT
07 POP
08 DISCO
09 TECHNO
10 RAVE
11 R & B
12 BLUES
13 GOSPEL
14 ROCK BALLAD
15 SLOW ROCK
16 60'S ROCK 60
17 HARD ROCK
18 HEAVY METAL
19 ROCK & ROLL 1 1
20 ROCK & ROLL 2 2
21 TWIST
22 BOOGIE WOOGIE
23 SWING
24 FOXTROT
25 CHARLESTON
26 BIG BAND
27 DIXIELAN
28 JAZZ WALTZ
29 BOSSA NOVA

17
APPENDIX 3. DRUM KIT LIST
KEY Prog 1STANDAED SET Prog 2 ROOM SET Prog 3 POWER SET Prog 4 ELECTRONIC Prog 5 DANCE SET Prog 6 JAZZ SET Prog 7 BRUSH SET Prog 8 ORCHESTRA SET Prog 9 SFX SET
#
D 1 High Q Q
E1 Slap Pedal Hihat
F1 Scratch Push Open Hihat
#
F 1 Scratch Pull
G1 Sticks
#
G 1 Square Click
A1 Metronome Click
#
A 1 Metronome Bell
B1 Kick drum 2 2 Electronic Kick2 909BD Jazz Bass Drum2 Jazz Bass Drum2 Concert Bass Drum2
C2 Kick drum 1 1 Power Kick Electronic Kick1 808BD Jazz Bass Drum1 Jazz Bass Drum1 Concert Bass Drum1
#
C 2 Side Stick 808Rim shot
D2 Snare Drum 1 1 Gated Snare Drum Electronic Snare Drum 808 Snare Drum Brush Tap Concert Snare Drum
#
D 2 Hand Clap Brush Slap Castanets High Q
E2 Snare Drum 2 2 Gated Snare Drum 909 Snare Brush Swirl Concert Snare Drum Slap
F2 Low Floor Tom Power Low Tom2 Power Low Tom2 Electronic Low Tom2 808 Low Tom2 Timpani F Scratch Push
##
F 2 Close Hi Hat[EXC1] 808 CHH[EXC1] Timpani F Scratch Pull
G2 High Floor Tom Power Low Tom1 Power Low Tom1 Electronic Low Tom1 808Low Tom2 Timpani G Sticks
##
G 2 Pedal Hi Hat[EXC1] 808 CHH[EXC] Timpani G Square Click
A2 Low Tom Power Mid Tom2 Power Mid Tom2 Electronic Mid Tom2 808 Mid Tom2 Timpani A Metronome Click
##
A 2 Open Hi-Hat[EXC1] 808OHH[EXC1] Timpani A Metronome Bell
B2 Lov Mid Tom Power Mid Tom1 Power Mid Tom1 Electronic Mid Tom1 808 Mid Tom1 Timpani B Guitar Slide
C3 Hi Mid Tom Power Hi Tom2 Power Hi Tom2 Electronic Hi Tom2 808 Hi Tom2 Timpani C Gt Cut Noise(down)
##
C 3 Crash Cymbal 1 1 808 Cymbal Timpani C Gt Cut Noise(up)
D3 High Tom Power Hi Tom1 Power Hi Tom1 Electronic Hi Tom1 808 Hi Tom1 Timpani D Double Bass Slap
##
D 3 Ride Cymbal 1 1 Timpani D Key Click
E3 Chinese Cymbal1 Reverse Cymbal Timpani E Laughing
F3 Ride Bell Timpani F Screaming
#
F 3 Tambourine Punch
G3 Splash Cymbal Heart Beat
#
G 3 Cowbell 808 Cowbell Footsteps 1
A3 Crash Cymbal 2 Concert Cymbal 2 Footsteps 2
#
A 3 Vibraslap Applause
B3 Ride Cymbal 2 2 Concert Cymbal 1 Door Creaking
C4 Hi Bongo Door Closing
#
C 4 Low Bongo Scratch
D4 Mute Hi Conga 808 High Conga Wind Chine
#
D 4 Open Hi Conga 808 Mid Conga Car Engine Start
E4 Low Conga 808 Low Conga Car Breaking

18
F4 High Timbale Car Pass
#
F 4 Low Timbale Car Crash
G4 High Agogo Police Siren
#
G 4 Low Agogo Train
A4 Cabasa Jet Take-off
#
A 4 Maracas 808 Maracas Helicopter
B4 Short Whistle[EXC2] Starship
C5 Long Whistle[EXC2] Gun Shot
#
C 5 Short Guiro[EXC3] Machinegun
D5 Long Guiro[EXC3] Lasergun
#
D 5 Claves 808 Claves Explosion
E5 Hi Wood Block Dog
F5 Low Wood Block Horse Gallop
#
F 5 Mute Cuia[EXC4] Birds
G5 Open Cuica[EXC4] Rain
#
G 5 Mute Triangle[EXC5] Thunder
A5 Open Triangle[EXC5] Wind
#
A 5 Shaker Sea Shore
B5 Jingle Bell Stream
C6 Belltree Bubble
#
C 6 Castanets
D6 Mute Surdo[EXC6]
#
D 6 Open Suredo[EXC6]
E6 Applause

19
APPENDIX 4. SINGER FINGER CHORDS

20
APPENDIX 5. FINGERED CHORDS
Table of contents
Other Worlde Musical Instrument manuals