Worlde W8820B User manual

1
To the happy family of satisfied electronic musical instrument owners! To get the
most out of the many features and functions of the digital piano, please be sure
to read carefully this manual and keep it at hand for future reference.
MAIN FEATURES
WELCOME ...
W8812B:88-key standard piano touch response keyboard.
Voice setting function, Relative voice parameter will be selected automatically after choosing one voice.
Various types of commonly-used voices and styles for rapid choice.
With 9 groups of percussion instrument and a special-effect-voice, including a group of Chinese
Be able to synthesize certain digital effects like the reverb, chorus, and so on,which could
Minus Channel Mode and Repeated Playback function are excellent for teaching and practicing.
Song Recording function can record one accompaniment track and five melody tracks.
Be able to record user’s songs.
Beautiful demo songs, making great contributions to lifting your performance level.
Memory Bank can reserve at most 8 panel parameter settings and each setting can be recalled whenever you want.
MIDI function makes your instrument able to connect to any other standard MIDI system.
163 different kinds of well-chosen voices, including 4 voices of Chinese
Almost including 100 popular accompaniment styles in the world. Each rhythm has its own intro and
folk instruments(Trichord, Gu-zheng, Erhu, Suona).
traditional percussion instrument.
create various sound field effects.
main (A, B), variation and ending.
W8820B:88-key standard piano keyboard with hammer action.

CONTENTS
2
W8820B/W8812B
Safety Precautions ............................
Preparations ............................
4-5
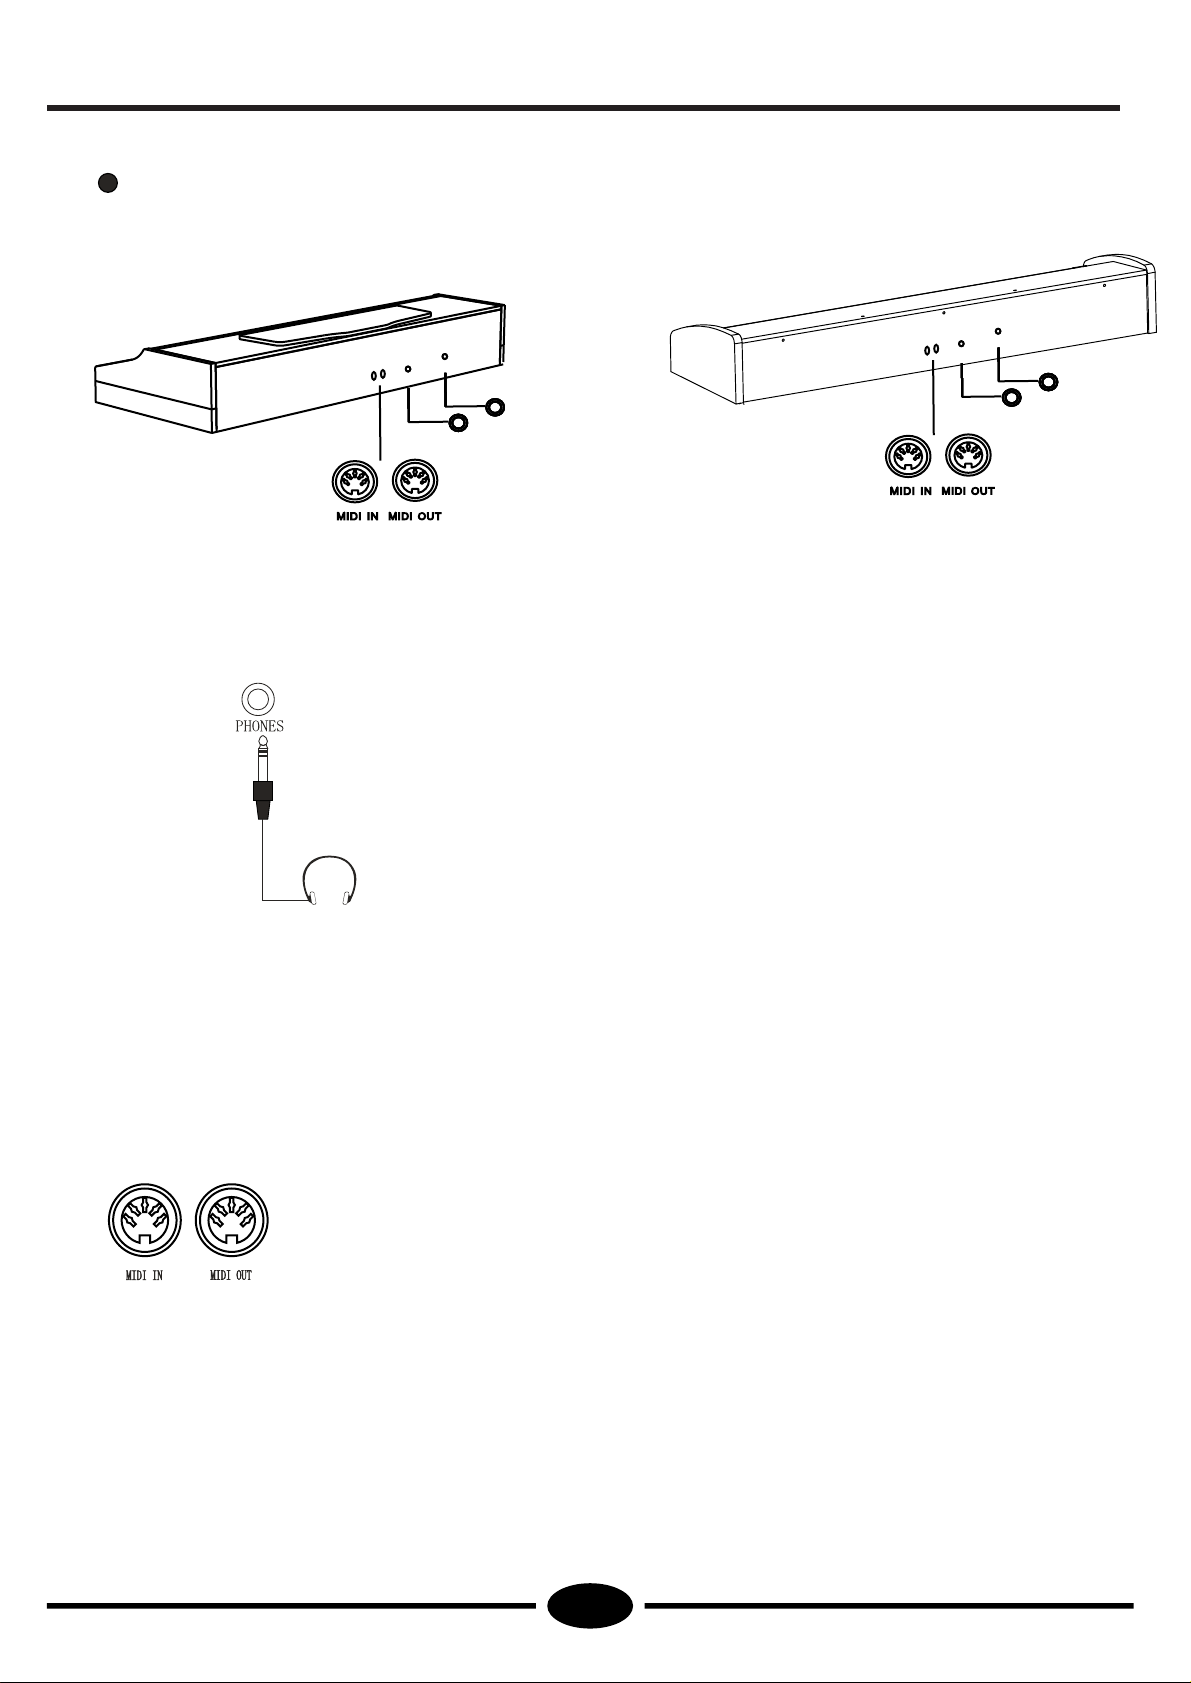
External Terminals .............. 5
* Earphone Output
5
* ......................................MIDI In/Out 5
Panel Control&Terminals . ... ... .. ... ... ... ... .. 6
Function Groups.................................... 21
24
26
26
.........................*SYNCHRO Start
26
* .........................SYNCHRO Stop
27
* Stop Playing ...............................
27
* ......................... Main A/B &fill-ins
28-30
* .......................................... Ending
28
MIDI Function ...........................
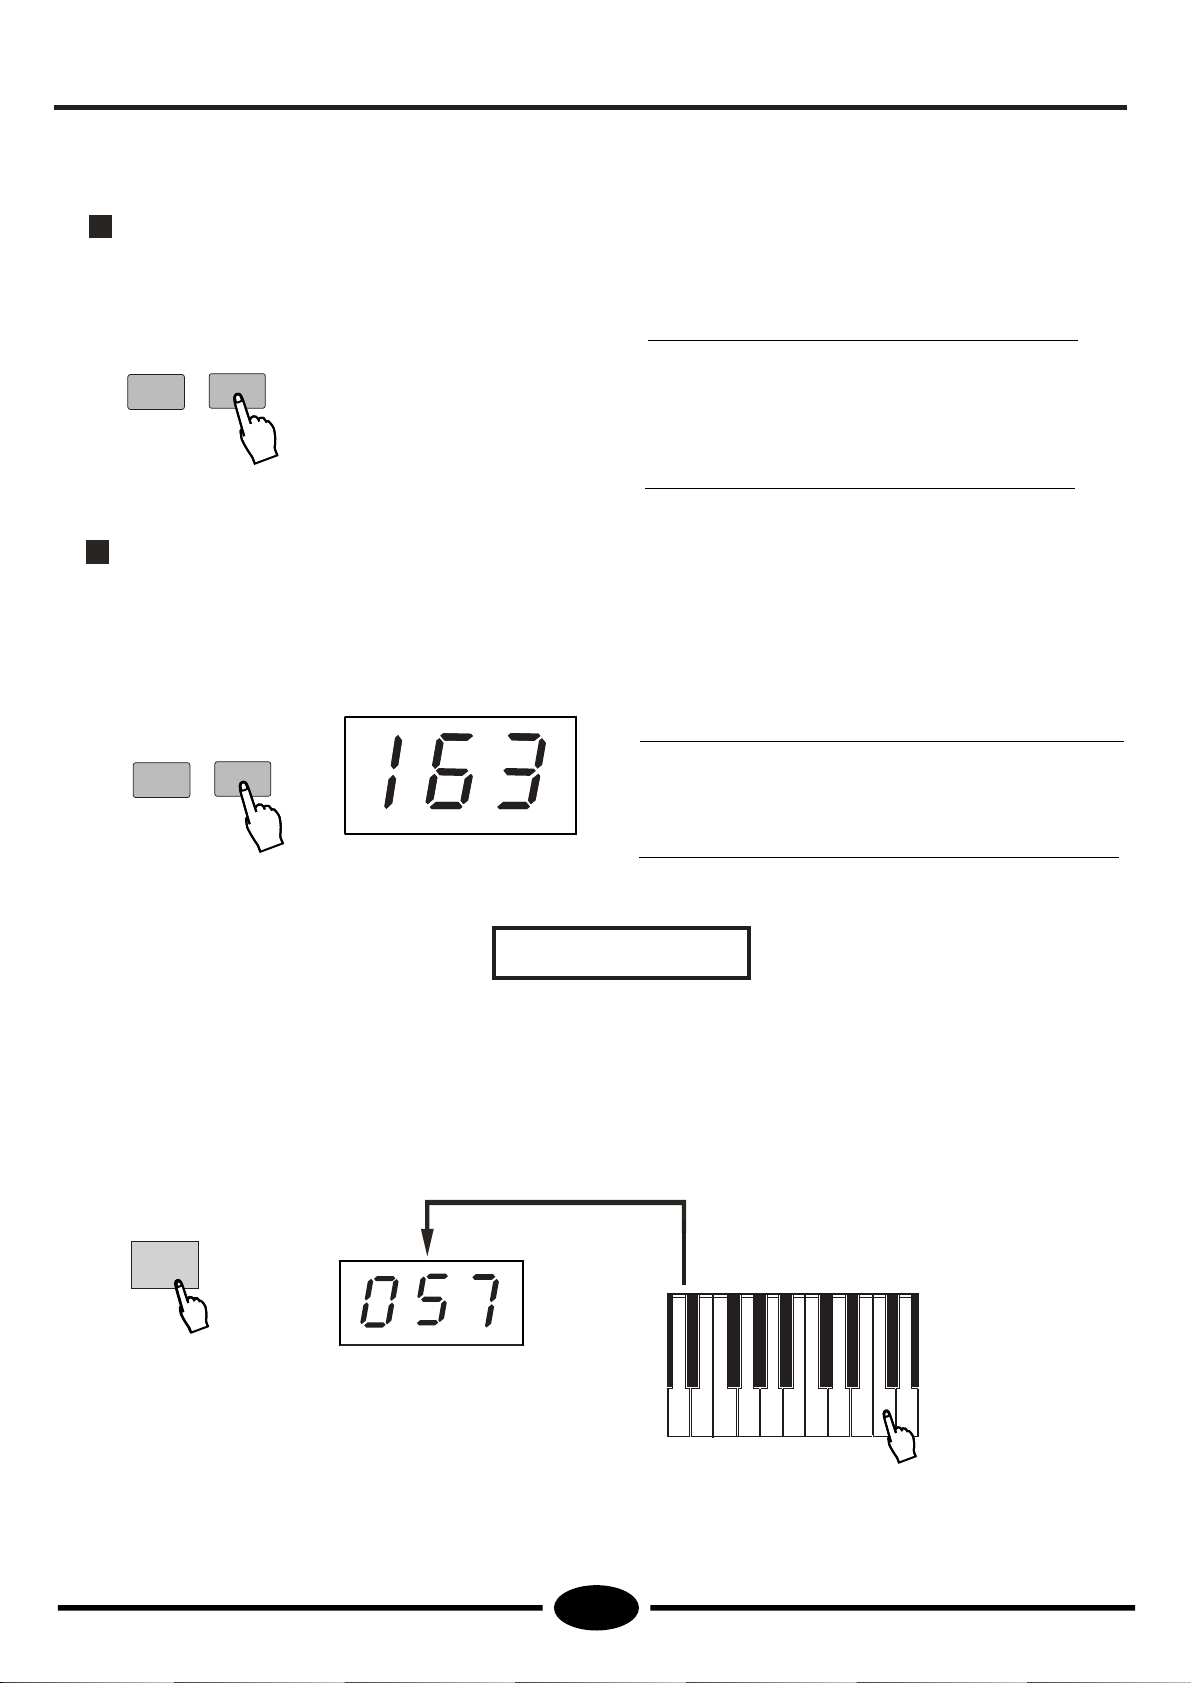
Playing the Piano ............................. 8~10
Sustain Pedal............................................ 20
Chord .................................................... 22 23~
22
* ........................ Chord Mode
23
* ..........Writing the Chord Name
* .............................What is MIDI
* ........................ Remote Passage 29
* ........................ Keyboard Output 29
* ....................Connecting to a PC 30
Appendix ........................................ 31
* ...................................Voice List 31-32
* ..............................Rhythm List 33
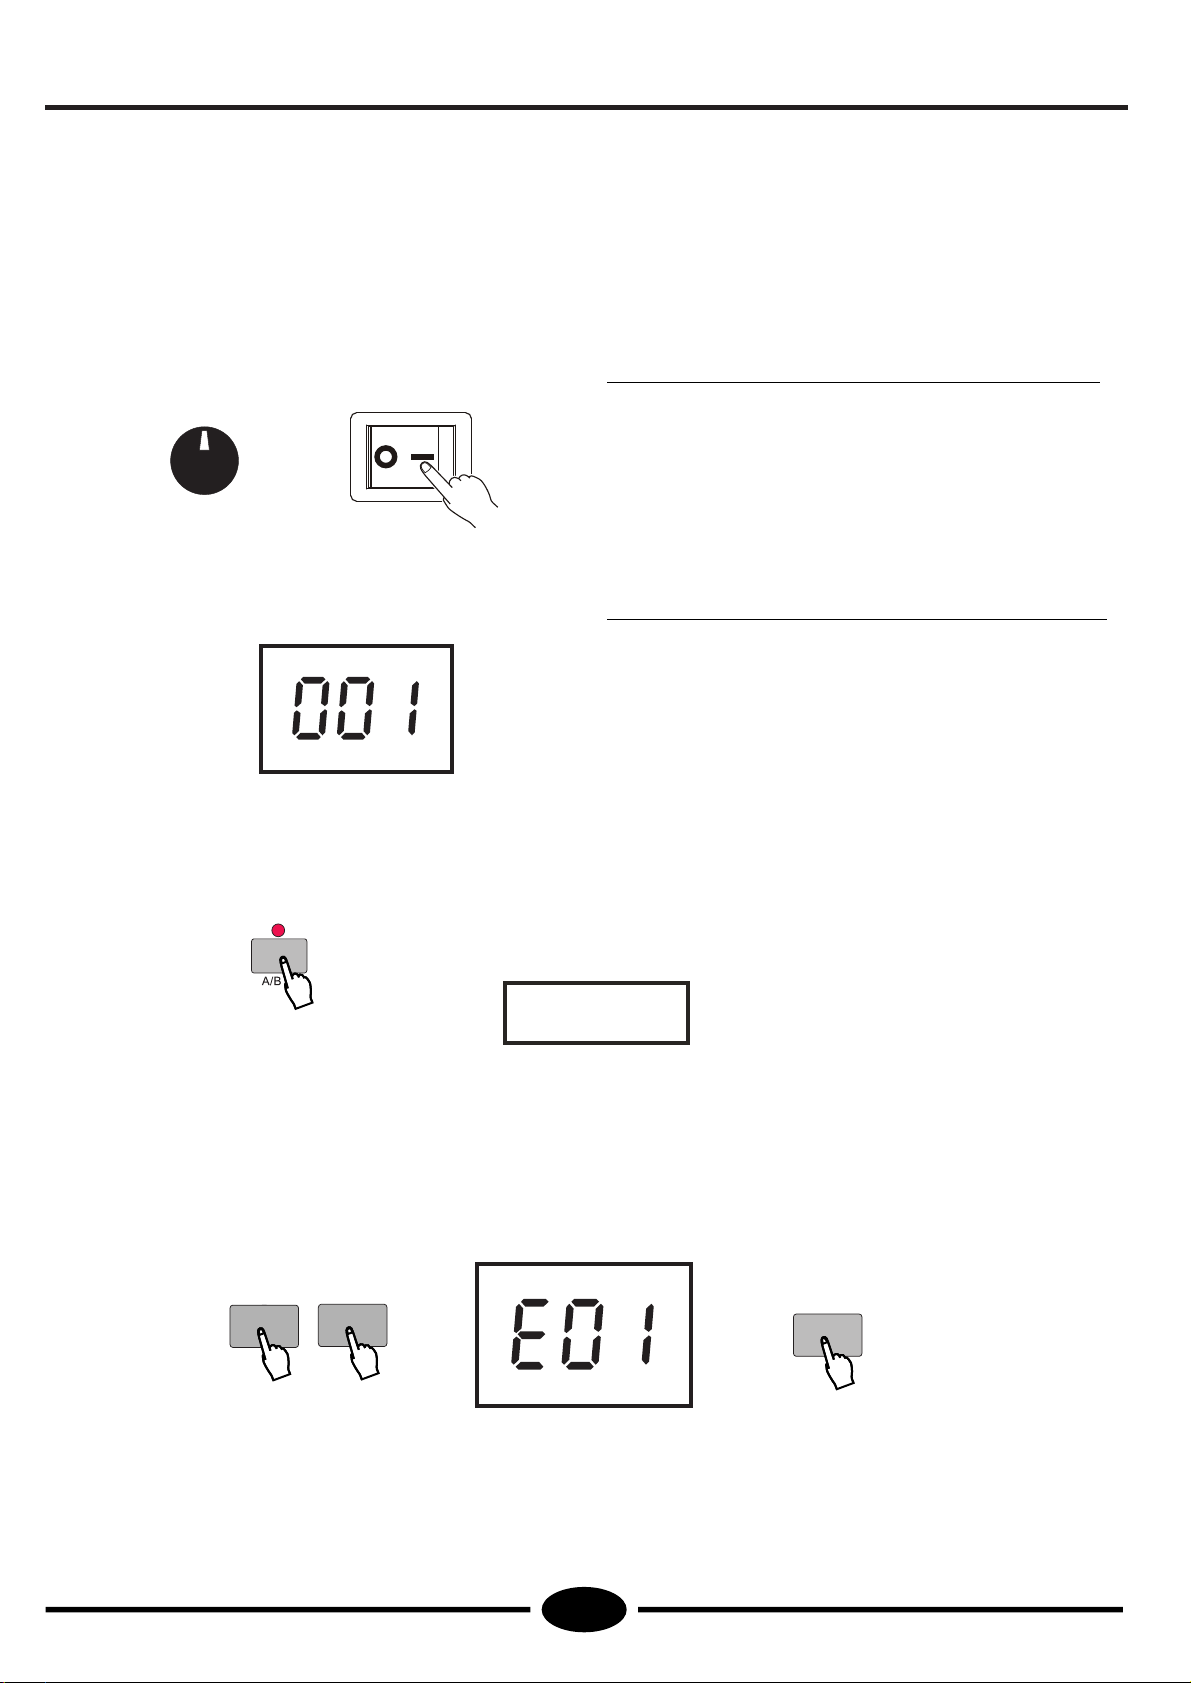
Basic Operations ............................... 7
Control and Effect ...........................11~15
Auto Accompaniment ....................... 16
Song Recording .......................................
17~19
Using Auto Accompaniment
* ...........................Drum Set Table 34
* ...........................Troubleshooting 35
* Fingered Mode .................... 24.......
* Single Finger Mode ................... 24
3
.........
.............................
................
*......

Locations:
Avoid exposure to sunlight.
Do not place the item in or near overheated places like car or over for a long time.
Do not place the item in places of moisture, dirty and vibrated.
Do not place the item near facilities with strong electromagnetic such as television and radio.
Avoid strong crash and scratches with hard object.
Turn off the power supply when not in use. If the item is not in use for a long time.
Cut the power supply if any of the following occur:
Power supply cable is damaged.
Fluid is splashed into/onto the item.
Thundering.
When cutting the power supply, plug out the power socket, rather than pull the cable.
When connecting to an external power supply, mind the maximum rated power.
Clean the item with soft and clean cloths. Few amounts of neutral cleanser could be used
but never use solvents which would damage the finishing of the piano, such as alcohol,
SAFETY PRECAUTIONS
3
W8820B/W8812B
benzene, paint, or diluents.

4
PREPARATIONS
● Setting up of W8820B
W8820B/W8812B
Setting up of W8812B
1.Fasten the left and right feet to the pedal
2.Fasten the shelter board to the left and
right feet with 4 bolts and screws.
3.Place the piano body onto the plank, and fix it
4.Connect the cable of foot switch with the
socket cable.
rack with 2 bolts at each side.
with 2 zinc-gilded screws at each side as shown
in the illustration.
1.Fix the left and right feet on the ground
2.Put 4 zinc-gilded screws into the small holes
in the bottom of back board. Then put 2 more
screws into the holes in the top of the back board.
4.Place the piano body onto the plank, and fix it
5.Connect the cable of foot switch with the
socket cable (As shown in the illustration).
board with 2 black screws at each side.
with 2 zinc-gilded screws at each side as shown
in the illustration.
5
3.Put 4 wooden screws into the small holes in the
front left and right feet,2 for each side. Then fix these
feet separately on the ground board and ground feet.

● Earphone Output
PREPARATIONS
5
Put a standard earphone to connect this instrument’s PHONE plug.
While connection is made, you may only hear the sound inside the
earphone and practice the music without disturbing others.
MIDI IN receives data from the outside MIDI devices connected(e.g. Sequencer).
MDI OUT sends MIDI data of this instrument.
● MIDI Input/Output
W8820B/W8812B
External Terminals
▲▲
Headphone
▲▲▲
▲▲▲▲
DC12V
W8820B:
▲▲
Headphone
▲▲▲
▲▲▲▲
DC12V
W8812B:

6
Panel
........ 16
17.[SONG RECORDING] button . .
18
16.[TEMPO] button
■ Control Board:
7
2.[MASTER VOLUME] dial
4.[MENU] button
3.[VOICE] button .............
10
....
5.[ ] +]&[- button
6.[METRONOME]
7.[DEMO] button ............7
8.LED SCREEN ............
9.[A/B SHIFT] button ....... . . . 7
10.[TOUCH] button .... ......111
11.[REVERB] button
. ......... 13
1.Power Switch ......
7
...........
.................
.............
.......... 15
....
...
....
....
....
...
12.[DUAL ] button
.........
11
13.[KEYBOARD SPLIT] button . .
.....
[SYNC STOP] button ..
24
[SYNC START] button .. 24
[CHORD] button ...... 16
[INTRO]button ....... 25
[ENDING] button ..... 25
[MAIN B]/[FILL-INS]
25
[MAIN A]/[FILL-INS] ..... 25
15.[ACMP VOLUME] button . . . 16
14.[ACMP ON/OFF] button
....
.
W8820B/W8812B
PANEL CONTROL & TERMINALS
▲
1
2
3
8
DUA L SPLIT ON TOU . ON/OFF R EV. ON-O FF CH O. ON-O FF HAR.ON -OFF MI N.ON -OFF A CMPF REEZ E 0 1 2 3 4 5678 9 MEM ORY CL EAR CHO RD
EXI T
VOIC E
STYL E SEVO ICE S. VOIC E S.SPLI T ACCS PPNT TOUC H REVE RB CHO RUS HA RMON Y MINU SOFF SO NG NO.T RACK T UNIN G TRAN SP.BA NK ACC MP VOL + ACCMP V OL-TEM PO+TE MPO-
10
13
5
7
6
911
12
17
15
16
4
[STYLE]button . . . . . 16
..........
.....
12

7
W8820B/W8812B
BASIC OPERATIONS
Press the [DEMO] button, the screen shows [E.0.1.], this piano will play all the demo songs automatically.
The songs will be played in order and circularly before being stopped.
There are all together 22 to 100 demonstration songs in this instrument, which thoroughly display its excellent
quality in the tone and melody. You can get a general idea of this instrument through them.
DEMO SONGS
*
●
■Turn on the Power
● Open the keyboard cover, and set up the music stand.
●
This instrument will be supplied with direct current power, by connecting the output terminal of the adaptor with
Set the Power Switch to 1 position, then the screen shows 001, and then adjust the Master Volume dial to set the
You should wait another 2 or 3 seconds to restart
this instrument after you just turn it off, for it
needs this time to make the internal circuit
discharge completely. Otherwise, some abnormal
During normal performance, the master volume
should be set to max. 3/4position, as some voices
will distort if the volume is over 3/4.
phenomenon might occur during the performance.
Notice:
.
VOLUME
MAXMIN
■ A/B Shift Functions
●LED lighting shows the functions shown below the buttons are selected, otherwise, the functions
Power Switch
DEMO SONG
-
+
.
volume you want.
DC 12 V power input jack.
shown above the buttons are selected.
Press [Play/Stop]button to stop the playback.

SONG PAUSE FUNCTION
8
PLAYING THE PIANO
W8820B/W8812B
● In auto accompaniment mode, press the [ can stop the present demo song SYNC START/STOP]
being played. If you press [SYNC START/STOP] button again the demo song will be played again.
No parameter for this shows on the screen.
FF/REW FUNCTION
With this function you can control the FF/REW function freely when the songs are being played.
● In auto accompaniment, press the [MAIN A] button after playing the demo songs will move the
song back toward the beginning.
Press the [MAIN B] can fast forward the song being played.
*
MINUS CHANNEL MODE
Under this mode, the left/right part of the keyboard of the demo can be closed in order to make
you more convenient to follow the playing. The relative parameter shows on the screen.
*
● Press the [MENU] button and the keyboard will enter into function mode, the LED above [MENU] button
[+] and [-] buttons to close the appointed part. The parameter is “J00-J01-J02”.
start/stop
MAIN A MAIN B
This function will make a pause of the song. Press this button again can restart the song
from the stopped point.
will be lighting at the same time. Press the key functioned as [MINUS OFF] button and then press

9
MENU
Minus Channel Mode has no effect
on the song
PARAMETER
Notice:
.
your selection.The instrument will automatically turn on 001 acoustic ground piano.
PLAYING THE PIANO
W8820B/W8812B
you record by yourself.
MODE
MINUS ON
Right hand MinusMod
MinusMod Left hand
This instrument comes with 163 built-in voices (01-163) and 10 percussion groups (01-10)for
SELECTING AND PLAYING A VOICE
MINUS OFF

10
Selecting the Keyboard Percussion Function
While selecting the Percussion, you may not use
the DUAL and the HARMONY function
on the percussion instrument.
You can use [+] and [-] buttons or numeric buttons to select any of the 163 voices when the LED
shows 001.
Selecting a Voice
You can also select the voice number by the
numeric buttons under voice mode. More
information please refer to the specification
of numeric buttons. The voice list is in the
Notice:
.
.
Notice:
These buttons are used to input the desired voice number. For two-digit numbers (01-99) entries, simply
pressing the two numbers in order will be fine. For example, if you want to select voice number 57, you
NUMERIC BUTTON
●
Some keys on this instrument can be used as numeric button which is used for choosing some functions rapidly.
Press the [MENU] button then the LED will be lighting and the keys will be used as NUMERIC BUTTONS at this time.
*
When it comes to three-digit number entry, hold [1] until it appears at hundred’s place, then input the next
●
PLAYING THE PIANO
W8820B/W8812B
appendix.
at the
same time. These functions will automatically
just have to press [5] and [7].
two numbers following the same procedure as above.
-+
MENU
0 1 2 3 4 5678 9
-+
Keep pressing [VOICE] button when the digit 154-163 shows in the LED, and then select one of the 10
groups of percussion with [+] and [-] buttons, the name of the percussion is in the percussion voice list
The keyboard can play the drums and other percussion instrument under keyboard percussion mode.
in the appendix.
close. The transpose parameters have no effect

11
This digital piano offers you various types of effects. You can freely choose your favorite one. The effects
include touch, dual voice, reverb, harmony, chorus, transpose, tuning, keyboard split, accompaniment
volume, tempo,
sustain pedal and so on. The details about the effects will be introduced in this section.
*
Adjusting the Sensitivity Parameter of Touch Response
There are five touch types (Touch SNS 1~5) available. It’s default touch type is medium response(100).
*
TOUCH RESPONSE
This function could adjust the volume by controlling the strength of pressing the keyboard.
*
The keyboard will automatically call up touch
indicator shows in the screen.
●
The keyboard will automatically call up touch
response after you turn it on. Its default touch
Notice:
Notice:
.
DUAL VOICE
3
This function makes available the keyboard play two combined voices at the same time.
One voice is selected by the normal function, and another voice by this function.
*
CONTROL AND EFFECT
W8820B/W8812B
type is medium response.
SEVOICE
TOU. ON/OFF
TOUCH
-+
0 1 2 3 4 5678 9
The parameter is from C00 to C04.
Press the key functioned as [TOUCH] button and the indicator “C02” appears in the LED. You can
change the touch type by using [+] and [-] button.
Five touch types(Touch SNS1~5) are available in this instrument.
Press the [MENU] button, the LED will be lighting. Then press the key functioned as
[TOUCH ON/OFF] button may open/close the keyboard touch function.
response after you turn it on. No

12
Selecting the Relative Parameters of Dual
● Press the [MENU] button, the LED will be lighting, then press the key functioned as [DUAL] when “049”
second voice, the current setting is displayed in the LED. The parameter adjustment is from 001 to 153.
KEYBOARD SPLIT MODE
Changing the Voice in Keyboard Split Mode
● Press [MENU] button, the LED will be lighting, then press the key functioned as [ ] button and the LEDSplit On/Off
on LED accordingly. The parameter is from 001 to 128.
The keyboard Split Mode and Dual
Mode can play at the same time.
Only the right hand plays the Dual.
Notice:
.
.
HARMONY/ECHO
3
The Harmony section features a variety of performance effects that enhance the melodies you play when
using the accompaniment styles of this piano. A total of ten Harmony types are available. Echo effects
(01,02) can add harmony note in the melody you are playing. Echo is decided by the chord played by
*
the left hand. Echo effects(03, 10) can add delay effect to your right hand playing.
W8820B/W8812B
CONTROL AND EFFECT
Notice:
Stringed instruments ensemble would be automatically
set as defaulted second voice after you turn on this
instrument. In this mode, you cannot choose the first
.
voice, so you ought to settle the first voice before
entering into this mode.
3
Under this mode, the keyboard split to the right & left hands. Each can play a different Voice. Example:
SYNTH VOICE/PIANO. This mode splits the keyboard. One range is assigned a synth voice and
*
other range is assigned a piano voice. The voice of the right hand selects by normal mode.
S. SPLIT SPLIT POINT
RIGHT HAND VOICE
SPLIT VOICE/LEFT HAND
SPLITON
appears in LED. Use [+] and [-] buttons or numeric buttons to select parameter settings of the
shows [055]. You can select right hand voice with [+] and [-] buttons, the voice number will be displayed
It has no effect on keyboard
percussion mode.

13
Selecting the Type of Harmony/Echo
● Press the [MENU] button, the LED will be lighting, then press the key functioned as [HARMONY ON-OFF] may
open/close the Harmony/Echo function. You can choose your desired harmony type by using [+] and [-] buttons.
The Echo/Harmony function can’t
be used when the instrument is in
Percussion mode. Only a few echoes
can’t be used in normal performance
mode. 00 shows when the echo mode
is closed.
REVERB
Selecting the Reverb Function
This function is to add reverberation effect to the voices, which can create live effect and sound as if you were
performing in a small room or a concert. A total of eight different Reverb types simulating various different
Changing the Reverb Function
Selecting the Type of Reverb
Press the key functioned as [REVERB] when Reverb is on, the LED displays as below. You can
select 8 reverb types from R01 to R08 with [+] and [-] buttons.
The reverb function is automatically
on when the instrument is powered on.
MENU
REVERB ON-OFF
Notice:
.
Notice:
.
CHORUS
Selecting the Chorus Function
It is to add chorus effect to the voices. There are 8 different types available.
CONTROL AND EFFECT
W8820B/W8812B
This function opens when the LED shows from 1 to 10 and the relative echo appears in the LED.
performance environments are available. Press [REVERB] button and the reverb icon appears in LED.
Press the [MENU] button, the LED will be lighting, then press the key functioned as [REVERB ON-OFF] button
may open/close the reverb function , and the keyboard has reverb effect at this time.
More information please see P. 21
HARMONY ON-OFF
More info please see P.21.

14
● Press [MENU] button, the LED will be lighting. Press the key functioned as [CHORUS ON-OFF] may
open/close the chorus function. Press the key functioned as [CHORUS] and select one of the 8 chorus
TRANSPOSE
Selecting the Parameter of Transpose
This function determines the key of both the main voice and the bass/chord accompaniment of the selected style.
It also determines the pitch of the songs. This allows you to easily match the pitch of this instrument to other
singers, or play in a different key without changing your fingering. The transpose settings can be adjusted over a
● Hold [MENU] button, the LED will be lighting. Press the key functioned as [ and the LED shows [P00]TRANSPOSE]
(transpose position).Use the [+] and [-] buttons or numeric buttons to select the parameter number.
More information please see P. 21
Press [+] and [-] buttons at the same time
and the transpose value will return to
00. A new mode is only valid to notes
played after this new mode is set. But it
has no effect on keyboard percussion
mode.
*
Notice:
.
TUNING
Selecting the Parameters of Tuning
This function enables you to match this unit and the other musical instruments with the exact pitch.
● Press [MENU] button, the LED will be lighting. Press the key functioned as [TUNING] and the LED shows[d00]
(tuning position). Use the [+] and [-] buttons or numeric buttons to select the parameter number(-100...d00...d99),
and the tuning value will return to 00.
It has no effect on keyboard percussion
mode. The new tuning value will be applied
to the next note played.
Press [+] and [-] buttons at the same time
Notice:
.
*
CONTROL AND EFFECT
W8820B/W8812B
MENU
range of 12 semitones( 1 octave).± ± .0 stands for the standard pitch
CHORUS ON-OFF
d00 stands for the standard pitch.
styles(U01-U08) with [+] and [-] buttons.
The tuning setting can be adjusted over a range of ±100(approx.±1 semitone). “00” stands for the
standard pitch.

15
METRONOME
Metronome Display
Metronome is included in this model. When it is on, Metronome sounds under Accompaniment
/User Song Record mode. When it is on the metronome indicator flashes in the LED.
*
Press [METRONOME] button to open/close the metronome.
●
n00 indicates the Metronome function
is off, n01 indicates the metronome
function is on. The Metronome function
Notice:
.
This piano provides dynamic rhymes and accompaniment patterns, as well as voice settings appropriate for each
pattern for various popular music styles. A total of 100 kinds of different accompaniment styles are available.
Each style is made up of separate sections: Intro, Main A, Main B and Ending, letting you call up accompaniment
sections as you perform. The auto accompaniment features that are built into the rhythms add the excitement of
instrumental backing to your performance, letting you control the accompaniment by the chords you play. Auto
accompaniment effectively splits the keyboard into two sections: the upper is used for playing a melody line,
and the lower (set by default to keys F#2 and lower)is for the auto accompaniment function.
*
Selecting Chord Accompaniment Mode
CONTROL AND EFFECT
W8820B/W8812B
Use [+] and [-] buttons to adjust metronome value.
is off when the power is just turned on.
METRONOME
TEMPO+
TEMPO-

16
1
This instrument comes with 100 built-in styles, providing a complete band or style accompaniment.
*
.
Notice:
You can also select the voice number
by numeric buttons under voice mode. For
details please refer to the usage of numeric
buttons. Voice list is in the appendix.
Press [MENU] button then the LED will be lighting. Press the key functioned as [STYLE] may open/close style function.
SETTING THE VOLUME
Press [MENU] button, the LED will be lighting. Press the key functioned as [ACCMP VOL+ ] and
[ACCMP VOL-] to set the volume, adjusting scale to be 00~127.
*
Press [MENU] button, the LED will be lighting. Press the key functioned as [TEMPO+] and [TEMPO-]to select
Press the [TEMPO+] and [TEMPO-] at the same time to return to the original tempo 94.
SETTING THE TEMPO
Each Style type has its own Tempo. While the Accompaniment is started, this Tempo will not be changed
even if you select any other style at the same time.
*
USING AUTO ACCOMPANIMENT
W8820B/W8812B
MENU
00(8 beat-1) is automatically selected when the power is on.
Use [+] and [-] buttons or Numeric buttons to select styles.
MENU
ACCMP VOL+ ACCMP VOL-
the tempo of 40-240/tempi. Each press will increase by one tempi. Keep pressing to quicken the procedure.
TEMPO+
TEMPO-
MENU
CHORD
Press [MENU] button, the LED will be lighting. Press the key functioned as [CHORD] may open/close chord
function. Press the key functioned as [CHORD] continuously to shift between single finger mode
and fingered mode. More information please refer to P.22-23.
MENU
*

17
Song recording is to record your performance (5 melody parts) and accompaniment(chord part),
and save as a song, and replay the song whenever you want. This unit can save up to 5 songs.
▲
▲ Touch ON/OFF
▲ Dual Voice number&ON/OFF(Vol)
▲ Voice number
▲ Reverb ON/OFF
Note ON/OFF ▲ Metronome ON/OFF and Tempo
▲ Sustain ON/OFF
▲ Pitch bend
▲ Keyboard volume
▲ Tempo(Accompaniment track and melody track)
The data that can be recorded to normal(melody) tracks:
The data that can be recorded into Chord track:
▲
▲ Chord changes and timing
▲ Section changes(Intro, Main A/B, Ending, etc.)
Style Number
▲ Accompaniment Vol
▲ Tempo, Beat No.
Those settings can only be recorded once when the music begins, while others can be changed during playing.
Recording to the Chord Track
Press [MENU] button, the LED will be lighting, press the key functioned as [TRACK] button to start
track function. Press [+] and [-] button to select the track No. .
●
SONG RECORDING
*
SONG RECORDING
W8820B/W8812B
Press [RECORD] button to start recording function, now you can start to play what you want to record.
Press [MENU] button, the LED will be lighting, then press the key functioned as [SONG NO.] and press
●
Recording
[+] and [-] button to select the desired song number.
RECORD MENU
SONG NO.

18
Notice
If you record the user song that is already recorded with accompaniment tracks, the new recorded
accompaniment will erase and replace the original accompaniment chord. The recording will go on
with each beat as unit, if you stop during the recording the rest part will be recorded as the caesarea
symbol.The recording will automatically stop if the recorded notes exceeds 2000.The dual voice
number will not display in the melody track. If the previous accompaniment track or melody track is
on, it can be monitored during the recording. If that track is not needed, you can press its button again
Stop Recording
Press the [RECORD] button to stop recording after finishing playing the song to be recorded.
Playing the Recorded Song
You just need to press [PLAY] button to play the recorded song from the beginning, and press once again
to stop playing.
Notice
If no power is provided, the recorded data can only be reserved for one week or more. Important data should
be stored in other equipment through the function of batch output. If only one single track is to be played,
press other tracks (accompaniment track, 1-5tracks) for 2 seconds, the closed track will not make sound.
During playing you can reset the voice setting of any track and the setting will effect right away.
The changes of other voices in the recorded data will change accordingly in the relative time.
SONG RECORDING
W8820B/W8812B
MENU
TRACK
to close it. You can’t record in keyboard percussion mode, the instrument will select normal performance
in record mode.

19
●Press [MENU] button, the LED will be lighting, press the key functioned as [SONG NO.], and then
select the song number(A01-A05) to be cleared with [+] and [-] buttons. Press the key functioned
as [CLEAR] button to confirm deletion.
Clear User Songs
Song clearance can delete all the recorded data of the selected song number. Do not use this function unless
you are sure to delete one song and record another new one. If you want to delete one track and keep the other
tracks intact, please use single chord clearance.
SONG RECORDING
W8820B/W8812B
SONG NO.
MENU
CLEAR

SUSTAIN PEDAL
FOOT SWITCH
①②③
Notice:
*
1
*
*
Sustain Pedal(3)
Using the Sustain Pedal can add sustain effect to the melody.
Sostenuto Pedal(2)
The Sostenuto pedal is used to sustain one note or one
chord and meanwhile having no effect on other notes.
Soft Pedal(1)
You can diminish the melody pitch by using soft pedal.
Different voice has different sustain effect, and the sustain pedal can not make the sustain effect to
the accompaniment and percussion.
Do not press the sustain pedal when you turn the power on, otherwise the sustain switch will be reversed.
W8820B/W8812B
20
This manual suits for next models
1
Table of contents
Other Worlde Musical Instrument manuals