Worlde W8850 User manual

WELCOME
To the happy family of satisfied electronic musical instrument owners! To get the most out
of the many features and functions of the keyboard, please be sure to read carefully this
manual and keep it at hand for future reference.
MAIN FEATURES
Strong multifunctional LCD system with large-scream display, which makes selecting and
editing parameters much easier.
153 different kinds of voices, including 4 voices of Chinese folk instruments( Trichord,
Gu-Zheng, Erhu, Suona)
Almost including 100 popular accompaniment styles in the world. Each rhythm has its
own intro and main (A, B two types), variation and ending.
32 types of commonly-used voices and 32 types of commonly-used styles for rapid choice.
With 9 groups of percussion instrument and a special-effec-voice group, including a
group of Chinese traditional percussion instrument.
Song Recording function can record one accompaniment track and two melody tracks.
Soft LCD back light makes the piano more luxurious.
Be able to synthesize certain digital effects like the reverb chorus and 3 D stereo effect,
which could create various sound field effects.
Be able to record one user song..
Beautiful demo songs, making great contributions to lifting your performance level.
Memory Bank can reserve at most 8 panel parameter settings and each setting can be
recalled whenever you want.
Minus Channel Mode and Repeated Playback function are excellent for teaching and practising.
MIDI function makes his instrument able to connect to any other standard MIDI system.

Safety Precautions P. 2
Control Panel & Terminals P. 3
Preparations P. 5
* Setting Up P. 5
* Connections
Earphone and Audio output P. 6
MIDI input/output P. 8
Listening to the Demo Songs
P. 9
P. 11
* Selecting and Playing a Voice P. 11
P. 1 3
* Touch Response P. 1 4
* Dual Voice P. 1 4
* Harmony/Echo P. 1 5
* Sustain P. 1 5
* Sostenuto P. 1 5
* Soft P. 1 5
* Transpose P. 1 6
* Pitch Bend P. 1 6
P. 1 7
* Using Number Effect P. 1 7
* Changing the Reverb Effect P. 1 7
P. 1 7
* Changing Chorus Effect P. 1 8
Chorus Style P. 1 8
* Sustain P. 1 8
Using Auto Accompaniment
P. 1 9
Playing the Piano
Percussion
Number Effect
Reverb Style
CONTENT
* Selecting Accompaniment Mode P. 1 9
* Single Finger Mode P. 1 9
* Fingered Mode P. 2 0
* Selecting the Style P. 2 1
* Setting the Tempo P. 2 1
* Starting the Accompaniment P. 2 2
* Stopping the Accompaniment P. 2 4
* Sync Stop P. 2 4
Registration Memory P.25
* Register Panel Setting P. 2 5
* Recalling the Registered Panel Setting
P. 2 6
Song Recording P.27
* Recording a User Song P. 2 8
* Accompaniment Track Recording P. 2 9
* Melody & ACMP Tracks Playback P. 2 9
Practice Function P.30
* Minus Channel Mode P. 3 0
* Repeated Playback P. 3 1
Whole Function P.32
MIDI Functions P.33
MIDI Interface P. 3 4
Remote Passage P. 3 4
Connect to a Personal Computer P. 3 5
Appendix
* Voice List P. 3 6
* Style List P. 3 8
* Drum Set Table P. 3 9
* Technique Specifications P. 4 0
1

SAFETY PRECAUTIONS
2
Locations:
Avoid exposure to sunlight.
Do not place the item in or near overheated places like car or oven for a long time.
Do not place the item in places of moisture, dirty and vibrated.
Do not place the item near facilities with strong electromagnetic such as television and radio.
Avoid strong crash and scratches with hard object.
Turn off the power supply when not in use. If the item is not in use for a long time, please plug
out the power supply cable to avoid any accident.
Cut the power supply if any of the followings occur:
Power supply cable is damaged.
Fluid is splashed into/onto the item.
Thundering.
When cutting the power supply, plug out the power socket, rather than pull the cable.
When connecting to an external power supply, mind the maximum rated power.
Clean the item with soft and clean cloths. Few amounts of neutral cleanser could be used, but
never use solvents which would damage the finishing of the piano, such as alcohol, benzene,
paint, or diluent.

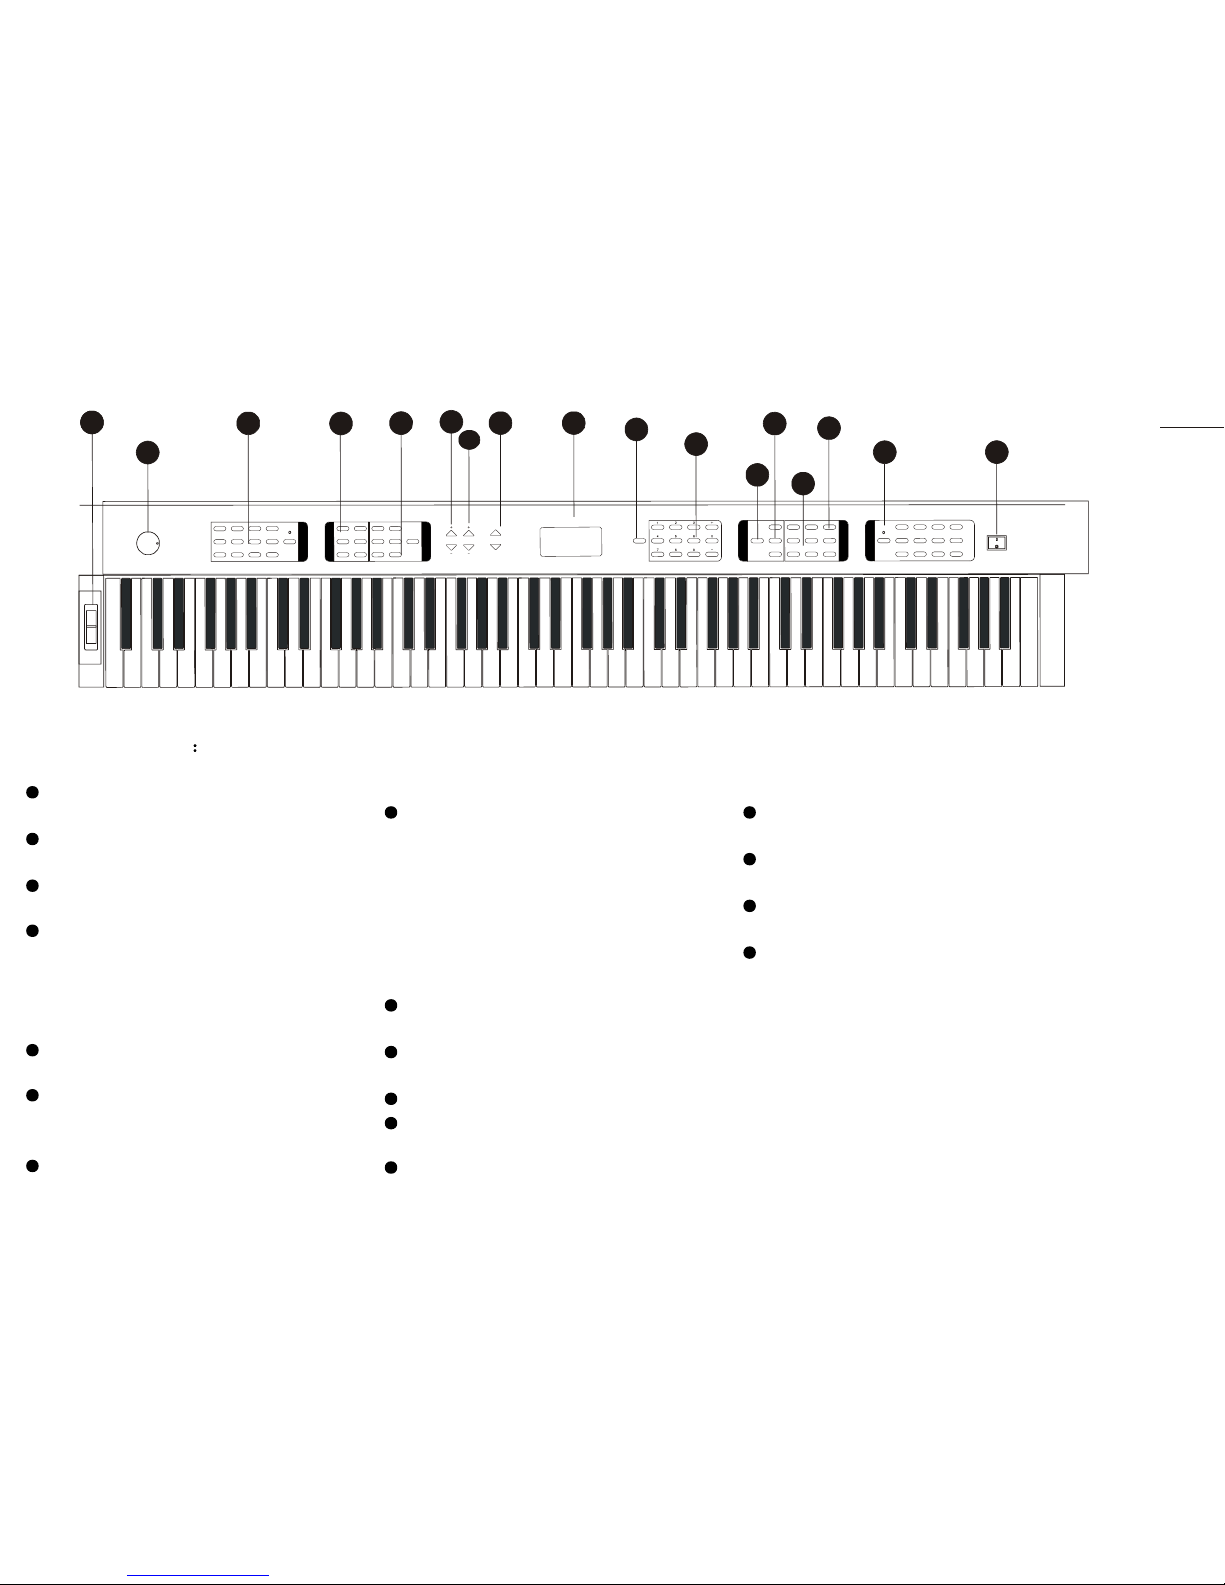
CONTROL PANEL & TERMINALS
!!
RECORDbutton .... .............P.25 MEMORYbutton .................... P.23
+Control Board
!!
TracksandClearbuttons ........P.25 M1~M4buttons .................... P.23
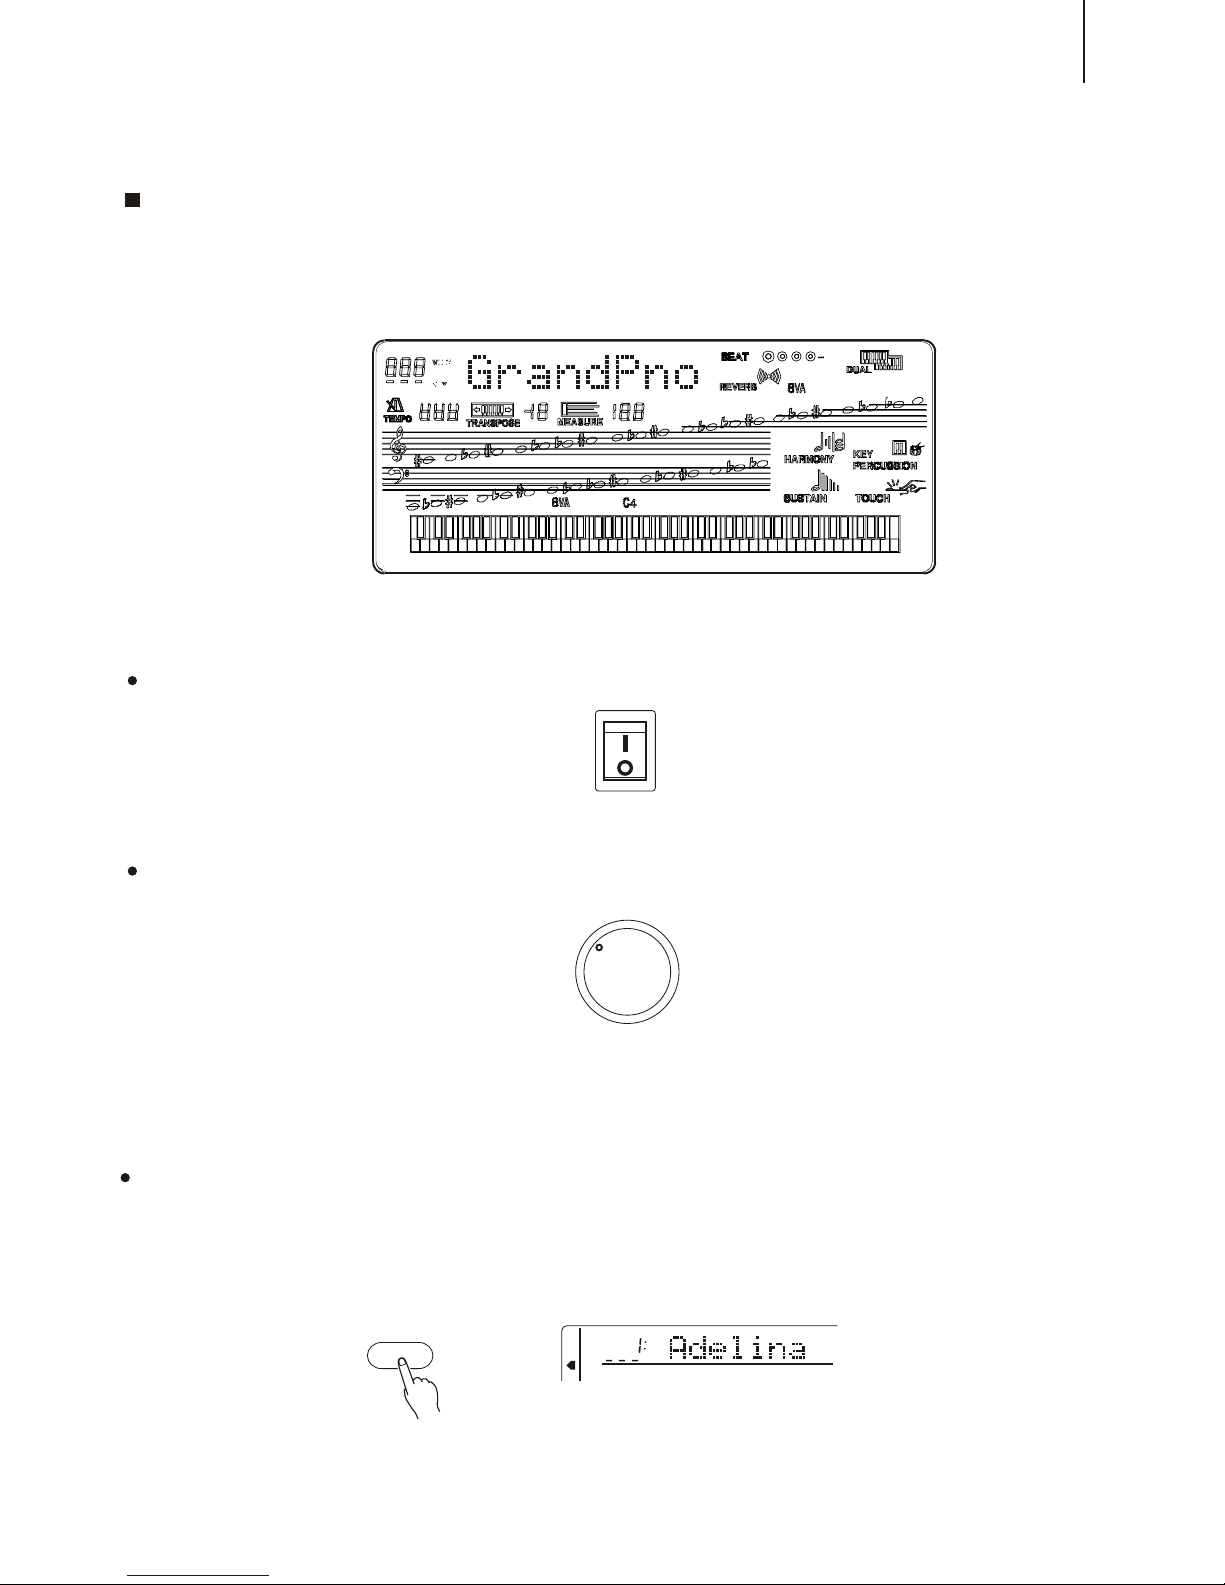
POWER Switch ........................ P. 7
AUTO ACCOMPANIMENT ......... P.17 TOUCH ...........................P.12
!Sync Start/Stop ............... P.22
MASTER VOLUME dial .............. P. 7
!STYLE button ..........................P.19
Intro/Ending button .................P.22
!
DEMO button .......................... P. 7 Main A/B ................................P.22
VOICE button ........................ P.9
!SyncStop button . ......................P.22
EFFECT !FingeredChordbutton ........... P.22
!PITCH BEND roller ................. P.14
REVERB button ..................... P.15 !Start/Stopbutton ......................P.22
!DUAL button ........ ............P.12
!SUSTAIN button ...................P.13 ACMP Volume button ....................P.22
LCD screen ............................... P.11 TEMPO button ..............................P.19
Number buttons[0-9] and [+/YES], [+/YES], [-/NO] buttons.................... P.19
[-/NO] buttons ........................P.13 FUNCTION button ......................P.29
SONG MEMORY ............ ............. P.25 REGISTRATION MEMORY ........ P.23
1
2
3
3
17
26
7
12 14
1
8
13 9
15
10
11
11
5
3
16
4
×¢
²á
´æ
´¢
°é
×à
·ç
¸ñ
B
A
Òô
¡¡
É«
B
A
ÑÝʾ
Óë
Ч¹û
ÀÖ
Çú
´æ
´¢
1
2
3
4
5
6
7
8
9
10
11
12
13
14
15
16
17
8 beat 1 Blues 1 Vienna Waltz Chacha1
16 beat 2 Ball Jazz1 Swing Salsa
Rock 80s Twist Country 1 Manbo
Ball Rock Slow Rock Polka Latin
Quick Step Rock N’Roll Bossa 1 Fox Trot
Disco Samba 1 Rumba Tango
Bank Sync Stop Sync Start
M1 M2 Intro Start Chord
Pause
Registration
Memory
Ending Stop A-B repeat
M3 M4 Main A Main B
Fill-in/REW Fill-in/FF
SELECT
and
PLAY
ACMP VOLUME TEMPO
+/YES
-/NO
Dual Record Song NO Touch
Demo Reverb Track1 Track2 Track3
Sustain Track4 Track5 Chord
Clear
Grand Piano Harpsichord Church Organ Cello
Honky-Tonk Elec.Piano1 Percussive Organ Violin
Trumpet Orchestral Harp Flute Oboe
Trombone Banjo Pan Flute Bassoon
Acoustic Guitar Electric Bass Pizzicato Strings Clarinet
Overdriven SCO-FI Ensemble1 Ensemble2
FUNCTION

4
External Terminals
Foot Pedals
Soft Pedal........................................P. 15
Sostenuto Pedal ..............................P. 15
Sustain Pedal ..............................P. 8. 15
2121
1919
2020 2222
2323
1818
2929
2727
2828
2727
2828
2929
NOTICE:
In W8850, there is no complimentary pedal, however in W8850A and W8850B,
all the pedals stated above will be there.
DC Adapter Jack..............................................................P. 6
Soft / Sustain Pedal Jack ................................................P. 15
Sostenuto Pedal Jack ...................................................P. 15
MIDI OUT .................... ..................................................P. 8
MIDI IN ..........................................................................P. 8
Headphone Jack..............................................................P. 6
USB Jack ........................................................................P. 7 ..
Audio Out L .....................................................................P. 7
Audio Out R.....................................................................P. 7
1818
1919
2020
2121
2222
2323
2424
2525
2626
W8850 W8850A W8850B
Only for W8850B
2424
2525
2626

PREPARATIONS
5
1
2
3
4
Setting Up
1. Fasten the left and right feet
to the pedal rack with 2 bolts
(M6x60).
2. Fasten the shelter board to
the left and right feet with 4
bolts and screws(M6x60).
3. Place the body onto the plank
and fix it with 4 zinc-gilded
screws at each side as shows
in the illustration.
4. Connect the cable of foot
pedals with the illustration.
1
2
1. Fasten the left and right feet to
the pedal rack with 2bolts
(M6x60).
2. Place the body onto the plank,
and fix it with 4zinc-gilded
screws at each side as shows
in the illustration.
W8850
W8850A W8850B

Put a standard earphone to connect the keyboard's
PHONE plug. While connection is made, you may only
hear the sound inside the earphone and practice the
music without disturbing the others. This plug can
also be connected to the speaker to have a stereo
system.
Earphone and Audio output
PHONES/
OUTPUT
Stereo system
6
Powersupply
Pleaseuse external power supply.
This instrument can use F J-E148 Adapter by
connecting the output terminal of the adapter with DC
15V power input jack and the input terminal with
alternating current power.
DC15V
AC Adapter PlugAC Adapter Plug
-
+
FJ-EI48
POWER SUPPLY CONVERTOR

It is applied to USB 1.1, connecting to the PC
could provide power supply.
XP, MAC SOX.
Compatible with main pro audio and sequence
softwares such as CAKEWALK and SONAR.
Compatible with
This interface could input signal into external
amplifier, and connect with external stereo
amplification system, forming an amplification
system to amplify the sound. This function is
designed for stage performance.
The difference with earphone is: the sound from
this output is the primary sound that has not been
processed, while the sound from earphone is
processed.
7
ONLY FOR W8850B
Music Stand
You can add one music stand to this instrument.
USB INTERFACE
AUDIO OUT

SUSTAIN PEDALSUSTAIN PEDAL
The sustain pedal can connect to the sustain interface,
press this pedal, when your finger release from the key,
the very key will have a prolonged sound effect.
There are three pedals with this item, sustain pedal,
sostenuto pedal, and soft pedal. You can connect the
pedal to the relative interface
NOTICE:
Please do not press the sustain pedal when connecting it to
the piano or turning on the power supply, otherwise, the
polarity of the pedal will be reversed, which means when
pressing the pedal, there is no sustain, but when releasing
the press, there is sustain. If this incident happens, turn off
the piano and repeat the operation will just do.
Receive MIDI Data from the outside devices connected
(e.g. Sequencer )
MIDI OUT
Send MIDI Data of this keyboard
MIDI OUT
MIDI IN
MIDI input/output
MIDI IN
8

LISTENING TO THE DEMO SONGS
*. Listen to the Music of the Memory
After installation, you may play this keyboard. Just experience its excellent
performance. There are four demos.
1. Tune on the POWER
2. Adjust the MASTER VOLUME dial to 1 / 4 circle. You can also adjust it during
the playback
. It's always a good idea to set the keyboard volume at a relatively low level before
playing.
3. Press the [DEMO] button
MINMIN MAXMAX
MASTER VOLUMEMASTER VOLUME
POWER
Press the [DEMO] button, this piano will play the music automatically. The name
of the first song will appeared on the screen. The songs will be played in order
And circularly before being stopped.
DEMO
9

DEMO
NOTICE:
If you press the [PLAY/STOP] button again after you stopped the playing all the demo songs in
order, this instrument only plays the present demo song and stops when the song stops.
5.Quit
Press [DEMO] or [PLAY/STOP] button to stop the playback, then press [VOICE] button to
return to normal performance.
4.To Select other demos
+/YES
-/NO
10
During the demo playback, you can use to select
other demo songs.
Press [PLAY/STOP] button, and this instrument will play from the beginning of the song you
have selected.
[+/YES] and [-/NO] or the number pad

This instrument comes with 163 built-in voices (01-163) and 10 percussion groups(01-10)
for selection.
1.Selecting the normal mode
2.Selecting the Voice Play function
You have to select the Voice Play Function before performance. The easiest way is to
press [VOICE] button. Another approach is to keep pressing the [FUNCTION] button
until the arrow points to [VOICE], or simply to select the 32 commonly-used voices in
the [Voice Selecting] area. When the indicator of [VOICE] A/B is on, it is the voice below
the button that is selected, and vice versa.
.
Selecting and Playing a Voice
PLAYING THE PIANO
11
+/YES+/YES
-/NO-/NO
FUNCTION

3.Selecting a Voice
You can use [+/YES] and [-/NO] buttons or numeric buttons to select any of the 163 voices,
which are printed on the panel. And the current voice name and voice number are displayed
on the first line of the LCD.
[+/YES] and [-/NO] buttonsl
After entering the Voice Play function , the buttons can change the voice number in order,
which could be accelerated by holding the button.
+/YES
-/NO
Numeric buttons
These buttons are used to input the desired voice number. For two-digit numbers (01-99)
entries, simply pressing the two numbers in order will be fine. For example, if you want to select
voice number 57, you just have to press [5] and [7].
+/YES
+/YES
-/NO
-/NO
When it comes to three-digit number entry, hold [1] until it appears at hundred’s place,
then input the next two numbers following the same procedure as above.
12

4.Adjusting the Volume
First try the keyboard and then adjust the volume to a suitable place.
NOTICE
In the Whole Function team, the keyboard volume and
the accompaniment volume can be separately adjusted.
Holding down the [VOICE] button can quickly select the
keyboard volume function. More information please refer
to P. 46.
PERCUSSION
Keep pressing [Function] button until the arrow points to VOICE and then select
one of the 10 groups of percussion with the [+/YES] and [-/NO] buttons, the relative
name of the percussion will be displayed on the LCD.
1. Selecting the PERCUSSION FUNCTION
FUNCTION
2. Selecting the PERCUSSION TEAM
STANDARD DRUMS
ROOM DRUMS
ELECTRIC DRUMS
JAZZ DRUMS (same as 01)
CLASSIC DRUMS
CHINESE PERCUSSION GROUPS
ROCK DRUMS
T808 DRUMS
BRUSH KIT
SFX KIT
01 02
03 04
05 06
07
09 10
08
Notice:
*.while selecting the Percussion, you may not use the DUAL and the HARMONY function
At the same time. These functions will automatically close.
+/YES
-/NO
13

14
TOUCH
TOUCH RESPONSE
*. Press the [TOUCH] button may open/close the keyboard touch function. While
this function is on, the relative icon appears on the screen display, and the touch
sensitivity (touchsns) can be adjusted in whole function group. While the function is
closed, the keyboard will produce the same volume to simulate instruments without
such touch response, such as the ORGAN & CLASSIC PIANO.
*. This function automatically open when the power switch turns on.
Press the [TOUCH] button to quickly select the parameter of the touch sensitivity.
More information please refer to P 48.
SUSTAIN
HARMONY
TOUCH
DUALVOICE
*This function make available the keyboard play two combined voices at the same time.
One voice is selected by the normal function, and another voice by this function.
Press this button to turn on/off the second voice. While the function is selected, the
relative icon appears on the screen display.
DUAL
KEY
PERCUSSION
Dual
Reverb
Sustain
Demo
Selecting the relative parameters of DUAL
Selecting the DUAL MODE
Press the FUNCTION buttons till the arrow points to the DUAL Mode position.
Use [+/YES] and [-/NO] buttons or numeric buttons to select parameter settings, the current
setting is displayed on the first line of LC.
Notice:
*.Press [FUNCTION] button to edit the settings of the second voice.
*.Percussion can not be applied to Dual.
*.Press [+/YES] and [-/NO] buttons at the same to return to the initial setting of the second
voice:70.
Quit
Press the [VOICE] button or select the other function to quit from this mode.

HARMONY/ECHO
Selecting Harmony/Echo function
Press [FUNCTION] button until the arrow points to Harmony/Echo.
Selecting the type of Harmony/Echo
10 kinds of harmony/echo can be selected with [+/YES], [-/NO] buttons or numeric buttons.
TYPE EXPLANATION
01:Duet Double-voice Harmony, 2nd voice lower than the melody
02:Octave Add a bass octave to the melody
03:Tremolo 1/4 Produce the tremolo 1 / 4
04:Tremolo 1/6 Produce the tremolo 1 / 6
05:Tremolo 1/8 Produce the tremolo 1 / 8
06:Tremolo 1/12 Produce the tremolo 1 / 12
07:Echo 1/4 Produce the Echo 1 / 4
08:Echo 1/6 Produce the Echo 1 / 6
09:Echo 1/8 Produce the Echo 1 / 8
10:Echo 1/12 Produce the Echo 1 / 12
Quit
Press [-/NO] and [+/YES] buttons to close harmony or to select another Function
to quit from harmony/echo..
SUSTAIN PEDAL
*Sustain Pedal : Using this pedal can bring sustain effect to the melody.
SOSTENUTO PEDAL
*Sostenuto Pedal: Using this pedal can sustain one note or one chord and
meanwhile having no effect on other notes.
15
SOFT PEDAL
*Soft Pedal : Using this pedal can diminish the sound of the melody.

TRANSPOSE
*.This function can transpose the note up/down one octave by every half note
Select the parameters of transpose
Use the CURSOR buttons to select the number at right side of the TRANSPOSE
in the screen display, which makes the number flash.
Set the parameter you need
Use the [+/YES], [-/NO] buttons to select the parameter number(-12 to+12).0 stands
for the standard pitch.
NOTICE:
*.Hold [-/NO] button and press numeric buttons to input
+/YES
-/NO
The extension could be set by the PBRange parameter by the Whole Function.
The roller on the left side of the keyboard could change the volume of the keyboard.
Up to rise and down to reduce.
PITCH BEND
16

USING NUMBER EFFECT
This instrument provides many Number Effects:8 Reverbs; 8 Chorus; sustain effect to
make your performance more perfect.
NUMBER EFFECT
CHANGING THE REVERB EFFECT
Selecting the Reverb Style
Selecting the Reverb function
Hold the [REVERB] button for 3 seconds till the reverb function styles appear on the
LCD, then select one of the 8 reverb styles with [+/YES], [-/NO] buttons, the name of the
current reverb style displayed on the first of the LCD.
17
:01:ROOM1 02:ROOM2
03:ROOM3 04:HALL1
05:HALL2 06:PLATE
07:DELAY 08:PANNINGDELAY
Notice:
Press [+/YES] and [-/NO] buttons at the same time to return to the initial setting..
Reverb Styles
+/YES
-/NO

CHANGING THE CHORUS
Selecting the Chorus Function
Press the FUNCTION button till the chorus styles appear on the LCD. Then select
one of the 8 chorus styles with [+/YES], [-/NO] buttons. The name of the current chorus
is displayed on the first line of LCD.
Selecting the Chorus Style
Notice:
The settings of chorus have effect on every voice.
The chorus return level of each voice (including dual) can be set separately.
CHORUS STYLE
01 CHORUS1 02 CHORUS2
03 CHORUS3 04 CHORUS4
05 FEEDBACK CHORUS 06 FLANGER
07 SHORT DELAY 08 SHORT DELAY WITH FEED-BACK
Quit
Press [+/YES] and [-/NO] buttons or select other functions to quit from chorus mode.
SUSTAIN
Press [SUSTAIN] button on the panel to turn on this function, press again to turn off.
+/YES
-/NO
18

This instrument comes with 100 built-in styles, providing a complete band or style
accompaniment. The auto-played bass and chord could match your performance
and personal style perfectly. (When using auto accompaniment, the maximum number
of notes played at the same time will be reduced accordingly.)
Selecting Chord Accompaniment Mode
Keep pressing the [CHORD] button till SINGLE FINGER OR FINGERED appears on
the LCD.
*.SINGER FINGER MODE
Under this mode, the chord accompaniment lets you play four types of chords with
one or two fingers..
USING AUTO ACCOMPANIMENT
Example Chord Types
Major
Minor
Seventh
Major chord---Press the root note of the chord.
Minor chord----Press the rootnote together withthe nearest
black key tothe left ofit.
Seventh chord----Press the rootnote together with the nearest
white key tothe left ofit.
19
Sync Stop Sync Start
Intro
Ending
Pause
Start
Stop
Chord
A-B repeat
Minor seventh chord----Press the root note together with the nearest
white and black keys to the left of it (three keys altogether).
minor seventh
This manual suits for next models
2
Table of contents
Other Worlde Musical Instrument manuals