Worldwide Window Fashions Capri Sheer Shadings Installation guide

CORDLESS STRAP HANDLE
OPERATING SYSTEM
Capri Sheer Shadings
Installation, Operation,
and Care Instructions

Capri Sheer Shadings Installation,
Operation, and Care Instructions
© 2017
. All rights reserved.
CONTENTS
Getting Started
:
Product View .....................................................................................3
Tools and Fasteners Needed ......................................................... 4
Installation
:
Installation Overview ........................................................................5
Mount the Installation Brackets — Inside Mount .................6
Mount the Installation Brackets — Outside Mount
Mount the Installation Brackets — End Mount
............8
....................
10
Install the Shading ............................................................................11
Attach the Dust Cover (Optional) ..............................................
Attach the Magnetic Hold-Down Brackets (Optional) .......12
Ope
ration:
Operate the Shading ......................................................................13
Troubleshooting ...............................................................................14
Ca
re:
Removing the Shading ..................................................................17
Cleaning Procedures .......................................................................17
11

3
Capri Sheer Shadings Installation,
Operation, and Care Instructions
GETTING STARTED
1
Product View
Headrail
Headrail
End Cap
Installation
Bracket
Limit Stop
StrapHandle
Back/Dust Cover
(Optional)
Magnetic
Hold-Down
Bracket
(Optional)

4
Capri Sheer Shadings Installation,
Operation, and Care Instructions
GETTING STARTED
Thank you for purchasing Capri Sheer Shadings. With proper installation, operation,
and care, your new shadings will provide years of beauty and performance. Please
thoroughl review this instruction booklet before beginning the installation.
Tools and Fasteners Needed
Flat blade and Phillips screwdrivers Level (laser level is recommended)
Measuring tape and pencil Pliers
Power drill,
3
/
32
" drill bit,
and
1
/
4
" hex driver
Scissors (heavy-duty)
Speed Nut
and Screw
(Two Provided with
Each Extension Bracket)
#6 x1
1
/
2
"
Hex Head Screw
(Provided)
Longer #6 Hex Head Screw
for Use with Spacer Blocks
(Not Provided)
Importance of Limit Stops on Capri Sheer Shadings
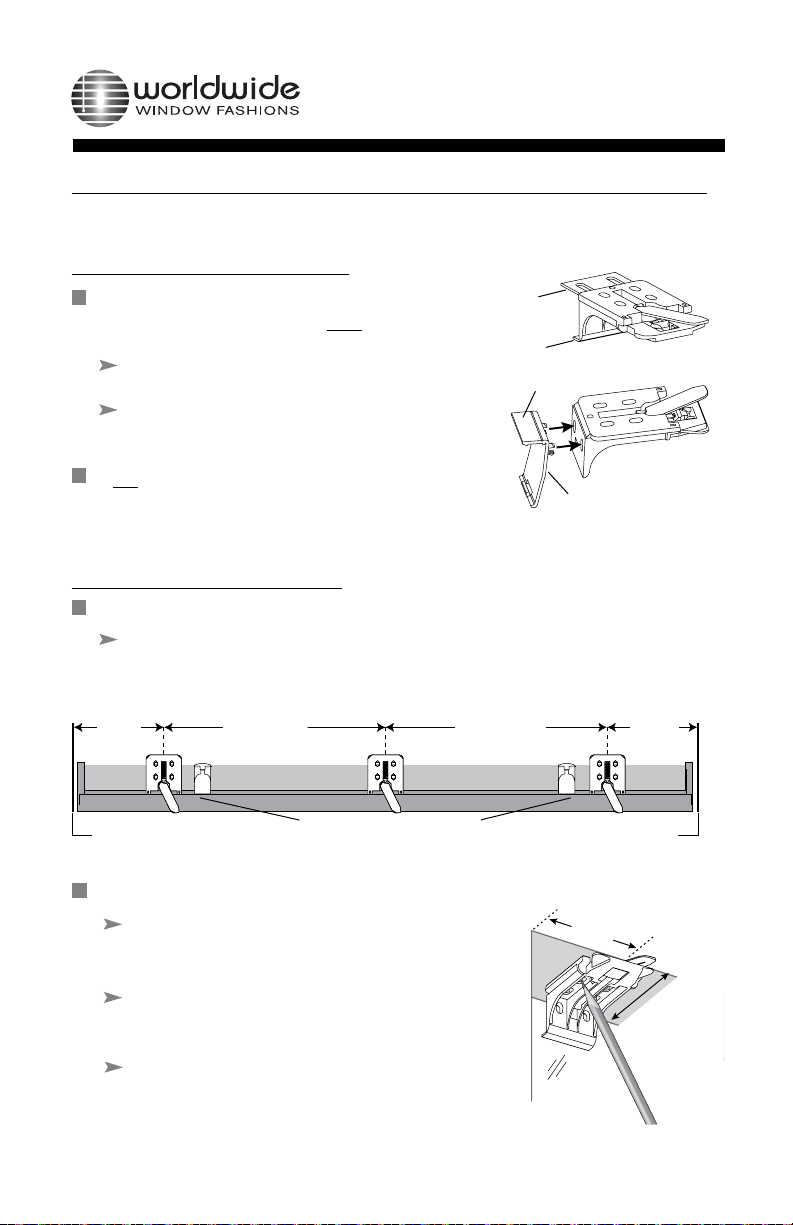
Limit stops serve as the upper travel limit for the bottom rail, preventing it from
rotating around the fabric roll. Limit stops are located 6" from the ends of the
headrail or are centered on shadings less than 36" wide.
When a shading is made, the limit stops are adjusted according to the size of the
fabric roll. Occasionally, this adjustment changes during shipping or installation.
If this happens, problems can be fixed by readjusting the limit stops. See page
12 in the Troubleshooting section if shading operation is difficult or if the bottom
rail rotates around the fabric roll. Shown below are the four possible positions
of limit stops for large to small fabric rolls.
Large Fabric Roll Small Fabric Roll
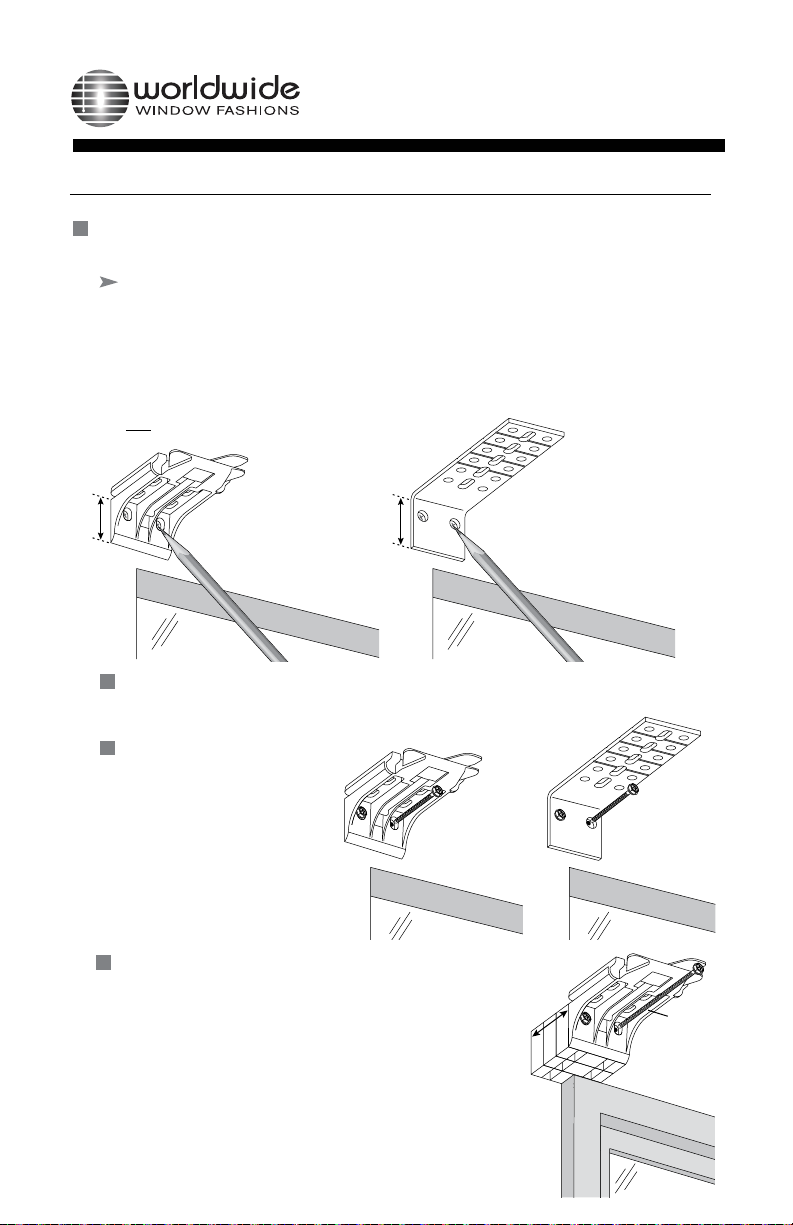
In addition, you will need fasteners designed to work with your specific
mounting surface(s).
#6 Hex Head Screws (Provided). Two 11/2" screws are provided
per installation bracket.
Longer #6 Hex Head Screws (Not Provided). If using spacer blocks,
use #6 screws long enough for a secure attachment.
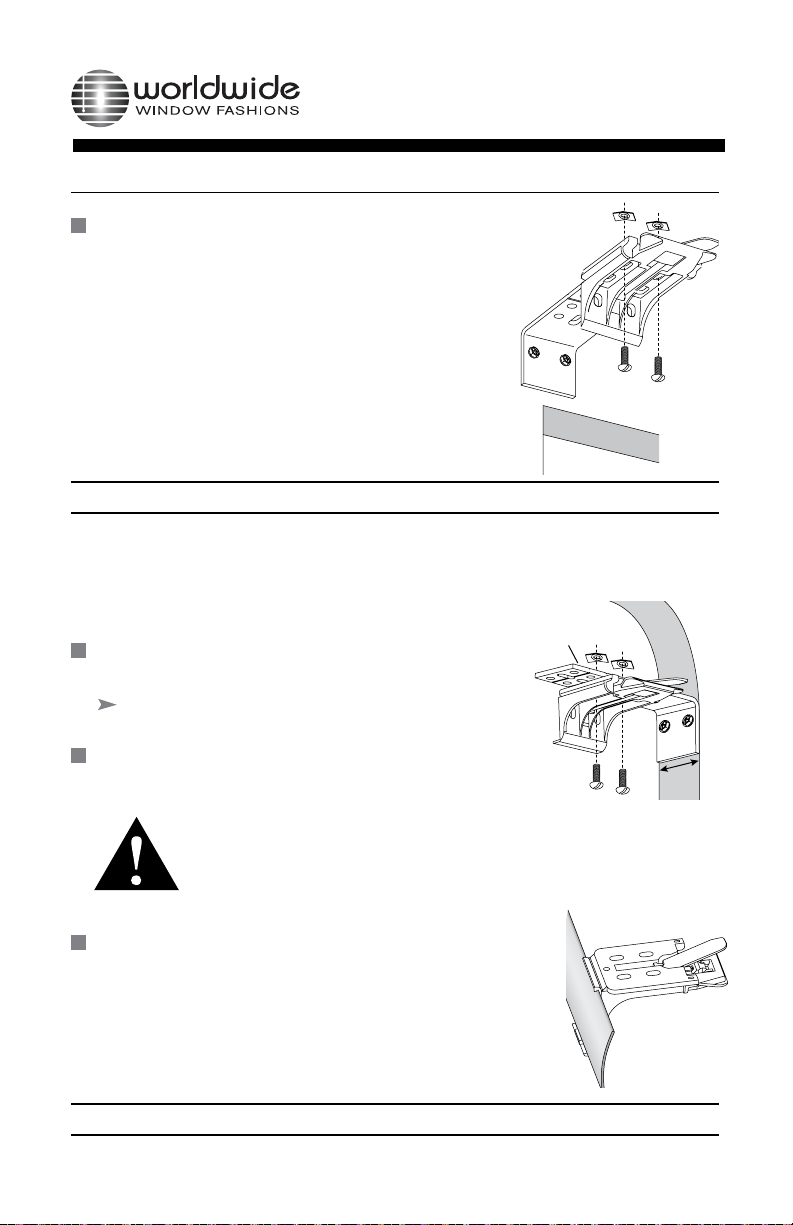
Speed Nuts and Screws (Provided). Extension brackets come with
screws and speed nuts.
Drywall Anchors (Not Provided). Use drywall anchors when
mounting into drywall.

5
Capri Sheer Shadings Installation,
Operation, and Care Instructions
INSTALLATION
Installation Overview
Mounting Types and Window Terminology
If the installation brackets are mounted correctly, the rest of the installation process
follows easily. To prepare for this important first step, review the mounting types
and basic window terminology illustrated below.
Refer to the appropriate page below based on your order:
Inside Mount — Page 4
Outside Mount — Page 6
End Mount — Page 8
Installation Bracket For Added Clearance
Panel Width Brackets
2
3
4
Extension
Bracket
1
/
4
" and
1
/
2
"
Spacer Blocks
18" – 36"
36
1
/
8
" – 79"
79
1
/
8
" – 84"
Outside Mount
Shading mounts
outside window
opening.
Inside Mount
Shading fits within
window opening.
Collectively, the sill and
jambs are called the
“window casement.”
Molding
Head Jamb
Sill
Jamb Jamb
Your order will include the correct number of installation brackets for your shading width,
as shown in the table below.
Shading orders may also include spacer blocks or extension brackets, if they were specified
for added clearance.
Extension brackets are used for end mount shadings, as well.

6
Capri Sheer Shadings Installation,
Operation, and Care Instructions
INSTALLATION
Mount the Installation Brackets — Inside Mount
Prepare the Installation Brackets
If using the optional back cover: Use pliers or
heavy-duty scissors to remove both the top and
bottom tabs on the installation brackets.
Then remove the top tab on the back
cover brackets.
Snap the prongs on the back cover brackets
into the holes on the back of the installation
brackets.
If not using the optional back cover: Remove the
top tab only on the installation brackets.
NOTE: Save these tabs once removed. They may be used as shims, if necessary.
Mount the Installation Brackets
Mark 2"to 3" from each jamb for bracket location.
If more than two installation brackets came with your order, space additional
bracket(s) evenly between the two end brackets and mark their location.
Mount into wood whenever possible.
The minimum casement depth for installation
bracketsis 1". Mark the rear set of installation
bracket holes with shallow mounting depths.
The minimum casement depth for a fully recessed
mountis 35/16". Mark the front set of bracket holes
when depth permits.
Add 1/4" to the minimum depths if using the
optional back cover.
IMPORTANT: The front edges of the brackets must be level and aligned to each other.
Top
Tab
Bottom
Tab
Remove Top Tab
Back Cover Bracket
Limit stops should be equal
distance from the ends of headrail.
Space Evenly Space Evenly
2" to 3" 2" to 3"
Jamb Jamb
2" to 3"
Casement
Depth
Center the brackets on your marks, then mark the screw hole locations.

7
Capri Sheer Shadings Installation,
Operation, and Care Instructions
INSTALLATION
5
Drill the screw holes using a
3
/
32
" drill bit.
CAUTION: Use drywall anchors when mounting into drywall.
Use a level to check that the mounting surface is level.
Shim the brackets, if necessary. (Use the top tab that was
removed from the brackets.)
Attach the installation brackets using the screws provided.
IMPORTANT: Do not overtighten the screws. Check to
ensure the lever can be moved easily side to side. If not,
loosen the screws
in one-eighth turn increments until the
lever can be moved easily.
IMPORTANT:
The front edges of the installation brackets
must be level and alighned to each other.
If using the optional back cover: Install the cover into
the back cover brackets. If necessary, trim the back cover
to the desired width.
Proceed to “Install the Shading” on page 11.
Back
Cover

8
Capri Sheer Shadings Installation,
Operation, and Care Instructions
INSTALLATION
Mount the Installation Brackets — Outside Mount
Prepare the Installation Brackets
Use pliers or heavy-duty scissors to remove both
the top and bottom tabs on the installation brackets.
NOTE: Save these tabs once removed. They may be
used as shims, if necessary.
Mount the Installation Brackets
Center the headrail over the window opening at the desired height. Use a pencil
to lightly mark each end of the headrail.
Alternatively, measure the width of the headrail and use that width to mark
the headrail end points over the window opening.
If more than two installation brackets came with your order, space additional
bracket(s) evenly between the two end brackets and mark their location.
Mount into wood whenever possible.
Top
Tab
Bottom
Tab
RemoveTopTab
Back Cover Bracket
Window Opening
Space Evenly Space Evenly
2" to 3" 2" to 3"
Headrail End Mark Headrail End Mark
Mark 2" to 3" from each end of the headrail.

9
Capri Sheer Shadings Installation,
Operation, and Care Instructions
INSTALLATION
1
1
/
8
"Extension
Bracket
1
1
/
4
"
1
1
/
2
"
Maximum
Spacer
Blocks
Longer
Screw
Center the installation brackets or extension brackets on your marks and
mark where to drill the screw holes.
A minimum 11/8" flat vertical surface is required for the installation brackets.
Extension brackets require 11/4".
The tops of the installation brackets or extension brackets should be at the
desired height. The brackets should be level and aligned.
CAUTION: The rear of the brackets must be flush against a flat mounting surface.
Do not mount brackets on curved molding.
IMPORTANT: The tops of
the installation brackets or
extension brackets must be
level with their front edges
aligned.
If using spacer blocks, attach the spacer block(s)
and installation bracket to a flat vertical
mounting surface with #6 screws long
enough for a secure installation.
IMPORTANT: Do not add more than 11/2"
of clearance using spacer blocks.
IMPORTANT: The tops of the installation brackets
must be level with the front edges aligned.
Drill the screw holes using a
3
/
32
" drill bit.
CAUTION: Use drywall anchors when mounting intodrywall.
Attach the installation or
extension brackets using
the screws provided.

10
Capri Sheer Shadings Installation,
Operation, and Care Instructions
INSTALLATION
If using extension brackets, attach an installation
bracket to the underside of each extension bracket
using the speed nuts and screws provided.
Proceed to “Install the Shading” on page 11.
End mount the headrail when conventional mounting techniques will
not work — for example, in an arched window opening.
Mount the extension brackets on a flat vertical surface
at least 11/4" wide.
Add 1/4" to the minimum depth if using the optional
back cover.
Attach the installation brackets to the extension brackets
using the provided screws and speed nuts.
If using the optional back cover: Install the cover into
the back cover brackets. If necessary, trim the back cover
to the desired width.
Proceed to “Install the Shading” on page 11.
Speed Nuts
Screws
Extension
Bracket
1
1
/
4
"
Minimum
Depth
Back
Cover
WARNING: To end mount shadings into a surface other than
a secure wall stud, use medium to heavy-duty wall anchors
(not provided) matched to the wall thickness. Failure to mount
the brackets securely may result in injury or property damage.
Mount the Installation Brackets — End Mount

11
Capri Sheer Shadings Installation,
Operation, and Care Instructions
INSTALLATION
Install the Shading
Position the shading so that the
front faces you.
Slide the headrail into the
installation brackets so the edge
of the headrail is between the
lever and the bracket, as shown.
Firmly push the headrail into each bracket until it clicks
and the lever snaps to the right side of the bracket.
IMPORTANT:
Attach the Dust Cover (Optional)
Cut the dust cover to desired width.
Remove the paper backing oneside of the hook and loop
fastener dots.
Remove the remaining paper backing from the dots.
Center the dust cover over the top of the shading, above the dots.
Press the dust cover down onto the dots.
Headrail
Installation
Bracket
Lever
Headrail
Remove
Paper
Backing
Overhead View
No Dust Cover
Dots
Dust Cover Installed
OverheadView
No Dust Cover
Dots
Dust Cover Installed
Carefully pull on the headrail at each bracket to ensure
it is installed securely.
The dust cover is used to protect the top of the headrail from exposure to dust
on outside mounted shadings.
Apply the dots to the installation brackets on each end of the shading.
Slide the headrail
between the lever
and the bracket.

12
Capri Sheer Shadings Installation,
Operation, and Care Instructions
INSTALLATION
Attach the Magnetic Hold-Down Brackets (Optional)
Lower the shading, keeping the vanes closed.
Place the magnetic hold-down bracket onto the
bottom rail just inside the end cap, oriented as shown.
Hold the bracket while opening and closing the vanes.
(It may be necessary to have someone else assist you.)
Adjust the bracket to the best overall position.
Mark the screw location using the mounting options
shown below.
The screw should be placed in the middle of the
channel. This will allow for adjustment.
Drill the screw holes using a 3/32" drill bit.
Attach the hold-down brackets to the mounting surface
using the screws provided.
If necessary, adjust bracket height by loosening the screw
and sliding the bracket up or down.
Hold-Down
Bracket
Bottom
Rail
Outside Mount
Preferred Alternate
Inside Mount
Preferred Alternate
Adjust the
bracket
using the
channel.

13
Capri Sheer Shadings Installation,
Operation, and Care Instructions
OPER
ATION
Ope
rate the Shading
T
o Lower the Shading
Gently pull down on the strap handle.
T
o Open the Vanes
Lower the shading all the way down and continue pulling down on the handle
until the vanes open.
T
o Close the Vanes and Raise the Shading
Pull down on the handle slightly (about 1") and release the handle. The vanes
will close first and then the shading will retract into the headrail.
NOTE:
IMPORTANT:
NOTE
:
Once you are done operating the shading, lift the pull ring toward the front
of the bottom rail until the magnet holds it in place.
With inside mounted shadings, you may need to pull the bottom rail
away from the window to release the locking mechanism.
To reposition the shading, it must be raised several inches first to
reset the mechanism and then pulled down to the new position.

14
Capri Sheer Shadings Installation,
Operation, and Care Instructions
OPERATION
Troubleshooting
Problem The shading will not snap into the installation brackets.
Solution Check that the installation brackets are aligned and level.
Check that the locking tab on the installation bracket slides
over the headrail.
Problem
Solution
IMPORTANT: Both limit stops
must be adjusted to the same
position orelse skewing may occur.
Pull Back
to Adjust
Fabric Roll
Bottom
Rail
Limit StopHeadrail
Pull Back
to Adjust
Too Tight —
Adjust One Step Up
Too Loose —
Adjust One Step Down
The shading is hard to raise or lower, or the bottom rail does not stop
at the top limit.
Check the adjustment position
of both limit stops. The top
illustration shows the correct
adjustment. The limit stop
catches the bottom rail,
and the bottom of the limit
stop is slightly above or barely
touching the fabric roll.
In the second illustration, the
limit stop adjustment is too tight.
The fabric may not drop freely
and could even be damaged
when the shading is raised.
To correct this, the limit stop
should be adjusted one step up.
Simply pull back on the rear of
the limit stop to adjust its position.
In the bottom illustration, the
adjustment is too loose. The
bottom rail can slip under
the limit stop. If the bottom rail
rotates through the headrail,
it must be backed out before
adjusting the limit stop.

15
Capri Sheer Shadings Installation,
Operation, and Care Instructions
OPERATION
Problem The shading is hard to raise or lower, or will not raise or lower.
Solution Shadings cannot be forced into tight inside mount window openings.
If an inside mount, check that the shading is installed correctly. Make
sure there is clearance between the ends of the shading and the
window casement.
Check that the installation brackets are level. Shim to level, if necessary.
Check that the shading fabric is not catching on any brackets or
window components.
Problem The shading raises or lowers unevenly, the fabric rubs against one end
of the headrail, or the bottom rail is uneven when fully raised.
Solution Check that the window is square by measuring the diagonals.
Check that the installation brackets are level. Shim to level, if necessary.
Adjust the bottom rail weight. See below.
Adjusting the Bottom Rail Weight
Release the weight clips by
inserting a flat blade screwdriver
into the weight clip and turning
clockwise.
Move the weight in 1" increments toward the side where the
fabric is gathering.
Secure the weight clips in position by turning them counterclockwise
after making the adjustment.
Test and, if necessary, adjust again.
Weight
Bottom Rail
Weight
Clip
Weight
Clip
Fabric Roll
Gathered
Fabric
MoveWeight

16
Capri Sheer Shadings Installation,
Operation, and Care Instructions
OPERATION
14
Problem Vanes do not align on side-by-side shadings.
Solution Vane alignment is only guaranteed within 1/4" when shadings are ordered
at the same time, at the same height, with the same color and fabric,
and when specified on the order form.
Check that the windows are square and the same height.

17
Capri Sheer Shadings Installation,
Operation, and Care Instructions
CARE
Removing the Shading
Move each lever of the installation brackets to the
left to release the shading.
A flat blade screwdriver can be used to move the lever.
Be very careful not to tear or damage
the fabric.
CAUTION:
If the lever is inaccessible or inoperable, lower the shading
until you can see the underside of
the bracket. Carefully reach a small
flat blade screwdriver behind the
shading to the tab on bottom of the
bracket between the screw holes.
Push the tab away from the
shading and pull the headrail
to release it from the bracket.
Carefully pull the shading to remove
it from the brackets.
Cleaning Procedures
Capri Sheer Shadings are made of 100% polyester, which means they are inherently
durable and resilient. However, care must be taken to avoid wrinkling the fabric,
particularly where the vanes meet the facings.
Dusting
Regular light dusting with a feather duster is all the cleaning needed in
most circumstances.
Vacuuming
Use a low suction, hand-held vacuum for more thorough dust removal.
Forced Air
Blow away dirt and debris between the vanes using clean compressed air.
Spot-Cleaning
Do not spot-clean Capri Sheer Shadings.
Move Lever to Left
TopView
Tab
Installation Bracket
Underside of
Bracket
End Cap

18
Capri Sheer Shadings Installation,
Operation, and Care Instructions
CARE
Ultrasonic Cleaning
Capri Sheer Shadings can be ultrasonically cleaned by a professional with the
exception of light-dimming fabrics.
Specify that a mild detergent solution be used.
Never immerse the headrail in the solution.
Dry the shading completely in the lowered position.
Injection/Extraction
Capri Sheer Shadings can be professionally cleaned using the injection/extraction
method.
A dry method of injection/extraction is required for light-dimming fabrics.
Never immerse the headrail in the solution.
Electrostatic Cleaning
Do not use electrostatic cleaning wipes on any shadings.
A Note About Fabrics
As with all textiles, Window Shading fabrics are subject to some variations.
Slight wrinkling, puckering, or bowing is inherent to this textile product and
should be considered normal, acceptable quality. These characteristics are not
usually visible from the front or rear but may be visible from a side angle.
Precautions should be taken to reduce exposure to harsh environmental elements,
such as salt air. Continuous exposure through open windows and doors will
accelerate the fabric deterioration.
Table of contents
Popular Indoor Furnishing manuals by other brands

overstock
overstock ALEXANDER Series user manual

kd frames
kd frames 7903-TR-T instructions

Safavieh Furniture
Safavieh Furniture Meek COF6603A Assembly

Balkene Home
Balkene Home TRIBECA 62762 quick start guide

ESD-PROTECT
ESD-PROTECT ERGO 400 ST EP0805005 owner's manual

Modus Furniture
Modus Furniture NEVIS NV23L3 Assembly instructions

Amart Furniture
Amart Furniture GIBBS 74169 Assembly instruction

Alice's Home
Alice's Home MIKA IMKCHEST6DWD Assembly instructions

DIVERSIFIED WOODCRAFTS
DIVERSIFIED WOODCRAFTS P8 Series Assembly instructions

Ballard Designs
Ballard Designs Prelit Noblis Fir quick start guide

Bush Business Furniture
Bush Business Furniture 99TB3636CS Assembly instructions

Lightolier
Lightolier Lytecaster 1000LVRE1 specification